Picazzo M288 User manual

_
www.picazzo.hk
M288
Digital TV Home Media Center
數碼電視家庭媒體中心
OPERATION MANUAL v1.52
使用說明書 v1.52
English version

www.picazzo.hk 2
Contents
Safety Information .............................................. 4
Features ................................................................... 5
Standard Components ...................................... 6
Main Unit ................................................................. 7
First start up and Auto channel scanning . 8
Globe usage of the remote control ............. 8
Learn mode of the remote control ............... 8
Digital TV (DTV) Mode
Remote operations ...................................... 9
Using Electronic Program Guide ..........10
TV Channel List ...........................................10
Subtitle and Audio select ........................10
Parental Control ..........................................10
Start Recording ...........................................11
Scheduled Recording ...............................11
Scheduled with standby and off ..........11
Scheduled list / Manual set schedule...11
Conflict of schedules ................................11
Recording with internal or USB HDD ........12
MHEG5 interactive function .........................14
NOW TV Mode
Remote operations ....................................16
NOW TV Control and Menu ..................17
NOW EPG ......................................................17
Audio Channels ..........................................17
Start NOW TV Recording ........................17
Scheduled Recording ...............................17
Schedule list .................................................17
Parental Control ..........................................17
Media Playback Mode
Remote operations ....................................18
Media Library Operation .........................19
Multimedia Server .....................................19
MEDIA .............................................................19
UPnP / DLNA Server .................................19
YouTube ......................................................... 17
Media Playback - UPnP / DLNA .................. 18
M288 as an UPnP / DLNA Server ................21
Videos
Play Control .................................................. 22
Volume level and Display files info. .... 22
Jump file ........................................................ 22
Image
Play control .................................................. 22
Music
Play control .................................................. 22
Display files info. and jump file ............ 22
Playback mode ........................................... 22
Recorded Playback Mode
Remote operations ................................... 23
Menu operations ....................................... 24
Recorded playback .................................... 24
Jump file ........................................................ 24
Volume level and Display files info. .... 24
Play control .................................................. 24
Select Subtitles and Audio ..................... 24
Directories and files Management
Files and Hard disk info. .......................... 25
Create directory and file rename........... 25
Delete recording files ............................... 25
Copy and Move files ................................. 25
System Setup –Main Menu
Netvigator Condition Notice ................ 26
System Setup –Video and Audio
Operations in Setup Page ....................... 27
Video Output ............................................... 27
TV standard .................................................. 27
TV type ........................................................... 27
SPDIF Out ...................................................... 27
Speakers Out ............................................... 27

www.picazzo.hk 3
Contents
System Setup –Preferences
UI languages ..............................................28
EPG languages ..........................................28
MHEG5 .........................................................28
Slideshow interval ...................................28
Rec. file size ..................................................28
System Setup –TV
Quick Scan / Full Scan ............................28
Record Media ............................................28
Auto Channel info. ...................................28
Disk Slow Warning ..................................28
System Setup - Network
Network Mode: DHCP / static IP ......29
NFS Server settings.................................29
Windows Network settings ...............29
YouTube Buffer size ...............................29
Network Connection Test ...................30
System Setup - Advanced
Firmware Update ...................................30
System Information.................................30
Format HDD...............................................30
Restore Factory Settings .......................30
System Setup –HMC
NOW TV Source .......................................31
DLNA Server ..............................................31
Analog Recording Quality ..................31
Change Password ..................................31
AV Input Standard ...................................31
Picazzo.tv account creation.............................32
Use of Remote Recording ..............................35
Windows Network Setup procedures ......39
Troubleshooting .................................................42
Specification and Warranty ...........................43

www.picazzo.hk 4
Safety Information
Location and Handling
Do not place your Product in closed spaces or do not cover it to prevent excessive
temperatures inside the product.
Keep the Product away from strong magnetic objects.
Do not place any object containing water or other liquids on the Product. In the event
that liquid should enter the cabinet, unplug the Product immediately and contact Picazzo
service center.
Do not remove the Product cabinet. Touching parts inside the cabinet could result in
electric shock and/or damage to the product. For service and adjustment inside the
cabinet, call Picazzo service center.
Ensure the Product and other parts was shut down before connecting or cut off the
power supply.
Non-use Periods
When the Product is not being used, switch the Product to the standby mode.
When left unused for a long time, the Product should be unplugged form the household
AC outlet.
Cleaning
Unplug your Product before cleaning. Use a damp cloth for cleaning. Do not use cleaning
fluids or aerosols which could enter the Product and cause damage, fire, or electric shock.
These substances may also deteriorate the finish of your Product.
Service
Do not attempt to service this Product yourself. Please refer any service to the Picazzo
service center.
Copyright
Audio-visual material may consist of copyrighted works which must not be recorded
without the authority of the owner of the copyright. Please refer to relevant laws in Hong
Kong.

www.picazzo.hk 5
Features
Higher-tier Digital TV Receiver
Support DMB-T/H Digital TV standard, decoding of MPEG-2 and H.264 content.
A Higher-tier Receiver with HKTA 1108 standard of OFTA.
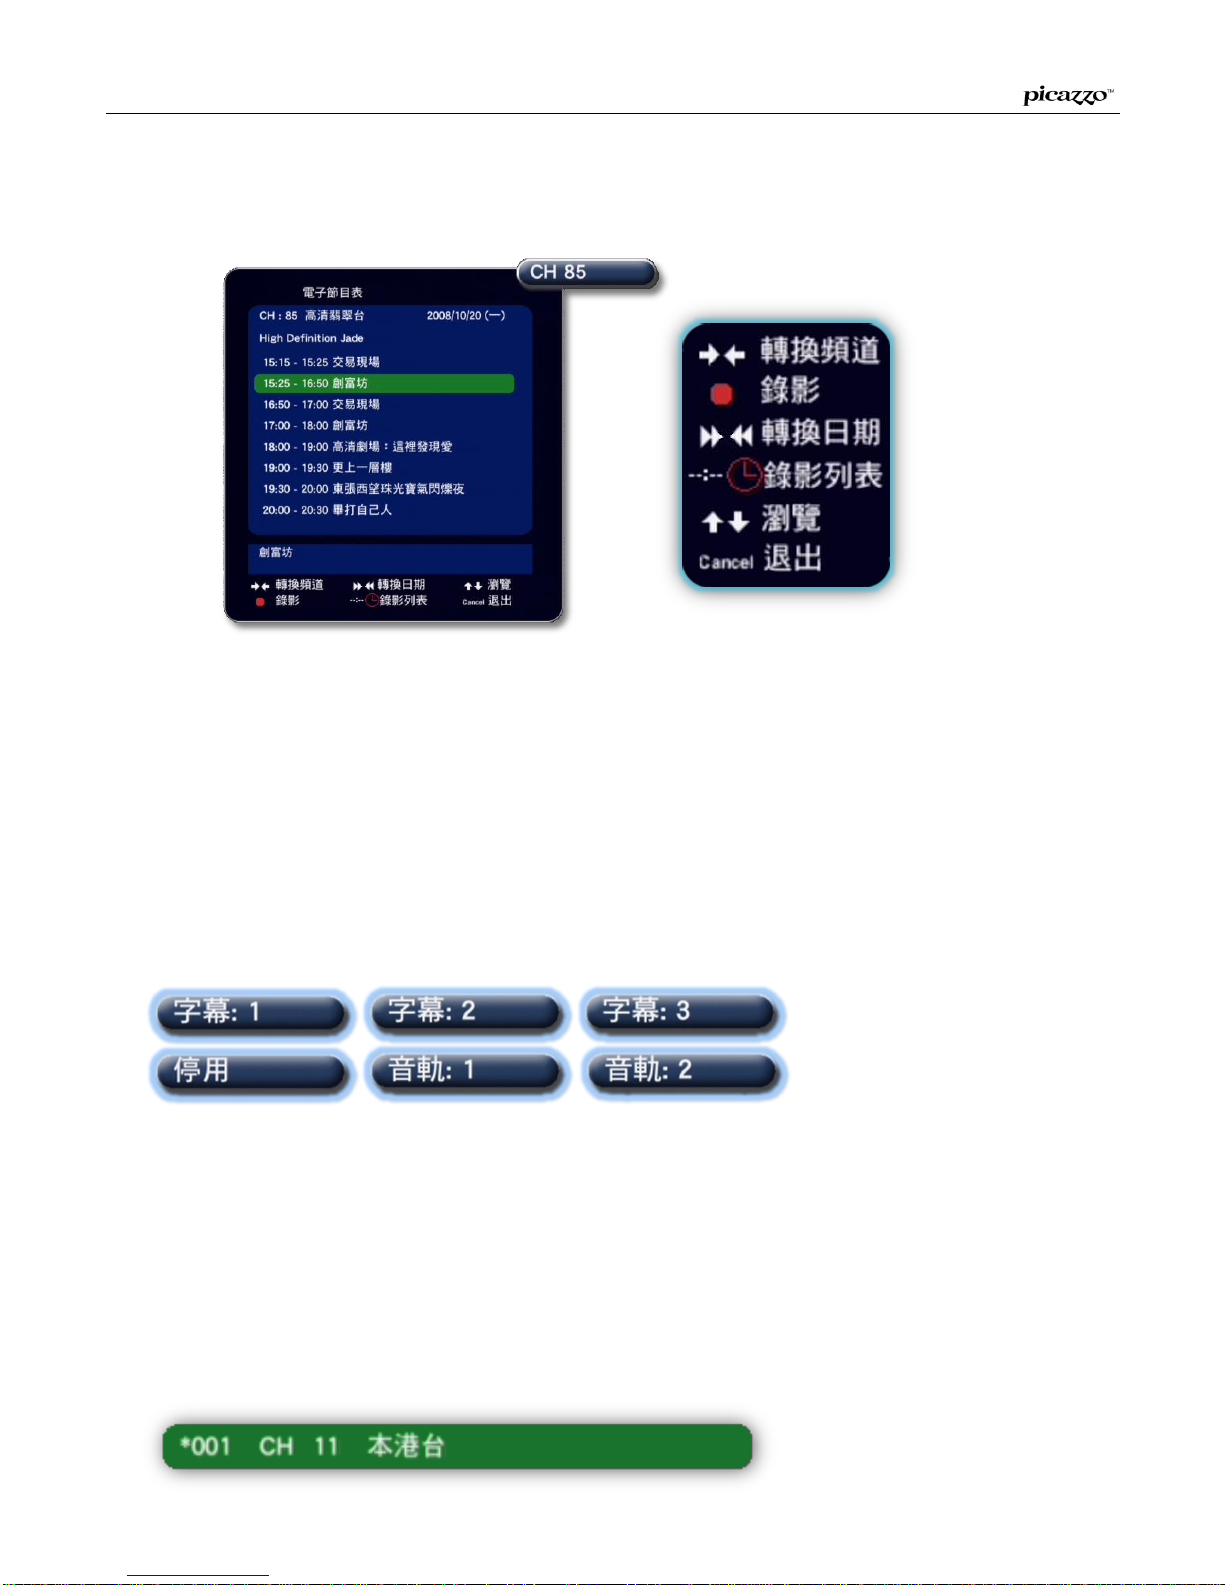
Auto channel scanning with Electronic Program Guide support.
Powerful Digital Recording
Retain HD quality, audio channels and subtitles, Support EPG scheduled recording.
Videos via Composite or S-video input can be convert to digital format, just one easy step
to backup your precious video tapes.
Schedule recordings would start, no matter the system is under standby or power off.
Support remote recording. Schedule can be set via network.
Full HD
Support upscale to 1080P。
Support HDMI, Component and Composite video with high compatibility.
Unique NOW TV EPG for scheduled recording
Unify the EPG of channels form Now TV and digital TV.
Control both Now channels and digital channels with a single remote.
Multimedia player
Support playback of various format video, audio and image
Scalability
Records to USB storage, CF card or network storage.
Support FAT32, EXT2 read/write and NTFS read.
Powerful Network Access
Unique network access function which playback media files form LAN computer, NAS,
DLNA devices and YouTube videos form Internet.
Support HDCP
Perform HDCP protection to HD content.
Supported Media Type
Video format: WMV9, WMV HD, AVI, MPG, MOV, VOB, MP4, ASF, TS, M2TS.
Audio format: MP3, WMA, AAC, PCM, AC-3 pass through or down mixing.
Image format: JPEG, PNG, TIF, BMP.

www.picazzo.hk 6
Standard Components
Standard Components of M288:
M288 x 1
Manual CD x 1
- M288 user manual
- Picazzo Assistant 1.0
- M288 tutorial videos
Remote Control x 1
Composite cable x 1
HDMI cable x 1
RF coaxial cable x 1
Ethernet cable x 1
IR blaster cable x 1
AA battery x 2
AC adapter x 1
Quick Start Guide x 1
Warranty card x 1

www.picazzo.hk 7
Main Unit
Front
1. Power Switch (Press 2 sec)
2. LED Front Display
3. Recording Indicator LED
4. USB port
Back
5. RF Loopback
6. RF IN / Tuner
7. Optical / Coaxial SPDIF Audio OUT
8. IR Blaster
9. HDMI OUT
10. Component and Composite OUT
11. S-video OUT
12. Composite AV / S-video IN
AV top: INPUT2 AV bottom: INPUT1 S-video: INPUT1
13. USB port
14. 10/100M LAN port
15. Power adapter port
The illustrations and on-screen displays in this manual are for explanation purposes and may vary slightly
from the actual operations.

www.picazzo.hk 8
First start up and Auto channel scanning
Confirm both your M218 and TV set are power on.
Install batteries to the remote. Open the batteries slot plate at the back of the remote. Install
two UM-3 AA 1.5V batteries which are provided. Put back the plate.
The M288 system would choose the connected video out automatically when first startup,
you can also toggle the video out manually by press Menu on the remote until the front
panel shows PICAZZO. Then, press Mode to toggle video out with the description of the
front panel. (Read Quick Start Guide for details)
If the system not contains any channel list, you would be asked to perform a channel scan.
Press OK to start scanning. You can also start scanning manually in Main Menu -> Setup->
TV-> Quick Scan / Full Scan.
Globe usage of the remote control:
Except during recording, the following key would be function under any operating mode.
1Standby mode
1 Power off –Hold this key in stand mode.
2 Enter NOW TV mode
3 Enter DTV mode
4 Learning mode
Learning mode of the remote:
Place the remote against the remote of your TV set
like the picture below, than hold the Learn key until
the red LED turn to bright form normal.
Press the power key on TV remote, a blue LED would flash to indicate the IR signal is read.
Then, press the Grey power key of M288 remote, the LED would stop flashing, which means
the IR signal was learnt on the Grey power key.
Use the above procedures to learn the TV/AV, Volume keys of your TV remote.
With remote learning completed, press Learn again to quit learn mode.
Use of the blue power key on the remote:
1. Press once to enter Standby mode, and press again to wakeup.
2. Press once to enter Standby mode. After that, hold two seconds to power off.

www.picazzo.hk 9
Digital TV Mode
1 Standby mode
2 NOW TV (AV) mode
3 Digital TV mode
4 Electronic Program Guide
5 Exit
6 Channel Up / Down
7 Enter Media library
8 Stop Recording / Main Menu
9 Select Subtitle
10 Screen Zoom / Parental Control
11 Adjust Brightness, Contrast, Saturation
12 Select Audio Channel
13 Adjust M288 audio out level
14 Mute
15 Main Menu
16 Cancel
17 Channel list / Enter
18 Display Program Info.
19 Scheduled Recording List
20 Instance Recording
21 Channel Up / Down
** The usage of the four color keys and Display key would be difference in MHEG5 channels.
Read page 14 for details.

www.picazzo.hk 10
Digital TV (DTV) Mode
Using Electronic Program Guide
Press TV Guide (EPG) button on remote to call EPG. Follow the instructions on screen to check
TV program schedule in coming 7 days. Note: Input 85 + Enter can jump to Channel 85 directly.
In the EPG, navigate to a desire program and press ●to setup recording job.
Press --:-- to show up Scheduled Recording List to check whether the job is scheduled.
TV Channel List
Press Enter to call Channel list. The list shows each of the channel number and channel name.
Press Enter again to switch to the selected channel, ◄◄ / ►► to jump to next/previous page.
Subtitle and Audio select
Use Subtitle and Audio button to select available subtitles and audio channels.
There are usually Chinese Traditional, Chinese Simplified and English subtitles.
Audio Channels provides bilingual or 5.1 channels audio output. If 5.1 channels S/PDIF audio
output is needed, please read page 25 for S/PDIF audio output settings.
Parental Control
M288 support channels parental control by using password protection. Press Enter to call
Channel list, navigate to the channel which needs parental control and press yellow button.
A * appear in front of the protected channel which cannot setup any scheduled recording.

www.picazzo.hk 11
Digital TV (DTV) Mode
Start Recording
Press ●button at a TV channel, recording would start immediately. Recording duration
preset to no limit (until storage used up). Press again ●to select recording duration form
30mis, 1hr, 1.5hrs, 2hrs, 2.5hrs and 3hrs circularly.
During a recording, a recording duration left timer would show on screen with any remote
button press. Also, most of the function would temporally disable. Press ▓ to stop recording.
Scheduled Recording
Call out EPG, navigate to a desire program on
EPG and press ●. After that, a filled job table
would show up. Select Once, Daily, Monday to
Friday or Every weekday for repeat nature of
this scheduled recording. M288 can save up to
25 scheduled jobs. Also, the starting time and
jobs duration can be alter if needed. Edit the
source if it needs to record AV input signal.
Scheduled Recording with Standby mode and Power down
When M288 is under standby mode or shut down, it can wake up to record TV program
automatically. With the scheduled recording finished, it goes back to standby (only if M288
woke up form standby). The pictures show schedule alarm indicator on the M288 front panel.
Start time of next recording job Clock with * sign indicates jobs were scheduled
Schedule list and Manual Setup a schedule
Press --:-- to call up schedule list, it shows details of the scheduled recording jobs. Follow the
instructions, press or to remove or make a schedule.
Conflict of schedules, Low in storage and Storage empty
When adding a schedule that overlaps others schedule in time, system would prompt a
warning and the new schedule cannot be added. If free space lowers than 4GB, system would
suggest cleaning up for more storage. Once used up, recording stop with warning message.

www.picazzo.hk 12
Guide for TV recording with internal or USB hard disk
M288 with a 320GB hard disk inside which works quietly, cool and low power consumption.
M288 have 2 USB ports, user can connect USB storage for higher mobility recording.
Settings before recording
Go to Main Menu->Setup->TV->Record Media to set a prefer storage place for recording.
- USB: record to any USB storage which connect to M288.
- HDD: record to internal 320GB hard disk.
- NFS / Windows Network: Record to a network location of NFS/ Windows Network。
Go to Main Menu->Setup->Advanced->Format HDD to format internal/USB hard disk.
- USB FAT32: format USB hard disk to FAT32 file format, which has file size limit of 2GB.
- USB EXT2: format USB hard disk to EXT2 file format, which file size limit up to 7.8GB.
- Internal: format internal hard disk, file size limited at 7.8GB.
* EXT2 would not be support by Windows XP / Vista directly, please read page 28.

www.picazzo.hk 13
Use of internal / USB hard disk in TV recording
When watching TV program, press ●, recording start immediately. Press ●again, to control
the duration of the instance recording job. Please read page 11 for details.
If Disc Error message appear, it indicates system cannot access into the hard disk, please check
the connection / power supply of the hard disk to ensure it can be accessed.
During recording, press Enter to show the left time of the job, press ▓to stop recording.

www.picazzo.hk 14
MHEG5 interactive function
M288 support MHEG5 interactive, first go to Main Menu-> Preferences to turn on MHEG5,
then, interactive function can be used in CH82, 83 and 85. (Read page 28 for details)
Remarks:
-With MHEG5 switched on, the four color keys and Display key would be allocated by
MHEG5, these keys need to long press for the original functions, like:
Long press Yellow key for Screen Crop.
Long press Blue key to adjust Brightness, Contrast and Saturation.
Long press Display key to display program information.
-MHEG 5 slows system down a bit. There is an option to turn it off in Preferences.
-With using MHEG5 application, most of the remote keys are allocated by MHEG5 for
interactive usage. Press Exit to exit MHEG5 application
MHEG5 Application
A TVBar message would shows up
when watching CH82 and CH85,
Press red key to start using
interactive.
In the application, follow the
instructions to check weather
forecast, HSI, Stock price and
News update.
Press Exit to close the application.

www.picazzo.hk 15
MHEG5 interactive function
A News Bar message would shows
up when watching CH83, press
yellow key to start using
interactive.。
In the application, follow the
instructions to check weather
forecast, and Stock price. Press Exit
to close the interactive application.
For example, Press 2 to check
Stock price. Enter the stock
number and press OK to check.
After checking, press back to
interactive menu.
Press Exit to close the interactive
application.

www.picazzo.hk 16
NOW TV Mode
1 Standby mode
2 NOW TV (AV) mode
3 Digital TV mode
4 NOW EPG / <long press> DTV EPG
5 Exit
6 Channel Up / Down
7 <long press>Stretch / Crop / Normal
8 <long press>Adjust Brightness, Contrast,
Saturation
9 Select Audio Channel
10 Adjust NOW TV box audio level
11 Mute
12 NOW Menu / <long press>Main Menu
13 Back / Cancel
14 Enter
15 Program information
16 <long press>Scheduled list
17 Instance recording
18 Channel Up / Down
19 Favorite Channel Up / Down
** Long press TV Guide to call Picazzo EPG, long press ▓can back to Main Menu.

www.picazzo.hk 17
NOW TV Mode
Under NOW TV Mode, M288 plays NOW broadband TV program. Go to Setup->HMC to
select the correct input of NOW TV signal:AV Input1 or S-Video input. If the system is not
register to server for NOW EPG activation, please follow page 30 to obtain an ACT Code.
NOW TV Control and Menu
Use the remote of M288 can forward most of the NOW command to control NOW TV box. It
can switch to NOW mode, switch NOW channels, adjust audio level, select audio channels
and call NOW EPG.
Use of EPG for NOW channels
Press EPG to call up original NOW EPG.
Long press EPG to call up Picazzo EPG for NOW Channels, it shows the programs details of
coming 7 days of NOW TV.
Selection of audio channels
Press Audio to switch between audio channels of A, B or A/B.
Start NOW TV recording
Press ●under the channel you need to record, instance recording start until storage used up.
Press ●again to alter the recording duration form unlimited, 30mins, 1hr, 1.5hrs, 2hrs, 2.5hrs,
and 3hrs. Recording remaining time would show up with any keys press, and most of the
functions were disabled temporary, press ▓ to stop recording.
Scheduled recording
Long press EPG button to call EPG, select a desired NOW channel and program then press ●,
a pre-fill job table shows up, select daily, weekly or Monday to Friday for job repeating
nature.
Schedule list
Long press --:-- button to call schedule list, it shows the details of scheduled recording jobs,
follow the on screen instructions, press or to remove or make a new schedule.
Parental Control
M288 support channels parental control by using password protection. Press Enter to call
Channel list, choose a channel to perform parental control and press on it. Then, a star *
appear in front of the protected channel which cannot setup any scheduled recording.

www.picazzo.hk 18
Media Playback Mode
1 Standby mode
2 NOW TV (AV) mode
3 Digital TV mode
4 <Long press>Next media file
5 Move selection pointer
6 Select Repeat Mode
7 Play All / Slideshow / Pause
8 Next page / fast forward
9 Stop
10 Adjust Brightness, Contrast, Saturation
11 Increase/decrease volume level
12 Mute
13 Main Menu
14 <long press> Previous media file
15 Enter / Play
16 Display current file info.
17 Previous page/ fast backward
18 Jump to
19 Toggle video output
20 Select / Tag files
** Press ►II to play all files in Media library sequentially, Press Enter to play the select file.
When playing slide show, the system auto plays the audio files in the same folder.

www.picazzo.hk 19
Media Playback Mode
Select Media in Main Menu to enter media playback mode. Video, audio and image files via
network or USB storage can be play in this mode. Read page 5 for supported formats.
Media library Operation
Title ◄/► Enter ▲/▼Cancel ◄◄/►►
Select items Select command Confirm Move pointer Stop Pre. / Next page
Multimedia Server
When staying in the page of Media Servers, the
system would search on-LAN UPnP and DLNA
servers automatically.
MEDIA
Access internal/external storage in MEDIA.
-LOCAL DRIVE: Internal hard disk.
-NFS:Enter the mounted NFS network location.
-USB: Enter the USB storage which plugs in the system, it can be two at the same time.
-WINDOWS NETWORK: Login to the Windows Network share folder on local LAN
** If using NFS and Windows Network, server information must be provided, read page 29, 38 for details.
UPnP Server / DLNA Server
Devices with UPnP icon are UPnP or DLNA servers that share their multimedia files on the
LAN, browse into these servers to play their shared video, music and photo. For example, PC
with Vista, NAS and Picazzo M288 can
be a UPnP/DLNA server.
YouTube
List out the videos on YouTube Hong
Kong. The videos are listed in group, like
Most Popular or NOW channel. Press
Enter to play the video, right key ►to
search related videos and select
[]back to previous video list.

www.picazzo.hk 20
Media Playback Mode –UPNP/DLNA
M288 support UPnP and DLNA multimedia files
sharing. M288 would search over the local LAN for
sharing on available UPnP or DLNA server, e.g. PS3,
NAS, PC and Mac etc. Also, M288 can be a DLNA
server to share the recordings in its hard disk.
Play files on UPnP/DLNA server
Start in Main Menu; select MEDIA to search UPnP
servers on local LAN. Please wait in the Media
Servers list for a few seconds to list out all
available servers.
Select and enter an UPnP / DLNA server, these
servers usually provide a list of its sharing in
type. For example, browse into Pictures contents,
it shows photos grouped by Date or Folder.
Select by Folder to list the photos by folder
structures.
Select List All to list out all available photos on
the server.
Table of contents