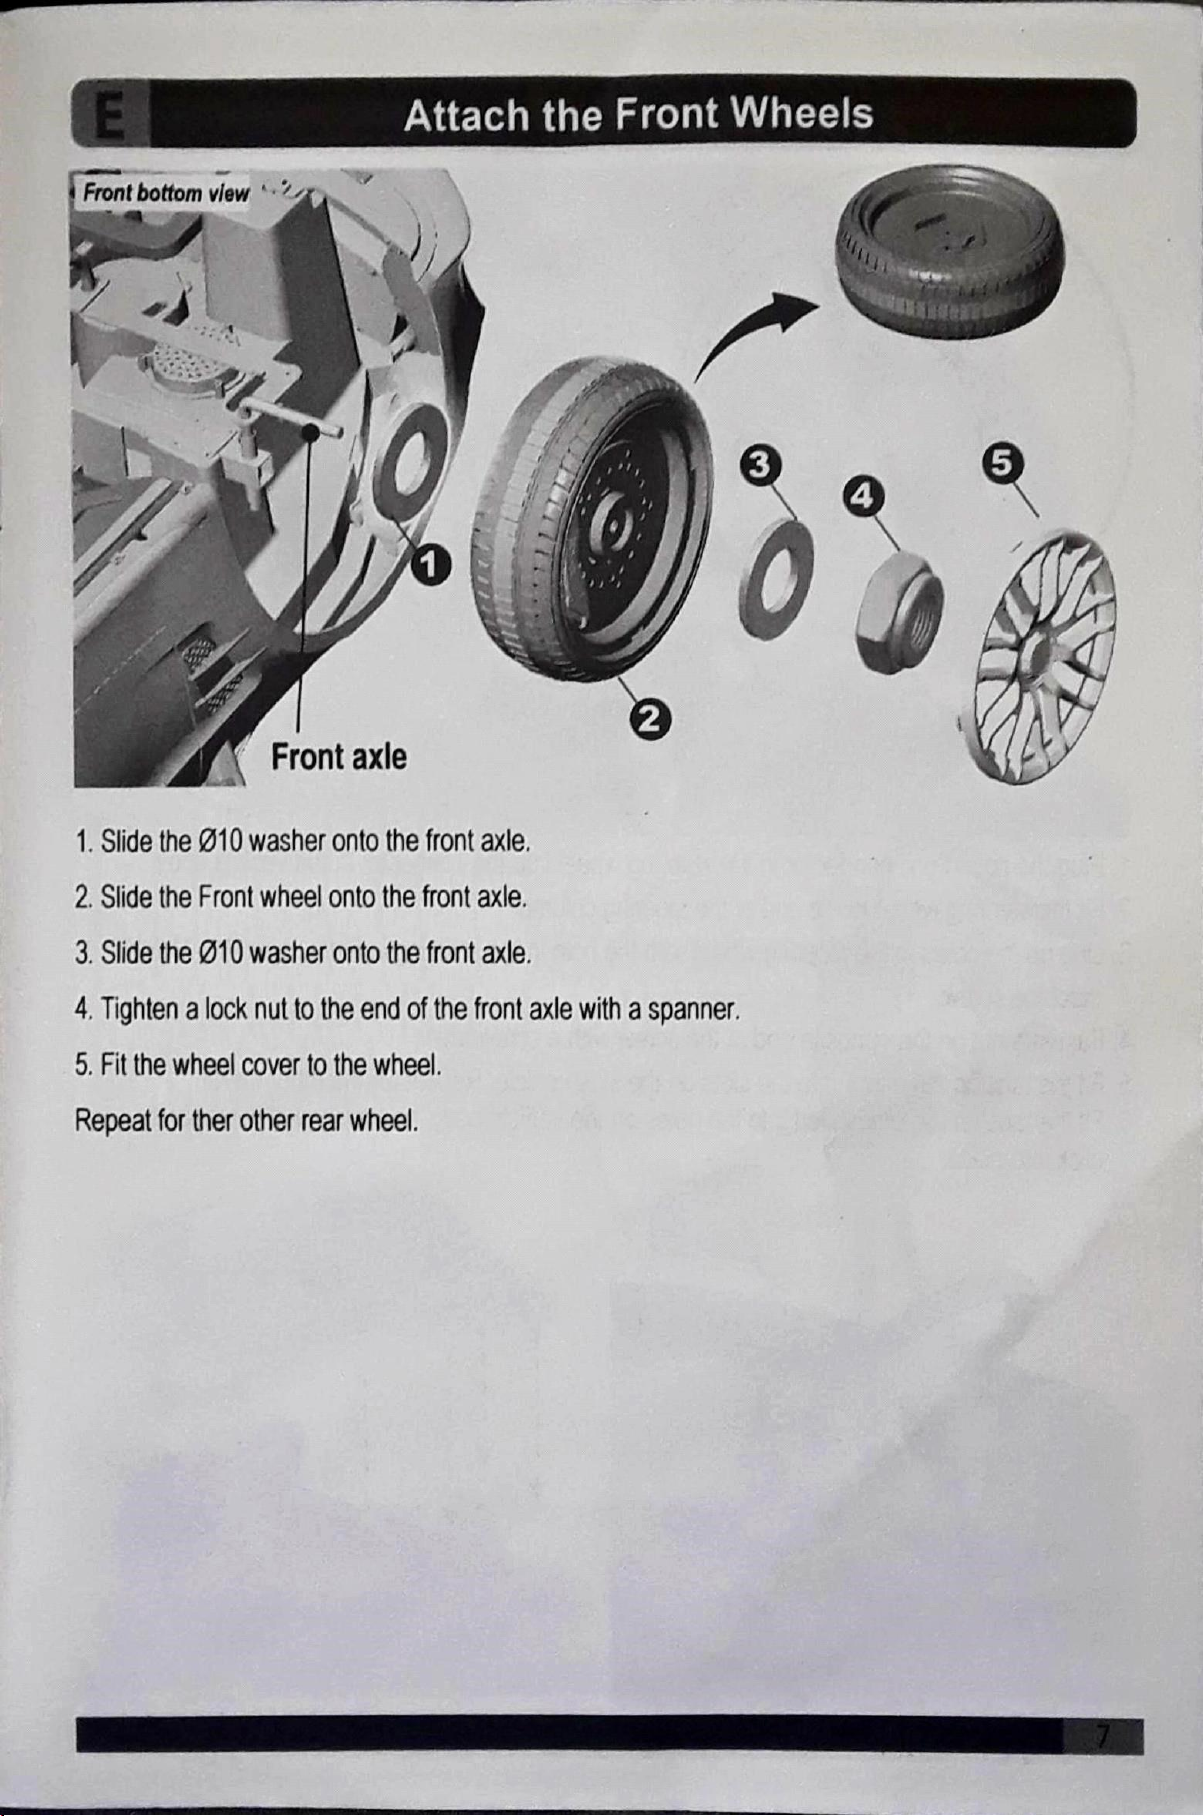
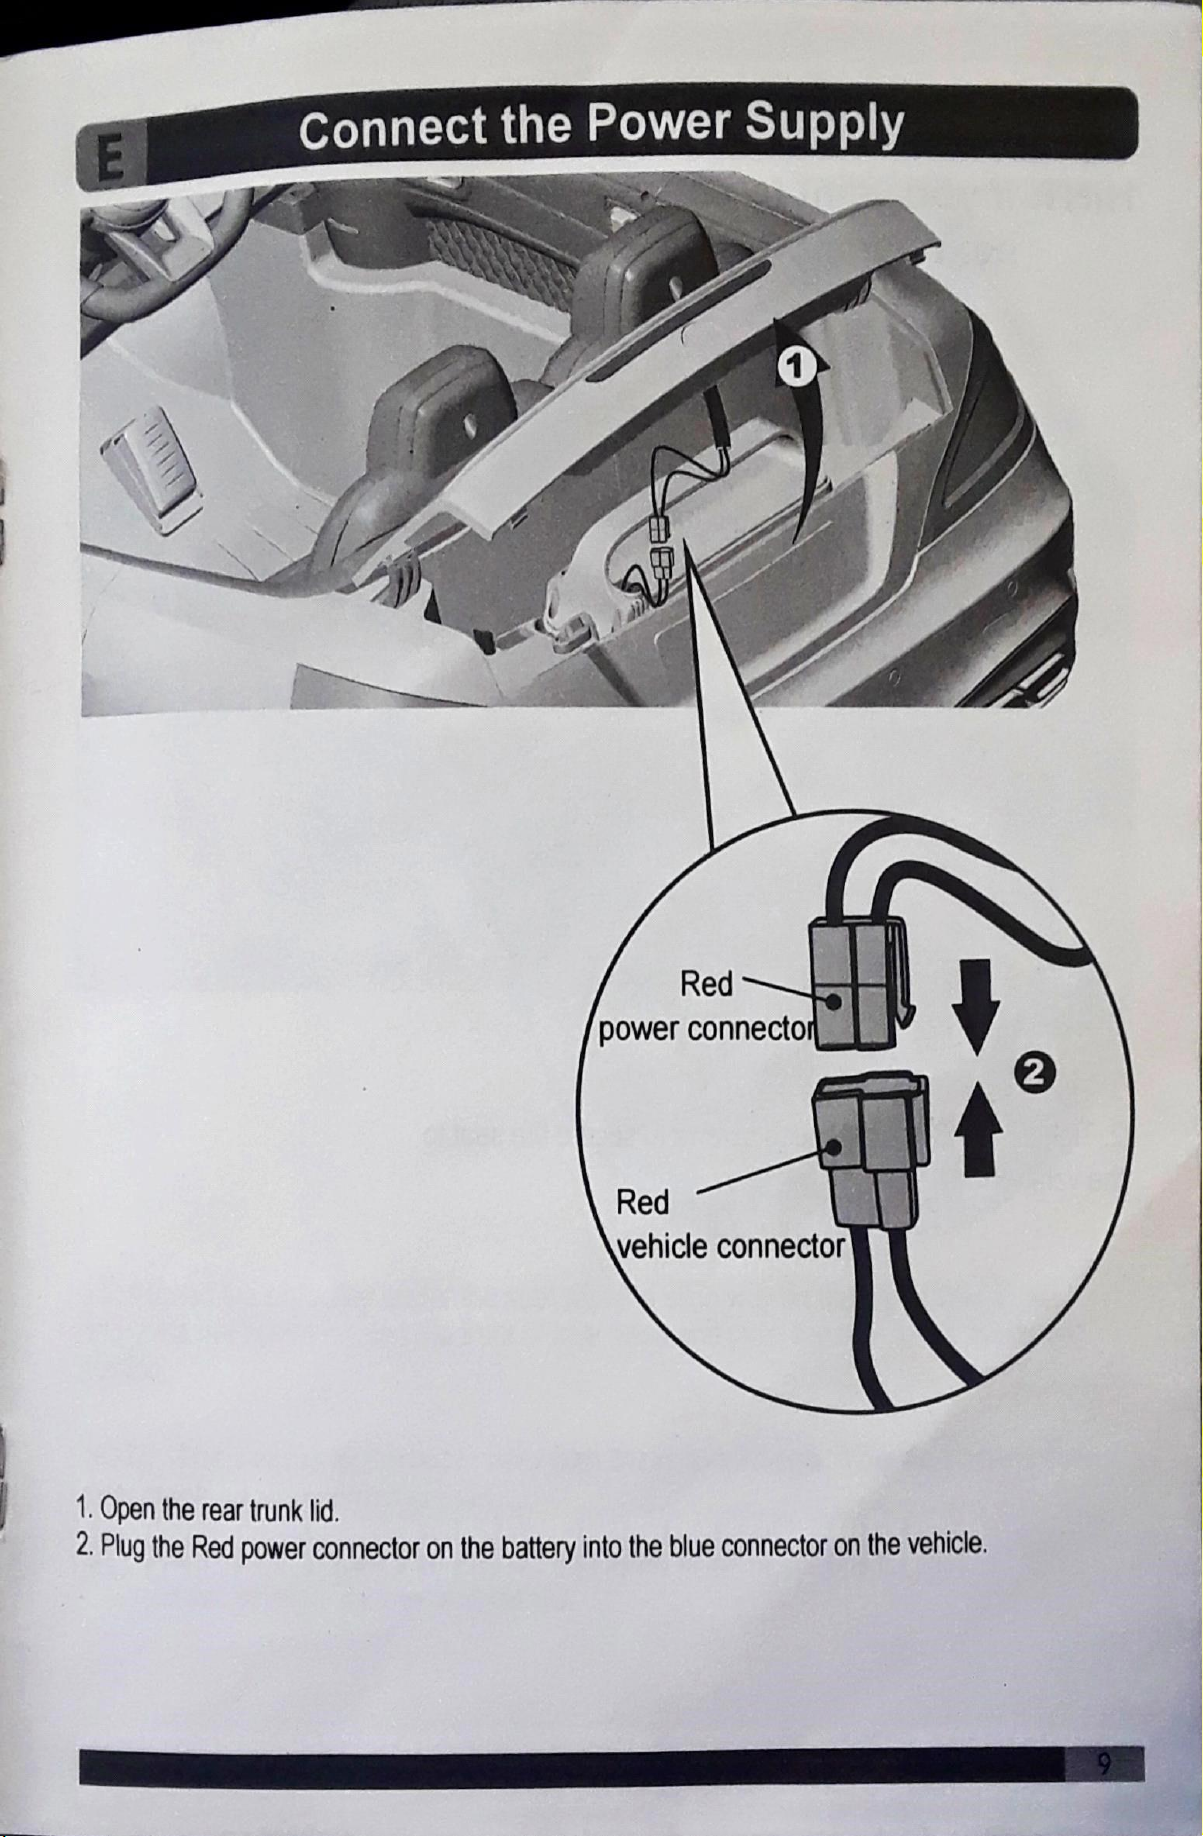
Pinghu City Xiao Ming Xing Children's Products XMX602 Datasheet

Mercedes-Benz
Licensed
Battery-PoweredRide-on
Stylesand mayvary
• Suitable age for 3+ Years
• Maximum user weight: 30kg
• Adult assembly required
owNER's MANUAL
with Assembly Instructions
Read and understandthis entiremanualbeforeusing!
Please keep this manual for futurereferenceas it contains importantinformation.
Before first time use, charge the batteryfor at least 8-12
hours.

About Your NewVehicle
On the purchase of your new Ride-On.
"Mercedes-Benz" ,@and the design of the enclosed product
are subject to intellectual propertyprotectionownedby Daimler AG. They
are used by Pinghu City Xiao Ming Xing Children's Products CO.,LTD
under
license.
Specification
Suitableage:
Battery:
Charge time:
Charge:
Load capacity:
Size of car:
Speed:
3+ Years
6V7AH xl or
12v7AH
Xl
8-12 hours
Input:
depend on local voltage
output: DC6V700mA
Under 30kg
CM
3-5 km/h
BATTERY INFORMATION
• Non-rechargeable batteriesare not
to be recharged.
e If removable rechargeable batteries are used, the are only to be charged under adult
supervision.
• Remove rechargeable batteries from the product before charging.
• Do not mix old and new batteries. Do not mix different
types of batteries: alkaline, standard
(carbon-zinc) or rechargeable (nickel-cadmium).
• Insert batteries as indicated inside the battery compartment, anode to anode, cathode to cathode.
• Remove batteries during long periods of non-use. Always removeexhausted batteries
from
the
product. Battery leakage and corrosion can damage this product.
Dispose of batteriessafely.
• Never short circuit the batteryterminals.
170405

Parts List
Q'TY
(PCS)
PART NAME
Vehiclebody
Driving wheel
Normal wheel
washer
Lock nut
Wheel cover
View mirror
Windshield
Seat
$4x12 screw
Steering wheel
12 M5X45machine
screw
13 nut
14 Charger
15 Remote controller
16 Spanner
• Assembly tools required:
REMARK
IWD DD
1
2
32
76
4
4
2
1
1
2For attach the adjustableseat
1
1
1
1
2
Screwdriver
(not included)

Parts Diagram

Safety
PREVENT INJURIES AND DEATHS:
• NEVER LEAVE CHILD UNATTENDED.
ADULT DIRECT
SUPERVISION IS REQUIRED.
child in view when child is in vehicle.
• This toy should be used withcaution since skill is required to avoid falls or collisions causirq
injury to the user or third parties.
• Protective equipment should be worn.
• Never use in roadways, near cars, on or near steep inclines or steps, swimming pools
other bodies of water.
• Always wear shoes, always sit on the seat.
• Not to be used in traffic.
• This toy is unsuitable for children under 36 months due to its maximum speed; Maximum user
weightis 30 kgs.
•
This toy has no brake.
WARNING:
• CHOKING HAZARD! Not suitable for children under 37 months.
• ADULT ASSEMBLY REQUIRED.
•
Keep Children withinSafe Riding Areas:
- Never use in roadway, near motor
vehicles, on lawn space, on or near steep inclines or steps,
swimming pools or other bodies of water;
•
Use the toy only on flat surfaces. Such as inside your house, garden or playground.
•
Never use in the dark, A child could encounterunexpectedobstacles and have an accident.
Operate the vehicle only in the daytime or a well-lit
area.
• It is prohibited to change the circuit or add other electric parts
•
Inspect wires and connections of the vehicle periodically.
•
Do not let any child touch the wheels or be near themwhen the car is moving .
• This vehicle has adjustable play seat belts. Please instructchildren how to tie the safety belt
before
using, guarantee the security.

Attach the Rear Wheels
please.
Turn over the vehicle body.
1. Slide the driving wheel onto the rear axle from Left Side. And keep the driving wheel match
with the gear box.
2. Slide the Ø10 washer onto the rear axle.
3. Tighten a lock nut to the end of the rear axle with a spanner.
4. Fit the wheel cover to the wheel.
l)
5. Slide a ØIO washer onto the rear axle from other side.
6. Slide a normal wheel onto the rear axle.
7. Slide the other Ø10 washer onto the rear axle.
8. Tighten a lock nut to the end of the rear axle with spanner.
9. Fit the wheel cover to the wheel.

Attach the Rear Wheels
Rear boramview
i
Rear axle
Turn over the vehicle body.
1. Slide the driving wheel onto the rear axle from Left Side. And keep the driving wheel
match
with the gear box.
2. Slide the Ø10 washer onto the rear axle.
3. Tighten a lock nutto the end of the rear axle with a spanner.
Repeat for the otherdriving wheel.
4. Fit the wheel cover to the wheel.
Rear bottom view
Rear axle
5-8. Repeat the above procedure to assemble the other driving wheel.

Attach the Front Wheels
Front bottom view
Front axle
1. Slide the Ø10 washer onto the front axle.
2. Slide the Front wheel onto the front axle.
3. Slide the Ø10 washer onto the front axle.
4. Tighten a lock nut to the end of the front axle with a spanner.
5. Fit the wheel cover to the wheel.
Repeat for ther other rear wheel.

Attach the Steering Wheel, Mirrors & Windshield
1. Plug the sound unitconnector in the steering wheel into the connector in the vehicle body
2. Fit the steering wheel to the end of the steering column.
3. Line up the holes in the steering wheel with the hole in the steering column, insertthe M5x45
machine screw.
4. Fasten a nut on the opposite end of the *crew with a screwdriver.
5. Fit the tabs on the mirrorinto the slots on the side vehicle. Repeat for the othermirror
6. Fit the tabs on the windshiled into the holes on the vehicle body, and push until
you hear
it
click into place.

Connect the Power Supply
Red
power connecto
Red
vehicle connector
1. Open the rear trunk lid.
2. Plug the Red power connector on the battery into the blue connector on the vehicle.

Attach the Normal Seat
HINT: If you want to use the Adjustable Seat, see the
next page please!
1. Flt the seat to the vehicle body.
2. Tighten two Ø4x12 fiat head screws to secure the seat to
the vehicle.

Attach
the Adjustable Seat
Button for adjust the seat
1,2.
Aligned
theslide strip under the seat with the slide way on the top of seat base,
and
press
the
button
located the frontof seat base and push the seat to the innermost
postion.
NOTE:
The
seat is adjustable and has threepositions. You can move the
seatbackas your child grows.
WARNING:
When
you adjust the seat, ensure the seat "snaps" into
place,or may cause accidents.

Use Your New
Vehicle
r! IMPORTANT!
Always stop vehicle
when changing the
speed or directionto
avoid damage the
gears and motor.
1. Power Switch: Tums the vehicle on and off.
2. Forward/Reverse switch: Changes the direction that vehicle moves from forward to reverse.
3. Sounds buttons: Press forsoundsplaying.
4. Foot pedal: • To move
the
car, press thepedaldown.
• To brake or slow down, release pressure from the pedal.
5. Lights switch: Turns the lights on and off.
6. MP3player:
A. USB slot:
Only
support
MP3
format cDE
B. TF card slot: Onlysupport
MP3
format
C. Auxiliary input: Allow the audio from your portable music player or phone to be played through
the
vehicle
speakers.
D. Previous I Increase volume: Long press forincreasing
the
volume.
E. Play I Pause: Playing andpausing
themusic.
F. Next I decrease volume: Long press for
decreasing
the
volume.
G. Change the audio input: This button
worked while you inserted two audio input devices.
H. Display screen: It displays the power level of the battery when the vehicle is stop.
1
WD men the numerical value less than 5, recharge the batteryplease.
2WD When the numerical value less than 10, recharge the batteryplease.

Use the Remote Controller
Brake
Foward button
button Left
Reverse button
button
Right
Speed
select button button
Speed indicator
ASSEMBLY
Lift
thebattery
compartment door on the back of the controller and insert two
AAA(LR03) batteries.
NOTE:This product did not included the AAA(LR03) batteries. Follow the
battery
information on page 1.
1.Connection button
Long press the forward and reverse buttons
for 3 seconds, and the speed indicator
flashes.Then power on the vehicle, the speed indicatorgoes to long bright,means
theconnectionsuccessful. If the speed indicator no response, means the
connection
failed. Replace the batteriesand retry.
2.Brake button
Press the buttonto stop the vehicle, press it again to release the brake.
3.Speed select button
The switch operates the vehicle to move in low, normal or high speed.
HINT:Thevehicle is designed to operate in lowspeed only in reverse.
NOTE:
• Leave the remote controller idling for about 10 seconds, itwill shut down
automatically.
• Repeat step 1 when you replace the batteries of the remotecontroller.

Use the Pull Handle & Remove the battery
HOW
TO USE THE PULL HANDLE
1. Rotate the support wheels out.
2. Rotate the Pull handle out
3. You can move the vehicle by putting.
How to remove the battery from the vehicle
1. Open the rear trunk lid.
2. Unplug the Red connectoron thevehide and
tie
Red connector on the battery.
3. Position the battery lock switch to
4. Take the battery out from the vehide.

Charging
Z •The POWER SWITCH be turned
in
OFF positionwhen charging,
• Before the firstuse, you should charge
the batteryfor 4-6 hours. Do not recharge
the battery
for more than 10 hours to
avoid overheating the charger,
•
When the vehicle begins to run slowly,
recharge the battery.
1. Plug the charger port into tho input gockot, (tho
socket is below the goat)
2. Plug the charger port into tho charger tockot on
the battery.
WARNING!
ONLY
an
ADULT can charge and recharge the battery!
This
product
withCharging Protection: when charging, all functions will be
cut
offl Only
an adult
can charge and recharge the battery!
Maintaining
• It
is parents'
responsibility to check main parts of the toy before using, Must regularly
examine
for
potential
hazard, such as the battery,charge,cable or cord, plug, screws are
fastening
enclosureof other parts and that in the event of such damage, the toy must
not
beused until
that damage had been properly removed.
• Make
sure theplastic parts of the vehicle are not cracked or broken.
• Occasionally
use a lightweight
oil to lubricate moving parts such as wheels.
• Parkthe
vehicle indoors or cover it with a tarp to protect it from wet weather.
• Keepthe
vehicle
away fromsources of heat, such as stoves and heaters. Plastic parts
may melt.
• Rechargethe
battery
after
each use. Only an adultcan handle the battery.
Recharge the
batteryat
least
oncea monthwhen the vehicle Raider is notbeing used.
• Do
notwash the vehicle with a hose. Do not wash the vehicle with soap and water. Do
not
drivethevehicle in rainy or snowy weather. Water will damage the motor, electric
system and battery.
• Clean
the
vehicle
witha soft,dry cloth. To restore shine to plastic parts, use a non-wax
fumiture
polish.Do notuse car wax. Do notuse abrasive cleaners.
• Do
not
drive
thevehicle in loose dirt, sand or fine gravel which could damage the moving
parts,
motorsor the electric system.
• men not
using, all the electrical source should be tum off. Tum off the power switch and
disconnect
the battery connection.

Troubleshooting Guido
Solution
Probiojn
does not
Pooolbio Couoo
low on
itippod
tii0 fiftniy
(if WOOS motor
10000 your
doad your distributorploago.
damngod Contact your dlotr/"utor p/oogo.
Motor damagød Contact your d/nfrli»utor
ploooo.
Vohiciodooo not
vory long
Vohicio runs siugoi»hly
ohicionoods a push
to 00 forward
Difficult shifting
forward to rovoroo or
vico.vorsa
Loud grindingor clicking
noisos coming from
motor
or gear box
I
Battery will not
recharge
Whenrecharging
undoc Chook titmly plugged
Into whon
oid
low on powoc
Oattory is old
Vohiolo ovorloud
VohiclO boing usod In haf0h
conditions
Poor contact of wiroo or
Connectors
"Doad Spot' on motor
Attompting to nhift
whilo tho
vohiclo in motion
Motor
or goaro oro domoqod
Battery connector Ofadaptor
connoctor is 10000
Chargor not plugged in
E.
Chargoris notworking
This is normaland nota
causo forconcom
contact your distributor ploogo,
bnttory,
contact your dlotrlbufor plooso,
battery,
contact your distributor pjoaoo.
woight on vohiulo. M/i/imum
user wojqhtjs
30 Ego,
Avoid li0ing harsh conditiono €8atotY>,
Chook that tho battnty e.onnoct0f0ore firmly plugged
Intoouch othot, Itwiroo aro 10000atound tho motor.
contact your distributorploaso.
A dood npot moonq tho oloctrio power not boing
dolivotod to tho tormlnal connection and tho vohiclo
noodotopair.Contact your distributor ploao«
I Complotoly Stop the vohic.lo and shift, goe '{uso Your
Now Vohi010>
I Contact your distributor plooso.
Chock that tho battery connoctorg oro firmly plugged
into each other.
Chook that tho battory charger io plugged into a
working wall outlot„
Contact your distributor ploaso.
Completely read through this manual and the troubleshooting guide table before calling, Ifyou
still need hel resolvinq the roblemContact our distributor loaso.

Disposal Of Battery
• Your sealed lead-acid batterymust be recycled or disposed of in an environmen-
tally sound manner.
• Do not dispose of your lead-acid batteryin a fire. The batterymay explode or
leak.
• Do not dispose of a lead-acid batteryin your regular, household trash. The
'incineration,land filling or mixing of sealed lead-acid batterieswithhousehold
trash is prohibitedby law.
our products are suitable for ASTM F963•,
GB6675; EN71 and EN62115
standard.
Table of contents
Other Pinghu City Xiao Ming Xing Children's Products Motorized Toy Car manuals