Pioneer 600 User manual


3.
4
5.
6.
7.
FIGURE
8.
9.
MUFFLER
CH IN OILER
RESERVOIR
GENER L INFORM TION
If you are a new owner, some of the tenus applied to Power Chain Saws may ne cl
explanation, see (figure 1).
Throughout the- pages following in this operator s Manual, you will find detailed
instruction on the care and maintenance of your chain saw. Adherence to these
instructions will give you better performance, lower maintenance costs and longer
Raw life.
Your Power Saw has received a factory run in, but the operator should treat th
Saw as any new equipment for a break in period. Let the motor idle to warm up.
Recheck all nuts for correct tension. The operator s initial care will payoff in
longer life.
The following instructions are IMPORTANT and will add to the life of your chain
and efficient operation.
1. Install chain properly, with recommended chain tension. (See figure 5.)
2. Run chain at low speed for almost 5 minutes, giving plenty of OIL durin
period.
Switch off the engine and readjust the chain tension.
Recheck tension often until the chain is fully broken in.
Keep your chain well lubricated during cutting, at all times.
If possible, leave chain in an oil bath overnight. This ensures internal lubri-
cation.
Keep your chain SHARP. A light touch up with the file will prevent the dam a .
caused to cutters and side links by operating with a dull chain.
Study your Chain Pocket Instructor and the information given in your Operators
Manual. Remember, chain maintenance pays off in both time and money.
This Model carries two sighting points for large timber; one on the Strut and th
second on the Starter Cover.

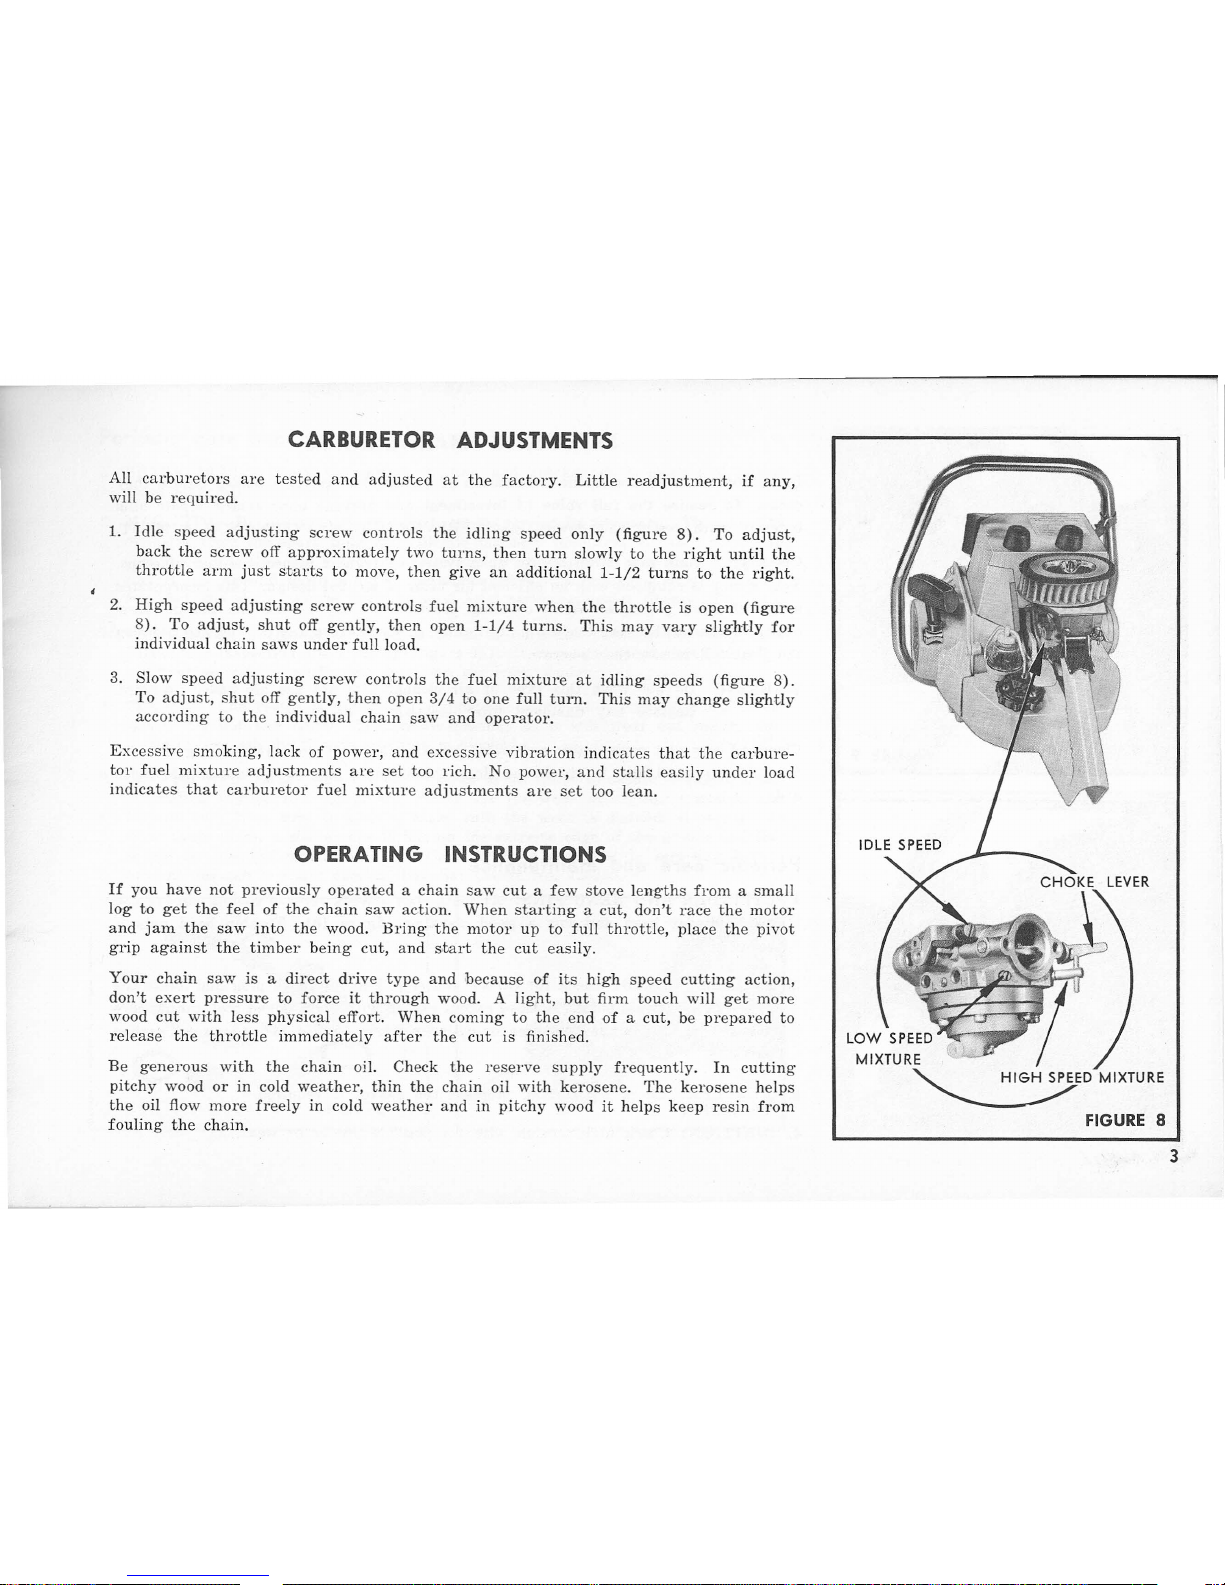
PREP RING YOUR CH JN S W FOR USE
It will be necessary to assemble the pivot grip, cutter bar and chain to the moto-r
unit and properly adjust the chain tension.
1. Remove the strut assembly and outer and inner guide plates from the motor unit
figure 3).
2. Secure the pivot grip to the motor unit figure 3).
3. Place the inner guide plate and cutter bar on the motor unit engaging them on the
two mounting studs.
4. Assemble the chain to the sprocket and cutter bar making sure that the cutting
teeth direction is correct figure 4).
5. Replace the outer guide plate and strut assembly, but do not tighten permanently.
The chain adjusting pin must engage into the cutter bar slot.
6. Tighten chain, using the adjusting screw figure 4). Then back off until the chain
can be pulled freely around the bar by hand figure 5). CAUTION - Use gloves
or cloth to protect your hands.
7. Secure the two hexagonal nuts attaching the strut assembly and cutter bar to the
motor unit. Lift bar tip slightly to insure correct seating.
FUEL ND LUBRIC TION
Lubrication of internal moving parts of your chain saw motor is solely supplied by oil
which is mixed with gasoline. Therefore it is very important to prepare your fuel
mixture properly. Mix one part of SAE: 40 motor oil to 16 parts of regular gasoline:
or use a ratio of 1 pint of oil to 2 gallons of regular gasoline. MIXING PRO-
CEDURE: Pour into a clean metal container half the amount of gasoline to be mixed,
and add all the required oil. Shake or stir until thoroughly mixed. Then add balance
of gasoline and shake or stir to insure mixing. DO NOT MIX DIRECTLY IN CHAIN
SAW FUEL TANK. Strain fuel mixture through a fine mesh screen when pouring into
fuel tank, to eliminate any water or foreign particles.
CH IN OILER
Lubrication of the cutting chain is essential to minimize pitch fouling, wear and fric-
tion power loss. This is done through the chain oiler figure 1) which is manually
controlled, drawing its oil supply from a separate reservoir located at the cutting end
of the motor unit. Good clean oil is a must. SAE 10 or 20 is recommended but
because of locality, season and the timber being cut the weight of oil is variable,
We recommend a penetrating oil with a tacky quality.
INNER GUIDE
PL TE

FIGURE
STARTING INSTRUCTIONS
1. Put fuel in the tank that is properly mixed as explained previously.
2. Fill the chain oiler reservoir. See CHAIN OILER.
3. To start the motor, place the chain saw ina convenient position where it will sit
squarely and firmly when you pull the starter cord.
4. Choke by moving the choke lever down.
5. Turn the ignition switch to an up position.
6. Take a firm hold on the pistol grip with the right hand, and open the throttle with
your index finger (figure 7).
7. Take the starter handle in your left hand and place the left foot firmly on the
starter foothold (figure 7).
8. Open the throttle and turn the motor over slowly once, then give starter firm
sharp pulls, engaging it slowly.
9. When the motor starts, ease off on the throttle and move the choke lever up, to
running position. If the motor is cold it may be necessary to choke the motor
slightly for several seconds to obtain a satisfactory idle. Run the motor just fast
enough to turn the chain and operate the oil pump lever until the chain is thorough-
ly lubricated.
10. Check your General Instruction page for important information on keeping your
chain sharp and correctly tensioned at all times. Readjustment of tension during
break-in period is a must.
For the first several hours of operation treat your chain saw with care to prevent
needless wear during the break-in period. Give it plenty of time to warm up before
starting to cut, but use full throttle when cutting. Don t race motor when cutting
small timber.

C RBURETOR DJUSTMENTS
All carburetors are tested and adjusted at the factory. Little readjustment, if any,
will be required.
1.
Idle speed adjusting screw controls the idling speed only (figure 8). To adjust,
back the screw off approximately two turns, then turn slowly to the right until the
throttle arm just starts to move, then give an additional
1-1/2
tUl11Sto the right.
2. High speed adjusting screw controls fuel mixture when the throttle is open (figure
8). To adjust, shut off gently, then open
1-1/4
turns. This may vary slightly for
individual chain saws under full load.
3. Slow speed adjusting screw controls the fuel mixture at idling speeds (figure 8).
To adjust, shut off gently, then open 3/4 to one full turn. This may change slightly
according to the individual chain saw and operator.
Excessive smoking, lack of power, and excessive vibration indicates that the carbure-
tor fuel mixture adjustments aloe set too rich. No power, and stalls easily under load
indicates that carburetor fuel mixture adjustments are set too lean.
OPER TING INSTRUCTIONS
If you have not previously operated a chain saw cut a few stove lengths from a small
log to get the feel of the chain saw action. When starting a cut, don t race the motor
and jam the saw into the wood. Bring the motor up to full throttle, place the pivot
grip against the timber being cut, and start the cut easily.
Your chain saw is a direct drive type and because of its high speed cutting action,
dont exert pressure to force it through wood. A light, but firm touch will get more
wood cut with less physical effort. When coming to the end of a cut, be prepared to
release the throttle immediately after the cut is finished.
Be generous with the chain oil. Check the reserve supply frequently. In cutting
pitchy wood or in cold weather, thin the chain oil with kerosene. The kerosene helps
the oil flow more freely in cold weather and in pitchy wood it helps keep resin from
fouling the chain.
3

4
PREVENTIVE M INTEN NCE
Preventive maintenance is the elimination of potential cause of troubles before they
occur. To realize the full value of investment and prevent unnecessary repair bills
together with costly shut-downs, make PREVENTIVE MAINTENANCE A MUST.
Check your chain saw daily and set up a system of regular inspections and tune-ups.
Your motor is equipped with an efficient air filter of pleated design. This incorporates
a self cleaning principle. When cleaning proves necessary release the thumb .screw
about two turns then tap the top plate lightly. This releases any dirt packed between
the pleats. Retension thumb screw.
WARNING Do not wash this type of air cleaner. Do not use air under pressure.
Replace any damaged filter element at once.
Clean off any dirt around the carburetor breather hole. If you are working the saw
hard, it is a good idea to check and clean the air filter and the breather hole twice
a day.
Periodic care and maintenance
1. CYLINDER AND HE AD FINS: At least once a week remove cooling shroud and
give cylinder head and fins a good cleaning (figure 10). Tighten head nuts if
required.
2. EXHAUST PORTS: Check for carbon deposits. Remove spark plug and locate the
piston at its lowest point. Remove excess carbon with blunt edged tool, taking care
not to burr or damage port area or cylinder sleeve (figure 14). Clean out carbon
particles.
3. MUFFLER: Check for carbon. Replace the gasket if required.
4. IGNITION: Check high tension wire for possible breaks or wear.

Periodic
care and maintenance cont.)
5. SPARK PLUG: Check for carbon, fouling and cracks. Keep clean and adjust
spark plug gap to .025 inch.
6. MAGNETO: Do not inspect or adjust unless absolutely necessary. The quantity
of spark from the spark plug will indicate magneto condition. Breaker point gap
should be .020 inch. In event of removal all magneto parts must be replaced in
correct setting and location. It is recommended that if magneto service work is
required, the chain saw be taken to your local servicing dealer figure 12).
7. CARBURETOR: Do not screw adjustments in too tight. Remove the pump base
portion for inspection and cleaning figure 11). It is recommended that carburetor
overhaul should be performed by your servicing dealer.
8. CLUTCH: The clutch is automatic, designed to apply at a predetermined motor
speed. Do not slip clutch through overloading as it will wear out lining. Im-
mediately release the throttle if chain is pinched.
9. OUTTER BAR: Make sure the bar is clean at all times to assure sufficient chain
lubrication figure 13). Check the cutter bar for wear at regular intervals and
turn it over from time to time to make sure the wear is distributed evenly. As
wear takes place, a sharp edge is left on the extreme edge of the groove and this
should be removed with a file . . . Care must be exercised in servicing bar to
prevent damage to chain groove. Use Bar Gauge No. 426235.
FIGURE 11 FIGURE 12
e
BAR OIL VENT FIGURE 13
5

SERVICE DI GNOSIS
TROUBLE PROBABLE CAUSE REMEDY
Motor fails
to start. Fuel tank empty.
Ignition switch off.
Motor not choked.
Carburetor,
Over choking.
Spark plug.
Magneto.
*Plugged or frost-covered pickup in fuel
tank.
*Plugged impulse hole in carburetor or
misaligned carburetor manifold gasket.
*Frozen gas line or ice in filter or car-
buretor
Fill with correct fuel mixture.
Turn on or check for short.
Move choke lever down.
See carburetor adjustments.
Unchoke, open throttle and pull starter 3 or 4 times.
f
motor is continually flooding check for plugged carbure-
tor breather.
Remove plug, clean and adjust. Re-attach wire and hold
metal seat of plug against motor. Pull starter. A blue
spark should jump gap between electrodes.
Disconnect wire from spark plug. Hold so metal end is
inch from clean metal surface. (Away from gas tank.)
Pull starter. There should be a strong spark across the
gap. If no spark the trouble is breaker points, coil, condens-
er, shorted wire,
01
switch.
Remove and clean. Check for ice, water, and dirt in fuel
tank filter screen and water trap felt.
Remove and clean. Check for ice, water, and dirt in fuel
tank filter screen and water trap felt.
Remove and clean. De-ice additive used in prescribed
proportion will counteract this. (One teaspoon to a full
tank of fuel.)
6
*Probable causes indicate conditions which may be experienced during cold weather operation.

SERVICE DIAGNOSIS CONT.)
TROUBLE PROBABLE CAUSE REMEDY
Motor cuts
out, leans
out or mis-
fires.
Motor lacks
power.
Short circuit in ignition system.
Partial stoppage in fuel. system.
Fouled, wet or damaged spark plug.
Magneto. Faulty breaker points, coil, con-
denser, ignition wire or connection.
Inlet control lever sticking on the inlet
control lever screw shaft.
Improper sequence of fuel pump diaphragm
and gasket.
Dirty 01 leaking carburetor filter.
Dirt in fuel lines or carburetor passages.
Air leak in fuel lines.
t
Improper inlet lever setting.
Incorrect fuel mixture.
Carburetorout of adjustment.
Exhaust ports or muffler clogged.
Air Intake filter clogged.
Poor compression.
Check all wires and connections.
Clean out carefully and check earburetor.
Clean and adjust or replace.
Check.
Remove and clean control lever, or replace.
Fuel pump diaphragm must be next to fuel pump body.
Remove and clean. Properly secure filter to fuel pump body.
Check and clean.
Replace.
Adjust.
Drain tank, refill with correct mixture.
Adjust carburetor.
Clean.
Clean.
See your servicing dealer.
tInlet Needle Lever Adjustment: The correct lever setting is level with the face of the diaphragm chamber. Ad-
just short part of the lever to obtain correct setting. Do not jamb the needle into the seat.
7

CONT.)
PROBABLE CAUSE
SERVICE DIAGNOSIS
REMEDY
TROUBLE
Motor over-
heats
Chain stalls
in cut.
Chain moves
when throttle
is closed.
Chain cuts
roughly or
digs in.
Chain oiler
stops pump-
ing.
Cylinder fins or air system clogged.
Incorrect fuel mixture.
Carburetor lean.
Loose cylinder head nuts.
Leaking cylinder head or base gaskets.
Clutch slipping.
Improper filing or jointing.
Cutter bar and chain pinched in log.
Idling speed too fast.
Top and front angles on cutters incorrectly
filed. Too much joint.
Dirt in pump assembly or discharge vent.
Clean.
Drain tank, refill with correct mixture.
Adjust.
Tighten.
Check .and replace if necessary.
Check linings, if worn replace.
Check filing and jointing instructions, or see your servicing
dealer.
Use wedge if necessary to open cut wider to free
bar
and
chain.
Adjust idle speed.
Check filing and jointing instructions, or see your servicing
dealer.
Remove and clean pump and feed line. Fill with clean oil.
SAE
10
or
20.)
NOTE: If- motor idling is erratic or races away and then drops, it may indicate the possibility of excess air en-
tering the crankcase.
i:
this condition exists, the motor would continue to idle with the idle stop screw backed
completely off. Check the following points: 1.) Cocked throttle shutter. 2,) Leaking carburetor gasket. 3.)
Loose carburetor nuts. 4.) Leaking crankshaft seals. 5.) Improper carburetor adjustments.
8

SH RPENING ND JOINTING
Sharpening
Tighten chain firmly on the cutter bar to hold secure. When sharpening take a firm
grip on the file and use it with a steady thrust. Don't swing the file during the stroke.
Keep consistent cutting angles (minimum 35°) on all teeth (figure 15). Make certain
the file is also bearing against the top cutting face.
Keeping one fifth of the diameter of the file above the top cutting edge of the tooth
will give a nice hollow ground cutting edge which will cut fast and dull slowly. Don't
file off any more metal than necessary to give a sharp cutting edge.
Make sure your file is really sharp because the chain teeth 'are made of a heat
treated steel alloy. Also, a dull file can surface harden the cutter edges and make
them
extremely-
hard to sharpen. Use only a sharp
14
inch full round file. Be
careful to keep the cutting teeth the same length. If the teeth are not uniform, the
longer ones will take a deeper bite and cause the saw to cut in an arc.
When you have finished sharpening the chain, slack off the chain slightly and run it
free while oiling it heavily to make sure that all filings are flushed from the cutter
bar groove. Be sure to re-tension chain correctly.
hain Tension
The importance
of
correct chain tension cannot be overstressed, Check the instruc-
tions given under General Instructions carefully. PARTICULAR CARE must be used
to properly break in a new Chain.
Correct chain tension is especially important on bar lengths of 32 inches and over,
to prevent the chain jumping the bar and causing damage to the equipment and
loss of time to the operator.
When the chain is correctly filed, properly lubricated, correctly jointed and proper
chain tension maintained, it will cut smoothly and be easier on the motor, bar, chain
and the operator.
Wrong-
Hooked
9

FIGURE .15
o
URE '6-A
FIGURE 16
..
-
-
FIGURE 17-A ..' FIGURE 17-8
FIGURE 17-C
FIGURE 17
10
KEEP YOUR CHAIN PROPERLY MAINTAINED
1. Maintain top angle basic 35 degrees.
2. File with straight even strokes.
3. Keep all cutters the same length.
4. Use
14"
full round file.
Filing with the tooth, to maintain the approximate 30 degree angle from the vertical
as illustrated in Figure 16-A hold the file approximately 5 degrees from horizontal,
with the handle low, (Figure 16).
1. Use correct
14"
full round file.
2. Keep 1/5 of file diameter above top edge of cutter. This produces the correct
undercut, see Figure 17-A.
3. File held too high 'results in blunt slow cutting edge, (Figure 17-B).
4. File held too low results in thin; quick dulling edge with hook, (Figure 17-C ).
Jointing
The chain is precision ground and has a standard joint of .025 inch. Experience has
shown that .025 inch is best for average conditions. However, to suit particular cut-
ting conditions the joint can be changed as long as the joint heights are kept uniform
(lfigure 17). If you change the joint use Gauge Part No. 470163, available at your
servicing dealer, and proceed with caution since the chain can be easily damaged by
over filing. In filing the runners, maintain the rounded corners. Improperly filed
runners will make some teeth cut more than others and the saw action will be rough
and tend to cut off line.

CORRECT JOINT AND CUTTING ACTION
Maintain recommended depth of 025 on the depth gauge
Check your joint reguarly. Make a practice of jointing your chain after every second
filing. This will result in a fast cutting, smooth operating chain with less effort
on your part. Visualize your cutters as a properly adjusted planer blade with ALL
depth gauges 'jointed evenly. (Figure 18).
EXCESSIVE JOINT
Lack of care in jointing may result in excessive or uneven joint. This will cause the
cutters to bite in, chain will grab, resulting in overloading of attachments, poor
performance and damage to both chain and bar will result. In this illustration we
have used a deep biting chisel to convey the action of excessive or uneven jointing
with its accompanying chain result. (Figure 19).
INSUFFICIENT JOINT
FAILING TO CHECK OR JOINT' REGULARLY. Cutters cannot bite into the wood,
chain will not cut efficiently or to capacity. This will require extra pressure on
your part resulting in excessive wear to the bottom of the cutters and links plus
rapid wear to the cutter bar rails. Again using a chisel we illustrate the chain
at work with insufficient joint. (Figure 20).
FIGURE 18
- --I
FIGURE 19
FIGURE 2
11

11
FIGURE 2
FIGURE 23 FIGURE 24
2
JOINTING
Two Methods in eneral Use
1. Using Jointing Gauge #470163 as illustrated is simple and 'accurate. First
preset the adjustable plate, using the feeler gauge supplied, .to the recommended
joint. Next place jointing tool on top of the chain with the depth gauge protuding
through the slot in the jointing plate and resting on the two cutters near the
centre of the bar. Using a flat file, file the depth gaJug to the level of the
jointing tool plate. WARNING: Always work near the centre of the bar and
move the chain each time, NOT the tool. This is necessary due to the contour
of all cutter bars. To operate your jointing tool at various positions could give
an uneven joint and a rough cutting chain. (Figure 21).
2. If the above mentioned Jointing Tool is not available place a straight edge, long
enough to cover at least six cutters, on top of the chain. Next check the existing
joint with a standard .025 feeler gauge. If you cannot insert the feeler give one
stroke of a flat file and recheck. When correctly jointed
Y'OU
should just feel
the drag between the straight edge and the top of the depth gauge. Repeat this
step for each depth gauge throughout the entire chain. (Figure 22). This
method of jointing chains is much slower 'and less accurate than with a proper
jointing tool.
3. Figures 23 and 24 illustrate two types of depth gauges used in standard chains.
E'ither method of jointing may be carried out on chains of these types. We
recommend that after each jointing that the front of the depth gauge be rounded
off to maintain original contour.

BAR AND CHAIN SERVICING
Tool No 426235
1. This illustration recommends the use of the die cut corner, sheared at 35° for
the maintaining of correct top angle on all cutters. This important feature on.
chain filing is outlined in all chain instruction pieces and the Operator s Manual
(Figure 25) .
2. Front end of the cutter bar tool is marked to indicate the minimum safety depth
of the bar groove to avoid the chain drive lugs riding on the bottom of the
groove causing extensive chain and bar damage. (Figure 26).
3. By using either of the sharp corners of this tool the bar groove can be cleaned
regularly. The removal of the accumulated sawdust, old oil and chain filings will
overcome the common fault of a chain riding up in the groove resulting in both
chain weave and breakage. (Figure 27).
4. To carry out minor repairs such as a pinched bar, enter one corner of the tool
in the groove near the pinched section, then tap the tool with a light hammer
until the entire length of the gauge enters into the groove. While in this position
lightly tap along the bar rail which will straighten out the pinch and give chain
clearance.
A further use for the side of this tool is to close up the rails to correct groove
width, as illustrated, for proper chain performance. This overcomes chain weave
and rapid deterioration of both the bar and chain. (Figure 28).
3

CHAIN DIAGNOSIS
TROUBLE
,I
Chain stretched beyond adjustment.
il
:11
Chain breakage.
,j
Chain stiff. Hard to tension.
I
Chain stalls in cut and/or scored
drum.
Chain cuts rough or digs in.
Chain jumps bar.
Chain cuts angle.
Worn drive sprockets.
Excessive wear drive links and/or
side straps.
PROBABLE CAUSE:
Dull cutters.
Lack of lubrication.
Excessive pressure by operator. Exces-
sive joint. Lack of lubrication. Dull
cutters.
Lack of lubrication.
Poor maintenance.
Clutch slipping. Excessive pressure [by
operator. Clutch springs not releasing.
Cutter angles incorrectly filed. Too
much or uneven joint.
Incorrect chain tension. Damaged cut-
ter bar. Damaged drive links. Worn
or damaged sprocket.
Cutter angles not the same on both
sides. Uneven joint. Cutter bar rails
uneven.
Incorrect chain tension. Lack of lubri-
cation. Dull cutters.
Lack of lubrication. Excessive tension.
Dull chain. Worn sprocket.
RIDMEDY
Remove a side and drive link. Increase
Iubrication.
Replace damaged parts. Check balance
of oil. Increase lubrication. Rejoint
chain. File chain.
Clean chain in solvent. Oil bath over-
night. Check oil pump and vent holes.
Check lining for wear. Check springs
for tension. Apply less pressure cor-
rectly filed chain will self-feed.
Check your filing instructions. Refile
to correct angles. Check joint rejoint
your chain.
Correct chain tension. Check bar for
damage repair or replace. Check drive
links for damage. Replace links or entire
chain.
Refile cutters to same angle. Check rails
if worn have bar serviced or replace.
Rejoint. Increase lubrication.
Replace sprocket: Correct chain tension.
Increase lubrication. File cutters and
joint chain.
Increase lubrication. Check oil pump.
Extensive damage can be occasioned in
a few hours. Check tension. File chain.
Check sprocket
4

C3F-260 And C3FH-260 Type Chain
ALWAYS USE GENUINE PIONEER BARS AiND CHAINS
There are four types of chain available for your chain saw.
1. General Purpose (C3F-260) - Recommended for use where
the length of the cutter bar is greater than the diameter of
the timber being cut.
2. General Purpose Heavy Duty (C3FH-260).
3. Blind or End Cutting (C3G-260)-Recommended for use on
larger timber where the diameter of the log is greater than
the length of the cutter bar.
4. Blind or End Cutting Heavy Duty (C3GH-260).
Part No.
Ref. C3F- C3FH
No. 260 260 Description
1425250 425294 Right Cutter
1 470295 470304 Right Cutter with 2 Rivets, Pre-Set
2 425284 425285 Side Link with Jointer, LH
3425246 425286 Side Link
3 470294 470303 Side Link kith 2 Rivets, Pre-Set
4 425251 425296 Left Cutter
5425921 425283 Side Link with Jointer, RH
5470296 470297 Side Link with Jointer, 2 Rivets,
Pre-Set, RH
6425248 425248 Center Link
7425345 425345 Rivet,
470054 470298 Chain Repair Kit
C3G-260 And C3GH-260 Type Chain
Part No.
Ref. C3G- C3GH-
No. 260 260 Description
1425250 425294 Right Outter
1470295 470304 Right Cutter with 2 Rivets, Pre-Set
3425246 425286 Side Link
3470294 470303 Side Link with 2 Rivets, Pre-Set
4425251 425296 Left Cutter
6425248 425248 Center Link
7 425345 425345 Rivet
8425347 425347 Center Link with Jointer, RH
9425348 425348 Center Link with Jointer, LH
470300 470301 Chain Repair Kit
CUTTER BARS TOOLS
Part No. Length Tool No. Description
470060 *16 425733 Spark Plug Wrench
470061 *20 425580 Strut Wrench
470062 *24 425592
14
Full Round File
470063 *28 470163t Jointing Gauge
470064 *32 426235 Bar Tool
*Cutting chains of comparable length are available from your
dealer.
t Available from your dealer.
Can. Pat. 421,726; 468,826; 515,241; 515,019; U.S. Pat. 24,129; 2,508,784; 2,622,636; 2,632,484;
5

14---;H
13
16
6

CLUTCH PARTS LIST
-
Item Ref. Qty.
No. No. Description Req'd.
1 47 442
Strut Assembly
1
(Includes Parts Marked *)
2425 2
Clutch Cover
1
3425 91
**Sprocket Bearing
1
447 34
Sprocket Assembly
1
.... ..---
(Includes Parts Marked $*)
5
425 15
Inside Sprocket Washer
1
6425 61
Clutch Driver Key
1
747 667
Clutch Shoe Assembly
3
8425 12
Clutch Driver Spring
3
9425 19
Clutch Driver Pin
3
1 425 18
Clutch Driver
1
11 2 2139
Clutch Driver Clip
3
12 425 92
Clutch Driver Nut (Flexloc)
1
13 2 219
*Chain Adjusting Screw
1
14 425672
*Chain Adjusting Pin
1
15 425116
Strut Washer
2
16 425 31
Strut Nut
2
OILER ASSEMBLIES PARTS LIST
Item Ref. Qty.
No. No. Description Req'd.
47 43
Oiler Body Complete
(Includes Parts Marked *)
1 3 2948
*Oiler Body Screw
4
2 47 193
*Oiler Pick-Up Assembly
1
34262
*Oiler Inlet Tube
1
4426221
*Oil Ball Valve Spring
1
5426227
*Oiler Ball
1
642622
*Oiler Intake Connector
1
7426199
Oiler Body Gasket
1
8425 93
*Gland Nut Gasket
1
47 427
*Pump Plunger Assembly
1
(Includes Parts Marked **)
9425114
**Pump Piston Clip
1
1 426197
**Pump Piston
1
11 425 95
**Pump Piston Gland
1
( 0 Ring)
12 3 6522
**Washer
1
13 425 21
**Gland Washer
2
14 426196
**Plunger Rod
1
15 3 4634
**Cotter Pin
1
16 425 85
**Gland Nut
1
17 425 28
** 0 Ring
1
18 426198
**Pump Spring
1
19 47 36
*Oiler Filler Cap
1
2 425 74
*Oiler Filler Cap Gasket
1
21 426119
*Oiler Body
1
7

I
I
11
18
Table of contents
Other Pioneer Chainsaw manuals