Pioneer PDK-TS14 User manual

2
En
Thank you for buying Pioneer’s product.
Please read through the Operating Instructions to learn
how to operate your model safely and properly.
Please be advised to keep the Operating Instructions in
your place for future reference.
Contents
Cautions ................................................................... 2
Checking the Standard Accessories ...................... 3
Assembling the Stand ............................................ 3
Attaching the Plasma Display ................................ 4
Installing the Product on a Rack etc...................... 4
Preventing Equipment from Falling Over ............. 5
Specifications .......................................................... 6
Dimensions Diagram .............................................. 6
Installation
¶Consult your dealer if you encounter any difficulties
with this installation.
¶Pioneer is not liable for any damage resulting from
improper installation, improper use, modification, or
natural disasters.
Cautions
This product is a table top stand exclusively designed for
Plasma Displays (PDP-436RXE / PDP-436SXE) from
Pioneer. Use with other model is capable of resulting in
instability causing possible injury. For further information,
please contact the store where you purchased your display.
Do not install or modify the product other than specified.
Do not use this stand for a Plasma Display other than those
designated and do not modify it or use it for other
purposes.
Improper installation is extremely dangerous because it
may result in it falling over or other accident.
Installation Location
• Select a location that is strong enough to support the
weight of the stand and the displays.
• Make sure to place it in a level and stable location.
• Do not install it outdoors, at a hot spring, or near a beach.
• Do not install the stand where it may be subjected to
vibration or shock.
Assembling and Installation
•Assemble the stand in accordance with the assembly
instructions and securely attach all screws at the
designated locations.
There have been cases where unforeseen accidents
such as the equipment breaking or falling over
occurred after the installation of the display because
the stand was not installed as instructed.
•The display must always be installed by two or more
people to assure it is installed safely.
•Before installation, turn off the power for the display
and peripheral devices then remove the power cord
plug from the power outlet.
Prevent accidents caused by the product falling over by
taking reliable measures to prevent it from falling over (see
Page 5).
CAUTION
This symbol refers to a hazard or unsafe practice which
can result in personal injury or property damage.
IMPORTANT NOTICE
Record the model number and serial number of this
equipment below.
Model No. PDK-TS14 Serial No.
Keep these numbers for future use.

3
En
English
Checking the Standard Accessories
Check to make sure that you have all the standard accessories before assembly and installation.
Base cover x 1 Stand pipes
(left and right, interchangeable) x 2
Hexagonal wrench x 1
(Diagonal size: 6 mm)
Screws 1(4 x 10 mm) x 4
Installation bolts 3
(M8 x 30 mm: silver) x 2
Installation bolts 2
(M8 x 60 mm: silver) x 2
Operating instructions
(this document) x 1
Assembling the Stand
1Turn the base cover over so the
underside is facing up.
2Insert the stand pipes into the base
cover.
3Tighten the screws to stabilize the
stand pipes.
Base cover
Screws 1
(4 x 10 mm)
Stand pipe
Screws 1
(4 x 10 mm)
Stand pipe
Assembly Procedure
Operating instructions
Mode d’emploi
Bedienungsanleitung
Istruzioni per l’uso
Gebruiksaanwijzing
Manual de instrucciones
Table top stand
Pied de table
Tischständer
Supporto di tavolo
Tafelbladstaander
Soporte de mesa
PDK-TS14

4
En
Installation bolts 3
(M8 x 30 mm: silver)
Attaching the Plasma Display
The weight of a 43 inch model is about 32 kg (70.4
lbs), they have no depth, and are unstable.
Therefore, at least two people must assemble and
install them.
Note
Be sure to install it on a flat stable location.
Insert the screws in the holes vertically and do not tighten
them with more force than necessary.
Attachment Method
1Attaching the Plasma Display to the stand.
Fit the stand’s support columns to the bottom of the
Plasma Display as indicated by the arrows, then slowly
insert them vertically. Be extremely careful not to insert the
support columns of the stand into any part of the Plasma
Display other than the stand insertion slots. Note that doing
so might damage the Plasma Display panel or its ports or
result in the warping of the stand.
Line up the column
supports with the bottom
of the Plasma Display as
indicated in the accompa-
nying diagram.
3Securing the Plasma Display with
Installation bolts 3.
Secure them using the enclosed hexagonal wrench.
2Securing the Plasma Display with
Installation bolts 2.
Attach the Plasma Display at the points indicated by the
arrows using the enclosed hexagonal wrench.
Installation bolts 2
(M8 x 60 mm: silver)
Caution
Installing the Product on a Rack etc.
When installing on a rack etc., hold the Plasma
Display.
Caution

5
En
English
12 to 15 mm
(1/2 to 5/8 inch)
M8
Using a wall for stabilization
1Attaching falling prevention bolts (hooks)
to the Plasma Display.
2Using strong cords or chains to stabilize it
appropriately and firmly to a wall, pillar, or
other sturdy element.
Perform this work in the same way on the left and right
sides.
Note
Use hooks, ropes, chains, and
fittings that are available on the
market.
Recommended hook:
Nominal diameter M8
Length 12 to 15 mm (1/2 to 5/8 inch)
1Hook
2Cord or chain
Fitting
Stabilizing on table or floor
Stabilize the equipment as shown in the diagram using
screws that are available on the market.
Note
To stabilize the equipment on a
table or on the floor, use
screws that have a nominal
diameter of 6 mm (1/4 inch)
and that are at least 20 mm
(13/16 inch) long.
After installing the stand, be sure to take special care to ensure that the equipment will not fall over.
Position of table/floor screws
When stabilizing the stand to a table or the floor, use
nominal diameter 6 mm (1/4 inch) with a length above 20
mm (13/16 inch).
Unit: mm (inch)
Preventing Equipment from Falling Over
•A table or an area of the floor with adequate strength
should always be used to support the Plasma Display.
Failure to do so could result in personal injury and
physical damage.
•When installing the Plasma Display, please take the
necessary safety measures to prevent it from falling or
overturning in case of emergencies, such as
earthquakes, or of accidents.
•If you do not take these precautions, the Plasma
Display could fall down and cause injury.
•The screws, hooks, chains and other fittings that you
use to secure the Plasma Display to prevent it from
overturning will vary according to the composition and
thickness of the surface to which it will be attached.
•Select the appropriate screws, hooks, chains and other
fittings after first inspecting the surface carefully to
determine its thickness and composition and after
consulting a professional installer if necessary.
Min. 20 mm
(13/16 inch)
6 mm
(1/4 inch)
9 to 15 mm
(3/8 to 5/8 inch)
249 (9-13/16) 24 (1)
120
(4-23/32)
478
(18-13/16)
Side View
11 (13/32)
Caution

6
En
Specifications
External dimensions 559 (W) x 279 (H) x 273 (D) mm (22 (W) x 11 (H) x 10-3/4 (D) in.)
Weight 2.5 kg (5.5 lbs)
•The above specifications and exterior may be modified without prior notice to improve the product.
Dimensions Diagram
Unit: mm (inch)
559 (22)
1076 (42-3/8)
169.5
(6-11/16)
80
(3-3/16)
736 (28-15/16)
696 (27-3/8)
23 (15/16)
116
(4-9/16)
55 (2-1/8) 102.1 (4-1/32)
273 (10-3/4)
15 (19/32)
22.5 (7/8)
Published by Pioneer Corporation.
Copyright © 2005 Pioneer Corporation.
All rights reserved.

7
Fr
English
Français
Nous vous remercions d’avoir choisi un produit Pioneer.
Veuillez lire attentivement ce mode d’emploi pour savoir
comment utiliser votre support correctement et en toute
sécurité. Nous vous conseillons de conserver
soigneusement ce mode d’emploi à portée de main et
dans un endroit sûr afin de pouvoir vous y référer le cas
échéant.
Table des matières
Attention ........................................................................... 7
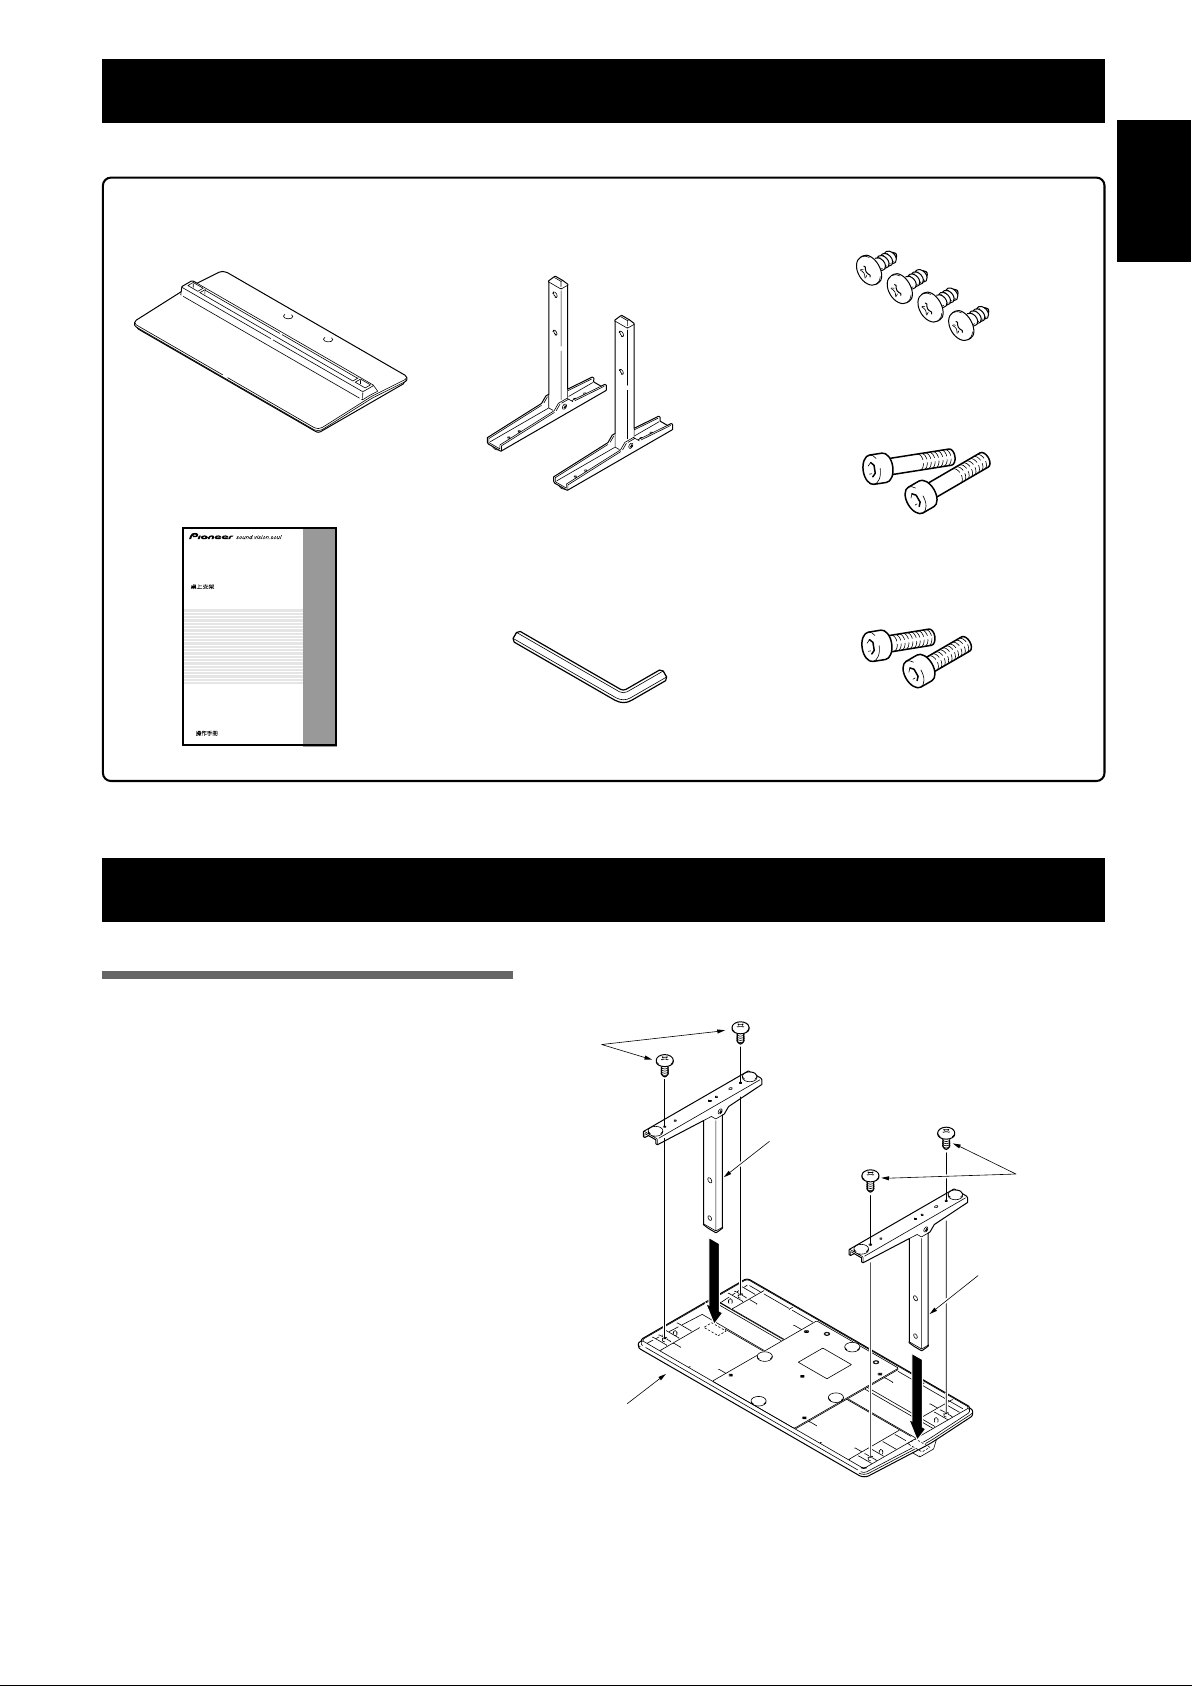
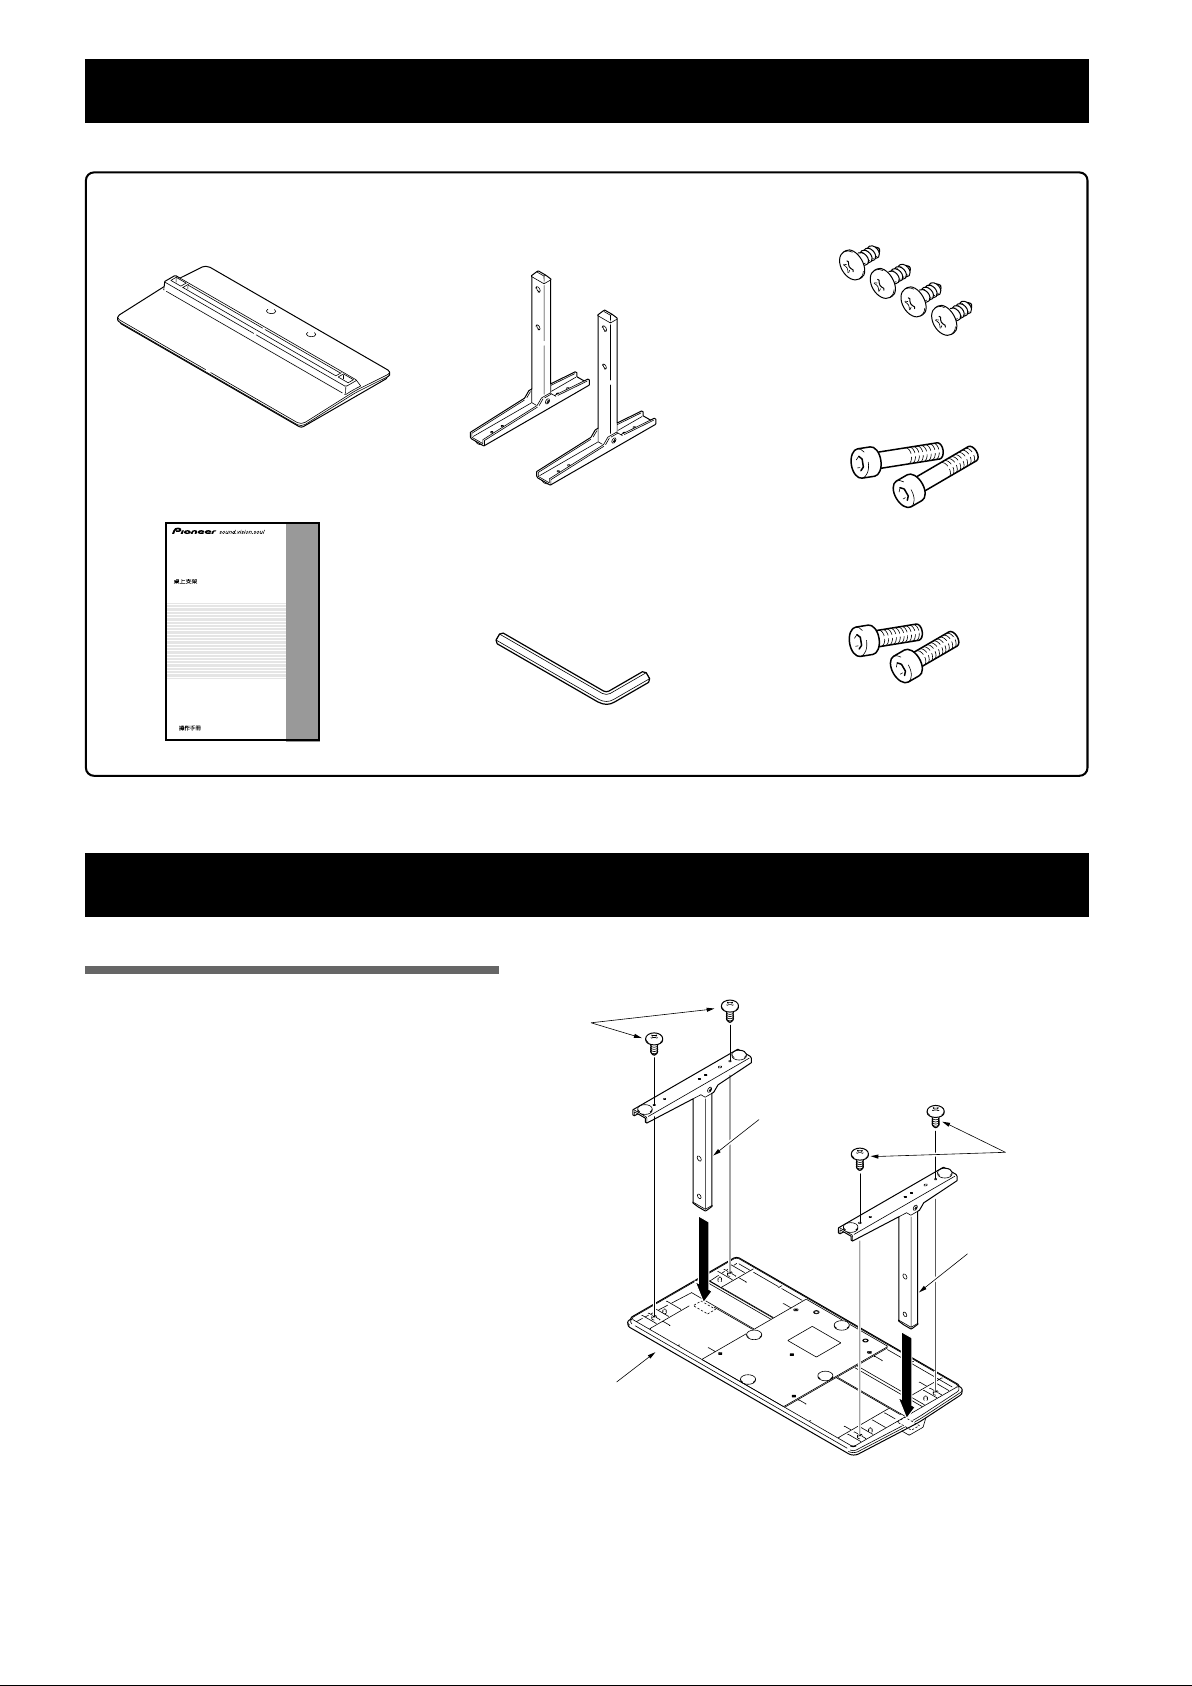
Vérification des pièces fournies...................................... 8
Assemblage du support .................................................. 8
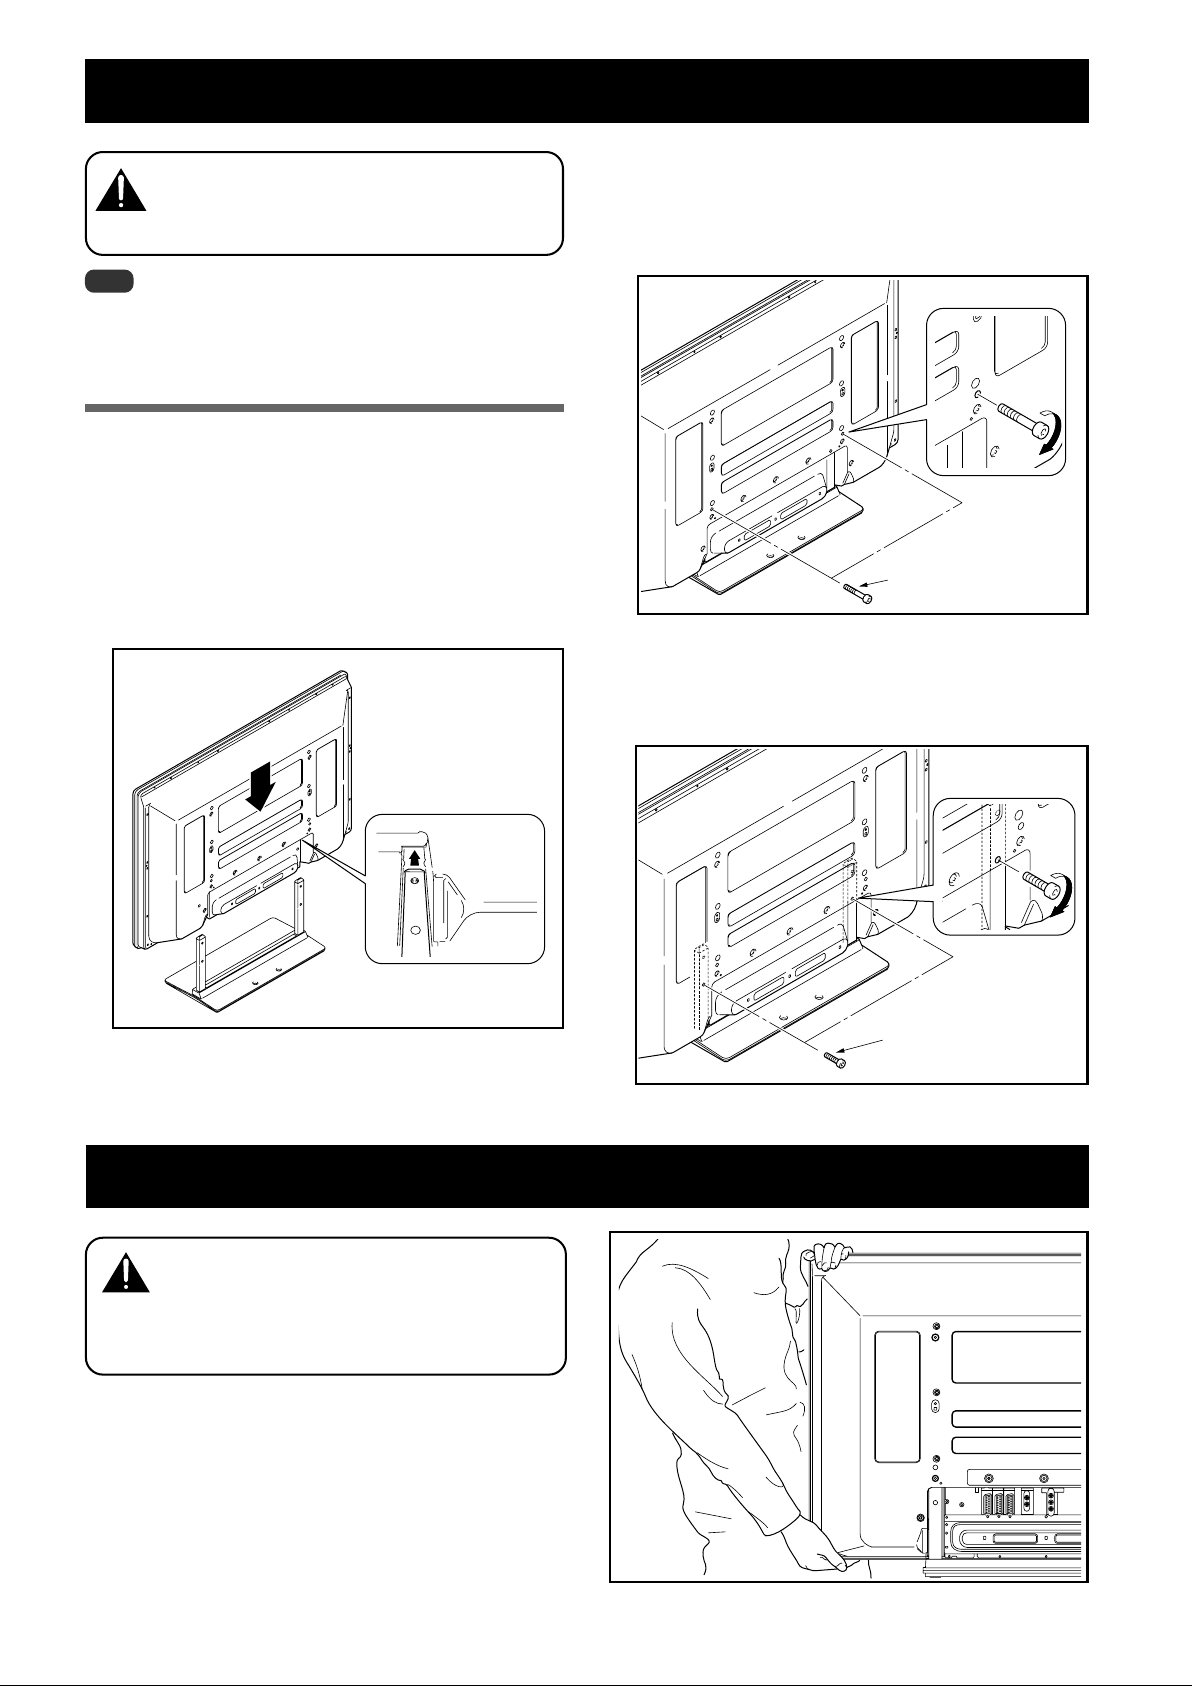
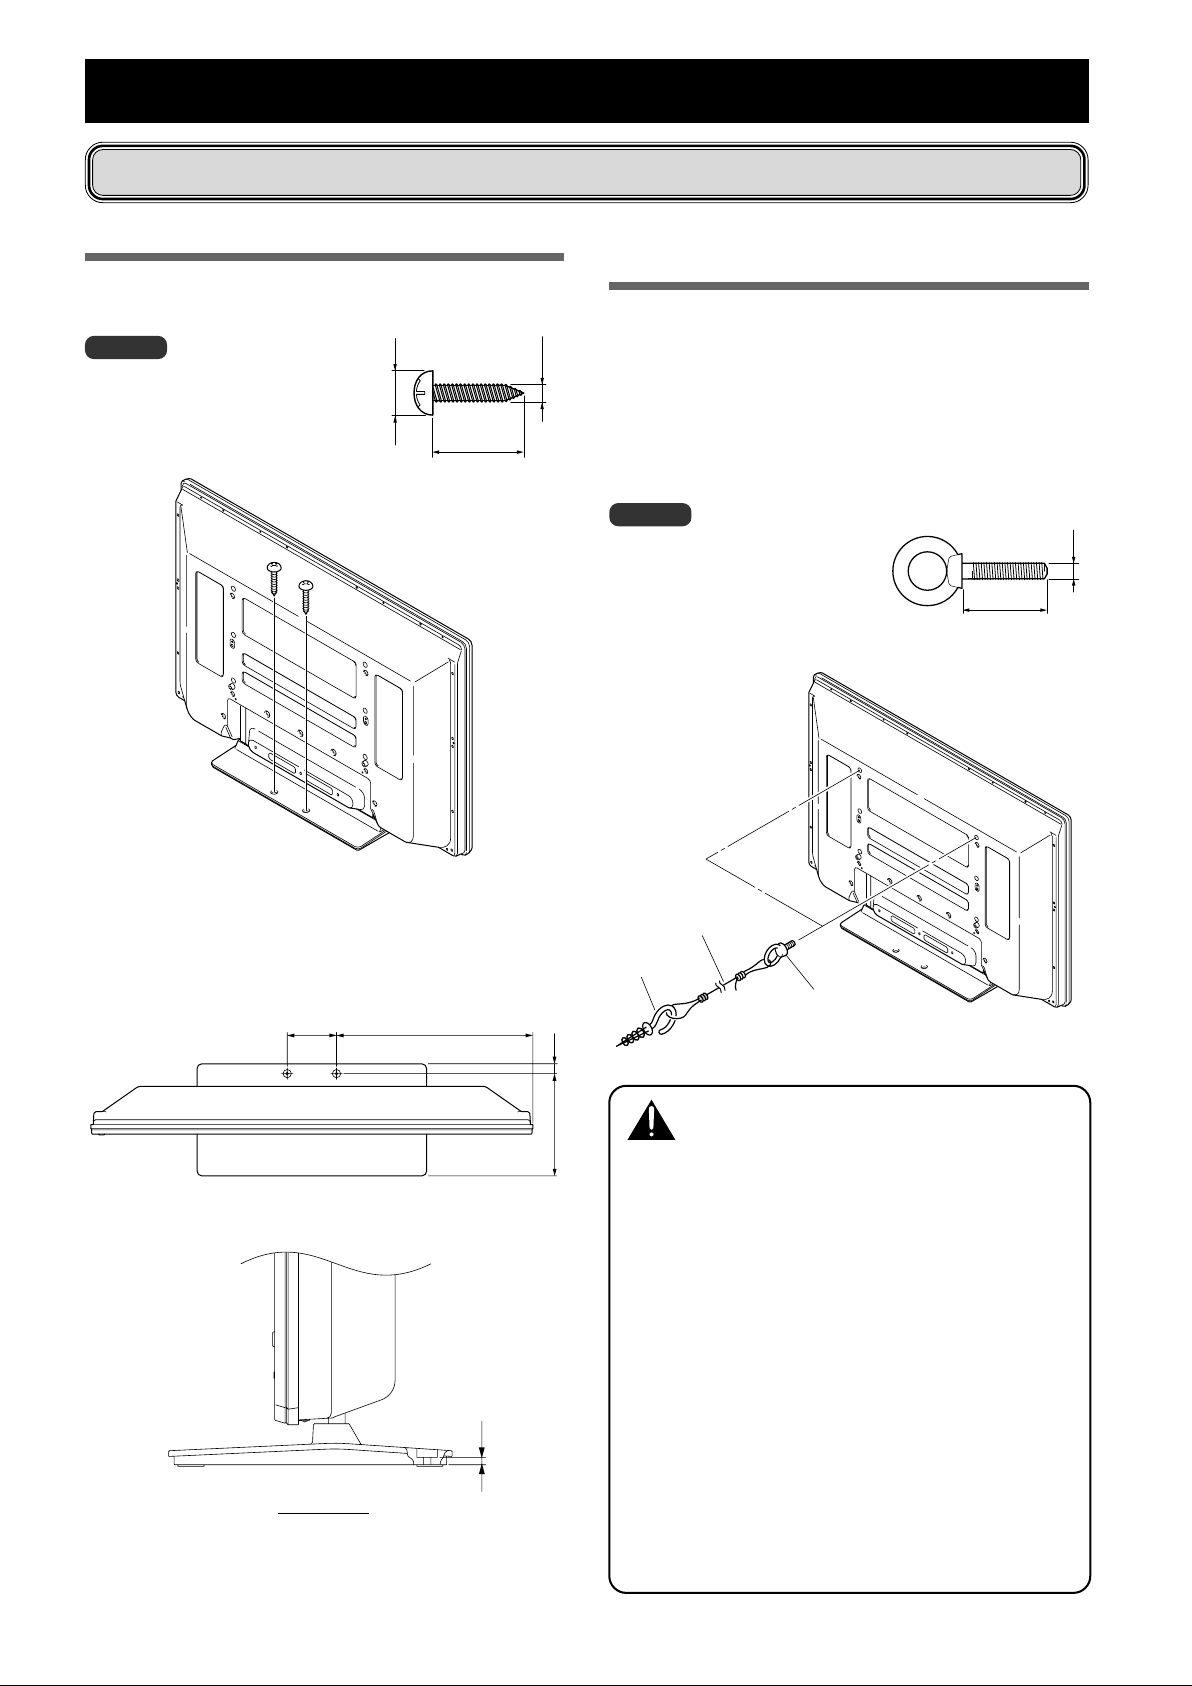
Installation et fixation de l’écran à plasma.................... 9
Installation du produit sur une étagère, etc. ................. 9
Prévenir toute chute de l’équipement ......................... 10
Caractéristiques techniques.......................................... 11
Schéma de dimensions ................................................. 11
Attention
Ce produit est un pied de table conçu exclusivement pour les
écrans à plasma (PDP-436RXE / PDP-436SXE) de marque Pioneer.
L’utilisation de ce produit avec un autre modèle peut être à
l’origine d’un manque de stabilité pouvant provoquer une
blessure. Pour de plus amples informations, veuillez contacter le
magasin où vous avez acheté votre écran.
Ne procédez en aucun cas à installer ou à modifier le produit
autrement qu’en suivant les indications fournies. En outre,
n’utilisez pas ce support pour un écran à plasma autre que celui
pour lequel il a été conçu et ne le modifiez pas ou ne l’utilisez pas
à des fins autres que celles pour lesquelles il a été conçu.
Une installation incorrecte est extrêmement dangereuse car elle
peut provoquer la chute du support ou tout autre accident.
Lieu d’installation
•
Sélectionnez un emplacement assez solide pour supporter le
poids du support et de l’écran.
•
Assurez-vous de placer le produit à un emplacement stable et
plat.
•
N’installez pas le support à l’extérieur, à proximité d’une source
thermale ou sur une plage.
•
N’installez pas le support à un endroit où il pourrait être soumis
à des chocs ou à des vibrations.
Montage et installation
•
Montez le support en suivant les instructions et vissez
solidement toutes les vis aux endroits prévus à cet effet.
Des accidents ont été constatés (casse, chute du matériel,
etc.) suite à l’installation de l’écran parce que le support
n’avait pas été installé conformément aux instructions.
•
Pour une bonne installation, l’écran doit toujours être
installé par au moins deux personnes.
•
Avant de procéder à l’installation, mettez l’écran ainsi que
les équipements périphériques hors tension en coupant
l’alimentation, puis retirez la prise du câble d’alimentation
de la prise murale.
Prévenez les accidents causés par la chute du produit
en prenant des mesures fiables visant à éviter toute chute
(voir Page 10).
Installation

En cas de difficultés, veuillez consulter votre revendeur.

Pioneer ne saurait être tenu responsable d’aucun dommage
résultant d’une installation ou d’une utilisation incorrecte de
ce produit, de sa modification ou encore de catastrophes
naturelles.
AVIS IMPORTANT
Veuillez prendre note du numéro du modèle et du numéro de
série de cet équipement ci-dessous.
N° du modèle. PDK-TS14 N° de série.
Conservez ces numéros pour pouvoir les utiliser
ultérieurement.
ATTENTION
Ce symbole indique un danger ou une pratique dangereuse
susceptible de provoquer des dommages corporels ou
matériels.

8
Fr
Vérification des pièces fournies
Veuillez vous assurer que vous possédez bien toutes les pièces nécessaires avant de procéder au montage et àl’installation du support.
Couverture de table x 1 unité
Colonnes de support
(gauche et droite, interchangeables) x 2 unités
Clé hexagonale x 1 unité
(Taille en diagonale : 6 mm)
Vis 1(4 x 10 mm) x 4 unités
Vis d’installation 3
(M8 x 30 mm : argentée) x 2 unités
Vis d’installation 2
(M8 x 60 mm : argentée) x 2 unités
Mode d’emploi
(ce document) x 1 exemplaire
Assemblage du support
1Tournez le pied de table de façon àce
que le dessous regarde vers le haut.
2Insérez les colonnes de support dans le
pied de table.
3Serrez les vis afin de stabiliser les
colonnes de support.
Vis 1
(4 x 10 mm)
Colonne de
support
Procédure de montage
Operating instructions
Mode d’emploi
Bedienungsanleitung
Istruzioni per l’uso
Gebruiksaanwijzing
Manual de instrucciones
Table top stand
Pied de table
Tischständer
Supporto di tavolo
Tafelbladstaander
Soporte de mesa
PDK-TS14
Colonne de
support
Couverture de table
Vis 1
(4 x 10 mm)

9
Fr
Français
Installation et fixation de l’écran àplasma
Le poids d’un écran àplasma 43 pouces est d’environ 32 kg.
Leur profondeur étant limitée, ils ne sont pas stables. Par
conséquent, ils doivent toujours être installés par deux
personnes àla fois.
Remarques
Montez toujours l’écran àplasma sur une surface plane et stable.
Introduisez les vis àla verticale et ne les serrez pas plus que
nécessaire.
Méthode de fixation
1Installation de l’écran àplasma sur le support.
Mettez les colonnes de soutien en place au bas de l’écran à
plasma comme indiquépar les flèches, puis insérez-les
lentement àla verticale. Veillez àne pas insérer les colonnes
ailleurs que dans les fentes prévues àcet effet. Cela risquerait
d’endommager l’écran, ses ports ou encore le support.
Alignez les colonnes du
support sur la partie inférieure
de l’écran comme indiquésur
le schéma ci-joint.
3Fixez solidement l’écran àplasma avec les vis
d’installation 3.
Vissez solidement celles-ci au moyen de la cléhexagonale
fournie avec le support.
2Fixez solidement l’écran àplasma avec les vis
d’installation 2.
Fixez l’écran àplasma aux endroits indiqués par les flèches à
l’aide de la vis hexagonale fournie.
Vis d’installation
2
(M8 x 60 mm : argentée)
Installation du produit sur une étagère, etc.
Lors de l’installation de l’appareil sur une étagère, etc.,
veuillez tenir l’écran àplasma.
Attention
Vis d’installation
3
(M8 x 30 mm : argentée)
Attention

10
Fr
Utilisation d’un mur pour stabiliser le
support
1Fixation des boulons empêchant la chute
(crochets) sur l’écran àplasma.
2Utilisation de câbles solides ou de chaînes pour
stabiliser solidement le dispositif sur un mur,
un pilier ou d’autres éléments stables.
Ces opérations doivent être effectuées de la même manière à
gauche et àdroite.
Remarque
Utilisez des crochets, des chaînes ou
d’autres dispositifs de fixation en
vente dans le commerce.
Crochet recommandé: Diamètre
nominal M8, longueur de 12 à15 mm.
1Crochet
2Câble ou chaîne
Attache
Stabilisation sur une table ou sur la base
Stabilisez le support comme indiquésur le schéma àl’aide de vis
vendues dans le commerce.
Remarque
Afin de stabiliser l’équipement sur une
table ou sur la base, utilisez des vis 6
mm d’au moins 20 mm de long.
Après avoir installéle support, veillez àprendre les précautions nécessaires pour qu’il ne tombe pas.
Position des vis table/base
Afin de stabiliser le matériel sur une table ou sur le sol, utilisez
des vis de 6 mm de diamètre nominal et d’au moins 20 mm de
long.
Unité: mm
Prévenir toute chute de l’équipement
•
Choisissez toujours une table ou une portion du sol avec une
force suffisante pour supporter l’écran plasma. Il en
résulterait autrement des blessures corporelles et des
dégâts physiques.
•
Lors de l’installation de l’écran plasma, veuillez prendre les
mesures de sécuriténécessaires pour l’empêcher de tomber
ou de basculer en cas de sinistres comme un tremblement
de terre ou un accident.
•
Le cas contraire, l’écran plasma pourrait tomber et provoquer
des dégâts.
•
Les vis, crochets, chaînes et autres raccords que vous
utilisez pour fixer en place l’écran plasma afin de l’empêcher
de basculer dépendront de la composition et de l’épaisseur
de la surface sur laquelle vous le fixez.
•
Choisissez les vis, crochets, chaînes et autres raccords
appropriés après avoir tout d’abord soigneusement inspecter
la surface pour déterminer sa composition et son épaisseur
et après avoir pris contact avec un installateur professionnel
si besoin est.
249 24
120 478
Vue latérale
11
Min. 20 mm
6 mm
9 à15 mm
12 à15 mm
M8
Attention

11
Fr
Français
Caractéristiques techniques
Dimensions extérieures 559 (largeur) x 279 (hauteur) x 273 (profondeur) mm
Poids 2,5 kg
•
Les caractéristiques techniques indiquées ci-dessus ainsi que les dimensions extérieures peuvent êtres modifiées sans préavis en vue
d’améliorer le produit.
Schéma de dimensions
Unité: mm
559
1076
169,5 80
736
696
23
116
55 102,1
273
15
22,5
Publication de Pioneer Corporation.
© 2005 Pioneer Corporation.
Tous droits de reproduction et de traduction réservés.

12
Ge
Wir danken Ihnen, dass Sie sich für den Kauf dieses Produkts der
Firma Pioneer entschieden haben.
Bitte lesen Sie die Bedienungsanleitung aufmerksam, um sich
damit vertraut zu machen, Ihr Modell richtig und sicher zu
handhaben.
Wir empfehlen Ihnen, die Bedienungsanleitung gut
aufzubewahren, um sie künftig im Bedarfsfalle jederzeit zu Rate
ziehen zu können.
Inhalt
Sicherheitshinweise....................................................... 12
Überprüfung des Standardzubehörs auf
Vollständigkeit ............................................................... 13
Montage des Tischständers .......................................... 13
Montieren des Plasmadisplays ..................................... 14
Installation des Plasmadisplays an einem Gestell usw. .... 14
Verhinderung eines möglichen Umfallens der Einheit ..... 15
Technische Daten ........................................................... 16
Darstellung der Abmessungen ..................................... 16
Sicherheitshinweise
Dieses Produkt ist ein Tischständer, der ausschließlich für
Plasmadisplays (PDP-436RXE / PDP-436SXE) der Firma Pioneer
vorgesehen ist. Die Verwendung des Tischständers für ein
anderes Modell führt möglicherweise zu einer Instabilität und kann
demzufolge Unfälle mit Verletzungen verursachen. Hinsichtlich
weiterer Informationen wenden Sie sich bitte an diejenige
Handelseinrichtung, bei der Sie das Plasmadisplay gekauft haben.
Installieren Sie das Produkt nicht anders als angegeben und
nehmen Sie keine Veränderungen am Produkt vor. Verwenden Sie
den Tischständer nicht für ein anderes Plasmadisplay als für die
Modelle, für die er vorgesehen ist, nehmen Sie keine
Veränderungen daran vor und verwenden Sie ihn nicht für andere
Zwecke.
Eine falsche Installation ist sehr gefährlich, da sie zum Umfallen
der Einheit oder zu einem anderen Unfall führen kann.
Installationsort
•
Wählen Sie für die Installation einen Platz, der stabil genug ist,
das Gewicht des Tischständers und des Displays zu tragen.
•
Sorgen Sie dafür, dass der Ständer und das betreffende Display
auf einem ebenen und stabilen Platz installiert werden.
•
Installieren Sie beides nicht im Freien, in der Nähe einer heißen
Quelle oder in Strandnähe.
•
Installieren Sie die Einheit nicht an einem Platz, an dem sie
möglicherweise Vibrationen oder Stößen ausgesetzt ist.
Montage und Installation
•
Montieren Sie den Ständer gemäß den
Montageanweisungen und befestigen Sie sorgfältig alle
Schrauben an den dafür vorgesehenen Positionen.
Es hat Fälle gegeben, dass es zu unvorhergesehenen
Unfällen wie beispielsweise einer Havarie oder einem
Umfallen der Einheit gekommen ist, weil der Ständer nicht
gemäß den gegebenen Anweisungen installiert wurde.
•
Das Display muss immer von mindestens zwei Personen
installiert werden, um zu sicherzugehen, dass es sicher
installiert wird.
•
Schalten Sie das Display und die peripheren Geräte vor der
Installation aus und ziehen Sie anschließend den Stecker
der Netzschnur aus der Steckdose.
Verhindern Sie Unfälle, die durch das Umfallen der Einheit
verursacht werden, indem Sie geeignete Maßnahmen treffen, die
dies ausschließen (siehe Seite 15).
Installation
¶Sollten Sie bei der Installation irgendwelche Schwierigkeiten
haben, dann wenden Sie sich bitte an Ihren Händler.
¶Für Schäden aufgrund von inkorrekter Installation,
falscher Verwendung, vorgenommenen
Veränderungen oder Naturkatastrophen übernimmt
Pioneer keine Verantwortung.
Wichtiger Hinweis!
Bitte notieren Sie sich unten die Nummer des Modells und die
Serien-Nummer des Geräts.
Modell: PDK-TS14 Serien-Nummer:
Bewahren Sie diese Angaben für den künftigen Gebrauch.
Vorsicht!
Dieses Symbol kennzeichnet eine gefährliche oder
unsichere Handlungsweise, die zu einem Unfall mit
Verletzung oder zu Sachschäden führen kann.

13
Ge
Deutsch
Überprüfung des Standardzubehörs auf Vollständigkeit
Überprüfen Sie vor Beginn der Montage und Installation, ob alle Teile des Standardzubehörs vorhanden sind.
Basisabdeckung x 1
Ständerelemente
(links und rechts, austauschbar) x 2
Innensechskantschlüssel
(Diagonalgröße: 6 mm) x 1
Schrauben 1(4 x 10 mm) x 4
Installationsschrauben 3
(M8 x 30 mm, silberfarben) x 2
Installationsschrauben 2
(M8 x 60 mm, silberfarben) x 2
Bedienungsanleitung
(das vorliegende Dokument) x 1
Montage des Tischständers
1Drehen Sie die Basisabdeckung um,
so dass die Unterseite nach oben
zeigt.
2Führen Sie Ständerelemente in die
Basisabdeckung ein.
3Ziehen Sie die Schrauben fest an, um
die Ständerelemente zu stabilisieren.
Montage
Operating instructions
Mode d’emploi
Bedienungsanleitung
Istruzioni per l’uso
Gebruiksaanwijzing
Manual de instrucciones
Table top stand
Pied de table
Tischständer
Supporto di tavolo
Tafelbladstaander
Soporte de mesa
PDK-TS14
Basisabdeckung
Schrauben 1
(4 x 10 mm)
Ständerelement
Ständerelement
Schrauben 1
(4 x 10 mm)

14
Ge
Installationsschrauben 3
(M8 x 30 mm, silberfarben)
Montieren des Plasmadisplays
Ein 43-Zoll-Modell wiegt etwa 32 kg. Die Modelle weise
keine Tiefe auf und sind daher instabil.
Daher müssen beim Zusammenbau und bei der
Installation mindestens zwei Personen beteiligt sein.
Hinweise
Vergewissern Sie sich, dass Sie das Plasmadisplay an einem
ebenen und stabilen Ort installieren.
Führen Sie die Schrauben vertikal in die Schraublöcher ein und
ziehen Sie sie nicht mit mehr Kraft als erforderlich fest.
Befestigungsmethode
1Befestigen des Plasmadisplays am Ständer.
Passen Sie die Stützsäulen des Tischständers auf der
Unterseite des Plasmadisplays an, wie es in der Abbildung
durch Pfeile dargestellt ist, und führen Sie dann den
Plasmaständer langsam vertikal ein. Achten Sie dabei
besonders darauf, die Stützsäulen des Tischständers nicht
anders einzuführen als in die dafür vorgesehenen Öffnungen.
Wenn Sie dies nicht beachten, besteht die Gefahr, dass Sie
das Bedienfels des Plasmadisplays beschädigen oder seine
Anschlussbuchsen oder dass sich der Ständer verzieht.
Bringen Sie die Stützsäulen
in Übereinstimmung mit
dem unteren Teil des
Plasamdisplays, wie es in
der zugehörigen Abbildung
dargestellt ist.
3Sichern des Plasmadisplays mit den
Installationsschrauben 3.
Ziehen Sie die Befestigungsschrauben unter Verwendung des
mitgelieferten Sechskant-Stiftschlüssels fest.
2Sichern des Plasmadisplays mit den
Installationsschrauben 2.
Montieren Sie das Plasmadisplay an den in der Abbildung
durch Pfeil angezeigten Punkten unter Verwendung des
mitgelieferten Innensechskant-Stiftschlüssels.
Installationsschrauben 2
(M8 x 60 mm, silberfarben)
Vorsicht!
Installation des Plasmadisplays an einem Gestell usw.
Halten Sie die Einheit bei der Installation an einem Gestell
usw. am Plasmasdisplay.
Vorsicht!

15
Ge
Deutsch
Verwendung einer Wand zur Stabilisierung
1Montage von Schrauben (Haken) an das
Plasmadisplay zur Verhinderung des Umfallens.
2Verwendung starker Schnuren oder Ketten zur
angemessenen und sicheren Stabilsierung der
Einheit an einer Wand, einer Säule oder einem
anderen stabilen Bauelement.
Führen Sie diese Arbeiten in der gleichen Weise auf der linken
und der rechten Seite aus.
Hinweise
Verwenden Sie handelsübliche
Halteschrauben, Schnuren, Ketten
und Haken.
Empfohlene Halteschrauben:
Nenndurchmesser M8
Länge 12 –15 mm
1Halteschraube
2Schnur oder Kette
Haken
Stabilisierung auf dem Tisch oder dem Boden
Stabilisieren Sie die Einheit unter Verwendung handelsüblicher
Schrauben, wie im Bild dargestellt.
Hinweise
Verwenden Sie zur Stabilisierung der
Einheit auf einem Tisch oder dem
Boden nur Schrauben, die einen
Nenndurchmesser von 6 mm haben
und die mindestens 20 mm lang sind.
Verwenden Sie bei der Installation des Tischständers besonderes Augenmerk darauf, zu verhindern, dass die
Einheit umfallen kann.
Position der Schrauben auf dem Tisch/Boden
Verwenden Sie zur Stabilisierung des Ständers auf einem Tisch
oder dem Boden Schrauben mit einem Nenndurchmesser von
6 mm und einer Länge von mindestens 20 mm.
Einheit: mm
Verhinderung eines möglichen Umfallens der Einheit
•
Für das Plasmadisplay muss ein ausreichend stabiler Tisch
oder eine entsprechende Bodenfläche gewählt werden.
Geschieht das nicht, könnte es zu einem Unfall mit
Verletzungen oder mit Sachschaden kommen.
•
Bitte treffen Sie die nötigen Vorsichtsmaßnahmen zur
Verhinderung des Fallens oder Umkippens im Falle von
Gefahren wie beispielsweise Erdbeben oder von Unfällen.
•
Wenn Sie diese Vorsichtsmaßnahmen nicht treffen, könnte
das Plasmadisplay herunterfallen oder umfallen und so zu
einem Unfall mit Verletzungen führen.
•
Die Schrauben, Halteschrauben, Ketten und Haken, die Sie
zur Sicherung des Plasmadisplays verwenden, um es vor
dem Umfallen zu bewahren, können je nach dem Aufbau
und der Dicke der Fläche, auf der es montiert wird, variieren.
•
Wählen Sie die jeweils geeigneten Schrauben,
Halteschrauben, Ketten und Haken, nachdem Sie sich
zunächst die vorgesehene Fläche genau angesehen haben,
um ihre Dicke und ihren Aufbau zu beurteilen, und nachdem
Sie, wenn erforderlich, einen Fachmann konsultiert haben.
249 24
120 478
Seitenansicht
11
Vorsicht!
Mind. 20 mm
6 mm
9 –15 mm
12 –15 mm
M8

16
Ge
Technische Daten
Außenabmessungen 559 (Breite) x 279 (Höhe) x 273 (Tiefe) mm
Gewicht 2,5 kg
•
Die obigen technischen Daten und das Äußere können, um das Produkt zu verbessern, ohne vorherige Ankündigung verändert werden.
Darstellung der Abmessungen
Einheit: mm
559
1076
169,5 80
736
696
23
116
55 102,1
273
15
22,5
Veröffentlicht von Pioneer Corporation.
Urheberrechtlich geschützt © 2005 Pioneer
Corporation. Alle Rechte vorbehalten.

17
It
Deutsch
Italiano
Grazie per aver acquistato un prodotto Pioneer.
Per imparare ad usare il vostro modello in modo sicuro e
corretto, leggete accuratamente le istruzioni per l’uso.
Vi consigliamo di tenere le istruzioni per l’uso a portata di
mano per future consultazioni.
Indice
Attenzione ...................................................................... 17
Controllo degli accessori standard ............................... 18
Montaggio del supporto................................................ 18
Fissaggio del Display a Plasma ..................................... 19
Montaggio del prodotto su uno scaffale, ecc. ............. 19
Prevenire la caduta dell’apparecchio ........................... 20
Dati tecnici ...................................................................... 21
Grafico delle misure ....................................................... 21
Attenzione
Questo articolo è un supporto di tavolo, progettato
esclusivamente per i display a plasma Pioneer (PDP-436RXE /
PDP-436SXE).
L’uso con altri modelli può causare instabilità e provocare danni.
Per ulteriori informazioni, contattate il negozio dove avete
acquistato il Vostro display.
Non installate o modificate il prodotto diversamente da come
illustrato. Non usate un supporto per display a plasma diverso da
quello progettato, e non modificatelo per altri scopi.
Un’installazione non corretta è estremamente pericolosa perché
potrebbere causare la caduta dell’apparecchio o altri incidenti.
Posizione dell’installazione
•
Scegliete una posizione abbastanza resistente da sostenere i
pesi del supporto e del display.
•
Assicuratevi di posizionarlo in piano e in modo stabile.
•
Non installatelo all’aperto, vicino a fonti di calore o a una
spiaggia.
•
Non installate il supporto dove potrebbe essere esposto a
vibrazioni o urti.
Montaggio e installazione
•
Montate il supporto secondo le istruzioni di montaggio e
fissate bene tutte le viti nelle posizioni predisposte.
Dopo l’installazione del display, si possono verificare
incidenti imprevisti, come la rottura o la caduta
dell’apparecchio, se il supporto non è stato installato
secondo le istruzioni.
•
Per garantire un’installazione sicura, il display deve essere
montato sempre da due o più persone.
•
Prima dell’installazione, spegnete il display e le periferiche,
poi disinserite la spina dalla presa di alimentazione.
Per evitare incidenti causati dalla caduta del prodotto, prendete le
necessarie precauzioni per impedire la sua caduta (vedi pagina 20).
Installazione
¶Se incontrate delle difficoltà durante l’installazione,
rivolgetevi al vostro fornitore.
¶Pioneer non è responsabile per qualsiasi danno
causato da un’installazione non corretta, da un uso
improprio, da modifiche o da calamità naturali.
AVVISO IMPORTANTE
Registrate il numero di modello e di serie dell’apparecchio
qui sotto.
Modello n. PDK-TS14 Serie n.
Conservate questo numero per usarlo in seguito.
ATTENZIONE
Questo simbolo si riferisce ad una procedura azzardata
o pericolosa che può recare danni alle persone o alle
cose.

18
It
Controllo degli accessori standard
Prima del montaggio e dell’installazione controllate che tutti gli accessori standard siano stati forniti.
Coperchio della base x 1
Gambe del supporto x 2
(sinistra e destra, intercambiabili)
Chiave inglese x 1
(dimensione diagonale 6 mm)
Viti 1x 4 (4x10 mm)
Bulloni da installazione 3x 2
(M8 x 30 mm, argento)
Bulloni da installazione 2x 2
(M8 x 60 mm, argento)
Istruzioni per l’uso x 1
(questo manuale)
Montaggio del supporto
1Girate il coperchio della base con la
parte inferiore rivolta verso l’alto.
2Inserite le gambe del supporto nel
coperchio della base.
3Stringere le viti per bloccare le gambe
del supporto.
Coperchio della base
Gamba del
supporto
Operating instructions
Mode d’emploi
Bedienungsanleitung
Istruzioni per l’uso
Gebruiksaanwijzing
Manual de instrucciones
Table top stand
Pied de table
Tischständer
Supporto di tavolo
Tafelbladstaander
Soporte de mesa
PDK-TS14
Procedura di montaggio
Gamba del
supporto
Viti 1
(4 x 10 mm)
Viti 1
(4 x 10 mm)

19
It
Italiano
Bulloni da installazione 3
(M8 x 30 mm, argento)
Fissaggio del Display a Plasma
Il peso del modello di 43 pollici èdi circa 32 kg. Non sono
profondi e sono instabili.
Per questo motivo devono essere montati e installati da
almeno due persone.
Nota
Assicuratevi che la superficie sulla quale installate il dispay sia
perfettamente piana e stabile.
Inserite verticalmente le viti nei fori e non serratele con una forza
maggiore al necessario.
Metodo di Fissaggio
1Montaggio del display a plasma sul supporto.
Fissate le colonne di supporto di tavolo alla parte inferiore del
display a plasma, come indicato dalle frecce, quindi inseritele
adagio verticalmente. Fate molta attenzione ad inserirle
esattamente nelle scanalature del display a plasma e solo in
quel punto. Agire in un altro modo puòdanneggiare il pannello
del display a plasma, le sue aperture o provocare una
deformazione del supporto.
Allineate le colonne di
sostegno con la parte
inferiore del display a
plasma, come indicato nello
schema allegato.
3Fissaggio del display a plasma con le bulloni da
installazione 3.
Serratele utilizzando la brugola esagonale fornita.
2Fissaggio del display a plasma con le bulloni da
installazione 2.
Fissate il display a plasma nei punti indicati dalle frecce,
utilizzando la brugola esagonale in dotazione.
Bulloni da installazione 2
(M8 x 60 mm, argento)
Attenzione
Montaggio del prodotto su uno scaffale, ecc.
Quando montate il display a plasma su uno scaffale, ecc.
tenetelo fermo.
Attenzione

20
It
Fissare l’apparecchio al muro
1Fissate i bulloni (ganci) al display a plasma per
prevenire la caduta.
2Usate corde o catene robuste per stabilizzarlo
con sicurezza e saldamente al muro, a un
pilastro o a qualche altro solido elemento.
Svolgete questo lavoro nello stesso modo sul lato sinistro e su
quello destro.
Nota
Usate ganci, corde, catene e accessori
che si trovano sul mercato.
Gancio consigliato:
Diametro nominale M8
Lunghezza da 12 ai 15 mm
1Gancio
2Corda o catena
Accessorio
Fissare su tavolo o a pavimento
Fissare l’apparecchio usando delle viti disponibili sul mercato
come mostrato nel grafico.
Nota
Per fissare l’apparecchio su un
tavolo o a pavimento, usate viti
con diametro nominale di 6 mm e
lunghezza di almeno 20 mm.
Dopo il montaggio del supporto, assicuratevi che l’apparecchio non sia in condizioni di cadere.
Posizione delle viti per il tavolo/pavimento
Se il supporto viene fissato su un tavolo o sul pavimento, usate
un diametro nominale di 6 mm con una lunghezza superiore ai
20 mm.
Unità: mm
Prevenire la caduta dell’apparecchio
•
Per sostenere il display a plasma si dovrebbe usare sempre
un tavolo o una superficie del pavimento con resistenza
adeguata. Se ciònon fosse possibile ne potrebbero derivare
danni alle cose o alle persone.
•
Durante l’installazione del display a plasma, prendere le
necessarie precauzioni per prevenire la caduta o il
capovolgimento in casi d’emergenza, come terremoti o
incidenti.
•
Se non si prendono queste precauzioni, il display a plasma
potrebbe cadere e causare danni.
•
Le viti, i ganci e gli altri accessori usati per fissare il display a
plasma e prevenire alla sua caduta varieranno secondo la
composizione e lo spessore della superficie alla quale sarà
agganciato.
•
Scegliere le viti, i ganci, le catene e gli altri accessori adatti
dopo aver controllato accuratamente la superficie e
determinato il suo spessore e la sua composizione, ed
eventualmente dopo avere consultato un esperto.
249 24
120 478
Vista laterale
11
min. 20 mm
6 mm
da 9 a 15 mm
Dai 12 ai 15 mm
M8
Attenzione
Table of contents
Languages:
Popular Indoor Furnishing manuals by other brands

Coaster
Coaster 300260F B1 Assembly instructions

Argos
Argos Normandy 2 Door Tall Robe 357/1505 Assembly instructions

Powell
Powell 18Y6013 manual

Home Decorators Collection
Home Decorators Collection Elmhurst WSFP60ECHD-20 Assembly instructions

Philips
Philips 14837-9 operating instructions

Gami
Gami G36 140 Assembly instructions