PIRATE MIDI mLoop User manual

THINK LESS. CREATE MORE.
µLOOP
BYPASS LOOPER &
USB MIDI INTERFACE

© PIRATE MIDI 2022 www.learn.piratemidi.com
2© PIRATE MIDI 2022 www.learn.piratemidi.com
3
This device was created and
designed to empower your
creativi.
It is the result of many long nights and early
mornings. It is born from the desire to
bridge the gap between musician and
instrument, and we want to say a huge
thank you for your support. Our brand is
built around a strong communi and we
hope you love your new PIRAT MIDI
creation as much as we do.
The PIRAT MIDI team.
Table of contents .......................................................................... 3
Device Description ....................................................................... 4
Technical Specs ............................................................................. 5
Hardware Layout........................................................................... 6
Quick Start...................................................................................... 8
1. Device Interface......................................................................10
2. Power ........................................................................................11
3. Presets & MIDI Channel ........................................................12
4. USB MIDI Interface .................................................................13
5. AUX Switch Input....................................................................14
6. MIDI Implementation ............................................................15
Support & Warranty ...................................................................16
TABLE OF CONTENTS
CLICK User Manual

© PIRATE MIDI 2022 www.learn.piratemidi.com
4© PIRATE MIDI 2022 www.learn.piratemidi.com
5
DEVICE DESCRIPTION
introduction to your new bypass looper
4 mono loops or 2 stereo loops in an enclosure that fits under the smallest pedalboards
- only 22mm thick. Plus a USB MIDI Interface!
This MIDI-controlled bypass looper and USB MIDI interface is unmatched for its
compact size and its affordability.
Stereo buffered output with JFET muting for silent switching.
You can also change the MIDI Out mode to an Aux Switch input and switch the relays or
presets with an Aux footswitch - no MIDI required!
Split-Y TRS to TS cables needed to access 4 mono loops.
LINK TO DOWNLOADS:
https://learn.piratemidi.com/downloads/firmware-updates
DIMENSIONS
Metric (129x57x22 mm)
Imperial (5”x 2.2”x 0.86”)
INPUTS/OUTPUTS
Stereo TRS Input & Output
Stereo or Mono Split Sends &
Returns
WEIGHT
Metric (190g)
Imperial (6.7 oz.)
POWER REQUIREMENT
9 Volts DC (@ 600 mA)
or 5 Volts USB
TECHNICAL SPECS
all important specification
BOX CONTENTS
1x µLoop MIDI Bypass Looper
1x USB type C cable
1x Getting Started Card

© PIRATE MIDI 2022 www.learn.piratemidi.com
6© PIRATE MIDI 2022 www.learn.piratemidi.com
7
HARDWARE LAYOUT
quick overview of top interface
USB type C (cable included) for USB MIDI, editing the
device with the app, and powering the device.
Dedicated 1/8” (3.5mm) TRS MIDI Out conforming to the MIDI.org
specification. Also switchable between Type A, Type B, or dual outputs
for split-y MIDI cables. This can power a CME WIDI Jack.
Mode can be changed to work as an Aux Switch input.
2.1mm 9v DC barrel jack - as standard on most effects pedals
and power supplies.
Dedicated 1/8” (3.5mm) TRS MIDI In conforming to the
MIDI.org specification.
HARDWARE LAYOUT (CONT.)
quick overview of other inputs and outputs
¼” (6.35mm) TRS Audio Send/Return Jacks.
1
1
2
2
3 4
3
5 6
6
Relay Indicator LEDs to show whether a channel is currently active or
bypassed.
7
Power and MIDI activity LED
8
4
¼” TRS Stereo Audio Input and Output Jacks.
5
7 8

© PIRATE MIDI 2022 www.learn.piratemidi.com
8© PIRATE MIDI 2022 www.learn.piratemidi.com
9
QUICK START
Getting started with the basics
1. Connecting Power
Power the µLoop with a type-C USB cable, or a 2.1mm centre negative 9V DC power
supply.
The µLoop requries 600mA to function correctly.
2. Connecting MIDI to switch loops
You can take your uLoop straight out of the box, plug in a MIDI controller, and send
CC’s to switch the loops.
CC Numbers 0 to 3 control the 4 loops in Mono mode, and 0 & 2 control the loops in
Stereo mode. When you take it out of the box, the uLoop will be in Stereo mode.
See the MIDI Implementation on page 20 for full details. For Audio diagrams, see page
16 onwards.
Check that your CLICK firmware is up to date. Updates are released
periodically adding new features and bug fixes. Go to:
https://learn.piratemidi.com/downloads/firmware-updates
QUICK START (CONT.)
Getting started with the basics
3. USB MIDI Interface
Any MIDI sent to the MIDI In TRS port on the µLoop can be passed through to the USB
MIDI port on the device. Likewise with USB MIDI being passed to the MIDI out TRS
port.
Even without using the audio loop function, the µLoop can be used as a USB MIDI
interface.
•QUICK TIP
To go mono (4 channels) you’ll need to use Y-split TRS to dual TS cables. They can be
purchased from lots of online music/guitar retailers.
Cable/Adapter Suggestions
MIDI
•https://piratemidi.com/en-au/products/3-5mm-to-din5-adapter
•https://piratemidi.com/en-au/products/right-angle-3-5mm-to-din5-adapter-1pc
•https://piratemidi.com/en-au/products/widi-jack-by-cme?variant=39439507423284
AUDIO or MIDI
•https://piratemidi.com/en-au/products/3-5mm-to-6-35mm-trs-adapter
AUDIO
•https://www.rockboard.de/en/cables-and-connections/flat-trs-to-midi-cables-1
•https://www.rockboard.de/en/cables-and-connections/rockboard-flat-patch-y-
splitter-cable-20-cm-7-78-black-rbo-cab-f-y-20-bk
•https://www.rockboard.de/en/cables-and-connections/rockboard-flat-patch-y-
splitter-cable-50-cm-19-1116-black-rbo-cab-f-y-50-bk
•https://www.rockboard.de/en/cables-and-connections/rockboard-flat-patch-y-
splitter-cable-30-cm-11-1316-black-rbo-cab-f-y-30-bk
•https://www.tourgeardesigns.com/collections/flat-y-splitter-cables
•https://ebssweden.com/content2/accessories/patch-cables-connectors/

What it all does
© PIRATE MIDI 2022 www.learn.piratemidi.com
10 © PIRATE MIDI 2022 www.learn.piratemidi.com
11
let’s turn this thing on and get going
2. POWER1. DEVICE INTERFACE
You can power your uLoop with either a USB cable, or a centre-negative 9v DC jack
(2.1mm) commonly used for guitar pedals.
Centre-Negative DC Power USB Power
Switching Power Sources
The uLoop uses smart power switching so you can have both plugged in at once, and if
you need to remove one or the other, the unit will seamlessly switch power sources
without shutting down or restarting.
Power Requirement
If you’re using a 9v DC power supply, please make sure
it is able to supply the required 600mA.
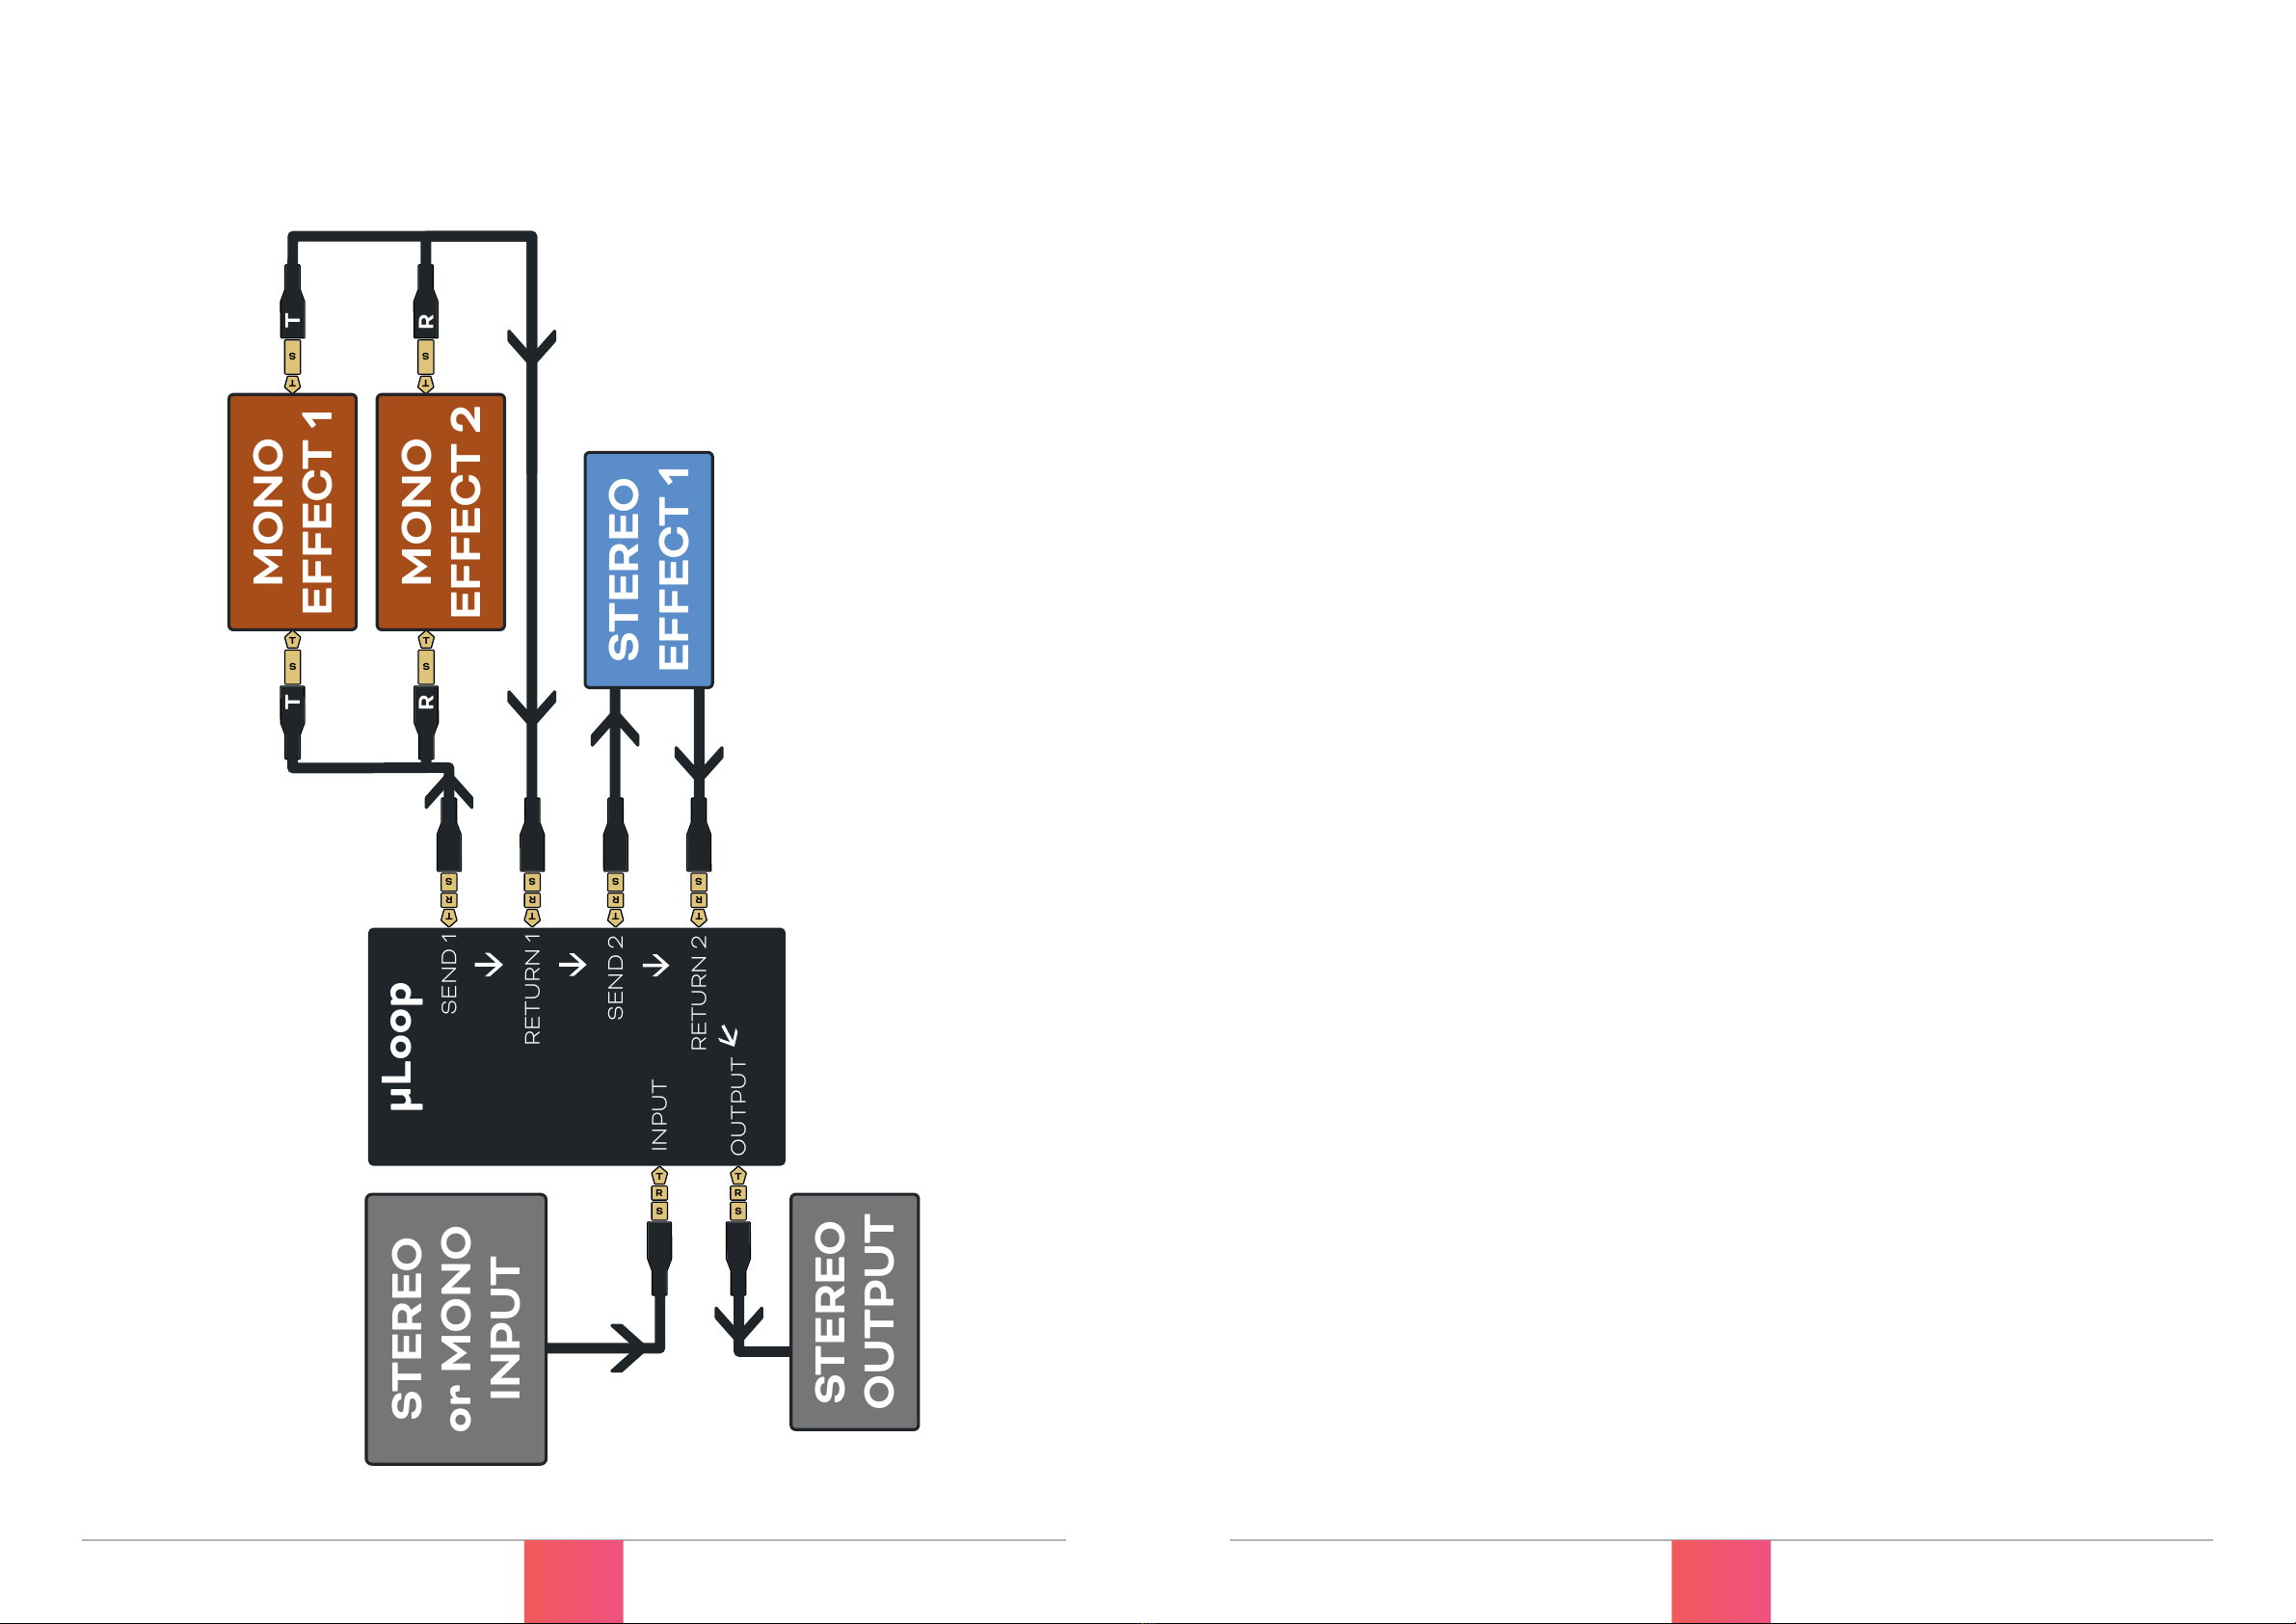
1/4” (6.35mm) TRS Audio Jacks
The ¼” TRS jacks on the uLoop are used for Stereo Input, Stereo Output, and Stereo or
Dual-Mono Send/Returns for the audio loops. Stereo/Mono mode is selected using
MIDI commands as per the table on page 20.
1/8” (3.5mm) TRS MIDI In & Out Ports
The MIDI In port is a Type A TRS MIDI port for receiving MIDI messages that are
intended to control the relay switching port, or for passing through to the USB when
being used as a compact USB MIDI interface.
The MIDI Out port is also a Type A MIDI port. This port will send MIDI messages from
the USB MIDI, and pass it onto other devices, or it can be used to daisy-chain MIDI
devices so that your CLICK doesn’t have to be the last MIDI device in the chain.
The MIDI Out port can also be used to plug in a TRS 3-way aux switch to control the
loops without needing to use MIDI at all. Deeper customisation for this will be
available through the web editor soon.
Power/Data LED
The LED in the corner will show solid when the device is powered. When MIDI data is
passing through the device - either via USB or the 1/8” (3.5mm) TRS MIDI ports - the
LED will flash.
Channel 1 & 2 Relay LEDs
Each Loop has two paths (Left and Right) which are split when in mono mode. The
Labelled 1L/1R, 2L/2R LEDs on the device will be lit when the loop is engaged, and dim
when the loop is bypassed.
These loops are manually controllable via MIDI commands listed on page 20.
Presets are a saved combination of which loops are bypassed or engaged. There are
127 preset slots on the device, which can be recalled via MIDI.

Preset Up & Down
There are 127 presets available for you to customise. Sending MIDI CC 4 will advance
to the next preset, and sending MIDI CC 5 will go to the previous preset.
Save A Preset
To save the current settings as a new preset, send MIDI CC 3 and set the CC value to
the preset number you want to overwrite.
Go to a Preset
To go directly to a particular preset, you can use CC’s or PC’s. Send MIDI CC 6 with your
chosen preset number as the value (0-127). Or send a MIDI PC message of your chosen
preset number (0-127).
MIDI Channel
Out of the box, your µLoop will respond to any MIDI channel. If you want to change the
MIDI channel so that it only listens to MIDI messages sent with its specific channel
number, send a MIDI message of CC 7, with any value. This will tell the µLoop to listen
for the MIDI channel of the next message.
Next you will need to send another MIDI message, of any kind, and whichever channel
that message is sent on, that is the channel your µLoop will set itself to.
Saving your settings
3. PRESETS & MIDI CHANNEL
© PIRATE MIDI 2022 www.learn.piratemidi.com
12 © PIRATE MIDI 2022 www.learn.piratemidi.com
13
An interface for your pedalboard
4. USB MIDI INTERFACE
The µLoop is a class-compliant USB MIDI device. You can plug it into any USB host
device like a PC, Mac, Phone, or Tablet and you will see the 1 In/1 Out MIDI device
show up in apps that support MIDI devices. This means you can send MIDI into and out
of your computer using the µLoop!
It does not have USB host capability, so it cannot connect to a MIDI controller directly
via USB nor power anything via the onboard USB port.
Sending the appropriate MIDI from your USB device to the µLoop will allow you to
engage or bypass loops and recall/save presets from your computer.
MIDI Thru to and from the 3.5mm TRS jacks can be switched on and off with CC’s 9 &
10. See the MIDI Implementation chart on page 15 for details.

© PIRATE MIDI 2022 www.learn.piratemidi.com
14 © PIRATE MIDI 2022 www.learn.piratemidi.com
15
6. AUDIO ROUTING
From there to here, from here to there
5. AUX SWITCH INPU
No MIDI required!
3-Way Aux Switch
By plugging a TRS 3-way switch into the MIDI Out port of your µLoop, you can toggle
the loops without using any MIDI at all. This could be super helpful for controlling a
non-MIDI pedal that happens to be hiding away in an awkward spot on your pedalboard
or rack.
To change the MIDI Out jack to Aux Switch mode, send a MIDI message to the CliCK.
CC 8, Value 127
To customise what function is assigned to each Aux switch, you will need to use the
wed editor at edit.piratemidi.com (coming soon for µLoop).
By default, the switch buttons will be assigned to Preset Up & Preset Down.
The PIRATE MIDI Aero (Coming Soon) is an aux switch AND a MIDI controller. It would
be an excellent companion for this feature!
Audio Signal Path
The µLoop has full stereo series signal path, unless you split the loops to act as series
mono loops. The ¼” TRS input and output are stereo, and the four ¼” TRS send and
return jacks are TRS.
In stereo mode, you can use TRS cables to connect stereo effects that use TRS jacks, or
you can use split-Y TRS to dual TS cables to connect mono pedals (or stereo pedals that
use two TS jacks).
Full Stereo Signal Path: Input (L+R) > Loop 1 (L+R) Send > Loop 1 (L+R) Return > Loop
2 (L+R) Send > Loop 2 (L+R) Return > Output (L+R)
Full Mono Signal Path: Input (Tip) > Loop 1L (Tip) Send > Loop 1L (Tip) Return > Loop
1R (Ring) Send > Loop 1R (Ring) Return > Loop 2L (Tip) Send > Loop 2L (Tip) Return >
Loop 2R (Ring) Send > Loop 2R (Ring) Return > Output (Tip)
Muting
The µLoop has a stereo buffered output with JFET muting for silent switching. The
JFET muting can be switched on or off for the left and/or the right output channel with
MIDI CC’s as detailed in the MIDI implementation table in chapter 8.
Stereo & Mono
Using Stereo mode, everything is stereo TRS from input to output. If you want to switch
to mono, loop 1 (1L and 1R) and loop 2 (2L and 2R) are individually switchable between
stereo and mono.
This makes the following signal path possibilities:
1. Input > Stereo > Stereo > Output
2. Input > Mono > Mono > Stereo > Output
3. Input > Stereo > Mono > Mono > Output
Please note: there is no onboard summing or splitting for the stereo>mono or
mono>stereo signal.

© PIRATE MIDI 2022 www.learn.piratemidi.com
16 © PIRATE MIDI 2022 www.learn.piratemidi.com
17
7. DIAGRAMS (CONT.)
Some ideas for using the bypass looper
7. DIAGRAMS
Some ideas for using the bypass looper
µLoop
SEND 1
INPUT
RETURN 1
OUTPUT
SEND 2
RETURN 2
T
R
S
T
R
S
T
R
S
T
R
S
T
R
S
T
R
S
STEREO
EFFECT 1
STEREO
or MONO
INPUT
STEREO
EFFECT 2
STEREO
OUTPUT
µLoop
SEND 1
INPUT
RETURN 1
OUTPUT
SEND 2
RETURN 2
T
R
S
T
R
S
T
R
S
T
R
S
T
R
S
T
R
S
T
S
T
S
T
S
T
S
T
S
T
S
T
S
T
S
STEREO
or MONO
INPUT
STEREO
or MONO
OUTPUT
MONO
EFFECT 1
MONO
EFFECT 3
MONO
EFFECT 2
MONO
EFFECT 4
T
T
T
T
R
R
R
R

© PIRATE MIDI 2022 www.learn.piratemidi.com
18 © PIRATE MIDI 2022 www.learn.piratemidi.com
19
7. DIAGRAMS (CONT.)
Some ideas for using the bypass looper.
7. DIAGRAMS (CONT.)
Some ideas for using the bypass looper
µLoop
SEND 1
INPUT
RETURN 1
OUTPUT
SEND 2
RETURN 2
T
R
S
T
R
S
T
R
S
T
R
S
T
R
S
T
R
S
T
S
T
S
T
S
T
S
STEREO
EFFECT 1
STEREO
or MONO
INPUT
MONO
EFFECT 1
MONO
EFFECT 2
STEREO
OUTPUT
T T
R R

© PIRATE MIDI 2022 www.learn.piratemidi.com
20 © PIRATE MIDI 2022 www.learn.piratemidi.com
21
CHAPTER TITLE
short description
8. MIDI IMPLEMENTATION
Controlling the uLoop with external MIDI commands
The µLoop can be controlled by MIDI from an external MIDI device via the dedicated
MIDI In (3.5mm TRS) or USB MIDI.
Details on setting the MIDI channel are found in chapter 3.
These MIDI assignments are included in the PIRATE MIDI Device Library. If you are
using a BRIDGE controller, you can probably ignore this part!
The table is on the next page…
© PIRATE MIDI 2022 www.learn.piratemidi.com
20 © PIRATE MIDI 2022 www.learn.piratemidi.com
21
8. MIDI IMPLEMENTATION (CONT.)
Controlling the uLoop with external MIDI commands
CHAPTER TITLE
short description
FUNCTION MIDI CC# VALUE
Loop Control
Loop 1: Stereo or Left 0 0=Bypass, 127=Engage
Loop 1: Right
- Inactive when Loop 1 is
in stereo mode
1 0=Bypass, 127=Engage
Loop 2: Stereo or Left 2 0=Bypass, 127=Engage
Loop 2: Right
- Inactive when Loop 2 is
in stereo mode
3 0=Bypass, 127=Engage
Loop 1 Mode 14 0=Stereo, 127=Mono
Loop 2 Mode 15 0=Stereo, 127=Mono
Preset Control
Save Current Settings to
Preset
4 0-127 (Value=Preset
Number)
Preset Up 5 Any (0-127)
Preset Down 6 Any (0-127)
Go to Preset ‘x’ 7 0-127
Go to Preset ‘x’ (PC) PC 0-127
Device Settings
Left Output Switch Muting 8 0=Inactive, 127=Active
Right Output Switch
Muting
9 0=Inactive, 127=Active
Set MIDI Channel 10 Any (0-127)
- See chapter 3
MIDI Out/Aux Switch
Mode
11 MIDI Out=0, Aux
Switch=127
USB MIDI Thru to MIDI Out 12 Off=0, On=127
MIDI In Thru to USB MIDI 13 Off=0, On=127

Thanks for purchasing a µLoop!
If you have any questions, please feel free to contact us via
support@piratemidi.com or use technical support on www.learn.
piratemidi.com.
Manufacturing defects are covered by our warranty. Please contact us if
your device is defective.
Australian domestic customers are covered by Australian Consumer Law
which requires repair or replacement for devices that do not fulfil their
advertised purpose.
International (Non-Australian) customers are covered by our own
workmanship guarantee. We aim to create a satisfactory outcome for
every single customer. Please contact us if you have an issue with your
device.
Customer-caused damage may be repairable for a fee. We offer repair
services for most components that receive damage. Contact us for
details.
MADE IN
AUSTRALIA
© PIRATE MIDI 2022 www.learn.piratemidi.com
22 © PIRATE MIDI 2022 www.learn.piratemidi.com
23
SUPPORT & WARRANTY
Technical help & guarantee

THINK L SS. CR AT MOR
support@piratemidi.com
www.learn.piratemidi.com
Table of contents