Chase Bliss Audio Cooper FX Generation Loss User manual
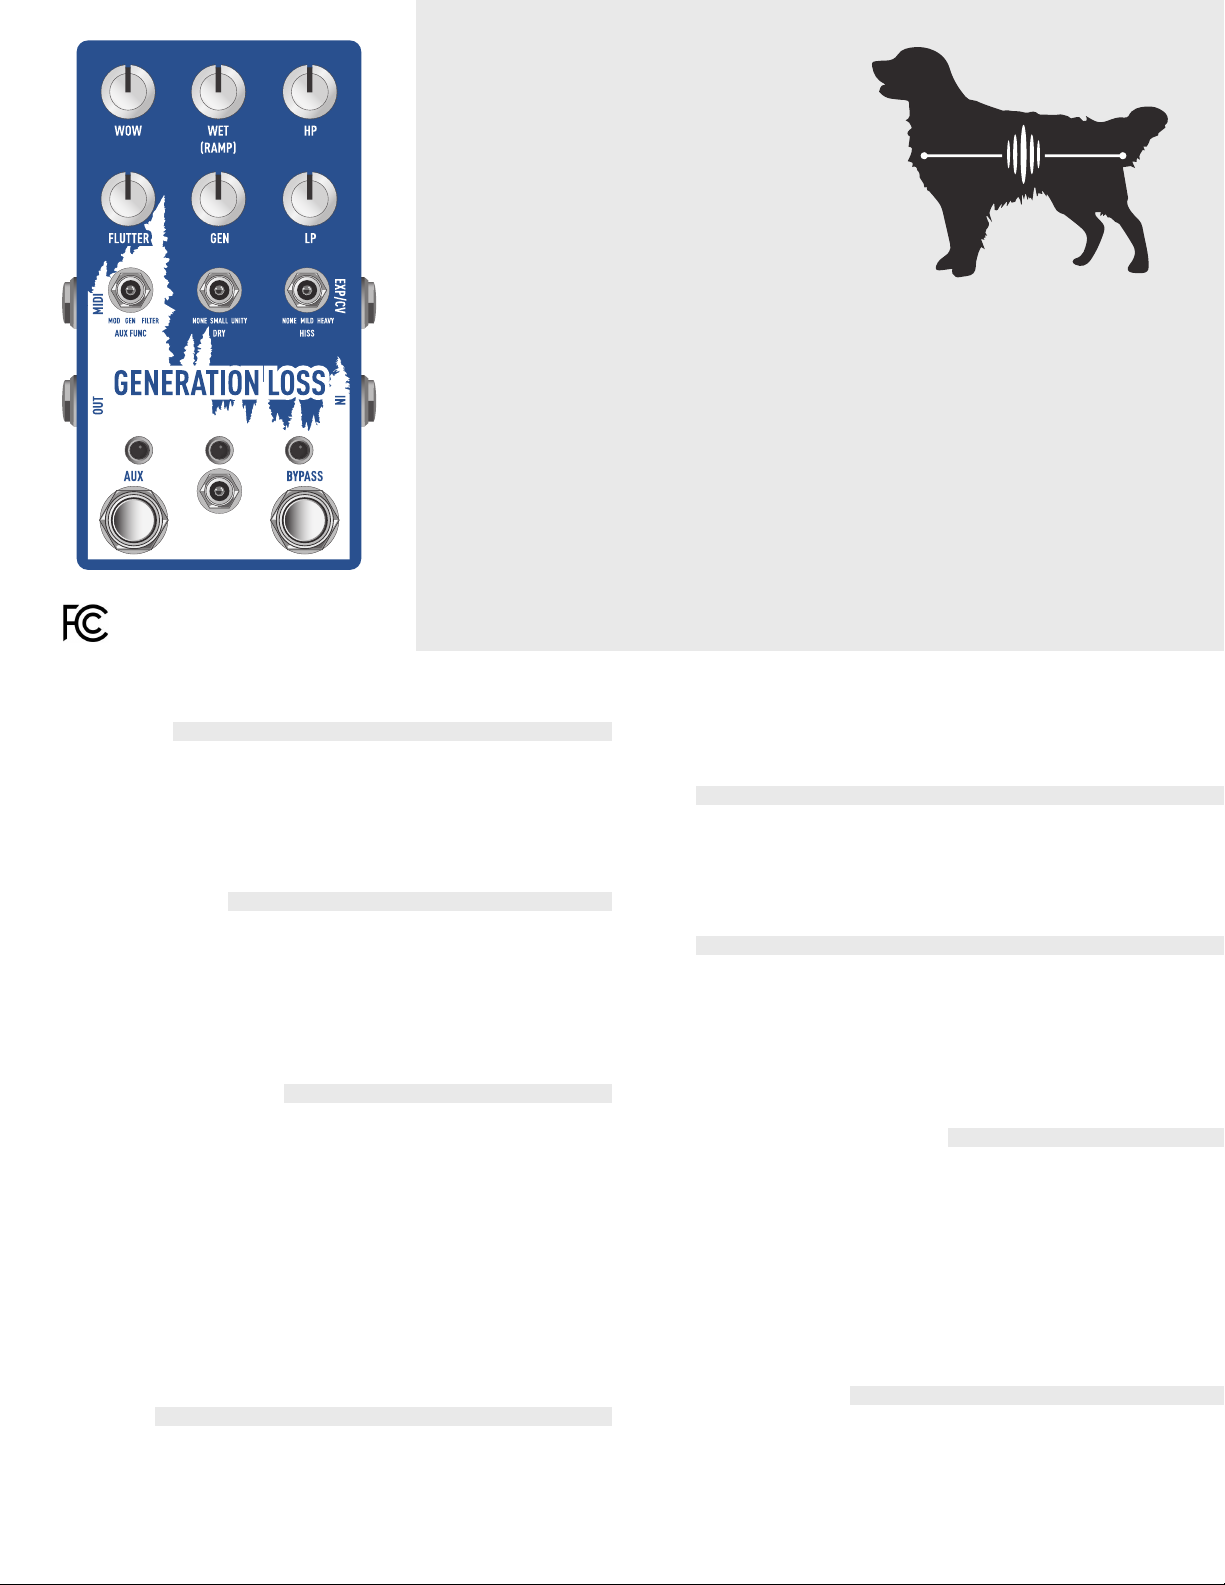
INSTRUCTIONS
OVERVIEW
This is the sound of nostalgia. Chase Bliss Audio & Cooper FX are
teaming up once again to take everything you love about the original
Generation Loss while making some tweaks based on customer
feedback and adding the additional control Chase Bliss is known for.
Generation Loss™brings together all aspects of tape degradation
and uses a combination of effects to hone in on that sound we’re all
familiar with. Generation Loss refers to the decrease in sound quality
and introduction of noise and sound artifacts each time a copy is made
on magnetic media such as tape. Random pitch fluctuations, filters to
cut down on the signal’s bandwidth, sample rate reduction, and noise
are all brought together in this pedal to mimic that sound without the
need for a broken VHS player.
aspect of analog tape degradation, this control is useful
to have in any lo-fi effect.
HP
Sets the cutoff frequency for a resonant high-pass
filter. Turn clockwise to sweep from no hi pass filtering,
to heavy filtering. This has a “brightening” effect on
the audio.
LP
Sets the cutoff frequency for a resonant low pass filter.
The sweep is the opposite of the high pass filter, in
that more of the audio is filtered as you turn the knob
counter clockwise. Used in conjunction with the HP
knob, the user can really narrow in on the high and low
frequency signal attenuation to get that tape sound.
AUX FUNC TOGGLE
This toggle selects the function applied to the signal
when the AUX stomp is pressed. When the toggle is
set to the MOD setting, both the WOW and FLUTTER
controls will be maxed out when the footswitch is
activated. Setting the toggle to GEN will allow the
user to change between the max Gen setting and the
knob defined Gen setting each time the footswitch is
activated. Finally, the AUX stomp can be used to bypass
the filters by setting the AUX FUNC toggle to FILTER.
DRY TOGGLE
This toggle selects the amount of dry signal that is
mixed in with the wet signal. The user can select from
NONE, SMALL, or UNITY. When set to SMALL, a little
bit of the dry signal will be mixed in. There is a trim pot
that allows the user to select how present the dry signal
WOW
This control refers to the lower frequency pitch
fluctuation that can affect audio played back on tape
machines. Turning the control clockwise will increase
the depth and speed of the random pitch fluctuations
allowing for random vibrato and chorus sounds.
FLUTTER
While WOW describes the slow gentle pitch
fluctuations, Flutter refers to the relatively fast,
random pitch fluctuations that are in large part
responsible for “that” tape sound. Instead of sounding
like vibrato, flutter causes more of a timbral change
to the incoming audio.
WET (RAMP)
When there are no dip switches assigned to ramp
any controls, this knob controls the level of the wet
signal. The volume of the wet signal increases as the
user turns the knob clockwise. This is useful to make
up for signal loss due to use of the filters. If a dip
switch is engaged for ramping, you can set this knob
to control any of the five parameters individually or
simultaneously (Wow, Flutter, Gen, LP, HP), and have
it either modulate (Bounce) or ramp-and-hold (rise or
fall) via dip switches in the back of the pedal. In this
case, this knob controls the ramp time in which this
takes place.
GEN
Gen controls the sample rate of the wet signal.
At its max, the audio quality is as pristine as it gets,
but as you turn the knob counterclockwise, the audio
becomes increasingly lower quality. While not truly an
This device complies with part 15 of the FCC rules.
Operation is subject to the following two conditions:
(1) This device may not cause harmful interference, and
(2) this device must accept any interference received,
including interference that may cause undesired operation.

will be. When set to UNITY, the dry signal will be set
to the same level as your bypassed tone. This can also
be adjusted via internal trimmer.
HISS TOGGLE
Selects between three levels of noise, from none, to
quite a bit. These noise generators are a mixture of
white noise and flutter distortion and can be sculpted
with the high pass and low pass filters.
BYPASS STOMP
Activates or bypasses the effect. This can be changed
to a momentary bypass or momentary active via a
dip switch in the back of the pedal if it is desired.
This pedal allows for “True Bypass” via a relay or
Buffered Bypass selectable via a dip switch in the
back of the pedal.
AUX STOMP
Activates the auxiliary function defined by the AUX
FUNC toggle. This stomp can also be set to latching or
momentary active via a dip switch on the back.
LOWER TOGGLE
This switch recalls presets. The right position recalls
preset #1, the left position recalls preset #2. The
middle position will always reflect wherever the knob
positions, toggle positions, and dip switch positions
are currently at. In order to save to the right preset
slot, you hold down the right stomp (bypass) for 3
seconds, and then hold down both stomp switches
simultaneously for another 3 seconds. The LED blinks
and your setting is saved. For the left slot, you do the
same thing, but hold the left stomp first. If you recall
a preset, and move a knob, you will notice that the
LED above the toggle goes dim. This is to signify that
something has changed on the preset. If you want to
save this change in the preset, you will have to save
it again.
IN / OUT
¼” mono jack.
EXP / CV
¼” TRS jack for expression pedal (parameter
selectable via dip switch in the back of the pedal).
Tip goes to wiper. Can also be used for 0-5V Control
Voltage (CV) on tip – the ring should be left floating in
this case. There are many expression pedals that work
with Chase Bliss Audio products, contact us for
more info.
MIDI/AUX
¼” TRS jack. This can be used to interface the pedal
with a Chase Bliss Midibox. There is much more
information on this in the MIDI manual. In addition,
this can be used as a secondary switch to activate
/ bypass the AUX FUNC control with a momentary
normally open (NO) switch.
POWER & OTHER INFO
This pedal consumes ~150mA and should be operated
with a standard 2.1mm 9V DC center negative adapter
with current supply capabilities of 200mA or more. If
you use a “standard” outlet of 100mA, the pedal will
not function properly. Input impedance of this device
is 1M, and output impedance is less than 1k.
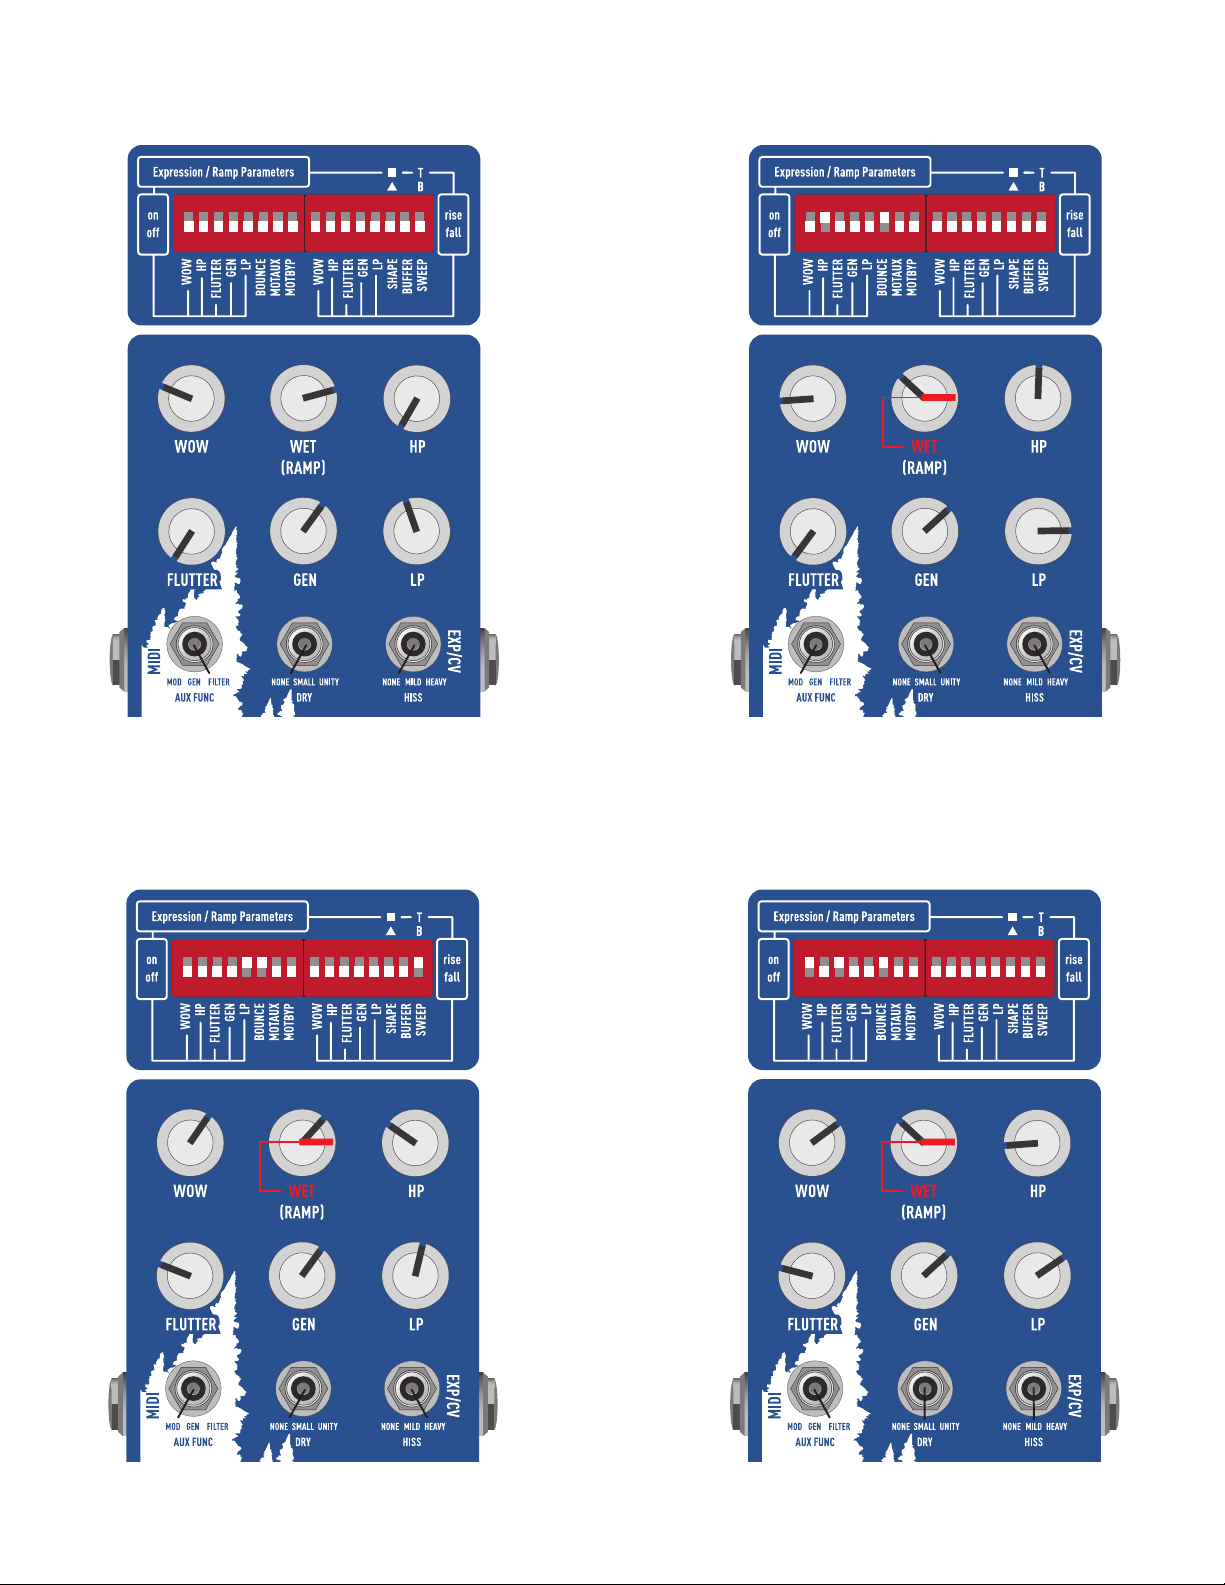
EXPRESSION / CV CONTROL
& DIP SWITCHES
The Wow, HP, Flutter, Gen, and LP dip switches
in the left bank allow you to control parameters
via Expression Pedal / CV. If you have something
plugged into the EXP / CV jack but do not have any
parameters selected via dip switch, you can control
the Wet knob via expression or CV. It behaves like it
has “rise” and “bottom” sweep dip switches engaged.
SETTING EXPRESSION /
CV RANGE
The range of the expression / CV is controlled by the
parameter knob position and the “Sweep” dip switch.
For example, if you wanted an expression pedal to
control the WOW parameter from the least possible to
halfway, you would make sure the “Sweep” dip switch
is in the bottom position and set the WOW knob
around noon. If you need more WOW, you simply
turn the WOW knob clockwise. This will increase the
maximum range of the expression pedal. This allows
you to control multiple parameters with an expression
pedal, but you can fine tune the range that you want
for each parameter.
UNDERSTANDING THE
DIP SWITCHES
When you save a preset, all of this information
gets saved. The indicated parameters below
correspond to the ramp function or an expression
pedal (if one is plugged in).
A very important thing to remember is that ramping
always gets reset when bypassing. The parameters’
current knob position control where the parameters
ultimately will either start or stop ramping.

Example presets continued on next page
The Wow, HP, Flutter, Gen, and LP dip switches on
the left side simply turn that parameter on or off for
ramping or expression / CV capability.
The Wow, HP, Flutter, Gen, and LP dip switches
on the right side control whether or not the
parameters will rise (go clockwise in ramp mode)
or fall (go counterclockwise in ramp mode). It also
controls how the parameters will behave with an
expression pedal plugged in.
Bounce: When on (and no expression pedal),
parameters will go back and forth (i.e. modulate), if
it’s off, parameters will ramp and hold.
MOTAUX: Momentary engage or bypass for AUX
stomp. It changes from “momentary engage” or
“momentary bypass” dependent on what state (i.e.
active or bypass) the pedal was in when this dip
switch was changed. If the channel was engaged,
then it acts as a momentary bypass. If the channel
was in bypass, then it acts as a momentary engage.
MOTBYP: Momentary engage or bypass for the
pedal. It changes from “momentary engage” or
“momentary bypass” dependent on what state (i.e.
active or bypass) the pedal was in when this dip
switch was changed. If the channel was engaged,
then it acts as a momentary bypass. If the channel
was in bypass, then it acts as a momentary engage.
Shape: Allows for either triangular / linear ramping
(default) or square.
Buffer: This enables optional noise-less
/ click-less high-quality buffered bypass.
Sweep: This controls where ramp sweeps. In “T”
(top), the expression control will occur between the
current knob position and the max position (fully
clockwise). In “B” (bottom) the expression control
will occur between the current knob position and
the minimum position (fully counterclockwise).
NOTE: It may seem overwhelming and difficult for users to take
all this in at first. Our suggestion is always to forget about the
dip switches for a while when you get the pedal. Get to know
the basic functionality of it, and then if/when you want to
experiment with ramping or expression, it will likely be easier.
Some of these concepts are much easier to explain
and demonstrate on video, and we have many tutorials
available on our youtube channel at
www.youtube.com/ChaseBlissAudio.
We also love to hear from customers and answer
questions so feel free to write us anytime at
chaseblissaudio.com/contact.
Thank you so much for purchasing this
product and ENJOY!
All presets created by Andy Othling
Hear them at soundcloud.com/chaseblissaudio
MILO
LAIKA

Example presets continued on next page
TOTO
THE TACO BELL DOG
OLD YELLER
WISHBONE
LASSIE
BEETHOVEN
AIR BUD
HOOCH
Other Chase Bliss Audio Music Pedal manuals

Chase Bliss Audio
Chase Bliss Audio Generation Loss MKII User manual

Chase Bliss Audio
Chase Bliss Audio Mood User manual

Chase Bliss Audio
Chase Bliss Audio Reverse Mode C User manual

Chase Bliss Audio
Chase Bliss Audio Blooper User manual

Chase Bliss Audio
Chase Bliss Audio MOOD MKII User manual

Chase Bliss Audio
Chase Bliss Audio Lossy User manual

Chase Bliss Audio
Chase Bliss Audio Brothers User manual

Chase Bliss Audio
Chase Bliss Audio Thermae User manual

Chase Bliss Audio
Chase Bliss Audio MOOD MKII User manual

Chase Bliss Audio
Chase Bliss Audio Blooper User manual


