PITT Altar User manual

UM2019-1-PC/NL-EN-FR-DE-ES-IT EU
NL Gebruikshandleiding
EN User Manual
FR Notice d’utilisation
DE Betriebsanleitung
ES Manual del usuario
IT Manuale per l’utente
Top Side/Front Side

Voorwoord
Geachte klant,
Gefeliciteerd met de aankoop van uw PITT®cooking gaskooktoestel. Dit unieke systeem biedt u de vrijheid om zelf de
plaats van elke kookpit te bepalen. Op deze manier heeft u gegarandeerd jarenlang plezier van uw kooktoestel. Dankzij
de verschillende brandercapaciteiten kunt u elk gerecht op de juiste wijze bereiden. De geïntegreerde vonkontsteking in
de bediening zorgt er voor dat u met één hand de branders en de ontsteking kunt regelen.
Deze handleiding beschrijft hoe u optimaal gebruik kunt maken van alle functies van dit kooktoestel. Wij raden u aan de
gebruikershandleiding en montage-instructies zorgvuldig door te lezen, voordat u het apparaat in gebruik neemt.
Bewaar deze handleiding goed, zodat een eventuele volgende gebruiker er ook zijn voordeel mee kan doen. Bovendien
dient deze handleiding ook als naslagwerk voor de servicedienst.
Wij wensen u veel kookplezier!
PITT®cooking
Inhoud
Hoofdstuk Onderwerp Pagina
1 Inbouwmaten 3
2 Aansluiting gas en elektrisch 4
3 Algemene instructies 5
4 Bediening PITT®cooking 6
5 Optimaal gebruik van het PITT®cooking systeem 6
6 Onderhoud van het PITT®cooking systeem 7
7 Storingen in het PITT®cooking systeem 8
8 Top Side Modellen overzicht 9
9 Front Side modellen overzicht 11
10 Verpakking 12
11 Serviceadres 76
1 Inbouwmaten
• Een PITT®cooking module mag nooit over de scheiding van twee kasten gemonteerd worden. De kookplaat moet te allen
tijde demontabel zijn in geval van service.
• Zodra de PITT®cooking module bijvoorbeeld boven een lade wordt gepland, dient u rekening te houden met de totale
dikte van de unit en ondersteuningsset van 115 mm (Top Side) en 170 mm (Front Side) gemeten vanaf de bovenkant van
het blad (afb. 2).
• Om doorbuigen van het keukenblad te voorkomen, dient de module ondersteund te worden met de PITT®cooking
ondersteuningsset (afb. 2 en 4).
32
Type sticker
Steunbalk
afb. 2
fig. 4
Top Side (TS) maten in mm
Min. 47 Min.
150
Min. 50
Min. 600
Min. 4
Max. 35
fig. 1
Steunbalken
88mm TS
140 mm FS
115mm TS
170 mm FS
Min.
450
Min.
650
fig. 2
Steunbalk
Front Side (FS) maten in mm
fig. 3
Min.
150
75 mm
Min. 650
Min. 4
Max. 25
Min. 47
NLNL

4 5
Aanwijzingen gasaansluiting
• Controleer voor installatie of de lokale distributie condities (soort gas en gasdruk) overeenkomen met de
instellingwaardes van dit apparaat.
• De instellingwaardes van dit apparaat zijn vermeld op de typeplaat.
• Dit apparaat is niet uitgerust met een verbrandingsgasafvoer installatie.
Installatie en aansluiting dienen te voldoen aan de lokaal en landelijk geldende voorschriften. Daarbij moet vooral gelet
worden op de ventilatievoorschriften.
• De gasaansluiting dient te voldoen aan de algemeen geldende voorschriften. Wij adviseren de kookplaat met een vaste
gasleiding aan te sluiten. Gebruik van een goedgekeurde, speciaal daarvoor bestemde, gasslang is ook toegestaan.
• Gebruik achter een oven altijd een volledige metalen slang.
• Bij gebruik van een goedgekeurde gasslang mag deze niet geknikt zijn en niet in aanraking komen met bewegende
delen van het keukenmeubel.
• De aansluitkraan moet op een makkelijk bereikbare plaats geplaatst worden.
• Controleer voor ingebruikname alle aansluitingen op lekken, dit kan met behulp van zeepsop.
• De elektrische installatie dient te voldoen aan de nationaal en plaatselijk geldende voorschriften.
• Wandcontactdoos en stekker moeten te allen tijde bereikbaar zijn.
• Het toestel aansluiten met de meegeleverde geaarde stekker op een geaard stopcontact.
• Bij beschadiging van de aansluitkabel mag deze alleen vervangen worden door de fabrikant, of een door hen aan te
wijzen installateur. Dit om gevaarlijke situaties te voorkomen.
Aanwijzingen elektrische aansluiting 230 V – 50 Hz – 0,6 VA
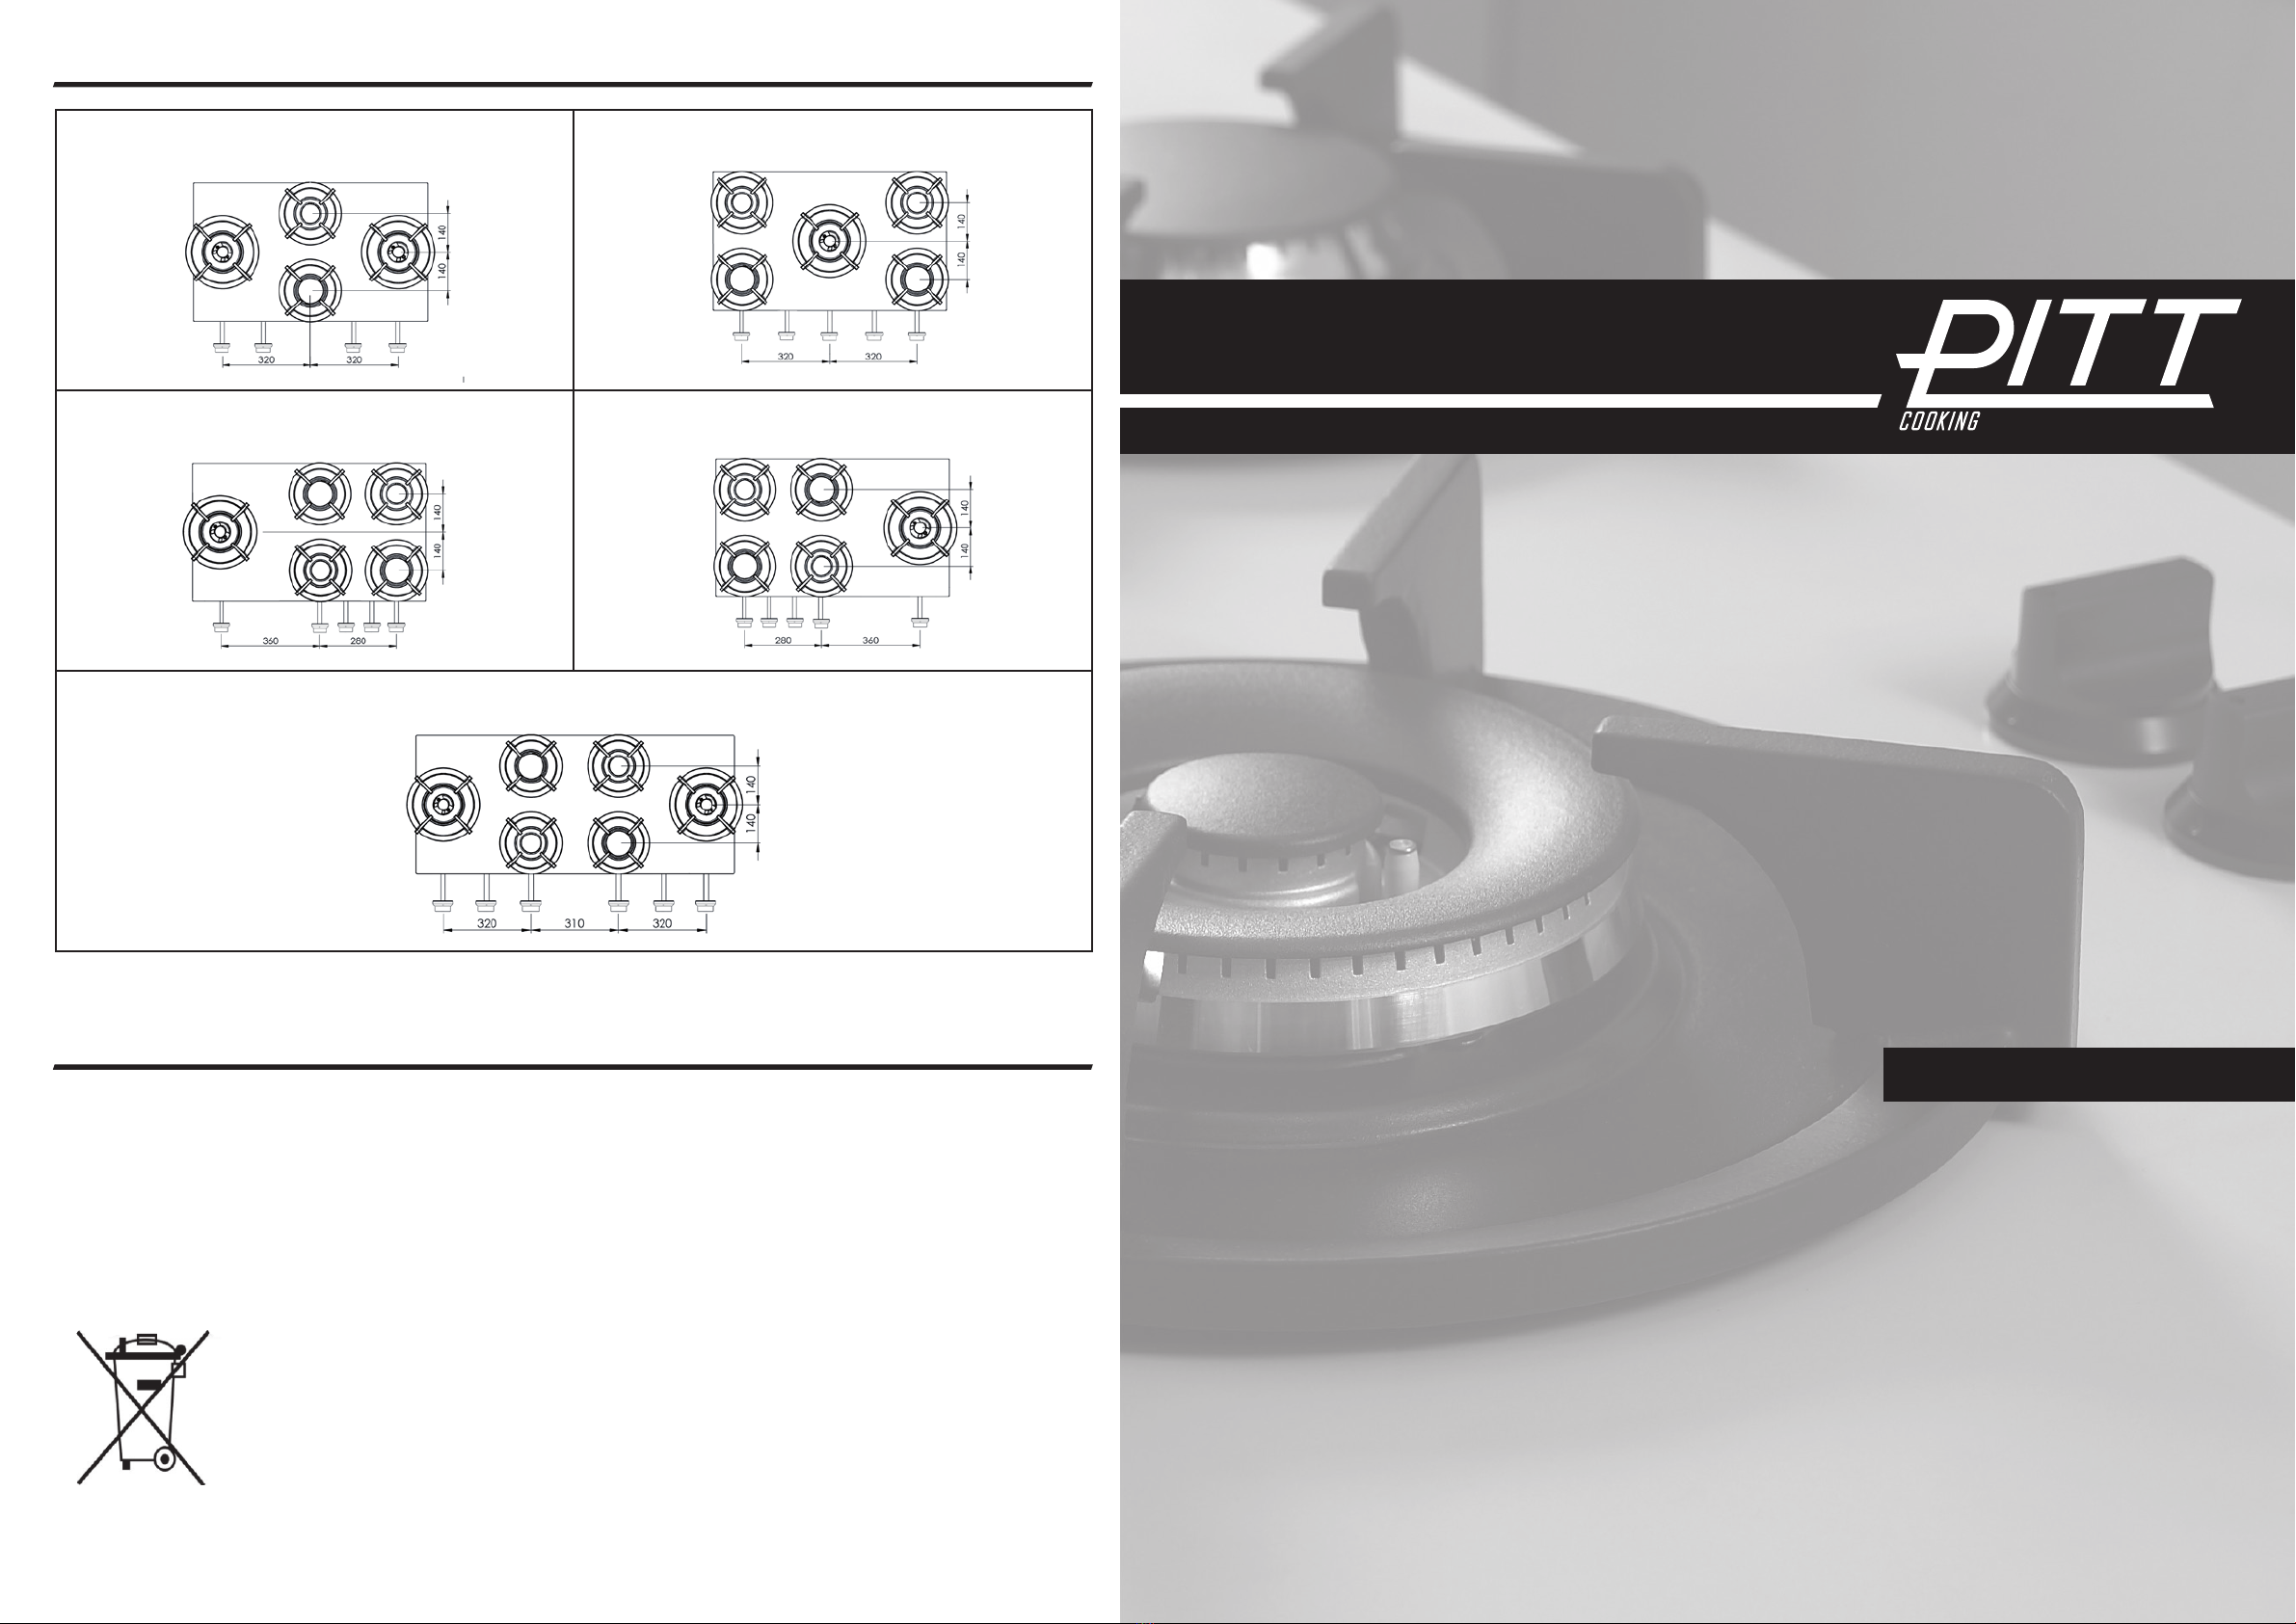
2 Aansluiting: gas en elektrisch
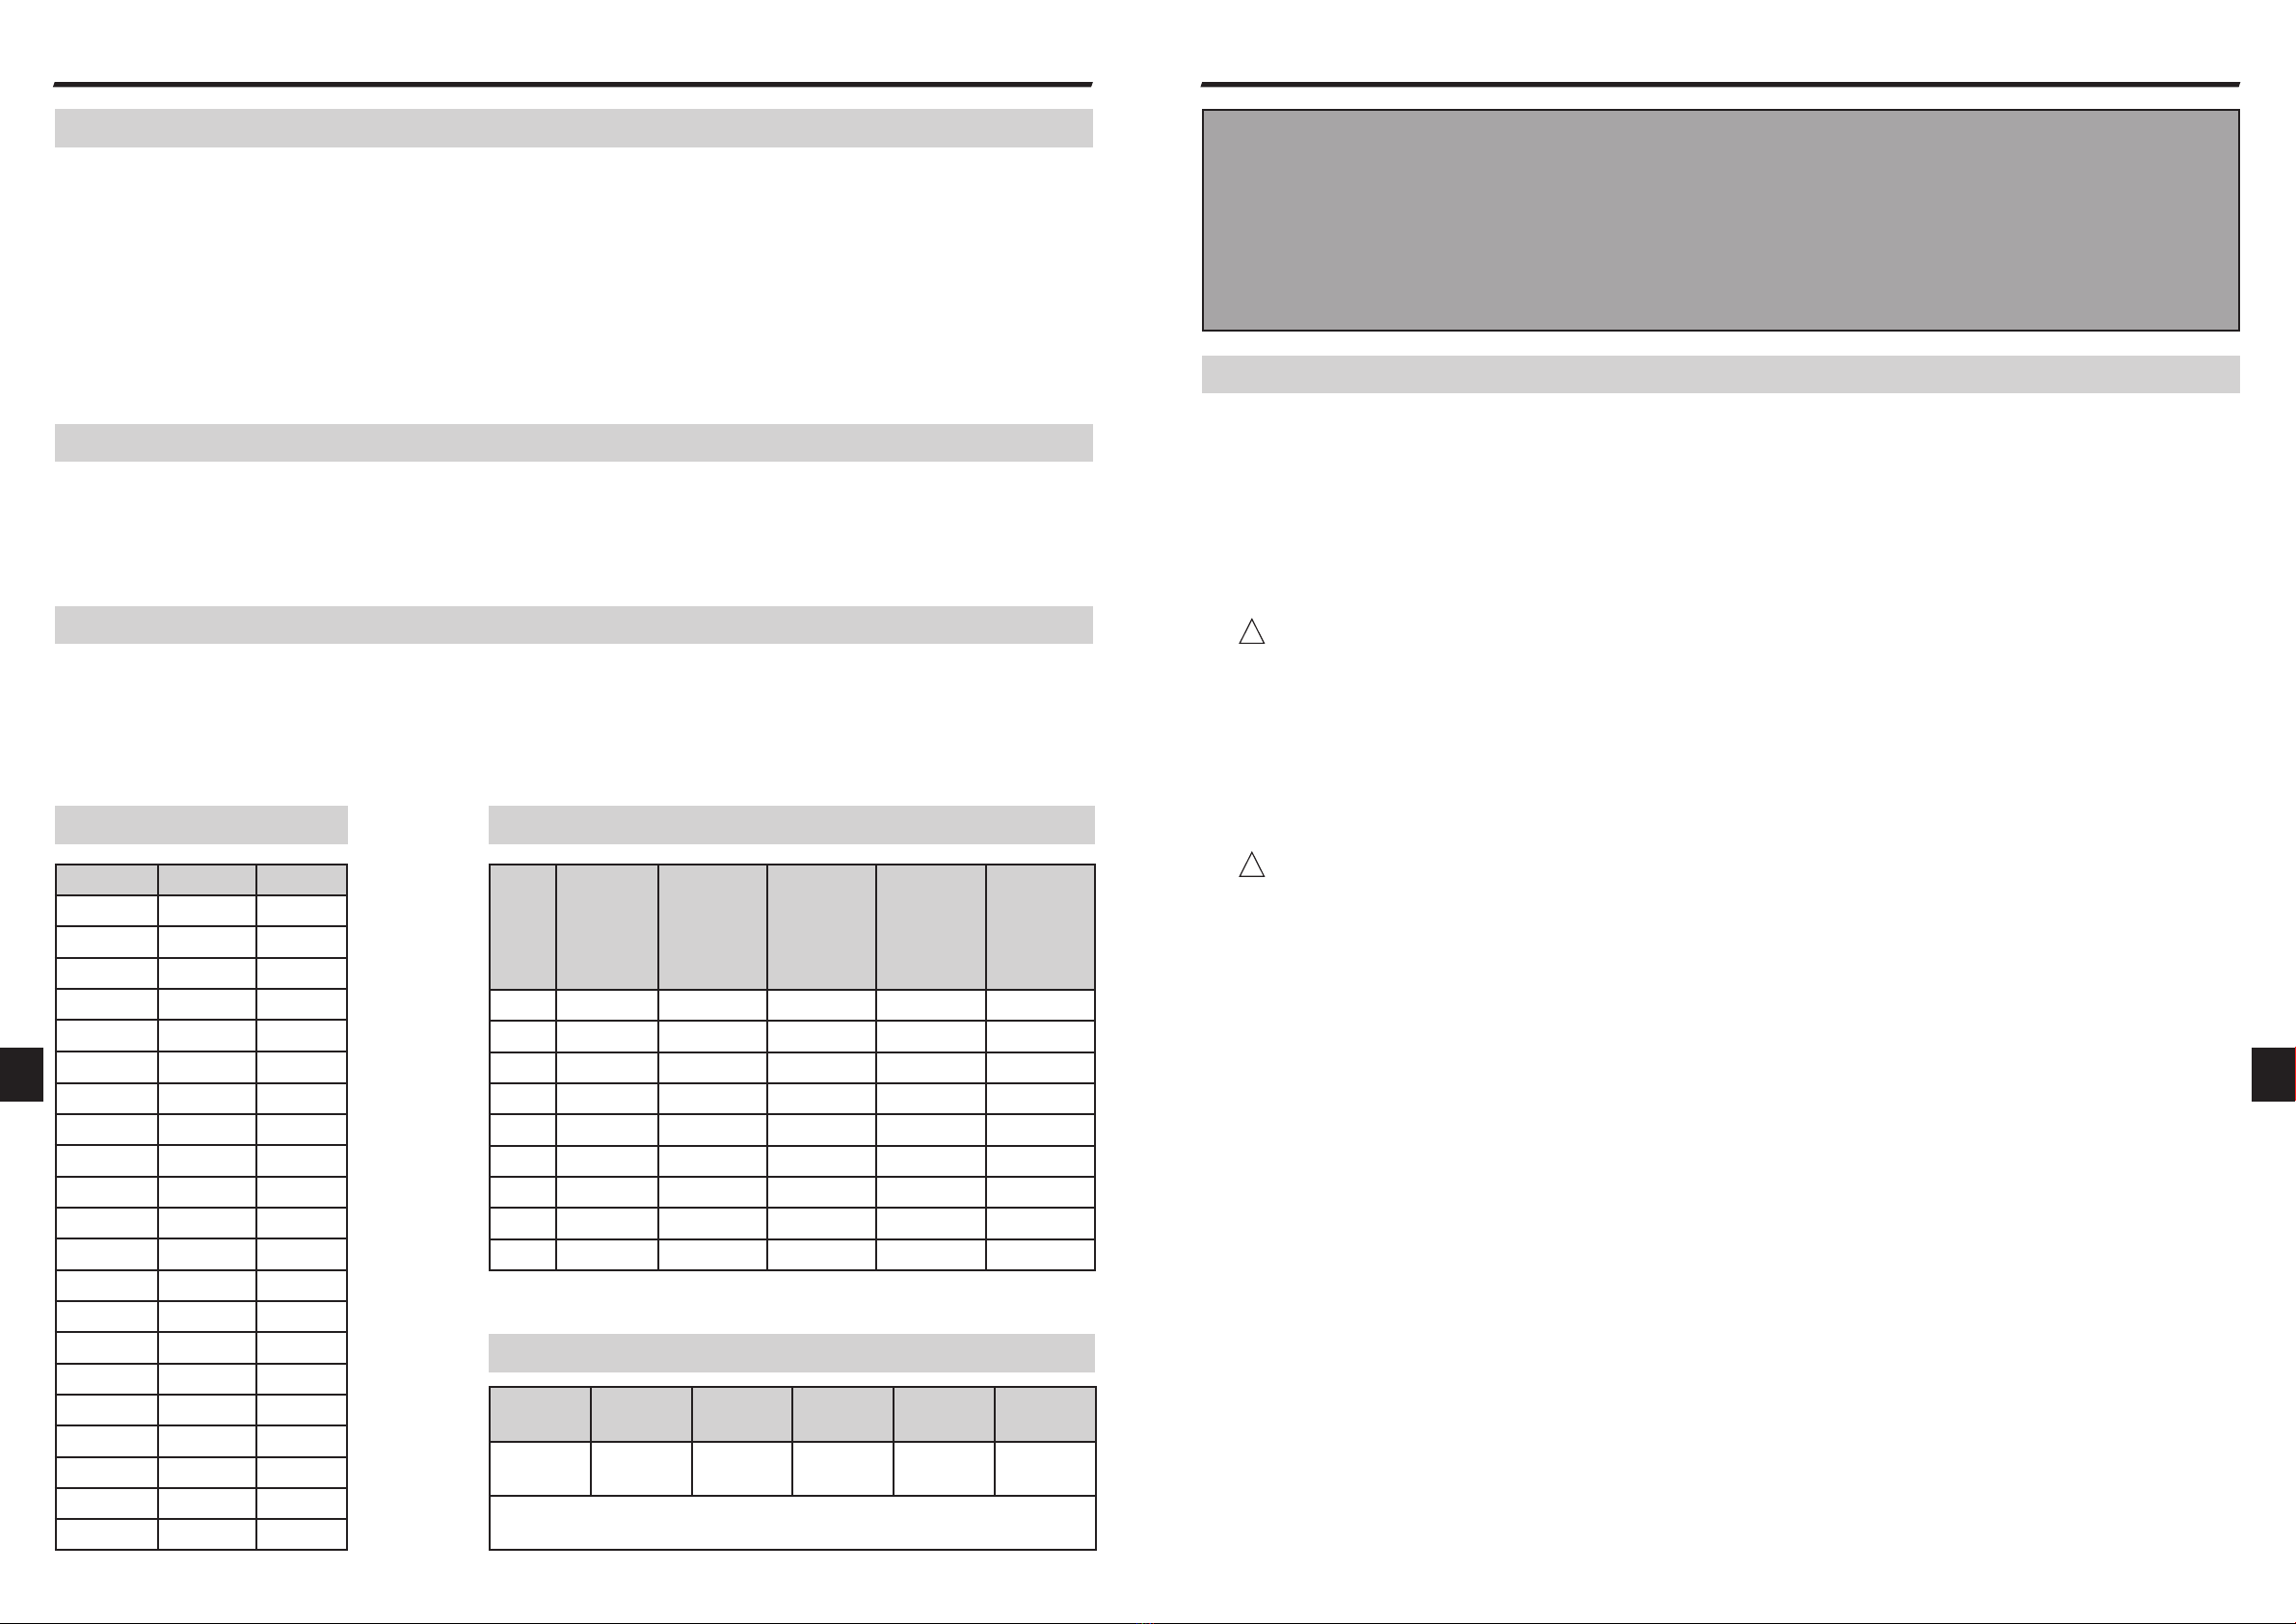
Overzicht modellen
Model PITT Totaal kW Bel. gr/h
Akan 1,8 Kw Hs 130
Altar 3 kW Hs 220
Air 5 kW Hs 360
Azuma 5 kW Hs 360
Bandai 4,8 kW Hs 350
Baluran 8 kW Hs 580
Bennett 6,8 kW Hs 490
Baula 8 kW Hs 580
Bely 6,8 kW Hs 490
Bromo 10 kW 720
Capital 9,8 kW Hs 710
Cima 9,8 kW Hs 710
Colo 12 kW Hs 850
Cusin 13 kW Hs 940
Dempo 14,8 kW Hs 1070
Danau 14,8 kW Hs 1070
Drum 14,8 kW Hs 1070
Ebeko 14,6 kW Hs 1060
Elbrus 14,6 kW Hs 1060
Enep 14,6 kW Hs 1060
Foessa 19,6 kW Hs 1420
Overzicht gas - sproeier combinatie
Gas Gasdruk Brander
0,3 - 1,8 kW
sproeier
Brander
0,3 - 3 kW
sproeier
Brander
0,2 - 5 kW
buitenring
sproeier
Brander
0,2 - 5 kW
binnenring
sproeier
G25 25 mbar 1.02 1.32 2x 1.18 1x 0,71
G25.3 25 mbar 1.02 1.32 2x 1.18 1x 0,71
G25 20 mbar 1.07 1.45 2x 1.28 1x 0,74
G20 20 mbar 1.01 1.29 2x 1.15 1x 0,70
G30 30 mbar 0.66 0.87 2x 0.72 1x 0.46
G30 50 mbar 0.58 0,79 2x 0.68 1x 0.40
G31 30 mbar 0.70 0.94 2x 0.80 1x 0.48
G31 37 mbar 0.66 0.87 2x 0.72 1x 0.46
G31 50 mbar 0.62 0.80 2x 0.70 1x 0.42
Gas I2H/E/LL
G20/25
I2L/I2EK
G25/G25.3
I3+
G30/31
I3B/P
G30/31
I3P
G31
Gasdruk 20
mbar
25
mbar
30/37
mbar
50
mbar
50
mbar
Toestel klasse: 3
Toestel categorieën
NLNL
• De vonkontsteking werkt via een AA-batterij.
• De batterij bevindt zich aan de onderzijde in de behuizing.
• Vervang de batterij als de vonkontsteking niet werkt.
* afhankelijk van het model
Batterij vonkontsteking* 1,5V DC
Waarschuwingen met betrekking tot veiligheid
Lees de instructies uit deze gebruikershandleiding zorgvuldig door. Pas daarna kunt u het PITT®cooking systeem op de juiste manier
gebruiken.
Bewaar zowel de montagehandleiding als de gebruikershandleiding goed. Bij het overdragen van het PITT®cooking systeem aan een
andere gebruiker dient u deze documentatie mee te leveren.
Controleer het PITT®cooking systeem direct na het verwijderen van de verpakking. Indien er sprake is van transportschade dient u
contact op te nemen met PITT®cooking en de veroorzaakte schade schriftelijk vast te leggen.
Veiligheidsvoorschriften
1. PITT®cooking is alleen bedoeld voor huishoudelijk gebruik.
2. Gebruik de kookplaat uitsluitend voor het bereiden van gerechten. Het toestel is niet geschikt om ruimtes mee te
verwarmen.
3. Let op dat alle branderonderdelen op de juiste manier zijn geplaatst.
4. Zorg voor voldoende ventilatie tijdens het gebruik.
5. Afstand van de pan tot een niet-hittebestendige wand- of bedieningsknop dient minimaal 2 centimeter te zijn.
6. Plaats pannen altijd op de pandragers, plaats deze nooit rechtstreeks op de branderdop.
7. Controleer het product regelmatig op beschadigingen. Neem het apparaat niet in gebruik wanneer het beschadigd is,
maar laat het repareren.
8. De gebruiker is zelf verantwoordelijk voor het juiste gebruik en de goede staat van het systeem. Bij onjuist gebruik kan
de fabrikant niet aansprakelijk worden gesteld voor eventuele schade.
Oververhitting en brandgevaar
9. Schakel de brander alleen in als u er een pan of wok op heeft geplaatst. Bij het verhitten van een lege pan kan er
oververhitting optreden.
10. Oververhitte olie of boter kunnen gemakkelijk vlam vatten. Nooit blussen met water. U kunt de vlammen smoren door
de pan af te dekken met een deksel.
11. Flambeer nooit onder een afzuigkap, dit kan brand veroorzaken.
12. Leg nooit ontvlambare of metalen voorwerpen op de kookplaat.
13. Plaats nooit een grill of bakplaat over twee branders.
14. Gebruik geen pannen met een grotere bodemdiameter dan de pannendrager. Wij adviseren bij de 2 en 3kW brander een
pan met een bodemdiameter van maximum 230 mm en bij de 5kW een maximum van 270 mm.
Hete onderdelen
15. Branderdelen en het keukenblad rondom de branders worden heet tijdens gebruik en blijven dit nog geruime tijd na het
koken. Raak deze hete delen niet aan.
16. Bij gebruik van pannen met een grotere diameter dan aanbevolen (punt 14) kunnen de bedieningsknoppen bij langdurig
en intensief gebruik heet worden.
17. Zorg ervoor dat de vlam altijd onder panbodem blijft (geldt niet bij wokken). Vlammen langs de panwand zijn niet
effectief en veroorzaken ongewenste oververhitting.
18. Het is van groot belang dat kinderen op afstand blijven.
!
!
3 Algemene instructies

6
4 Bediening PITT®cooking
Branders PITT®cooking
Branders ontsteken en instellen
Om storingen te voorkomen dient u voor het ontsteken van de brander te controleren of alle onderdelen op de juiste manier
gemonteerd zijn. Voor het ontsteken van de brander dient u een pan op de gaspit te plaatsen. Elke brander kan traploos
worden ingesteld tussen hoge en lage stand.
Inschakelen
Om de brander te ontsteken dient u de vonkontsteking te activeren. Dit doet u door de bedieningsknop helemaal in te
drukken en deze ingedrukt te houden. Draai de bedieningsknop naar links (afbeelding 5). Houdt de knop vervolgens nog 5
tot 8 seconden ingedrukt. Op deze manier wordt de temperatuursensor warm, waardoor gastoevoer mogelijk is. U kunt de
grootte van de vlam reguleren door langzaam aan de bedieningsknop te draaien tussen de hoge en lage stand (afbeelding 5
en 6).
Let op: mocht de vlam na 2 tot 4 seconden niet ontsteken, dan dient u de bedieningsknop door te draaien naar de lage
stand (afbeelding 6). Een kleine vlam ontsteekt vaak sneller dan een grote vlam.
Uitschakelen
Om de brander uit te schakelen draait u de bedieningsknop terug tot de stand weergegeven op afbeelding 4.
Brander uitgeschakeld Hoge stand Lage stand
afb. 4 afb. 5 afb. 6
5 Optimaal gebruik van het PITT®cooking systeem
• Voorkom dat de vlammen om de pan heen gaan, dit zorgt ervoor dat er veel energie verloren gaat. Ook handgrepen van
de pannen kunnen hierdoor te heet worden.
• Voor het doorkoken van grote hoeveelheden en wokken kunt u het beste de wokbrander gebruiken. Bereiding van
sauzen, doorkoken en sudderen kan het beste gebeuren op de sudderbrander. Voor het doorkoken dient deze wel op de
hoogste stand te staan.
• Kook met het deksel op de pan, hiermee spaart u energie.
• Gebruik pannen met een vlakke, schone en droge bodem. Vlakke pannen staan stabieler en een schone bodem zorgt
voor een betere warmteoverdracht naar het gerecht.
Wokbrander
Met de wokbrander kunt u gerechten op een zeer hoge temperatuur bereiden. Hierbij is het echter belangrijk om op een
aantal dingen te letten:
• Zorg ervoor dat u de ingrediënten van te voren snijdt.
• Gebruik bij het roerbakken olie van goede kwaliteit. Olijfolie, zonnebloemolie of arachideolie zijn zeer geschikt voor het
wokken. Gebruik geen boter of margarine, deze verbranden door hoge temperaturen.
• Om alle ingrediënten tegelijk gaar te laten worden, dient u eerst de ingrediënten met de langste bereidingstijd in de pan
te doen.
0,3 - 3 kW 0,2 - 5 kW0,3 - 2 kW
7
NLNL
6 Onderhoud van het PITT®cooking systeem
Het PITT®cooking systeem is vervaardigd uit hoogwaardige materiaalsoorten, die eenvoudig gereinigd kunnen worden.
Let hierbij op de volgende aandachtspunten:
1. Reinig branderdelen nooit in de vaatwasser, het vaatwasmiddel kan deze aantasten. Voorkom reiniging met teveel vocht,
dit kan de brander en ventilatieopeningen binnen dringen.
2. Gebruik een doekje om de elektrische vonkontsteking (zie afb. 7) te reinigen. Bij zware vervuiling kan de punt met een
fijn borsteltje worden gereinigd. Doe dit wel voorzichtig, voorkom dat de afstand van de vonkontsteking tot de brander
wijzigt. Het gevolg kan zijn dat de brander slecht of niet ontsteekt.
3. Plaats de pandragers direct op de branders, zonder deze over uw werkblad te schuiven.
4. Let bij het in elkaar zetten van de branderdelen op de geleidingsnokken (zie afb. 8).
5. Reinig de kookplaat direct na gebruik, dan voorkomt u dat overgekookt voedsel lange tijd kan inwerken en later lastig
te verwijderen zal zijn.
6. Begin met het reinigen van de knoppen, branders en pandragers. Reinig daarna het werkblad, zo voorkomt u dat deze
na reiniging opnieuw vuil wordt.
7. Gebruik een mild schoonmaakmiddel en zachte doek om de verwijderbare branderdelen te reinigen. Hardnekkige
vlekken op pandrager en branderdoppen kunnen het beste worden verwijderd met een vloeibaar reinigingsmiddel.
8. Gebruik in geen geval schuurpoeders, schuurpads, scherpe voorwerpen of agressieve reinigingsmiddelen.
9. Voor onderhoud en reiniging van uw werkblad verwijzen wij naar de handleiding van het desbetreffende product.
Let op: Het PITT®cooking systeem mag niet met een stoom- of hogedrukreiniger worden schoongemaakt. Op deze ma-
nier kan de elektrische veiligheid niet worden gewaarborgd.
Let op: Verwijder nooit de schroeven van het hitteschild (fig. 8a)
Elektrische vonkontsteking Pandrager met geleidingsnok
afb. 7 afb. 8 afb. 8a
Schroeven hitteschild

9
Let op: het PITT®cooking-systeem mag alleen worden aangesloten door een erkend installateur. Om de veiligheid
en garantie te waarborgen mogen reparaties alleen worden uitgevoerd door erkende vakmensen. U dient uitsluitend
gebruik te maken van originele onderdelen.
Storing Oorzaak Oplossing Hoofdstuk / Pagina
Een brander ont-
steekt en gaat direct
weer uit.
De bedieningsknop is niet lang
genoeg ingedrukt om de vlambe-
veiliging te activeren.
Houd de knop na ontsteken
enkele seconden ingedrukt.
Hoofdstuk 4 / pagina 6
De bedieningsknop is niet op de
juiste hoogte afgesteld.
Stel de bedieningsknop goed af. Montage handleiding**
TS: 13 t/m 15 FS: 11 t/m 17
De bedieningsknop
loopt aan op de
afdichtingsschaal.
Kookplaat is niet vlak onder het
werkblad gemonteerd.
Stel de bedieningsknop goed af. Montage handleiding**
TS: 13 t/m 15 FS: 11 t/m 17
Afdichtingsschaal niet gecentreerd
t.o.v. bedieningsknop.
Afdichtingsschaal loshalen en
opnieuw vastplakken.
Montage handleiding**
TS: 20 t/m 21 FS: 16 t/m 17
Vonkontsteking blijft
hangen
Kookplaat is niet vlak onder het
werkblad gemonteerd.
Stel de bedieningsknop goed af. Montage handleiding**
TS: 13 t/m 15 FS: 11 t/m 17
Afdichtingsschaal niet gecentreerd
t.o.v. bedieningsknop.
Afdichtingsschaal loshalen en
opnieuw vastplakken.
Montage handleiding**
TS: 20 t/m 21 FS: 16 t/m 17
Een brander
ontsteekt niet.
De bedieningsknop is niet op de
juiste hoogte afgesteld.
Stel de bedieningsknop goed af. Montage handleiding**
TS: 13 t/m 15 FS: 11 t/m 17
De stekker zit niet in het
stopcontact.
Steek de stekker in het stopcon-
tact.
Zekering defect of de zekering
ring in de meterkast is uitgescha-
keld.
Monteer een nieuwe zekering of
schakel de zekering weer in.
Vonkontsteking is vervuild of
vochtig.
Reinig of droog de vonkontste-
king.
Hoofdstuk 6 / pagina 7
Branderdelen zijn niet juist gemon-
teerd.
Zet de branderdelen via de
centreernokken in elkaar.
Hoofdstuk 6 / pagina 7
Branderdelen zijn vervuild of voch-
tig.
Reinig/droog de
branderdelen. Let hierbij op of
de uitstroomgaten open zijn.
Hoofdstuk 6 / pagina 7
Hoofdgaskraan is gesloten. Open de hoofdgaskraan. Hoofdstuk 2 / pagina 4
Bedieningsknop is niet lang of diep
genoeg ingedrukt.
Houd de bedieningsknop lang
genoeg en voldoende ingedrukt
tussen vol- en kleinstand.
Hoofdstuk 4 / pagina 6
Batterij leeg* Batterij vervangen
Een brander brandt
niet egaal.
Branderdelen zijn niet juist ge-
plaatst.
Zet de branderdelen via de
centreernokken in elkaar.
Hoofdstuk 6 / pagina 7
Branderdelen zijn vervuild of voch-
tig.
Reinig/droog de
branderdelen. Let hierbij op of
de uitstroomgaten open zijn.
Hoofdstuk 6 / pagina 7
Gaslucht in omge-
ving van het kook-
toestel.
Aansluiting kookplaat lekt. Controleer de aansluiting. Indien
de oorzaak niet gelijk te verhel-
pen is sluit dan onmiddellijk de
hoofdgaskraan.
Er is een brander ingeschakeld,
maar niet ontstoken.
Sluit de bedieningsknop en
wacht enkele minuten met op-
nieuw ontsteken.
Hoofdstuk 4 / pagina 6
7 Storingen in het PITT®cooking systeem
Krijgt u de storing niet verholpen aan de hand van de bovenstaande punten? Neem contact op met uw vakhandelaar of de
PITT®cooking klantenservice: Zie het serviceadres op pagina 76.
8
NLNL
8 Top Side modellen overzicht
Akan Altar Azuma Air
Baluran Bennett Baula Bely
Bromo Cima Capital
Cusin Colo
Danau Drum
653
450
503
* Afhankelijk van het model
** TS = Top Side / FS = Front Side

10 11
NLNL
Dempo Elbrus
Enep Ebeko
Foessa
9 Front Side modellen overzicht
Akan Altar Azuma Air
Baluran Bennett Baula Bely
Bandai Bromo Cima Capital
Cusin Colo
Danau Drum
8 Top Side modellen overzicht

EN User Manual
Top Side/Front Side
10 Verpakking
Het PITT®cooking systeem is vervaardigd met gebruik van duurzame materialen.
De verpakking is recyclebaar en bestaat uit de volgende materiaalsoorten:
- karton;
- papier;
Deze materialen dienen conform de overheidsbepalingen op een verantwoorde wijze te worden afgevoerd. De verpakking
van dit product is voorzien van een sticker met de afbeelding van een doorgekruiste vuilnisbak (zie afbeelding 9).
De richtlijn inzake afgedankte elektrische en elektronische apparatuur (AEEA) van de Europese Unie. De richtlijn AEEA
van de Europese Unie vereist dat producten die in de landen van de EU worden verkocht (of in sommige gevallen de
verpakking daarvan), moeten zijn voorzien van het etiket met een doorgekruiste vuilnisbak. Zoals bepaald door de
richtlijn AEEA, betekent dit etiket met de doorgekruiste vuilnisbak dat klanten en eindgebruikers in de landen van de EU
elektrische en elektronische apparatuur of toebehoren niet met het huisvuil mogen wegwerpen. Klanten en eindgebrui-
kers binnen de EU moeten contact opnemen met hun plaatselijke leverancier of onderhoudscentrum voor informatie over
het afvalinzamelsysteem in hun gemeente.
afb. 9
Dempo Elbrus
Enep Ebeko
Foessa
9 Front Side modellen overzicht
12

Foreword
Dear customer,
Congratulations on the purchase of your PITT®cooking gas hob. This unique system gives you the opportunity to
determine the location of each burner which means you are guaranteed to cook with pleasure for many years. Thanks to
the various burner capacities you can properly prepare each dish and the integrated spark ignition in the controls ensures
that the burners can be handled with one hand. This manual describes how to take full advantage of all the features of
this gas hob.
We recommend you read the user manual and mounting instructions carefully before you use the gas hob.
Do not throw this manual away, so that any following user also benefits from it.
Happy Cooking!
PITT®cooking
Content
Chapter Subject Page
1 Installation dimensions 15
2 Connection: gas and electrical 16
3 General instructions 17
4 Control PITT®cooking 18
5 Optimal use of the PITT®cooking system 18
6 Maintenance of the PITT®cooking system 19
7 Failures in the PITT®cooking system 20
8 Models overview Top Side 21
9 Models overview Front Side 23
10 Packaging 24
11 Service addresses 76
1 Installation dimensions
• A cooking module cannot be installed over a partition of cabinets. It has to be accessible in case it needs servicing.
• When PITT®cooking is combined with a drawer cabinet, always be aware of the measurements of the unit and the support
bar. The height of the unit and the support bar is 115 mm (Top Side) and 170 mm (Front Side) measured from the top of
the worktop (fig.2).
• To prevent bending of the worktop the appliance need to be supported by two PITT®cooking support bars
(fig. 2 and 4).
Type sticker
15
Top Side (TS) measure in mm
Support bar
afb. 2
fig. 4
Min. 47 Min.
150
Min. 50
Min. 600
Min. 4
Max. 35
fig. 1
Support Bar
88mm TS
140 mm FS
115mm TS
170 mm FS
Min.
450
Min.
650
fig. 2
Support bar
Front Side (FS) measure in mm
fig. 3
Min.
150
75 mm
Min. 650
Min. 4
Max. 25
Min. 47
ENEN
14

16
2 Connection: gas and electrical
• Check that installation or local distribution regulations (type of gas and gas pressure) match the setting value of this
device.
• The setting values of this device are indicated on the type plate.
• This device is not equipped with a combustion gas drain installation. Installation and connection must comply with the
regulations in force locally and nationwide. You must check the regulations in regards to ventilation requirements.
• The gas connection must comply with the general regulations. We recommend to connect the hob with a fixed gas pipeline
or to use an approved gas hose.
• Always use a full metal hose behind the oven.
• An approved gas hose should not be kinked and should not come into contact with moving parts of the kitchen furniture.
• The main gas supply must be in an easily accessible place.
• Before using the cooking unit check all the connections for leaks with soapy water.
• The electrical installation must conform to the national and local regulations.
• Power socket and plug must always be reachable.
• Connect the unit with the supplied plug to an earthed socket.
• Damage to the connection cable may only be replaced by the manufacturer, or an approved Installer. This to prevent
dangerous situations.
Electrical connection instructions*
• The spark ignition operates through a battery AA.
• The battery is positioned in the casing at the underside.
• Replace the battery if the spark ignition does not operate
* Depending on the model
Battery spark ignition*
Gas connection instructions
230 V – 50 Hz – 0,6 VA
1,5V DC
17
Models PITT®cooking overview Gastype - nozzle combination overview
Unit category
Gas Supply
pressure
Burner
0,3 - 2 kW
nozzle
Burner
0,3 - 3 kW
nozzle
Burner
0,2 - 5 kW
outer ring
nozzle
Burner
0,2 - 5 kW
inner ring
nozzle
G25 25 mbar 1.02 1.32 2x 1.18 1x 0,71
G25.3 25 mbar 1.02 1.32 2x 1.18 1x 0,71
G25 20 mbar 1.07 1.45 2x 1.28 1x 0,74
G20 20 mbar 1.01 1.29 2x 1.15 1x 0,70
G30 30 mbar 0.66 0.87 2x 0.72 1x 0.46
G30 50 mbar 0.58 0,79 2x 0.68 1x 0.40
G31 30 mbar 0.70 0.94 2x 0.80 1x 0.48
G31 37 mbar 0.66 0.87 2x 0.72 1x 0.46
G31 50 mbar 0.62 0.80 2x 0.70 1x 0.42
Gas I2H/E/LL
G20/25
I2L/I2EK
G25/G25.3
I3+
G30/31
I3B/P
G30/31
I3P
G31
Supply
pressure
20
mbar
25
mbar
30/37
mbar
50
mbar
50
mbar
Class of appliances: 3
Model PITT Total kW Bel. gr/h
Akan 1,8 Kw Hs 130
Altar 3 kW Hs 220
Air 5 kW Hs 360
Azuma 5 kW Hs 360
Bandai 4,8 kW Hs 350
Baluran 8 kW Hs 580
Bennett 6,8 kW Hs 490
Baula 8 kW Hs 580
Bely 6,8 kW Hs 490
Bromo 10 kW 720
Capital 9,8 kW Hs 710
Cima 9,8 kW Hs 710
Colo 12 kW Hs 850
Cusin 13 kW Hs 940
Dempo 14,8 kW Hs 1070
Danau 14,8 kW Hs 1070
Drum 14,8 kW Hs 1070
Ebeko 14,6 kW Hs 1060
Elbrus 14,6 kW Hs 1060
Enep 14,6 kW Hs 1060
Foessa 19,6 kW Hs 1420
ENEN
3 General instructions
Safety Warnings
Read the instructions in this user manual carefully. Only then you can use your PITT®cooking gas hob the right way.
Save both the Assembly instructions and the user manual. If the PITT®cooking system transfers to another user, they need this
documentation.
Check the PITT®cooking system immediately after removing the packaging. If there is any shipping damage you should contact PITT®
cooking immediately by e-mail or in writing.
Safety Rules
1. PITT®cooking is intended for domestic use only.
2. Only use the gas hob for the preparation of dishes. This appliance is not suitable for heating your home.
3. Please ensure that all burner parts are placed correctly.
4. Ensure adequate ventilation during use.
5. Distance from the pan to a non-heat resistant wall or control knob must be at least 2 cm or 0,8 inches.
6. Always place pans on the pan support, never directly on the burner top.
7. Check the product regularly for damage. Do not use the product when damaged, repair it immediately.
8. The user is responsible for the proper use and good state of the system.
When used incorrectly, the manufacturer is not liable for any damages.
Overheating and fire hazards
9. Use the burner only with a pan or a wok on the pan support. Warning: an empty pan may overheat.
10. Overheated oil or butter can easily ignite. Never put out with water. You can smother the flames by closing the pan with
a lid.
11. Do not flambé under a cooker hood, this can cause a fire.
12. Never put flammable objects on the hob.
13. Never place a grill or griddle over two burners.
14. Do not use pans with a larger base diameter than the pan support. We recommend for the 2 and 3KW burners a pan
with a maximum base diameter of 230 mm and for the 5KW burner a maximum base of 270 mm.
Hot parts
15. Parts of the burner and the worktop surrounding the burner may become hot during use and will remain hot for a long
period after use. Please take care not to touch these parts until they have fully cooled.
16. Please be aware that if you use a pan with a larger base diameter than the pan support (see point 14) there is a possi-
bility that the control knobs may become hot.
17. Please be aware that the flame should always remain beneath the base of the pan (unless you are stir frying with a
wok). Flames rising against the side of the pan will not be effective and will produce unwanted overheating.
18. It is very important that children remain at a distance.
!
!

18 19
4 Control PITT®cooking
Burners PITT®cooking
Burners ignite and set
Before you ignite the burner verify that all components are mounted in the right way to prevent unwanted interference.
Before igniting the burner you need to place a pan on the hob. Each burner can be set easily between high and low.
Igniting
To ignite the burner you need to activate the spark ignition. You do this by pressing the control knob all the way and hold.
Turn the control knob to the left (Figure 5). Keep the button pressed for another 5 to 8 seconds. This way the temperature
sensor warms and gas can be distributed. You can regulate the size of the flame by turning the control knob slowly between
the high and low position (Figure 5 and 6).
Caution: If the flame does not ignite after 2 to 4 seconds, you need to return the knob to the low position (Figure 6).
A small flame often kindles faster than a large flame.
Turning off
To turn off the burner, turn the control knob back to the state displayed on Figure 4.
Burner off High flame size Low flame size
fig. 4 fig. 5 fig. 6
5 Optimal use of the PITT®cooking system
• Avoid flames rising around the pan to minimise the loss of energy. Be careful as the handles of the pans can become
hot.
• To cook large quantities you best use the stir-fry cooker. For preparation of sauces and simmering dishes best use the
side burner. To cook through it should be on the highest level.
• Cooking with the lid on the pan conserves energy.
• Use cookware with a flat, clean and dry bottom. Flat pans are more stable and a clean bottom makes for a better heat
transfer.
High burner
With the cooker you can prepare dishes at a very high temperature. It is important, however, to pay attention to a number of
things:
• Make sure you have the ingredients cut in advance.
• Use an oil of good quality for frying, for example: olive oil, sunflower oil or peanut oil. Do not use butter or margarine
as these will be overheated and blackened by high temperatures.
• To ensure all the ingredients are ready at the same time, you must put the ingredients with the longest preparation time
in the pan first.
0,3 - 3 kW 0,2 - 5 kW0,3 - 2 kW
ENEN
6 Maintenance of the PITT®cooking system
PITT®cooking is manufactured with high-grade materials, which can be very easily cleaned.
Please take the following into consideration:
1. Never clean in the dishwasher as the detergent can affect the materials. Avoid cleaning with too much moisture as the
can enter the burner outlet and cause damage.
2. Use a cloth to clean the electric spark ignition (fig. 7). In case of heavy use it can be cleaned with the point of a fine
brush. Do this carefully as an accidental change in the distance between the burner and spark ignition may result in the
burner being damaged or failing to ignite.
3. Place the pan support directly onto the burners without scratching your countertop.
4. Assemble the burner parts via the centring cams in each part (see fig. 8).
5. Clean the cooker immediately after use. This prevents overcooked food settling on the burner and becoming difficult to
remove.
6. Start with cleaning the buttons, burners and pan support. Then clean the countertop to prevent it from being stained
again.
7. Use a mild detergent and a soft cloth to clean the removable burner parts. Stubborn stains on pan carriers and burner
tops are best removed with a liquid cleanser.
8. Never use scouring powders, pads, sharp objects or aggressive cleaning agents.
9. For maintenance and cleaning of the countertop refer to the manual of the particular product.
Caution: The PITT®cooking system must not be steam cleaned or high-pressure cleaned. If cleaned this way the electri-
cal safety is not ensured.
Caution: Never unscrew the screws of the heat shield(s) (see fig. 8a).
Electric spark ignition Pan support with centering cams
fig. 7 fig. 8 fig. 8a
Screws heat shield

20 21
Note: the PITT®cooking-system may only be connected by an approved installer. To ensure the safety and warranty
repairs may only be performed by approved professionals. You should only use original parts.
Failure Cause Solution Chapter / Page
A burner ignites and
turns off again.
The control knob is not pressed
long enough to activate the auto-
flame detection.
Press the control knob down
long enough to turn between full
and low heat.
Chapter 4 / page 18
The control knob is not adjusted at
the correct height.
Adjust the control knob properly. Installation manual **
TS: 13 t/m 15 FS: 11 t/m 17
The control-button
touches the sealing
scale.
Hob is not mounted the right way
under the countertop.
Adjust the control knob properly. Installation manual **
TS: 13 t/m 15 FS: 11 t/m 17
Sealing scale is not in the center
vs. control knob.
Detach sealing scale and and
re-stick again.
Installation manual **
TS: 20 t/m 21 FS: 16 t/m 17
Spark ignition
remains igniting.
Hob is not mounted the right way
under the countertop.
Adjust the control knob properly. Installation manual **
TS: 13 t/m 15 FS: 11 t/m 17
Sealing scale is not in the center
vs. control knob.
Detach sealing scale and and
re-stick again.
Installation manual **
TS: 20 t/m 21 FS: 16 t/m 17
The burner doesn’t
ignite.
The control knob is not adjusted at
the correct height.
Adjust the control knob properly. Installation manual **
TS: 13 t/m 15 FS: 11 t/m 17
The power plug is not in the power
socket.
Put the power plug into the
power socket.
Fuse malfunction / fuse in meter
cupboard is disabled.
Install a new fuse or switch on
the fuse again.
Spark ignition is dirty or wet. Clean or dry the spark ignition. Chapter 6 / page 19
Burner parts are not properly
mounted.
Ensure the burner parts are
correctly aligned with the
centring cams.
Chapter 6 / page 19
Burner parts are dirty or wet. Clean or dry the
burner parts. Make sure the
outflow holes are open.
Chapter 6 / page 19
The main gas supply is not open. Open the main gas supply.
The control knob is not pressed
long enough
Press the control knob down
long enough to turn between full
and low heat.
Chapter 4 / page 18
Battery empty* Replace battery Chapter 2 / page 16
A burner does not
burn evenly.
Burner parts are not placed
properly.
Ensure the burner parts are
correctly aligned with the
centring cams.
Chapter 6 / page 19
Burner parts are dirty or wet. Clean or dry the
burner parts. Make sure the
outflow holes are open.
Chapter 6 / page 19
Gas smell. Gas connection leaks. Check the connection. Turn main
gas supply off immediately when
you’re not able to fix it right
away.
There is a burner turned on, but
not inflamed.
Close the control knob and wait
a few minutes before reigniting.
Chapter 4 / page 18
7 Failures in the PITT®cooking system
If the failure still remains please contact your dealer or the PITT®cooking customer service: See the service addresses on
page 76.
* Depending on the model
** TS = Top Side / FS = Front Side
ENEN
8 Models overview Top Side
Akan Altar Azuma Air
Baluran Bennett Baula Bely
Bromo Cima Capital
Cusin Colo
Danau Drum
653
450
503

22 23
ENEN
Dempo Elbrus
Enep Ebeko
Foessa
9 Models overview Front Side
Akan Altar Azuma Air
Baluran Bennett Baula Bely
Bandai Bromo Cima Capital
Cusin Colo
Danau Drum
8 Models overview Top Side

FR Notice d’utilisation
Top Side/Front Side
10 Packaging
The PITT®cooking system is manufactured using sustainable materials.
The packaging is recyclable and consists of the following types of materials:
-paperboard
-paper
These materials are in accordance with the provisions of Government to be disposed of in a responsible manner. The
packaging of this product is equipped with a sticker with the image of a crossed-out dustbin (see Figure 9).
The directive on waste electrical and electronic equipment (WEEE) of the European Union. The WEEE directive of the
European Union requires that products that are sold in the countries of the EU (or in some cases the packaging thereof)
must be labelled with a crossed-out dustbin. As determined by the WEEE directive, this means label with the crossed-out
dustbin that customers and end users in the countries of the EU electrical and electronic equipment or accessories not
with the garbage may dispose. Customers and end users within the EU should contact their local supplier or maintenance
centre for information about the waste collection system in their municipality.
afb. 9
Dempo Elbrus
Enep Ebeko
Foessa
9 Models overview Front Side
24

Avant-propos
Cher client,
Nous tenons tout d’abord à voues remercier pour l’achat de votre appareil de cuisson à gaz PITT®cooking. Ce système
unique vous permet de déterminer vous même l’emplacement de chacun des points de cuisson. Ceci vous garanti le
plaisir d’utiliser votre appareil de cuisson pour de nombreuses années. La capacité différente de chaque brûleur vous
permet de préparer chacun de vos plats de la meilleure manière. L’allumage par étincelle intégré vous permet de régler
avec une seule main les brûleurs et l’allumage.
Cette notice décrit comment vous pouvez utiliser de manière optimale toutes les fonctions de cet appareil de cuisson.
Nous vous conseillons de lire attentivement les instructions de la notice d’utilisation et de montage, avant de commencer
à utiliser l’appareil.
Conservez précieusement cette notice, de manière à ce qu’un éventuel prochain utilisateur puisse aussi l’utiliser à son
avantage. De plus cette notice peut être utilisée comme ouvrage de référence pour le service après-vente.
Nous vous souhaitons beaucoup de plaisir à cuisiner !
PITT®cooking
Sommaire
Chapitre Sujet Page
1 Tailles d’encastrement 27
2 Raccordements de gaz et électrique 28
3 Instructions générales 29
4 Exploitation de PITT®cooking 30
5 Utilisation optimale du système PITT®cooking 30
6 Entretien du système PITT®cooking 31
7 Pannes du système PITT®cooking 32
8 Vue d’ensemble des modèles Top Side 33
9 Vue d’ensemble des modèles Front Side 35
10 Conditionnement 36
11 Adresse du service après-vente 76
1 Tailles d’encastrement
• Un module PITT®cooking ne doit jamais être monté au dessus de la séparation de deux placards. La plaque de cuisson
doit pouvoir être démontée à tout moment pour l’entretien.
• Quand le module PITT®cooking est planifié par exemple au-dessus d’un tiroir, vous devez prendre en compte l’épaisseur
totale de l’unité et du jeu de supports de 115 mm (Top Side) et 170 mm (Front Side) mesurés à partir du dessus de la
plaque (image 2).
• Pour éviter que la plaque ne se déforme, le module doit être soutenu avec le jeu de supports PITT®cooking
(images 2 et 4).
Étiquette type
27
Top Side (TS) dimensions en mm
Support
afb. 2
img. 4
Min. 47 Min.
150
Min. 50
Min. 600
Min. 4
Max. 35
img. 1
Support
88mm TS
140 mm FS
115mm TS
170 mm FS
Min.
450
Min.
650
img. 2
Support
Front Side (FS) dimensions en mm
img. 3
Min.
150
75 mm
Min. 650
Min. 4
Max. 25
Min. 47
FRFR
26

28
Instructions concernant le raccordement au gaz
• Vérifiez avant l’installation si les conditions de distribution locales (type et pression du gaz) correspondent aux valeurs
de mise au point de cet appareil.
• Les valeurs de mise au point de cet appareil sont indiquées sur la plaque signalétique.
• Cet appareil n’est pas équipé d’une installation de transport de gaz de combustion.
L’installation et le raccordement doivent être réalisés en conformité avec les prescriptions locales et nationales. Surtout
en ce qui concerne les prescriptions de ventilation.
• Le raccordement du gaz doit être conforme aux prescriptions générales en vigueur. Nous recommandons de relier la
plaque de cuisson à une conduite de gaz fixe. L’utilisation d’un tuyau à gaz flexible conforme, spécialement destiné à
cet usage est aussi autorisé.
• Utilisez toujours à l’arrière d’un four un tuyau entièrement métallique.
• En cas d’utilisation d’un tuyau à gaz flexible, veillez à ce que celui-ci ne soit pas plié, et qu’il ne soit pas en contact
avec des parties du meuble de cuisine pouvant bouger.
• Le robinet de fermeture du gaz doit être placé dans un endroit facile d’accès.
• Vérifiez avant la mise en service que les raccordements ne fuient pas, ceci peut être réalisé à l’aide d’eau savonneuse.
• TL’installation électrique doit être conforme aux prescriptions nationales en vigueur.
• PLe raccordement sur la prise électrique murale doit toujours être accessible.
• Raccorder l’appareil avec la fiche mâle reliée à la terre à la prise murale reliée à la terre.
• En cas d’endommagement du câble de raccordement, celui-ci ne doit être remplacé que par le fabricant, ou par un in-
stallateur agréé. Ceci pour prévenir la survenue de situations dangereuses.
Instructions concernant le raccordement électrique* 230 V – 50 Hz – 0,6 VA
2 Raccordements de gaz et électrique
• L’allumage par étincelle fonctionne grâce à une pile AA.
• La pile est située dans le boîtier en dessous.
• Si l’allumage par étincelle ne fonctionne pas, remplacer la pile.
* En fonction du modèle
Allumage par étincelle avec pile* 1,5V DC
29
Vue d’ensemble des modèles Vue d’ensemble combinaison gicleur - gaz
Gaz Pression
de gaz
Brûleur
0,3 - 1,8 kW
gicleur
Brûleur
0,3 - 3 kW
gicleur
Brûleur
0,2 - 5 kW
bague exté-
rieure
gicleur
Brûleur
0,2 - 5 kW
bague
intérieure
gicleur
G25 25 mbar 1.02 1.32 2x 1.18 1x 0,71
G25.3 25 mbar 1.02 1.32 2x 1.18 1x 0,71
G25 20 mbar 1.07 1.45 2x 1.28 1x 0,74
G20 20 mbar 1.01 1.29 2x 1.15 1x 0,70
G30 30 mbar 0.66 0.87 2x 0.72 1x 0.46
G30 50 mbar 0.58 0,79 2x 0.68 1x 0.40
G31 30 mbar 0.70 0.94 2x 0.80 1x 0.48
G31 37 mbar 0.66 0.87 2x 0.72 1x 0.46
G31 50 mbar 0.62 0.80 2x 0.70 1x 0.42
Catégories d’appareils
Gaz I2H/E/LL
G20/25
I2L/I2EK
G25/G25.3
I3+
G30/31
I3B/P
G30/31
I3P
G31
Pression
de gaz
20
mbar
25
mbar
30/37
mbar
50
mbar
50
mbar
Classe d’appareil: 3
Modèle PITT Total kW gr/h
Akan 1,8 Kw Hs 130
Altar 3 kW Hs 220
Air 5 kW Hs 360
Azuma 5 kW Hs 360
Bandai 4,8 kW Hs 350
Baluran 8 kW Hs 580
Bennett 6,8 kW Hs 490
Baula 8 kW Hs 580
Bely 6,8 kW Hs 490
Bromo 10 kW 720
Capital 9,8 kW Hs 710
Cima 9,8 kW Hs 710
Colo 12 kW Hs 850
Cusin 13 kW Hs 940
Dempo 14,8 kW Hs 1070
Danau 14,8 kW Hs 1070
Drum 14,8 kW Hs 1070
Ebeko 14,6 kW Hs 1060
Elbrus 14,6 kW Hs 1060
Enep 14,6 kW Hs 1060
Foessa 19,6 kW Hs 1420
FRFR
Avertissements relatifs à la sécurité
Lisez attentivement l’ensemble des instructions de cette notice d’utilisation. Vous pourrez ensuite utiliser correctement le système
PITT®cooking.
Conservez soigneusement aussi bien la notice de montage que la notice d’utilisation. Vous devrez fournir cette documentation à
un prochain utilisateur en cas de transmission du système PITT®cooking. Vérifiez le système PITT® cooking immédiatement après
son déballage. En cas de dommages liés au transport prenez immédiatement contact avec PITT®cooking en signifiant par écrit les
dommages causés.
Prescriptions de sécurité
1. PITT®cooking n’est destiné qu’à un usage ménager.
2. N’utilisez la plaque de cuisson que pour la préparation de repas. L’appareil n’est pas approprié pour le chauffage
d’ambiance.
3. Assurez-vous que les éléments du brûleur sont bien placés correctement.
4. Assurez-vous que la ventilation est suffisante lors de l’utilisation.
5. La distance entre les ustensiles de cuisine et un mur ne résistant pas à la chaleur ou les boutons de commande doit
être d’au minimum 2 centimètres et 0,8 inches.
6. Placez les ustensiles de cuisine sur les supports de cuisson, ne les placez jamais directement sur les brûleurs.
7. Vérifiez régulièrement l’éventuel endommagement du produit. N’utilisez jamais l’appareil lorsque celui-ci est endom-
magé, mais faites-le réparer.
8. L’utilisateur est responsable de la bonne utilisation du système et de son bon état. En cas d’utilisation inappropriée, le
fabricant ne pourra pas être tenu responsable des dommages occasionnés.
Surchauffe et danger d’incendie
9. N’allumez le feu que si un ustensile ou un wok est placé au-dessus. Le fait de placer un ustensile vide sur le feu peut
entrainer une surchauffe.
10. De l’huile ou du beurre surchauffé peut facilement s’enflammer. Ne jamais éteindre le feu avec de l’eau. Vous pouvez
étouffer les flammes du contenant en les couvrant avec un couvercle.
11. Ne flambez jamais d’aliments sous une hôte aspirante, ceci peut causer un incendie.
12. Ne posez jamais d’éléments inflammables ou en métal sur la plaque de cuisson.
13. Ne placez jamais de grill ou de moule sur deux brûleurs.
14. Ne pas utiliser de poêles dont le diamètre de la base est plus large que le support de poêle. Nous recommandons pour
les brûleurs de 2 et 3kW des poêles d’un diamètre de base de 230 mm et pour le bruleur de 5kW une base d’au maxi-
mum 270 mm.
Éléments chauds
15. Des éléments du brûleur et dans les environs du brûleur peuvent devenir très chauds pendant l’utilisation et peuvent le
rester pendant une longue période suivant l’utilisation. Veiller à ne pas toucher ces éléments avant leur complet refroi-
dissement.
16. Veuillez tenir compte du fait, que si vous utilisez une poêle dont le diamètre de base est supérieur au support de poêle
(voir point 14), il est fort probable que le bouton ce commande devienne chaud.
17. Veuillez vous assurer que la flamme reste toujours bien en dessous de la base de poêle (à moins que vous fassiez sau-
ter des aliments au wok). Les flammes qui montent jusque sur le côté de la poêle ne sont pas efficaces et produisent
une surchauffe inutile.
18. Il est très important de tenir les enfants à distance.
!
!
3 Instructions générales

30 31
4 Exploitation de PITT®cooking
Brûleurs PITT®cooking
Allumage et réglage des brûleurs
Pour éviter la survenue de pannes, vérifiez avant l’allumage d’un brûleur si tous les éléments ont été montés
correctement. Avant l’allumage d’un brûleur, veillez à placer un contenant au dessus du feu. Chaque brûleur peut être réglé
progressivement entre les positions petit et grand feu.
Allumer
Pour allumer le brûleur, il faut activer l’allumage par étincelle. Ceci se fait en appuyant complètement sur le bouton de
commande, et en le maintenant appuyé. Tournez le bouton de commande vers la gauche (img. 5). Maintenez ensuite le
bouton appuyé pendant encore 5 à 8 secondes. Ceci permet au capteur de température de monter en température, ce
qui rend possible l’alimentation en gaz. Vous pouvez régler l’intensité de la flamme en tournant doucement le bouton de
commande entre les positions petit et grand feu (img. 5 et 6).
Attention: si la flamme ne s’allume pas après 2 à 4 secondes, veuillez remettre le bouton sur la position petit feu (img. 6).
Une petite flamme s’allume plus rapidement qu’une grande flamme.
Éteindre
Pour éteindre le brûleur remettez le bouton de commande sur la position affichée sur la image 4.)
Brûleur éteint Grand feu Petit feu
img. 4 img. 5 img. 6
5 Utilisation optimale du système PITT®cooking
• Évitez que les flammes atteignent le contenant, ceci permet d’éviter de gaspiller de l’énergie. Cela permet aussi d’éviter
que les poignées du contenant chauffent de trop.
• Pour laisser mijoter de grandes quantités de nourriture ou pour les woks, le mieux est d’utiliser le brûleur pour wok.
Pour la préparation de sauces et pour laisser mijoter, le mieux est d’utiliser le brûleur pour mijotage. Pour le mijotage,
celui-ci doit être sur la position la plus haute.
• Cuisez en utilisant un couvercle, ceci permet d’économiser de l’énergie.
• Utilisez des ustensiles à fonds plats, propres et secs. Les ustensiles à fonds plats sont plus stables et un fond propre
permet un meilleur transfert de chaleur à votre repas.
Brûleur pour wok
Avec le brûleur pour wok, vous pouvez préparer des repas à très haute température. Avec ceci, il est important de faire
attention à un certain nombre de choses:
• Assure-vous d’avoir coupé les ingrédients à l’avance.
• Si vous souhaitez faire cuire en touillant, utilisez de l’huile de bonne qualité. L’huile d’olive, l’huile de tournesol ou
l’huile d’arachide sont particulièrement adaptés pour la cuisson au wok. N’utilisez pas de beurre ou de margarine, ils
peuvent brûler à haute température.
• Pour faire cuire à point tous les ingrédients, il faut commencer par faire cuire les ingrédients ayant les temps de
préparation les plus important.
0,3 - 3 kW 0,2 - 5 kW0,3 - 2 kW
FRFR
6 Entretien du système PITT®cooking
Le système PITT®cooking est constitué de matériaux de grandes qualités, qui peuvent être nettoyés simplement.
Faites toutefois attention aux points suivants:
1. Ne nettoyez jamais les éléments du brûleur dans un lave-vaisselle, le détergent peut les détériorer. Ne nettoyez pas avec
beaucoup d’eau, cela pourrait entrer dans le brûleur ou dans les ouvertures de ventilation..
2. Utilisez un chiffon pour nettoyer l’allumage par étincelle électrique (voir img. 7). En cas d’encrassement important, la
pointe peut être nettoyée avec une brosse fine. Faites-le très doucement, assurez-vous que la distance entre l’allumage
par étincelle et le brûleur ne soit pas modifié. Cela pourrait avoir comme conséquence que le brûleur ne s’allume plus
ou mal.
3. Placez les supports de cuisson directement sur les brûleurs, sans les faire glisser sur le plan de travail.
4. Faites attention à placer les éléments du brûleur ensemble sur les arêtes de guidage (voir img. 8).
5. Nettoyez la plaque de cuisson immédiatement après son utilisation, cela permet d’éviter que de la nourriture surcuite
s’incruste longtemps, et soit plus tard difficile à enlever.
6. Commencez par nettoyer les boutons, les brûleurs et les supports de cuisson. Nettoyez ensuite le plan de travail, de
manière à ce qu’il ne soit pas sali par la suite.
7. Utilisez un agent nettoyant doux et un chiffon mou pour nettoyer les éléments du brûleur qui peuvent être enlevés. La
meilleure solution pour éliminer les taches persistantes sur les supports de cuisson ou sur le dessus des brûleurs, est
d’utiliser un agent nettoyant liquide.
8. N’utilisez en aucun cas des poudres récurrentes, des éponges abrasives, des objets tranchants ou des agents de
nettoyage agressifs.
9. Pour l’entretien et le nettoyage de votre plan de travail, reportez-vous à la notice du produit concerné.
Attention: Le système PITT® cooking ne doit pas être nettoyé avec un nettoyeur à vapeur ou à haute pression.
Ceci pourrait remettre en question la sécurité électrique de l’appareil.
Attention: Ne jamais dévisser les vis des boucliers thermiques. (voir image 8a)
Support de cuisson avec arête
de guidage
Allumage électrique par étincelle
img. 7 img. 8 img. 8a
Bouclier vis de chaleur

32 33
Attention: le raccordement du système PITT®cooking ne doit être effectué que par un installateur agréé. Pour assurer la
sécurité et la garantie, les réparations ne doivent être effectuées que par professionnels. Seules des pièces détachées
d’origine doivent être utilisées.
Panne Cause Solution Chapitre / Page
Un bruleur s’allume
et s’éteint immédia-
tement.
Le bouton de commande n’est pas
appuyé suffisamment longtemps pour
activer la protection d’inflammation.
Maintenez le bouton appuyé
quelques secondes après l’allumage.
Chapitre 4 / page 30
Le bouton de commande n’est pas
réglé à la bonne hauteur.
Réglez correctement le bouton de
commande.
Notice de montage**
TS: 13 au 15 FS: 11 au 17
Le bouton de
commande frotte sur
la coque d’obturation.
La plaque de cuisson n’est pas
montée bien à plat sur le plan de
travail.
Réglez correctement le bouton de
commande.
Notice de montage**
TS: 13 au 15 FS: 11 au 17
La coque d’obturation n’est pas
centrée p.r. au bouton de commande.
Libérez la coque d’obturation et
repositionnez la.
Notice de montage**
TS: 20 au 21 FS: 16 au 17
L’allumage par étin-
celle reste activé.
La plaque de cuisson n’est pas
montée bien à plat sur le plan de
travail.
Réglez correctement le bouton de
commande.
Notice de montage**
TS: 13 au 15 FS: 11 au 17
La coque d’obturation n’est pas
centrée p.r. au bouton de commande.
Libérez la coque d’obturation et
repositionnez la.
Notice de montage**
TS: 20 au 21 FS: 16 au 17
Un brûleur ne
s’allume pas.
Le bouton de commande n’est pas
réglé à la bonne hauteur.
Réglez correctement le bouton de
commande.
Notice de montage**
TS: 13 au 15 FS: 11 au 17
Le cordon électrique n’est pas
raccordé à la prise murale.
Placez la fiche mâle dans la prise.
Fusible défectueux ou un disjoncteur
du tableau électrique a déclenché.
Montez un nouveau fusible ou
réenclenchez le disjoncteur.
L’allumage par étincelle est encrassé
ou humide.
Nettoyez ou séchez l’allumage
par étincelle.
Chapitre 6 / page 31
Des éléments du brûleur ne sont pas
montés correctement.
Réassemblez les éléments du bruleur
via l’arête de centrage.
Chapitre 6 / page 31
Des éléments du brûleur sont en-
crassés ou humides.
Nettoyez/séchez les
éléments du brûleur. Vérifiez la
bonne ouverture des orifices.
Chapitre 6 / page 31
Le robinet de gaz est fermé. Ouvrez le robinet de gaz.
L’appui sur le bouton de commande
n’est pas suffisamment long.
Maintenez appuyé le bouton de
commande suffisamment longtemps
entre la position petit et grand feu.
Chapitre 4 / page 30
Pile vide* remplacer la pile Chapitre 2 / page 28
Un brûleur ne s’al-
lume pas comme les
autres.
Des éléments du brûleur ne sont pas
placés correctement.
Réassemblez les éléments du bruleur
via l’arête de centrage.
Chapitre 6 / page 31
Des éléments du brûleur sont en-
crassés ou humides.
Nettoyez/séchez les éléments du
brûleur. Vérifiez la bonne ouverture
des orifices.
Chapitre 6 / page 31
Fuite de gaz à
proximité de
l’appa-reilde cuisson.
Le raccordement fuit. Vérifiez le raccordement. Si la cause
n’est pas remédiée rapidement,
fermez immédiatement le robinet de
gaz principal.
Un brûleur est activé, mais ne s’al-
lume pas.
Fermez le bouton de commande et
attendez quelques minutes avant de
le rallumer.
Chapitre 4 / page 30
7 Pannes du système PITT®cooking
Si vous ne pouvez pas remédier à la panne à l’aide des points ci-dessus ? Prenez contact avec le responsable des ventes
du service clientèle de PITT® cooking. Voir l’adresse du service après-vente page 76.
* En fonction du modèle
** TS = Top Side / FS = Front Side
FRFR
8 Vue d’ensemble des modèles Top Side
Akan Altar Azuma Air
Baluran Bennett Baula Bely
Bromo Cima Capital
Cusin Colo
Danau Drum
653
450
503

34
8 Vue d’ensemble des modèles Top Side
35
FRFR
Dempo Elbrus
Enep Ebeko
Foessa
Akan Altar Azuma Air
Baluran Bennett Baula Bely
Bandai Bromo Cima Capital
Cusin Colo
Danau Drum
9 Vue d’ensemble des modèles Front Side

DE Betriebsanleitung
Top Side/Front Side
10 Conditionnement
TLe système PITT®cooking est composé de matériaux durables.
L’emballage est recyclable et est constitué avec les types de matériaux suivants:
-carton
-paper
Ces matériaux sont conformes aux préconisations gouvernementales en matière d’évacuation responsable des déchets.
L’emballage de ce produit comporte une étiquette avec l’illustration du bac d’évacuation marqué d’une croix (voir figure 9).
La directive concernant la mise au rebut d’appareils électriques et électroniques (DEEE) de l’union Européenne. La direc-
tive DEEE de l’union Européenne exige que les produits qui ont été achetés dans l’UE (et dans certains cas leurs embal-
lages), doivent comporter une étiquette avec le bac d’évacuation marqué d’une croix. Comme déterminé par la directive
DEEE, l’étiquette avec le bac d’évacuation marqué d’une croix, indique que les clients ou utilisateurs finaux dans les pays
de l’UE ne doivent pas jeter les appareils électriques et électroniques et leurs accessoires avec les déchets ménagers.
Les clients et utilisateurs finaux à l’intérieur de l’UE doivent prendre contact avec leur fournisseur local ou leur centre
d’entretien, pour obtenir des informations relatives au système de collecte des déchets de leur mairie.
afb. 9
Dempo Elbrus
Enep Ebeko
Foessa
9 Vue d’ensemble des modèles Front Side
36

1 Einbaumaße
• Ein Kochmodul kann nicht über einem Küchenschrankbereich installiert werden, da es zu Wartungszwecken zugänglich
sein muss.
• Wenn PITT®cooking mit einem Schubladenblock kombiniert wird, beachten Sie immer die Maße des Bauteils und die
Haltestange. Die Höhe der Baugruppe und Haltestange beträgt 115 mm (Top Side) und 170 mm (Front Side) gemessen
von der Oberseite des Arbeitsblatts (abb. 2.).
• Um ein Biegen der Arbeitsplatte zu verhindern muss im Inneren des Küchenschranks vollständig gestützt werden mit die
PITT®cooking Haltestangen (Abb. 2, und 4).
Typenschild
39
Vorwort
Sehr geehrte Kundin, sehr geehrter Kunde!
Herzlichen Glückwunsch zum Kauf Ihres PITT®cooking. Bei diesem einzigartigen System haben Sie die Möglichkeit, die
Positionen der Brenner selbst zu bestimmen. Deshalb ist größtes Kochvergnügen für viele Jahre garantiert. Dank der
verschiedenen Brennerkapazitäten können Sie alle Gerichte optimal zubereiten. Da die Funkenzündung direkt in die
Drehknöpfe integriert ist, können die Brenner mit einer Hand bedient werden.
In diesem Handbuch wird beschrieben, wie Sie alle Funktionen dieses optimal nutzen können.
Lesen Sie das Benutzerhandbuch und die Montageanweisungen sorgfältig durch, bevor Sie das benutzen.
Bewahren Sie dieses Handbuch auf, damit Sie es gegebenenfalls an andere Benutzer weitergeben können. Außerdem
enthält dieses Handbuch wichtige Informationen für Wartungstechniker.
Wir wünschen Ihnen viel Spaß beim Kochen!
PITT®cooking
Inhalt
Kapitel Thema Seite
1 Einbaumaße 39
2 Anschluss: Gas und Strom 40
3 Allgemeine Hinweise 41
4 PITT®cooking steuern 42
5 PITT®cooking optimal nutzen 42
6 PITT®cooking warten 43
7 Störungen am PITT®cooking 44
8 Modellübersicht Top Side 45
9 Modellübersicht Front Side 47
10 Verpackung 48
11 Service-Adresse 76
Top Side (TS) Abmessungen in mm
Haltestange
afb. 2
abb. 4
Min. 47 Min.
150
Min. 50
Min. 600
Min. 4
Max. 35
abb. 1
Haltestange
88mm TS
140 mm FS
115mm TS
170 mm FS
Min.
450
Min.
650
abb. 2
Haltestange
Front Side (FS) Abmessungen in mm
abb. 3
Min.
150
75 mm
Min. 650
Min. 4
Max. 25
Min. 47
DEDE
38
This manual suits for next models
20
Table of contents
Languages:
Popular Cooker manuals by other brands

Zanussi Electrolux
Zanussi Electrolux U30359 ZKC5540 user manual

Belling
Belling Db4 90dft Prof manual

Indesit
Indesit K6C320/G Instructions for installation and use

iLive
iLive PANORAMAGIC UPMI09 User instructions, installation, maintenance

Hotpoint
Hotpoint EG53 Use and Installation Instructions

DS Produkte
DS Produkte CK-S93120 instruction manual

Indesit
Indesit KP9507EB Installation and operating instructions

Siemens
Siemens HG0K9VQ50M instruction manual

Creda
Creda X152 Use and Installation Instructions

Miele
Miele SmartLine CS 7632 Operating and installation instructions

Creda
Creda X252E Installation & user's instructions

Bosch
Bosch HKA000021U instruction manual