PJLink IN5132 Installation and maintenance instructions

1
Projector
IN5132/IN5142/IN5134/IN5134a/
IN5144/IN5144a/IN5135/IN5145
User's Manual (detailed)
Network Guide
Thank you for purchasing this product.
This manual only explains the network function of this product. For proper use of
this product, refer to this manual and the other manuals for this product.
Features
This projector has a network function that provides you with these features:
►Before using this product, be sure to read all manuals for this
product. After reading them, store them in a safe place for future reference.
WARNING
• The information in this manual is subject to change without notice.
• The manufacturer assumes no responsibility for any errors that may appear in
this manual.
• The reproduction, transfer or copy of all or any part of this document is not
permitted without express written consent.
NOTE
Trademark acknowledgment
üNetwork Presentation : allows the projector to project computer images transmitted
through a network. (&15)
üWeb Control : allows you to monitor and control the projector through a network from a
computer. (&16)
üMy Image : allows the projector to store up to four still images and project them. (&50)
üMessenger : allows the projector to display text sent from a computer through a network.
(&51)
üNetwork Bridge : allows you to control an external device through the projector from a
computer. (&52)
• Microsoft®, Internet Explorer®, Windows®, Windows Vista® and Aero® are registered trademarks
of Microsoft Corporation in the U.S. and/or other countries.
• Adobe®and Flash® are registered trademarks of Adobe Systems Incorporated.
• Pentium® is a registered trademark of Intel Corporation.
• JavaScript® is a registered trademark of Sun Microsystems, Inc.
• HDMITM, the HDMI logo and High-Denition Multimedia Interface are trademarks or registered
trademarks of HDMI Licensing LLC in the United States and other countries.
• Crestron®, Crestron e-Control®, e-Control®, Crestron RoomView® and RoomViewTM are
trademarks or registered trademarks of Crestron Electronics, Inc. in the United States and other
countries.
• Trademark PJLink is a trademark applied for trademark rights in Japan,
the United States of America and other countries and areas.
All other trademarks are the properties of their respective owners.
009-1417-01

2
Contents
Contents &
Caution .......................................................................................... 4
1. Connection to the network ...................................................... 5
1.1 System requirements ................................................................................. 5
1.1.1 Required equipment preparation ..................................................................................... 5
1.1.2 Hardware and software requirement for computer .......................................................... 5
1.2 Quick connection ........................................................................................ 6
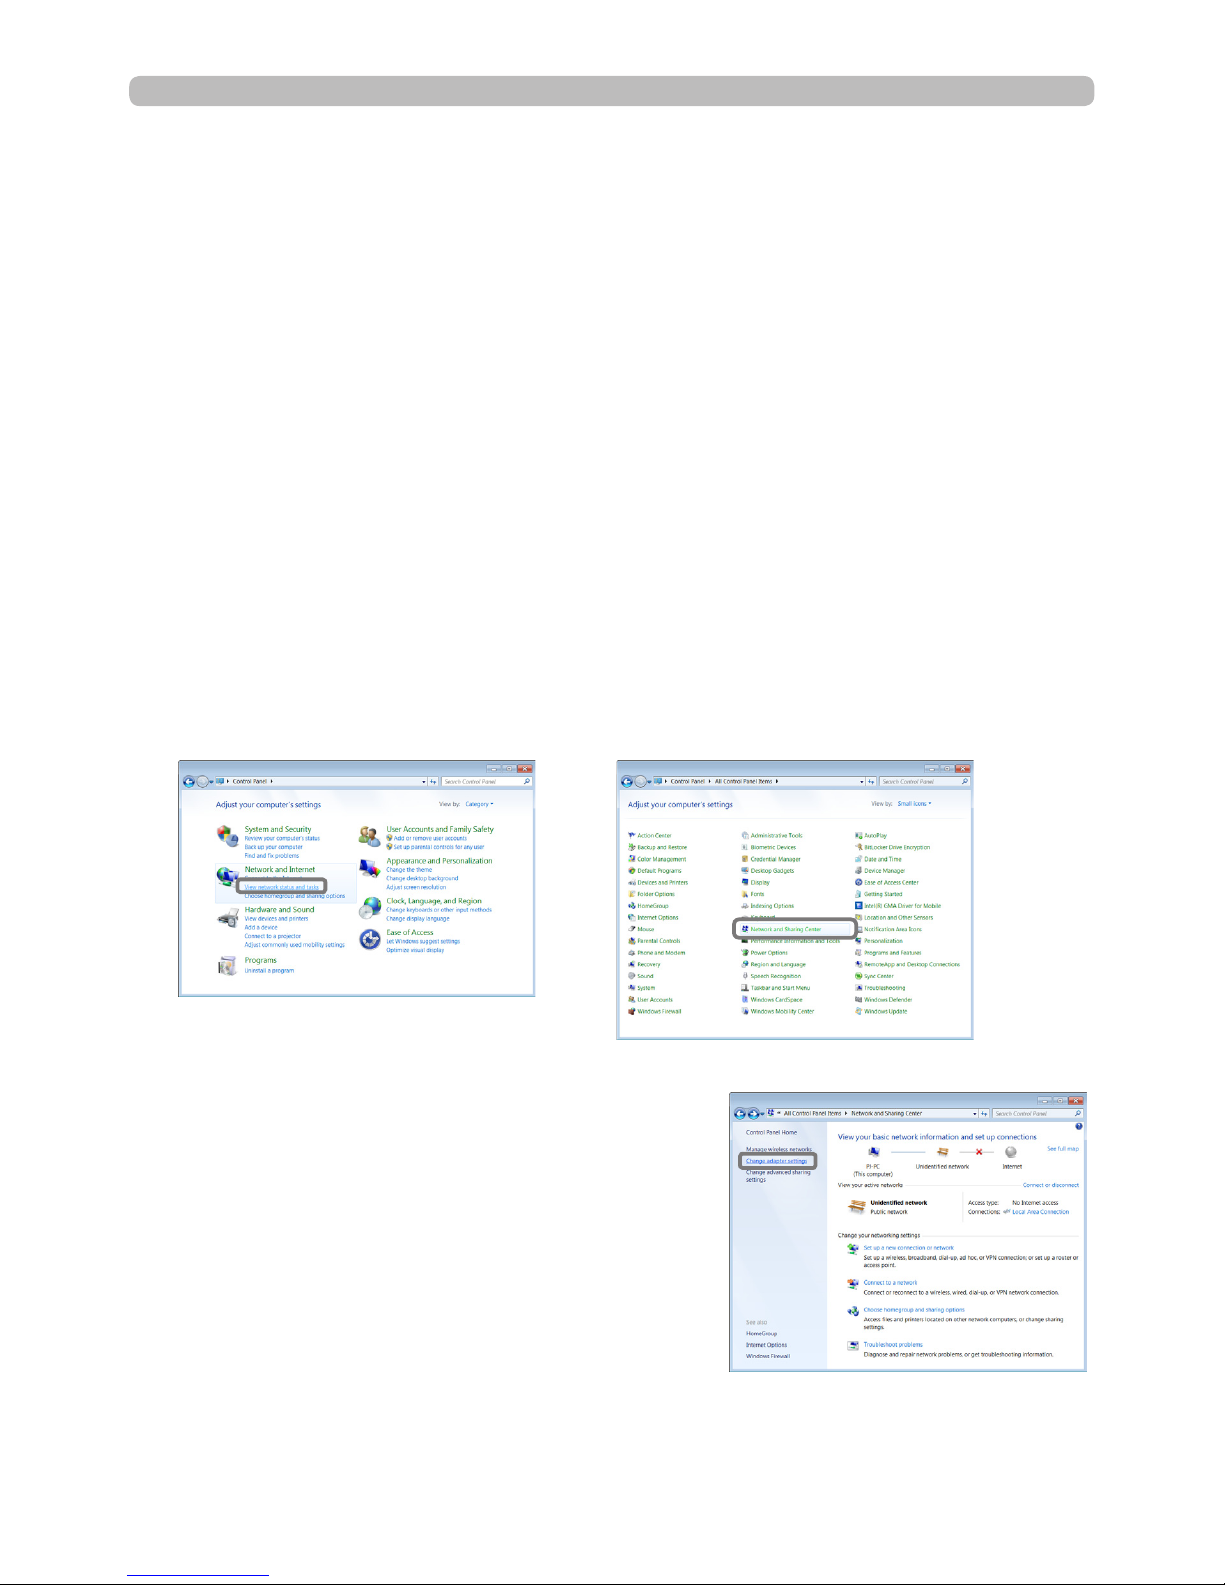
1.3 Manual network connection setting - Wired LAN -. ..................................... 7
1.3.1 Equipment connection ..................................................................................................... 7
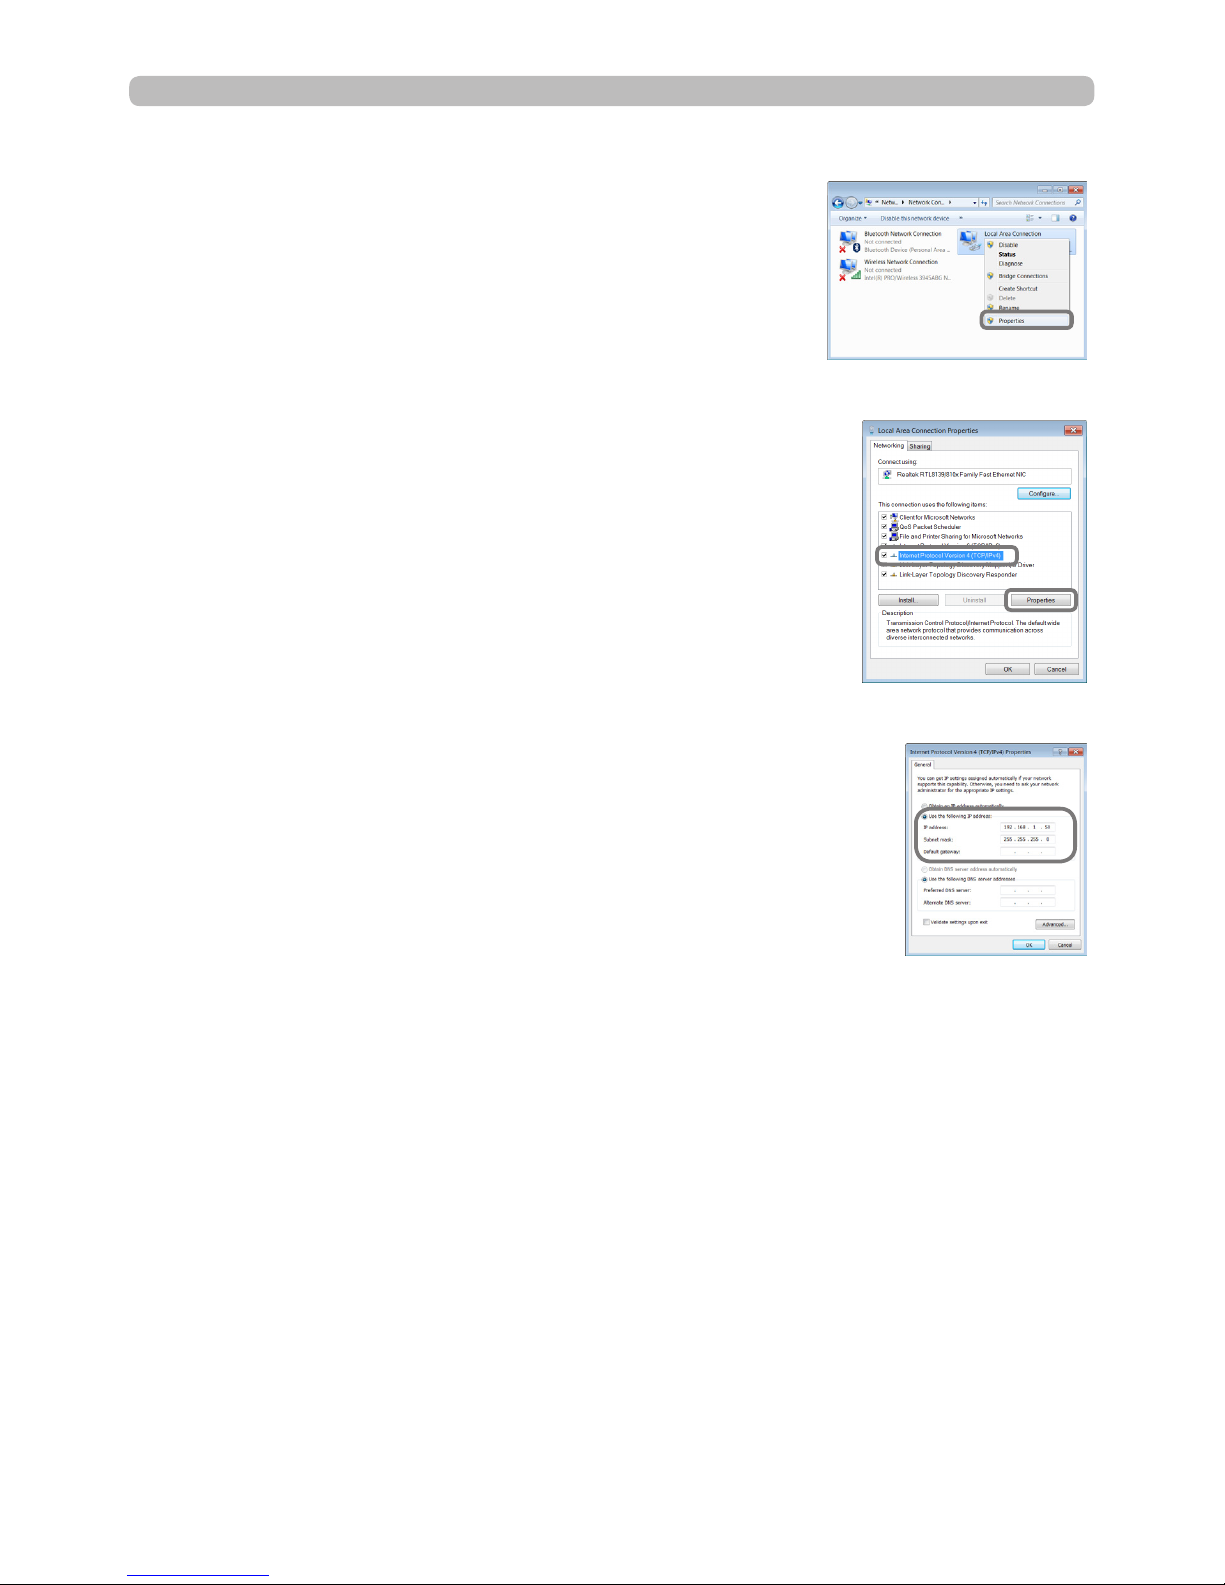
1.3.2 Network settings .............................................................................................................. 7
1.3.3 “Internet Option” setting ................................................................................................. 10
1.4 Manual network connection setting - Wireless LAN - ............................... 11
1.4.1 Preparation for wireless LAN connection ....................................................................... 11
1.4.2 Wireless LAN connection set up .................................................................................... 12
2. Network Presentation ............................................................. 15
3. Web Control ............................................................................ 16
3.1 Projector Web Control ............................................................................... 17
3.1.1 Logon ............................................................................................................................. 17
3.1.2 Network Information ....................................................................................................... 18
3.1.3 Network Settings ............................................................................................................ 19
3.1.4 Port Settings .................................................................................................................. 22
3.1.5 Mail Settings .................................................................................................................. 24
3.1.6 Alert Settings .................................................................................................................. 25
3.1.7 Schedule Settings .......................................................................................................... 27
3.1.8 Date/Time Settings ......................................................................................................... 30
3.1.9 Security Settings ............................................................................................................ 32
3.1.10 Projector Control .......................................................................................................... 33
3.1.11 Remote Control ............................................................................................................ 39
3.1.12 Projector Status ........................................................................................................... 41
3.1.13 Network Restart ........................................................................................................... 41
3.2 Crestron e-Control®.................................................................................. 42
3.2.1 Main window .................................................................................................................... 43
3.2.2 Tools window ................................................................................................................... 45
3.2.3 Info window ..................................................................................................................... 47
3.2.4 Help Desk window ........................................................................................................... 48
3.2.5 Emergency Alert .............................................................................................................. 49
4. My Image Function ................................................................. 50
5. Messenger Function ............................................................... 51

3
Contents
&
6. Network Bridge Function ....................................................... 52
6.1 Connecting devices .................................................................................. 52
6.2 Communication set up .............................................................................. 53
6.3 Communication port ................................................................................. 53
6.4 Transmission method ............................................................................... 54
6.4.1 HALF-DUPLEX .............................................................................................................. 54
6.4.2 FULL-DUPLEX ............................................................................................................... 55
7. Other Functions ...................................................................... 56
7.1 E-mail Alerts ............................................................................................. 56
7.2 Projector Management using SNMP ........................................................ 58
7.3 Event Scheduling ..................................................................................... 59
7.4 Command Control via the Network .......................................................... 62
7.5 Crestron RoomView®................................................................................. 63
8. Troubleshooting ..................................................................... 64
9. Specications ......................................................................... 65
10. Warranty and after-sales service ........................................ 66

4
Caution
Caution
To use the wireless network function of this projector, you must use the optional
USB wireless adapter which is designated. For precautions according to the stan-
dards and laws, refer to the documents that come with the adapter.
[Restrictions on plugging and unplugging the USB wireless adapter]
Before you insert or pull out the USB wireless adapter from the projector, turn off
the power of the projector and pull out the power cord’s plug from the outlet. Do
not touch the USB wireless adapter while it is plugged into the projector and the
projector is receiving AC power.
Do not use extension cables or other devices when connecting the adapter to the pro-
jector.
[Security precautions when using wireless LAN]
We recommend setting all security settings, including SSID and ENCRYPTION,
when using wireless LAN communication. If the security settings are not set up,
the data being transmitted may be intercepted or your computer may be accessed
by unauthorized personnel. For details on wireless LAN security settings, refer to
3.1 Projector Web Control or &NETWORK menu in the Operating Guide.
►The optional IEEE802.11b/g/n USB wireless adapter uses
the 2.4GHz radio frequency band. You do not need a radio license to use the
adapter, but you should be aware of the following:
• DO NOT USE NEAR THE FOLLOWING!
• Microwave ovens
• Industrial, scientic or medical devices
• Designated low power radio stations
• Radio station buildings
Using the USB wireless adapter near any of the above may cause radio
interference, which would result in a transmission speed decrease or
communication interruption, and even lead to malfunctioning of devices such
as pacemakers.
•
Depending on the location where the USB wireless adapter is used, radio wave
interference may occur, which may result in a transmission speed decrease or
an interruption in communication. In particular, be aware that using the USB
wireless adapter at locations where there is reinforced steel, other types of
metals or concrete is likely to cause radio wave interference.
• Available Channels
The USB wireless adapter uses the 2.4GHz radio frequency band, but
depending on the country or region you are in, the channels that you can use
might be limited. Consult your dealer for information on the usable channels.
• Bringing the optional USB wireless adapter out of the country or region you
reside in and using it there could lead to a violation of the radio laws of that
country or region.
CAUTION

5
1. Connection to the network
1.1 System requirements
1. Connection to the network
The following equipment is required to connect the projector to your computer
through the network.
■ Common The projector: 1 unit, Computer : minimum 1 set
■ Depending on how you want to connect
1) For the wired connection *1
LAN cable (CAT-5 or greater): 1 piece
2) For the wireless connection *2
- Projector side
IEEE802.11 b/g/n USB wireless adapter (part number: SP-DONGLE-USB) :
1 unit
- Computer side
IEEE802.11 b/g/n wireless LAN equipment: 1 unit for each *3
To connect your computer to the projector and use the projector's network
function, your computer needs to meet the following requirements:
1.1.1 Required equipment preparation
1.1.2 Hardware and software requirement for computer
üOS: One of the following.
Windows ® XP Home Edition /Professional Edition
Windows Vista ® Home Basic /Home Premium /Business /Ultimate /Enterprise
Windows ® 7 Starter /Home Basic /Home Premium /Professional /Ultimate /
Enterprise
üCPU: Pentium 4 (2.8 GHz or higher)
üGraphic card: 16 bit, XGA or higher
* When using "LiveViewer", we recommend that your computer's resolution is
set to 1024 x 768.
üMemory: 512 MB or higher
üHard disk space: 100 MB or higher
üWeb browser: Internet Explorer ® 6.0 or higher
üCD-ROM/DVD-ROM drive
*1: The system for using the projector's network function requires communication
environment conforming 100Base-TX or 10Base-T.
*2: An access point is required when the wireless LAN connection is used as
Infrastructure mode.
*3: Depending on the type of wireless network device and computer you are
using, the projector may not be able to communicate properly with your
computer, even if the computer has embedded wireless LAN.
To eliminate communication problems, use a Wi-Fi certied wireless network
device.

6
1. Connection to the network
1.1 System requirements (continued)
• The network communication control is disabled while the projector
is in standby mode if the STANDBY MODE item is set to SAVING. Set the
STANDBY MODE to NORMAL to set up the network communication to the
projector. (&SETUP menu in the Operating Guide)
• You can get the latest application versions for the projector's network functions
and the latest information for this product from the InFocus website (www.
infocus.com/support).
NOTE
1.2 Quick connection
"LiveViewer" supports very quick and simple connection to the network.
When using the network function, we recommend that you install "LiveViewer" on
your computer. For details, refer to the "LiveViewer" manual.
In case you don’t want to use "LiveViewer" or you cannot use it by some reason,
follow the manual settings instructions, item 1.3 for the wired LAN (&7) and item
1.4 for the wireless LAN. (&11)

7
1. Connection to the network
1.3 Manual network connection setting - Wired LAN -
This section explains how to set network connections up manually.
1.3.1 Equipment connection
Connect the projector and a computer with a LAN cable.
* Before connecting with an existing network, contact the network administrator.
Next, check the following computer settings.
1.3.2 Network settings
This provides an explanation of network connection settings for Windows® 7 and
Internet Explorer.
1) Log on to Windows® 7 as an administrator authority. Administrator authority is
the account which can access all functions.
2) Open “Control Panel” from the “Start” menu.
3) Open “View network status and tasks” in “Network and Internet”.
With the icons in the "Control Panel" window displayed, click "Network and
Sharing Center".
4) Click "Change adapter settings" in the menu
on the left side of the "Network and Sharing
Center" window.
(continued on next page)

8
1. Connection to the network
1.3 Manual network connection setting - Wired LAN - (continued)
7) Select "Use the following IP address" and congure the IP
address, Subnet mask and Default gateway for the computer
accordingly. If a DHCP server exists in the network, you
can select "Obtain an IP address automatically" and the IP
address will be assigned automatically.
After completing the settings, click [OK] to close the window.
5) Right-click "Local Area Connection" to open the menu,
and select "Properties".
6) Select "Internet Protocol Version 4 (TCP/IPv4)" and click
[Properties].
(continued on next page)

9
1. Connection to the network
1.3 Manual network connection setting - Wired LAN - (continued)
[About IP address]
■ Setting manually
The Network address portion of the computer and the projector's IP address must
match. In addition, the computer's IP address must be unique from any other
device, including the projector, in the network.
The projector’s settings are as follows:
IP address: 192.168.1.254
Subnet mask: 255.255.255.0
(Network address: 192.168.1 in this case)
Therefore, specify the computer’s IP address as follows:
IP address: 192.168.1.xxx (xxx shows decimal number.)
Subnet mask: 255.255.255.0
(Network address: 192.168.1 in this case)
For example:
Select a number from 1 to 254 for “xxx” which is unique from other equipment.
In this case, since the IP address of the projector is “192.168.1.254”, specify a
setting between 1 to 253 for the computer.
• “0.0.0.0” cannot be set to the IP address.
• The projector’s IP address can be changed by using the conguration utility
from a web browser. (&21)
• If the projector and the computer exist in the same network (i.e., same
network address), you can leave the default gateway eld blank.
• When the projector and the computer exist in different networks, the default
gateway must be set. Consult the network administrator for details.
NOTE
■ Setting automatically
When a DHCP server exists in the connected network, it is possible to assign an
IP address to the projector and computer automatically.
* DHCP (“Dynamic Host Conguration Protocol”) provides the required network
settings like the IP address from server to client. A server that has DHCP
functionality is called a DHCP server.
(continued on next page)

10
1. Connection to the network
1.3 Manual network connection setting - Wired LAN - (continued)
2) Click the “Connections” tab and then click the [LAN settings]
button to open “Local Area Network (LAN) Settings”.
1.3.3 “Internet Option” setting
1) Click “Internet Options” in the “Network and
Sharing Center” window to open the “Internet
Properties” window.
3) Uncheck all boxes in the “Local Area Network (LAN) Settings”
window.
After completing the settings, click [OK] to close the window.

11
1. Connection to the network
1.4
Manual network connection setting
-
Wireless LAN -
Using the optional USB wireless adapter on the projector enables the projector
and computer to communicate in both Ad-Hoc and Infrastructure modes.
This section explains how to set up a wireless LAN connection manually.
1.4.1 Preparation for wireless LAN connection
* Ad-Hoc is a LAN communication method that does not require an access point
to communicate.
* Infrastructure is a LAN communication method that requires an access point to
communicate. If the equipment exists, this mode is most efcient.
If communicating with an existing network, consult with your network
administrator.
Fig. 1.4.1.a Without an access point communication (Ad-Hoc)
Fig. 1.4.1.b With an access point communication (Infrastructure)
First, insert the USB wireless adapter into one of the USB TYPE A ports.
(&Connecting with your devices in the Operating Guide)
Then, set up the computer for wireless communication.
When the computer comes with a built-in IEEE802.11b/g/n wireless LAN device,
enable it and disable other network connections. If a wireless LAN device is not
built into the computer, connect an IEEE802.11b/g/n wireless LAN device and
install the device driver. For details, refer to the computer and the wireless LAN
device's users' guides.

12
1. Connection to the network
1.4.2 Wireless LAN connection set up
Using the standard Windows® 7 wireless LAN utility, set up the initial Wireless
LAN settings for the projector as follows:
1.4 Manual network connection setting - Wireless LAN - (continued)
Connection Control : Ad-Hoc
SSID : wireless
Channel : 1
Encryption rating : None
IP address : 192.168.10.254
* You can change these settings using your computer's web browser or from the
projector's Network menu. Refer to section 3.1.3 Network Settings (&20) or
NETWORK menu in the Operating Guide.
1) Select "Change adapter settings" from the
menu on the left side of the "Network and
Sharing Center" window.
2) Right-click "Wireless Network Connection" to open the
menu, and select "Properties".
(continued on next page)
3) Select "Internet Protocol Version 4 (TCP/IPv4)" and click
[Properties].

13
1. Connection to the network
1.4 Manual network connection setting - Wireless LAN - (continued)
4) Select "Use the following IP address" and congure the IP
address, Subnet mask and Default gateway for the computer
accordingly.
After completing the settings, click [OK] to close the window.
(continued on next page)
[About the IP address]
The Network address portion of the IP address setting on your computer and your
projector must match. In addition, the computer's IP address must be unique from
any other device, including the projector, in the network.
The projector’s settings are as follows:
IP address: 192.168.10.254
Subnet mask: 255.255.255.0
(Network address: 192.168.10 in this case)
Therefore, specify the computer’s IP address as follows:
IP address: 192.168.10.xxx (xxx shows decimal number.)
Subnet mask: 255.255.255.0
(Network address: 192.168.10 in this case)
For example
Select a number from 1 to 254 for “xxx” which is unique from other equipment.
In this case, since the IP address of the projector is “192.168.10.254”, specify
a setting between 1 to 253 for the computer.
• “0.0.0.0” cannot be set to the IP address.
• The projector’s IP address can be changed by using the conguration utility
from a web browser. (&20)
• If the projector and the computer exist in the same network (i.e., same
network address), you can leave the default gateway eld blank.
• When the projector and the computer exist in different networks, the default
gateway must be set.
NOTE

14
1. Connection to the network
1.4 Manual network connection setting - Wireless LAN - (continued)
6) From the connectable wireless networks, select the SSID of the
projector (set to "wireless" by default), and click [Connect]. If you
have enabled encryption, a window asking for the encryption key
will be displayed. Input the associated encryption key.
5) Right-click "Wireless Network Connection" to open
the menu, and select "Connect / Disconnect".
7) After connection is established, "Connected" will appear to the
right of SSID.

15
2. Network Presentation
The projector can display or play back computer screen images and audio that
are transmitted through the network. This Network Presentation feature will help
you make presentations and conduct conferences smoothly.
2. Network Presentation
To start a Network Presentation, select the LAN port as the input source on the
projector and click the Starting Capture button on "LiveViewer".
"LiveViewer" functions are model dependent. If you want to use the latest version of
"LiveViewer", reference the group item in "LiveViewer" User's Manual. This model is
in the E Group.
To present over the network, a proprietary software application, "LiveViewer", is
required.
You can download it from the InFocus website (www.infocus.com/support). For
details about this feature, and for instructions to install "LiveViewer", refer to the
"LiveViewer" manual.
Wired LAN
Wireless LAN
• When the screen resolution of your computer is larger than specied,
the computer image will be shrunk to the size listed below before it is
transferred to the projector:
IN5132, IN5142: 1024 x 768 (XGA)
All other models: 1280 x 800
The transferred image will be displayed smaller on the projected screen even if
the projector resolution is larger than above.
NOTE

16
You can adjust or control the projector via a network from a web browser on a
computer that is connected to the same network.
• Internet Explorer® 6.0 or later is required.
• If JavaScript® is disabled in your web browser conguration, you must enable
JavaScript® in order to use the projector web pages properly. See the Help les
for your web browser for details on how to enable JavaScript®.
• We recommend that all web browser updates are installed.
• If data is transferred via wireless and wired LAN simultaneously, the projector
may not be able to process the data correctly.
NOTE
3. Web Control
3. Web Control
Refer to the following for conguring or controlling the projector from a web
browser.
Make sure that both your computer and projector are connected to the network,
and then open the Web browser.
Enter the projector's IP address into URL input box of the Web browser as per the
example below, and then press the Enter key or button.
Example: If the IP address of the projector is set to 192.168.1.10:
Enter “http://192.168.1.10/” into the address bar of the web browser
and press the Enter key or click button.
If the URL is entered correctly and
the projector and your computer
are connected to the same network
correctly, the selection window as
shown on the right will be displayed.
You can choose to use Projector Web
Control or Crestron e-Control® as a tool
for controlling the projector. Click one of
them.
For more details, refer to 3.1 Projector
Web Control (&17) or 3.2 Crestron
e-Control®(&42).
• Do not attempt to control the projector with the projector's menu or
remote control, and via Web Control simultaneously. Some operational errors
may occur.
• If Crestron e-Control in the Network Settings (&21) is set to Disable, the
selection window above will not appear. The Logon window of the Projector
Web Control will display instead.
• Crestron e-Control® is created using Flash®. You need to install the Adobe®
Flash® Player on your computer to use Crestron e-Control®.
NOTE

17
3. Web Control
3.1.1 Logon
To use the Projector Web Control function, you need
to logon with your user name and password.
• The language used on the Projector Web Control screen is the
same as that of the OSD on the projector. If you want to change it, you need
to change the OSD language on the projector. (&SCREEN menu in the
Operating Guide)
NOTE
Below are the factory default settings for user
name and password.
User name Password
Administrator <blank>
Enter your user name and password, and then click the [OK].
If you logon successfully, the following screen will be displayed:
Main menu
Click the desired operation or conguration item on the main menu.
3.1 Projector Web Control
Logon window

18
3.1.2 Network Information
Displays the projector’s current network
conguration settings.
Item Description
Common Information Displays information common to both wireless and wired
LAN.
Projector Name Displays the projector name.
Wireless Information Displays the current settings of wireless LAN.
Mode Displays the wireless LAN communication mode.
DHCP Displays the DHCP settings.
IP Address Displays the IP address.
Subnet Mask Displays the subnet mask.
Default Gateway Displays the default gateway.
DNS Server Address Displays the DNS server address.
MAC Address Displays the MAC address.
Ch Displays the wireless LAN channel.
Encryption Displays the data encryption setting.
SSID Displays the SSID used by the projector.
Speed Displays the current wireless LAN transmission speed.
Wired Information Displays the current wired LAN settings.
DHCP Displays the DHCP setting.
IP Address Displays the IP address.
Subnet Mask Displays the subnet mask.
Default Gateway Displays the default gateway.
DNS Server Address Displays the DNS server address.
MAC Address Displays the MAC address.
3. Web Control
3.1 Projector Web Control (continued)

19
3.1.3 Network Settings
Displays and congures network settings.
Item Description
Common Setup
Used for conguring settings common to both the wireless and
wired LAN.
Projector Name
Congures the name of the projector.
The Projector Name can be up to 64 alphanumeric
characters. Only letters, numbers and following symbols can
be used.
!"#$%&'()*+,-./:;<=>?@[\]^_`{|}~ and space.
A projector name is pre-assigned by default.
sysLocation (SNMP)
Congures the location to be referred to when using SNMP.
The sysLocation can be up to 255 alphanumeric characters.
Only numbers ‘0-9’ and letters ‘a-z’, ‘A-Z’ can be used.
sysContact (SNMP)
Congures the contact information to be referred to when
using SNMP.
The sysContact can be up to 255 alphanumeric characters.
Only numbers ‘0-9’ and letters ‘a-z’, ‘A-Z’ can be used.
AMX D.D.
(AMX Device
Discovery)
Congures the projector's AMX Device Discovery settings
so the projector can be detected by AMX controllers within
the same network. For the details about the AMX Device
Discovery, visit the AMX web site.
URL: http://www.amx.com (as of May 2012)
(continued on next page)
3. Web Control
3.1 Projector Web Control (continued)

20
3.1 Projector Web Control - Network Settings (continued)
3. Web Control
Item Description
Wireless Setup Used for conguring wireless LAN settings.
Mode Select "Ad-Hoc" or "Infrastructure".
IP Conguration Congures network settings.
DHCP ON Enables DHCP.
DHCP OFF Disables DHCP.
IP Address Congures the IP address when DHCP is disabled.
Subnet Mask Congures the subnet mask when DHCP is disabled.
Default
Gateway Congures the default gateway when DHCP is disabled.
DNS Server Address Congures the DNS server address.
Ch
Select from “1” to “11” a channel to use in the Ad-Hoc mode.
Encryption Select data encryption method.
WEP Key
Input the WEP key.
Either ASCII characters or hexadecimal numbers can be
used during WEP key input. However, you cannot use a
combination of both.The key is dened as follows according
to the WEP and character formats.
Encryption ASCII characters HEX numbers
WEP 64bit 5 characters 10 characters
WEP 128bit 13 characters 26 characters
WPA Passphrase
Input WPA Passphrase.
8 to 63 input characters can be used. Only letters, numbers
and following symbols can be used.
!"#$%&'()*+,-./:;<=>?@ [\]^_`{|}~ and space
SSID
Select an SSID from the list.
If you must set your unique SSID, select [Custom], then
set your own SSID following the rules below. Up to 32 input
characters can be used.
Only letters, numbers and following symbols can be used.
!"#$%&'()*+,-./:;<=>?@[\]^_`{|}~ and space.
(continued on next page)
• Depending on the country where you are
the channels may vary. In addition, depending on the
country or region where you are may be required to use a
wireless network card that conrm to the standards in the
respective country or region.
NOTE
This manual suits for next models
7
Table of contents
Other PJLink Projector manuals

PJLink
PJLink CP-EW300N User manual

PJLink
PJLink CPX10WN User manual

PJLink
PJLink CP-D27WN User manual

PJLink
PJLink CP-X4022WN User manual

PJLink
PJLink CP-X2015WN User manual

PJLink
PJLink CP-X2021WN User manual

PJLink
PJLink CP-WX3530WN User manual

PJLink
PJLink CP-WU8461 User manual

PJLink
PJLink MC-WU8701W Technical Document

PJLink
PJLink CP-X4022WN User manual