platypus PP10LV User manual

MODELS
PP10LV • PP25LV • PP40LV • PP12 • PP25 • PP40 • PP65 • PP85 • PP110 • PP30 • PP60
INSTRUCTION MANUAL
2018 v1.0

CONGRATULATIONS ON YOUR PURCHASE OF THIS
PRODUCT BY PLATYPUS.
TECHNICAL SPECIFICATIONS
PUMP FLOW RATE IN LITRES/HOUR
DESCRIPTION PP10LV PP25LV PP40LV PP12 PP25 PP40 PP65 PP85 PP110 PP30 PP60
MAXIMUM FLOW (L/H) 1000 2400 3900 1200 2400 3900 6500 8500 11000 3000 6000
MAXIMUM HEAD (M) 1.95 2.40 2.95 1.30 2.40 2.95 5.00 7.00 6.20 2.50 3.50
POWER* (W) 20 35 70 25 50 85 140 170 170 35 95
VOLTS (V) 12 12 12 240 240 240 240 240 240 240 240
FREQUENCY(HZ) 50 50 50 50 50 50 50 50 50 50 50
OUTLET BSP 15 19 19 15 15 15 25 32 32 25 25
CABLE LENGTH (M) 10 10 10 10 10 10 10 10 10 10 10
* SUBJECT TO VARIATION ACCORDING TO LOAD.
7.0 0
6.5 900 0
6.0 1400 1950
5.5 2000 2850
5.0 0 2300 3750
4.5 1000 2800 4600
4.0 1600 3400 5800
3.5 2800 3900 6600 0
3.0 0 0 3000 4500 7100 780
2.5 0 1040 0 1040 3900 5100 7850 0 1920
2.0 0 600 1600 600 1660 4500 5800 8400 540 2700
1.5 350 1150 2000 0 1150 2000 5000 6500 9000 1080 3420
1.0 550 1600 2550 350 1160 2650 5500 7100 9700 1680 4380
0.5 850 2000 3250 1000 2000 3250 6000 7900 10600 2400 5100
0.0 1000 2400 3900 1200 2500 3900 6500 8500 11000 3000 6000
PP10LV PP25LV PP40LV PP12 PP25 PP40 PP65 PP85 PP110 PP30 PP60
HEAD (M)

DESCRIPTION & FEATURES
YOUR PLATYPUS PUMP HAS BEEN
MANUFACTURED WITH ADVANCED
TECHNOLOGY TO PROVIDE YOU WITH THE
BEST QUALITY PUMP FOR YOUR POND OR
WATER FEATURE.
• The power cord cannot be replaced, if the cord is
damaged, the pump must be discarded.
• The complete vortex impellor set is a wearing
consumable part. Regular inspections, cleaning and
maintenance of impellor is necessary to ensure longer
impellor life. If the vortex impellor becomes worn
or damaged it should be replaced (available from
your local dealer). failure to do so may cause serious
damage to the pump.
1. Disconnect the power cord beforeperforming
maintenance.
2. Remove from water and detach tubing.
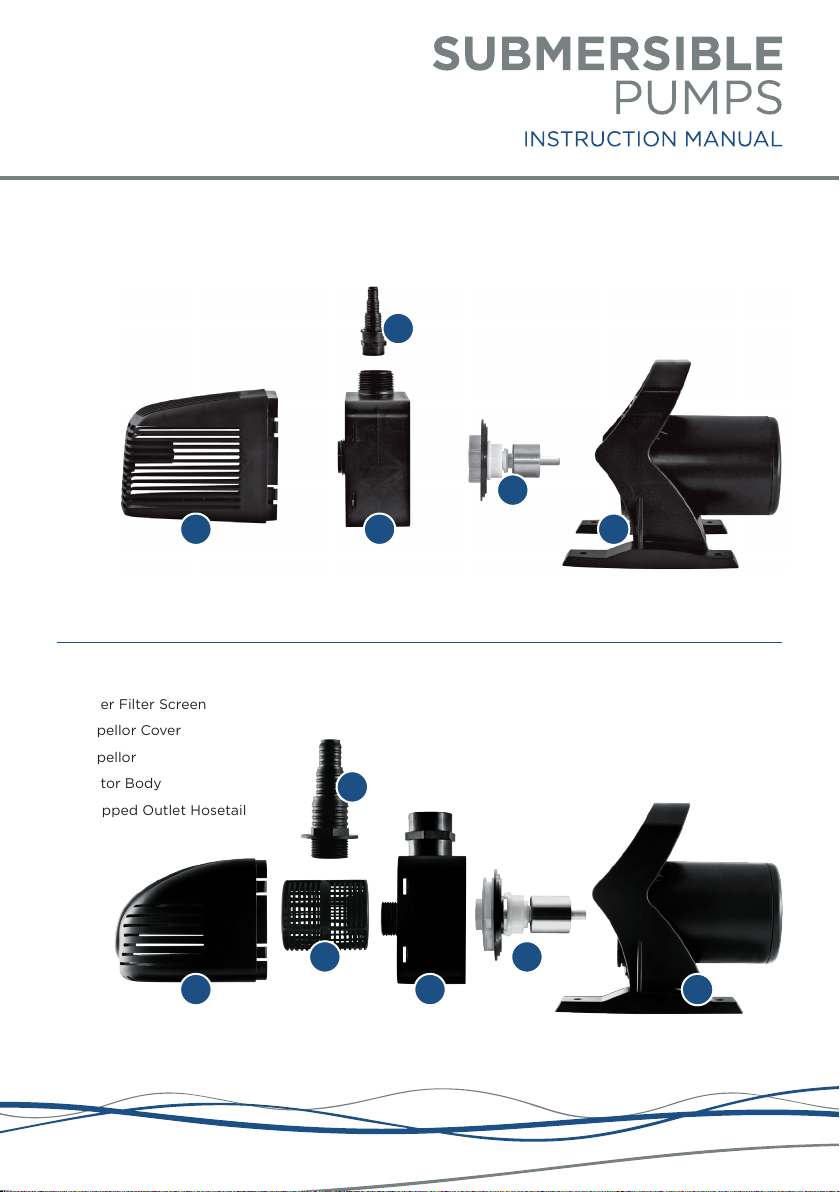
3. Remove front filter cage by gentlysqueezing sides.
4. Unscrew the four large screws facing the rear of the
motor and remove theimpellor housing. Note: You do
not need to remove impellor cover.
(Models: PP65, PP85, PP110, PP30, PP60)
5. Remove the impellor cover by turning anticlockwise
and pulling out (it may be quite sti due to algae and
grime build up. Gently remove the impellor and shaft,
use long nose pliers if needed. Take care not to break
ceramic shaft (if applicable) because they are brittle.
(Models: PP10LV, PP25LV, PP40LV, PP12, PP25, PP40)
6. Gently remove O’Ring seal & impellor set. Clean
the impellor & impellor chamber taking care not to
damage or scour surfaces. Check for any signs of
wear or damage.
7. Reinstall the complete impellor set making sure the
locator probe fits into the hole on the impellor set.
Put the impellor set in firmly. Carefully replace O’ring
seal. Check the impellor can spin freely. This step
is important, ensure impellor is refitted correctly or
the pump could be damaged. If unsure contact your
dealer.
8. Put impellor housing back on and screw the four
screws back in, making sure the screws are done up
evenly. Apply pressure to the impellor while replacing
housing to ensure impellor remains locked in correct
position.
9. Replace front filter cage, re-attach tubing to outlet,
submerse in water and turn on.
INSTALLATION
MAINTENANCE
• Platypus pumps are suitable for use in many dierent
applications including fountains, water features, small
ponds and hydroponics.
• Your Platypus pump has a single moving part (an
impellor set) therefore enabling easy cleaning and
maintenance.
• The motor and electrical components are
encapsulated in epoxy resin, ensuring safe operation
under water.
• The pump has a robust bearing and shaft design so
no oil/grease lubrication is required. Check out the
Platypus range of pond lights and accessories.
1. If required, have a qualified electrician install
weatherproof power point near to the pond or water
feature, (within the cable length of the pump).
2. Place the pump in desired location, ensure it is on
a stable surface free of sludge/debris and connect
tubing to the outlet.
3. Ensure pump is submerged, then plug in power cord
and switch on.
• Disconnect power cord from the power supply before
performing maintenance. Never lift the pump by the
power cord.
• The only serviceable item is the impellor set.
• The motor unit of the pump is encapsulated with
epoxy resin and does not need lubrication.
• All Platypus submersible pumps are water cooled; if
pump becomes restricted it will overheat and could
cause permanent damage. Ensure pump does not
become blocked or restricted.
IMPORTANT SAFEGUARDS
Please read the operating instructions and familiarize yourself with the equipment before placing it in service. Correct and safe use
of the system requires strict compliance with the safety instructions. For safety reasons persons less than 16 years of age or people
that are not familiar with these instructions should not use this equipment.

EXPLODED VIEW & PARTS
PP12 | PP25 | PP40
PP10LV | PP25LV | PP40LV
1. Front Cover
2. Biosponge
3. Intake Screen
4. Impellor Cover
5. Impellor
6. Motor Body
7. Extendable Riser
8. Bell Nozzle
9. Daisy Nozzle
10. Pump Adaptors
11. Inlet Adaptor*
12. Flow Controller with
Waterfall Outlet
13. Flow Controller Adaptor
1. Front Cover
2. Biosponge
3. Intake Screen
4. Impellor Cover
5. Impellor
6. Motor Body
7. Extendable Riser
8. Bell Nozzle
9. Daisy Nozzle
10. Tubing Adaptors
11. Inlet Adaptor*
12. Flow Controller
13. AC Adaptor
1
1 2 11 6
10
13
127
8
9
3 5
4
2
3
11 6
1278
9
10 13
4 4

PP30 | PP60
1. Front Suction Screen*
2. Stepped Hosetail
3. Impellor Housing
4. Impellor
5. Motor Body
1. Outer Filter Screen
2. Inner Filter Screen
3. Impellor Cover
4. Impellor
5. Motor Body
6. Stepped Outlet Hosetail
*This pump requires no prefilter sponge
PP65 | PP85 | PP110
1
1 3
2
5
4
3
6
5
2 4

PROBLEM REASON SOLUTION
Water Pump Not
Working No Power Check that the plug is connected
and turned on
Sponges and filter media
blocked with sludge Clean the sponges and filters
Impellor is blocked with
sludge or limescale
Clean the Impellor as per
the instructions
Running without sucient water Submerse the equipment underwater
then plug in. Refill if necessary.
Blocked Impellor chamber or ceramic
shaft is broken
Clean the Impellor. Check for ware.
Replace if necessary.
Water Pump is noisy Blockage in pump Clear the blockage
Impellor & Shaft worn out Replace Impellor & Shaft
Impellor broken Replace Impellor
Water valve closed on the outlet Open the valve and allow
water to flow
Unit inlet is blocked or the water
pump inlet is blocked Clear all blockages
TROUBLESHOOTING

IMPORTANT SAFEGUARDS
TO GUARD AGAINST INJURY, BASIC SAFETY
PRECAUTIONS SHOULD BE OBSERVED
INCLUDING, BUT NOT LIMITED TO:
LIMITED WARRANTY
WARRANTY COVERS ONLY APPLIANCE
DEFECTS AND FAULTY MATERIAL AND
WORKMANSHIP WITHIN A 2 YEAR PERIOD.
• The pump should only be used in clean water. Do
not use the pump in any solvent, gasoline that is
flammable or hot water.
• Do not operate the pump without water at any time,
permanent damage may occur.
• Do not operate the pump if the pump or any of the
components of the pump, such as the power cable,
have been damaged.
• The drip loop method should be used to prevent
water from traveling down the cord onto the plug or
power point. If the plug does get wet, do not unplug
the cord. Disconnect the circuit breaker that supplies
power to the power point. Then unplug and examine
the plug and power point for presence of water. If the
power point has become wet, you should consult an
electrician before using the power point again.
• Always use a properly grounded power supply that is
connected to an RCD with a rated residual operating
current not exceeding 30mA.
As per AS/NZS 3350.2.41:1997.
• Always unplug the pump from the power supply when
not in use or before performing any maintenance on
the pump. Never pull the cord to disconnect the plug
from the power supply. Grasp the plug and pull to
disconnect.
• Do not install or store the pump where it will be
exposed to extreme hot or cold temperatures
Operating temperature 5°C to 36°C.
• Keep out of reach of children or pets. This appliance
should not be used by children or infirm persons
without supervision.
• Do not cut the cord as this will result in voiding your
warranty.
• Care should be taken to arrange the power cord so
that it cannot be accidentally tripped over or pulled.
• Do not attempt to repair the pump yourself. Return to
an authorized service centre or place of purchase if a
fault occurs.
• Do not use in water above 35°C.
• Faults arising due to; accidents, misuse, not following
manufacturer’s guidelines/ instructions, or power
surges/spikes/ brownouts will not be covered.
• The impellor set is a consumable item and is therefore
not covered under warranty.
• Warranty will be void if any tampering, removal of
warranty labels, or electrical circuitry is evident.
• Warranty will be void if the power cord is cut or
damaged in any way.
• Warranty will be void if any visible signs of overheating
are present.
• Loss of livestock, damage to property or personal
injury caused by this product will not be covered.
• Warranty claims caused by installation faults will
not be covered. It is the customer’s responsibility to
return the faulty appliance for any warranty claim, to
Platypus.
• For any warranty to be valid, an original proof of
purchase must be provided.
• Our goods come with guarantees that cannot be
excluded under the Australian Consumer Law. You
are entitled to a replacement or refund for a major
failure and for compensation for any other reasonably
foreseeable loss or damage. You are also entitled to
have the goods repaired or replaced if the goods fail
to be of acceptable quality and the failure does not
amount to a major failure.
This manual suits for next models
10
Table of contents
Popular Water Pump manuals by other brands

Puretec
Puretec PT Series user guide

Central Pneumatic
Central Pneumatic 96677 Set up and operating instructions

Ecoflo
Ecoflo EPP33 owner's manual

FLORABEST
FLORABEST FTS 1100 C3 Translation of the original instructions

All Pond Solutions
All Pond Solutions AP-1.5-KIT quick start guide

Blue Diamond
Blue Diamond Microblue installation instructions

FLORABEST
FLORABEST FTS 1100 C3 translation of original operation manual

Aero-motive
Aero-motive 11140 installation instructions

T.I.P.
T.I.P. EJ 5 Plus operating instructions

SAMES KREMLIN
SAMES KREMLIN REXSON SH0560 user manual

Jula
Jula 731-077 operating instructions

Wilo
Wilo VeroLine-IPL Series Installation and operating instructions