POLAR-AIRE VF-9WFD Quick guide

9 In. Digital Twin Window
Fan
Operating and Safety
Instructions
Model No.: VF-9WFD
- FOR HOUSEHOLD USE ONLY -

2
3
IMPORT
ANT SAFE
GU
ARDS
De
finitions
Whenever used, the following identify safety and
property
damage messages and designate a level of hazard seriousness.
- This is the safety alert symbol. It alerts you to potential personal
injury hazards. Obey all safety messages that follow this symbol to avoid
possible injury or death.
DANGER – Indicates an imminently hazardous situation, which, if not avoided,
will result in death or serious injury. Usage of this signal word is limited to the
most extreme situations.
WARNING – Indicates a potentially hazardous situation, which, if not avoided,
could result in death or serious injury.
CAUTION – Indicates a potentially hazardous situation, which, if not avoided,
may result in minor/moderate injury.
NOTICE – Addresses practices not related to personal injury, such as product
and/or property damage.
Always follow basic safety precautions when using electrical
products, especially when children are present.
READ ALL
INS
TRUC
TIONS
BEFORE
USE.
DANGER -- To reduce the risk of electric shock:
Do not expose this product to rain, snow, or hail, as an electrocution hazard
exists and serious personal injury may occur.
WARNING--
To reduce the risk of fire, electric shock, or serious
personal injury:
Keep this product out of the reach of children and pets. This product is
not intended for use by children. Extra caution and close supervision are
necessary when using this product near children.
Always ensure the product is unplugged from the electrical outlet before
servicing, relocating, or cleaning it. Always unplug the product from the
electrical outlet when it is not in use or will be left unattended.
Do not operate this product with any solid-state speed control device.
Do not plug/unplug the product into/from the electrical outlet with a wet
hand.
Keep hands, hair, and clothing away from moving Blades during operation.
Do not immerse the product, power cord, or plug in water or other liquids.
To disconnect the product from an electrical outlet, press the Power Button
on the Control Panel and then pull directly on the plug; do not pull on the
power cord.
If using an extension cord with this product, the marked electrical rating of
the cord set or extension cord should be at least as great as the electrical
rating of the product.
Do not operate the product if it has a damaged or cut power cord or plug,
if wires are exposed, if it malfunctions, if it is dropped or damaged, or if it is
dropped in or exposed to water. This product has no user-serviceable parts.
Do not attempt to examine or repair this product yourself. Only qualified
service personnel should perform any servicing; take the product to the
appliance repair shop of your choice for inspection and repair.

4
5
CAUTION-- To reduce the risk of personal injury:
This product is intended solely for non-commercial, non-industrial, indoor,
household use in circulating air; do not use outdoors or for any other
purpose than intended.
Do not hang or wall-mount this product.
Do not run the power cord under carpeting, throw rugs, runners, or similar
coverings. Arrange the power cord away from traffic areas and where it will
not be tripped over.
Always operate the product on a flat, level, stable surface.
Parts
Expandable
panel
(inside)
Expandable
panel (inside)
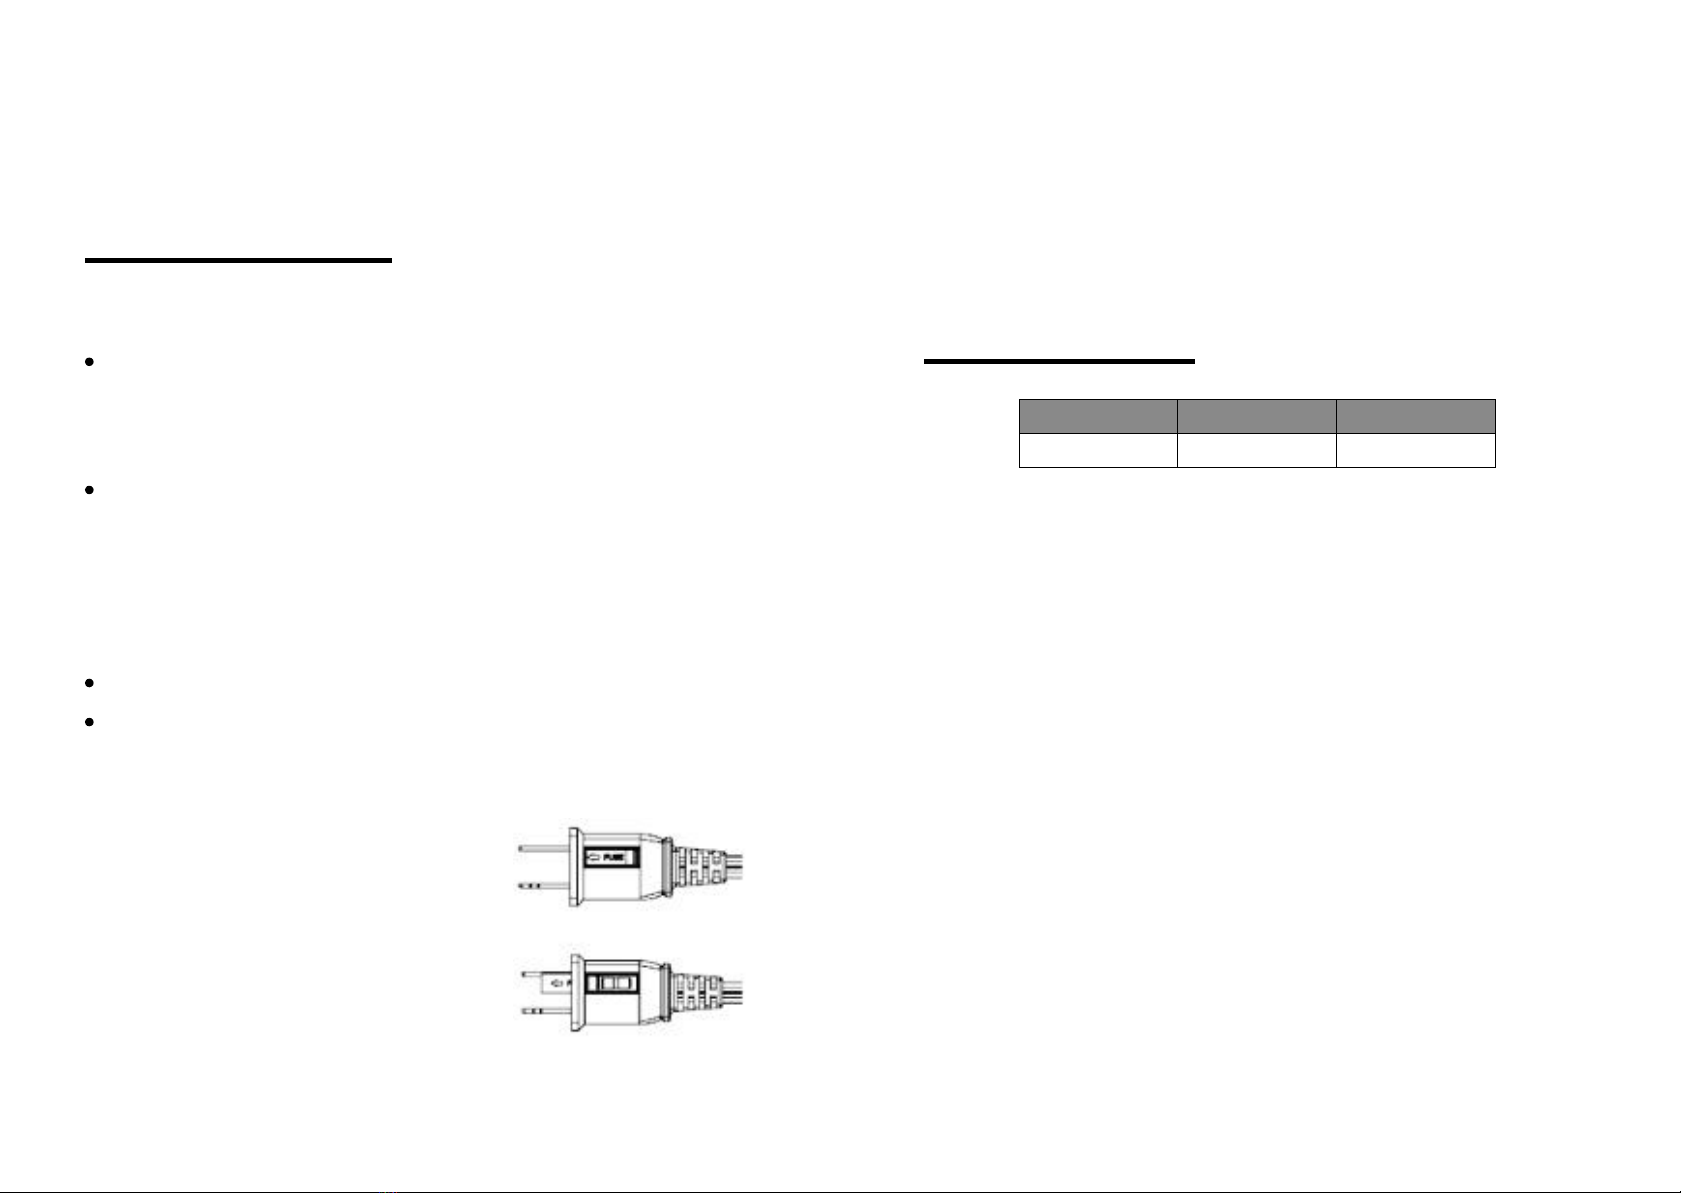
WARNING: This product has a polarized plug (one blade
is wider than the other). To reduce the risk of electric shock,
this plug will fit in a polarized outlet only one way. If the plug
does not fit fully in the outlet, reverse the plug. If it still does
not fit, contact a qualified electrician. Do not modify the plug
in any way.
Snap-on
Foot
To Set Up
As a floor or table fan:
Intake/
Exhaust/
Exchange
Switch
Power
button
Speed
Control
button
Thermostat
Control
button
Snap-on
Foot
NOTE: This product employs overload protection (fuse). A blown fuse indicates
an overload or short-circuit situation. If the fuse blows, unplug the product from
the outlet. Replace the fuse as per the user servicing instructions (follow product
marking for proper fuse rating) and check the product. If the replacement fuse
blows, a short-circuit may be present and the product should be discarded or
returned to a qualified service facility for examination and/or repair.
1. Slide the Snap-on Feet onto the edged slots,
located on the bottom of the Fan, until
they securely snap into place (see Fig.
1).
2. Place the Fan on a flat, level, stable
surface.
As a window fan:
SAVE THESE INSTRUCTIONS
FOR FUTURE REFERENCE
NOTICE: Do not set this product in a window that opens and closes
horizontally (side-to-side), as product damage may result.
Window Sash Holder

6
7
NOTES:
Remove Snap-on Feet when using the product as a window fan.
This product is designed to fit double-hung, casement, or vertically-sliding
windows.
Minimum window space opening is 23 inches (58 cm) x 11 inches (28 cm).
1. Ensure all four LOCK/UNLOCK Switches
for the Expandable Panels (see Fig. 2)
are set to the UNLOCK position.
2. Open the window where the fan is
to be placed. Raise the lower sash to
make an opening of at least 11 inches
(28 cm) high.
3. Center the Fan on the windowsill in
the window opening with the Control
Panel facing the inside of the room.
NOTE: Make sure the lower edge of the Fan is positioned over the
windowsill cap.
4. Grasp the Fan handle and gently lower the window sash onto the top
edge of the Fan.
NOTE: Make sure the window sash rests between the Sash Holders
protruding from the top edge of the Fan.
5. Pull out the Expandable Panels so they reach the side edges of the
window.
6. Once the fan is securely in place, slide all four LOCK/UNLOCK Switches to
the LOCK position.
WARNING: Do not lift the sash of a double-hung window while the Fan
is in operation, as there may be a risk of serious personal injury and/or
product damage.
To Use
WARNING: Do not expose this product to rain, snow, or hail, as an electrocution
hazard exists and serious personal injury and/or product damage may occur.
1. Plug the Fan into a standard 120-volt AC electrical outlet, the fan will stay on
standby mode.
2. Choose an airflow direction by sliding the FRESH AIR/EXHAUST Switches to the
desired positions.
NOTICE: Never change the airflow direction (Intake, Exhaust, or Air
Exchange) while the Fan is operating.
NOTES:
- Intake: Air is pulled into the room from the outside.
- Exhaust: Air is pushed from inside the room to the outside.
- Air Exchange: One Fan is set on “Intake”, pulling fresh air into the room,
while the other Fan is set on “Exhaust”, simultaneously pushing stale air
from inside the room to the outside.
3. To turn on the fan, press the power button( ) located on the left side of the
control panel. The fan will start on "HIGH" speed (Default Setting), and
"HIGH" speed indication light illuminates. Press the fan speed control button
( ) located on the right side of the control panel repeatedly to change fan
speed from "HIGH-MED-LOW", the indication light will illuminate accordingly.
Thermostat default setting is "OFF", three temperature indication lights are
"OFF".
4. THERMOSTAT
Choose from 60F, 75F or 90F settings by performing the following function:
60F: Press the Thermostat Control Button ( ) once.
75F: Press the Thermostat Control Button ( ) twice.
90F: Press the Thermostat Control Button ( ) a third time.
The temperature indication light will illuminate accordingly. Press the
Temperature Control Button a fourth time to turn the temperature feature off,
and all temperature indication lights will turn off.
NOTE: The fan will turn off if the room temperature drops below setting and
will turn on again if the room temperature climbs above setting.
8
9
Voltage Frequency Wattage
120VAC
60Hz 60W
5. To turn off the Fan, press the Power Button a second time, and then unplug
the Fan from the electrical outlet.
CAUTION: Always unplug the product from the electrical outlet when it is
not in use or will be left unattended.
User Servicing Instructions
WARNING: Always ensure the product is unplugged from the electrical outlet
before servicing, relocating, cleaning, or storing it.
This product is permanently lubricated at the factory before shipping and will
not require further lubrication for the life of the product.
WARNING: Additional lubrication of motor parts could increase the risk of a
fire hazard.
Clean the exterior surfaces only by wiping with a soft, damp cloth. Dust can
be removed from the Front/Rear Guards using a small vacuum.
WARNING: Do not use abrasive cleaners/pads to clean the product, and do
not allow water or other liquids to enter the interior of the product.
NOTICE: Do not disassemble the product for cleaning of internal parts, as
doing so may result in product damage and will void the warranty.
Make sure the product is completely dry before the next use.
Store the product with these instructions in the original box in a cool, dry
place.
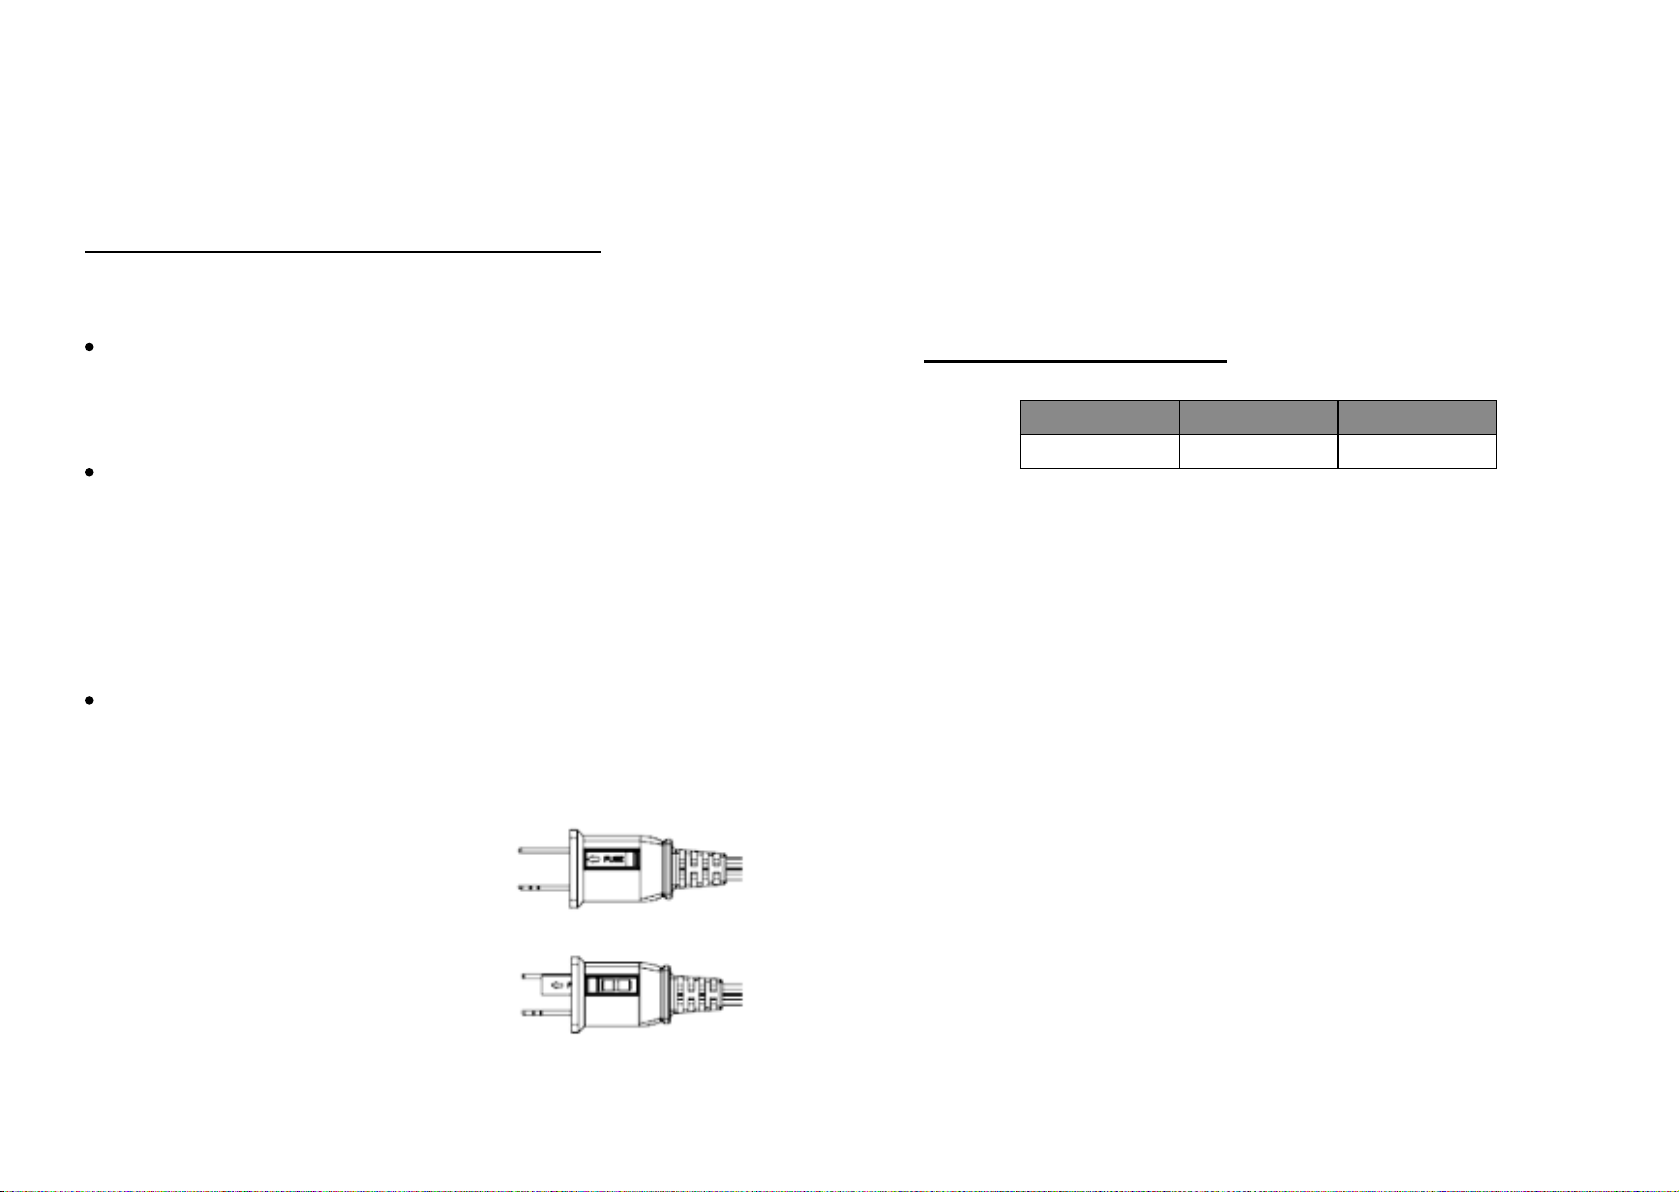
3. Using a small flat blade screwdriver, carefully remove the fuse by prying it up
from the end closest to the cord.
4. Replace the fuse with a 2.5 amp, 125-volt fuse (not included).
WARNING: Risk of fire. Use a 2.5 amp, 125-volt fuse only.
5. Close the fuse compartment cover by sliding it away from the blades.
Electrical Specifications
To Replace Fuse:
1. Grasp plug and remove it from the receptacle
or other outlet device.
CAUTION: Do not unplug by pulling on the
power cord.
2. Open the fuse compartment cover on top of
the plug by sliding it toward the blades.


Ventilador Doble para Ventana
de 9 pulgadas
Modelo No.: VF-9WFD
Instrucciones de Operación y Seguridad
-SÓLO PARA USO DOMÉSTICO-

PELIGRO -- Para reducir el riesgo de descarga eléctrica:
No exponga este producto a la lluvia, nieve o granizo, como existe un riesgo
de electrocución y pueden producirse lesiones personales graves.
ADVERTENCIA -- Para reducir el riesgo de incendio, descarga eléctrica
o lesiones personales graves:
Mantenga este producto fuera del alcance de los niños y las mascotas.
Este producto no está destinado a ser consumido por niños. La precaución
adicional y supervisión cercana son necesaria s cuando se utiliza este
producto cerca de niños.
Asegúrese siempre de que el producto está desenchufado del tomaco rriente
antes de dar servicio, ser reubicado o limpiado . Siempre desenchufe el
producto del tomacorriente cuando no esté en uso o se dejaría sin. vigilancia
No utilice este producto con cualquier dispositivo de control de velocidad de
estado sólido.
No enchufe / desenchufe el producto en / del tomacorriente con las manos
mojadas.
Mantenga las manos, el cabello y la ropa alejados de las paletas en
movimiento durante el funcionamiento.
No sumerja el producto, cable de alimentación o el enchufe en agua u otros
líquidos.
A desconectar el producto de una toma eléctrica, presione el botón de
encendido del panel de control y luego tire directamente de la clavija, no tire
del cable de alimentación.
Si se utiliza un cable de extensión con este producto, la capacidad eléctrica
marcada del cable o cable de extensión debe ser por lo menos la misma del
producto.
No ponga en servicioel producto si tiene un enchufe o cable de alimentación
dañado o cortado , los cables están expuestos, funciona mal, se ha caído
o dañado, o se cae en o expuesto al agua. Este producto no tiene piezas
reparables por el usuario . No trate de examinar o reparar este producto
usted mismo. Sólo el per sonal de servicio calificado puede realizar cualquier
acción de mantenimiento ; lleve el producto a l a tienda de reparación de
electrodomésticos que desea para su inspección y
reparación.
PRECAUCIONES IMPORTANTES
Definitions
Siempre que se utilice, los mensajes siguiente s identifican laseguridad y los daños
a la propiedad, y designan un nivel de gravedad del riesgo.
- Éste es el símbolo de alerta de seguridad. Se le advierte de posibles
riesgos de lesiones personales . Observe todos los mensajes de seguridad que
siguen a este símbolo par a evitar posibles lesiones o muerte.
PELIGRO – Indica una situación inminente de peligro que, si no se evita,
provocará la muerte o lesiones graves. El uso de este término in dicador se
limita a las situaciones más extremas.
ADVERTENCIA – Indica una posible situación de peligro que, si no se evita,
podría causar la muerte o lesiones graves.
PRECAUCIÓN – Indica una posible situación de peligro que, si no se evita,
puede provocar lesiones leves / moderados.
AVISO – Direcciones prácticas no relacionada s con lesiones personales, tales
como los daños a los productos y / o la propiedad
precauciones básicas de seguridad al utilizar productos eléctricos,
especialmente en presencia de niños.
LEA TODAS LAS INSTRUCCIONES
ANTES DE L USO
2 3

PRECAUCIÓN-- Para reducir el riesgo de lesiones personales:
Este producto está destinado exclusivamente para el uso doméstico y no
comercial, no industrial, interior en el aire que circula; no utilice al aire libre
o para cualquier otro propósito que se pretendía.
No cuelgue o monte este producto en la pared.
No coloque el cable debajo de alfombras. No cubra el cable con alfombrillas,
tapetes ni cubiertas similares. No coloque el cable debajo de muebles o
electrométricos.
Coloque el cable lejos de zona transitada y donde no se tropiece.
Siempre opere el producto en una superficie plana, nivelada y estable.
ADVERTENCIA: Este producto tiene un enchufe
polarizado conuna hoja más ancha que la otra). A fin dereducir
el riesgo deuna descarga eléctrica, el enchufe encaja rá en un
tomacorriente polarizado en una sola posición. Si el enchufe
no encaja completamente enel tomacorriente, invierta el
enchufe. Si aúnasí no encaja, llame a unelectricista calificado.
No modifique el enchufe de ninguna manera.
NOTA: En este producto se emplea la protección contra sobrecargas (fusible).
Un fusible quemado indica una situación de sobrecarga o cortocircuito. Si el
fusible se funde, desenchufe el producto del tomacorriente . Reemplace el
fusible de acuerdo con las instrucciones de mantenimiento del usuario (seguir el
marcandode producto para la capacidad adecuada de fusibles) y compruebe el
producto. Si se funde el fusible de repuesto, se puede ocurrir un cortocircuito y se
debe desechar el producto o devolverlo a un centro de servicio calificado para su
revisión y / o reparación.
4 5
GUARDE ESTAS INSTRUCCIONES
PARA FUTURA REFERENCIA
Piezas
A Configurar
Como un ventilador de suelo o de mesa:
Deslice los piesencajables en las ranuras
de bordes, que se encuentran en la parte
inferior del ventilador, hasta que encajen
con seguridad en su lugar (ver figura 1).
Coloque el ventilador sobre una superficie
plana, niveladay estable.
1.
2.
Como un ventilador para ventana:
AVISO: No instale este producto en una ventana que se abre y se cierra
horizontalmente (de lado a lado), ya que puede provocar daños en el
producto.
Panel
Extensible
(interior)
Panel
Extensible
(interior)
Soporte de Hoja de Ventana
Pie
Encajable Interruptor de
Cambio de
Admisión /
Escape
Pie
Encajable
Termostato
Control
Botón
Botón de
Control de
Velocidad
Botón de
Encendido
Pie
Encajable
Fig. 1

Sujete el mango del ventilador y baje suavemente la hoja de la ventana
hasta el borde superior del vent ilador.
NOTA: Asegúrese de que la hoja de la ventana se coloca entre los
Soportes de Hoja sobresalientes del borde superior del ventilador.
Extraiga los paneles extensibles de modo que estos lleguen a los bordes
laterales de la ventana.
Una vez que el ventilador queda firme en su posición, deslice todos los
cuarto interruptores LOCK/UNLOCK en la posición LOCK.
ADVERTENCIA: No levante la hoja de una ventana de guillotina mientras
el ventilador está en funcionamiento, dado que puede haber un riesgo de
lesiones personales graves y / o daños en el producto.
NOTAS:
Quitar los pies encajablescuando se utiliza el producto como un ventilador
para ventana.
Este producto está diseñado para adaptarse a las ventanas de tipo guillotina,
bisagras o corredera vertical.
Espacio mínimo de abertura de la ventana es de 23 pulgadas (58 cm) x 11
pulgadas (28 cm).
Asegúrese de que todos los cuarto
interruptores de LOCK/ UNLOCK para los
paneles extensibles (ver Fig. 2) se fija a la
posición UNLOCK.
Abra la ventana donde el ventilador se va a
colocar. Levante la hoja inferior, formándose
una abertura de al menos 11 pulgadas (28
cm) de altura.
Centre el ventilador en el alféizar de la
ventana que se abre con el panel de control
hacia el interior dela habitación.
NOTA: Asegúrese de que el borde inferior
del ventilador se coloca sobre el topede
alféizar.
1.
2.
3.
4.
5.
6.
6 7
A Utilizar
ADVERTENCIA: No exponga este producto a la lluvia, nieve o granizo, como existe
un riesgo de electrocución y pueden producirse lesiones personales graves y / o
daños en el producto.
Enchufe el ventilador en una toma de corriente estándar de CA de 120 voltios,
el ventilador permanecerá en modo de espera.
Elija una dirección de flujo de aire deslizando los interruptores FRESH AIR /
EXHAUST a las posiciones deseadas.
AVISO: Nunca cambie la dirección del flujo de aire (de admisión, escape, o
de intercambio de aire) mientras que el ventilador está en funcionamiento.
NOTAS:
-Admisión: El aire se mete en la habitación desde el exterior.
-Escape: El aire se empuja desde el interior de la habitación hacia el exterior.
-Intercambio de aire: Un ventilador se encuentra en "Admisión", tirando de
aire fresco en la habitación, mientras que el otro ventilador se encue ntra
en "Escape", empujando al mismo tiempo el aire viciado del interior de la
habitación hacia el exterior.
A encender el ventilador, presione el botón de encendido ( ) situado en
el lado izquierdo del panel de control. El ventilador va a comenzarse a la
velocidad "HIGH" (ajuste predeterminado), y la luz indicadora de velocidad
"HIGH" se ilumina. Pulse repetidamente el botón de control de velocidad del
ventilador ( ) situado en el lado derecho del panel de control para cambiar
la velocidad del ventilador entre "HlGH-MED-LOW", la luz indicadora se
iluminará en consecuencia. El ajuste predeterminado del termostato es "OFF",
tres luces indicadoras de temperatura están "OFF".
TERMOSTATO
Elija entre los ajustes de 60F, 75F o 90F ejecutando la siguiente función:
60F: Pulse una vez el botón de control del termostato ( ).
75F: Pulse dos veces el botón de control del termostato ( ).
90F: Pulse por tercera vez el botón de control del termostato ( ).
La luz indicadora de temperatura se iluminará en consecuencia. Presione por
cuarta vez el Botón de Control de Temperatura para desactivar la función de
temperatura, y todas las luces indicadoras de temperatura se apagan.
NOTA: El ventilador se apagará si la temperatura ambiente cae por debajo del
ajuste y se vuelve a encender si la temperatura ambiente sube por encima del
ajuste.
1.
2.
3.
4.
Esquina
Superior /
Derecha
(posterior) Bloqueo Desbloqueo
Esquina
Inferior /
Derecha
(posterior)
A apagar el ventilador, presione el botón de encendido por segunda vez, y
luego desenchufe el ventilador de la toma de corriente.
PRECAUCIÓN: Siempre desenchufe el producto del tomacorriente cuando
no esté en uso o se dejaría sin vigilancia.
Instrucciones de Mantenimiento del Usuario
ADVERTENCIA: Asegúrese siempre de que el producto está desenchufado del
tomacorriente antes de dar servicio, ser reubicado, limpiado o almacenado.
Este producto está permanentemente lubricado en la fábrica antes del envío y
no requiere lubricación adicional durante la vida del producto.
ADVERTENCIA: Lubricación adicional de las piezas del motor podría aumentar
el riesgo de un incendio.
Limpie las superficies exteriores sólo con un trapo suave y húmedo. Se puede
quitar elpolvo de los GuardabarrosDelantero / Traserousando una pequeña
aspiradora.
ADVERTENCIA: No utilice productos de limpieza abrasivos /estropajos para
limpiar el producto, y no permita que el agua u otros líquidos entren en el
interior del producto.
AVISO: Do not disassemble the product for cleaning of internal parts, as doing
so may result in product damage and will void the warranty.
Asegúrese de que el producto esté completamente seco antes del próximo
uso Almacene el producto con estas instrucciones en la caja original en un
lugar fresco y seco.
5.
AReemplazar el Fusible:
Sujete el enchufe y retírelo del tomacorriente u
otro dispositivo de salida.
PRECAUCIÓN: No desenchufe tirando del
cable de alimentación.
Abra la cubierta del compartimiento de fusible
en la parte superior del enchufe deslizándola
hacia la.s clavijas.
1.
2.
Con un destornillador plano pequeño, retire con cuidado el fusible haciendo
palanca desde elextremo más cercano al cable.
Reemplace el fusible con un fusible de 125 V, 2,5 A (no incluido).
ADVERTENCIA: Riesgo de incendio. Utilice sólo fusible sde 12.5 V, 2,5 A.
Cierre la cubierta del compartimiento de fusibles deslizándola lejos d.e las
clavijas.
3.
4.
5.
Especificaciones Eléctricas
Voltaje Frecuencia Potencia
120VAC 60Hz 60W
8 9

Garantía y Reclamaciones por Productos Defectuosos:
Los productos fabricados por POLAR-AIRE™ están garantizados para el consumidor
original de ser libres de defectos en materiales y mano de obra durante doce (12) meses
a partir de la fecha original de compra. La garantía no cubre los productos modificados
fuera de nuestra fábrica, daños o averías causadas por actos de Dios, abuso, mal uso, uso
anormal, instalación defectuosa, si no se siguen los procedimientos de mantenimiento
sugeridos adjuntos a este producto (según la definición de Magnuson-MossWarranty-
Federal TradeCommissionImprovementAct) Esta unidad está garantizada para el comprador
minorista original contra defectos de calidad o mano de obra durante un período de un
año a partir de la fecha de compra original. Si la unidad se compródentro de los Estados
Unidos, devuélvala, a portes pagados, al lugar de compra. Esta garantía no cubre los daños
debidos a los accidentes, funcionamiento no sometido a 120 voltios, 60 hertz, AC. de
corriente, o cualquier otro abuso. Todas las garantías implícitas, incluidas las garantías de
comerciabilidad y de adecuación del objetivo, (si procede)por la presente quedan limitadas
en su duración al período de un año desde la fecha de la compra original.
En caso de que el minorista rechace la devolución, entonces el consumidor tiene que seguir
el siguienteprocedimiento.
Reclamos de productos defectuosos requerirá lo siguiente desde el cliente al por menor.
Consumidor debe contactar con la compañía directamente para saber cómo se procesará
su solicitud. Si la tienda al por menor NO se llevará el producto de vuelta dentro de un
año a partir de la fecha de compra, el cliente deberá proporcionar (enviar) el siguiente
a Geneva Industrial Products para un reembolso. 1) Recibo fechado reflejado la fecha de
compra. 2) UPC código de barras sobre la caja en la que el producto se compra. 3) Cable de
alimentación cortado al ras con el ventilador / calentador. Para el reembolso, TODOS LOS 3
ITEMS deben enviar a Geneva Industrial Group, la atención de Servicio al Cliente. Asegúrese
de incluir la dirección del remitente para que su reembolso se pueda enviar a usted.
Esta garantía le otorga derechos legales específicos, y usted también puede tener otros
derechos que varían de estado a estado. No hay disponiblesmecanismos de solución para
controversias informales. Esta garantía limitada seofrece en lugar de toda otra garantía.
Warrantee & Defective Product Claims:
Products manufactured by POLAR-AIRE™ are warranted to the original consumer to be
free of defects in material and workmanship for twelve (12) months from the original date
of purchase. The warranty does not cover products modified outside our factory, damage
or failure caused by acts of God, abuse, misuse, abnormal usage, faulty installation, failure
to follow suggested maintenance procedures enclosed with this product (as defined
by magnuson-Moss Warranty-Federal Trade Commission Improvement Act) This unit is
guaranteed to the original retail purchaser against defects in quality or workmanship for a
period of one year from the date of original purchase. This warranty does not cover damage
due to accigents, operation on other than 120 volts, 60 hertz, AC. current, or any other
abuse. All implied warranties, including the warranties of merchantability and of fitness of
purpose, if applicable, are hereby limited in duration to the period of one year from the
date of original retail purchase.
Should the retailer refuse the return, then the consumer needs to follow the procedure
below.
Defective product claims will require the following from the retail customer. Consumer
should contact the company directly for how their claim will be processed. If the retail
store will NOT take the product back within the one year from date of purchase, the
customer must provide (send) the following to Geneva lndustrial Products for a refund.
1) Dated receipt reflecting date of purchase. 2) UPC bar code from the carton the product
was purchased in. 3) Power cord cut flush to the fan / heater. For a refund, ALL 3 OF THESE
ITEMS need to be sent to Geneva Industrial Group, attention Customer Service. Be sure to
include a return address so your refund can be sent to you.
This warranty gives you specific legal rights, and you may also have other rights which vary
from state to state. No informal dispute settlement mechanisms are available. This limited
warranty is given in lieu of all other warranties.
10 11


Table of contents
Languages:
Other POLAR-AIRE Fan manuals


Popular Fan manuals by other brands


AHRI
AHRI Swegon PARAGON b Installation, commissioning maintenance

Fanimation
Fanimation CCK8002 instruction sheet

GERMANICA
GERMANICA GF20ACB instruction manual

Harbor Breeze
Harbor Breeze OCEANSIDE manual

NuAire
NuAire DRIMASTER 365 Installation and Maintenance Details

Zehnder Rittling
Zehnder Rittling ComfoAir 350 Luxe user manual