Porsche CDC-4 Manual

TechnicalInformation Cayman(987)
2/05 ENU 9160 9
CDC-4 CD Changer (I No. 692)
Vehicle Type: CaymanS
ModelYear: As of2006
Situation: Installation Instructions
Information: Theabove-mentionedvehicle comesequippedwith CD changerpreparationconsistingof:
-opticalwaveguideconnectionpoint (at thefrontpanelin theluggagecompartment) and
-powersupply line(at the frontpanelin themiddleor rightofthe luggagecompartment behindthe trim
panel). Thismeans thatretrofittingcan beperformedwithoutanygreatexpense.
Beforeorderingparts, always checkandconsider the existingvehicle equipment! Thecorrectoptical
waveguidemust alsobeorderedfor the"CDC-4CD changer"set!
Thecorrectoptical waveguide to beusedis:
-vehicletype (left-handdrive[LHD])
-equipmentversion(e.g. with/withoutsound system,navigationmodule)
-installationversion (USA/RoW).
Forvehicleswithbrake booster lining,theplastic luggagecompartment trimpanel
997.551.133.00.02Acanalsobe retrofitted upon request.
Parts Info:
997.044.900.78 CDchanger
Only forvehicleswithoutBoseSurroundSoundSystem (INo. 680):
2005©PorscheCars NorthAmerica,Inc. Tequipment Nov16, 2005
Page 1of 8

Cayman(987)
99160 ENU 2/05 TechnicalInformation
997.622.708.00 1x Opticalwaveguide, withoutnavigationmodule
997.622.715.00 1x Opticalwaveguide, withnavigationmodule
Only forvehicleswithBoseSurroundSound System (INo. 680):
997.622.712.00 1x Opticalwaveguide, withoutnavigationmodule
997.622.713.00 1x Opticalwaveguide, withnavigationmodule
Parts List:
Figure2
997.645.140.02 1x CDchanger
Figure2-A-
997.645.221.00 1x CDchanger support
Figure2-B-
999.703.501.40 2x Insertmounting
Figure2-D-
999.507.766.02 2x Speednut, M6
Figure2-E-
900.378.179.09 2x Hexagon-headbolt,M6 x 16
Figure2-F-
N 014 128 13 6x Countersunkscrew, M5x8
Figure2-G-
997.610.122.00 1x Connectionpointholder(notshown)
ATTENTION
The optical waveguide can become damaged due to incorrect installation or if the requirements for handling
optical waveguides are disregarded.
Observe the requirementsfor working with optical waveguides
Workshop Manual ’9772IN Optical
waveguide - MOST bus’
Nov16,2005
Page2of 8 Tequipment 2005©PorscheCars NorthAmerica, Inc.

TechnicalInformation Cayman(987)
2/05 ENU 9160 9
ATTENTION
Damage to audio systems
♦
due to voltage spikes
Before unplugging/removing an audio system, remove ignition key and switch off the audio system.
Tools: Sidecutters Phillipsscrewdriver(medium)
Socket,a/f10mm Ratchet,3/8-inchwith extension
PIWISTesterP 9718 Carpetknife
Torquewrench0-30Nm(0-22ftlb.) Needle-nosepliers
WorkProcedure: 1 Preparatorywork.
1.1 Removeluggagecompartmentcover.
WorkshopManual ’703019Removingandinstalling
luggagecompartmentcover-sectionon"Removing"’
1.2 Only forvehicleswith TirePressureMonitoringcontrolunit:
RemovefasteningscrewonTirePressureMonitoringcontrolunit andlaycontrolunit tooneside.
WorkshopManual’443419Removing andinstallingTirePressure Monitoring controlunit-
sectionon "Removing"’
1.3 Only forvehicleswith luggagecompartment cooling:
Remove airguide fromfrontpanel.
Figure4
2 Installopticalwaveguide.
2.1 Removeconnectionpoint holder.
2.1.1 Only forvehicles with opticalwaveguide
component(navigationunitand/oramplifier) in
theluggagecompartment:
Disconnectopticalwaveguide connection
point
Figure4-B- inthe frontluggage
compartment. (Note: Figure3 was not
applicablefor USA/Canada and wastherefore
skipped)
2.1.2 Removeconnectionpointholder
Figure4-A-
from plenumpanelusing needle-nosepliers.
2005©PorscheCars NorthAmerica,Inc. Tequipment Nov16, 2005
Page 3of 8

Cayman(987)
99160 ENU 2/05 TechnicalInformation
Figure5
2.2 Only forvehicleswithout opticalwaveguide
componentinthe luggagecompartment:
Pullprotectivecap
Figure5-A- offthe optical
waveguide.
Figure6
2.3 Only forvehicleswithout opticalwaveguide
component:
Routeopticalwaveguide fromopticalwaveguide
connectionpoint
Figure6-A- alongtheplenum
panelto the CDchangerinstallation position
Figure6-B- andsecureatthisposition.
2.4 Only forvehicleswith optical waveguide
component:
Routeopticalwaveguide fromopticalwaveguide
connectionpoint
Figure6-A- alongtheplenum
panelto the CDchangerinstallation position
Figure6-B- and to theamplifier
Figure6-C-
andsecureatthis position.
Note
Ifthe connection pointholder is damagedduringremoval,
useanew connectionpointholder (seescopeof parts).
Thenpush theplugsocket intothenewconnectionpoint
holder.
2.5 Fastenconnectionpoint holdertothe frontpaneland connectopticalwaveguide connection
point.
2.6 Only forvehicleswith opticalwaveguidecomponent:
Securethestandardopticalwaveguideas apermanentfixture. Thisremainsfunctionlessin the
vehicle.
3 Exposetheelectric wire(powersupply)between the carpetliningand frontpanel.
Nov16,2005
Page4of 8 Tequipment 2005©PorscheCars NorthAmerica, Inc.

TechnicalInformation Cayman(987)
2/05 ENU 9160 9
Figure7
4 InstallCD changer.
WorkshopManual’916019
Removingand installingCD changer -section on
"Installing"’
4.1 AdjustCDchangerto installation position.
4.1.1 Loosenadjusting screws
Figure7.
4.1.2 Adjustinstallation position(horizontal)bymoving
theadjustingscrews.
4.1.3 Tightenadjustingscrews.
Figure8
4.2 Only forUSA/Canadianvehicles:
4.2.1 Clipin speed nuts
Figure8-E-.
Figure9
4.2.2 Clipinsertmounting
Figure9-D- into CD
changerretainingframe.
4.2.3 InsertCDchanger intoCDchanger retaining
frameandtightenfasteningscrews
Figure9
-G-.
Tightening torque: 2.5 (2.0 ftlb.) Nm
2005©PorscheCars NorthAmerica,Inc. Tequipment Nov16, 2005
Page 5of 8

Cayman(987)
99160 ENU 2/05 TechnicalInformation
Note
Ensurethattheinsertmounting isseatedcorrectlyin thefrontpanel.
Figure10
4.2.4 GuideCDchangerretainingframe with insert
mountings
Figure10-B- intothe frontpanel
from above
Figure10-Inset- andswivelit
downwards.
SecureCDchangerretainingframewithtwo
screws
Figure10-A-.
Note
Figure13shows theconnectors(ItemsA, B andE)fortheRoW version ofthe navigationunit(CD changer
andnavigationunitarranged oneontop oftheother).
Figure13
4.3 Plugelectric connectors
Figure13-C- and
opticalwaveguide
Figure13-D- into theCD
changeruntil theyarefelttoengage.
Nov16,2005
Page6of 8 Tequipment 2005©PorscheCars NorthAmerica, Inc.

TechnicalInformation Cayman(987)
2/05 ENU 9160 9
Note
Figure14shows theRoWversionof theaudiocomponents (CDchangerand navigationunit arrangedone
ontopofthe other).
Figure14
5 PositionCDchanger withsupport ontothemounting
pointand push ittowardsthe frontpanel untiltheCD
changersupport clicksintoplace.
6Only forvehicleswithluggage compartmentcooling:
Installair guide.
7Only forvehicleswithTirePressureMonitoring
controlunit:
Insert TirePressureMonitoringcontrolunitand
tightenfasteningscrews.
WorkshopManual
’443419Removing andinstallingTirePressure
Monitoringcontrolunit-section on"Installing"’
8 Installluggagecompartmentcoverandtighten
plasticscrews.
WorkshopManual ’703019
Removingand installingluggagecompartmentcover
-sectionon "Installing"’
Note
Forfurtherinformationand instructions oncarryingout the menuitems,see
WorkshopManual
’911019Removing andinstallingPCM displayand operatorcontrolunit-section on "Programming"’.
9 CodeCDchanger.
9.1 Connectbattery charger.
9.1.1 PIWISTester P 9718mustthen beconnectedandignition switchedon.
9.1.2 Select"GATEWAY"controlunitand"Coding"functionselection. Press•F12“ to continue.
9.1.3 Inthe "Gatewaycoding" menu,selectRequiredinstalled componentslistsand press•F8“to
changetheCD changercodingto Installed.
9.1.4 Select"PCM2.1" controlunitand"PCM2.1 MMI"functionselection.
9.1.5 Inthe "PCM 2.1MMIfunctionselection"menu,selectPlanned &Actualconfiguration andcheck
thatthe CD changer isconfigured.
9.1.6 Inthe "PCM 2.1MMIPlanned & Actualconfiguration"menu,press•F8“to accept themapping.
9.1.7 Readout fault memoryanderaseit ifnecessary.
9.1.8 Switchignitionoffand disconnectPIWISTesterP9718 .
2005©PorscheCars NorthAmerica,Inc. Tequipment Nov16, 2005
Page 7of 8

Cayman(987)
99160 ENU 2/05 TechnicalInformation
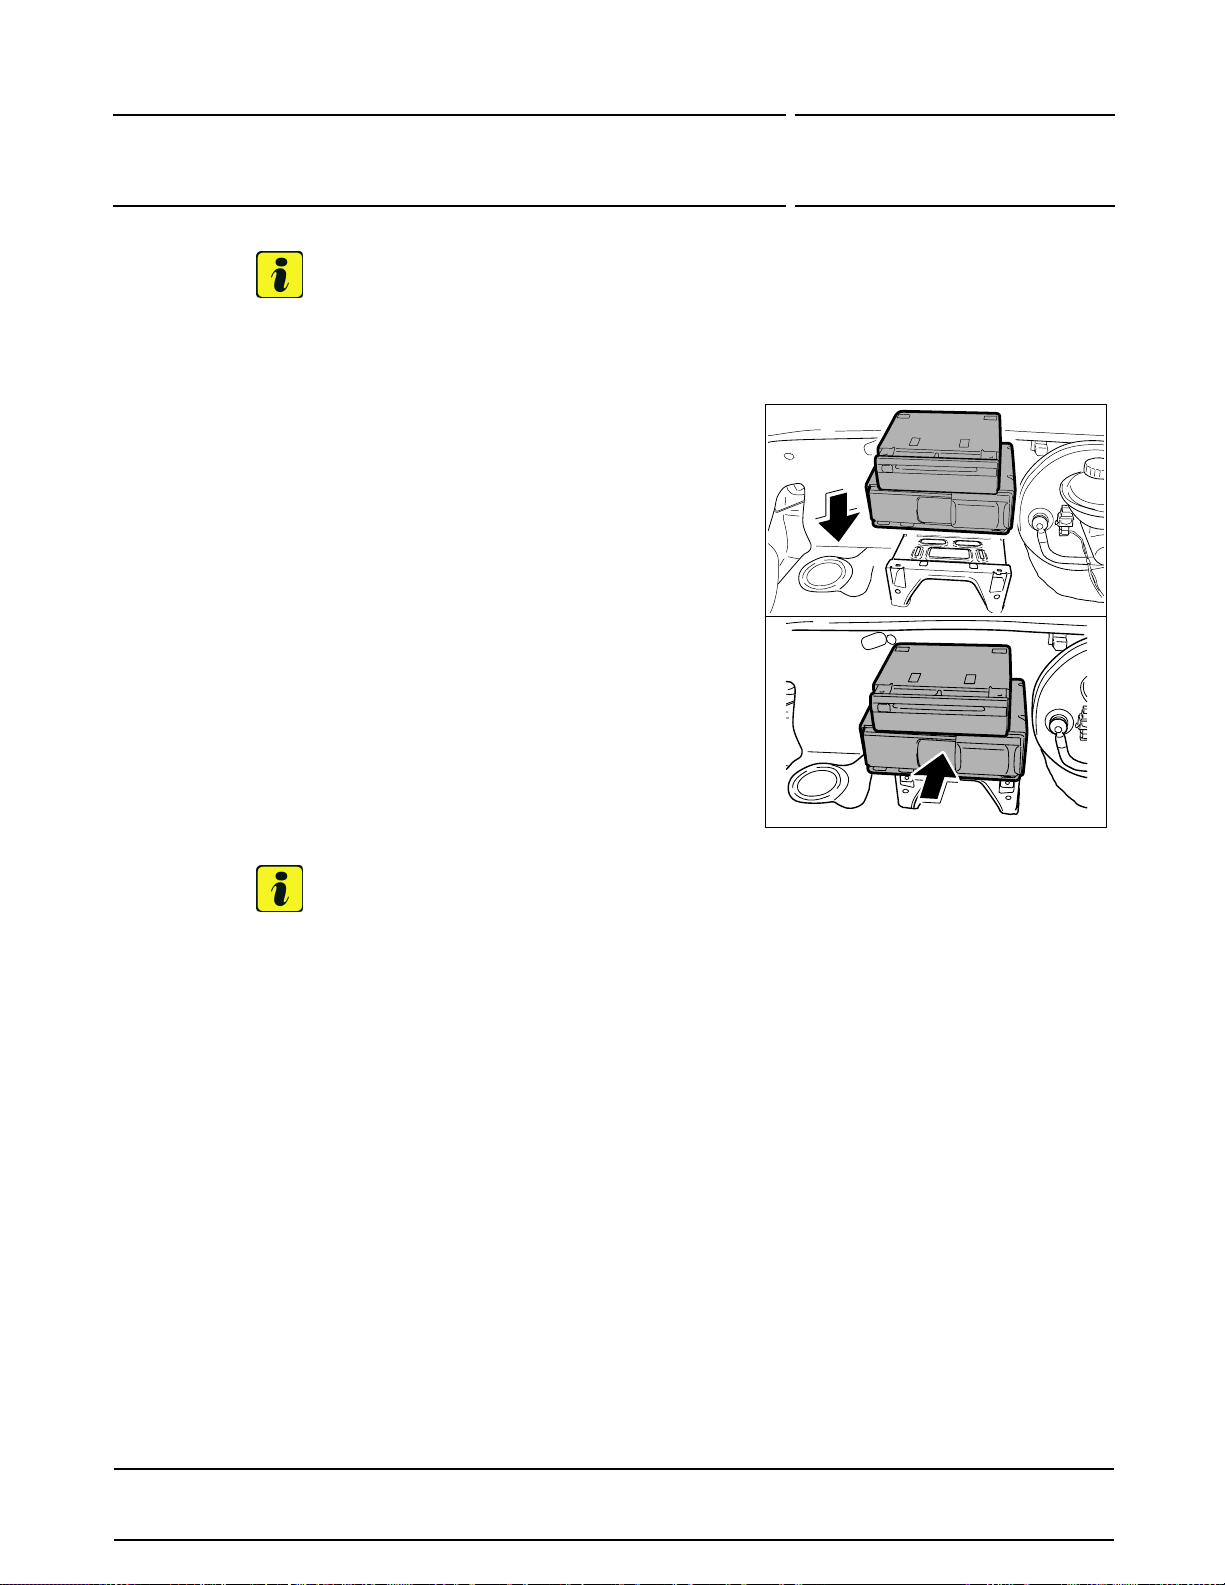
9.1.9 Disconnectbatterycharger.
9.2 Performafunctiontest.
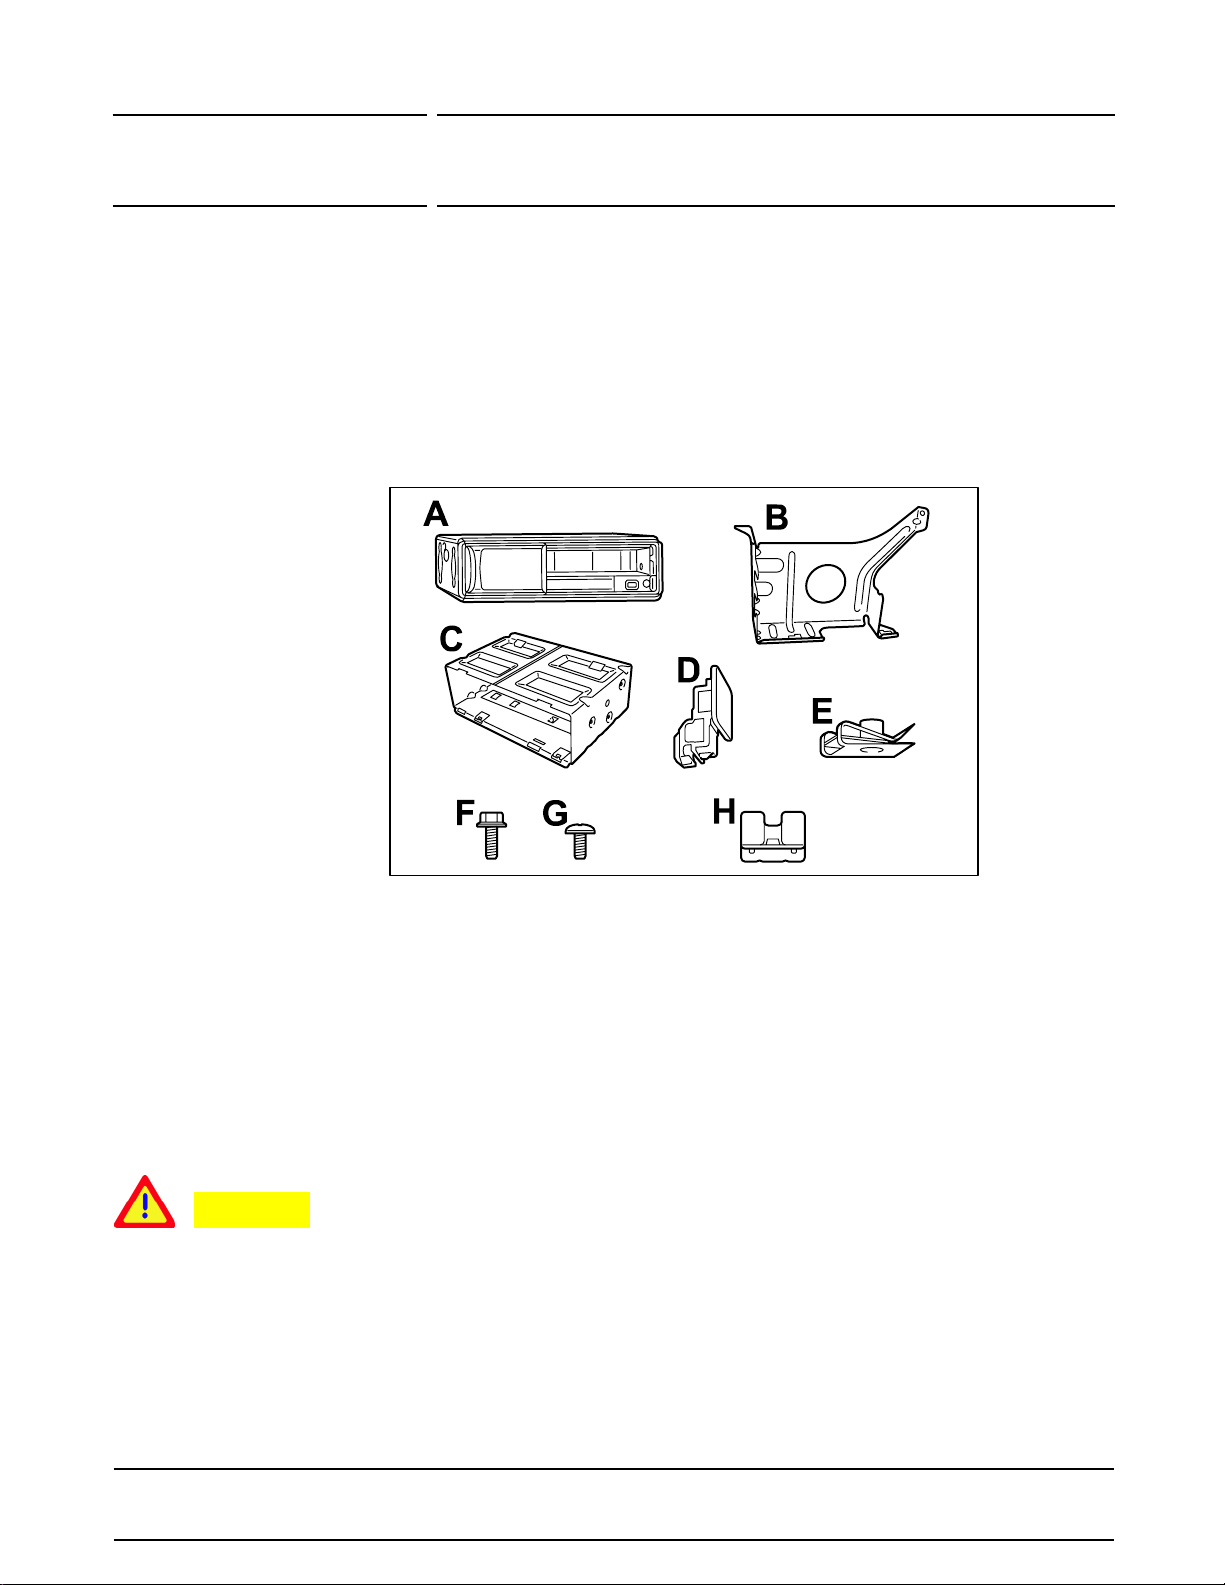
WorkingTime: 916023 00: Installing CDC-4CDchanger Labortime: 100 TU
Includes: InstallingCD changer, routingopticalwaveguide in theluggage
compartment and codingPCMwith thePIWISTester.
Without: Retrofittingplastictrim panel forluggagecompartment.
References:
WorkshopManual ’443419Removingand installingTirePressureMonitoringcontrolunit’
WorkshopManual ’703019Removingand installingluggagecompartmentcover’
WorkshopManual ’911219Removingand installingnavigation unit’
WorkshopManual ’916019Removingand installingCD changer’
Important Notice: PorscheCarsN.A Technical Bulletins are intendedforuse byprofessionaltechnicians,nota "Do-it-yourselfer."They are writtento inform these techniciansof conditionsthat may
occur on some vehicles, or to provide information that could assist in theproper service of avehicle. Special tools may be required to perform certain operations identified in these bulletins. Use of tools
and procedures other than those recommended in these bulletins may be detrimental to the safe operation of your vehicle. Properly trained technicians have the equipment, tools, safety instructions
andknow-how to do ajob properlyandsafely. Ifacondition isdescribed, donot assumethat the bulletinappliesto yourvehicle,orthat yourvehiclewill have that condition. See your Porsche Dealer for
information onwhether yourvehicle may benefitfromthe information. Part numberslisted inthese bulletins are for referenceonly. Alwayscheckwith yourauthorized Porsche dealertoverify correct part
numbers. © PorscheCars NorthAmerica, Inc.
Dealership
Distribution
Routing
ServiceManager
Asst. Manager
_______
_______
ShopForeman
Warranty Admin.
_______
_______
ServiceTechnician
ServiceTechnician
________
________
_______
_______
_______
_______
_______
_______
Dr. Ing. h.c. F. Porsche AG is the ownerofnumerous trademarks,bothregisteredand unregistered,includingwithoutlimitation thePorscheCrest®, Porsche®,Boxster®, Carrera®,Cayenne®,
Tiptronic®, VarioCam®, PCM®, 911®, 4S®, and the model numbers and distinctive shapes ofPorsche’s automobiles such as, the federally registered 911 automobile. Thethirdparty trademarks
contained herein arethe properties of their respective owners. Porsche Cars North America, Inc., believes the specifications to be correct atthe timeofprinting. However,specifications,standard
equipment and options are subject to change without notice. Printed in the USA
Nov16,2005
Page8of 8 Tequipment 2005©PorscheCars NorthAmerica, Inc.
Table of contents