Portable USA PU-10W User manual

10.4” Digital Picture Frame
“The brightest way to display your memories”
Model Number: PU-10W
Version 1.1ZM

2
Table of Contents
A. Table of Contents Page 2
B. Introduction and welcome page Page 3
C. Cautions and Warnings Page 4
D. What’s in the box Page 5
E. What do all the buttons do? Page 6
F. Quick Setup Guide Page 8
G. How does the remote work? Page 9
H. Memory options Page 11
I. Photo viewing Page 12
J. Playing music Page 13
K. Watching videos Page 14
L. Warranty Details Page 15
M. Specifications Page 16

3
Introduction and Welcome
From all the management and staff at Portable USA, we
would like to thank you for choosing us for your preferred
Digital Picture Frame. We hope it will provide much
happiness, a few giggles and plenty of smiles.
Service you can count on
We pride ourselves on our attention to quality, customers
and service. If for any reason you are not completely
satisfied with your choice, or have a technical question that
needs answering, please feel free to contact us. Each
question, query or concern is dealt with directly by Director
Level staff to ensure we get it right.
We can be reached by mail or email and typically respond
within 4 hours.
Portable USA
25 South Street
Hopkinton
MA 01748
Email:framesupport@portableusa.com
Quality you can trust
As you will see toward the back of this guide, we back all our
products with one of the best warranties in the industry. 1
year parts, 1 year labor. Of course there’s small print, but
we’ve made it big enough to read.
Before you start
Please take the time to read this manual completely or at
the very least make sure you have a complete package as
per Page 5 and read the Quick Start Guide on Page 8. It’s
worth the time.

4
Cautions and Warnings
Hopefully this should all be common sense but we want you
to be safe and to use your frame for the purpose it was
intended – it needs the right environment for the best
results!
To reduce the risk of fire, serious personal injury or shock;
✖Do not use the unit near water or expose it to rain or a
damp environment. It is intended for indoor use only.
✖Do not try to balance the frame on anything unstable
such as a bracket, tripod, sofa arm etc. We don’t want
it to fall and break or worse, injure someone.
✖Ensure that the ventilation holes are not blocked –
there is no fan in the unit – that’s why it’s quiet – but it
also means that blocking vents is a bad idea…so don’t
put it on a rug, sofa, bed but use a flat hard, stable
surface instead.
✖Keep it away from sources of heat such as stoves or
radiators.
✖Keep the power cord out of harms way – do not leave it
in a place where it may get trapped or perhaps tripped
over and remove the power when not in use.

5
✖For extra safety, use a surge protector to protect
against power surges.
✖Clean the outer plastic parts only with a soft dampened
cloth. You can use wood polish on the wood, but apply
to a cloth first – never spray or pour cleaner directly
onto the picture frame. The screen is covered in a thin,
protective acrylic guard and can also be cleaned.
What’s in the box
This is what you should have in the box;
•1 Digital frame with wooden surround
•Remote control
•Locking stand
•AC Power supply
•This fine manual
Please keep your packing materials until you have confirmed
that your unit is in perfect working condition.

6
What do all the buttons do?
AUTO – the Auto button adjusts your image for the best
overall image color and position.
MENU – Allows control of many of the display characteristics
of the frame, most of which are automatically controlled
however the menu options fall into five main categories, all
navigated by using the MENU button, along with the
up/down arrows.
MENU followed by or will scroll along the top
navigation bar where you can select from;
COLOR TYPE – Brightness, Contrast, Color and Color
Temperature

7
SCREEN ALIGNMENT – Primarily used for Horizontal
and Vertical Positioning of the image on the display.
Auto Adjust is the best setting.
OSD ALIGNMENT – allows you to reposition the on
screen display menu
LANGUAGE – Select from English, Spanish, French,
German and Chinese
MISCELLANEOUS – Allows you to RESET the unit,
change the volume settings and alter the rotation of
images
After scrolling to your desired option, hit MENU again and
your option will be highlighted in the top menu bar as well
as moving your selector to the top row of choices. Use the
or buttons to make your selection. Once selected, hit
MENU and use the or buttons to adjust your settings.
Once you have adjusted your settings hit MENU and then
scroll down with the or to BACK, to take you to the
top navigation bar.
Adjusts VOLUME when used by themselves. OSD
disappears after 5 seconds. Hitting MENU while the volume
screen is displayed, enables a MUTE function.

8
Quick Setup guide
A. The first thing to really understand is that a computer
is NOT required to enjoy your pictures on this frame –
just a memory card from your camera. The rest should
be straight-forward.
B. Assemble the rear support leg by inserting the
connector end of the leg into the frame. For landscape
mode, start with the base of the leg pointing to the
bottom left and rotate counterclockwise. For portrait
format, rotate clockwise. The leg will lock into place.
C. Ensure all packing material is clear of the screen and
ventilation holes and plug the power brick into an AC
outlet and then into the frame in the opening below the
power switch.
D. Insert a supported memory card (see Specification
section for full list) into the appropriate slot with the
label facing the front of the unit. Cards can only go in
one way, please exercise caution and do not force.
E. Turn the unit on with the switch located above the
power cord. 0 represents off, 1 represents on.
This will start a show of whatever you have on your card,
including playing compatible music or video files. To fine-
tune what you see, you will need to use the remote control.
Files will play in alphabetical order, regardless of type of file.

9
Using the Remote Control
The remote control supplied has push button ease of use
that allows full control of your digital photo frame
Changing your battery
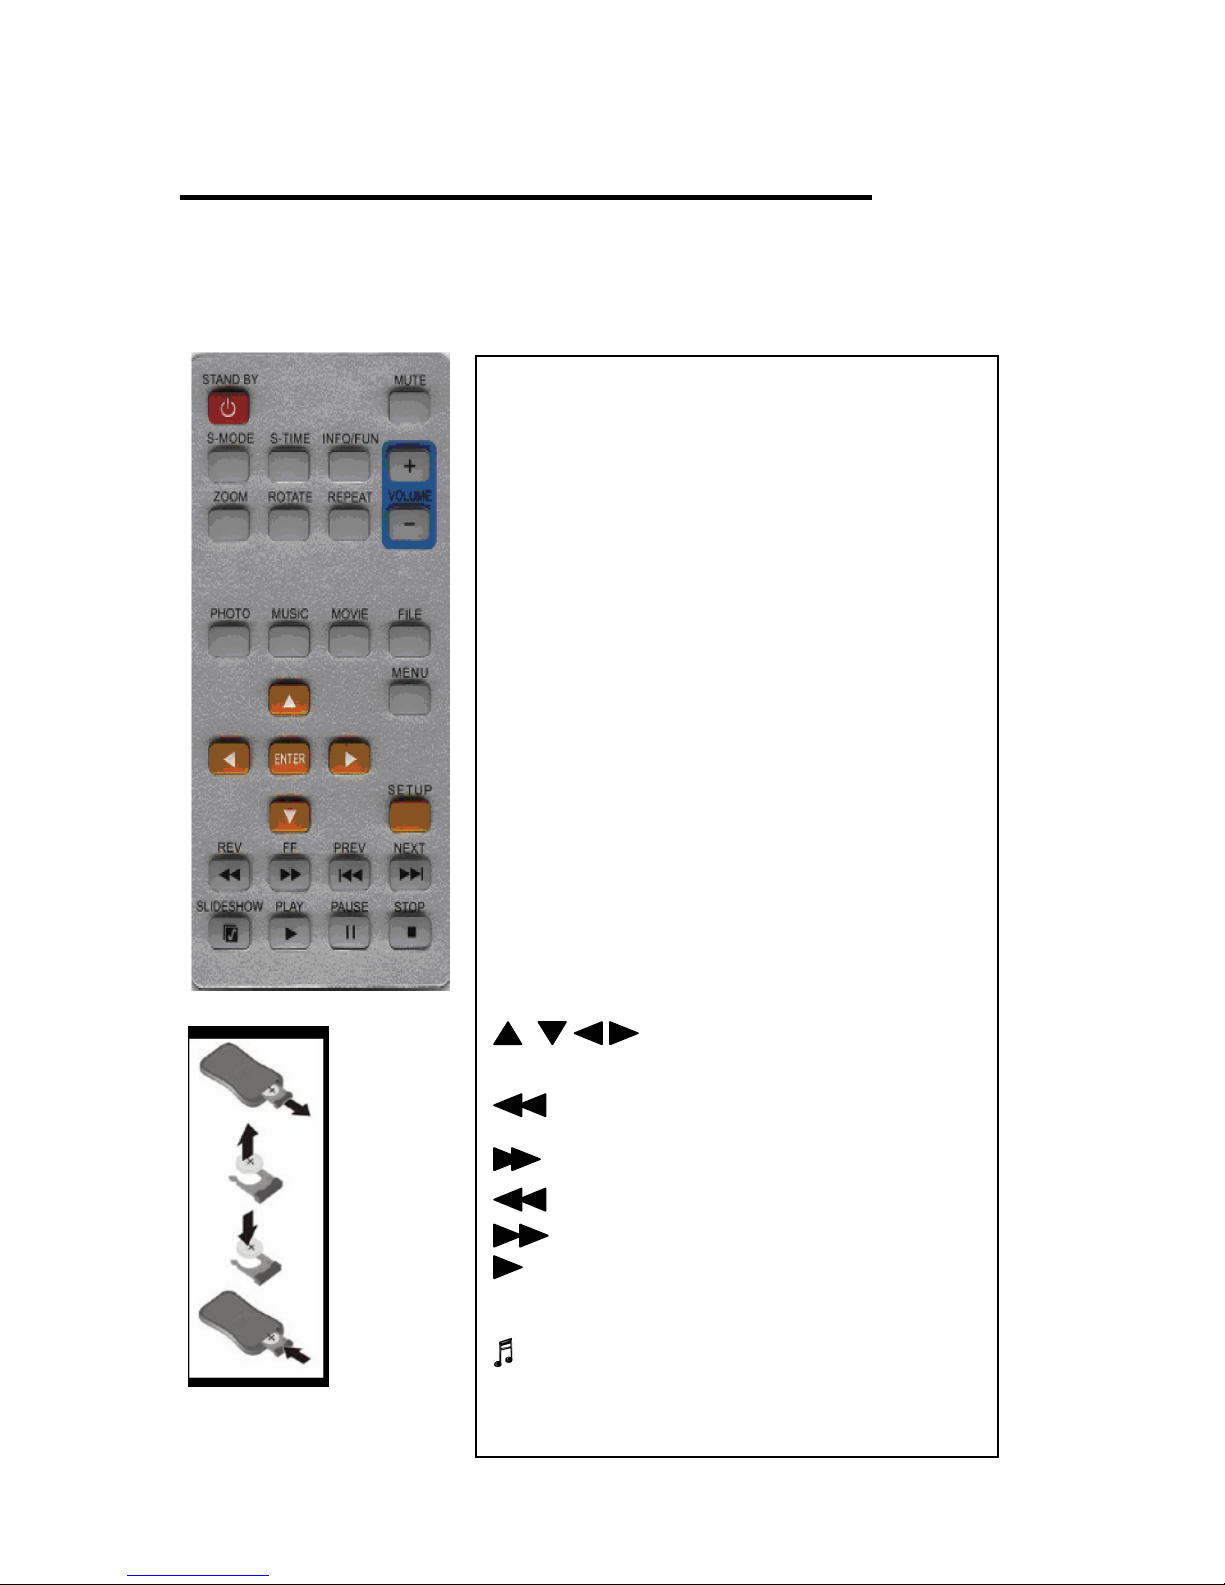
STANDBY: Puts the unit in and out of sleep
mode. To turn off fully, switch off on the frame
MUTE: Mutes and un-mutes all sound
+ / - : Controls the volume up and down
INFO/FUN: During a slide show, movie or song
shows file properties such as resolution,
sampling frequency, file size.
S-TIME: Slide Show Interval can be selected
from 1, 3, 5 or 10 seconds.
S-MODE: 14 choices of transition – Fullscreen,
roll top to bottom, roll bottom to top, roll top/
bottom to center, roll center to top/bottom,
blind top to bottom, roll left to right, roll right to
left, roll left/right to center, roll center to
left/right, implode, blind left to right, cross fade,
random
ZOOM: Allows 4 stages of zoom on still
images. Once zoomed, you can pan around
using the up/down keys
ROTATE: Rotates images 90 degrees
REPEAT: Allows a folder to be repeated
continually
PHOTO:Displays thumbnails of all images
MUSIC:Shows MP3 library
MOVIE: Shows Video Library as thumbnails
FILE: A root directory management system
displaying all contents of folder(s)
: Controls menu navigation
ENTER: Makes a selection from menu or
thumbnail listing
REV:For movie playback, reviews film
backwards
NEXT FF: For movie playback, fast
forwards
❙PREV: Move back one slide
❙NEXT:Move forward one slide
PLAY: Plays movies, slideshows, images and
mp3 files
❙❙PAUSE: Pauses movie, slideshow or song
MUSICAL SLIDESHOW: Plays your songs as
a background to a slideshow
SETUP: See below diagram for full details

10
Setup – from the remote
With no memory installed, hitting SETUP will bring up the
on screen menu that allows you to control many aspects of
the display. These options can be navigated with the arrow
keys, up and down, left and right. ENTER allows you to
select from the menu and ‘drill down’ to the sub-menu level.
From that level, UP and DOWN arrows will allow you to
select what you want. To the right of each submenu are the
choices available, selected by hitting the RIGHT arrow,
highlighting your desired selection, and pressing ENTER.
The chosen option will be confirmed in yellow. Hitting LEFT
arrow will return you to the submenu.
The menu tree below provides the options and paths used to
truly personalize your frame.

11
Memory Options
This 10.4” wooden frame supports Compact Flash, Secure
Digital, Memory Stick, Memory Stick Pro, MemoryStick
DuoMultimedia card, and xD Picture Cards(please note
Type M cards are not compatible due to the proprietary
compression method used).
You can put multiple (different) cards in the frame and
select which card to ‘play’ from at any one time – please
note the following;
•Use the FILE button to select which card you want to
use
•CF cards will play before SD cards
You can organize the files and copy them between memory
cards, create new folders and playlists by clicking FILE, then
INFO/FUN. A number of options will appear that are self-
explanatory i.e. COPY, DELETE, RENAME, NEW FOLDER and
PROPERTIES. Each will allow you to do as the heading
suggests – the system supplies a virtual keyboard on which
to create your file system.
We strongly recommend retaining master copies of any file
important to you on a separate card or device.

12
Viewing Photographs
All images must be jpegs of 12MP or less to be displayed on
this frame. The frame will automatically scale the image to
640x480 to provide perfect Aspect Ratio and image
accuracy. It is recommended that you maximize your
memory card capacity and auto-scale everything to 640x480
for quicker image display and better use of your memory.
There are four ways to view your photos. Some of these are
influenced by the SETUP options in the chart on page 10 .
Please review it; if you have changed any of the SETUP
settings described, your display may be different.
Choose one of the following options:
A. Plug in a memory card and hit the Power On Switch. A
photo show will automatically start.
B. Press the PHOTO button on the remote and you will see
the thumbnail display. Press INFO/FUN to get information
on the selected file. Press INFO/FUN again to remove it
from the screen. To start your slideshow, press the PLAY or
ENTER button.
C. If you want to play a slideshow with music, hit STOP and
then on the remote - the first music file will automatically
start to play with your selection of images.
D. Press FILE. Use the arrow keys and press the PLAY or
ENTER button to select an item. If you have more than one
memory card, you will see DEVICES at the top. With your
arrows, select DEVICES and the entire library will appear,
listing your memory cards. Select a memory card and you
will see the card’s contents. Select a file to play as above.
To personalize your display even more, with the remote, you

13
can select 14 ways of transitioning the slides along with a
transition delay of 1, 3, 5 or 10 seconds.
Playing your MP3 music files
This frame only supports the MP3 file format for audio, so
ensure you are using this on your flash cards.
There are two ways to play your tunes. Some of these are
influenced by the SETUP options in the chart on page 10.
Please review it; if you have changed any of the SETUP
settings described, your outcome may be different.
Choose one of the two options below:
A. Insert your memory card and turn on the Power. STOP
the Slideshow as detailed above and press MUSIC. You will
see a list of songs and the first one will automatically start
to play. If you scroll through the listing with your arrow
keys, it will play that song. When STOP is pressed, you will
see the song listing.
B. Press FILE. Find the file or folder that contains your MP3
files – these are highlighted with an icon to their left saying
MP3.
The graphic equalizer has several settings; Classic, Rock,
Pop, Ballad, Dance, Standard, Classic and Jazz. To choose
one of these, hit INFO/FUN.
The remote and unit itself both control volume settings and
other options as detailed.

14
Watching Your Videos
This frame will play MPEG1/2 and MPEG4 files. Please note
that MPEG1 and MPEG2 are very space and memory hungry
and while a fast speed, high capacity flash card may provide
enough bandwidth, it is not very efficient and may result in
slight stuttering. Additionally many cameras take MPEG4
files with embedded data that is incompatible with our
frame. We recommend saving all video files in DivXformat,
which is both processor and memory friendly. Approximately
1½hours can be stored on a small 512MB card. DivXcan
be downloaded from their website, www.divx.com .
Once you have the right format file, there are two ways to
play videos, again, affected by the SETUP options shown on
Page 10. If you have changed any SETUP settings, your
results may be different.
Choose one of the following options:
A. Insert your memory card and turn on the power. STOP
the slideshow and press MOVIE. You will see a thumbnail
list of movies. Hit PLAY or ENTER to play the chosen file.
B. Hit FILE. Find the file you want to play – it will be marked
as AVI, MPG, MOV or similar and then hit PLAY or ENTER.
Volume and scanning of the movie can also be controlled
with the buttons on the remote control, as detailed above.

15
Warranty Statement
Portable USA Warranty Statement for Digital Picture Frames and other
leading edge technologies
Portable USA warrants your hardware product against any defect in
material and workmanship, under normal use, for a period of 12
months from date of purchase. The warranty becomes effective from
the date of purchase by the end user. If the product is found to be
defective within the warranty period, Portable USA will, at its sole
option, repair or replace the defective product. Portable USA will not,
under any circumstances, be liable for direct, special or consequential
damages such as, but not limited to, damage or loss of property or
equipment, loss of profits or revenues, cost of replacement goods, or
expense or inconvenience caused by service interruptions.
This warranty is void if:
• The product was operated or stored in abnormal use or maintenance
conditions.
• The product was repaired, modified or altered or undergone
attempted repair by non-authorized personnel, unless Portable USA
has authorized such repair, modification or alteration.
• The product was damaged, abused or misused
• The product was installed without following the supplied installation
instructions.
• The serial number of the product is defaced, modified or missing.
• The decision of Portable USA shall be final and binding with regards
to the condition of product return and eligibility of repair or
replacement.
To obtain warranty service, within 30 days of the date of purchase,
please contact the retailer from whom you made your purchase. To
obtain warranty service, after 30 days of the date of purchase contact
Portable USA’s Technical Support Service. A proof of purchase will be
required to confirm that the product is still under warranty. Should
Portable USA’s Technical Support diagnose a fault on your product, a
Return to Manufacturer Authorization (RMA) number will be issued to
you. All products returned to Portable USA must be securely packaged
in their original box and shipped at the customer’s cost inclusive of any
requested documentation. Return shipment of repaired or replaced
product will be covered by Portable USA. Any product returned without
an RMA number issued by Portable USA’s Technical Support Service
will be refused.

16
Technical Details
Part Number PU-10W
UPC Code 094922596987
Frame Size 13” x 10.5” x 1.75”
Memory supported Secure Digital(SD), Multimedia
Card(MMC), CompactFlash(CF),
xD Picture Card, Memory Stick
(MS), Memory Stick
Pro,MemoryStick Duo
Weight 5lb
Power Supply 100-240V, 12VDC 1.5A
Remote Control CR2025 3V battery (supplied)
Screen Size 10.4” Corner to Corner
Screen Type Active TFT LCD screen
Display resolution 640x480
Max. orig. image 12MP
Weight 5lb
Power Supply 100-240V AC, 12V DC 1.5A, UL
approved
Positioning options Landscape, portrait for wall or
desktop
Audio 2x1W Stereo for MP3
Video Support MPEG 1/2/4, AVI, DivX
Table of contents
Other Portable USA Digital Photo Frame manuals