Portable USA PU-8C User manual

1
Digital Photo Frame
PU-8C
User Manual
Version 1.0J

2
Preface
About this manual
This manual describes how to get the most out of your new Digital Photo Frame. You
should read through this manual before using the Digital Photo Frame to familiarize
yourself with the various features and functions. While we strive for complete product
accuracy, sometimes changes are made after printing of our manual.

3
Table of Contents
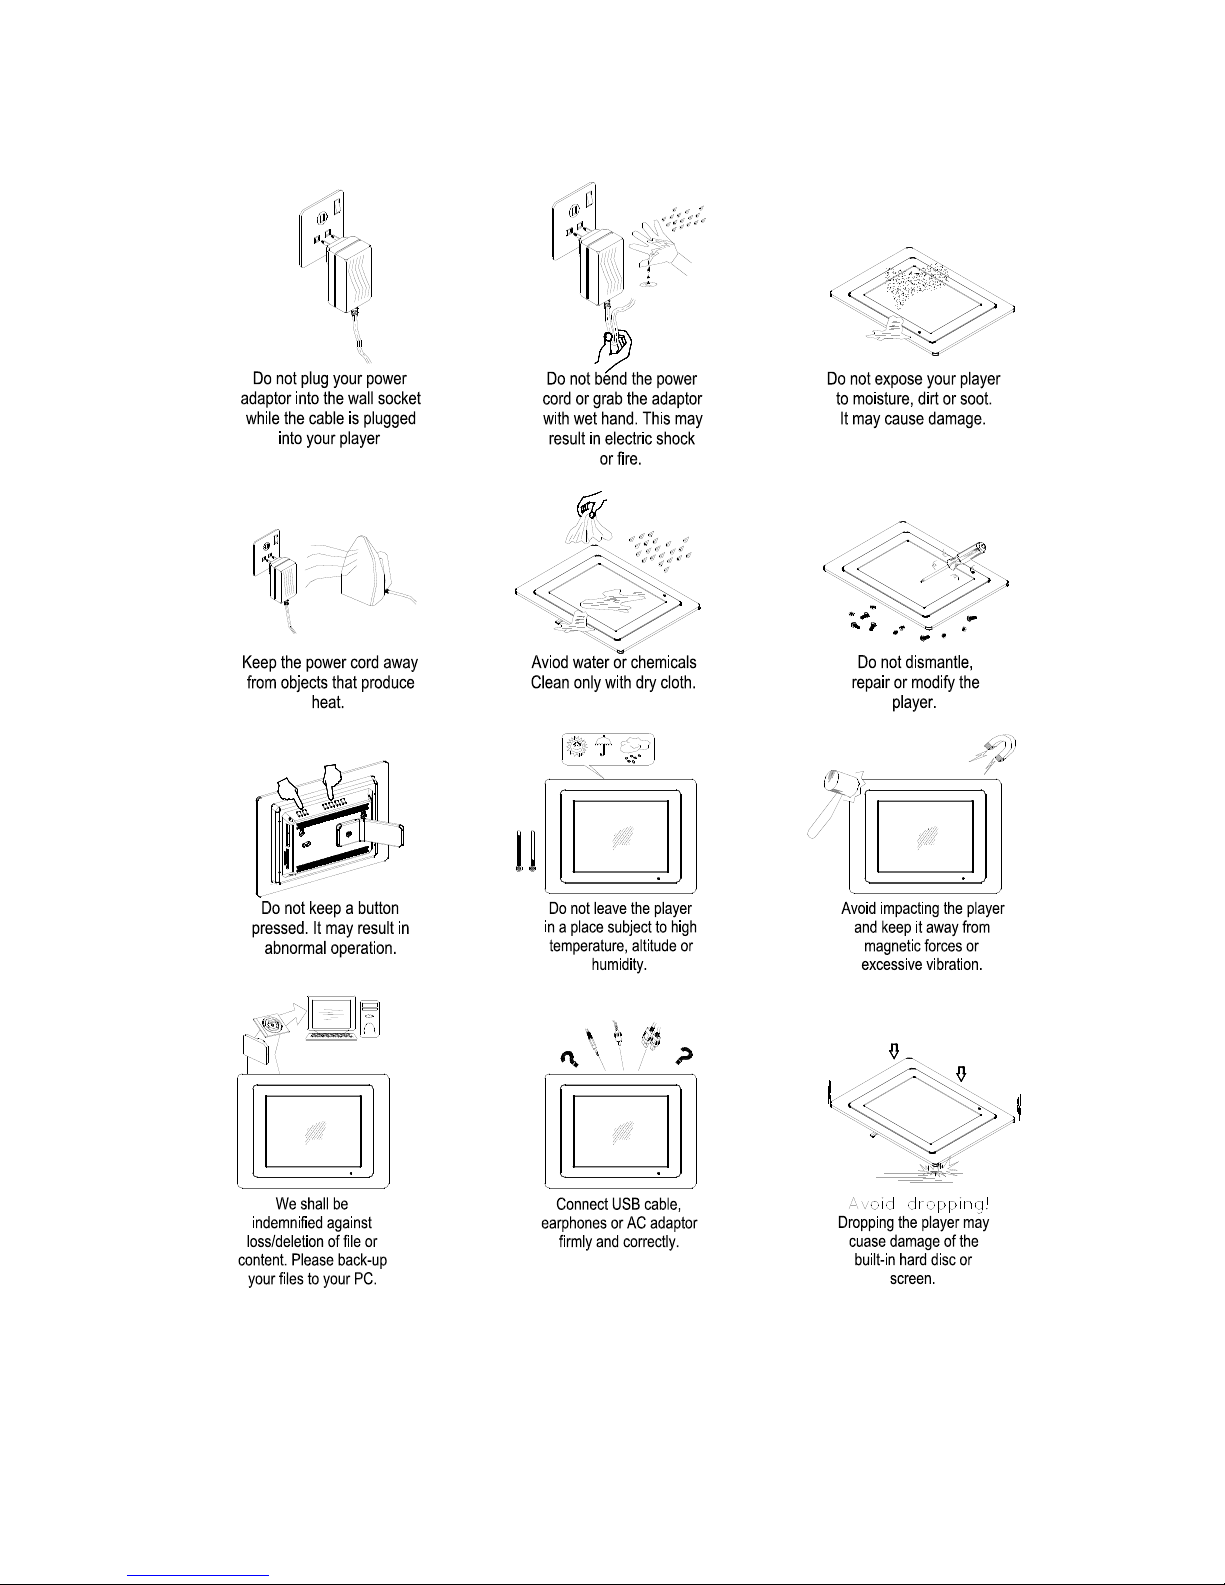
Safety Instruction …………….………………………………………………..…….5
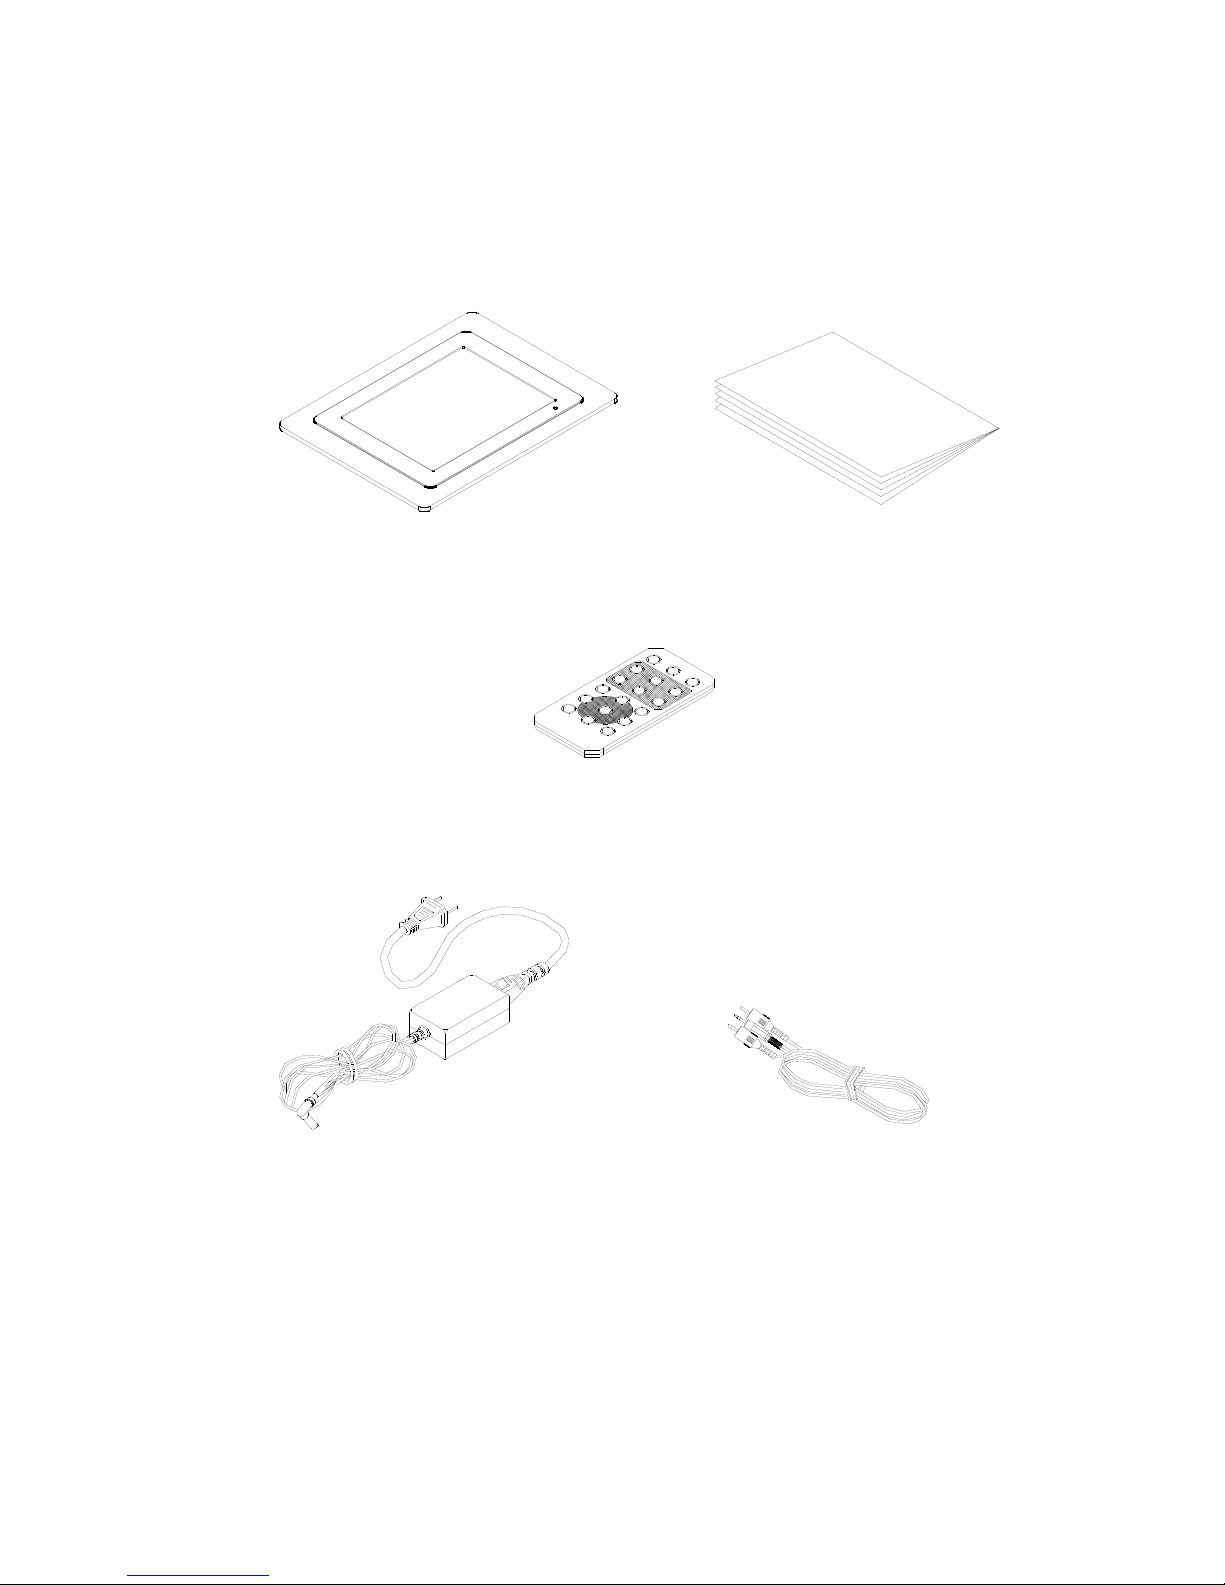
Package Contents ………………………………………………………….6
Introduction………………………………………………………………...7
About the Digital Photo Frame……………………………………………7
1.Getting Started…………………………………………………………...9
1.1 Using the stand……………………………………………………………………...9
1.2 Mounting the Frame on the Wall…………………………………………………...9
1.3 Connecting the Power …………………………………………………………….10
1.4 Connecting to a TV……...…………………………………………………...…....10
1.5 Connecting to a Earphone…………………………………………………………11
1.6 Connecting to a Amplifier………………………………………………………...11
1.7 Inserting & Removing the Flash Memory Cards………………………………….12
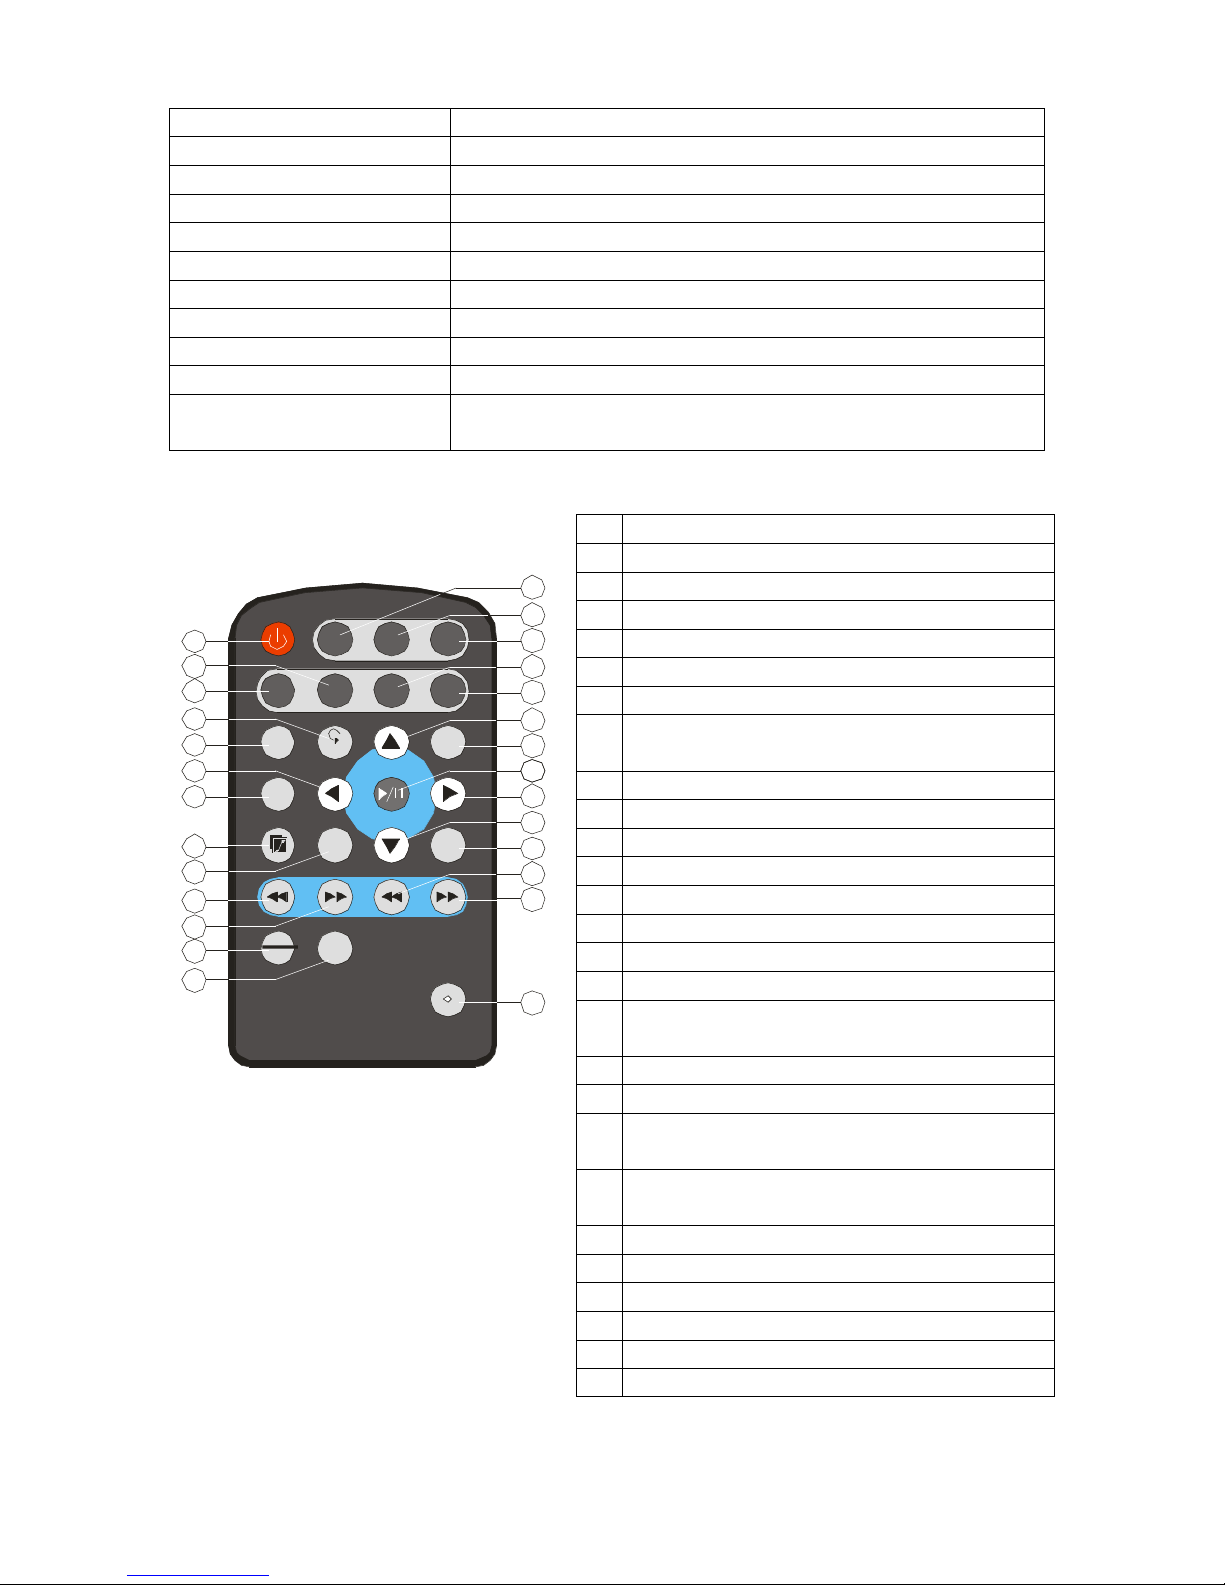
1.8 Replacing Remote Control Battery……….……………………………………….13
2.Menu……………………………………………………………………..14
2.1 Photo……………………………………………………………………………….14
2.2 Video……………………………………………………………………………....14
2.3 Audio………………………………………………………………………………15
2.4 Setting ……...…………………………………………………………………….16
2.4.1 Photo Set Up………………………..………………………………………....16
2.4.1.1 Thumbnail Digest………………………………………………………….16
2.4.1.2 Transition Mode…………………………………………………………...16
2.4.1.3 Orientation………………………………………………………………...16
2.4.1.4 Digest Style………………………………………………………………..17
2.4.2 Music Setup………………………………………..………………………….17
2.4.2.1 Repeat Mode………………………………………………………………17
2.4.3 Movie Setup………………………………..………………………………….18
2.4.3.1 Repeat Mode………………………………………………………………18
2.4.3.2 Digest Style………………………………………………………………..18
2.4.4 Slideshow Set Up………….………………………………………………….19
2.4.4.1 Slideshow Mode…….……………………………………………………..19
2.4.4.2 Folder Repeat……………………………………………………………...19
2.4.4.3 Interval Time………………………………………………………………19
2.4.4.4 Transition………………………………………………………………….19
2.4.4.5 Auto Start………………………………………………………………….19
2.4.5 LCD Set Up………………………………………………………….………...20
2.4.5.1 Bright…………………...………………………………………………....20
2.4.5.2 Contrast……………………………………………………………………20
2.4.5.3 Backlight……………………...…………………………………………...20
2.4.5.4 Setup Values…………………………...………………………………….21
2.4.6 Preferences……………………………………………………………………21
2.4.6.1 TV Type…………………………………………………………………...21
2.4.6.2 TV Display..……………………………………………………….………21
2.4.6.3 Video Output.………………………………………………..…………….22

4
2.4.6.4 OSD Language…………………………………………………………….22
2.4.6.5 OSD Message……………………………………………………………...22
2.4.6.6 Set Up Values……………………………………………………………..22
2.4.7 Mode Not Supported ………………………………………………………... 23
2.5 File Explorer……..………………………………………………………..……...23
2.5.1 Copy………………………………………………………………………....23
2.5.2 Delete………………………………………………………………………..24
2.5.3 Rename…….………………………………………………………………..24
2.5.4 New Folder.……….………………………………………………………...24
2.5.5 Properties……………………………………………………………………25
3.Troubleshooting……………………………………………………………………....26
4.Specifications………………………………………………………….………………27

5
Safety Instructions

6
Package Contents
Remote Control
Adaptor
Player
AV cable
User Manual
Printed

7
Introduction
This Digital Photo Frame features :
·8” TFT LCD screen for displaying images from a flash memory card.
·Support for JPEG images up to 12 Megapixels.
·Image display functions such as slideshow and image rotation.
·Support for CF, SD, MMC and MS, XD, MS Pro flash memory cards.
·Support for MPEG4 for playing back film clips.
·Playing an MP3 as background to a Slideshow.
·A single stand or wall mount enabling you to place the Digital Photo Frame on a desk
or mount it on a wall.
About the Digital Photo Frame
This section describes the various parts of the Digital Photo Frame.
ALL VIEW
10
9
11
8
12
65 4
7
321
/ MENU
Items
Functions
1.Power On/Off/Menu
Turn the Digital Photo Frame on and off & Press to display
menu

8
2.Enter
Used to confirm a setting or function
3.Forward
Used to navigate forwards.
4.Up
Used to navigate upwards.
5.Down
Used to navigate downwards.
6.Backward
Used to navigate backwards.
7.CF Card Slot
Slot for CF card.
8.5 in 1 Card Slot
Slot for SD/MMC/XD/MS/SM
9.DC in Socket
Power Connection to the adaptor.
10.Stand
Placing the Digital Photo Frame on a desk..
11.Infrared Sensor
Used with remote control
12.AV Out
Connect an AV cable for viewing a TV, earphone &
amplifier.
RCU Keys
Vol- Vol+ Mute
Photo Video Confi g Files
Zoom Menu
Rotate
File
Detail
Cancel
Enter
TV/LCD
EQ Set
M_SLIDESHOW
1
2
3
4
5
6
7
8
9
10
11
12
13
14
15
16
17
18
19
20
21
22
23
24
25
26
27
1
Turn the power on and off
2
Video mode
3
Photo mode
4
Rotate the image in photo mode
5
Zoom the image
6
Used to navigate backwards
7
Show the file detail in photo mode
8
Play MP3 as background during
slideshow
9
Equalizer setting
10
Skip to previous chapter or track
11
Fast forward
12
Repeat slideshow & video playback
13
Set video output in TV or LCD
14
LED
15
Skip to next chapter or track
16
Fast reverse
17
Stop the functionality currently running
and return to Main Menu
18
Used to navigate downwards
19
Used to navigate forwards
20
Play, Pause & Display menu or to confirm
a setting or function
21
Stop the functionality currently running
and return to Main Menu
22
Used to navigate upwards
23
Files mode
24
Set-up mode
25
Mute the audio output
26
Increase volume
27
Reduce volume

9
1.GETTING STARTED
1.1 Using the Stand
The Digital Photo Frame can be placed in a landscape or portrait position on a desk or
any other flat surface by removing the screw on the stand of the Digital Photo Frame.
Remove the screw
1.2 Mounting the Frame on the Wall
Digital Photo Frame can also be mounted on the wall on landscape or portrait position by
place the hanging holes “A” at the rear housing of Digital Photo Frame over the screw or
nail in the wall.
'A'
'A' 'A'

10
1.3 Connecting the Power
Connect the included power supply to your AC outlet and plug in the other end of the
AC adaptor to the DC-IN jack of Digital Photo Frame.
TO TURN OFF THE POWER:
Press the POWER button for 3 seconds to turn off the power.
1.4 Connecting to a TV
Connect the Digital Photo Frame to view pictures and video.
1. Insert the AV cable(yellow) video plug into the TV video socket.
2. Insert the AV cable(white and red) audio plugs into the TV’s corresponding AV IN
sockets. If the TV only has one audio in socket, insert either of the audio plugs.
3. Insert the other end into the Digital Photo Frame AV OUT socket.
4. Make sure the Digital Photo Frame is set to the right TV system; NTSC or PAL.
AV IN
R L VIDEO

11
1.5 Connecting the Earphone
To connect the earphone, insert the earphone’s plug into the Digital Photo Frame’s AV
OUT socket.
1.6 Connecting to an Amplifier
Connecting the Digital Photo Frame to an Amplifier
1. Insert the AV cable(white and red) audio plugs into the amplifier corresponding AV IN
sockets.
2. Insert the other end into the Digital Photo Frame AV OUT socket.
AMPLIFIER
AV IN
R L

12
1.7 Inserting & Removing the Flash Memory Cards
Inserting a CF Card
1. Position the CF card so that the pin-hole connections are facing the bottom flash
memory card slot. Place the card label-side up.
2. Slide the card gently into the slot until it touches the bottom.
Inserting Other Types of Cards (SD/MMC/XD/MS/MS )
1. Position the SD/MMC/XD/MS/MS cards so that the pin hole connections are
facing the bottom flash memory card slot. Place the card label-side up.
2. Slide the card gently into the slot until it touches the bottom.
Removing a Memory Card
To remove a memory card, gently pull the card out of the slot.
NOTE:
Do not remove the memory card while operating. Please turn off the power before
removing the memory card. Otherwise, memory card data loss or damage may occur.

13
1.8 Replacing Remote Control Battery
Step 1- Remove the battery compartment by pulling the cover in the
direction of the arrow.
Step 2- Remove the battery
Step 3 -Insert the replacement battery must follow the correct polarity(+/-).

14
2.MENU
2.1 Photo
On the main menu, use the►/◄buttons to
choose “Photo” and press “ENTER” button to
enter “Photo” mode.
You can view photos as thumbnails in matrix
images which can be set in Digest Style mode.
Use ►/◄& ▲/▼buttons to select a photo.
Press “ENTER” button to view a photo selected.
2.2 Video
On the main menu, use the ►/◄buttons to
choose “Video” and press “ENTER” button to
enter Movie Folders.

15
Movie folders will be displayed.
Choose the movie folder to be displayed and
press “ENTER”.
2.3 Audio
On the main menu, use the►/◄buttons to
choose “Audio” and press “ENTER” button to
enter “Audio” mode.
Press “File Detail” button on remote control to
enter Music Library..
Press “EQ Set” button on remote control to
select Music 2Equalizer types such as “rock”,
“pops”, “ballad”, “dance”, “standard”, “classic”,
& “jazz”..

16
2.4 SETTING
On the main menu, use the ►/◄button to
choose “Setting” and press “ENTER” button to
enter “Setting” menu..
2.4.1 PHOTO SETUP
In SETUP menu, use ▲/▼buttons to select
“PHOTO SETUP”.
Use “ENTER” button to enter “PHOTO SETUP”
submenu.
2.4.1.1 THUMBNAIL DIGEST
You can view photos as thumbnails. This is
another way of browsing for a particular photo.
Press ►button and then use ▲/▼buttons to
select “ON” or “OFF” setting mode.
Press “ENTER” button to enter.
2.4.1.2 TRNASITION MODE
You can set the transition mode in “FAST” or
“SLOW” speed.
Press ►button and then use ▲/▼buttons to
select “FAST” or “SLOW” setting mode.
Press “ENTER” button to enter.
2.4.1.3 ORIENTATION
You can set the ORIENTATION in
“DEFAULT” or “IGNORE” mode.
Press ►button and then use ▲/▼buttons to
select “DEFAULT” or “IGNORE” setting mode.
Press “ENTER” button to enter.

17
2.4.1.4 DIGEST STYLE
You can set the DIGEST STYLE in “2X2
MATRIS”, “3X3 MATRIX”, “4X4 MATRIX”
& “5X5 MATRIX” mode.
Press ►button and then use▲/▼buttons to
select Matrix size desired.
Press “ENTER” button to enter.
To exit the PHOTO SETUP menu, choose
“MAIN PAGE” mode & press “ENTER” button.
2.4.2 MUSIC SETUP
In MUSIC SETUP menu, use ▲/▼buttons to
select “MUSIC SETUP”.
Use “ENTER” button to enter “MUSIC
SETUP” submenu.
2.4.2.1 REPEAT MODE
You can set the REPEAT mode in “ONE”,
“OFF” or “ALL” .
Press ►button and then use ▲/▼buttons to
select “ONE”, “OFF” or “ALL” setting mode.
Press “ENTER” button to enter.
To exit the REPEAT mode, choose “MAIN
PAGE” mode & press “ENTER” button.

18
2.4.3 MOVIE SETUP
In MOVIE SETUP menu, use ▲/▼buttons to
select “MOVIE SETUP”.
Use “ENTER” button to enter “MOVIE SETUP”
submenu.
2.4.3.1 REPEAT MODE
You can set the REPEAT mode in “ONE”,
“OFF” or “ALL” .
Press ►button and then use ▲/▼buttons to
select “ONE”, “OFF” or “ALL” setting mode.
Press “ENTER” button to enter.
2.4.3.2 DIGEST STYLE
You can set the DIGEST STYLE mode in
“2X2”, “3X3”, “4X4” or “5X5” MATRIX .
Press ►button and then use ▲/▼buttons to
select the matrix setting mode.
Press “ENTER” button to enter.
To exit the MOVIE SETUP mode, choose
“MAIN PAGE” mode & press “ENTER” button.
2.4.4 SLIDESHOW SETUP
In SETUP menu, use ▲/▼buttons to select
“SLIDESHOW SETUP”.
Use “ENTER” button to enter “SLIDESHOW
SETUP” submenu.

19
2.4.4.1 SLIDESHOW MODE
You can set the SLIDESHOW MODE in
“MANUAL” or “AUTO” mode.
Press ►button and then use ▲/▼buttons to
select “MANUAL” or “AUTO” setting mode.
Press “ENTER” button to enter.
2.4.4.2 FOLDER REPEAT
You can set the FOLDER REPEAT in “ON” or
“OFF” mode.
Press ►button and then use▲/▼buttons to
select “ON” or “OFF” setting mode.
Press “ENTER” button to enter.
2.4.4.3 INTERVAL TIME
You can set the INTERVAL TIME in “1 sec”, “3
sec”,”5 sec” or “10 sec” mode.
Press ►button and then use ▲/▼buttons to
select the interval time desired.
Press “ENTER” button to enter.
2.4.4.4 TRANSITION
You can set the TRANSITION in 9 effect
modes as shown in display screen..
Press ►button and then use▲/▼buttons to
select the slideshow effect desired.
Press “ENTER” button to enter.
2.4.4.5 AUTO START
You can set the AUTO START in “ON” or
“OFF” modes.
Press ►button and then use ▲/▼buttons to
select the “ON” or “OFF” modes.
Press “ENTER” button to enter.

20
To exit the SLIDESHOW SETUP menu, choose
“MAIN PAGE” mode & press “ENTER” button.
2.4.5 LCD SETUP
In LCD SETUP menu, use ▲/▼buttons to
select “LCD SETUP”.
Use “ENTER” button to enter “LCD SETUP”
submenu.
LCD SETUP enables you to configure setting
such as brightness, contrast, saturation, hue &
backlight.
2.4.5.1 BRIGHT
You can set the BRIGHT mode in level 1 to
level 6.
Press ►button and then use ▲/▼buttons to
select the level desired.
Press “ENTER” button to enter.
2.4.5.2 CONTRAST
You can set the CONTRAST mode in level 1 to
level 6.
Press ►button and then use ▲/▼buttons to
select the level desired.
Press “ENTER” button to enter.
2.4.5.3 BACKLIGHT
You can set the BACKLIGHT mode in level 1
to level 6.
Press ►button and then use ▲/▼buttons to
select the level desired.
Press “ENTER” button to enter.
Table of contents
Other Portable USA Digital Photo Frame manuals
Popular Digital Photo Frame manuals by other brands

Insignia
Insignia NS-DPF8TR Guía De Instalación Rápida

Insignia
Insignia NS-DPF1110W Quick setup guide

Philips
Philips 9FF2CME - annexe 2 Specifications

Aluratek
Aluratek ADPF07SF quick start guide

Sandstrom
Sandstrom S7DPF10 instruction manual

Digital Spectrum
Digital Spectrum MemoryFrame MF-1201 quick start guide