Praep ProPilot User manual

1
OWNRS
MANUAL

3
2
IT IS ALL ABOUT
ARATION
THANK YOU FOR TAKING CARE OF YOUR MOTO MUSCLES!
PLEASE READ THE INSTRUCTIONS CAREFULLY AND ENJOY YOUR
PROPILOT EXPERIENCE AS MUCH AS NINA DOES.
YOUR
TEAM@PRAEP.COM

5
SHORTCUT
ASSEMBLY
VIDEO
https://youtu.be/E1S5V6bnBaM
CONTENT
01 ProPilot App (download)
02 5mm Hex Key
03 Level Ring
04 Phonepatch
05 PRAEP®ProPilot®
06 Shims 31.8mm
07 Clamping Brackets w. Screws
08 Stamp 35mm
NOTE Please start at p. 11 for 35mm handlebars
01
02
03
04
05
06
07
08
7
6
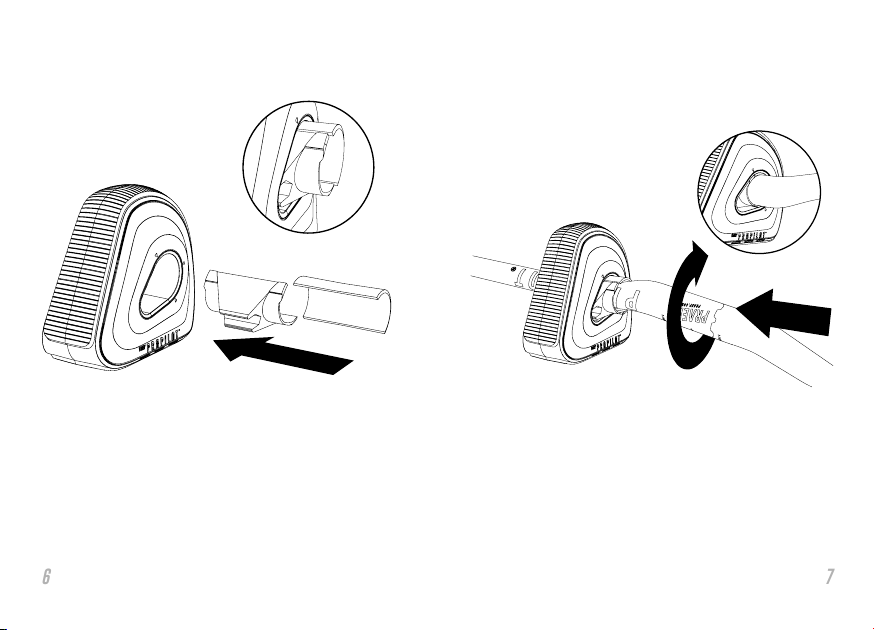
INSERT THE
SHIMS
DE Die 31.8 mm Shims zu ca. ⅔einschieben
EN Insert the 31.8 mm shims by approx. ⅔
FR Insérer les cales de 31,8 mm d‘environ ⅔
IT Inserire gli spessori da 31,8 mm di circa ⅔
ES Inserte las cuñas de 31.8 mm aprox. ⅔
INSTALLING A 31.8MM
HANDLEBAR
DE Lenker mit 180° Drehung einschieben
EN Insert the bar with a 180° twist
FR Insérez le guidon avec un tour de 180 °
IT Inserire il manubrio con una rotazione di 180 °
ES Inserte el manillar con un giro de 180 °
⅔
8
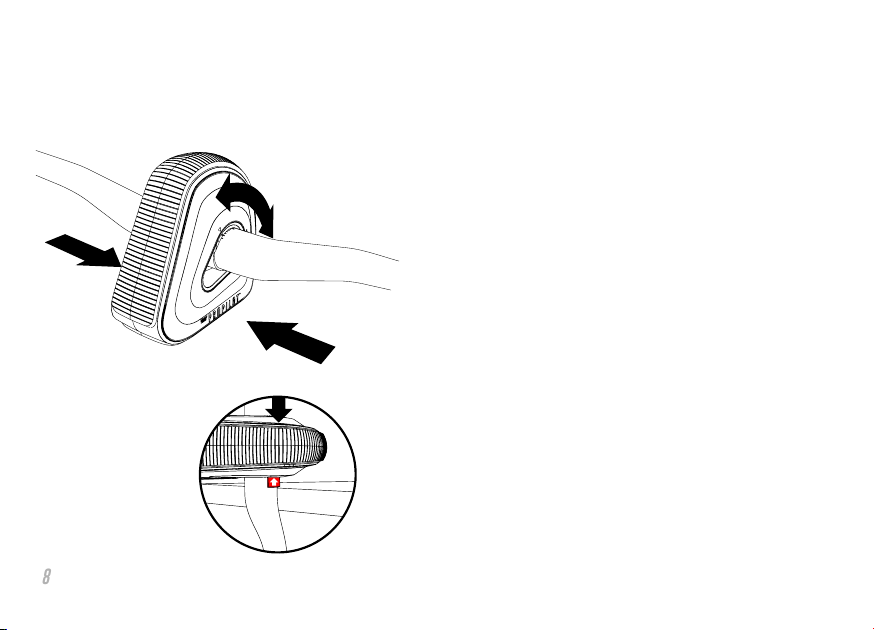
ADJUST THE SHIM
ALIGNMENT
DE - Die Shims sollten bündig und mittig sitzen. Kor-
rigiere ihre Position durch drehen des Lenkers, oder
drücke sie vorsichtig an einer Tischkante in Position
EN - The shims should sit flush on both sides. Correct
the position by turning the bars or press them carefully
into position on a edge
FR - Les cales doivent reposer au milieu. Corrigez le
vôtre Positionnez en tournant le guidon ou en le pous-
sant en position sur le bord de la table
IT - Gli spessori dovrebbero sedere nel mezzo. Correg-
gi il tuo Posizionare ruotando il manubrio o spingendo-
lo in posizione sul bordo di un tavolo
ES - Las cuñas deben sentarse en el medio. Corrige el
tuyo Posicione girando el manillar o empujándolo hacia
el borde de la mesa

10
INSTALL THE
CLAMPING
DE Installiere die Klemmung
EN Insert the brackets
FR Installez la pince
IT Installare il morsetto
ES Instale la abrazadera
INSTALLATION OF 35MM
HANDLEBARS
DE - Schiebe den Lenker ohne Shims in den ProPilot
und installiere die Klemmung mit dem 35er Stempel
EN - Slide the handlebar without shims into the Pro-
Pilot and install the clamp with the 35 stamp
FR - Faites glisser le guidon sans cales dans le ProPilot
et installez la pince avec le timbre 35
IT - Inserire il manubrio senza spessori nel ProPilot e
installare il morsetto con il timbro 35
ES - Deslice el manillar sin cuñas dentro del ProPilot e
instale la abrazadera con el sello 35
13
12
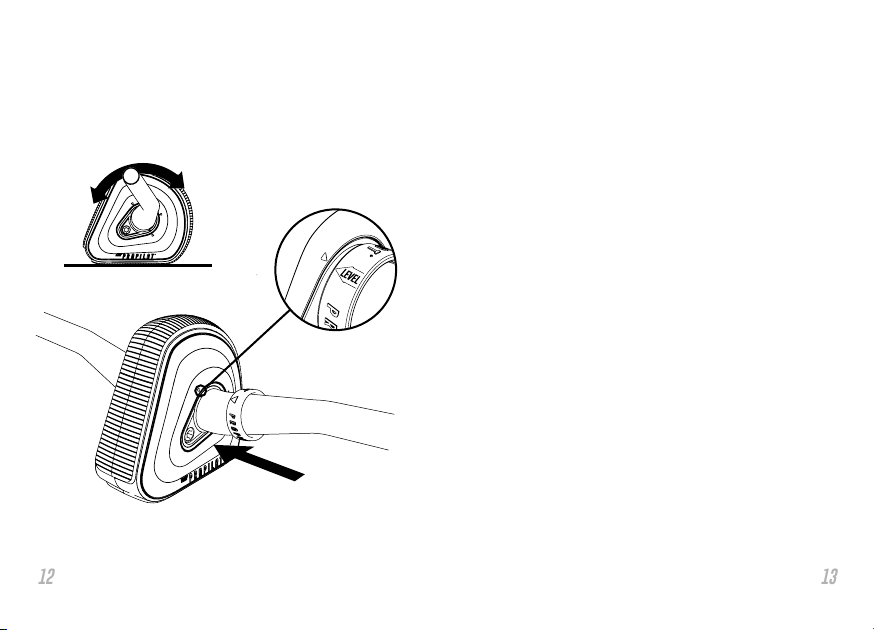
SLIDE ON THE
LEVEL RING
DE - Stelle in der Grundposition Deine gewünschte
Lenkerdrehung ein, schiebe den Level Ring von rechts
auf und richte ihn anhand der Markierungen aus
EN - Set your preferred handlebar twist in the basic
position, slide the level ring from the right and align it
using the markings
FR - Réglez la rotation souhaitée du guidon dans la
position de base, faites glisser la bague de niveau vers
la droite et alignez-la à l‘aide des repères
IT - Impostare la rotazione del manubrio desiderata
nella posizione di base, far scorrere l‘anello di livello da
destra e allinearlo utilizzando i segni
ES - Establezca la rotación deseada del manillar en
la posición básica, deslice el anillo nivelador desde la
derecha y alinéelo con las marcas.

15
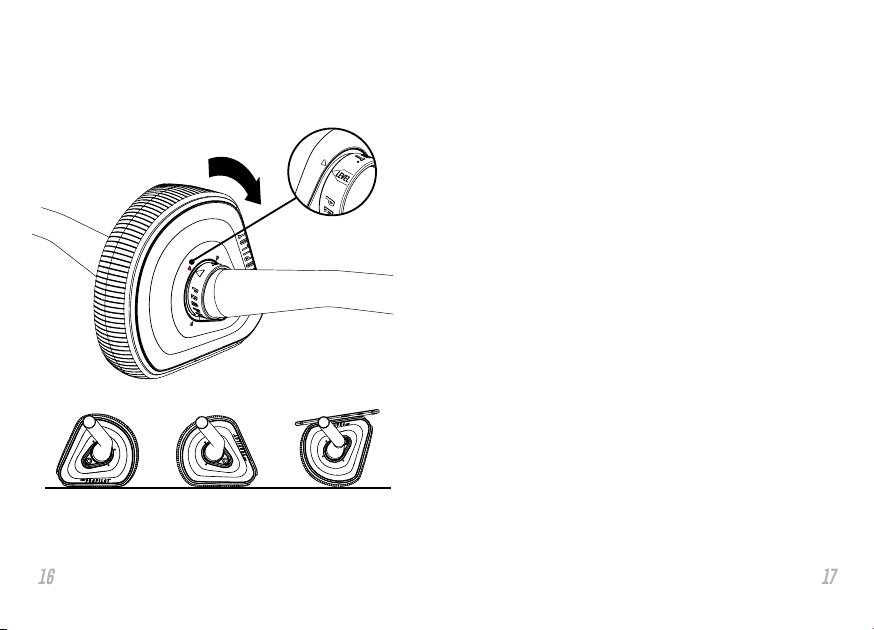
TIGHTEN THE
CLAMPING
DE - Die Klemmung beidseitig und abwechselnd
mit min. 7 NM anziehen
EN - Tighten the clamping on both sides alternately
to min. 7 NM
FR - Le serrage des deux côtés et alternativement
à min. serrer 7 NM
IT - Il bloccaggio su entrambi i lati e alternativamente
a min. stringere 7 NM
ES - La sujeción en ambos lados y alternativamente
a min. apriete 7 NM
INSTALL THE
GRIPS
DE - Installiere die beiden Griffe und ziehe diese den
Angaben entsprechend fest
EN - Install the two grips and tighten them as
mentioned at the bolt
FR - Installez les deux poignées et serrez-les comme
indiqué au boulon
IT - Installare le due impugnature e serrarle come
indicato sul bullone
ES - Instale los dos agarres y apriételos como se
menciona en el perno
17
16
BEGINNER ADVANCED PRO
Position Marks
DE - Die drei verschiedenen Level starten von stabil
(BEGINNER) über seitlich instabil (ADVANCED bis zur
Punktbalance (PRO)
EN - The three different levels start from stable
(BEGINNER), laterally unstable (ADVANCED) up to point
balance (PRO)
FR - Les trois niveaux différents partent de stable
(BEGINNER), instable latéralement (ADVANCED jusqu‘à
l‘équilibre ponctuel (PRO)
IT - I tre diversi livelli partono da stabili (BEGINNER),
instabile lateralmente (ADVANCED) fino al punto di
equilibrio (PRO)
ES - Los tres niveles diferentes comienzan desde
estable (BEGINNER),balanceo lateralmente
(ADVANCED) inestable hasta el punto (PRO)
THE DIFFERENT
LEVELS

19
18
CONNECTING THE
SMARTPHONE
DE - Appliziere den Phonepatch auf der Rückseite
Deines Smartphones und lege es auf die flache Seite
der ProPosition
EN - Apply the Phonepatch on the back of your smart-
phone and place it on the flat side of the Pro Position
FR - Appliquez le Phonepatch à l‘arrière de votre smart
phone et placez-le sur le côté plat de la position Pro
IT - Applica il Phonepatch sul retro dello smartphone e
posizionalo sul lato piatto di Pro Position
ES - Aplique el parche telefónico en la parte posterior
de su teléfono inteligente y colóquelo en el lado plano
de la posición Pro

21
20
INSTALL OUR APP
AND GET
TRAILREADY

DE - WARNUNG!
Dieses Produkt ist für die Benutzung auf sauberen und
ebenen Oberflächen entwickelt. Unsachgemässe Verwendung
und Montage kann zu vorzeitigem Materialversagen und/oder
Verletzungen führen.
NICHT EMPFOHLEN:
- CARBON LENKER
- LENKER MIT POLIERTEM KLEMMBEREICH
EN - WARNING!
This product is designed to be used on dry and smooth
surfaces. Improper use and assembly may cause early
material failure and/or injury.
NOT RECOMMENDED:
- CARBON HANDLEBARS
- HANDLEBARS WITH POLISHED CLAMPING ZONES
FR - WARNING!
Ce produit est conçu pour être utilisé sur des surfaces
propres et planes. Une utilisation et un assemblage
incorrects peuvent entraîner une défaillance prématurée du
matériau et / ou des blessures.
NON RECOMMANDÉ:
- GUIDON CARBONE
- Guidon avec zone de serrage polie
IT - ATTENZIONE!
Questo prodotto è progettato per l‘uso su superfici pulite e
piane. L‘uso e il montaggio impropri possono causare guasti
prematuri al materiale e / o lesioni.
NON CONSIGLIATO:
- MANUBRIO IN CARBONIO
- Manubrio con area di bloccaggio lucidata
ES - ADVERTENCIA!
Este producto está diseñado para su uso en superficies
limpias y planas. El uso y montaje incorrectos pueden
provocar fallas prematuras del material y / o lesiones.
NON RECOMENDADO:
- MANILLAR DE CARBONO
- Manillar con zona de sujeción pulida
WARNHINWEISE
WARNINGS
AVERTISSEMENTS
ADVERTENCIAS
AVVERTENZE

COPYRIGHT © 2020 KAIKAI GMBH
PRAEP® AND PROPILOT® ARE REGISTERED
TRADEMARKS IN THE EU, THE USA, CHINA
AND SWITZERLAND
DESIGNED AND MANUFACTURED
IN GERMANY
Other manuals for ProPilot
1
Popular Home Gym manuals by other brands

Torque Fitness
Torque Fitness TQ5-001 Assembly and maintenance guide

York Fitness
York Fitness 7240 Dual Stack Gym Assembly instructions

Kettler
Kettler COACH M ST2520-64 operating instructions

Total Gym
Total Gym JUMP TRAINER owner's guide

Impex
Impex MARCY DIAMOND ELITE MD-389 owner's manual

Weider
Weider 244 Bench Bedienungsanleitung


