Precision Pro GPS GOLF BAND User manual
PPGB-UM_Rev04 March-2016
Congratulations on the purchase of your new Precision Pro GPS Golf Band! Unlike other band
devices that must be paired to a smartphone or tablet app, your GPS Golf Band features true
built-in GPS technology to maximize performance and accuracy, enhancing your on-course
experience without carrying multiple devices.
This User Manual was compiled with the intention of guiding you through the full functionality
of the device, answering FAQs, providing troubleshooting techniques, and registering your
GPS Golf Band with iGolf in order to download updated course maps. For any questions not
phone at (888) 568-6770.
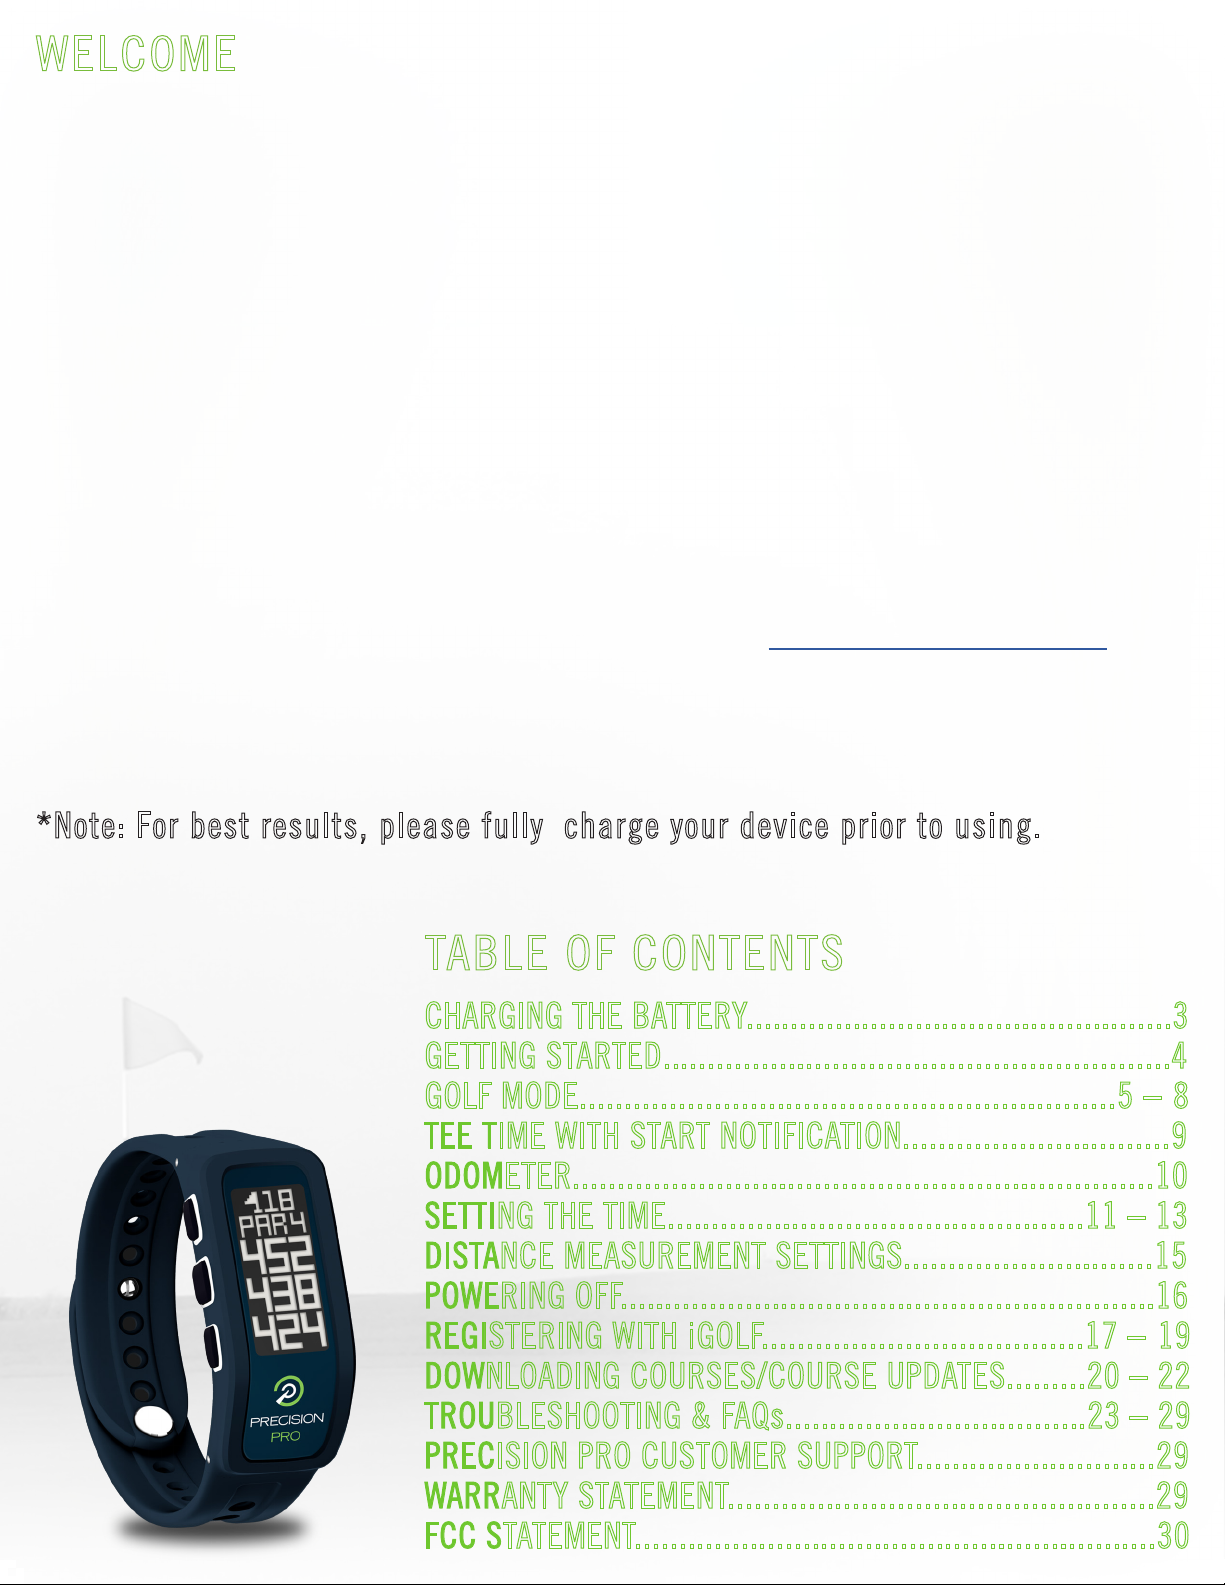
*Note: For best results, please fully charge your device prior to using.
2.
WELCOME
TABLE OF CONTENTS
CHARGING THE BATTERY................................................3
GETTING STARTED.........................................................4
GOLF MODE............................................................5 – 8
TEE TIME WITH START NOTIFICATION..............................9
ODOMETER.................................................................10
SETTING THE TIME...............................................11 –13
DISTANCE MEASUREMENT SETTINGS............................15
POWERING OFF............................................................16
REGISTERING WITH iGOLF....................................17 – 19
DOWNLOADING COURSES/COURSE UPDATES.........20 –22
TROUBLESHOOTING & FAQs..................................23 –29
PRECISION PRO CUSTOMER SUPPORT...........................29
WARRANTY STATEMENT................................................29
FCC STATEMENT...........................................................30
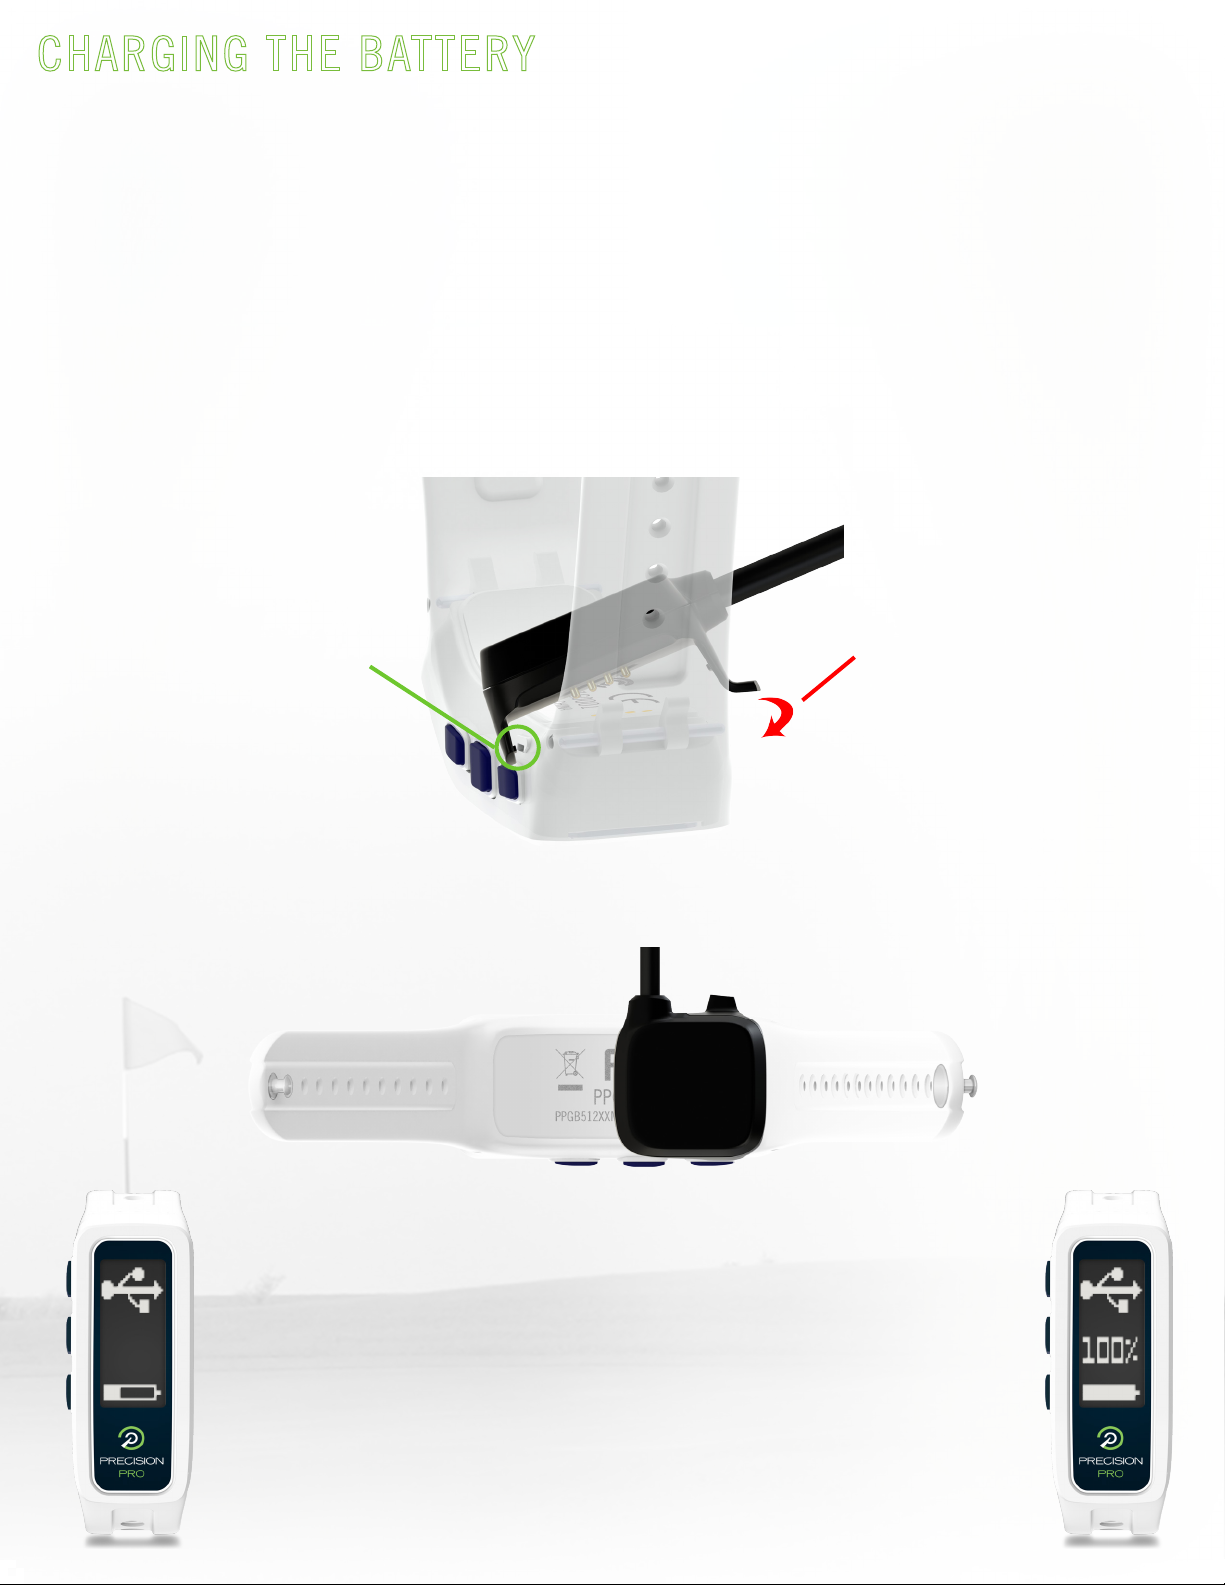
The charging ports are located on the backside of the GPS device. The charging clip is
compatible with any computer USB port, most A/C chargers* (see note below), and USB ports
found in automobiles.
*Note: AVOID THE USE OF QUICK-CHARGE A/C ADAPTERS TO CHARGE YOUR GPS GOLF BAND
DEVICE. DAMAGE MAY OCCUR AND VOID THE WARRANTY. COMPATIBLE A/C ADAPTERS DO NOT
EXCEED 5.0V. CHECK THE VOLTAGE RATING ON ANY A/C ADAPTERS PRIOR TO USING.
When the device is connected to the USB cradle (shown
above) and plugged-in, it will display the screen shown
in the image to the left. The scrolling battery icon at the
bottom of the screen indicates that the battery is charging.
When the battery is fully charged, the battery icon will stop
scrolling and remain full, and the center of the screen will
show 100%.
Charging/Connected Screen Full/Connected Screen
1. Align the tab located on
the non-cable side of the
clip with the notch on the
button side of the device.
2. Lock the clip into place
on the non-button side of
the device.
(To remove, use the handle
on this side of the clip to
pull the tab out and lift
away from the device).
CHARGING THE BATTERY
TO CONNECT THE USB CLIP TO YOUR DEVICE:
3.
GETTING STARTED
MENU
4.
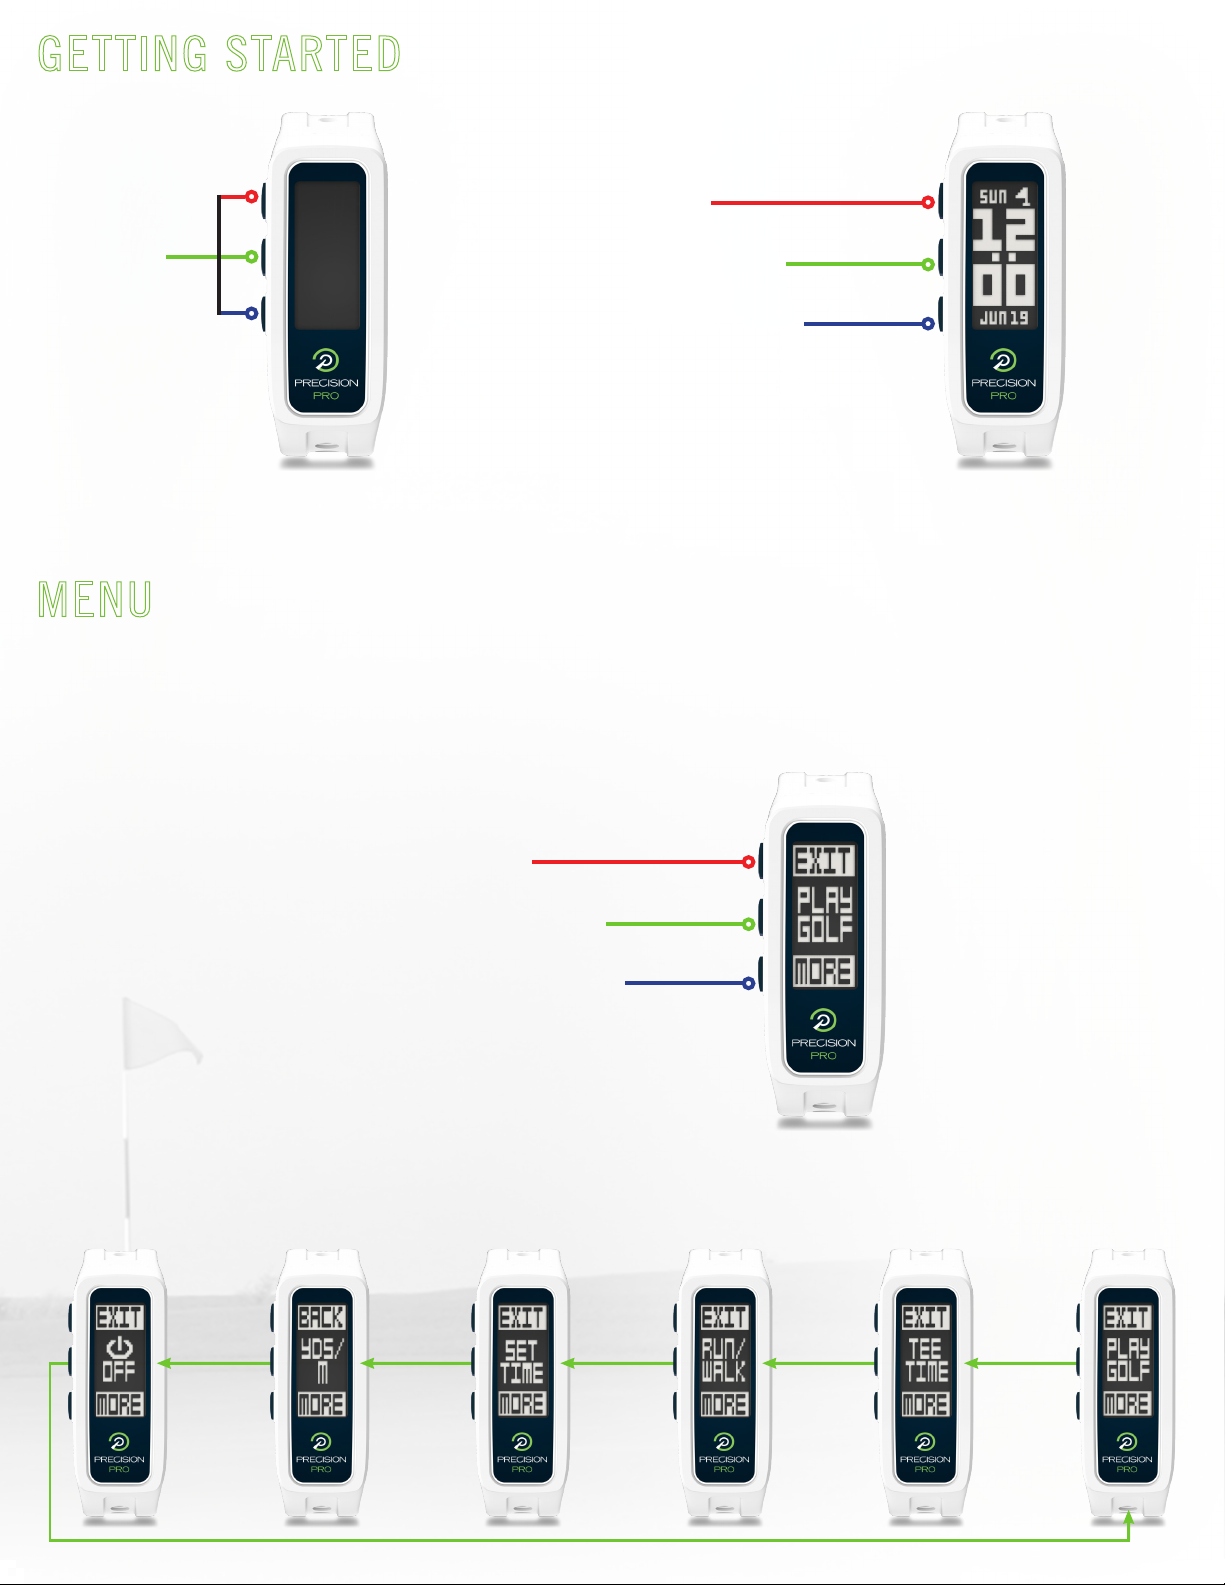
Toggle between date display
& battery indicator
Next Option
Activate backlight
for 10 seconds*
Return to Home
(Time) Screen
*Note: Backlight activates with any button press and remains lit for 10 seconds after the last button press. Backlight
is not functional in Golf Mode.
View menu options
(See MENU section below)
Select Current Option
Press any
button to
power on
From the menu you can access Golf Mode, set a tee time, access the odometer, set the time,
change your preferred distance-measurement settings, or power off. Button functionality
and menu scroll order shown below.
Golf ModeSet Tee TimeOdometerSet Time Options
Distance Measurement
Settings
Power Device
OFF
Menu Scroll Order
Home Time Screen
Menu
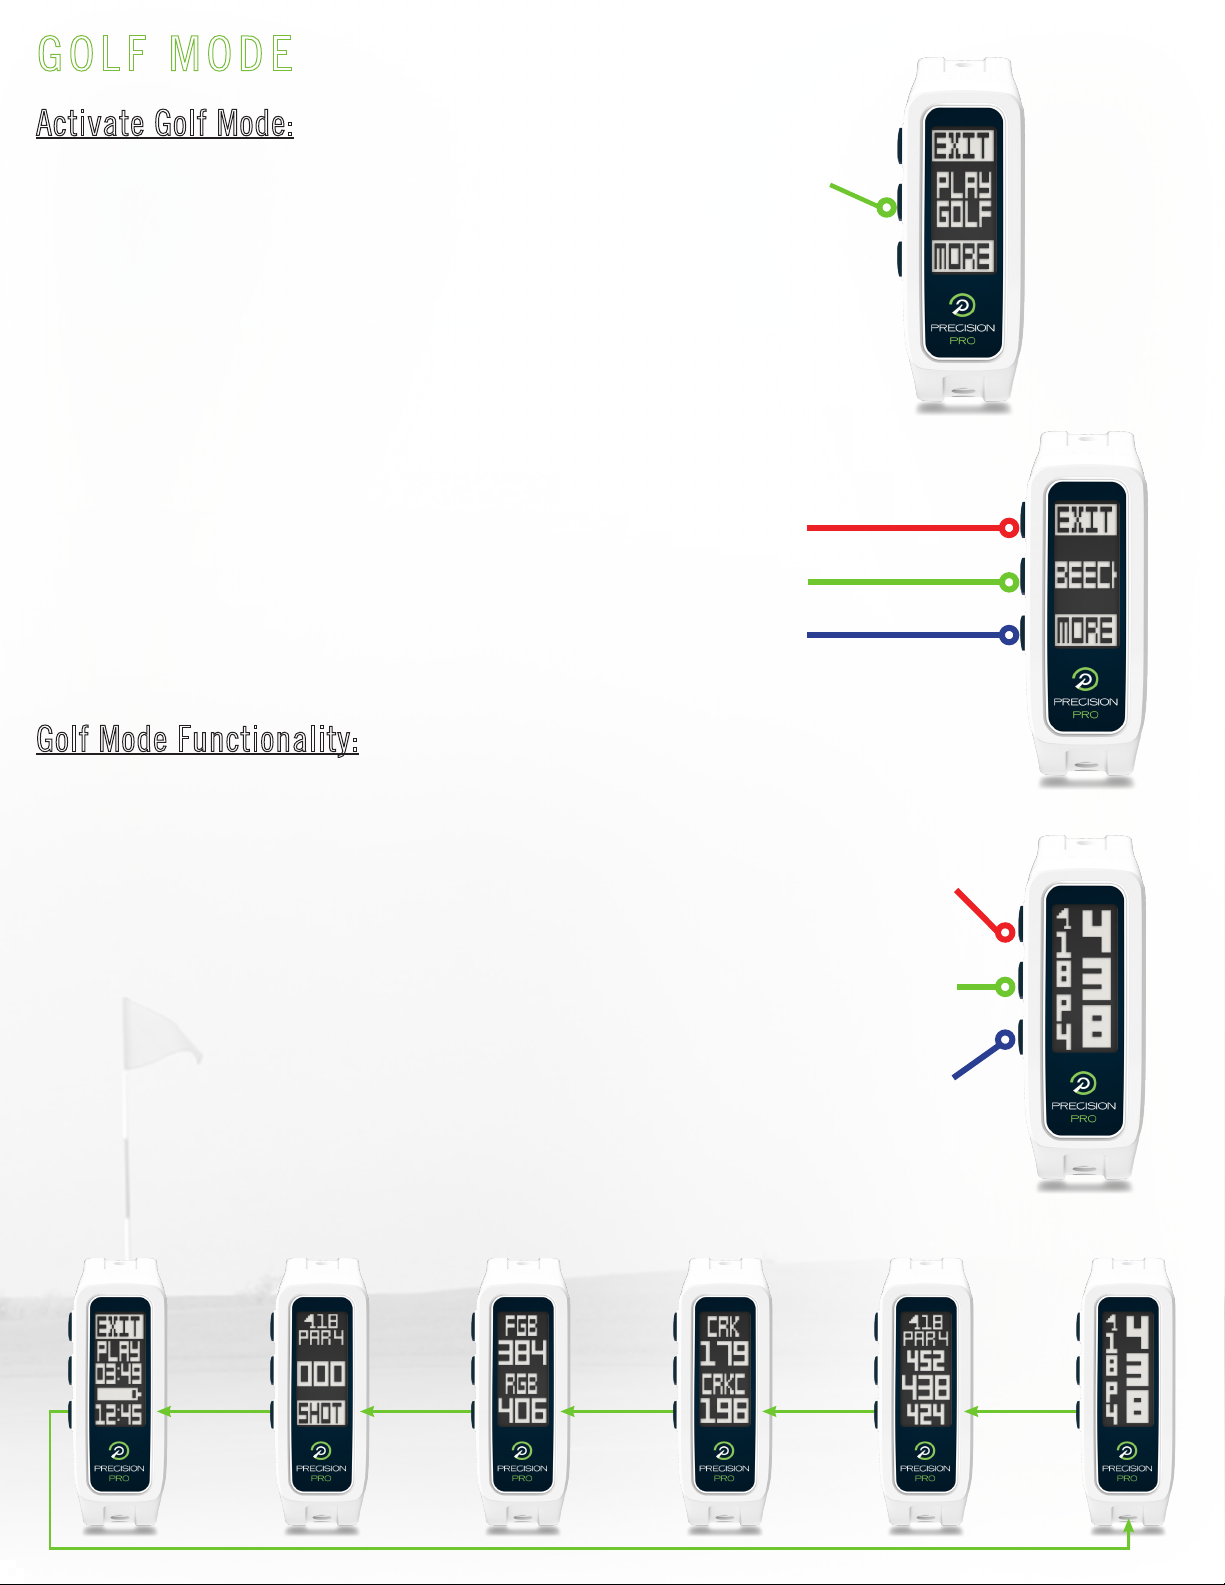
GOLF MODE
From the menu, press to select “Play Golf.” GPS is activated.
*Note: Upon GPS acquisition, the time is updated automatically.
To set time prior to playing golf, please see pages 10 – 12.
After GPS acquisition the device will display the name of the closest course:
Select course & view information for hole 1
Exit & return to home time screen
Scroll through additional courses
Activate Golf Mode:
Golf Mode Functionality:
Cycle through features
*Scroll order shown
below, Right-to-Left
Manually go
to previous hole
(From Center Distance
& FCB Screens only)
Manually go
to next hole
(From Center Distance
& FCB Screens only)
After selecting the course, the Center Distance
screen will display for the first hole (shown in
the image to the right). This screen displays
automatically when the distance is 250 yds/m
or more. When the distance is less than 250
yds/m, the Front/Center/Back (FCB) screen
will display automatically. Additional features
are accessed as indicated below:
5.
Center DistanceFCB Screen
Hazards 1 & 2
(will show N/A if no hazards)
Hazards 3 & 4
(when applicable)Shot DistanceRound Information
Golf Features Scroll Order
Menu (Golf Mode)
Course Results
Center Distance
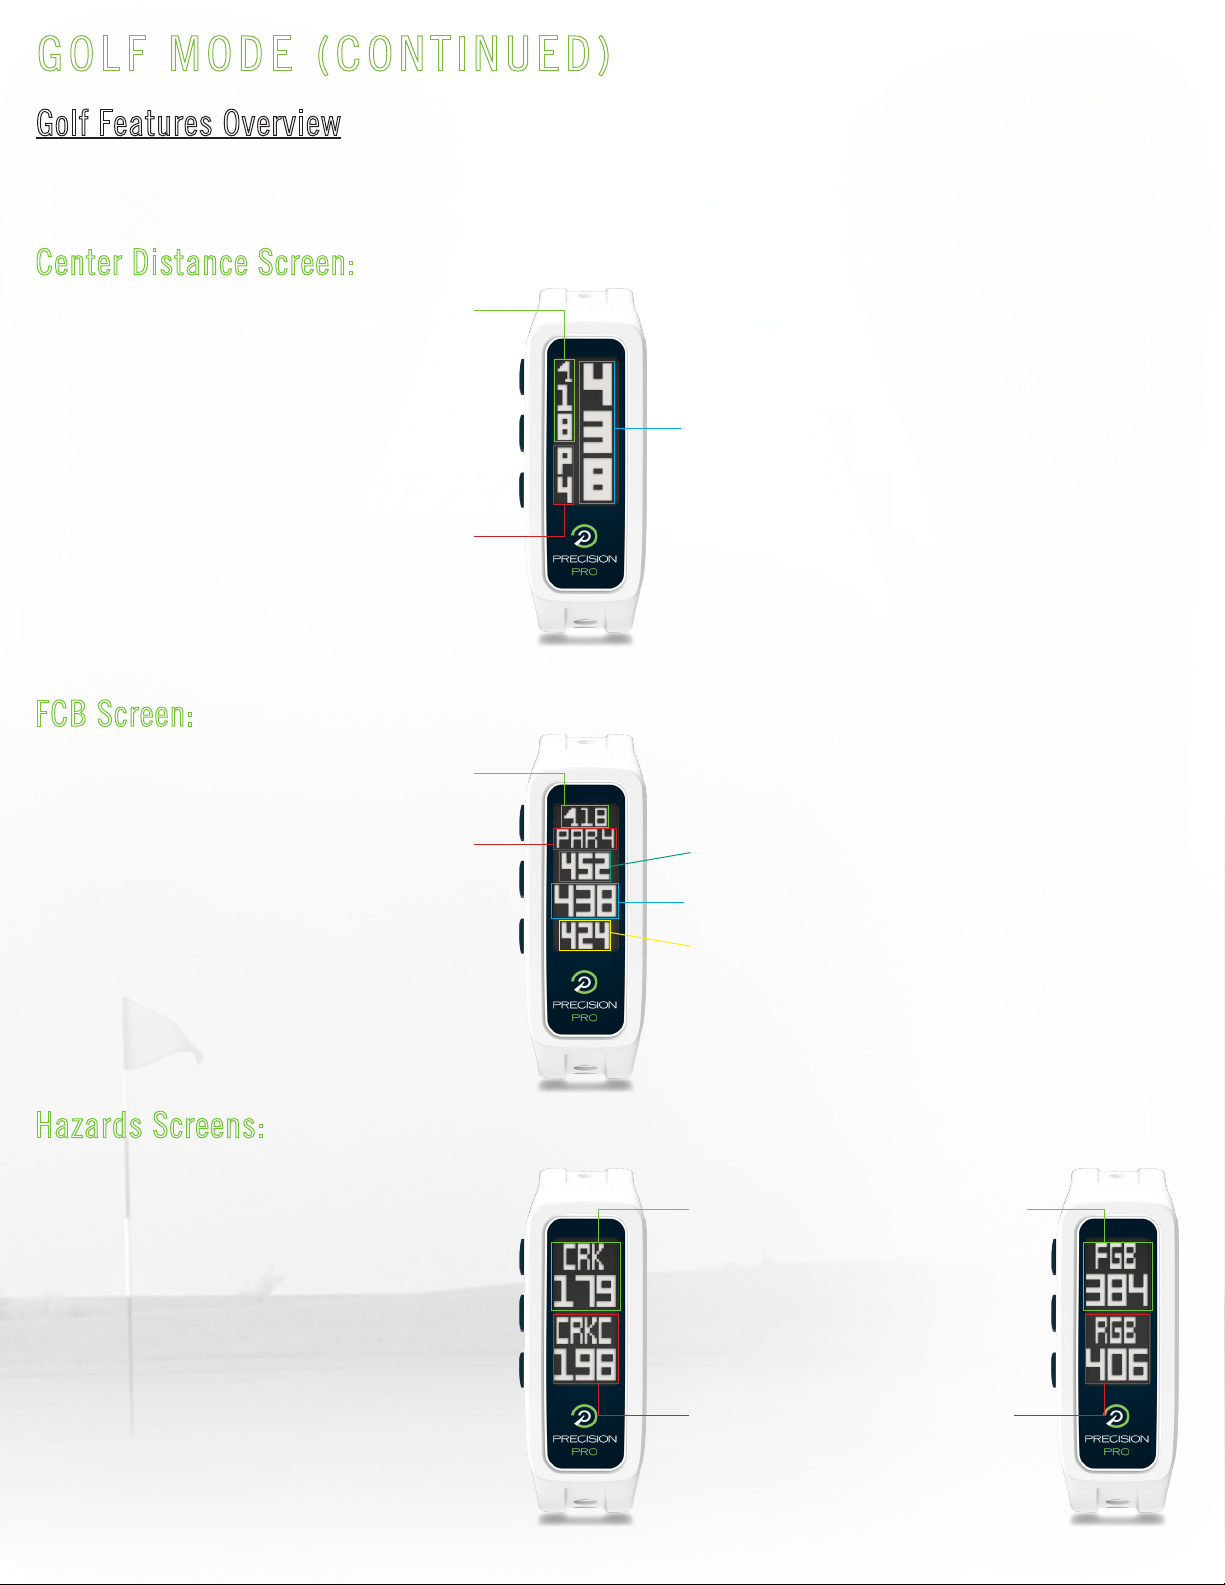
GOLF MODE (CONTINUED)
The various golf features provide key distances & information as follows:
Hole Number
Hole Number
Par Information
Par Information
Closest to
Teebox
2nd Closest
to Back of
the Green
2nd Closest
to Teebox
Closest to
Back of
the Green
Distance to the Center of the Green
Distance to the Center of the Green
Center Distance Screen:
FCB Screen:
Hazards Screens:
Distance to the Back of the Green
Distance to the Front of the Green
Hazards 1
FCB Screen
Center Distance Screen
Hazards 2
Golf Features Overview
6.
The GPS Golf Band will display
up to 4 hazards per hole, in
order of closest-to-the-teebox
to closest-to-the-back of the
green. For a full list of hazard
definitions see page 8.
Note: If no hazards are present,
Hazards 1 screen will display
N/A.
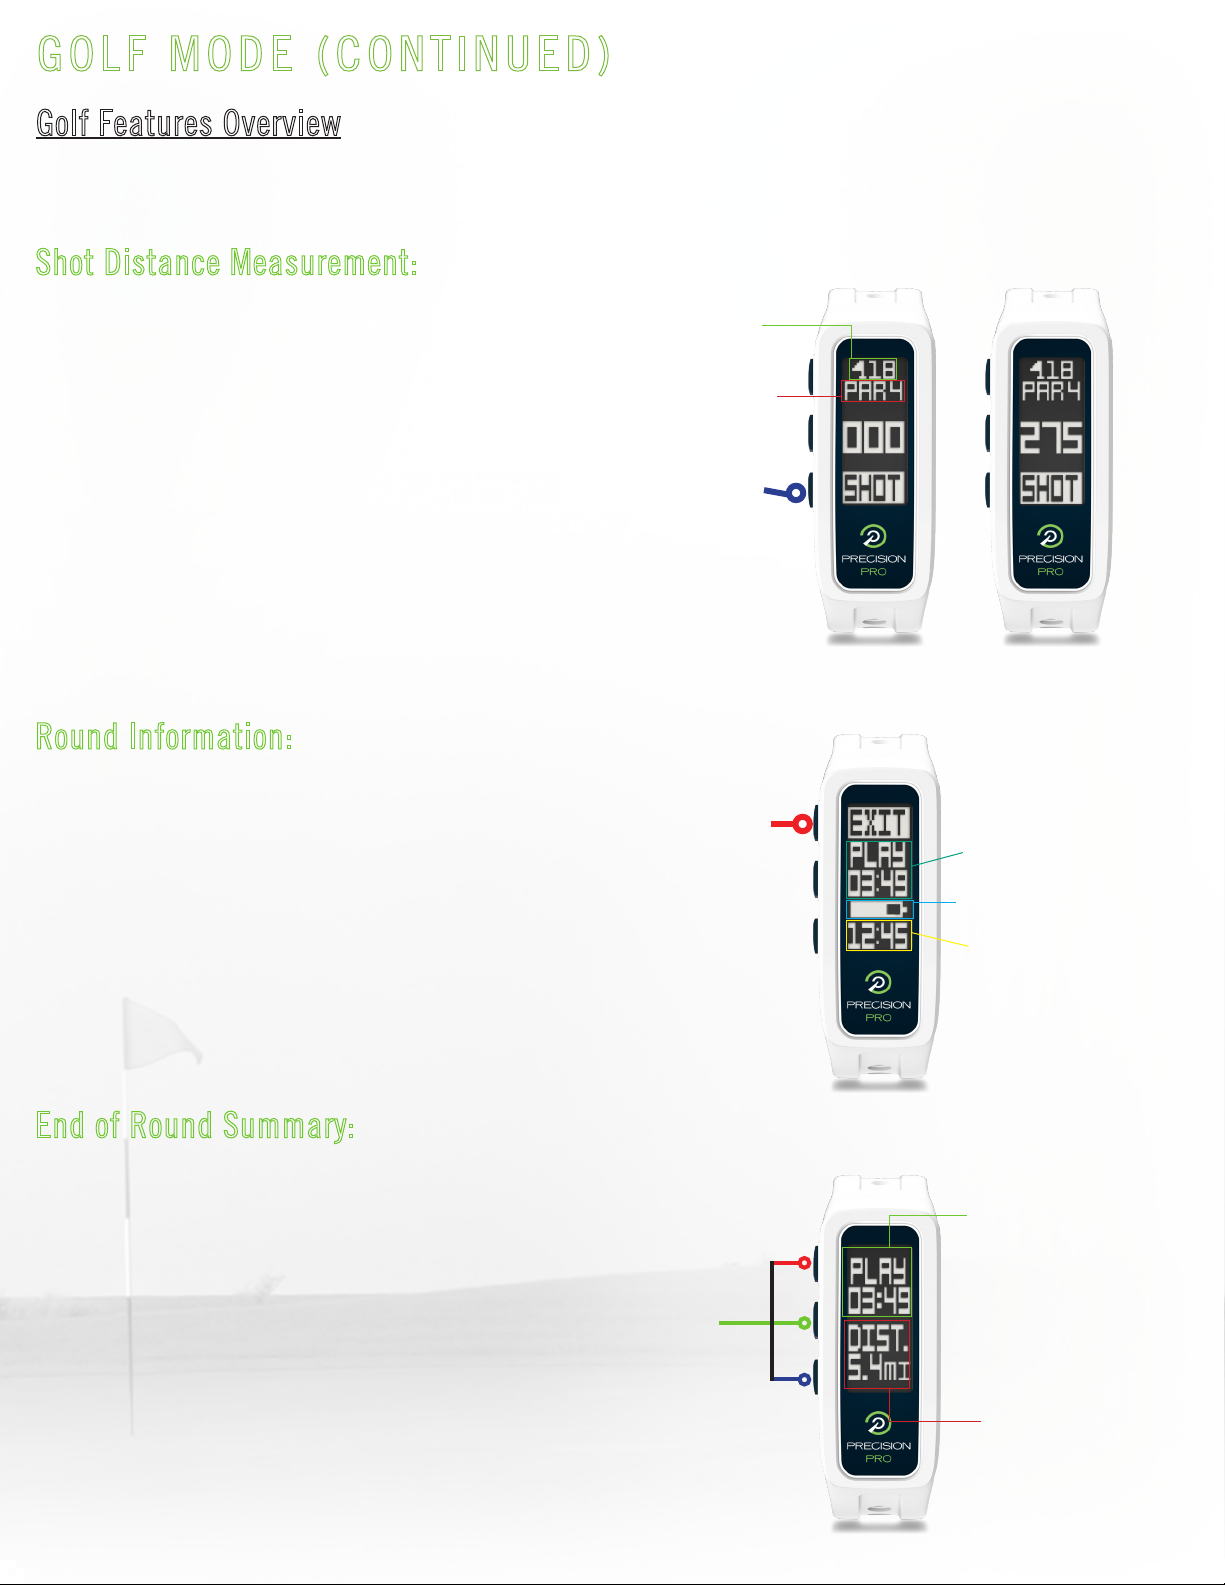
GOLF MODE (CONTINUED)
The various golf features provide key distances & information as follows:
Hole Number
Par Information
Total Time of Play
Total Distance
Traveled
Battery Status
Shot Distance Measurement:
Round Information:
End of Round Summary:
Total Time of Play
Current Time
Golf Features Overview
7.
Use the bottom button to activate
the Shot distance field. Doing so will
set the spot from where the shot was
taken (Point A) to “0,” and the GPS Golf
Band will begin measuring distance as
you make your way to your ball. When
standing by your ball (Point B), the
distance shown is the distance from
Point A to Point B in a straight line.
The Round Information screen provides
Total Time of Play, Battery Status, &
Current Time. Pressing the top button
from this screen will exit the round.
After Exit is confirmed, the End of
Round Summary will display as shown
below.
Activate Shot
Measurement
Exit & Display
End of Round
Summary
The End of Round Summary shows
the Total Time of Play for the round,
as well as the total distance traveled
across the course. The End of Round
Summary will timeout after 15 seconds
and return to the home time screen, or
press any button to return to the home
time screen.
Press Any
Button to
Return to
Home Time
Screen
Shot Distance Screen
Round Information
End of Round Summary
GOLF MODE (CONTINUED)
iGolf Hazards Definitions
8.
1. LFB- Left Fairway Bunker
2. MFB- Middle Fairway Bunker
3. RFB- Right Fairway Bunker
4. LFW- Left Fairway Water Layup
5. LFWC- Left Fairway Water Carry
6. MFW- Middle Fairway Water Layup
7. MFWC- Middle Fairway Water Carry
8. RFW- Right Fairway Water Layup
9. RFWC- Right Fairway Water Carry
10. FGB- Front Green Bunker
11. RGB- Right Green Bunker
12. LGB- Left Green Bunker
13. BGB-Back Green Bunker
14. RGW- Right Green Water
15. FGWC- Front Green Water Carry
16. FGW- Front Green Water Layup
17. LGW- Left Green Water
18. BGW- Back Green Water
19. CRK- Creek Layup
20. CRKC- Creek Carry
21. EOF- End of Fairway
22. N/A - No Hazards Available
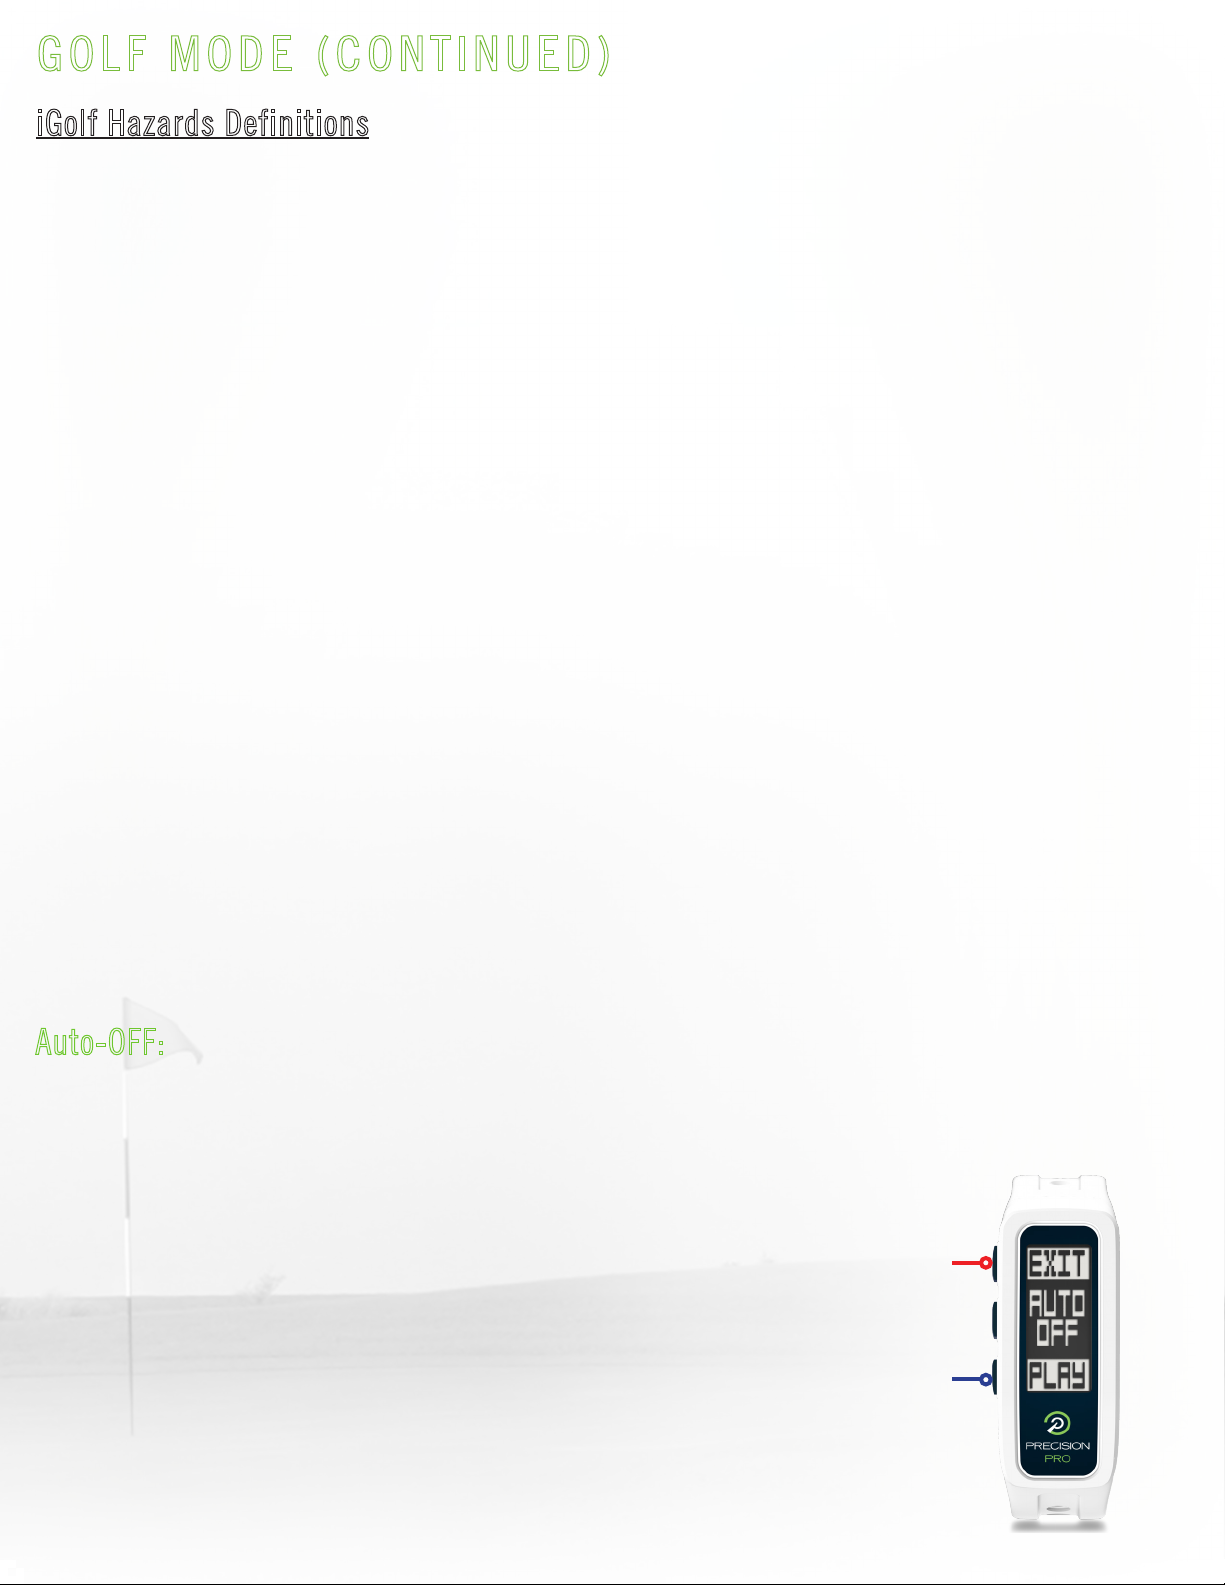
Auto-OFF:
The Auto-OFF feature is a battery
preserving function. After 6 hours of
golf, the message shown to the right
will pop up. To confirm, press the top
button to exit Golf Mode and return to
the home time screen. To cancel, select
the bottom button to resume golfing. If
no selection is made after 15 minutes,
the device will exit Golf Mode, power
the GPS module off, and return to the
home time screen.
Confirm Auto-Off
(Exit Golf Mode & return to Time mode)
Cancel Auto-Off
(Resume Golf Mode)
Auto-OFF Pop Up

TEE TIME WITH START NOTIFICATION
The Tee Time feature allows a tee time to be set up to 1 week in advance. On the day
of the set tee time, 10 minutes prior, the GPS Golf Band will alert you to go to your tee
box and display a countdown timer. When the timer hits the 7:00 mark, Golf Mode will
be activated automatically, and the GPS Golf Band will be ready for use by the time
you are set to tee off. To set a Tee Time:
9.
1. Select the
Tee Time option
from the Main Menu.
3. Confirm/Set
active field
& move to next
field (after AM/PM
is set, Tee Time is ON)
2. Press to activate setting
functionality
Quick toggle ON/OFF
(with day/time
currently showing)
Cycle active
field UP/NEXT 4. Exit
Cycle active
field DOWN/
PREVIOUS
Active Tee Time
is indicated on
home time screen
by a blinking Flag
icon
ODOMETER
10.
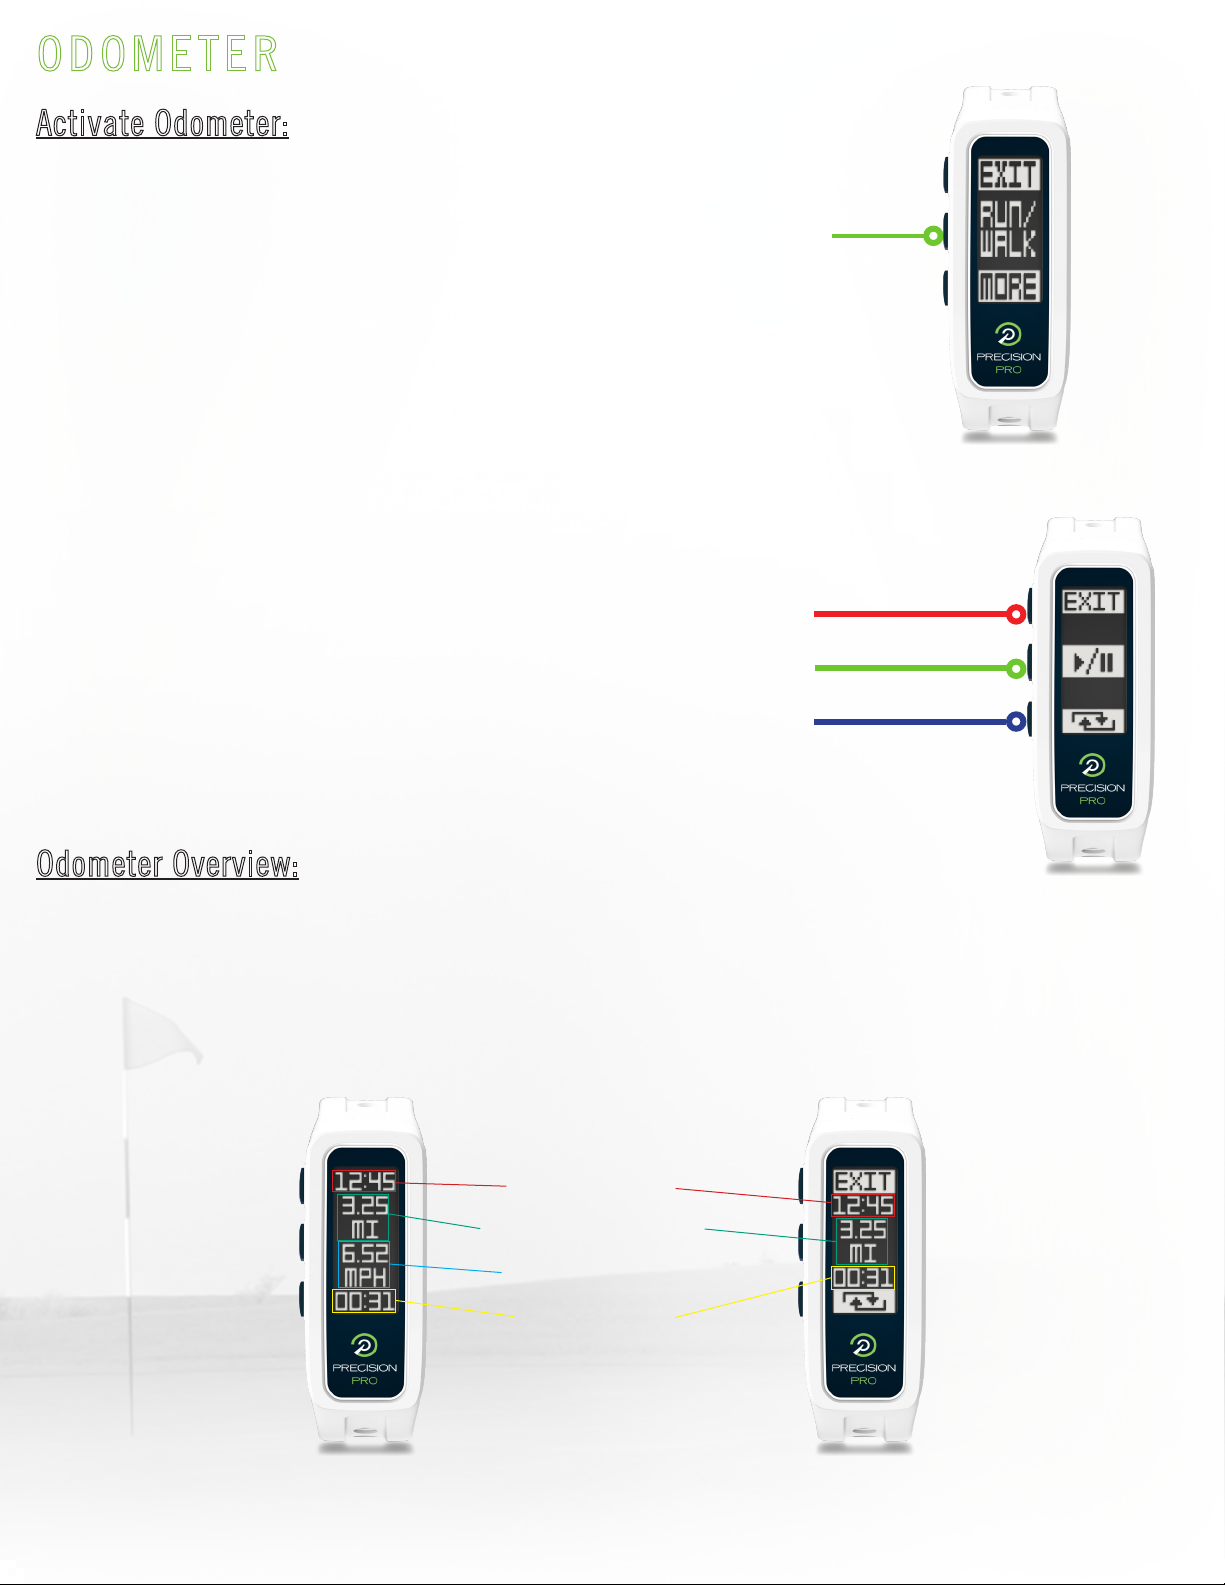
From the menu, press to select “Run/Walk.” GPS is activated.
*Note: Upon GPS acquisition, the time is updated automatically.
To set time prior to playing golf, please see pages 10 –12.
After GPS acquisition the device will display an overview of button functions:
Start/Pause Odometer
Exit & return to home time screen
(Note: after selecting Exit, you will be prompted to confirm exit)
Reset Odometer
(only functional when paused)
Activate Odometer:
Odometer Overview:
The Odometer tracks Distance Traveled and provides Current Speed, Total Activity time, and
Current Time as shown below.
Active Odometer Paused Odometer
Current Time
Distance Traveled
Current Speed
Activity Time
Menu (Odometer)
Odometer Functions
Toggle Daylight Savings Time ON + 1 hour or OFF - 1 hour
Note: by default, DST is set to ON + 1.
See DST section on page 11. for more information.
Return to Main Menu
SETTING THE TIME
11.
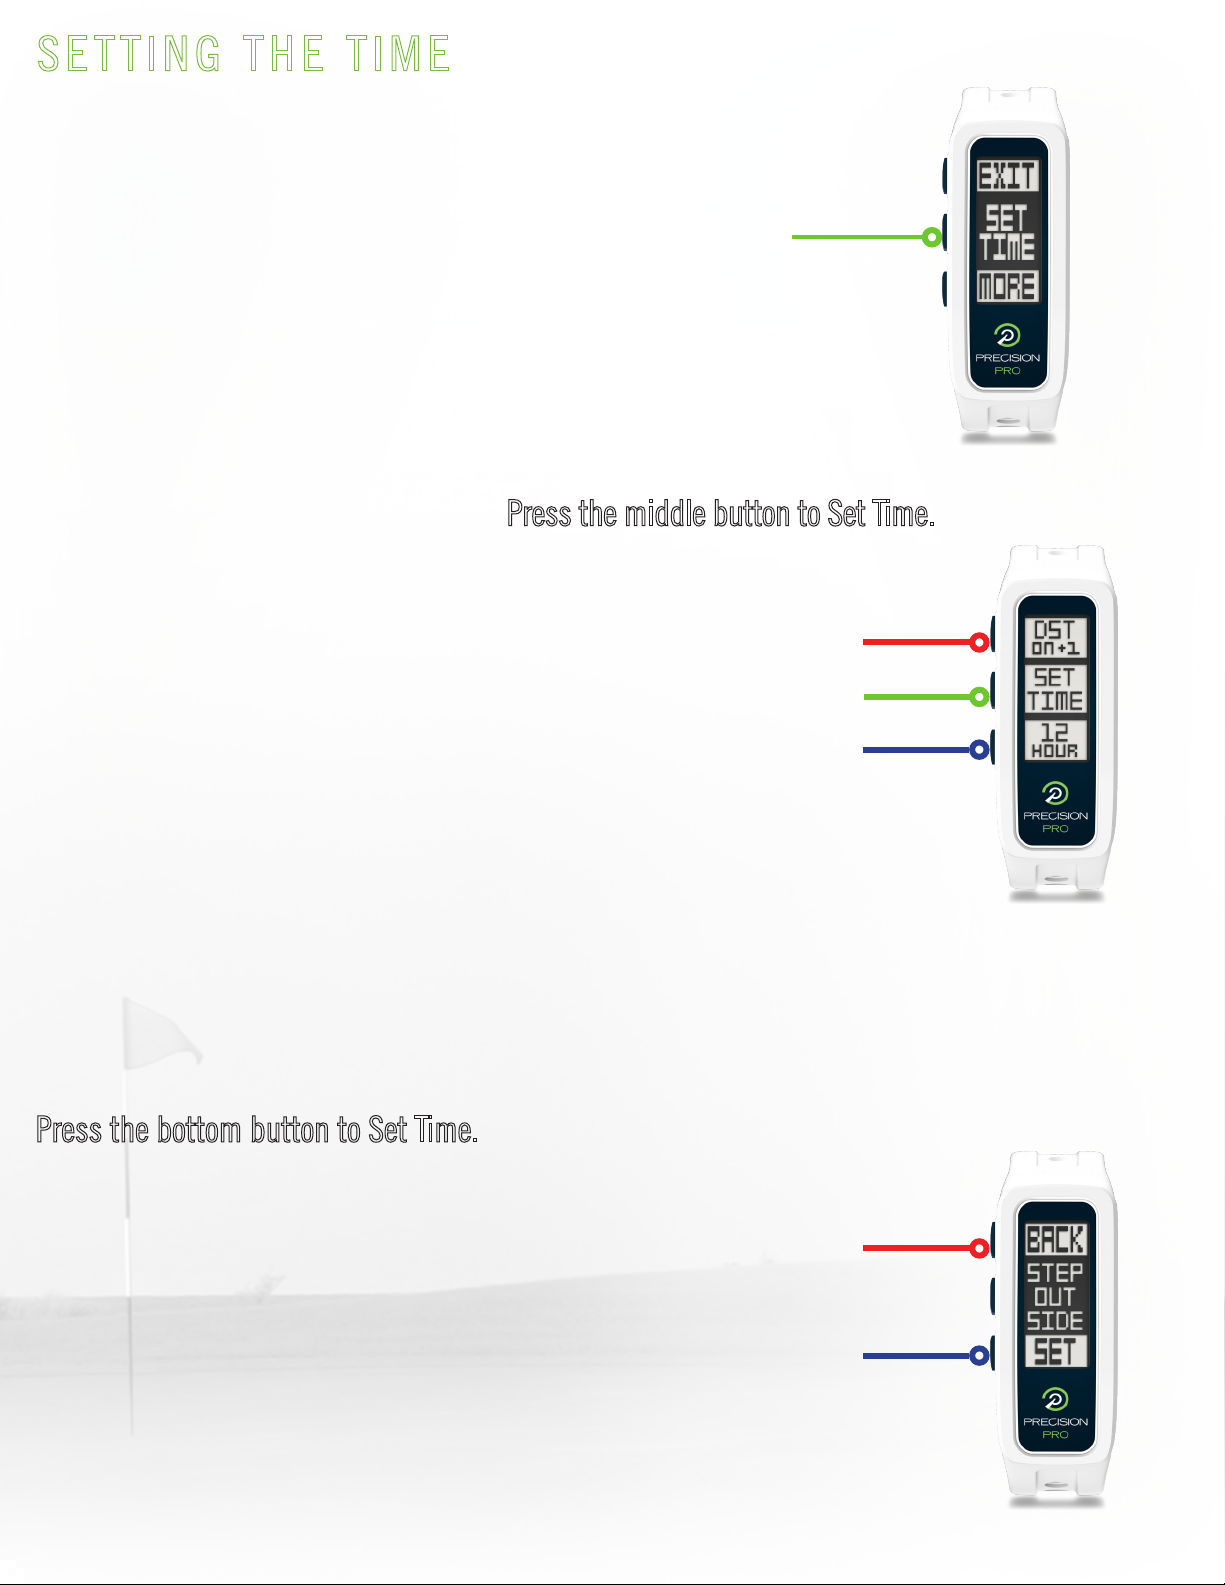
1. From the menu, press to select “Set Time.”
2. The Time Options screen will display. Press the middle button to Set Time.
3. You will be prompted to step outside. Go outside to an open area with a clear view of the sky.
Press the bottom button to Set Time. GPS Search will activate.
Time is set by GPS. To set the time, follow the steps below:
Set Time
Toggle Between 12-Hour and 24-Hour Clock Formats
Note: by default, clock is set to 12-Hour format.
See Clock Format section on page 11. for more information.
Set Time. GPS Search will Activate.
Menu (Set Time)
Time Options Screen
Step Outside Prompt
Cycle Hour UP
SETTING THE TIME (CONTINUED)
12.
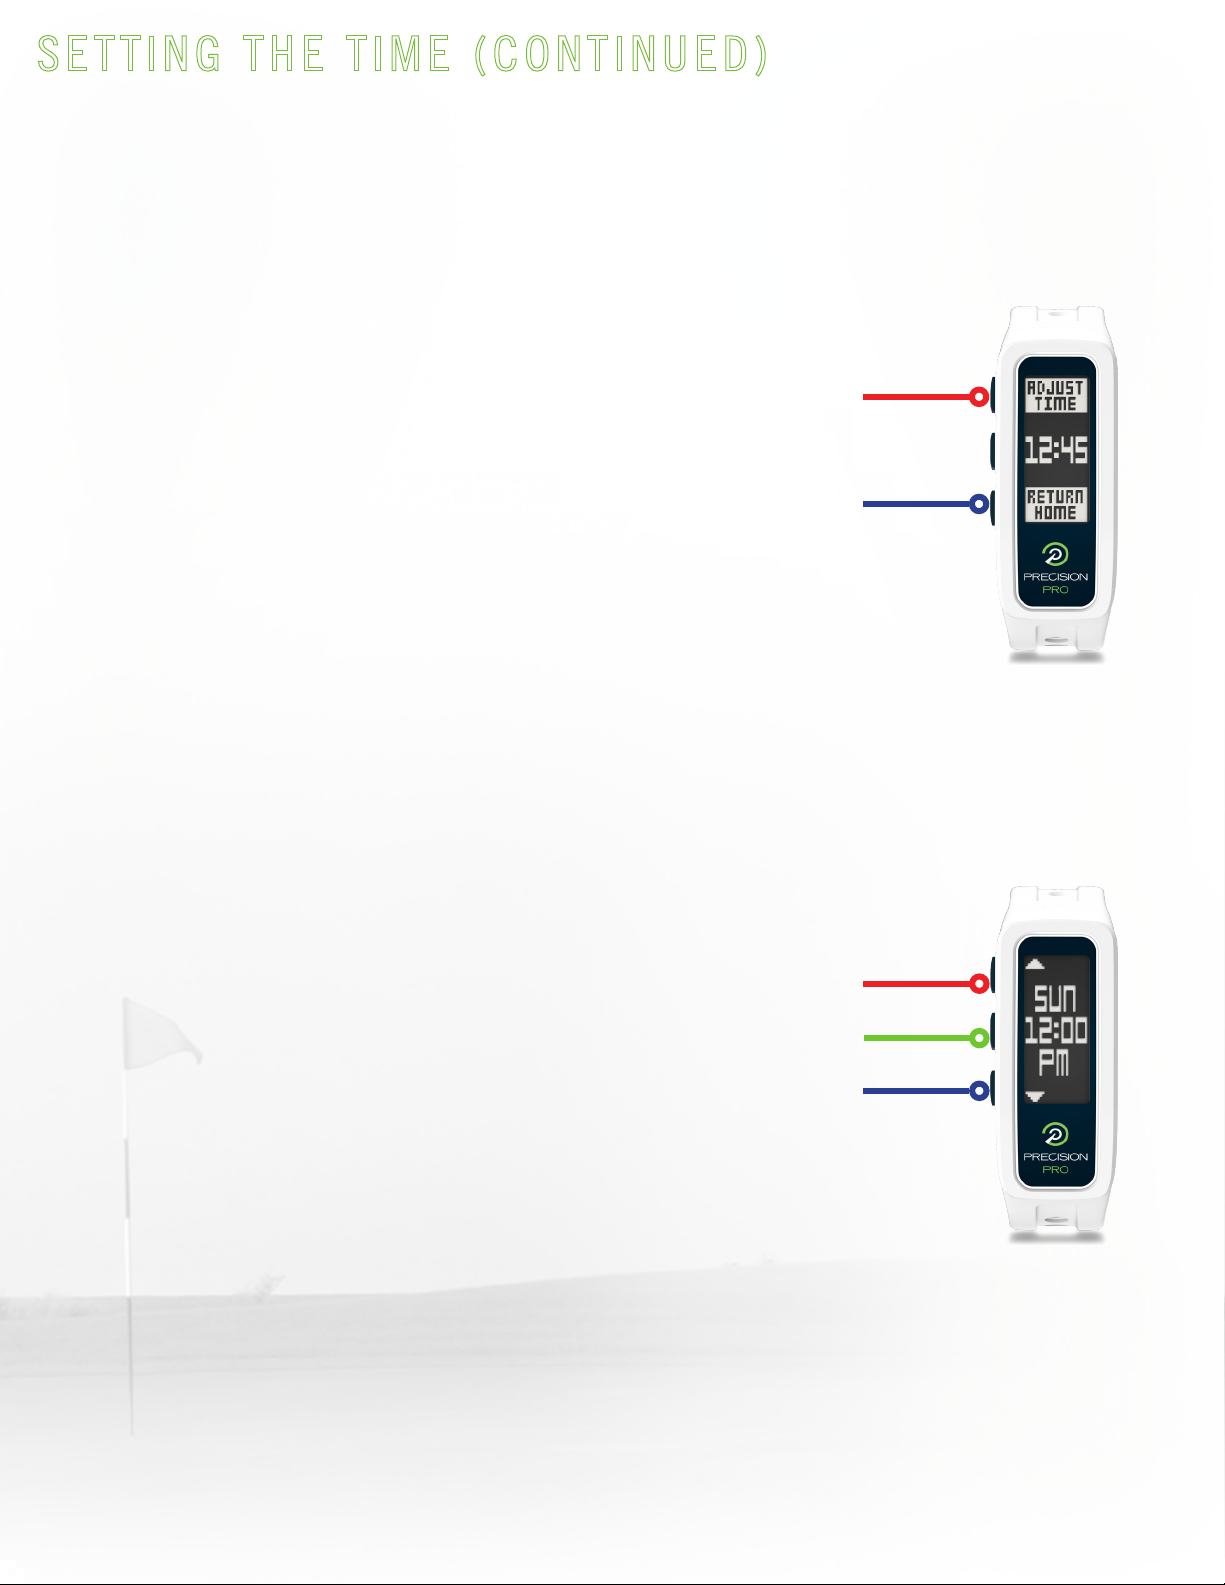
5. After selecting “Adjust Time,” the Hours field will be active. This can be adjusted up to 3
hours each way. Note: if time is adjusted from 11 to 12 or from 12 to 11, AM/PM will update
automatically. If time is adjusted from 11 pm to 12 am or from 12 am to 11 pm, day/date will
update automatically.
Setting time is complete at this point. Please see the next page for information regarding
Daylight Savings Time and Clock Format.
4. Upon GPS lock, the device will show the updated time along with options to either return
home (confirm time shown & return to the home time screen, setting time is complete) or adjust
time (manually, see step 5. below). In most cases, manually adjusting the time is unnecessary.
The option is provided simply for those that want to set their clocks fast or slow, for whatever
reason.
Confirm Time & Return to Home Time Screen
Cycle Hour DOWN
Manully Adjust Time (go to step 5.)
Confirm Time and Return to Home Time Screen
(setting time is complete)
Confirm or Adjust Time
Manual Time Adjust

Set Time
By default, Daylight Savings Time is set to
ON + 1 hour. Use the top button to adjust this
setting as shown in the image to the right.
This is the setting that should be used from
*Spring–Fall, which is prime golf season in
most of North America. From *Fall–Spring,
please use DST OFF -1 hour.
*Note: the time change dates from Daylight to Standard time and vice versa vary from year to
year. Please check accordingly prior to adjusting your DST setting.
You can change the clock format between 12-hour (standard AM/PM clock) and 24-hour format
(commonly known as military time). Use the bottom button as shown in the image above to
adjust this setting. Default setting is 12-hour format.
You may notice that the Time Options screen does not have a back button due to the fact that
there are 3-options listed and only 3 buttons available. To exit the time options without making
any changes, follow steps A. – C. below (shown from right-to-left).
Toggle Daylight Savings Time
ON + 1 hour or OFF - 1 hour
Note: by default, DST is set to ON + 1.
Toggle Between 12-Hour
and 24-Hour Clock Formats
Note: by default, clock
isset to 12-Hour format.
SETTING THE TIME (CONTINUED)
13.
Daylight Savings Time
Clock Format
Exiting Time Options
A.
C. B.
Time Options Screen
Time Options ScreenStep Outside PromptMenu (Set Time)Home Time Screen

DISTANCE MEASUREMENT SETTINGS
14.
To change the distance measurement setting, use the center button to select the YDS/M option
from the menu.
From the Distance Measurement Setting menu, use the bottom button to cycle through options
and the center button to select the appropriate setting. The default setting is Yards/Miles,
meaning that Golf Mode will measure & display distances in yards and the Odometer will
measure & display distances in miles. Additional settings available are Yards/Kilometers,
Meters/Kilometers, and Meters/Miles.
Select YDS/M
Return to Main Menu
Set Current Option
Cycle to Next Option
(scroll order shown below from right-to-left)
To change the distance measurement setting, use the center button to select the YDS/M option
from the menu. Menu (Yds/M)
Distance Measurement Setting Menu
Yards/MilesYards/KilometersMeters/KilometersMeters/Miles
Distance Measurement Setting Menu Scroll Order
POWERING OFF
15.
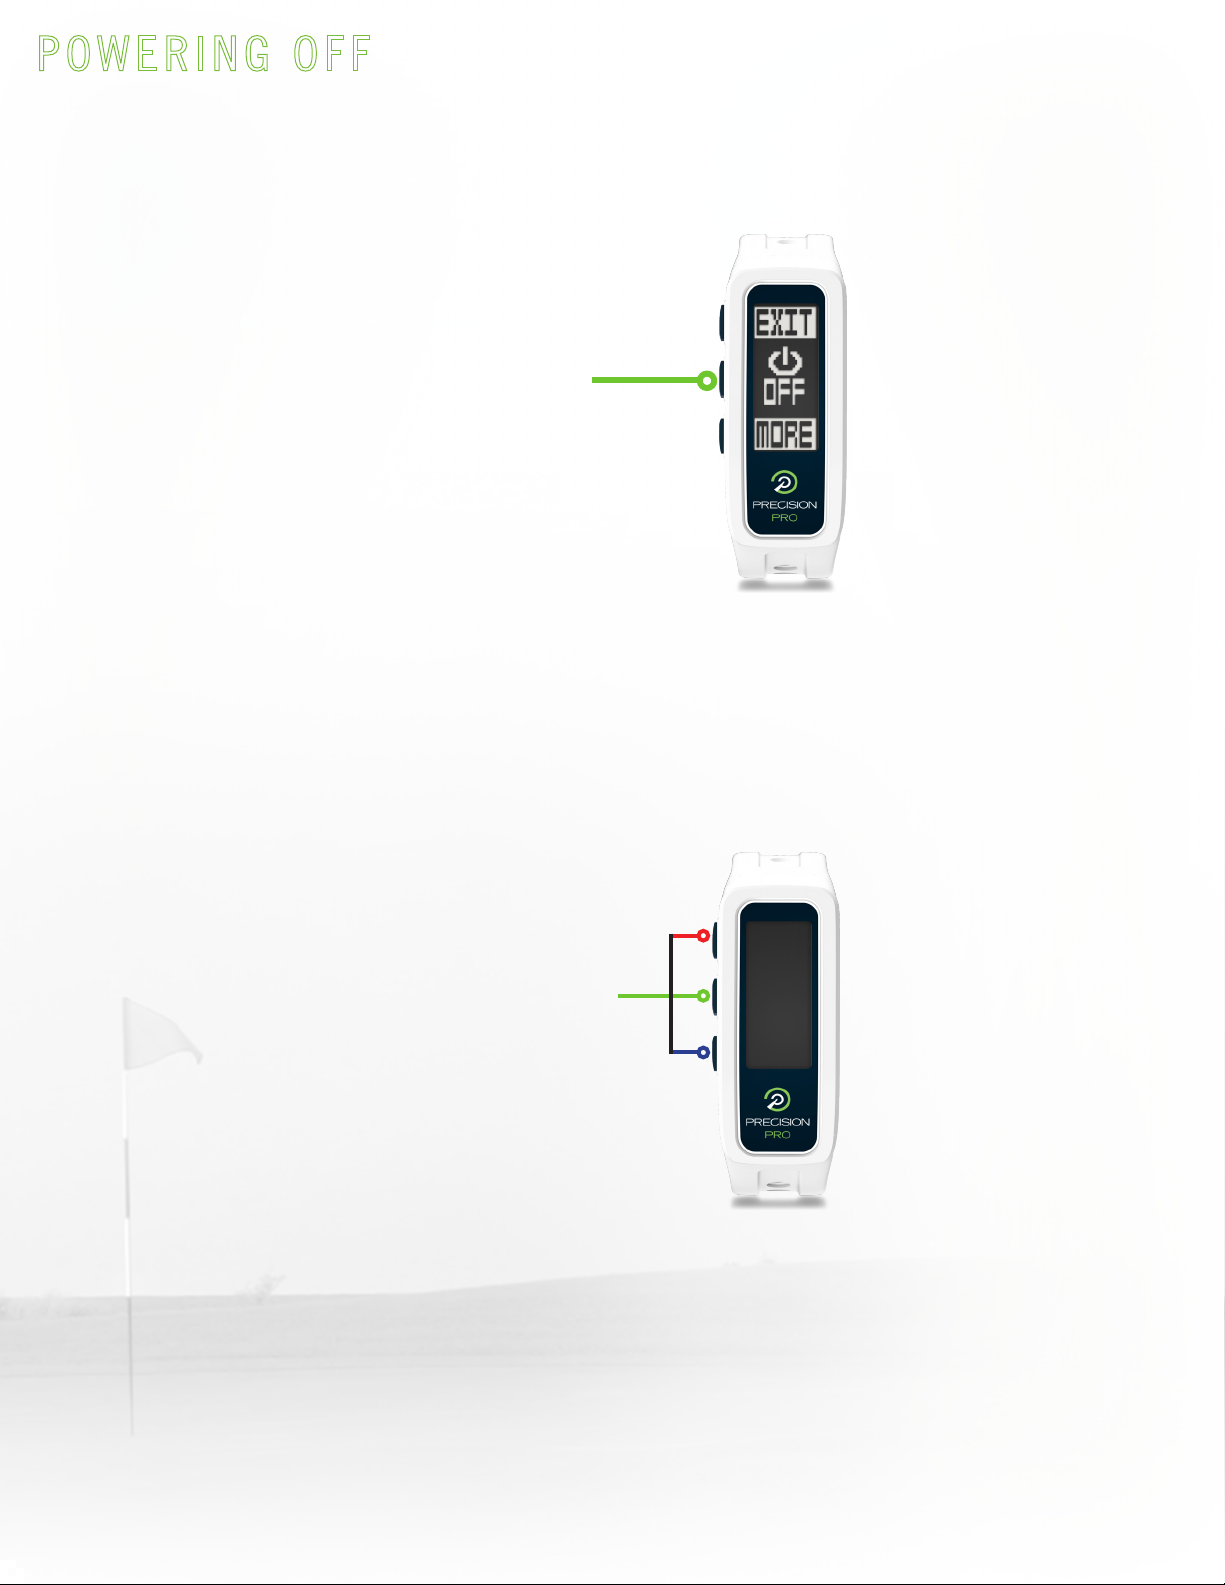
To power OFF, simply select the Power OFF option from the menu.
To power back ON, simply press any button.
Select Power OFF
Press any
button to
power on
Menu (Power OFF)
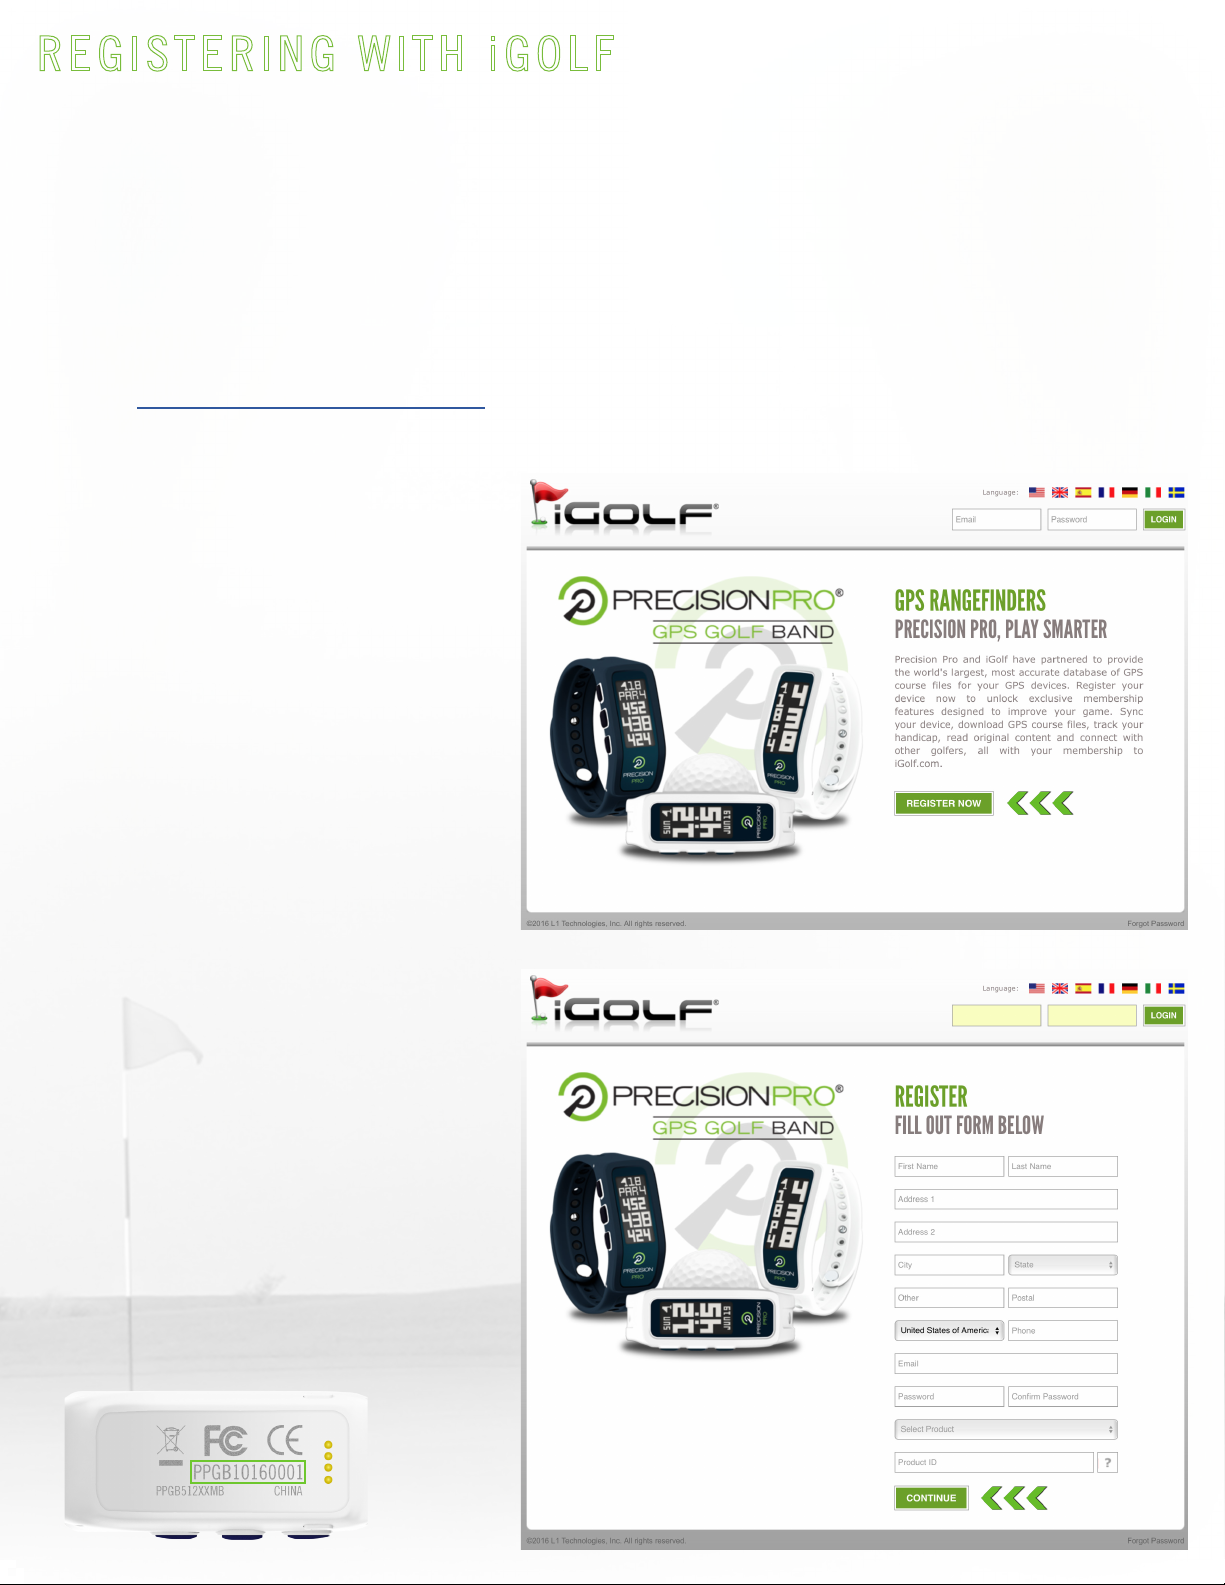
REGISTERING WITH iGOLF
16.
Creating an account with iGolf is quick, easy, and free, with no membership or download fees
ever. Registering allows you to download new courses and course updates, and allows you to
search for golf courses in your area.
To register:
1. Go to http://precisionpro.igolf.com
2. Select the “REGISTER NOW”
button as shown in the image to
the right.
3.Fillintheinformationcontained
on the registration form, then
select the “CONTINUE” button.
*Note: The Product ID is a
12-character alpha-numeric code
that is located on the back side
of the device as shown in the
example below.
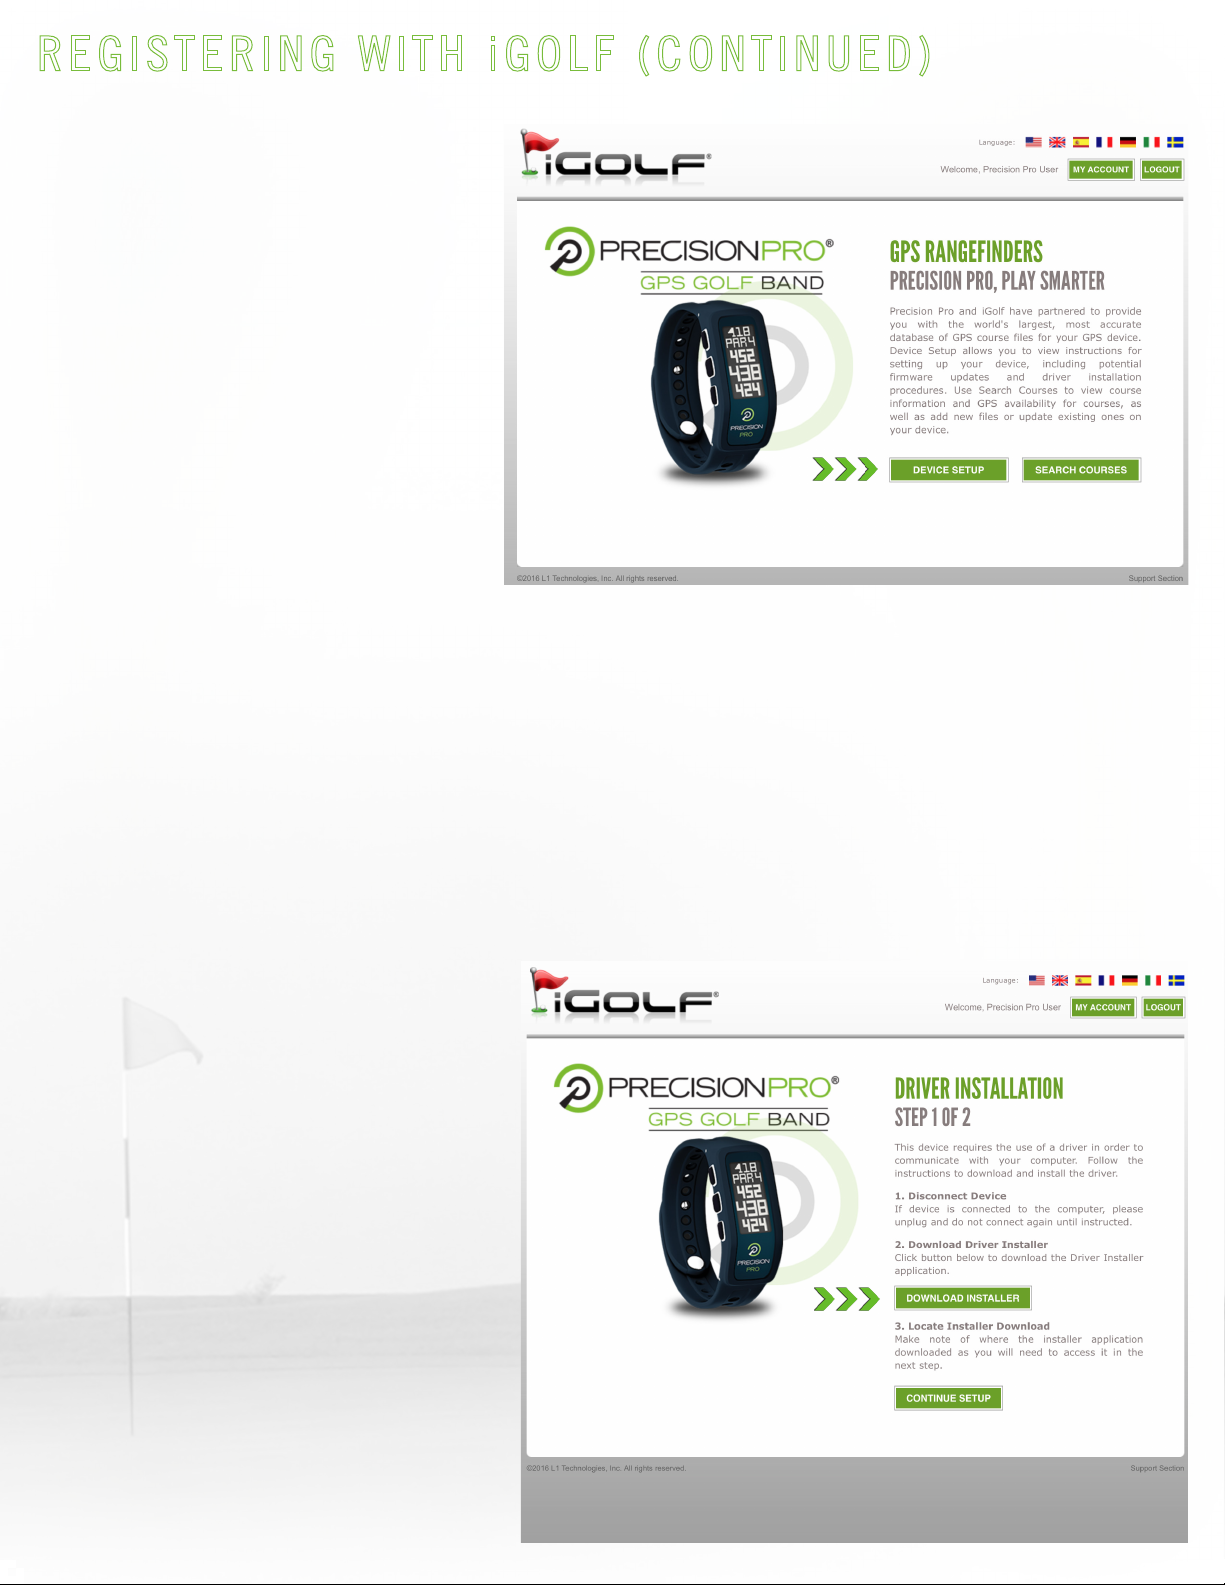
REGISTERING WITH iGOLF (CONTINUED)
17.
4. After registration is complete
(or when logging in at later times)
you will see two options as shown
in the image to the right:
- DEVICE SETUP
- SEARCH COURSES
You must complete the DEVICE
SETUP prior to being able to
download courses/course updates.
It is only necessary to complete the device setup one time. After that, you may download
courses/course updates at any time as necessary. Select the DEVICE SETUP button and go to
Step 5.
5. A driver is required in order for
the GPS Golf Band to communicate
with your computer. From the
DRIVER INSTALLATION page, select
the DOWNLOAD INSTALLER button.
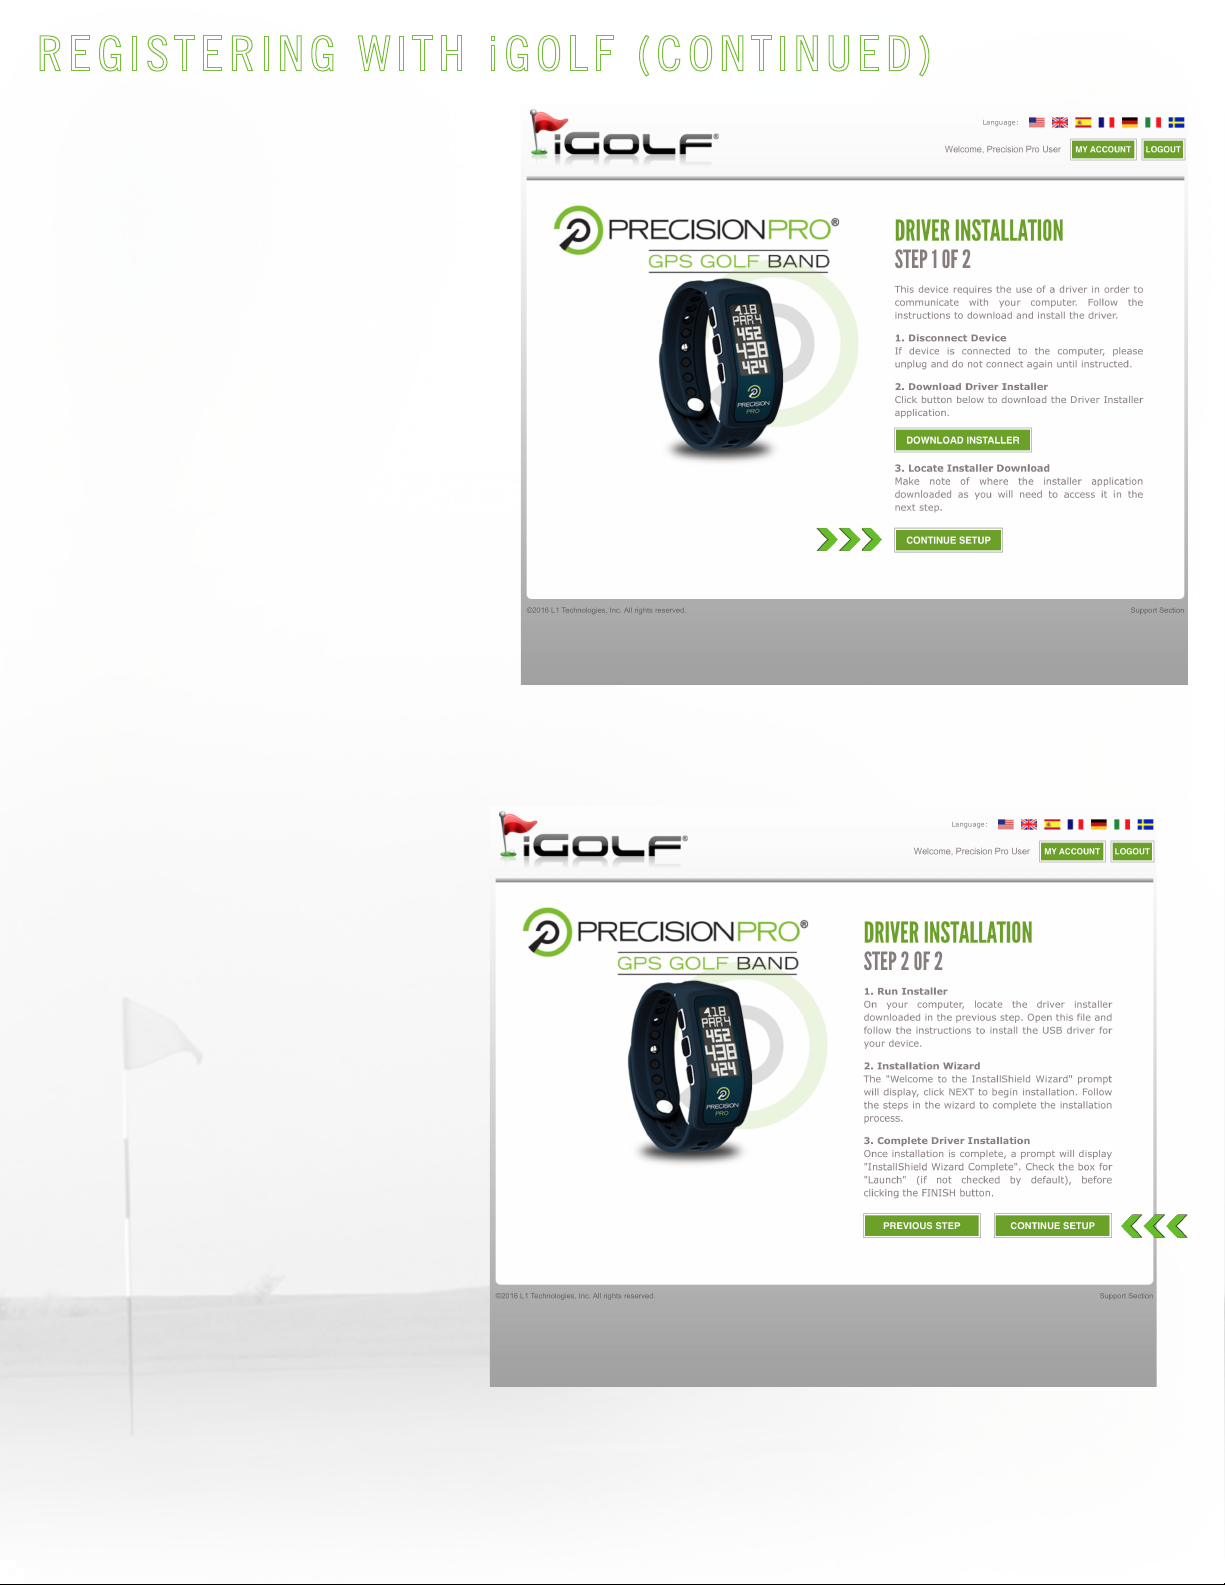
6. After the installer download
completes, select “CONTINUE
SETUP.”
7. The driver installer that was
downloaded in the previous steps
is located in your computer’s
Downloads folder. Open this file
and follow the on-screen prompts
to install the driver. Once this is
complete, select the “CONTINUE
SETUP” button.
REGISTERING WITH iGOLF (CONTINUED)
18.

8. After the driver is installed, you
will need to install the iGolf Sync
Application. This is necessary to
transmit data from the website to
the devicethrough yourcomputer. To
do so, select “SEARCH COURSES.”
9. From the INSTALL SYNC
APPLICATION pop-up message,
select “INSTALL APPLICATION” then
follow the on-screen prompts.
After the iGolf Sync Application has been installed, you may download courses/course updates
as outlined on the following page.
REGISTERING WITH iGOLF (CONTINUED)
19.

DOWNLOADING COURSES/COURSE UPDATES
20.
Your GPS Golf Band is preloaded with over 35,000 courses in North America, Western Europe,
Australia, New Zealand, South Africa, Puerto Rico, and the United Arab Emirates. Occasionally,
it may be necessary to download courses or course updates (i.e. if your local course has been
renovated or recently mapped by iGolf, or you are traveling to a location that is not preloaded).
If you come across a course that is not currently mapped by iGolf, or has been recently renovated
and needs to be remapped, you can request new mapping or updated mapping by emailing
Mapping requests are generally available within 1 –2 weeks of receipt. For best results it is
recommended that a current scorecard is submitted with requests for mapping.
To download a course or course update:
1. Login to your account at precisionpro.igolf.com
2. Select the “SEARCH COURSES”
button
Table of contents
Popular Watch manuals by other brands

Casio
Casio QW 5513 Operation guide

Piaget
Piaget 560P Instructions for use

Armitron
Armitron pro sport MD0346 instruction manual

West Marine
West Marine BlackTip 13411293 Instruction Booklet and Care Guide

Jaeger-leCoultre
Jaeger-leCoultre HYBRIS MECHANICA CALIBRE 184 manual

FOREVER
FOREVER iGO PRO JW-200 user manual


