Premier Range DT MFK6 User manual
90-OM1865-P1
90-OM1865
90-OM1865-P4
14
Kingsway House, Laporte Way,
Luton, Bedfordshire LU4 8RJ
Tel: 01582 544 510
PREMIER
RANGE
Thank you for your purchase of Premier Lights.
The Premier garden lighting range offers the ideal
lighting effect to any garden and feature
weatherproof transformers that can be positioned
outside safely. The transformer is equipped with
a photo-cell which switches the lights on at dusk
and off at dawn. Keep a copy of these
instructions for future reference.
Please read these instructions fully
before commencing the installation:
SAFETY INSTRUCTIONS
• These lights are only to be connected to a 12V
low voltage lighting system.
• Only use either lights provided with this kit or
compatible lights from the Homelec range.
• Only use the transformer supplied or a
transformer from the Homelec Premier garden
lighting range.
• Disconnect the power before changing a lamp
and ensure the lamp is cool before handling.
• Ensure the cable is routed so as not to be a trip
hazard.
• Ensure that the wattage of all the lights
combined does not exceed the rating of the
transformer.
• The transformer must be plugged in indoors.
• Only adjust the cable and lights when the power
is switched off.
INSTRUCTION MANUAL
CATALOGUE NUMBERS :
DT MFK6 and DT GFLK3
If you chose to extend the cable, use Homelec
catalogue number CBLI-10 only. The longer the
cable, the dimmer the lights will be. We
recommend a maximum cable length of 30m,
however even at this length, the lights will not be
at their full brightness.
Light & Transformer Warranty
It is unlikely that this transformer and light
fittings will fail in normal use due to faulty
materials or workmanship within 5 years for the
transformer and within 10 years for the light
fittings. If it does, Homelec undertake to repair or
replace it provided it has been installed, used and
maintained correctly in accordance with these
instructions, such that the transformer has not
been subjected to repair, opened or taken apart.
This guarantee does not cover lamps and the
finish of any product. This does not affect your
statutory rights.
This product is subject to Homelec’s Standard
Terms & Conditions of Sale.
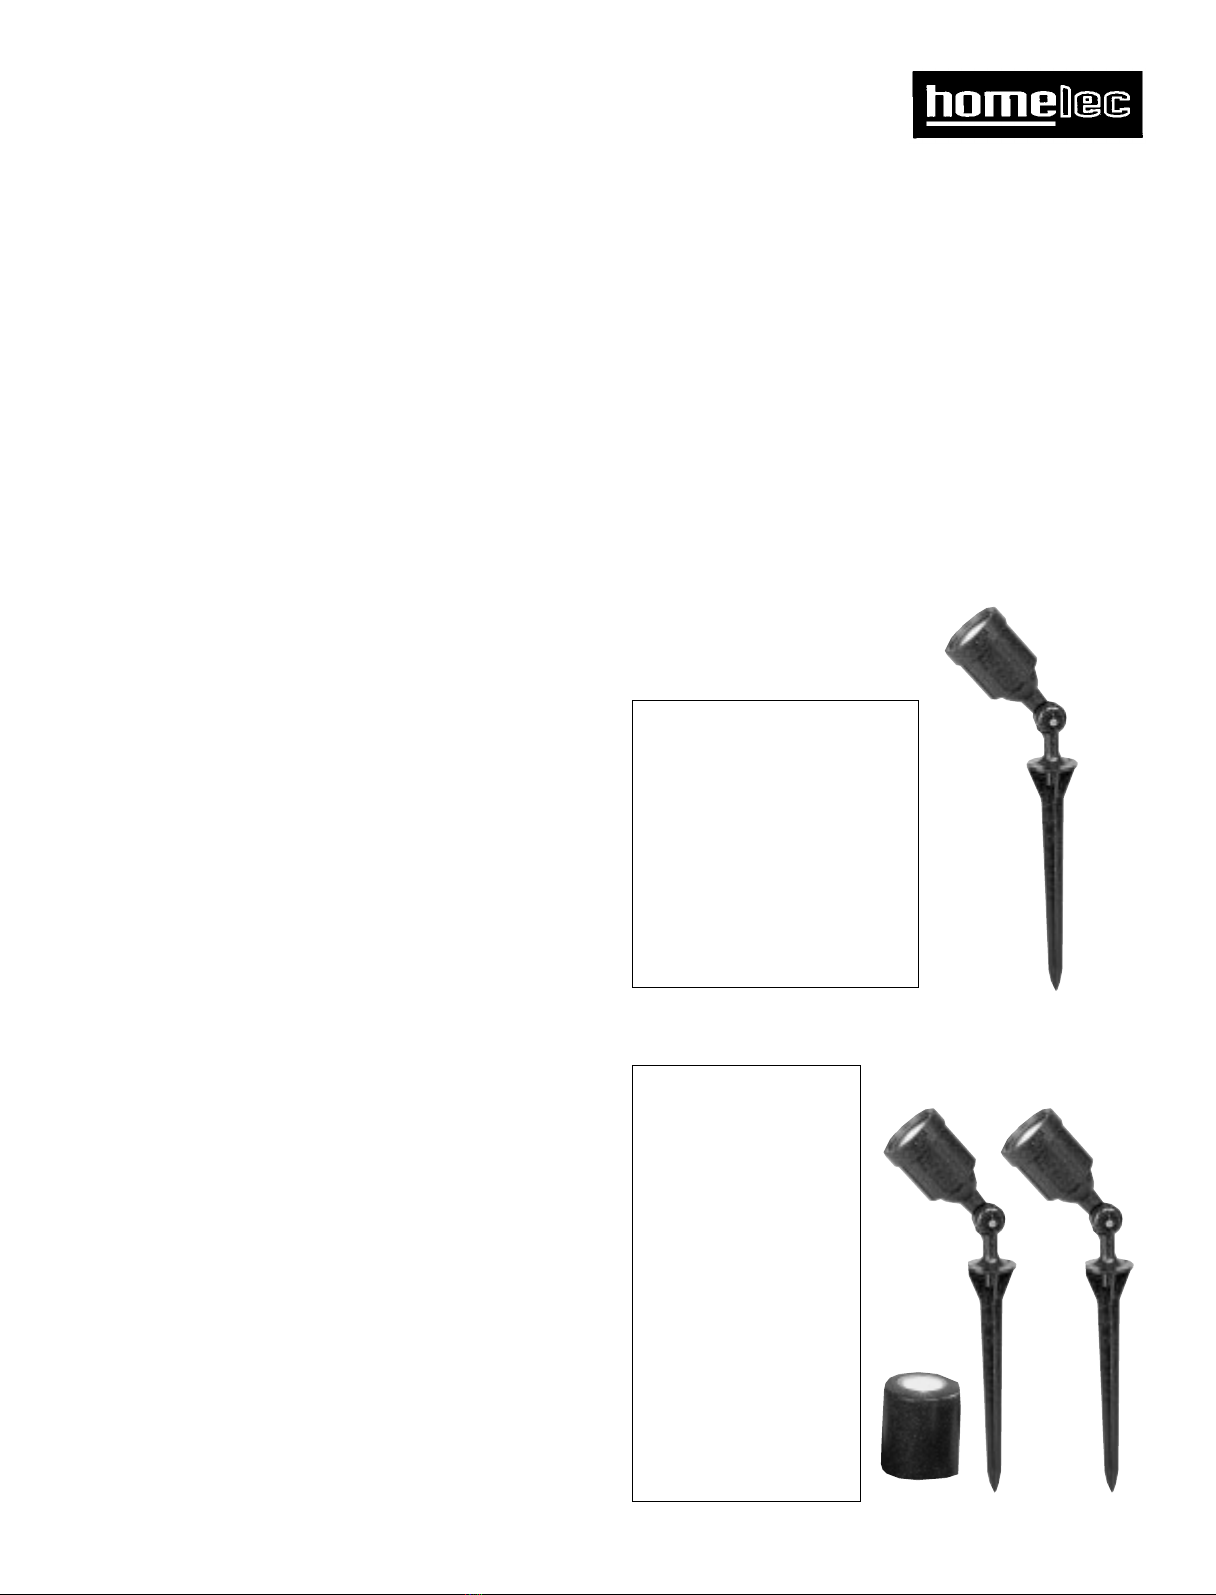
6 Flood Lights
6 Threaded Caps
6 Inserts
6 Ground Spikes
2 Fixing Screw Packs
7 10W 12V Halogen Lamps
1 96W Transformer
15m approx. Cable
Kit Contents :
MFK6
GFLK3
Transformer
Input :
Output :
Flood Light Fittings
Lamp Voltage :
Lamp Rating :
Lamp Type :
Shrub Light Fitting
Lamp Voltage :
Lamp Rating :
Lamp Type :
230V~50Hz
12V~96W, 8A
12V~
10W max.
halogen
n/a
n/a
n/a
230V~50Hz
12V~96W, 8A
12V~
10W max.
halogen
12V~
20W max. MR16
halogen
Specification :
BHFG-1 GF-1
2 Flood Lights
1 Shrub Light
3 Threaded Caps
3 Inserts
2 Ground Spikes
1 Fixing Screw Pack
3 10W 12V Halogen
Lamps
2 20W 12V Halogen
Lamp
1 96W Transformer
15m approx. Cable
90-OM1865-P390-OM1865-P2
32
Problem Suggested RemedyPossible Cause
1. Lights will not switch on at
dusk.
No power. Ensure transformer is plugged in
and power is switched on.
2. Only some of the lights
switch on at dusk.
Terminal spikes in the light power
connector have not made contact
with the core of the cable.
Straighten the terminal spikes and
reattach the power connector to
the low voltage lighting cable.
Low voltage cable has not been
connected to the transformer.
Ensure the low voltage cable is
connected to the transformer.
Artificial light affecting the
sensor e.g. street lights.
Mount the sensor where the
artificial lights will not affect the
sensor.
Lamp not correctly fitted into the
lampholder.
Ensure the lamp is correctly
fitted.
The lamp has blown. Replace the lamp.
Trouble Shooting :
8 CM
Mounting Slots
Installation :
1. Locate the transformer in a suitable position,
considering that the transformer has to be
plugged in indoors.
2. Unwind and lay out the cable to its full length
along the line where the lights will be
positioned, starting at the position where the
transformer is to be located.
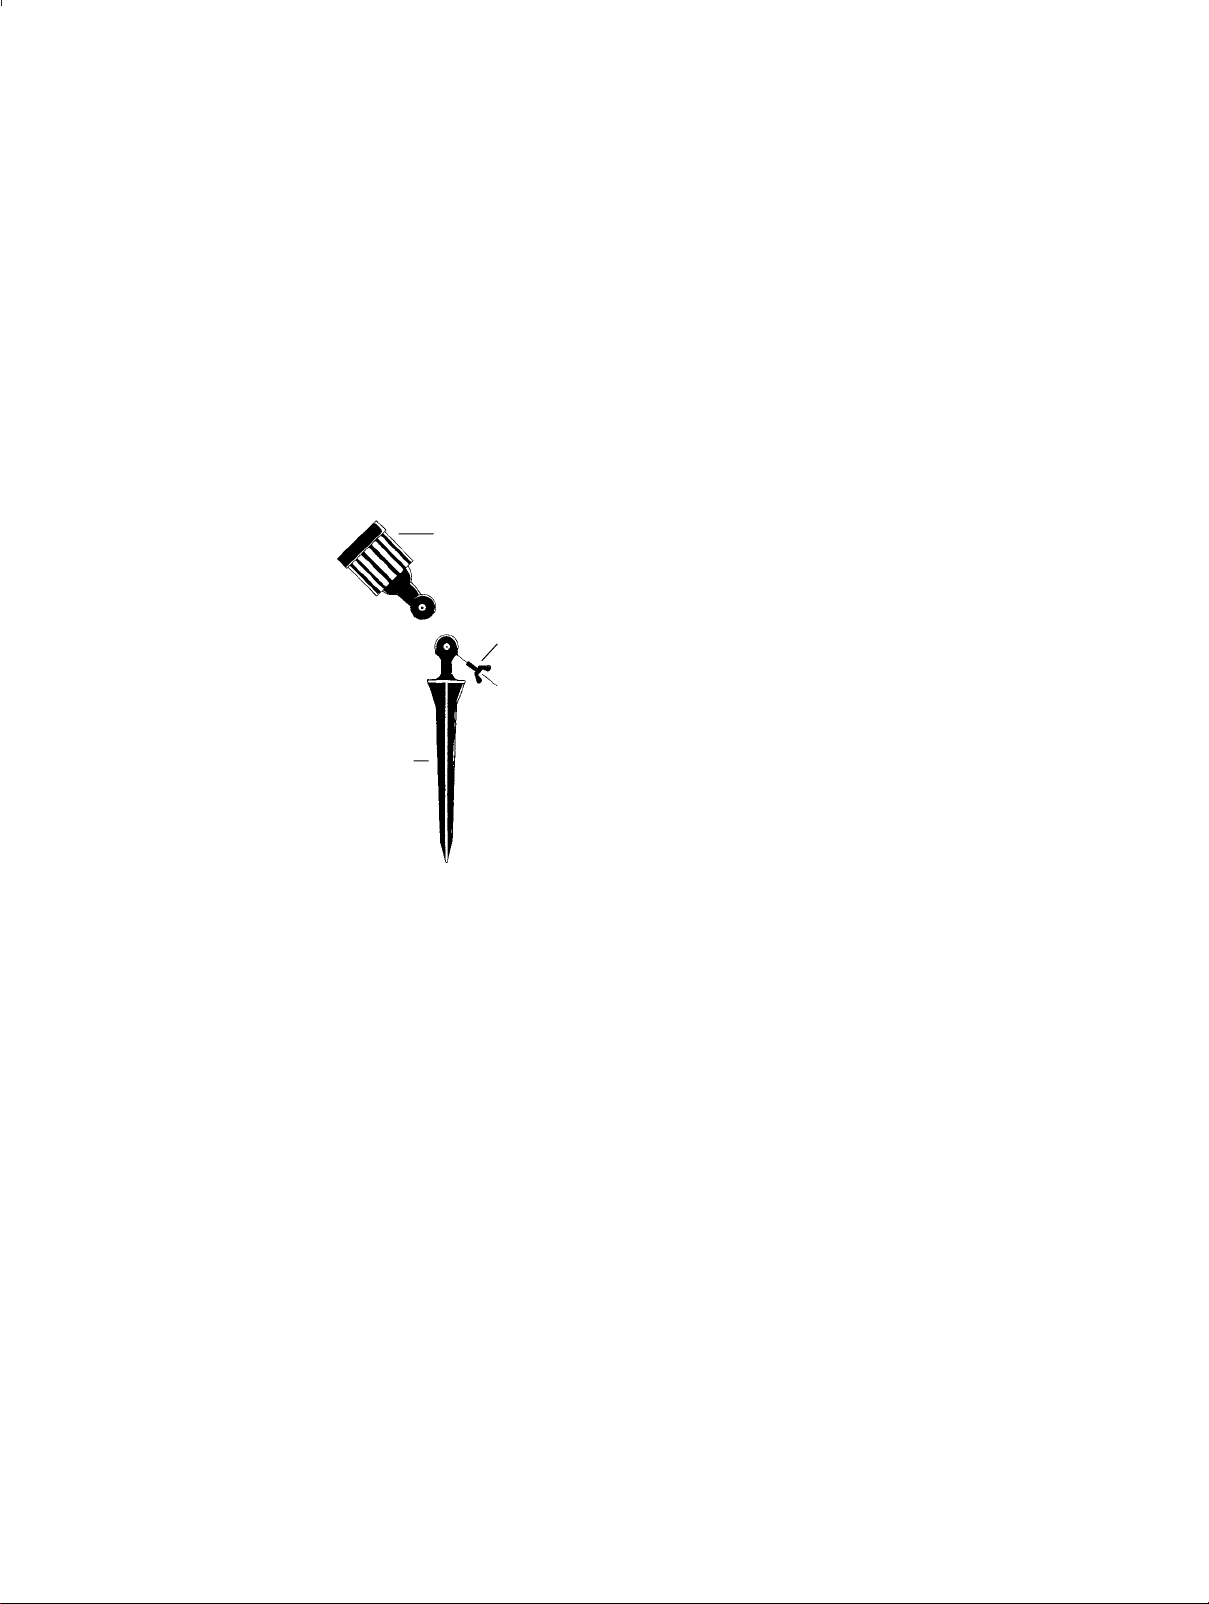
Assembly of Lights – Flood Lights: (MFK6)
1. Remove the wingscrew from the cable end of
the flood light head.
2. Attach the ground
spike to the flood
light head using the
wing bolt, ensuring
that the cable is not
trapped and is
positioned in the slot.
3. Repeat for the
remaining lights.
4. At the point where you want to locate the
Flood lights, attach the Flood light power
connector by the following method. Place the
plastic insert in the wiring channel, aligning the
holes with the terminal spikes. Lay the cable in
the plastic insert so that the terminal spikes
align with the centre of each core of the cable.
Whilst holding the cable in place, screw on the
threaded cap. The cap will force the terminal
spikes to pierce the cable, holding it in place.
5. Repeat for the remaining Flood lights.
Assembly of Lights – Shrub Light : (GFLK3)
1. Push the shub light in to the ground so that it is
secure. Allow sufficent space above the light
for the heat from the lamp to dissipate. Ensure
the cable is accessable so that it can be
connected to the low voltage lighting cable.
2. At the point where you want to locate the
Shrub light, attach the Shrub light power
connector by the following method. Place the
plastic insert in the wiring channel, aligning the
holes with the terminal spikes. Lay the cable in
the plastic insert so that the terminal spikes
align with the centre of each core of the cable.
Whilst holding the cable in place, screw on the
threaded cap. The cap will force the terminal
spikes to pierce the cable, holding it in place.
Ensure you have followed all of the steps
above and the lights are fully assembled and
connected to the low voltage cable before
connecting the low voltage lighting cable to
the transformer.
Transformer Installation :
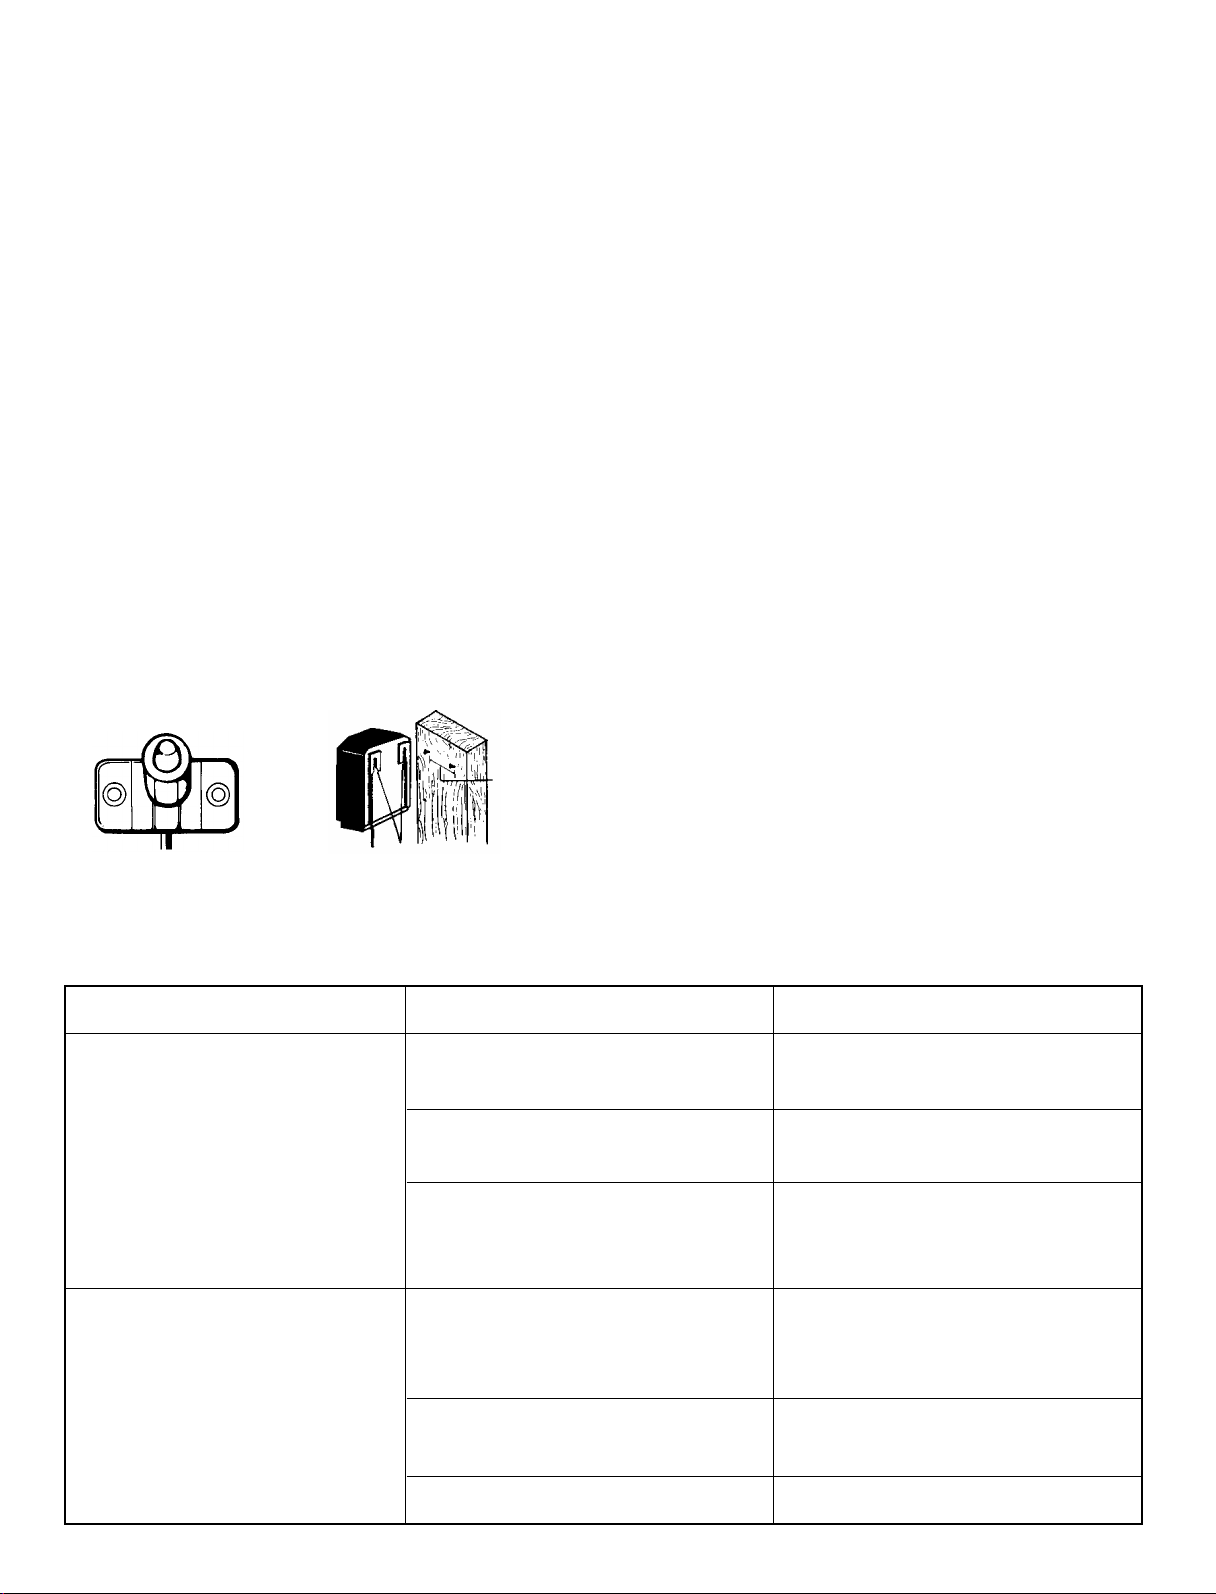
1. The recommended transformer mounting
location is a minimum of 30cm above the
ground and located where its power cord is
within reach of a standard 230V power socket
outlet located indoors, or a suitable
weatherproof socket if used outdoors.
The transformer is equipped with a photo-cell
which will automatically turn the lights on at
dusk and off at dawn. To accurately do this,
the photo-cell must be mounted (using the
screws provided) in an area where it will be
exposed to the natural light of the rising and
setting sun. Avoid heavily shaded areas or
areas where artificial light may shine onto the
photo-cell. Light from automobiles, streetlights,
porch light, etc. may cause your lights to turn
off prematurely.
Note : the photo-cell may be mounted
horizontally or vertically. If you chose to
mount the transformer indoors, the photo-cell
must be placed in a window.
2. You may hang the transformer indoors or
outdoors on a wall, fence, post etc. by using
the screws provided. The screw locations are
to be positioned so they will slide onto the
slots on the rear of the transformer.
There are not any user serviceable parts within
the transformer.
Wiring Instructions :
1. Strip away 15mm of insulation off of both wires
at one end only of the low voltage lighting
cable.
2. Remove the terminal cover at the bottom of the
transformer. Loosen the two terminal screws
and wrap one of the stripped wires around each
terminal screw. Tighten the screw ensuring that
all strands of the wire at captured under the
terminal screw heads. Replace the terminal
cover.
Do not loop the low voltage cable back to the
transformer.
The transformer may now be plugged into an
appropriate socket. Please note the lights will
not come on until dusk. If you require the lights
not to be operated by the photo-cell on the
transformer, it may be wrapped in insulation
tape to shut out the light from the sensor.
Lamp Replacement :
1. Switch off the power supply to transformer and
ensure the lamp is cool before handling.
2. For the Flood lights, remove the lens retention
ring, and remove the lens.
For the shrub light, remove the fixing screws at
the top of the unit and remove the cover.
3. Replace the lamp with a lamp of the same style
and rating.
4. Reassemble in reverse order, ensuring the
gasket is in place.
Floodlight
Head
Wingscrew
Stake
90-OM1865-P390-OM1865-P2
32
Problem Suggested RemedyPossible Cause
1. Lights will not switch on at
dusk.
No power. Ensure transformer is plugged in
and power is switched on.
2. Only some of the lights
switch on at dusk.
Terminal spikes in the light power
connector have not made contact
with the core of the cable.
Straighten the terminal spikes and
reattach the power connector to
the low voltage lighting cable.
Low voltage cable has not been
connected to the transformer.
Ensure the low voltage cable is
connected to the transformer.
Artificial light affecting the
sensor e.g. street lights.
Mount the sensor where the
artificial lights will not affect the
sensor.
Lamp not correctly fitted into the
lampholder.
Ensure the lamp is correctly
fitted.
The lamp has blown. Replace the lamp.
Trouble Shooting :
8 CM
Mounting Slots
Installation :
1. Locate the transformer in a suitable position,
considering that the transformer has to be
plugged in indoors.
2. Unwind and lay out the cable to its full length
along the line where the lights will be
positioned, starting at the position where the
transformer is to be located.
Assembly of Lights – Flood Lights: (BHFG-1)
1. Remove the wingscrew from the cable end of
the flood light head.
2. Attach the ground
spike to the flood
light head using the
wing bolt, ensuring
that the cable is not
trapped and is
positioned in the slot.
3. Repeat for the
remaining lights.
4. At the point where you want to locate the
Flood lights, attach the Flood light power
connector by the following method. Place the
plastic insert in the wiring channel, aligning the
holes with the terminal spikes. Lay the cable in
the plastic insert so that the terminal spikes
align with the centre of each core of the cable.
Whilst holding the cable in place, screw on the
threaded cap. The cap will force the terminal
spikes to pierce the cable, holding it in place.
5. Repeat for the remaining Flood lights.
Assembly of Lights – Shrub Light : (GF-1)
1. Push the shub light in to the ground so that it is
secure. Allow sufficent space above the light
for the heat from the lamp to dissipate. Ensure
the cable is accessable so that it can be
connected to the low voltage lighting cable.
2. At the point where you want to locate the
Shrub light, attach the Shrub light power
connector by the following method. Place the
plastic insert in the wiring channel, aligning the
holes with the terminal spikes. Lay the cable in
the plastic insert so that the terminal spikes
align with the centre of each core of the cable.
Whilst holding the cable in place, screw on the
threaded cap. The cap will force the terminal
spikes to pierce the cable, holding it in place.
Ensure you have followed all of the steps
above and the lights are fully assembled and
connected to the low voltage cable before
connecting the low voltage lighting cable to
the transformer.
Transformer Installation :
1. The recommended transformer mounting
location is a minimum of 30cm above the
ground and located where its power cord is
within reach of a standard 230V power socket
outlet located indoors, or a suitable
weatherproof socket if used outdoors.
The transformer is equipped with a photo-cell
which will automatically turn the lights on at
dusk and off at dawn. To accurately do this,
the photo-cell must be mounted (using the
screws provided) in an area where it will be
exposed to the natural light of the rising and
setting sun. Avoid heavily shaded areas or
areas where artificial light may shine onto the
photo-cell. Light from automobiles, streetlights,
porch light, etc. may cause your lights to turn
off prematurely.
Note : the photo-cell may be mounted
horizontally or vertically. If you chose to
mount the transformer indoors, the photo-cell
must be placed in a window.
2. You may hang the transformer indoors or
outdoors on a wall, fence, post etc. by using
the screws provided. The screw locations are
to be positioned so they will slide onto the
slots on the rear of the transformer.
There are not any user serviceable parts within
the transformer.
Wiring Instructions :
1. Strip away 15mm of insulation off of both wires
at one end only of the low voltage lighting
cable.
2. Remove the terminal cover at the bottom of the
transformer. Loosen the two terminal screws
and wrap one of the stripped wires around each
terminal screw. Tighten the screw ensuring that
all strands of the wire at captured under the
terminal screw heads. Replace the terminal
cover.
Do not loop the low voltage cable back to the
transformer.
The transformer may now be plugged into an
appropriate socket. Please note the lights will
not come on until dusk. If you require the lights
not to be operated by the photo-cell on the
transformer, it may be wrapped in insulation
tape to shut out the light from the sensor.
Lamp Replacement :
1. Switch off the power supply to transformer and
ensure the lamp is cool before handling.
2. For the Flood lights, remove the lens retention
ring, and remove the lens.
For the shrub light, remove the fixing screws at
the top of the unit and remove the cover.
3. Replace the lamp with a lamp of the same style
and rating.
4. Reassemble in reverse order, ensuring the
gasket is in place.
Floodlight
Head
Wingscrew
Stake

90-OM1865-P1
90-OM1865
90-OM1865-P4
14
Kingsway House, Laporte Way,
Luton, Bedfordshire LU4 8RJ
Tel: 01582 544 510
PREMIER
RANGE
Thank you for your purchase of Premier Lights.
The Premier garden lighting range offers the ideal
lighting effect to any garden and feature
weatherproof transformers that can be positioned
outside safely. The transformer is equipped with
a photo-cell which switches the lights on at dusk
and off at dawn. Keep a copy of these
instructions for future reference.
Please read these instructions fully
before commencing the installation:
SAFETY INSTRUCTIONS
• These lights are only to be connected to a 12V
low voltage lighting system.
• Only use either lights provided with this kit or
compatible lights from the Homelec range.
• Only use the transformer supplied or a
transformer from the Homelec Premier garden
lighting range.
• Disconnect the power before changing a lamp
and ensure the lamp is cool before handling.
• Ensure the cable is routed so as not to be a trip
hazard.
• Ensure that the wattage of all the lights
combined does not exceed the rating of the
transformer.
• The transformer must be plugged in indoors.
• Only adjust the cable and lights when the power
is switched off.
INSTRUCTION MANUAL
CATALOGUE NUMBERS :
BHFG-1 and GF-1
If you chose to extend the cable, use Homelec
catalogue number CBLI-10 only. The longer the
cable, the dimmer the lights will be. We
recommend a maximum cable length of 30m,
however even at this length, the lights will not be
at their full brightness.
Light & Transformer Warranty
It is unlikely that this transformer and light
fittings will fail in normal use due to faulty
materials or workmanship within 5 years for the
transformer and within 10 years for the light
fittings. If it does, Homelec undertake to repair or
replace it provided it has been installed, used and
maintained correctly in accordance with these
instructions, such that the transformer has not
been subjected to repair, opened or taken apart.
This guarantee does not cover lamps and the
finish of any product. This does not affect your
statutory rights.
This product is subject to Homelec’s Standard
Terms & Conditions of Sale.
6 Flood Lights
6 Threaded Caps
6 Inserts
6 Ground Spikes
2 Fixing Screw Packs
7 10W 12V Halogen Lamps
1 96W Transformer
15m approx. Cable
Kit Contents :
BHFG-1
GF-1
Transformer
Input :
Output :
Flood Light Fittings
Lamp Voltage :
Lamp Rating :
Lamp Type :
Shrub Light Fitting
Lamp Voltage :
Lamp Rating :
Lamp Type :
230V~50Hz
12V~96W, 8A
12V~
10W max.
halogen
n/a
n/a
n/a
230V~50Hz
12V~96W, 8A
12V~
10W max.
halogen
12V~
20W max. MR16
halogen
Specification :
MFK6 GFLK3
2 Flood Lights
1 Shrub Light
3 Threaded Caps
3 Inserts
2 Ground Spikes
1 Fixing Screw Pack
3 10W 12V Halogen
Lamps
2 20W 12V Halogen
Lamp
1 96W Transformer
15m approx. Cable
This manual suits for next models
1
Popular Outdoor Light manuals by other brands

Kichler Lighting
Kichler Lighting HELEN 37536 instructions

Thorn
Thorn OXANE L installation instructions

esotec
esotec Solar Globe Light multicolor 20 operating instructions

mitzi
mitzi HL200201 ELLIS Assembly and mounting instructions

HEPER
HEPER TILA S AFX 3 Module Installation & maintenance instructions

Designplan
Designplan TRON 180 installation instructions


BEGA
BEGA 84 253 Installation and technical information

HEPER
HEPER LW8034.003-US Installation & maintenance instructions

HEPER
HEPER MINIMO Installation & maintenance instructions

LIGMAN
LIGMAN BAMBOO 3 installation manual

Maretti
Maretti TUBE CUBE WALL 14.4998.04 quick start guide

Maxim Lighting
Maxim Lighting Carriage House VX 40428WGOB installation instructions