Prentke Romich Company Look User manual

18735
Version 2.01
Eye Tracking System
User’s Guide
Accent®Devices with Empower™Software
Accent®Devices with NuVoice®Software

Look User’s Guide 2
Copyright and Trademark Information
© 2019-2020 PRC-Saltillo. Non-commercial reprint rights for clinical or personal use granted with inclusion of copyright notice. Commercial use prohibited; may not
be used for resale. Contact PRC-Saltillo for questions regarding permissible uses.
Accent, Empower, Look, NuEye, and NuVoice are trademarks of PRC-Saltillo.
The MINSPEAK®, SEMANTIC COMPACTION®, UNITY®, and UNIDAD® trademarks are under license from Semantic Compaction Systems, Inc. in the United States and
other countries.
PIXON® brand products are trademarks under license from Semantic Compaction Systems, Inc. in the United States and/or other countries.
Microsoft and Windows are registered trademarks of Microsoft Corporation in the United States and/or other countries.
Contact Information
Manufacturer
Authorized Representative in the EU
Importer
Prentke Romich Company
1022 Heyl Rd
Wooster, OH 44691, USA
Tel.: (330) 262-1984 · (800) 262-1984
Fax: (330) 262-4829
Email: info@prentrom.com
Web: www.saltillo.com
Prentke Romich GmbH
Karthäuserstr. 3
D-34117 Kassel, Germany
Tel.: (05 61) 7 85 59-0
Fax: (05 61) 7 85 59-29
Email: info@prentke-romich.de
Web : www.prentke-romich.de
Liberator Ltd
“Whitegates”, 25-27 High Street
Swinstead, Lincolnshire NG33 4PA, UK
Tel.: +44 (0) 1733 370 470
Fax: +44 (0) 1476 552 473
Email: info@liberator.co.uk
Web: www.liberator.co.uk
Document Version
18735v2.01 · 03/12/2020
For Accent devices with Empower software or NuVoice software

Look User’s Guide 3
Contents
Important Safety Guidelines ............................................................................................................................4
Introducing Your Look Eye Tracking System ....................................................................................................... 5
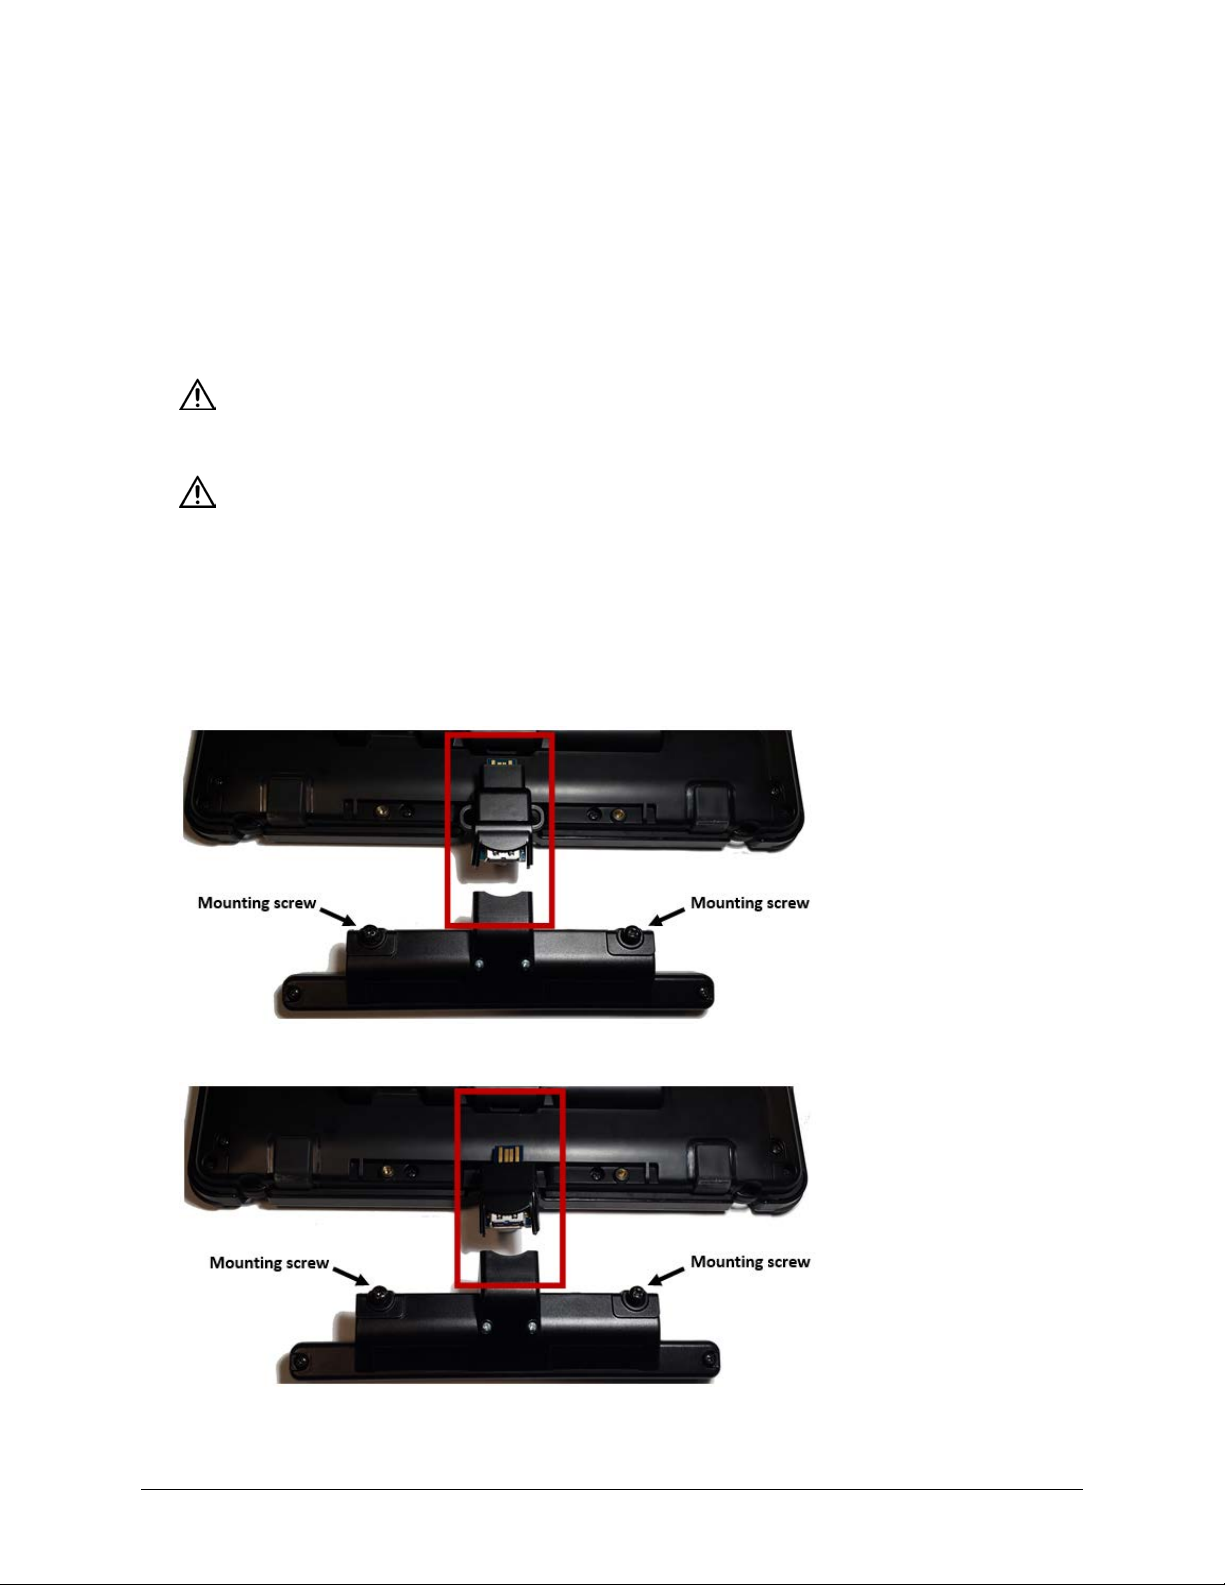
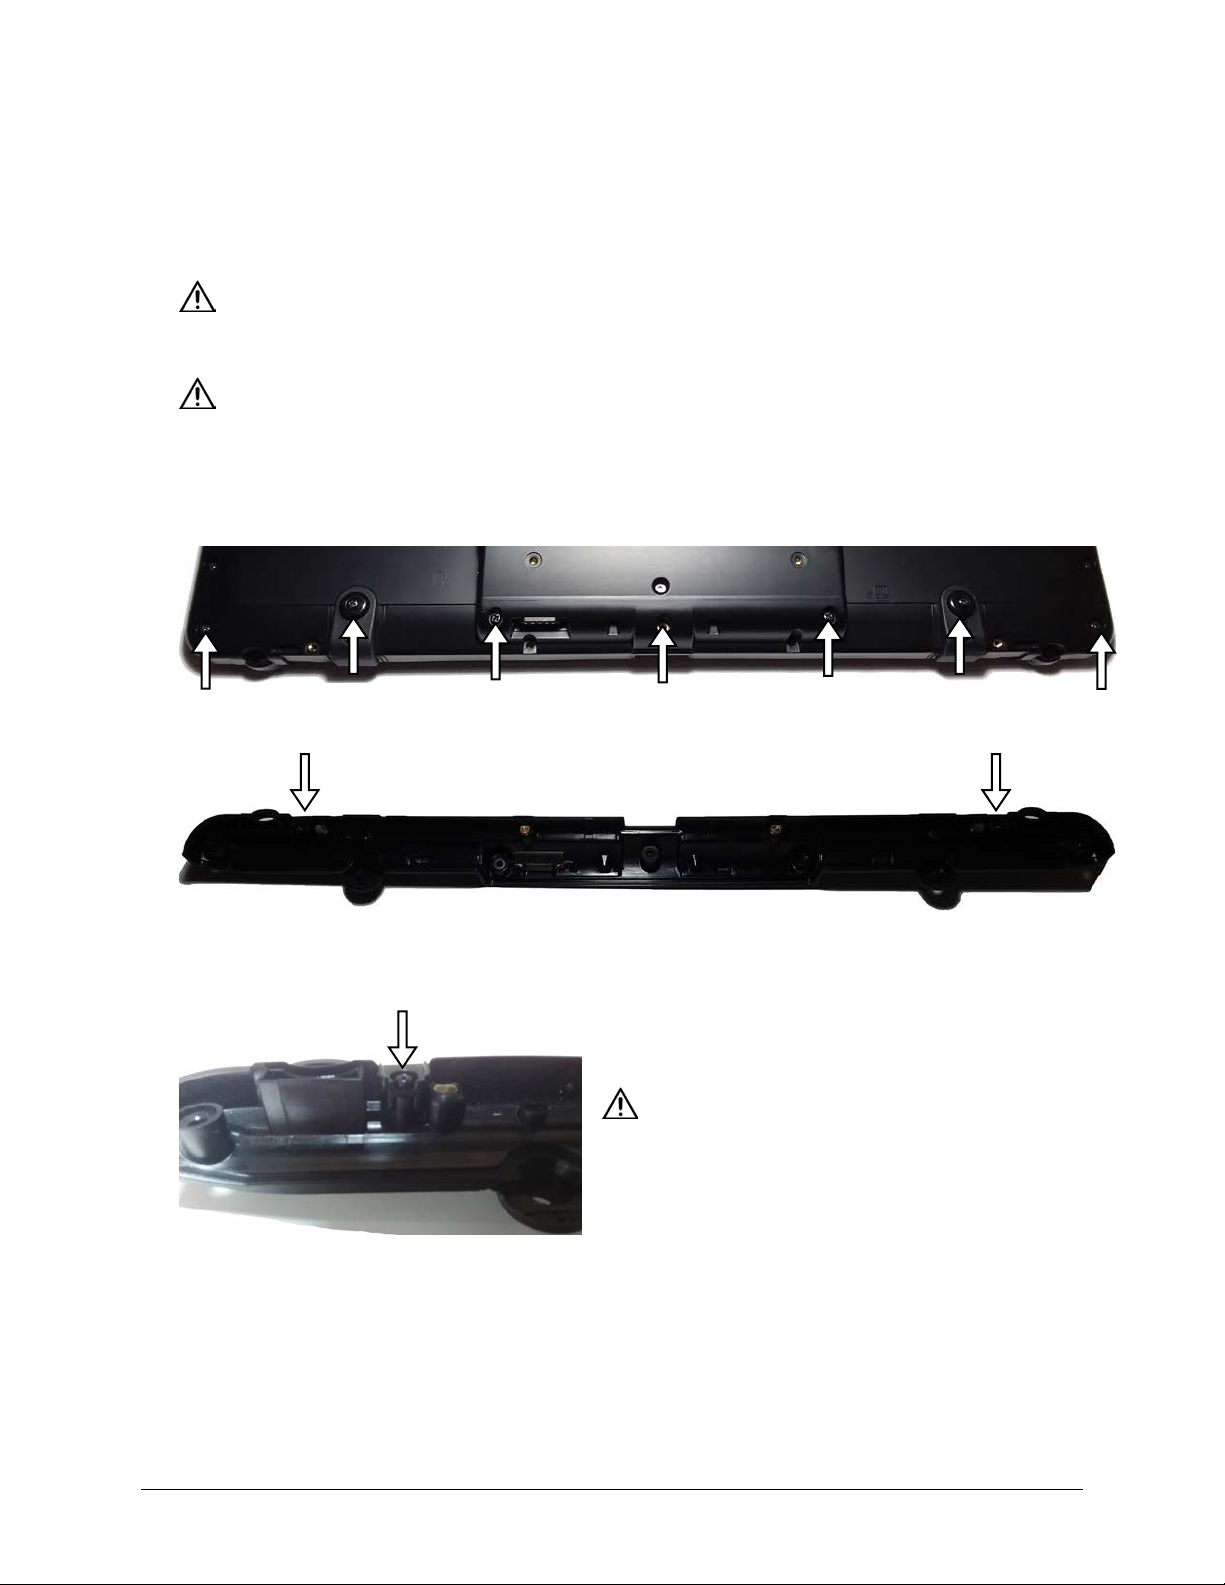
Attaching the Look Module: Accent 1000 .........................................................................................................6
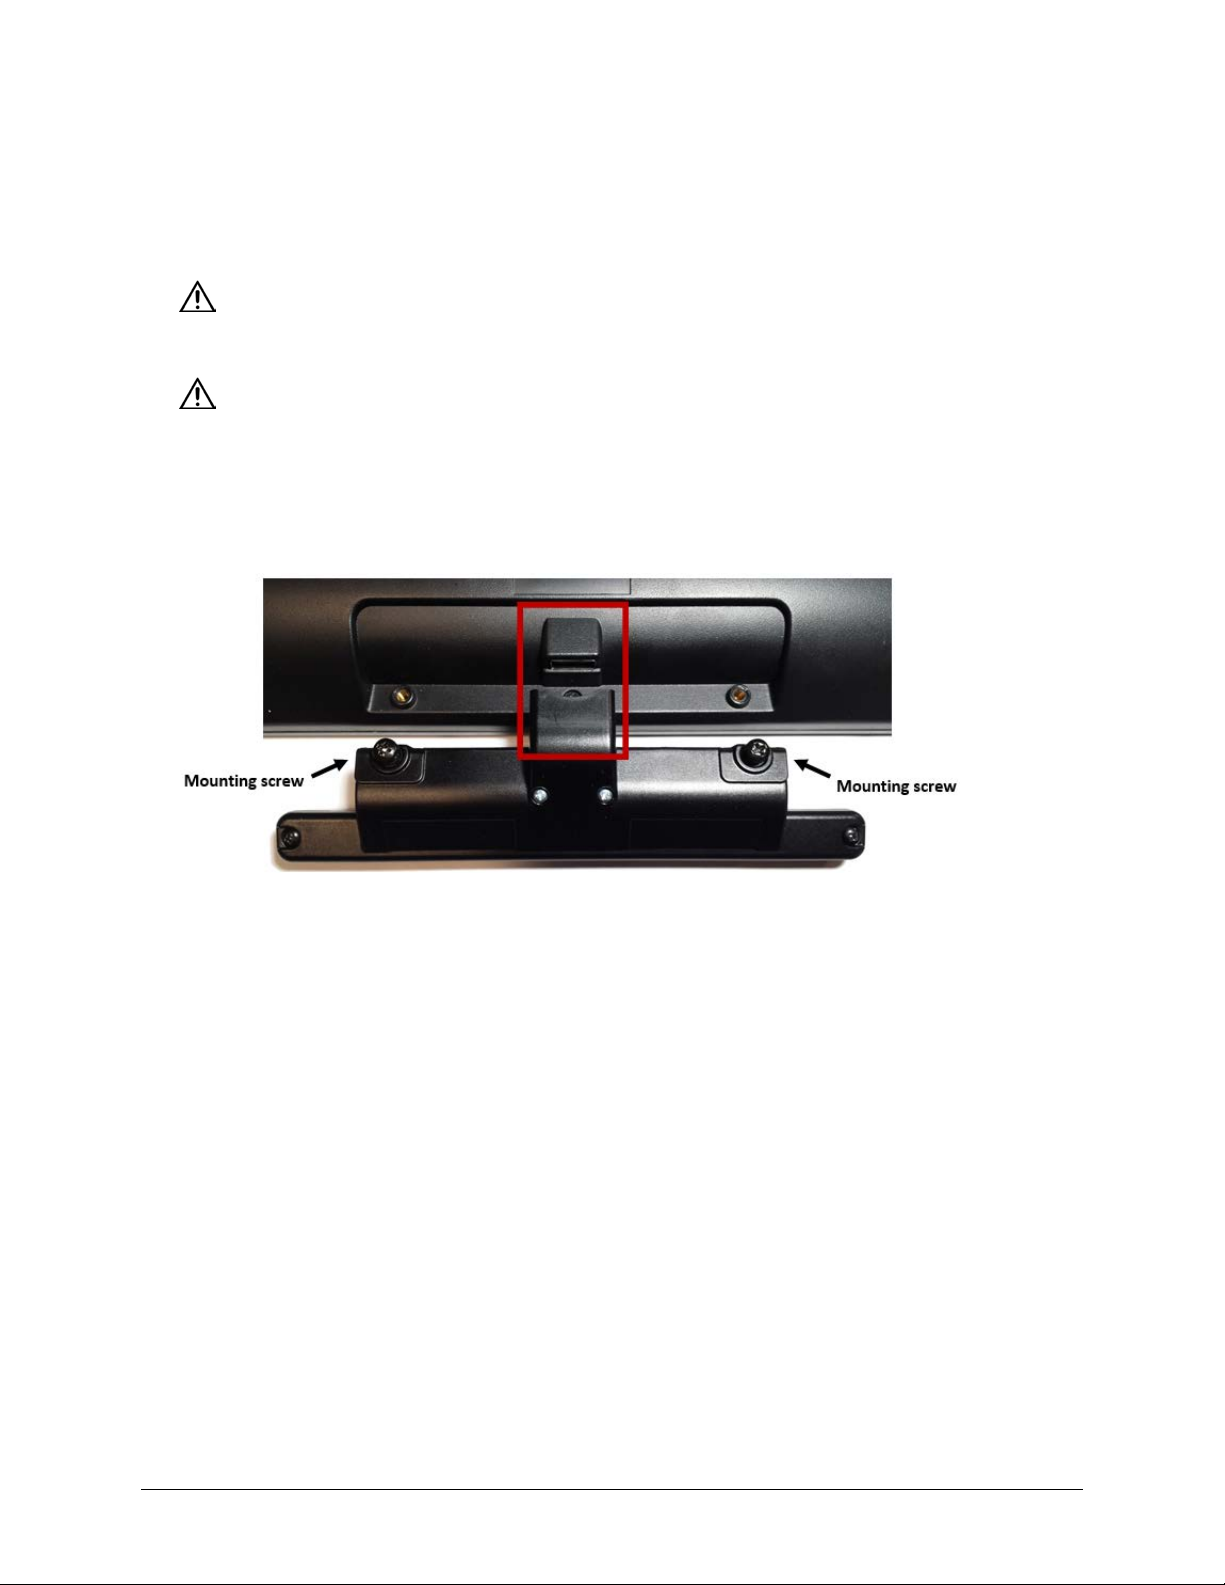
Attaching the Look Module: Accent 1400-20.....................................................................................................8
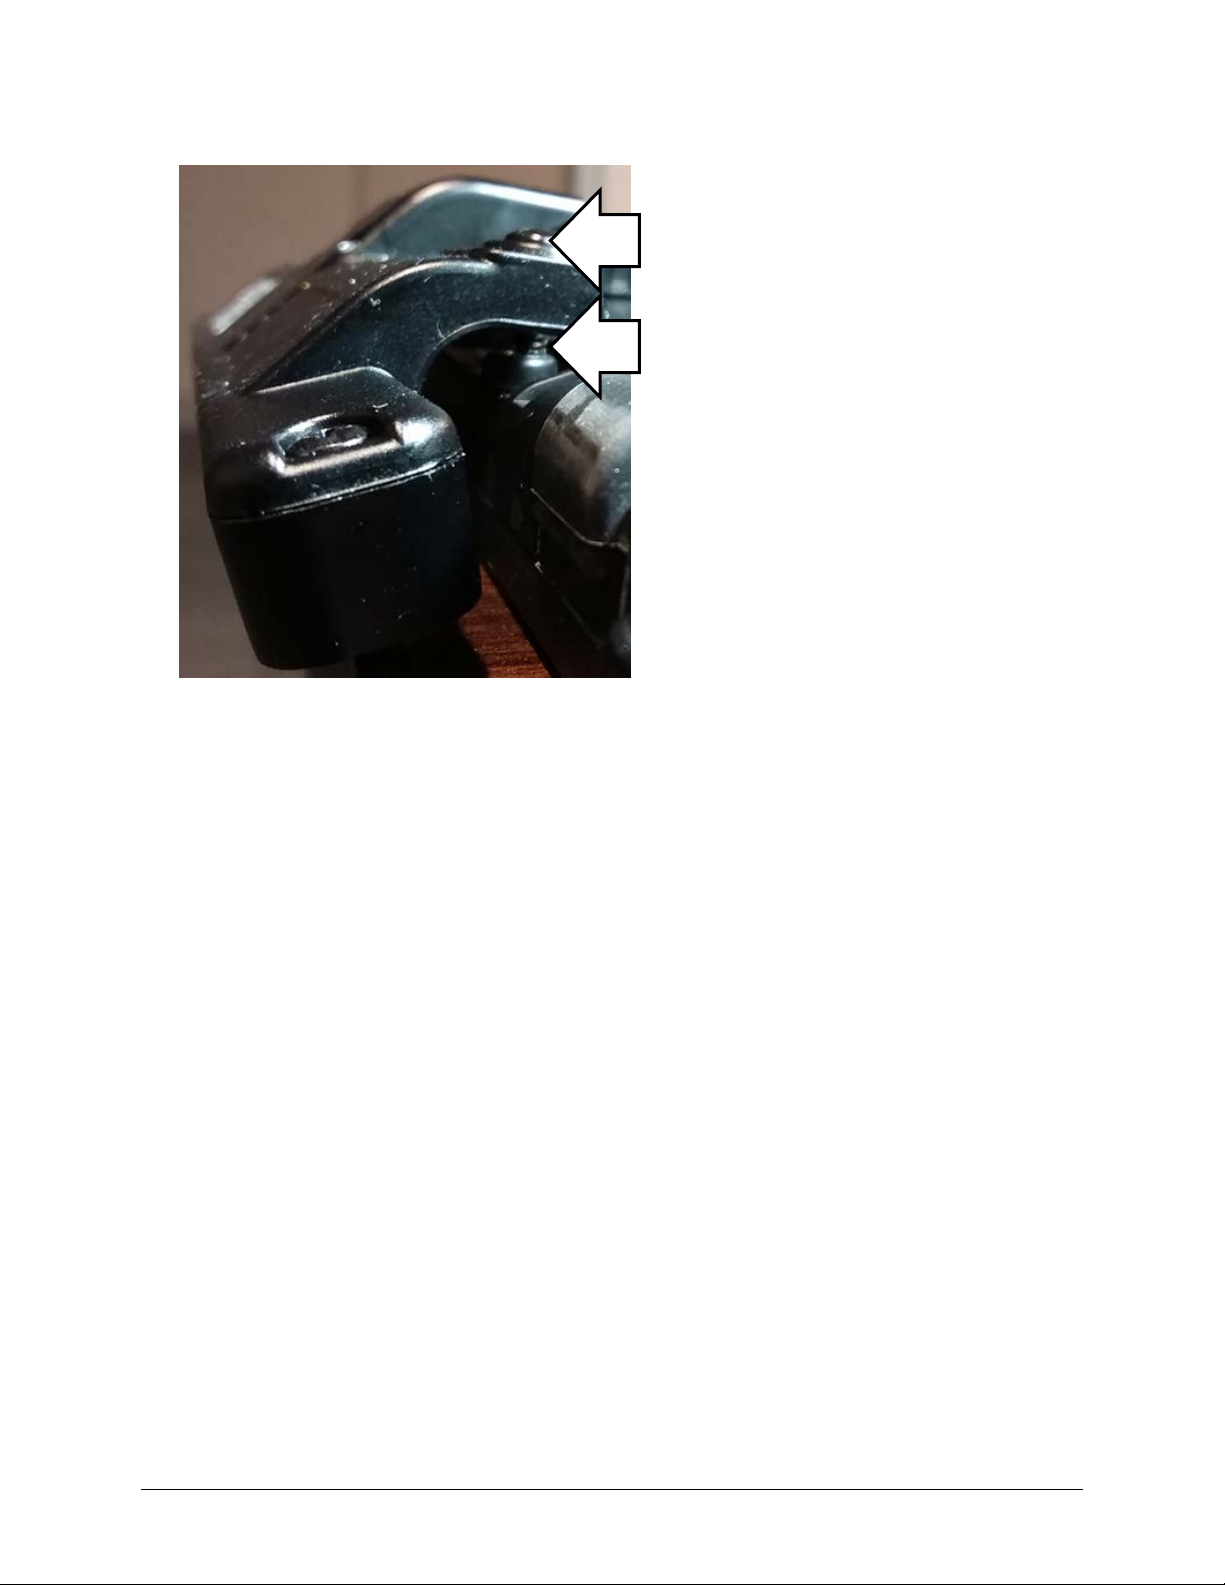
Attaching the Look Module: Accent 1400-30...................................................................................................10
Positioning the User and Eye Tracking System ................................................................................................12
Look Eye Tracking System Parameters .................................................................................................................12
Positioning Guidelines ..........................................................................................................................................13
Calibrating and Setting Up Eye Tracking in Empower.......................................................................................14
Starting Eye Tracking in Empower........................................................................................................................14
Using the Positioning Guide .................................................................................................................................14
Calibrating Eye Tracking .......................................................................................................................................15
Configuring Calibration Settings...........................................................................................................................16
Adjusting Eye Tracking Selection Settings ............................................................................................................17
Setting up Dwell Selection.............................................................................................................................17
Setting up Blink Selection ..............................................................................................................................18
Setting up Switch Selection ...........................................................................................................................18
Pausing and Resuming Eye Tracking.....................................................................................................................19
Observing the User’s Performance.......................................................................................................................19
Adjusting Eye Tracking Settings............................................................................................................................20
Adjusting Additional Eye Tracking Settings ..........................................................................................................21
Adding Eye Tracking Shortcuts .............................................................................................................................22
Adding a Positioning Shortcut .......................................................................................................................22
Adding a Tracking Shortcut ...........................................................................................................................23
Adjusting Additional Empower Settings ...............................................................................................................24
Adjusting Feedback Settings..........................................................................................................................24
Adjusting Button Padding..............................................................................................................................24
Adjusting the Action of Empty Buttons.........................................................................................................24
Calibrating and Setting Up Eye Tracking in NuVoice ........................................................................................25
Starting Eye Tracking in NuVoice..........................................................................................................................25
Using the Track Status Box ...................................................................................................................................26
Track Status Box ............................................................................................................................................26
Eye Tracking Positioning Markers .................................................................................................................27
Adjusting Positioning ............................................................................................................................................28
Correct Positioning ...............................................................................................................................................29
Calibrating the Look Eye Tracking System ............................................................................................................30
Calibrating for the First Time.........................................................................................................................30
Adjusting Calibration Settings .......................................................................................................................31
Using Calibration Menu Settings ...................................................................................................................32
Configuring a Selection Method...........................................................................................................................33
Choosing the Selection Type .........................................................................................................................33
Trying Out Your Settings................................................................................................................................34
Pausing Look Eye Tracking....................................................................................................................................35
Changing Pointer Settings ....................................................................................................................................36
Changing Tracking Settings...................................................................................................................................39
Changing Off-Screen Key Settings ........................................................................................................................40
Working with Profiles ...........................................................................................................................................42
Selecting and Loading a Profile .....................................................................................................................42
Managing Eyegaze Profiles............................................................................................................................43
Appendix A: Cleaning the Look Eye Tracking Module ......................................................................................45
Appendix B: Compliance Information................................................................................................................. 46

Look User’s Guide 4
Important Safety Guidelines
Emergencies
The device with the Look module attached is not intended to be an emergency call device or sole communication aid.
Cleaning, Maintaining, and Servicing
Do not attempt to service or maintain the device or Look module when they are in use. Disconnect the charger and turn off the
device before cleaning or disinfecting the device or module.
If the module is damaged, call Service for assistance. Do not attempt to make repairs yourself.
Accessories
Do not use accessories, detachable parts, or materials not described in this manual.
Do not use accessories, detachable parts, or materials in any other way than described in this user's guide.
Small Parts
When you are installing the Look module, loose screws can be a choking hazard.
If you install the Look module on an Accent 1000, loose adapters can be a choking hazard.
Small parts can present a choking or other hazard.
Interference
When operating the device and module in a medical environment, do not use with any product that is not medically approved.
Follow all rules for appropriate cell phone and wireless device use.
Do not use this module close to sources of RF/RFID radiation or you may encounter interference. Move away, if possible, from the source of
the interference.
Mounting and Positioning
A qualified person should analyze positioning to prevent repetitive stress injuries to the user.
A qualified person should install and adjust any mounts used, including switch mounts. Failure to install the mounting system
according to the manufacturer's instructions may result in an injury to the user.
Do not place the device with the module attached where it is difficult to operate or difficult to disconnect from the charger.
Damage
Do not use the module if the lens is cracked or broken.
Environment
Do not use the system in an environment in which explosive or flammable gases could be present.
Water
The device with the module is intended for use in normal communication situations. It is not waterproof, so use extreme caution
when using it around water. As with most electronic devices, you should never use the device when you are actually in the water (for
example, a pool or bath).
Fatigue
While the user is getting used to eye tracking, take frequent breaks to rest the user’s eyes and relax his or her concentration.
Some people may experience a certain amount of fatigue (due to intentional eye focusing and hard concentration) or even a dryness of
the eyes (due to less frequent blinking) when first getting used to eye tracking. If you are experiencing fatigue or dry eyes, start off slowly
and limit the length of your eye tracking sessions to your comfort level. Moisturizing eye drops can be helpful to combat dryness.
Seizures
Some people may have epileptic seizures triggered by light flashes or patterns. This may occur while presented successive pictures
or video material, even if they have never had a seizure before. Observe the individual using the system. Move the person away
from the system immediately and consult a physician if the individual shows the following or similar symptoms: involuntary
movements, disorientation, convulsions, loss of awareness, or altered vision.
Infrared Emissions
Your Look eye tracking system uses infrared (IR) technology. Certain medical devices are susceptible to disturbance by IR emissions.
Do not use the Look eye tracking system when in the vicinity of such susceptible medical devices. If you have questions about the
susceptibility of a medical device, consult the manufacturer of the medical device or your health care provider.
If you have questions about the susceptibility of a medical device to the infrared technology that is part of your eye tracking system,
consult the manufacturer of the medical device or your health care provider.

Look User’s Guide 5
Introducing Your Look Eye Tracking System
Look®is an eye tracking system that provides hands-free, switch-free access to an Accent® device, allowing
the user to select keys by gazing for a specified period of time to generate speech. The Look eye tracking
system is compatible with Accent 1400-20 models, Accent 1400-30 models, and Accent 1000 models that
have serial numbers 10000AC10 and higher or serial numbers between 5000AC10 and 9999AC10.
Before Using Your Look Eye Tracking System
Please be sure to view the Important Safety Guidelines on page 4.
Mounting Your Accent Device and Look Module
Mount your Accent device (with the Look module attached) to a wheelchair mount or table stand. If the
Look module did not come already attached to your device, you must attach it before you can start
using eye tracking.
•For instructions on attaching a Look module to an Accent 1000 device with a serial number
10000AC10 or higher or a serial number between 5000AC10 and 9999AC10, see “Attaching the
Look Module: Accent 1000” on page 6.
•For instructions on attaching a Look module to an Accent 1400 device, see “Attaching the Look
Module: Accent 1400-20” on page 8.
•For instructions on attaching a Look module to an Accent 1400 device, see “Attaching the Look
Module: Accent 1400-30” on page 10.
Additional Considerations
If you are using your Accent for the first time, plug in the battery charger.
When your Accent with the Look module attached is mounted on a wheelchair or a table stand and
the Accent is charged, you are ready to position the user, calibrate eye tracking, and configure a
selection method.

Look User’s Guide 6
Attaching the Look Module: Accent 1000
If you purchased the Look eye tracking system with your Accent 1000, the module is already attached to
the device. Proceed to Starting Eye Tracking on page 14.
If you purchased the module separately:
An extended-capacity battery was included in the package with the Look module. We recommend that you
replace the battery in your device with the extended-capacity battery.
Follow the instructions in this section to attach the module to your device. Follow the instructions that
came with the extended-capacity battery to replace your old battery. You will need a Phillips screwdriver.
The mounts used should be fitted by a qualified person. Failure to install the mounting system
according to the manufacturer's instructions may result in an injury to the user. Be certain that
the user's view is not obstructed by the mounting.
Loose screws and adapters can be choking hazards.
1. Place the Accent device face-down on a table or counter so that the USB port is near the edge of the
table or counter. This will make it easier to slide the Look module into place at the correct angle.
2. Insert the adapter into the USB port designed for the module on the back of the device.
3. Insert the module’s USB connector into the adapter.
Mounting the module on Accent 1000 models with serial numbers 10000AC10 and higher
Mounting the module on Accent 1000 model with a serial number between 5000AC10 and 9999AC10
4. Hold the module firmly in place and align the screws in the bracket with the holes in the device.

Look User’s Guide 7
5. Tighten the screws evenly to make sure the module attaches flat against the device.
Important! Be sure each screw is actually threading into the holes in the device.
6. Now you can place your Accent device on a wheelchair mount or a table stand. Your Look eye
tracking module is ready to use.
In this example, the head of the screw
is flat against the module bracket …
but the screw is not threaded all the way into
the hole in the device. The module sits unevenly
against the device and will not work properly.
If this happens, loosen the screw and make
sure it passes through both the upper and
lower holes before tightening.

Look User’s Guide 8
Attaching the Look Module: Accent 1400-20
If you purchased the Look eye tracking system with your Accent 1400, the module is already attached to
the device. If you purchased the module later, follow these instructions to attach it to the device. You
can attach the module to a device with or without a frame.
Note: You will need a Phillips screwdriver.
The mounts used should be fitted by a qualified person. Failure to install the mounting system
according to the manufacturer's instructions may result in an injury to the user. Be certain that
the user's view is not obstructed by the mounting.
Loose screws can be choking hazards.
1. Place the Accent device face-down on a table or counter so that the USB port is near the edge of the
table or counter. This will make it easier to slide the Look module into place at the correct angle.
2. Mount the Look module on your device by inserting the module’s USB connector into the USB port
designed for the Look module on the back of the device.
3. Hold the module firmly in place and align the screws in the bracket with the holes in the device.

Look User’s Guide 9
4. Tighten the screws evenly to make sure the module attaches flat against the device.
Important! Be sure each screw is actually threading into the holes in the device.
5. Now you can place your Accent device on a wheelchair mount or a table stand. Your Look eye tracking
module is ready to use.
In this example, the head of the screw
is flat against the module bracket …
but the screw is not threaded all the way into
the hole in the device. The module sits unevenly
against the device and will not work properly.
If this happens, loosen the screw and make
sure it passes through both the upper and
lower holes before tightening.

Look User’s Guide 10
Attaching the Look Module: Accent 1400-30
If you purchased the Look eye tracking system with your Accent 1400, the module is already attached to
the device. If you purchased the module later, follow these instructions to attach it to the device. You
can attach the module to a device with or without a frame.
Note: You will need a Phillips screwdriver.
The mounts used should be fitted by a qualified person. Failure to install the mounting system
according to the manufacturer's instructions may result in an injury to the user. Be certain that
the user's view is not obstructed by the mounting.
Loose screws can be choking hazards.
1. Place the Accent device face-down on a table or counter so that the USB port is near the edge of the
table or counter. This will make it easier to slide the Look module into place at the correct angle.
2. Remove the seven screws that hold the bottom cover in place and remove the cover.
3. From the bottom cover, remove the screws that hold two small inserts in place. Remove the inserts.
The small inserts are potential
choking hazard
s when removed
from the cover. Store them in a
safe place.
Detailed view:
Remove the screw and then remove
the insert. Repeat for the other insert.

Look User’s Guide 11
4. From the device, remove the two screws that hold the small port cover in place. Remove the small
port cover.
5. Insert the Look module’s USB connector into the USB port designed for the Look module.
6. Insert two small flathead screws through the module bracket holes and into the holes in the device.
7. Using the two screws that you removed from the small port cover, insert the screws through the
module bracket holes and into the holes in the device.
8. Replace the bottom cover and reinsert and tighten the seven screws to hold the cover in place.
9. Now you can place your Accent device on a wheelchair mount or a table stand. Your Look eye tracking
module is ready to use.
Important! Tighten the screws evenly to make
sure the module attaches flat against the device.
Be sure each screw is actually threated into the
holes in the device.
The small port cover is a potential
choking hazard when removed from
the device. Store it in a safe place.

Look User’s Guide 12
Positioning the User and Eye Tracking System
Select the Tracking is ON/Tracking is OFF dropdown and select Pause. The dropdown will show Tracking is
OFF. You are now ready to position the user and the Look module.
The positioning the eye tracking system in relation to the user is extremely important. The goal of
positioning is to achieve a stable eye image for the Look eye tracking system to track. Because of this,
you will probably need to try out different positions.
Look Eye Tracking System Parameters
The Look eye tracking system has an imaginary “eye box" that measures approximately 12" x 14" x 14".
As long as the user’s eyes are within this area, they are in the view range of the system. Position the user
between 18 inches and 32 inches from the Accent device screen. The optimal distance for most users is
22 to 26 inches. The optimal distance varies by user.
If the user moves in and out of the view area, the system will "remember" him or her. This means that
once you set up the system you should not have to recalibrate it because of the user’s body movement.
Imaginary Eye Box (or Gazing Area)

Look User’s Guide 13
Positioning Guidelines
Meeting these positioning guidelines will help you achieve success with the Look eye tracking system.
•Both eyes must be within the eye box; however, one eye will work.
•The user should be approximately 22 to 26 inches from the Accent device’s screen.
•The user’s nose should be aimed at the midpoint or upper two-thirds of the screen.
•The user’s face should be parallel to the screen. If the user is tilted due to positioning or posture,
the Accent device should be tilted at a similar angle.
•There should be no obstructions between the user’s face and the Accent device and Look
module.
Typically, a communication partner helps during the eye tracking setup process.
•The communication partner can pause and resume eye tracking by touching with a finger the
miniaturized positioning guide in the Multi-bar. Blue indicates eye tracking is active. Grey
indicates eye tracking is paused.
•While selecting menu options the communication partner can touch the with a finger.

Look User’s Guide 14
Calibrating and Setting Up Eye Tracking in
Empower
Note: Accent devices ship with two software options—Empower and NuVoice. Choose which software to
use based on your preferences and the features available. For information on how to use eye tracking with
NuVoice software, please see “Calibrating and Setting Up Eye Tracking in NuVoice”, beginning on page 25.
Starting Eye Tracking in Empower
Note: Eye Tracking appears as a selection only if you have an eye tracking module connected to your device.
To use eye movement to control your device, select Menu > Toolbox > User Settings > Access Method >
Eye Tracking.
•The Eye Tracking window displays the positioning guide with calibration and eye tracking settings.
•A Tracking is ON/Tracking is OFF dropdown appears at the top of the screen.
Once you configure eye tracking as the access method for a user, eye tracking is active and all settings
saved for that user take effect immediately.
Recommendation: While the user is getting used to eye tracking, take frequent breaks to rest
the user’s eyes and relax his or her concentration.
Using the Positioning Guide
When you select Eye Tracking from the Access Methods window, the Eye Tracking window displays the
positioning guide with calibration and eye tracking settings.
Use the positioning guide to make sure the eye tracking module is registering the user’s eyes. Green
indicates good positioning and red indicates poor positioning. When two medium green dots are
displayed and stable, the user is within the positioning box and ready to calibrate.
Note: The dots do not need to be in the center of the box; the system is registering the user’s eyes as
long as the dots are green.
If the user closes one eye or it is obstructed, the corresponding dot disappears.
If the user moves farther away or closer, the dots decrease or increase in size. The dots turn red if the user
moves too far back, too close, or too far off to the side. The tracking box shows the user’s distance from
the device.
When the user is positioned correctly, “Ready to calibrate” appears.

Look User’s Guide 15
Calibrating Eye Tracking
Calibration is the process by which eye tracking adjusts to the eyes of the person using it. It helps
determine where the user is looking on the screen.
When the positioning guide shows “Ready to calibrate”, select Calibrate Now from the Eye Tracking
window. A solid colored screen will appear, and the user will be shown a sequence of points. Have the
user focus on the center of each point as it appears until the next point appears.
When the user finishes focusing on points, the Calibration Results window opens.
If the results are unsatisfactory, select Recalibrate and try again. The user may need several tries to
obtain an accurate calibration.
Recommendation: Be sure to take breaks to avoid fatiguing the user or losing his or her
attention. If
Default calibration settings will be used unless you change them in Calibration Settings. For information on
configuring the number of calibration points and other eye tracking settings, see “Adjusting Eye Tracking
Selection Settings” and “Adjusting Eye Tracking Settings”.
To cancel a calibration:
To cancel a calibration, do any of the following:
•Tap the screen with your finger.
•Stop looking at the display. The calibration will time out.
•Finish the calibration and then perform another, more accurate, one.

Look User’s Guide 16
Configuring Calibration Settings
Calibration settings can be changed to improve the user experience. From the Eye Tracking window,
select Calibration Settings and then select the Settings tab.
Setting the Number of Calibration Points
Number of Calibration Points determines the number of stimulus points the user will look at during
calibration. The available settings are 0, 1, 2, 5, and 9; the default is 5. The more points you have to
follow, the more accurate the calibration will be.
The setting 9, for example, displays a sequence of nine stimulus points during the calibration process:
one at each corner, one at the top, one at the bottom, one on each side, and one in the middle. If you
select 1, only one stimulus point will be displayed for the calibration process.
Hint: If visual attention is poor, try using 0, 1, or 2 calibration points. This is a quick and easy way
to get started and get the individual used to using his or her eyes for control.
Setting the Active Eye
Select which of the user’s eyes will be recognized during the calibration process.
•If both of the user’s eyes function within normal limits, select Both.
•If one of the user’s eyes is more controlled than the other or if one eye is obstructed, select Left
Only or Right Only.
Setting the Background Color
Select the background color for the calibration screen.
Selecting and Resizing the Stimulus Image
From the Eye Tracking window, select Calibration Settings and then select the Stimulus tab. Select the
image the user’s eyes will follow during calibration.
1. Select the Stimulus Type. If you select one of the animated images, the stimulus image will be
animated during calibration.
2. Adjust the Stimulus Size. Move the slider or use the +and –buttons to select the size you want.
Available sizes are S (small), M (medium), L (large), and XL (extra large).
3. When you finish changing calibration settings, select Finished.
Recommendation: When initially setting up eye
tracking, adjustments are commonly made to the
stimulus type and number of calibration points. It
may take several tries to obtain an accurate
calibration. Be sure to take breaks to avoid
fatiguing the user or losing his or her attention.

Look User’s Guide 17
Adjusting Eye Tracking Selection Settings
Select Menu > Toolbox > User Settings > Access Method > Eye Tracking. From the Eye Tracking window,
select Eye Tracking Settings. The Eye Tracking window opens to the Selection tab.
Three methods are available for selecting a button on the screen.
Dwell: Select a button by dwelling on it. Buttons are selected automatically according to the Dwell
Time you choose.
Blink: Select a button by blinking volitionally. Use the Minimum Blink Duration and Maximum Blink
Duration sliders to adjust the amount of time you must close your eyes for the eye tracking system to
register a blink.
Switch:The user moves the cursor with his or her eyes and makes selections by activating a switch.
Use the slider to adjust switch selection time.
Setting up Dwell Selection
Selection Type
In the Eye Tracking window, with the Selection tab selected, select the Dwell tab. When Dwell is
selected, you can select a button by dwelling on it. Buttons are selected automatically according to
the dwell time you choose.
Dwell Time
Adjust the amount of time you need to gaze on a button to select it. Dwell time ranges from 0.0 to 10.0.
Repeat Delay
Repeat delay allows you to set how soon a button press will begin repeating when you continue to gaze
at a button beyond its initial dwell time. This setting is only available when the Dwell tab is selected.
Repeat Rate
Repeat Rate is the speed at which a button will repeat itself when you dwell on it. This setting is only
available when the repeat delay is set higher than 0.0.

Look User’s Guide 18
Setting up Blink Selection
When Blink is selected, you can blink to make a selection. Minimum Blink Duration and Maximum Blink
Duration settings are available. The eye tracking unit will ignore blinks that are of shorter or longer
duration than the minimum and maximum settings.
Minimum Blink Duration
Adjust the minimum amount of time you must close your eyes for the eye tracking unit to register a
blink. The minimum duration must be less than the maximum duration. Values range from 0.0 to 9.8.
Hint: Try using the default setting. If you need to change the setting, the minimum duration
should be long enough that normal blinks do not activate a button.
Maximum Blink Duration
Adjust the maximum amount of time your eyes can be closed and still make a selection when they open.
The maximum duration must be greater than the maximum duration. Values range from 0.1 to 10.00.
Hint: Try using the default setting. If you need to change the setting, the maximum duration
should be long enough that you can finish a blink before the maximum time has accumulated.
You do not want to make the maximum duration time so long that if your head turns away from
the screen and then back again, the system sees that as a selection.
Setting up Switch Selection
When you choose the Switch selection type, you can use a switch to make a selection. Adjust switch
settings as follows:
Switch Selection Time
Adjust how long you must hold the switch to make a selection. Selection time ranges from 0 to 10
seconds.
Next Button Selection Delay
Adjust how long you must wait after releasing the switch before making your next selection. Selection
delay ranges from 0 to 10 seconds.
Repeat Delay
Adjust how long to hold the switch down before the button selection begins to repeat itself.
Repeat Rate
Adjust the speed at which a button selection will repeat after the repeat delay has been met.

Look User’s Guide 19
Pausing and Resuming Eye Tracking
When eye tracking is the current access method, a Tracking is ON/Tracking is OFF dropdown appears at
the top of the screen.
When eye tracking is active, the button shows “Tracking is ON”.
When you dwell on the button, “Pause” is displayed. To pause eye tracking, select Pause;
the button changes to “Tracking is OFF”.
When eye tracking is paused, the button shows “Tracking is OFF”.
When you dwell on the button, “Resume” is displayed. To resume eye tracking, select
Resume; the button change to “Tracking is ON”.
When you want to pause eye tracking but still be able to make menu selections with a finger, select
Pause. Select Resume to resume using eye tracking. During setup, it is best to pause eye tracking until
you are ready to calibrate.
Show or hide the Tracking is ON/Tracking is OFF dropdown
Select Menu > Toolbox > User Settings > Access Method > Eye Tracking Settings and then select the
Settings tab. Select the Pause/Resume Dropdown toggle to turn the dropdown on or off.
Communication Partner: Quickly pause and resume eye tracking
The communication partner can pause and resume eye tracking by touching with a finger the
miniaturized positioning guide in the Multi-bar. Blue indicates eye tracking is active. Grey indicates eye
tracking is paused.
Observing the User’s Performance
Observe the user’s performance while using the default eye tracking settings and note any difficulties
the user is experiencing. This will help you decide if adjustments are needed. If you need to adjust some
settings, use the information in the following sections.

Look User’s Guide 20
Adjusting Eye Tracking Settings
From the Eye Tracking window, select Eye Tracking Settings and then select the Tracking tab.
Filter Method
The filter methods help smooth the movement of the cursor.
Setting Description
Stream The cursor moves with the eye wherever you look on the screen. This method works well for
most users and at all ranges of smoothing.
Snap Cursor movement is “sticky” as it snaps to the nearest selectable item within a set range. This
method works well for users who have significant shifts in gaze—poor visual attention, frequent
and constant head movement, or severe nystagmus.
Group This method works well for users who have frequent shifts in gaze (mild to moderate
nystagmus) around a central point.
Stream/Snap Cursor movement changes as needed between stream and snap.
Stream/Group Cursor movement changes as needed between stream and group.
Smoothing
When you select a smoothing value, the eye tracking unit will continually average the last X number of
eye movement signals it receives. This helps to smooth pointer movements. The lower the number of
samples the closer the cursor follows the actual gaze-point. The higher the number of samples the more
the cursor lags behind the actual gaze-point. If the cursor/pointer is very jumpy, increase the number of
samples. The higher you increase this number, the smoother (but slower) the pointer movement will be.
Values range from 1 to 10.
Table of contents
Other Prentke Romich Company GPS manuals