President's Choice PC25774 User manual

100,000 BTU double lid gas grill
instructions manual model # PC25774
LOBLAWS INC.,
1 PRESIDENT’S CHOICE CIRCLE,
BRAMPTON, ONTARIO L6Y 5S5 CANADA © 2008

SAVE THESE INSTRUCTIONS FOR
FUTURE REFERENCE. IF YOU ARE
ASSEMBLING THIS UNIT FOR SOMEONE
ELSE, GIVE THIS MANUAL TO HIM OR
HER TO SAVE FOR FUTURE REFERENCE.
FOR CUSTOMER SERVICE, PLEASE CALL 1-877-630-5396 (TOLL-FREE),
MONDAY THROUGH FRIDAY FROM 10:00 AM TO 7:00 PM (EST).
DO NOT RETURN TO PLACE OF PURCHASE.
DANGER: If you smell gas:
1. Shut off gas to the appliance.
2. Extinguish any open flame.
3. Open lid.
4.
If odour continues, keep away from the appliance and
immediately call your gas supplier or your fire department.
WARNING:
Failure to follow these instructions could result in fire
or explosion which could cause property damage,
personal injury or death.
2
1. Do not store or use gasoline or other flammable
liquids or vapours in the vicinity within 7.62 m/25 ft
of this or any other appliance.
WARNING:
Improper installation, adjustment, alteration, service or
maintenance can cause injury or property damage.
Read the installation, operation and maintenance
instructions thoroughly before installing or servicing this
equipment.
DANGER:
Failure to follow these instructions could result in a
fire or explosion that could cause property damage,
personal injury or death.
DANGER:
DO NOT use gas grill for indoor cooking or heating.
TOXIC fumes can accumulate and cause asphyxiation.
DO NOT use in or on boats or recreational vehicles.
WARNING:
FOR YOUR SAFETY:
For outdoor use only (outside any enclosure).
3

GRILL OPERATION 1-2-3
Before grilling:
1. Keep your grill a safe distance away from
your property.*
2. Always perform a leak-test on all connections
and hoses.*
3. Keep children away from the grill.
During grilling:
To avoid tripping safety valves, please follow
these instructions carefully!
1. First open lid and turn gas tank on slowly.
2. Turn only one knob on at a time when lighting
up the grill.
3. Use protective gloves when grill gets hot.
*Please refer to the Owner’s Manual for details.
After grilling:
1. Burn grill for 10-15 minutes to burn off food residues.
2. Wait until the grill is completely cooled before
closing lid.
3. Clean up grease build-up and cover your grill.
4

SAFETY INSTRUCTIONS
Always read and understand the WARNINGS and
INSTRUCTIONS that are contained in this manual
before attempting to use this gas barbecue grill, to
prevent possible bodily injury or property damage.
Always keep this manual for convenient future reference.
TABLE OF CONTENTS
SECTION ONE
Safety instructions .................................................................................6
General information............................................................................. 12
SECTION TWO
Parts list / Description ......................................................................... 13
Assembly instructions ........................................................................... 15
SECTION THREE
Safety ..............................................................................................26
Natural gas connection........................................................................27
Leak-testing........................................................................................29
SECTION FOUR
Lighting instructions .............................................................................30
Excess flow safety valve reset ................................................................34
SECTION FIVE
Cleaning...........................................................................................35
Troubleshooting ..................................................................................37
SECTION SIX
Limited warranty ................................................................................. 41
Read this Owner’s Manual carefully and completely before using your grill
to reduce the risk of fire, burn hazard or other injury.
5

SECTION ONE
SAFETY INSTRUCTIONS
NOTE: The use and installation of this product
must conform to local codes. In the absence of
local codes, use the National Fuel Gas Code,
ANSI Z223.1/NFPA54. Reference to Natural Gas
and Propane Installation code CSA B149.1 or
Propane Storage and Handling code B149.2
IMPORTANT NOTICE: READ ALL INSTRUCTIONS
PRIOR TO ASSEMBLY AND USE.
Safety First!
Read and understand all warnings and precautions
prior to operating your grill.
WARNING:
1. This grill is for outside use only. It should not
be used in a building, garage or any other
enclosed area.
2. The use of alcohol, prescription or non-prescription
drugs may impair an individual’s ability to properly
assemble or safely operate this appliance.
6

3. Always open the grill lid carefully and slowly
as heat and steam trapped within the grill could
cause severe burns.
4. Always place your grill on a hard and level
surface far away from combustible materials
and structures. An asphalt or blacktop surface
may not be acceptable for this purpose.
5. Do not leave a lit grill unattended.
6. Keep children and pets away from the grill
at all times.
7. This is not a tabletop grill. Do not place this grill
on any type of tabletop surface.
8. Do not use the grill in high winds.
9. This grill must be used with natural gas only.
10. Do not attempt to attach this grill to the
self-contained propane system of a camper,
trailer, motor home or house.
11. Do not use charcoal or lighter fluid.
12. Do not use gasoline, kerosene or alcohol
for lighting.
13. This outdoor gas appliance is not intended
to be installed in or on recreation vehicles
and/or boats.
7

14. Do not attempt to move the grill while it is lit.
15. Do not use the grill unless it is COMPLETELY
assembled and all parts are securely fastened
and tightened.
16. Keep combustible items and surfaces at least
60.96 cm/24" away from the grill at all times.
DO NOT use this gas grill or any gas product
under any overhead enclosure or near any
unprotected combustible constructions.
17. Do not use in an explosive atmosphere.
Keep grill area clear and free from combustible
materials, gasoline and other flammable vapours
and liquids.
18. Do not attempt to use or assemble with missing
or damaged parts. Contact customer service for
a replacement.
CAUTION: PREVENTION OF BURNS
1. To avoid burns, do not touch metal parts of
the grill until they have completely cooled for
at least 45 minutes or unless you are wearing
protective gear such as pot holders, protective
gloves or mittens.
2. Do not alter the grill in any manner.
8

3. Clean and inspect the hose before each use.
If there is evidence of abrasion, wear, cuts
or leaks, the hose must be replaced prior to
operation. The replacement hose assembly
should be in accordance with the
manufacturer’s specifications.
4. Move gas hoses as far away as possible
from hot surfaces and dripping hot grease.
SAFE LOCATIONS FOR USE OF THIS
OUTDOOR GRILL
DANGER:
Never use this outdoor grill inside any building,
garage, shed or breezeway, or inside any boat,
trailer or recreational vehicle, to prevent a possible
fire and to prevent the possibility of carbon monoxide
poisoning or asphyxiation.
WARNING:
1. Do not use this appliance under overhead
combustible surface or covered area
(e.g., awnings, umbrellas, porches or gazebos).
9

2. Always confirm that this grill is not positioned
under the overhang of a house, a garage or other
structure before lighting it. An overhang will serve
to deflect flare-ups and radiated heat into the
structure itself, which could result in a fire.
3. Always confirm that this grill is positioned more
than 60.96 cm/24" away from any combustible
materials or surface before lighting it, and that no
gasoline or other volatile substances are stored in
the vicinity of this grill.
4. The temperature of a grease fire or of the
radiated heat might otherwise be sufficient to
ignite nearby combustible or volatile substances.
5. Always locate this grill where there will be ample
combustion and ventilation air, but never position
it in the direct path of a strong wind.
6. Never allow the grill to operate while unattended,
to prevent uncontrolled grease fires from erupting.
7. Never attempt to move this grill while it is in
operation or while it is still hot, to prevent possible
personal injury.
8. Never store or use gasoline or other flammable
or volatile substances in the vicinity of this grill
10

or in the vicinity of any other heating-generating
appliance, because of the danger of starting a fire.
9. Always confirm that the installation of this grill
conforms with the requirements of all local codes
or, in the absence of applicable local codes,
with either the National Fuel Gas Code,
ANSI Z223.NFPA 54 or CAN/CGA-B149.2.
DANGER: GAS SAFETY
Natural gas
is flammable and hazardous
if
handled improperly. Become aware of its
characteristics before using any natural gas product.
• Natural gas characteristics: Flammable, explosive
under pressure, lighter than air and settles in pools
in high areas.
• In its natural state, natural gas has no odour.
For your safety, an odorant has been added.
• This grill is shipped from the factory for natural gas
use only.
CAUTION:
• It is essential to keep the grill’s valve compartment,
burners and circulating air passages clean.
11

venturi tube
valve nozzle
• Inspect the grill before each use.
1. Inspect all hoses and connections and
make certain they are secure.
2. Check and clean the burner venturi tubes for
spiders and insect nests by removing the burner
and inserting a bottle brush cleaner into each
tube to make sure the passage is clear.
A clogged tube can lead to a fire beneath the grill.
3. Ensure that the valve nozzle is pointing straight
and completely inserted into the venturi tube.
GENERAL INFORMATION
1. A natural gas hose is required for operation.
2. This gas grill is NOT intended for commercial use.
12
SECTION TWO
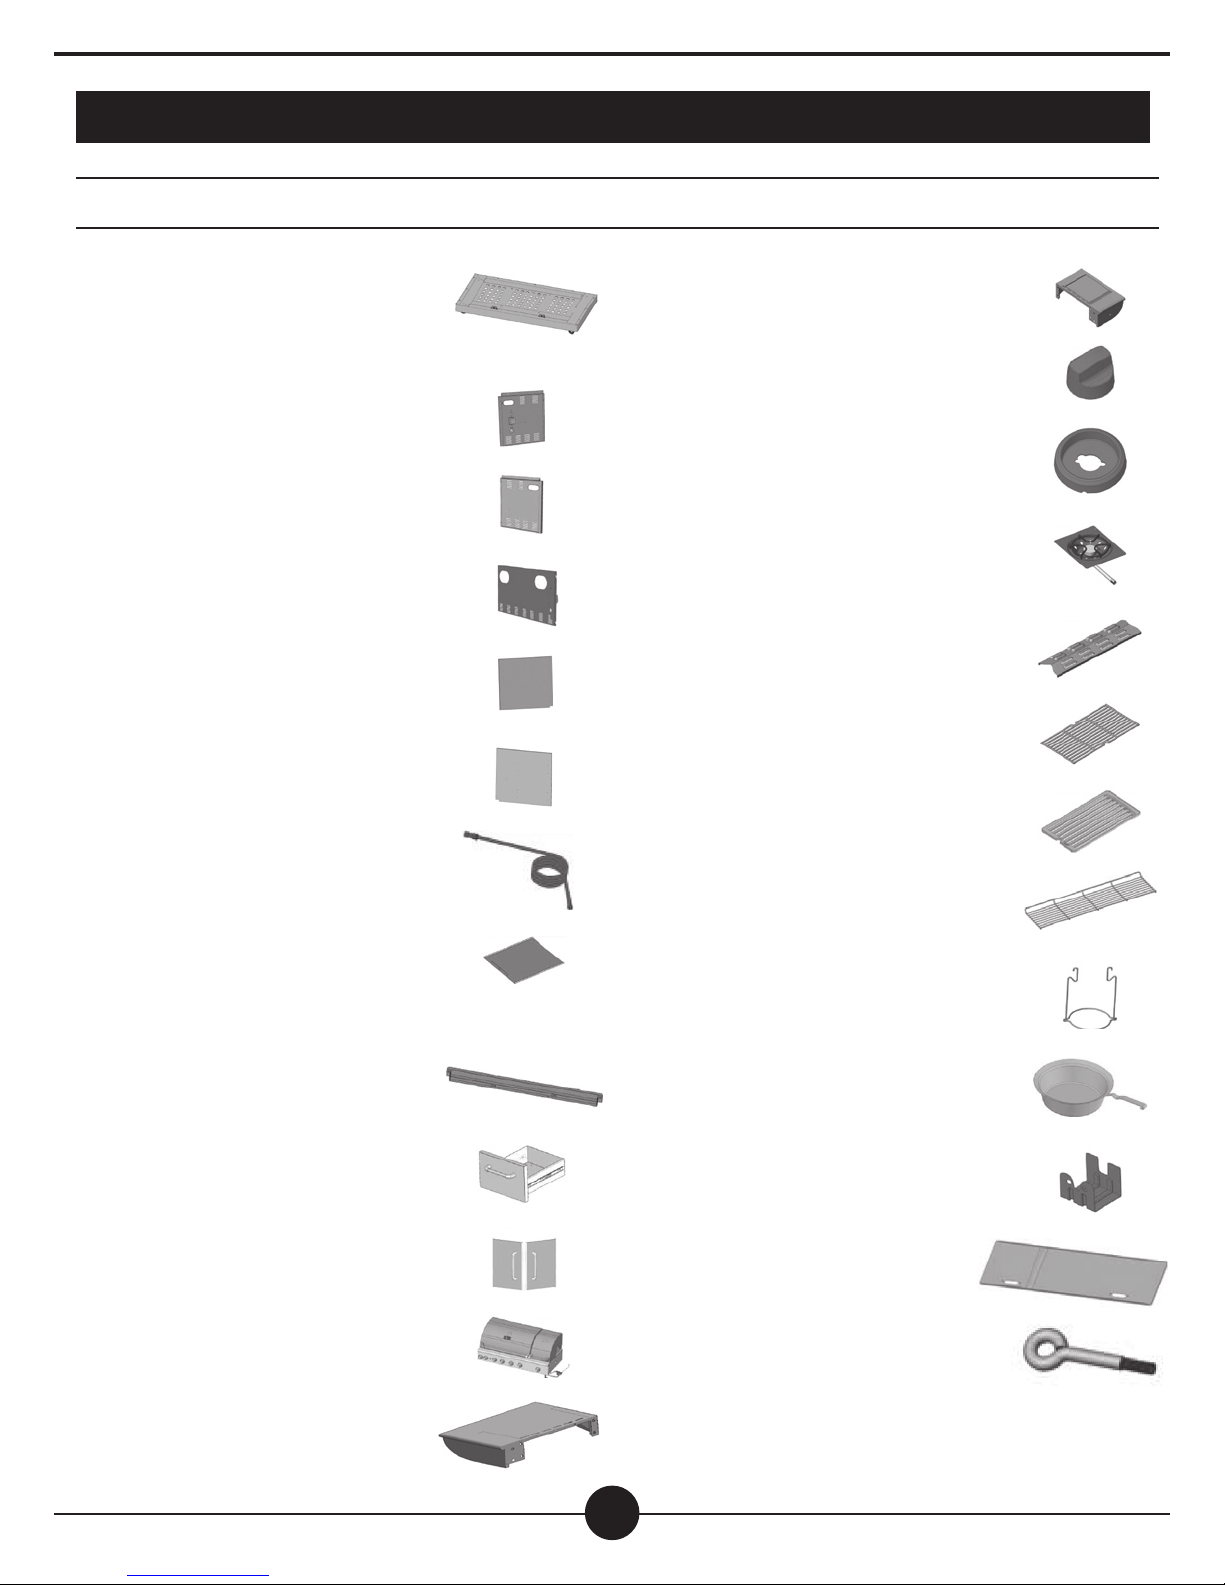
PARTS LIST / DESCRIPTION
13
14. right side shelf, 1 pc
15. side burner knob, 1 pc
16. side knob seat, 1 pc
17. side burner assembly, 1 pc
18. flame tamer, 5 pcs
19. cooking grid, 3 pcs
20. searing grid, 1 pc
21. warming grid, 1 pc
22. grease cup support, 2 pcs
23. grease cup, 2 pcs
24. motor support, 1 pc
25. grease pan, 1 pc
26. grease pan stopper, 1 pc
1. bottom panel assembly,
1 pc
2. left side panel, 1 pc
3. right side panel, 1 pc
4. back panel, 1 pc
5. left drawer support, 1 pc
6. right drawer support, 1 pc
7. natural gas hose, 1 pc
8. spare cylinder stopper,
2 pcs
9. front beam, 1 pc
10. drawer, 2 pcs
11. door, 2 pcs
12. body assembly, 1 pc
13. left side shelf, 1 pc

A. bolt (M6x20), 4 pcs
B. bolt (M6x15), 23 pcs
C. bolt (M4x15), 20 pcs
D. bolt (M4x10), 2 pcs
E. flat washer (M6), 22 pcs
F. spring washer (M6), 22 pcs
G. flat washer (M4), 22 pcs
H. spring washer (M4), 20 pcs
I. nut (M6), 2 pcs
J. nut (M4), 20 pcs
K. screwdriver, 1 pc
HARDWARE LIST
14
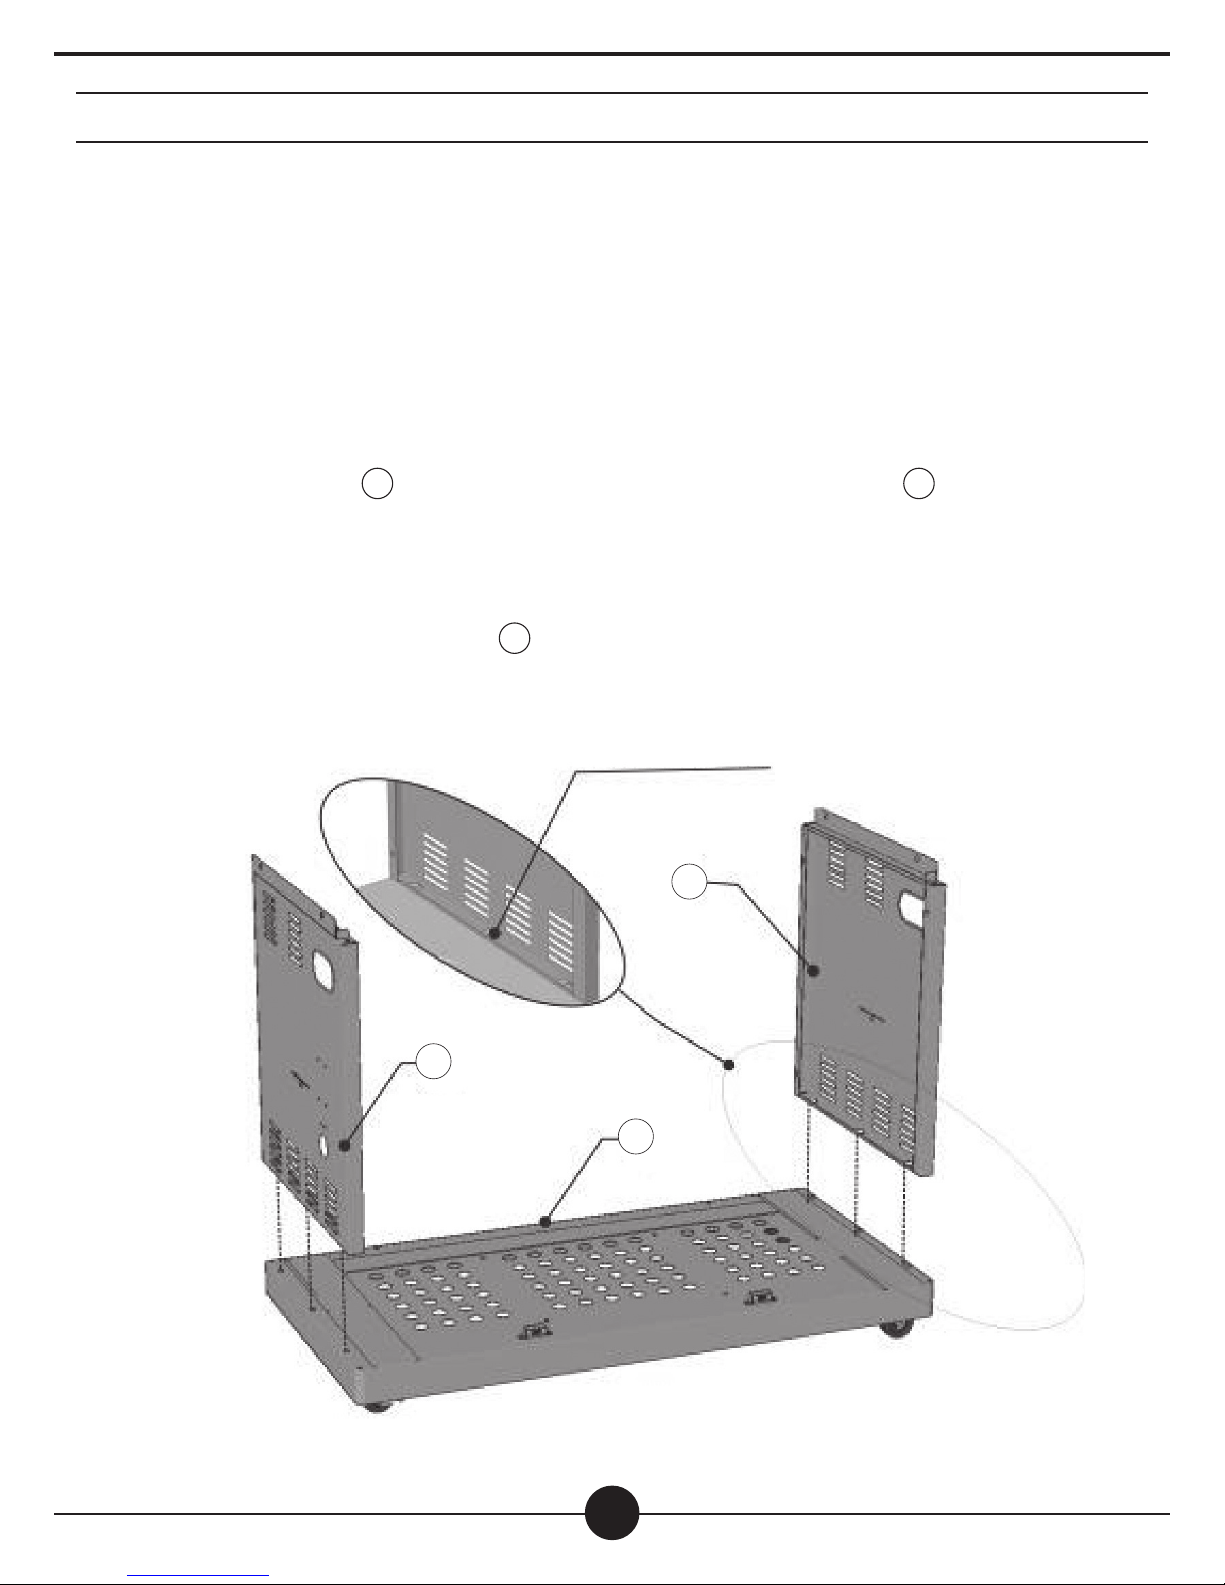
ASSEMBLY INSTRUCTIONS
STEP 1
Remove all contents from the carton packaging. Make sure all parts are
present before attempting assembly. Once the grill is fully assembled, go back
and check to make certain all the bolts are secure. Tighten again using the
screwdriver provided if necessary.
Note: Before beginning assembly, make certain the two swivel casters on the
bottom panel assembly are locked.
a) Align the holes on 3right side panel with the holes on the 1bottom panel
assembly.
b) Insert each pre-installed bolt on the right side panel into the pre-drilled holes
on the bottom panel and tighten by hand until secure.
c) Repeat the procedure for the 2left side panel. Go back to tighten all the
bolts using the screwdriver provided.
15
1
2
3
pre-installed bolt (6)

BFE
5 6
4
4
pre-installed bolt (4)
B
STEP 2
a) Loosen the four bolts
pre-installed on the left
and right side panels
and insert the 4
back panel. Tighten by
hand until secure.
b) Align the holes on the 4
back panel with the holes
on the 1bottom panel
assembly. Insert Bone bolt
into each pre-drilled hole
on the bottom panel.
c) Tighten all bolts using
the screwdriver provided.
STEP 3
a) Align the holes on the 5left
drawer support with the holes
on the 1bottom panel assembly.
b) Insert Bone bolt with Fone
spring washer and Eone flat
washer into each pre-drilled hole.
Tighten by hand until secure.
c) Align the holes on 5left
drawer support with the holes
on 4back panel.
d) Insert Bone bolt with Fone
spring washer and Eone flat
washer into each pre-drilled hole.
Tighten by hand until secure.
e) Repeat the procedure for the 6right drawer support.
f) Go back to tighten all the bolts using the screwdriver provided.
16

8
E
F
B
8
J
G
H
10 10 C
STEP 4
a) Align the hole on the
8 spare cylinder
stopper with the hole
on the 2 left side
panel as shown.
b) Insert B one bolt with
F one spring washer
and E one flat washer
into the pre-drilled hole.
Tighten the bolt using the
screwdriver provided.
c) Repeat the procedure for
the right spare cylinder stopper.
17
STEP 5
Drawer assembly: Make sure the drawer with the lighting stick is installed
onto the the upper drawer support, and make
sure the lower drawer is installed first.
b) Align the holes on the right track
support with the holes on the
right drawer support.
c) Insert one bolt into each
pre-drilled hole on the right track
support, then place one flat
washer, one spring wahser
and one nut onto each bolt as
shown. Tighten by hand until secure.
d) Repeat the procedure for the left
track support and the left drawer
support.
e) Go back to tighten all bolts using the screwdriver provided.
f) Repeat the procedure to install the upper drawer.
a)
Install lower drawer first: Pull out the two
track supports on the 10 drawer.
C
6
G
H
J

EF B
9
STEP 6
a) Place the 9 front beam on the front of cart assembly.
b) Align the holes on the front beam with the top and side holes on the frame
of the right side panel.
c) Insert one bolt with one spring washer and one flat washer into each hole.
Tighten by hand until secure.
B
d) Repeat the procedure for the frame of the left side panel.
e) Align the hole on the front beam with the top hole on the right drawer support.
f) Insert one bolt with one spring washer and one flat washer into each
hole. Tighten by hand until secure.
18
FE
BFE
g) Repeat the procedure for the left drawer support.
h) Go back and tighten all bolts using the screwdriver provided.

first step 11-2
second step
11-1
STEP 7
a) Insert the pin on the bottom of the 11-1 left door into the hole on left side of the
(1) bottom panel assembly as shown.
b) Insert the pin on the top of the 11-1 left door into the hole on the left side of (9)
front beam.
c) Repeat the procedure for the 11-2 right door.
19

12
EF
A
13
B
14
B
pre-installed bolt (10)
STEP 8
a) Place the 12 body assembly
on the top of cart assembly.
Make certain the pre-drilled
holes on the right side of body
assembly are aligned properly
with the holes on the right side
of cart assembly.
b) Insert Aone bolt with Fone
spring washer and Eone flat
washer into each hole on the
right side of body assembly.
c) Tighten all bolts by hand
until secure.
d) Repeat the procedure for
the left side of body assembly.
e) Go back to tighten all the bolts using the screwdriver provided.
STEP 9
a) Loosen the five pre-installed bolts on the right side of body assembly,
and allow ¼ bolt length to extend from the body assembly.
b) Align the large holes on the 14 right side shelf with the bolts
extending from the body assembly, and push down
on the right side shelf
until the shelf locks
into place. Tighten bolts
by hand until secure.
c) Align the hole on the
14 right side shelf with
the hole on the right
side of the control panel,
insert Bone bolt into the
hole and tighten the
bolt by hand until secure.
d) Repeat the procedure for
the 13 left side shelf.
e) Go back to tighten all bolts
using the screwdriver provided.
20
Table of contents
Other President's Choice Grill manuals


Popular Grill manuals by other brands


Maxim
Maxim George Foreman GR35WTMRCAN owner's manual

TEFAL
TEFAL XL HEALTH GRILL CLASSIC manual

Jackson Grills
Jackson Grills JPG850BI-2 owner's manual

Char-Broil
Char-Broil 463247412 Product guide

Tower Hobbies
Tower Hobbies T27001 Safety and instruction manual

Uniflame
Uniflame CBC1103W Series owner's manual