PRESMA PROW071 User manual

Digital Night Vision Monocular
Instruction Manual
PROW071
Presma™ Owl Series
PROW071 Digital Night Vision Monocular Manual
WARNING: Direct viewing of the sun can cause permanent eye damage.
DO NOT attempt to view the sun through Monocular or other optics
instruments.
Congratulations on your purchase of a PRESMA™ Owl Series Digital
Night Vision Monocular.
PRESMA™ Owl Series Digital Night Vision Monocular is part of a series
of precision instruments for use in low light to dark environments.
Constructed of the nest materials and assembled by our highly skilled
craftsman for a trouble-free use under the most demanding conditions.
Read the instructions carefully before using your Night Vision Scope.
This manual will help guide you to achieve optimum performance by
explaining how to use its various feature and how to care for it properly.
Overview of the Digital Night Vision Monocular
Model: PROW071
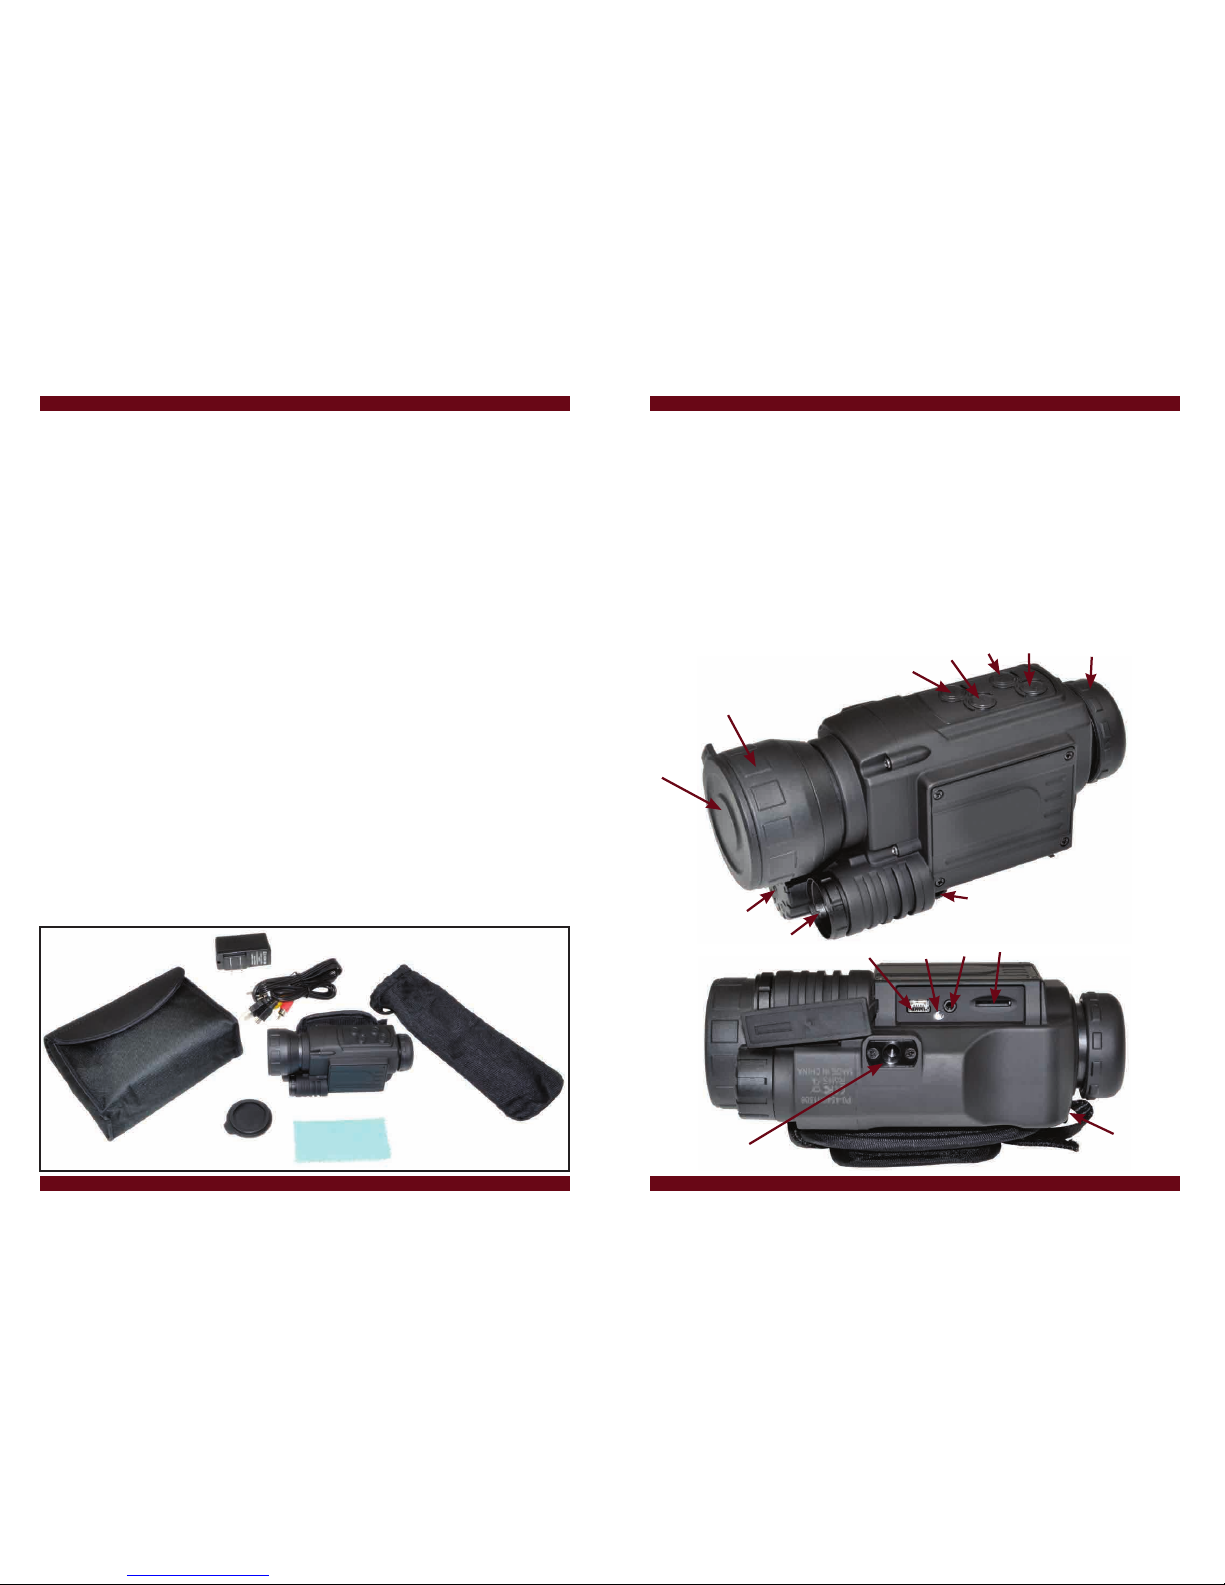
What is Included in the Package:
• USB cable • USB charger
• Video In/Out jack • Plastic Storage Pouch
• Accessories pouch • Operation Manual
• Optics soft cleaning cloth • Battery: (1) 3.7V RCR18650
Getting to Know your Digital Night Vision Monocular
1. Lens Cap
2. Objective Lens Focus Ring
3. Battery Compartment
4. Infrared Illuminator
5. Electronic Connectors Cover
6. Down Level Button
7. Up Level Button
8. Menu
9. On/Off
10. Diopter Scale Ring with
Eyepiece Lens
11. Tripod Receptacle Connection
12. USB 2.0 Socket
13. Charge/Power Indicator
14. AV OUT Socket
15. TF Memory Card Slot
16. Hand Strap Connector
1
2
3
4
5
678 9 10
11 16
12 13 14 15
PROW071 www.Presmainc.com
Presma Owl Series Digital NightVision Monocular Manual
www.Presmainc.com PROW071
Presma Owl Series Digital NightVision Monocular Manual

Operation of Buttons
The two buttons, Menu and On/Off, serve multiple functions in different
Modes.
Menu button serves as menu selection mainly. In Brightness Adjust
Mode, pressing MENU will move submenu selection up and down. It
also serves as the Photo Mode Shutter function and Stop function. In
Playback Mode it serves as the Playback Key and Stop function.
On/Off button mainly serves as On/Off. In Video Mode, it serves as the
video shutter.
Features:
1. With the Owl Series Monocular, you can observe objects during dim
light or dark environments with the Infrared Illuminator’s aid. During
viewing you can take photos, videos, and playback photos or videos
in the monoculars LCD monitor.
2. The Owl Series Monocular has 4.5X optical zoom power and 8X
digital zoom power.
3. Resolution is VGA 640 X 480.
4. Has an extension slot for a TF memort/storage card.
Capacity is from 2G-32G; record video up to 16 hours.
5. During day time observation, it can do audio recording in full color
mode.
6. During night time observation, under low light or dark conditions,
use the invisible LED illuminator to light up to 200 meters in black
and white image mode. Take pictures, videos, and audio recordings.
7. Using the enclosed USB connector, you can transfer data to a PC
and re-charge the Monoculars battery.
8. Power: one 18650 rechargeable lithium battery or two RCR 123A
batteries.
9. Battery life: 1.5 hours with illuminator Off; 1 hour with illuminator
On
10. Enclosed TV and AV out jack.
Operation Suggestions and Hints:
1. Night Vision Monocular is used under low light and dark
conditions to acquire images of objects.
2. It is equipped with an infrared illuminator to add light in dark
environments.
3. Working in dark conditions, user can turn On infrared illuminator
brightness level according to objects’ distance. Turn off illuminator
during lighted environment to preserve battery life. Gradually adjust
focal length ring to obtain sharp images.
4. Battery life: 1.5 hours with illuminator Off;
1 hour with illuminator On
Time Set Up
1. Setting up time of Monocular requires a USB cable connecting
your computer with the Monocular.
2. Use computer’s Notepad software to create a le named “time.txt”
in TF Memory card’s root directory.
3. How to create a le:
a. Open Notepad. Click File. Select New.
Type in the time format exactly like this example:
4. Save as le name “time.txt” in your local computer or TF folder.
Save “time.txt” into Monoculars root directory.
5. Caution: Time format has to be exactly as image shown above.
6. Disconnect the USB cable from the Monocular.
7. Time is now set up.
8. After inserting the “time.txt” le into TF folder, check the time
display on screen to see if it is displayed correctly.
2016.02.17 04:19:45
PROW071 www.Presmainc.com
Presma Owl Series Digital NightVision Monocular Manual
www.Presmainc.com PROW071
Presma Owl Series Digital NightVision Monocular Manual

Battery Installation and Maintenance
1. Remove battery compartment cap.
2. Replace battery. Place the “+” sign of battery face up toward battery
compartment cap.
3. To charge batteries, connect USB cable from Monocular to either
a computer USB port or to the USB charger adapter and plug into a
power outlet.
4. 10 hour charging time is recommended for rst time charging.
Operation of Monocular
Reading of the Screen Icons
Operating Procedures
1. Remove object lens cap.
2. If Off, click and hold On/Off button for 3 seconds to turn on.
If On, click and hold On/Off button for 3 seconds to turn off.
3. After initial screen ends, look through the eyepiece. The screen
should appear as shown in the following image.
4. Refer to prior page for icon descriptions/explanations.
03727
03727
12 3 4
To Observe
• Always remove the objective lens cap
• Look through the eyepiece lens
• Conrm if it is on Photo Mode or Video Mode (Both are
Observation Modes)
• Adjust Ocular scale for eye focus
• Next, adjust focal length by adjusting Focusing ring
• Focus until you obtain a clear and sharp image
• Adjust digital magnication power if needed by clicking UP button to
increase Power or clicking DOWN button to decrease power
• Current Mode/Photo Mode/Observation Mode
• Video Mode/Observation Mode
• Battery Life
• Flash card
• Capacity of storage; image quantity
+
PROW071 www.Presmainc.com
Presma Owl Series Digital NightVision Monocular Manual
www.Presmainc.com PROW071
Presma Owl Series Digital NightVision Monocular Manual

Shooting Photos
In Observation Mode,
• Press the Menu button
• Video icon will appear on left upper corner of the screen
• Time meter starts
• Click Menu button again to stop taking photos
• Photos will be automatically saved in TF memory card folder
To Playback Photos
1. Press Menu again. Photos will playback.
Shooting Videos
In Observation Mode,
• Press the Menu button
• Video icon will appear on left upper corner of the screen
• Time meter starts
• Press On/Off button to start recording videos
• When the right lower corner video meter is running, that indicates
your video is recording
• Press Menu again to stop recording the video
• Video clips will be automatically saved in TF memory card folder
To Playback Video
1. Press Menu again. Video will playback.
Playback Photo or Video on your TV or Computer
Connect via USB cable,
• Connect Monocular to computer USB port using USB cable.
(enclosed).
• TF folder will appear in your computers directory.
• Select desired folder to playback Video Clips.
Hint: During playback, the monoculars power should be turned on.
Connect Monocular via Video Out cable to TV,
• Use the video out jack to connect to TV to view a video clip
Hint: During playback, the monoculars power should be turned on.
To Adjust Infrared Illuminator and Image Brightness level
The infrared illuminator helps the monocular to obtain a brighter image
in dark or dim light environments.
Adjust Brightness Levels
• Press Menu for 3 seconds to enter Brightness adjustment mode
• Then, three options for the Brightness Menu appear on left side of
the screen
Example:
o Bright: 7
o Lamp: 0
o Auto NV:Yes
• Immediately press the Menu again to select Brightness
• Adjust brightness level UP and DOWN with button from 1 to 9. 9
1 indicates lowest level and 9.9 the highest
Adjust Infrared Illuminator
Repeat Press Menu 3 seconds to enter Brightness adjustment mode.
• Immediately press Menu again to Lamp
• Adjust Lamp level UP and DOWN with button from 1 to 9. 9
1 indicates lowest level and 9.9 the highest
Auto NV Mode
Repeat Pressing Menu 3 seconds to enter Brightness adjustment mode.
• Select YES or NO with the UP and DOWN button
• Auto NV Mode will control infrared illuminator and brightness level
automatically according to environmental condition.
Select YES or NO to set.
Remarks
All mode operations will resume to observing mode after 5 seconds
without any actions.
PROW071 www.Presmainc.com
Presma Owl Series Digital NightVision Monocular Manual
www.Presmainc.com PROW071
Presma Owl Series Digital NightVision Monocular Manual

Maintenance
• Store your Monocular in the protective plastic soft pouch after use
• Store in an environment with good dry air circulation to prevent
moisture and dust damage to the Monocular
• Working temperature range is from -5ºC to 40ºC
• Recharge battery at once when LCD monitor is dim or LCD
image is jittery
• Blow any dust or debris from the lens rst before applying the
provided soft cloth to the lens to prevent scratches
• Use the optics cleaning cloth to wipe or clean the optics lens only
Specication
Magnication:......................................4.5X
Objective Lens:..................................40 mm
Field of View:.......................................5ºx3.75º
Range (low Light environment):.....2M-∞
Range (dark environment):..............2M-200M
Battery:................................................3.7V, RCR123A; 2 pcs
Or 3.7V, RCR 18650 1 pcs
PROW071 www.Presmainc.com
Presma Owl Series Digital Night Vision Monocular Manual
Precision Targeting Solutions
Table of contents


