Prime Grill KC King 600 User manual
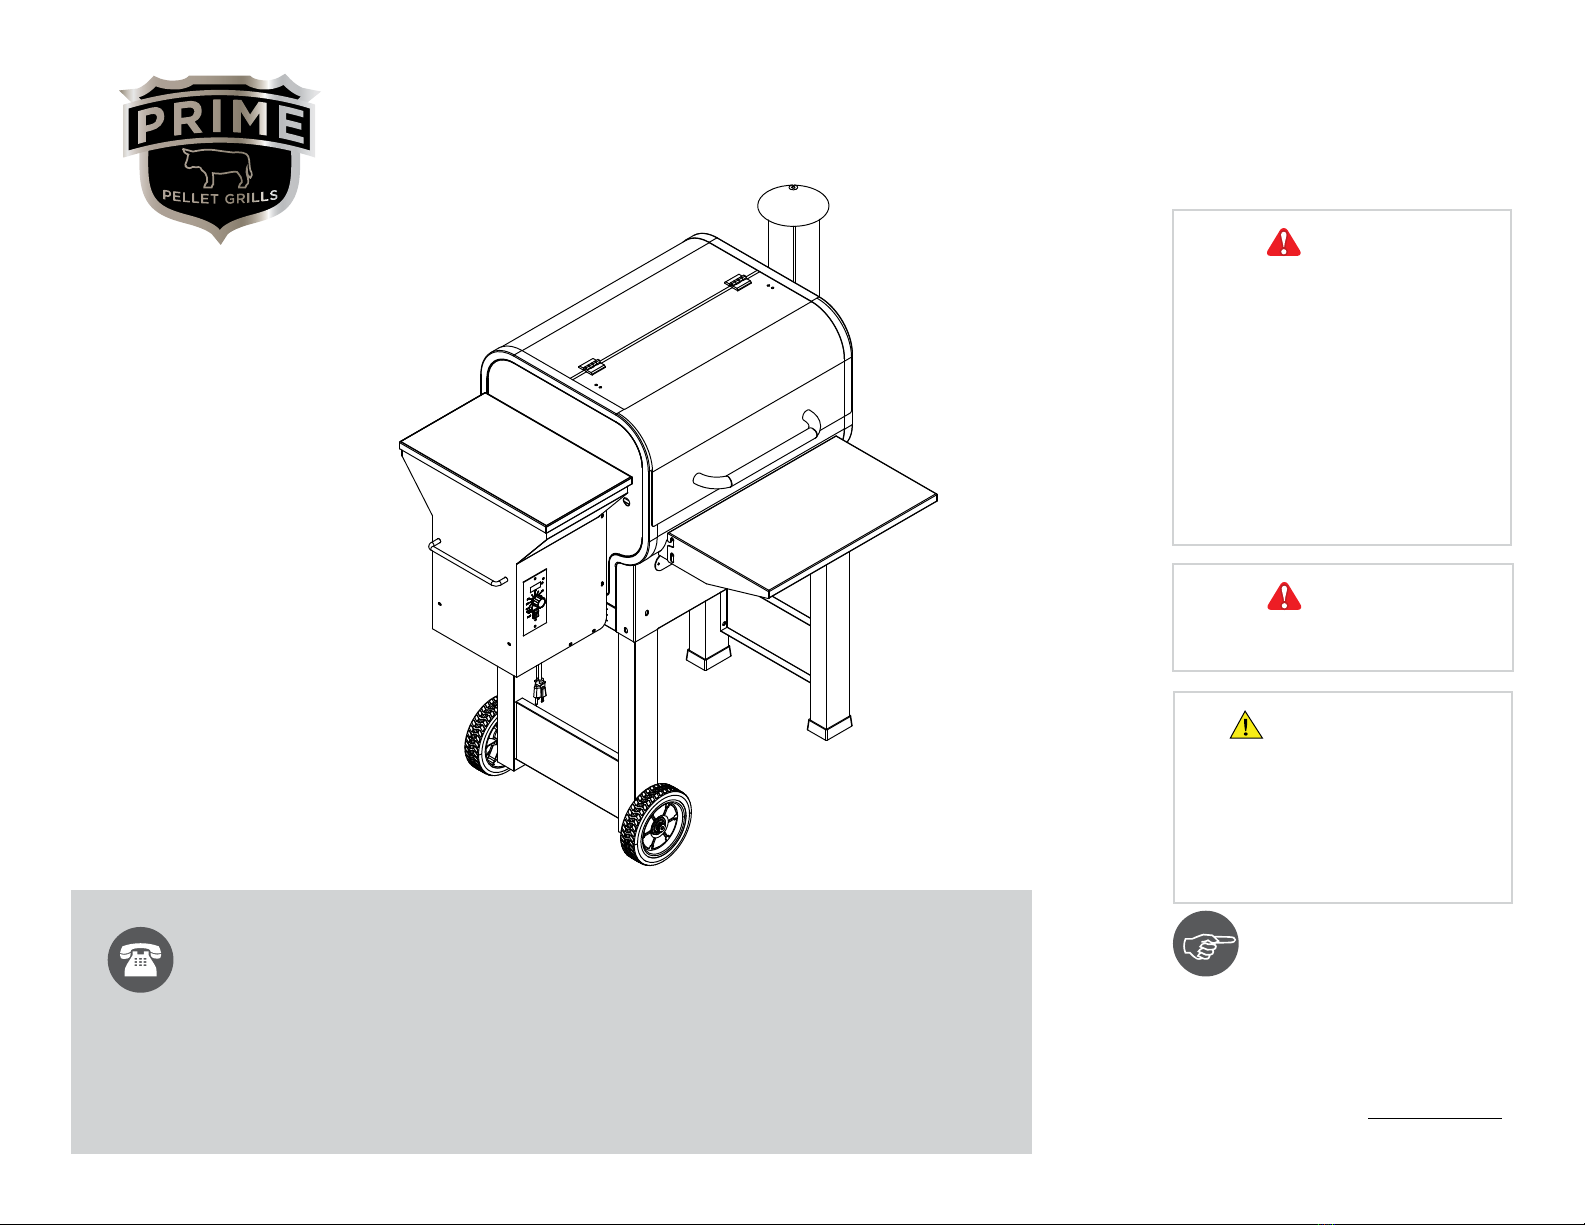
Prime Pellet Grill - KC King 600
Item#: 81221
Ignite, Inspire, Indulge
WARNING
FOR YOUR SAFETY
1. Please read this entire manual before
installation and use of this pellet fuel-
burning appliance. Failure to follow these
instructions could result in property
damage, bodily injury, or even death.
2. Contact local building or re ofcials
about restrictions and installation
inspection requirements in your area.
3. Save these instructions for future
reference.
WARNING
For Outdoor Use Only
ATTACH YOUR
RECEIPT HERE
Keep a copy of your proof of
purchase or order conrmation
which will be needed if you
need to contact us about
warranty coverage.
Purchase Date:
WARNING
This product can expose you to chemicals
including Carbon Monoxide, Lead, Chromium
(hexavalent compounds), Di(2-ethylhexyl)
phthalate (DEHP) and Diisononyl phthalate (DINP),
which are known to the State of California to cause
cancer and birth defects or other reproductive
harm. For more information, go to
www.P65Warnings.ca.gov.
12032019
Questions, problems, missing parts?
Before returning to your retailer, our exceptional customer service is available.
Call toll-free (866)
866) 985-7877 9 a.m. – 9 p.m., EST
Email [email protected]
Live chat www.primepelletgrills.com 9 a.m. - 4 p.m., EST, Monday - Friday

Contact us for assistance: (866) 985-7877 | www.primepelletgrills.com TABLE OF CONTENTS | 2
TABLE OF CONTENTS / BEFORE YOU BEGIN
TABLE OF CONTENTS
Table of Contents Page 2
Before You Begin Page 2
Package Contents Page 3
Hardware Contents & Tools Included Page 4
Safety Information Page 5
Assembly Pages 6-10
First Start-Up Pages 11-15
Grill Functions Page 16
Everyday Grilling Page 17
Reigniting Your Grill Pages 18-20
Getting to Know Your Prime Pellet Grill Pages 21-22
Care of your Prime Pellet Grill Pages 23-24
Troubleshooting Pages 25-26
Warranty Page 27
BEFORE YOU BEGIN
Please read and understand this entire manual before
attempting to assemble, operate or install this appliance.
If you have any questions regarding the product,
please contact Customer Service.
Safety precautions are essential when any mechanical or
wood pellet fueled equipment is involved. Always heed
these precautions, as they are essential when using any
mechanical or wood pellet fueled equipment. Contact
local building or fire officials about restrictions and
installation inspection requirements in your area.
AMAJOR CAUSE OF FIRES
IS FAILURE TO MAINTAIN
REQUIRED CLEARANCES (AIR
SPACES) TO COMBUSTIBLE
MATERIALS. IT IS OF UTMOST
IMPORTANCE THATTHIS
PRODUCT BE INSTALLED
ONLYIN ACCORDANCE
WITH THESE INSTRUCTIONS.

Contact us for assistance: (866) 985-7877 | www.primepelletgrills.com COMPONENTS | 3
PACKAGE CONTENTS
PART DESCRIPTION
1Grill Body
Wheeled Leg (A & B)
Support Leg (A & B)
Leg Brace (x2)
Haul Handle
Chimney Gasket
Drip Pail
Drip Pan
Main Cooking Grate
Upper Cooking Grate
Prep Shelf
Grill Door Handle
Chimney
1
2
2
4
4
3
3
9
5
6
7
82
3
4
5
6
7
8
9
!
#
$
%
&
!
&
%
$
#

Contact us for assistance: (866) 985-7877 | www.primepelletgrills.com HARDWARE | 4
HARDWARE CONTENTS & TOOLS INCLUDED
HARDWARE CONTENTS TOOLS INCLUDED
Spring Washer
5/16
8pc16pc2pc
Nut
1/4
6pc
Bolt
A
D E
G JIF H
1/4x20mm
8pc
Washer
5/16
8pc
Nut
5/16
C
Bolt
5/16-18x85mm
4pc
B
Bolt
5/16-18x65mm
4pc
Hex Bolt
1/4x20mm
6pc
Washer
1/4
Shelf Axle
1/4
4pc
Spring Washer
5/16
8pc16pc
2pc
Nut
1/4
6pc
Bolt
A D E
G JI
F
H
1/4x20mm
8pc
Washer
5/16
8pc
Nut
5/16
C
Bolt
5/16-18x85mm
4pc
B
Bolt
5/16-18x65mm
4pc
Hex Bolt
1/4x20mm
6pc
Washer
1/4
Shelf Axle
1/4
4pc
Spring Washer
5/16
8pc16pc2pc
Nut
1/4
6pc
Bolt
A D E
G JIF H
1/4x20mm
8pc
Washer
5/16
8pc
Nut
5/16
C
Bolt
5/16-18x85mm
4pc
B
Bolt
5/16-18x65mm
4pc
Hex Bolt
1/4x20mm
6pc
Washer
1/4
Shelf Axle
1/4
4pc
Spring Washer
5/16
8pc16pc2pc
Nut
1/4
6pc
Bolt
A D E
G JIF H
1/4x20mm
8pc
Washer
5/16
8pc
Nut
5/16
C
Bolt
5/16-18x85mm
4pc
B
Bolt
5/16-18x65mm
4pc
Hex Bolt
1/4x20mm
6pc
Washer
1/4
Shelf Axle
1/4
4pc
Spring Washer
5/16
8pc16pc2pc
Nut
1/4
6pc
Bolt
A
D
E
G JIF H
1/4x20mm
8pc
Washer
5/16
8pc
Nut
5/16
C
Bolt
5/16-18x85mm
4pc
B
Bolt
5/16-18x65mm
4pc
Hex Bolt
1/4x20mm
6pc
Washer
1/4
Shelf Axle
1/4
4pc
Spring Washer
5/16
8pc16pc2pc
Nut
1/4
6pc
Bolt
A D
E
G JIF H
1/4x20mm
8pc
Washer
5/16
8pc
Nut
5/16
C
Bolt
5/16-18x85mm
4pc
B
Bolt
5/16-18x65mm
4pc
Hex Bolt
1/4x20mm
6pc
Washer
1/4
Shelf Axle
1/4
4pc
Spring Washer
5/16
8pc16pc
2pc
Nut
1/4
6pc
Bolt
A D E
G JI
F
H
1/4x20mm
8pc
Washer
5/16
8pc
Nut
5/16
C
Bolt
5/16-18x85mm
4pc
B
Bolt
5/16-18x65mm
4pc
Hex Bolt
1/4x20mm
6pc
Washer
1/4
Shelf Axle
1/4
4pc
Wrench
Hex Key
Phillips Head
Screwdriver

Contact us for assistance: (866) 985-7877 | www.primepelletgrills.com SAFETY INFORMATION | 5
DANGER
EXPLOSION—FIRE HAZARD
• Keep solid combustibles, such as building
materials, paper, or cardboard a safe distance
away from the grill as recommended by the
instructions.
• Provide adequate clearances around air
openings into the combustion chamber.
• Never use the grill in spaces which do or may
contain volatile or airborne combustibles,
or products such as gasoline, solvents, paint
thinner, dust particles, or unknown chemicals.
• During operation, this appliance can be a
source of ignition. Keep grill area clear and
free from combustible materials, gasoline,
paint thinner, cleaning solvents and other
ammable vapors and liquids. Do not use
grill in areas with high dust content. When
operating this grill, maintain a minimum
distance of 30.48 cm./12 in. from the grill to
combustibles.
• When operating this grill under overhead
combustibles, a minimum of 101.6 cm./40 in.
Is required.
• Only use this grill outside on a
noncombustible surface and away from all
combustible materials.
• Never use gasoline, gasoline-type lantern fuel,
kerosene, charcoal lighter uid, or ammable
liquids to start or “refresh” a re in this grill. Keep
all such substances far away from this grill.
WARNING
WARNING indicates an imminently hazardous
situation which, if not avoided, will result in
death or serious injury.
WARNING
• Installation and repair should be done by
a qualied service person. The grill should
be inspected before use and annually by
a qualied service person. More frequent
cleaning may be required as necessary.
DANGER
CARBON MONOXIDE HAZARD
• This grill is a combustion appliance. All
combustion appliances produce Carbon
Monoxide (CO) during the combustion
process. This product is designed to produce
extremely minute, non-hazardous amounts
of CO if used and maintained in accordance
with all warnings and instructions.
• Carbon Monoxide (CO) poisoning produces
u-like symptoms, watery eyes, headaches,
dizziness, fatigue, and possible death. You
can’t see and you can’t smell it. It is an
invisible killer. If these symptoms are present
during operation of this product, get fresh air
immediately!
• For outdoor use only. Never use inside house,
building, or other unventilated or enclosed
areas.
• This grill consumes air (Oxygen). Do not use
in unventilated or enclosed areas to avoid
endangering your life.
• Alcohol consumption and drug use increase
the effects of Carbon Monoxide poisoning.
• Carbon Monoxide is especially toxic to mother
and child during pregnancy, infants, the
elderly, smokers, and people with blood or
circulatory system problems, such as anemia
or heart disease.
WARNING
BURN HAZARD
• Never leave grill unattended when hot or in
use.
• Keep out of reach of children. Children should
be supervised while in the vicinity of the grill.
• Never move the grill while it is operating.
• The grill must cool completely before being
moved, transported, or cleaned.
• Alert children and adults to the hazards of
high surface temperatures. Stay away from
these surfaces to avoid burning skin or
igniting clothing.
WARNING
• By-products of the combustion fuel used
by this product contain chemicals known to
the State of California to cause cancer, birth
defects, or other reproductive harm.
DANGER
• Make sure grill is plugged in to an appropriate
3-prong outlet.
• An electrical supply with a GFCI protection
is required. In order to protect against shock
hazard, locate a grounded 3-prong receptacle
in reach of the 1.8 m./6 ft. power cord. When
installing the receptacle, follow the National
Code and local codes and ordinances.
WARNING
• This grill must only be assembled and
operated in accordance with this instruction
manual and its warnings.
• Never use heating fuel pellets in this grill due
to potential hazardous contaminants and
additives that may be present.
• For best cooking results and avor, use only
Prime Pellet Grills brand wood pellets.
WARNING
• Wood pellets must be stored in a dry location
and away from heat-producing appliances
and other fuel containers.
• Keep this grill clean. Please refer to the
cleaning instructions in this instruction
manual.
• Only specied accessories should be used
with this grill.
SAFETY INFORMATION
SAFETY INFORMATION
Contact us for assistance: (866) 985-7877 | www.primepelletgrills.com ASSEMBLY | 6
ASSEMBLY
PREPARATION
Before beginning assembly, be sure to empty contents of carton and make sure all parts are present. READ ALL INSTRUCTIONS BEFORE INSTALLING AND USING THE APPLIANCE.
Place all parts on a soft, level surface for assembly. Tools Required for Assembly
Estimated Assembly Time: 60 Minutes | DO NOT over-tighten hardware!
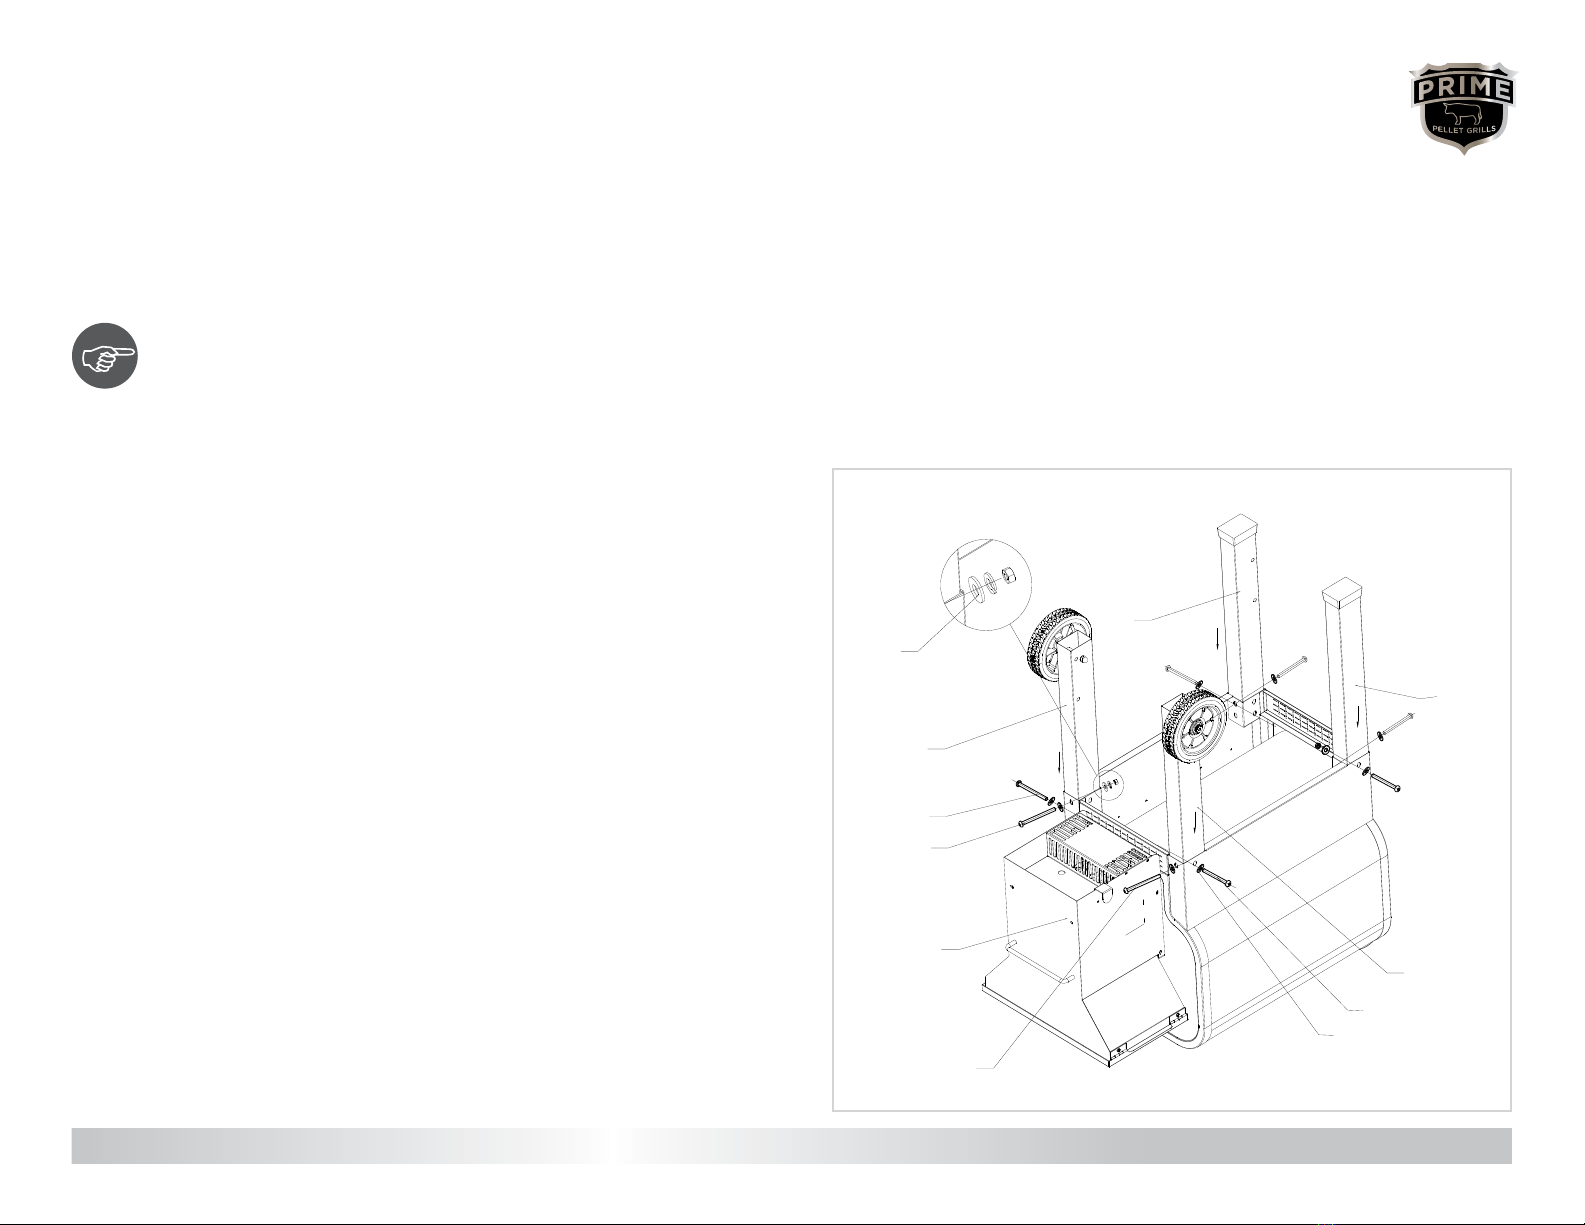
1On a protected, level surface on the ground, turn the Grill Body 1upside-down.
Attach the Wheeled Legs 2to the HOPPER END of the Grill Body. Legs are not
interchangeable. Find the 2 aligned holes on the inside of each Leg, near the bottom
(wheeled) end. Consult diagram for proper orientation. Align bolt eyelets in each
leg with the eyelets in corners of the skirt panels of the Grill Body. Place a Washer H
on a Bolt Band insert into the front skirt panel and through the leg, fastening with
Washer H, Spring Washer I, and Nut E. Repeat with the same hardware on the
back leg. Insert a Bolt Cwith Washer Hinto each of 2 eyelets in the side skirt panel
(on either side of the hopper), and through each Wheeled Leg. Secure with the same
combination of fastening hardware H/I/E.
Attach the Support Legs 3to the opposite end of the Grill Body. Legs are not
interchangeable. Find the 2 aligned holes on one of each Leg, near the bottom
(footed) end. Consult diagram for proper orientation. Insert Bolt Bwith Washer H
into the front skirt panel of the grill and through the leg, fastening with Washer H,
Spring Washer I, and Nut E. Repeat with the same hardware on the back leg. Insert
2 Bolts Cinto the two eyelets in the bottom edge of the side skirt panel, and through
the Wheeled Legs. Secure with the same combination of fastening hardware H/I/E.
Do not fully tighten all hardware yet.
Hardware Used:
BBolt (5/16-18x65) x4 CBolt (5/16-18x85) x4
ENut (5/16) x8 HWasher (5/16) x16
ISpring Washer (5/16) x8
1
A MAJOR CAUSE OF FIRES IS FAILURE TO MAINTAIN REQUIRED CLEARANCES (AIR
SPACES) TO COMBUSTIBLE MATERIALS. IT IS OF UTMOST IMPORTANCE THAT THIS
PRODUCT BE INSTALLED ONLY IN ACCORDANCE WITH THESE INSTRUCTIONS.
H/I/E
B
BB
B
C
C
1
C
2A
3A
3B
H
2B

Contact us for assistance: (866) 985-7877 | www.primepelletgrills.com ASSEMBLY | 7
ASSEMBLY
3Install the Chimney 7: Open the grill door. Align the Chimney Gasket 8with the open end of the
Chimney, then align both with the eyelets on either side of the exhaust hole on the body of the
grill. Insert 2 Hex Bolts Ainto the eyelets and fasten them on the inside of the grill using a Washer G
and Nut Fon each Hex Bolt.
Fully tighten Chimney hardware.
Hardware Used:
AHex Bolt (1/4x20) x2
FNut 1/4 x2
GWasher 1/4 x2
3
2Attach the Leg Brace 4between the Support Legs 3using 4 Bolts D. Repeat to install the Leg
Brace between the Wheeled Legs 2.
Once all 8 Bolts are seated, fully tighten all hardware installed to this point.
With assistance, carefully turn the grill back upright.
Hardware Used:
DBolt (1/4x20) x8
2
4
D
F/G
8A
7
4
Contact us for assistance: (866) 985-7877 | www.primepelletgrills.com ASSEMBLY | 8
ASSEMBLY
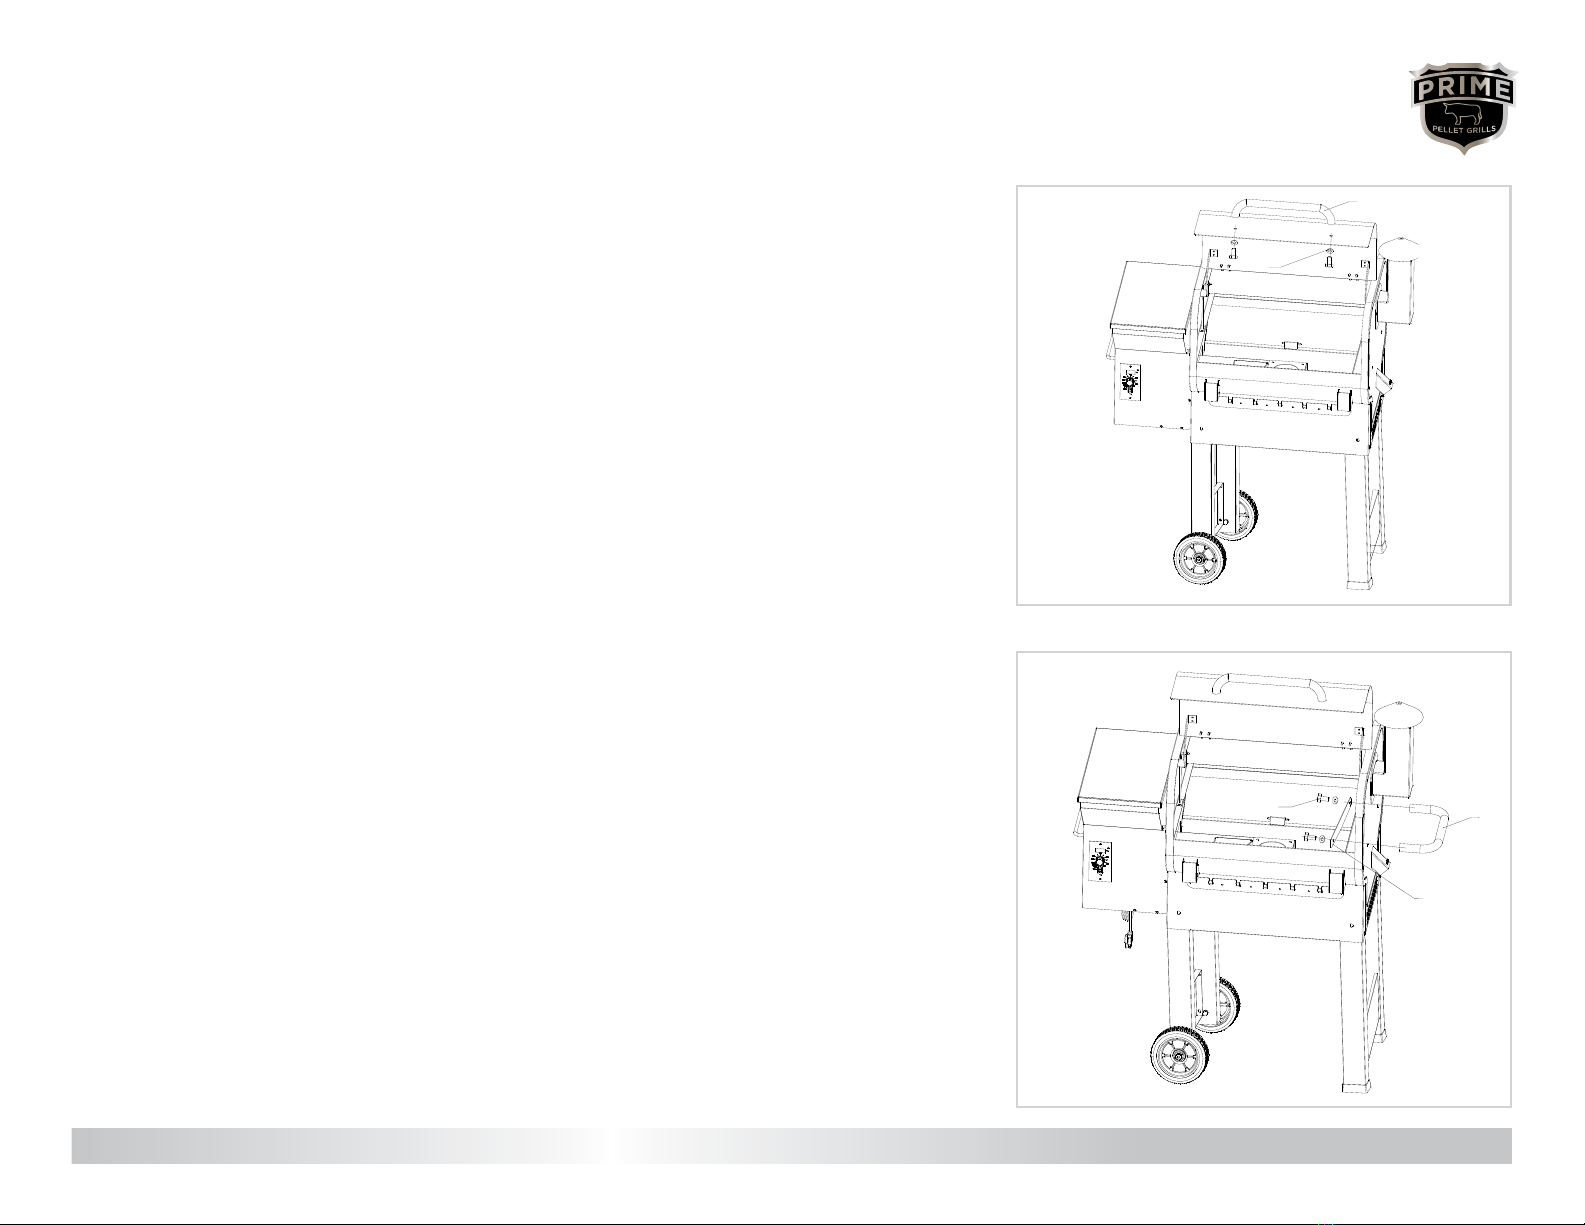
4Attach the Grill Door Handle 6: Select two Hex Bolts Aand Washers G. Place the Washers on
the Hex Bolts and insert one through each eyelet in the grill door into either end of the Grill Door
Handle. Fully tighten both Hex Bolts.
Hardware Used:
AHex Bolt (1/4x20) x2
GWasher (1/4) x2
4
5
5
A/G
6
A/G
Attach the Haul Handle 5: Select two Hex Bolts Aand Washers G. Place Washers on Hex Bolts.
Locate holes in the handle brace on the inside the grill chamber below the exhaust, and insert
one Hex Bolt in each hole as shown. Align threaded bolt holes in each end of the Haul Handle with
Hex Bolts and fasten together. Fully tighten both Hex Bolts.
Hardware Used:
AHex Bolt (1/4x20) x2
GWasher (1/4) x2

Contact us for assistance: (866) 985-7877 | www.primepelletgrills.com ASSEMBLY | 9
ASSEMBLY
NOTE: The Prep Shelf folds for transportation and storage. Simply lift up near the Axles
6
6
6Install the Prep Shelf 9using 4 Shelf Axles Jas shown. Fully tighten after all Shelf Axles are
inserted nger-tight.
Hardware Used:
JShelf Axles x 4 J
9

Contact us for assistance: (866) 985-7877 | www.primepelletgrills.com ASSEMBLY | 10
ASSEMBLY
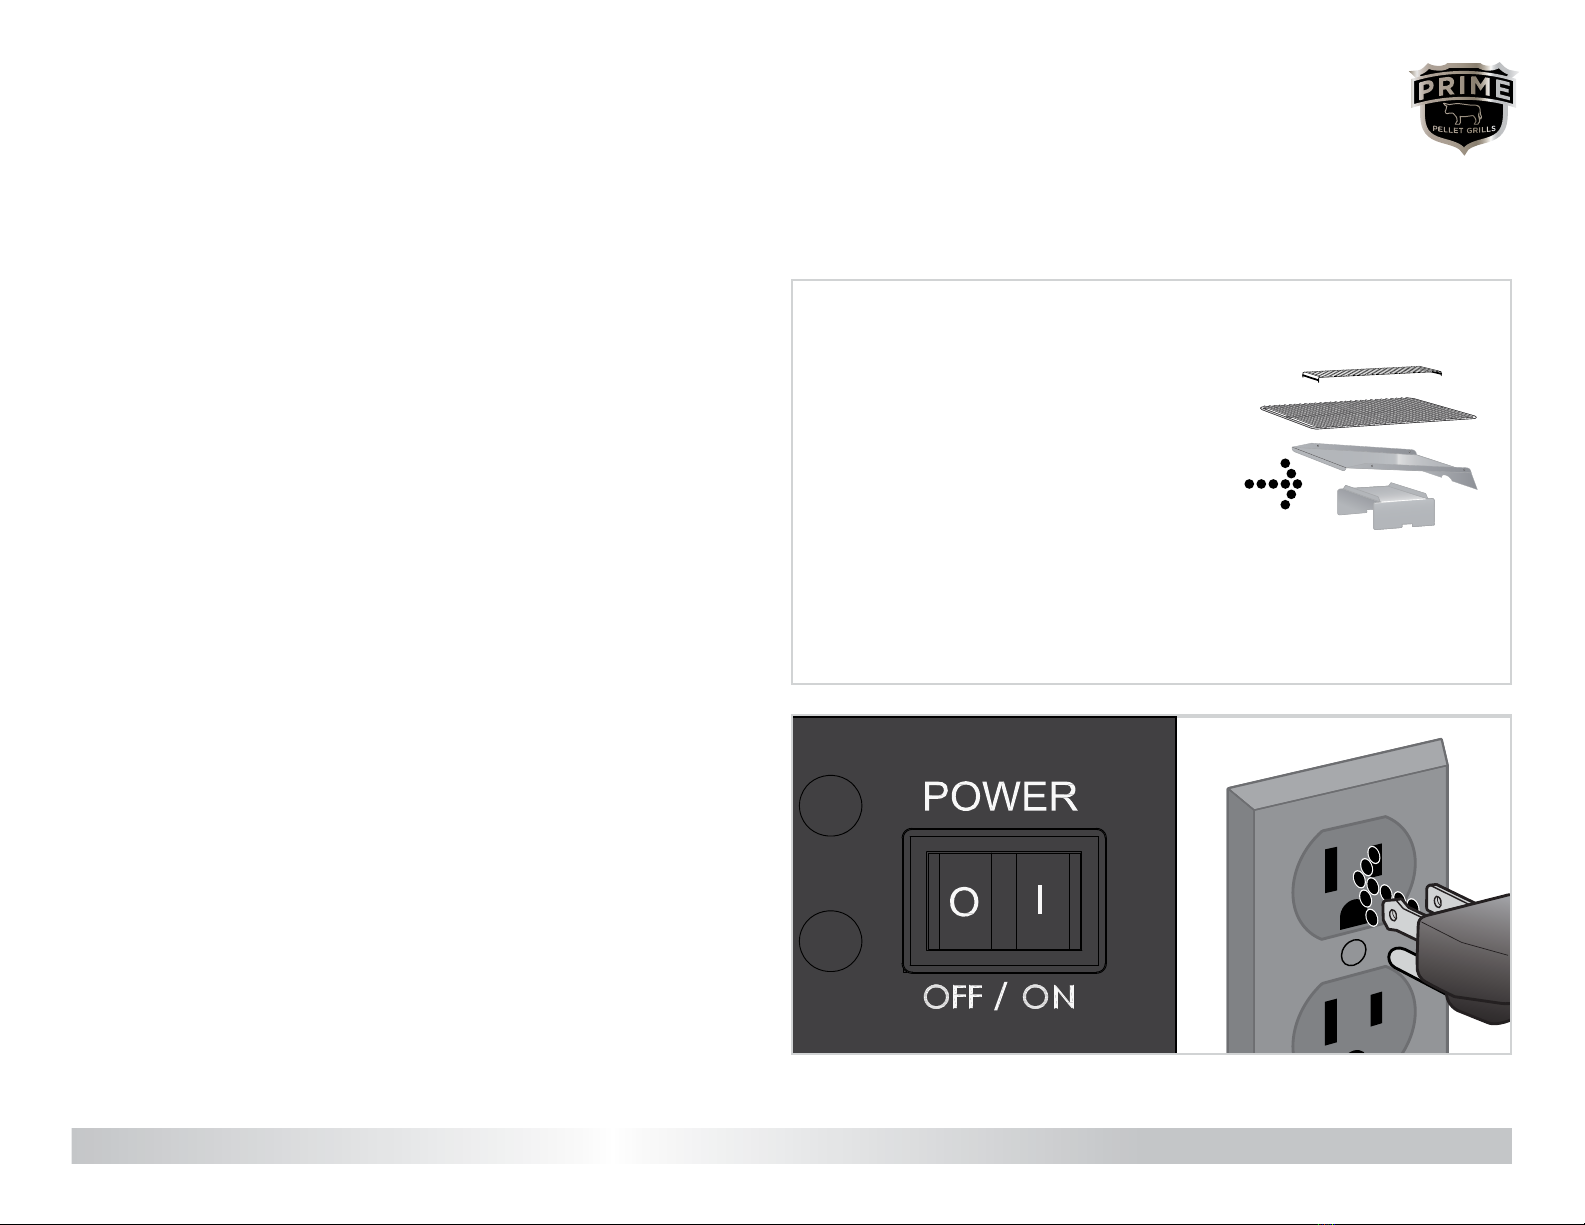
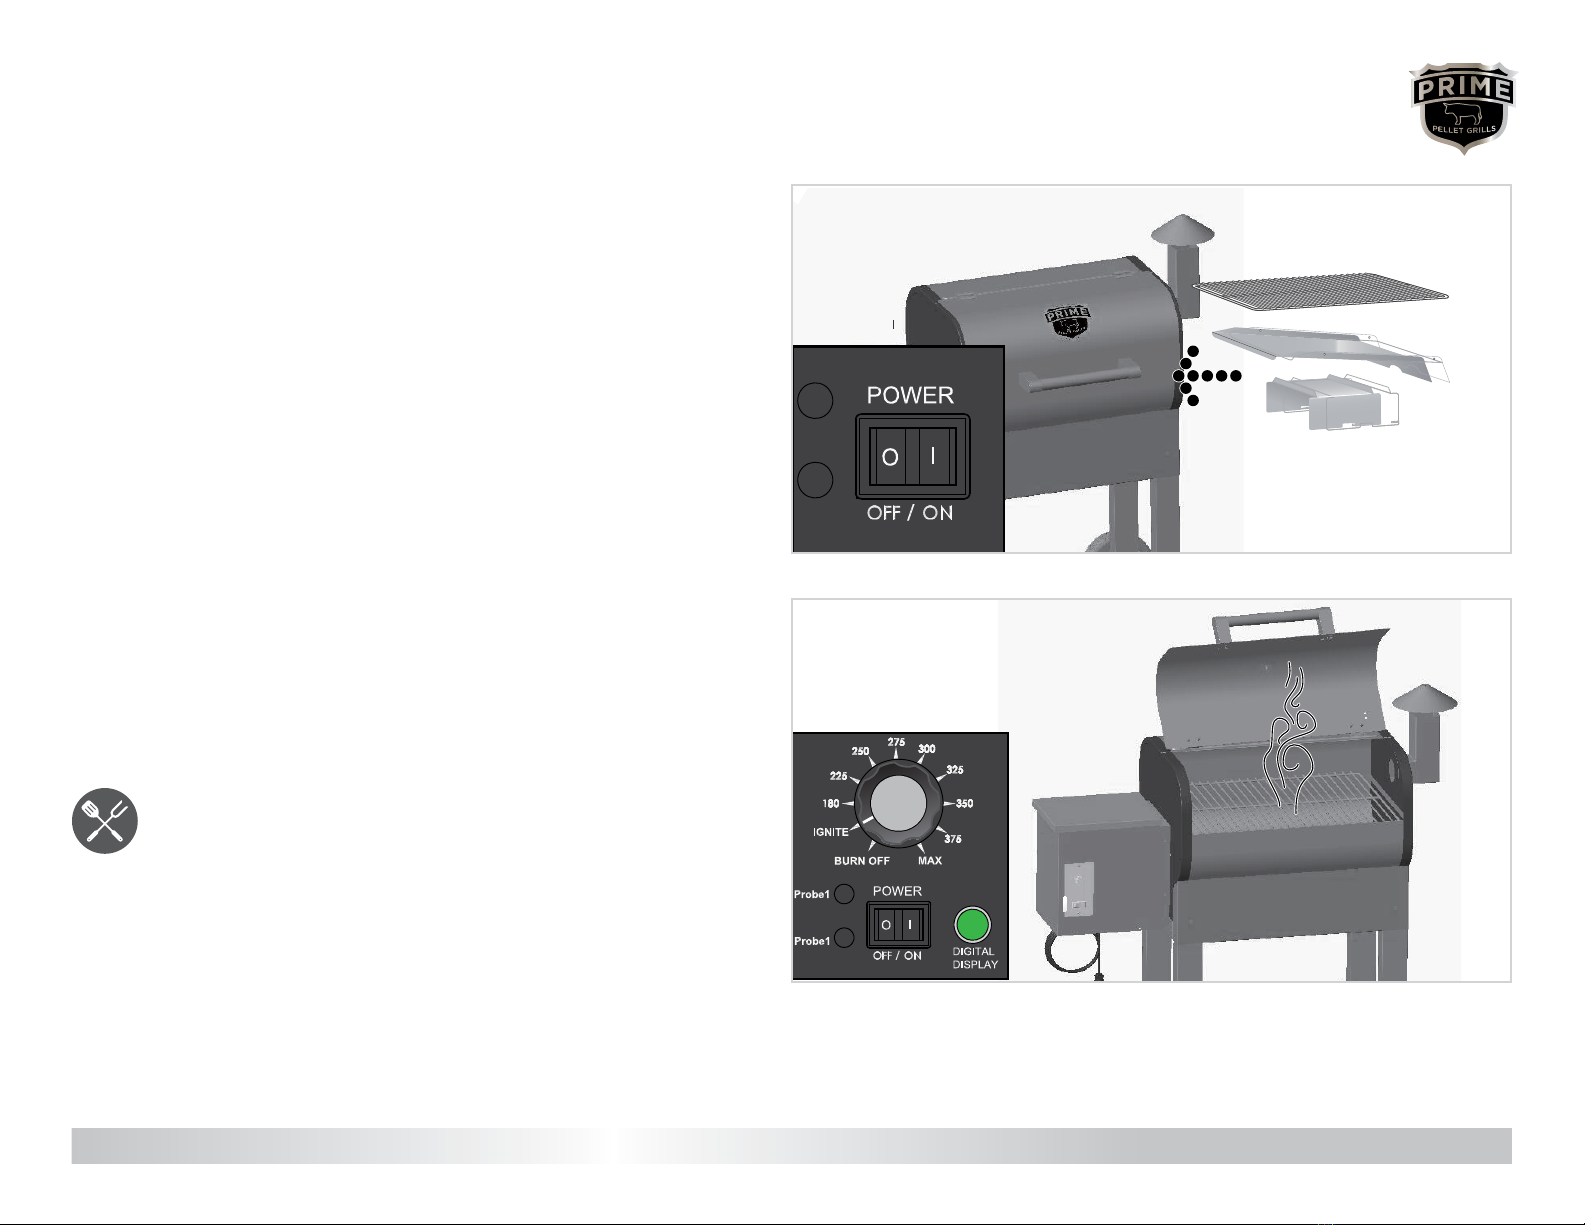
7Place the interior components: First insert the #, ensuring
that it is properly seated over the re pot. Position the Drip Pan $,
aligned with the grease drain tube. Finally, add the Main Cooking Grate %
and the Upper Cooking Grate &.
Hang the Drip Pail !below the drain.
You’re almost there! Follow the instructions for “First Start-Up” of your
Prime Pellet Grill (Pages 11-15).
SAVE THESE INSTRUCTIONS.
7
!
#
$
%
&
Contact us for assistance: (866) 985-7877 | www.primepelletgrills.com OPERATION | 11
FIRST START-UP
WARNING: Before use, place your Prime Pellet Grill on a non-combustible surface in accordance with local re safety ordinances. Do not use under a combustible ceiling or overhang.
You must follow these steps before rst use (prior to adding pellets), or whenever the grill runs completely out of pellets.
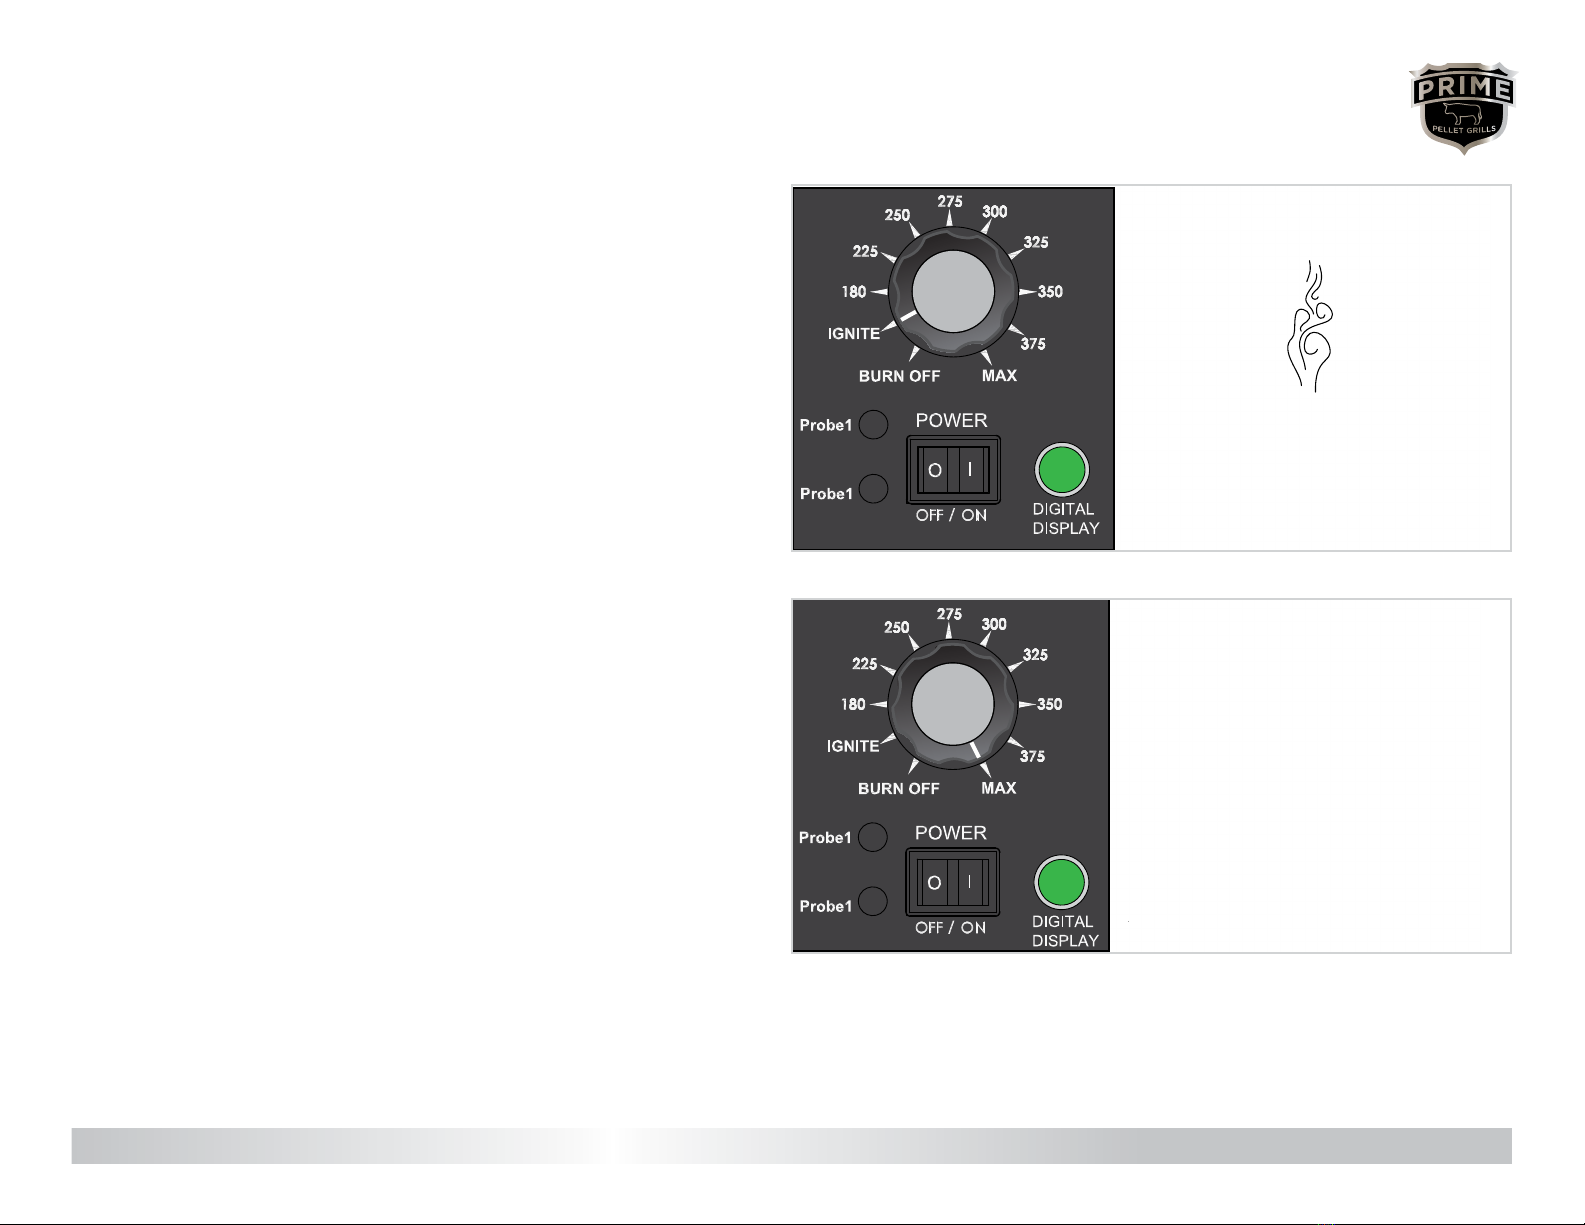
1Take out the interior components including cooking grates, drip pan,
and heat bafe.
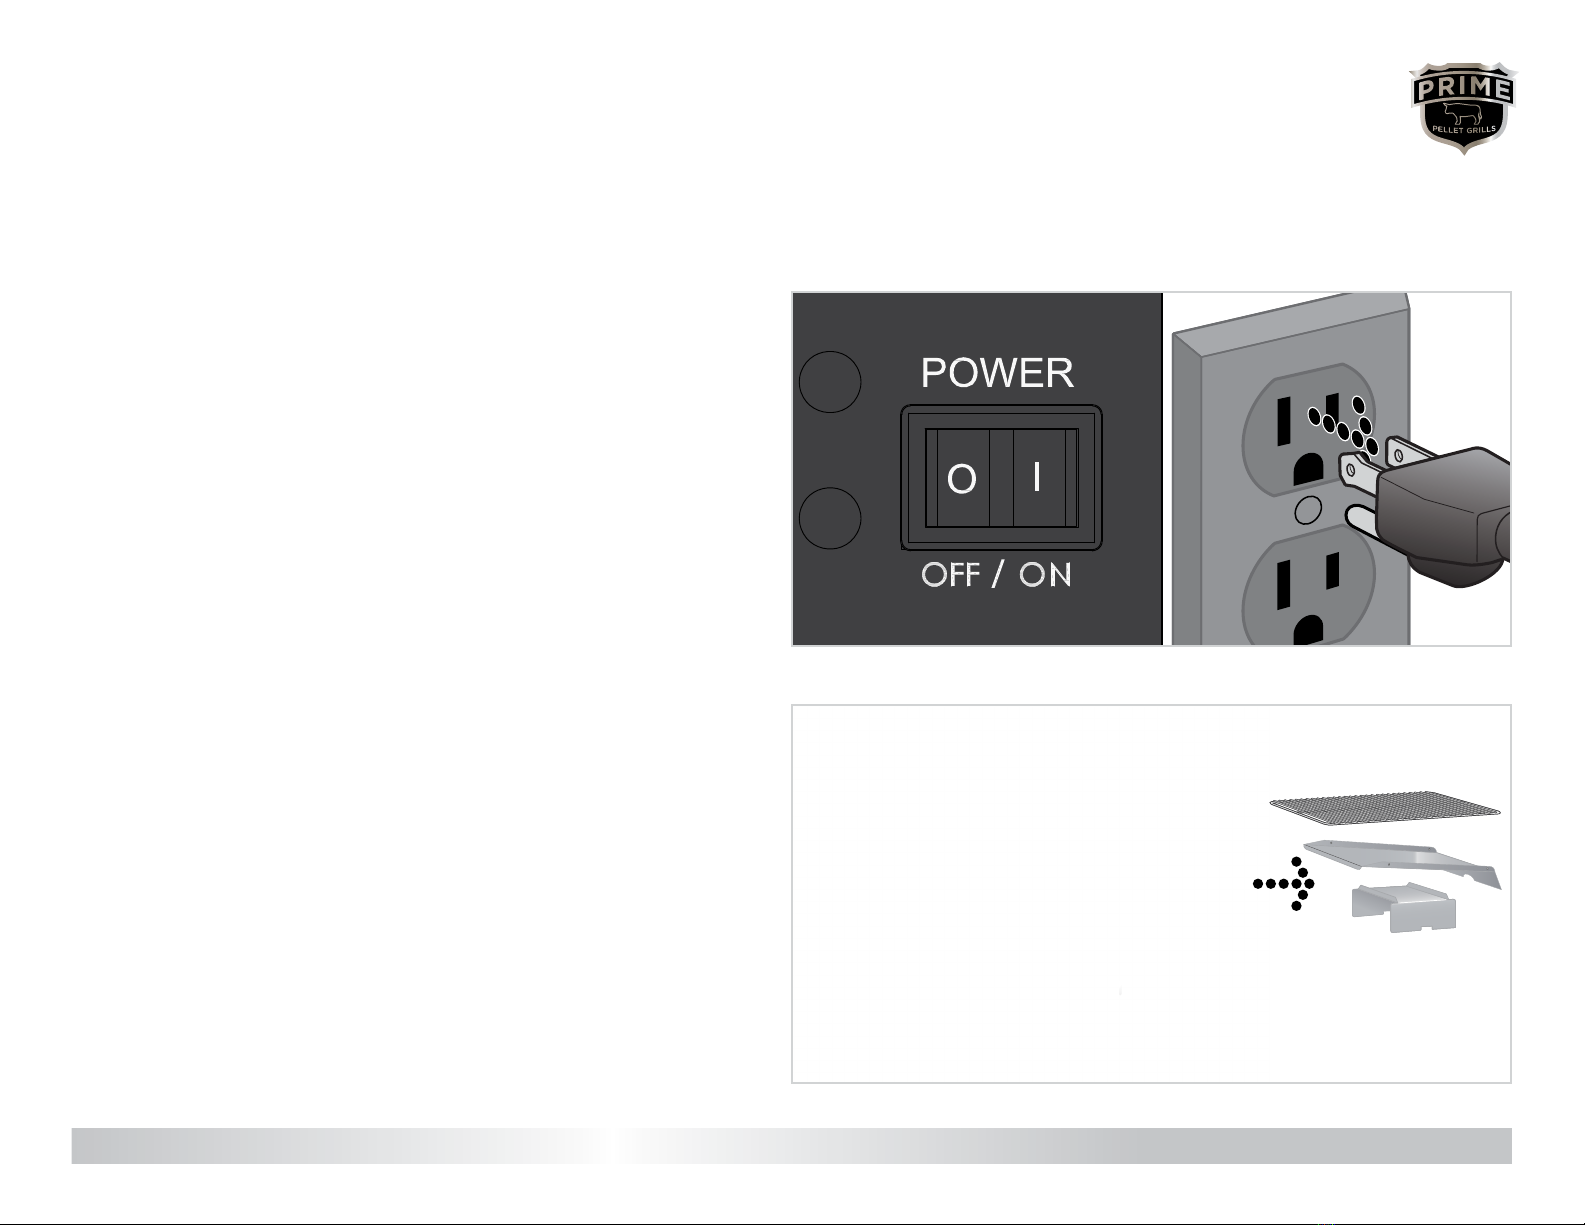
2Turn the switch to OFF (O) and plug the power cord into a
grounded household outlet.
10
F
225
180
325
275
375Smoke
Shut D own
Cycle
High
Temperatu re
Power
OFF
ON
375Smoke
Shut D own
Cycle
High
Power
OFF
ON
375Smoke
Shut D own
Cycle
High
Power
OFF
ON
rease drain pan, and both
With the switch in the OFF (O)
position, plug the power cord into an
appropriate grounded electrical outlet.
Make sure there are no foreign objects
in the auger. Turn the switch ON ( I)
and the temperature dial to SMOKE.
Make sure the auger is turning (inside
the pellet hopper).
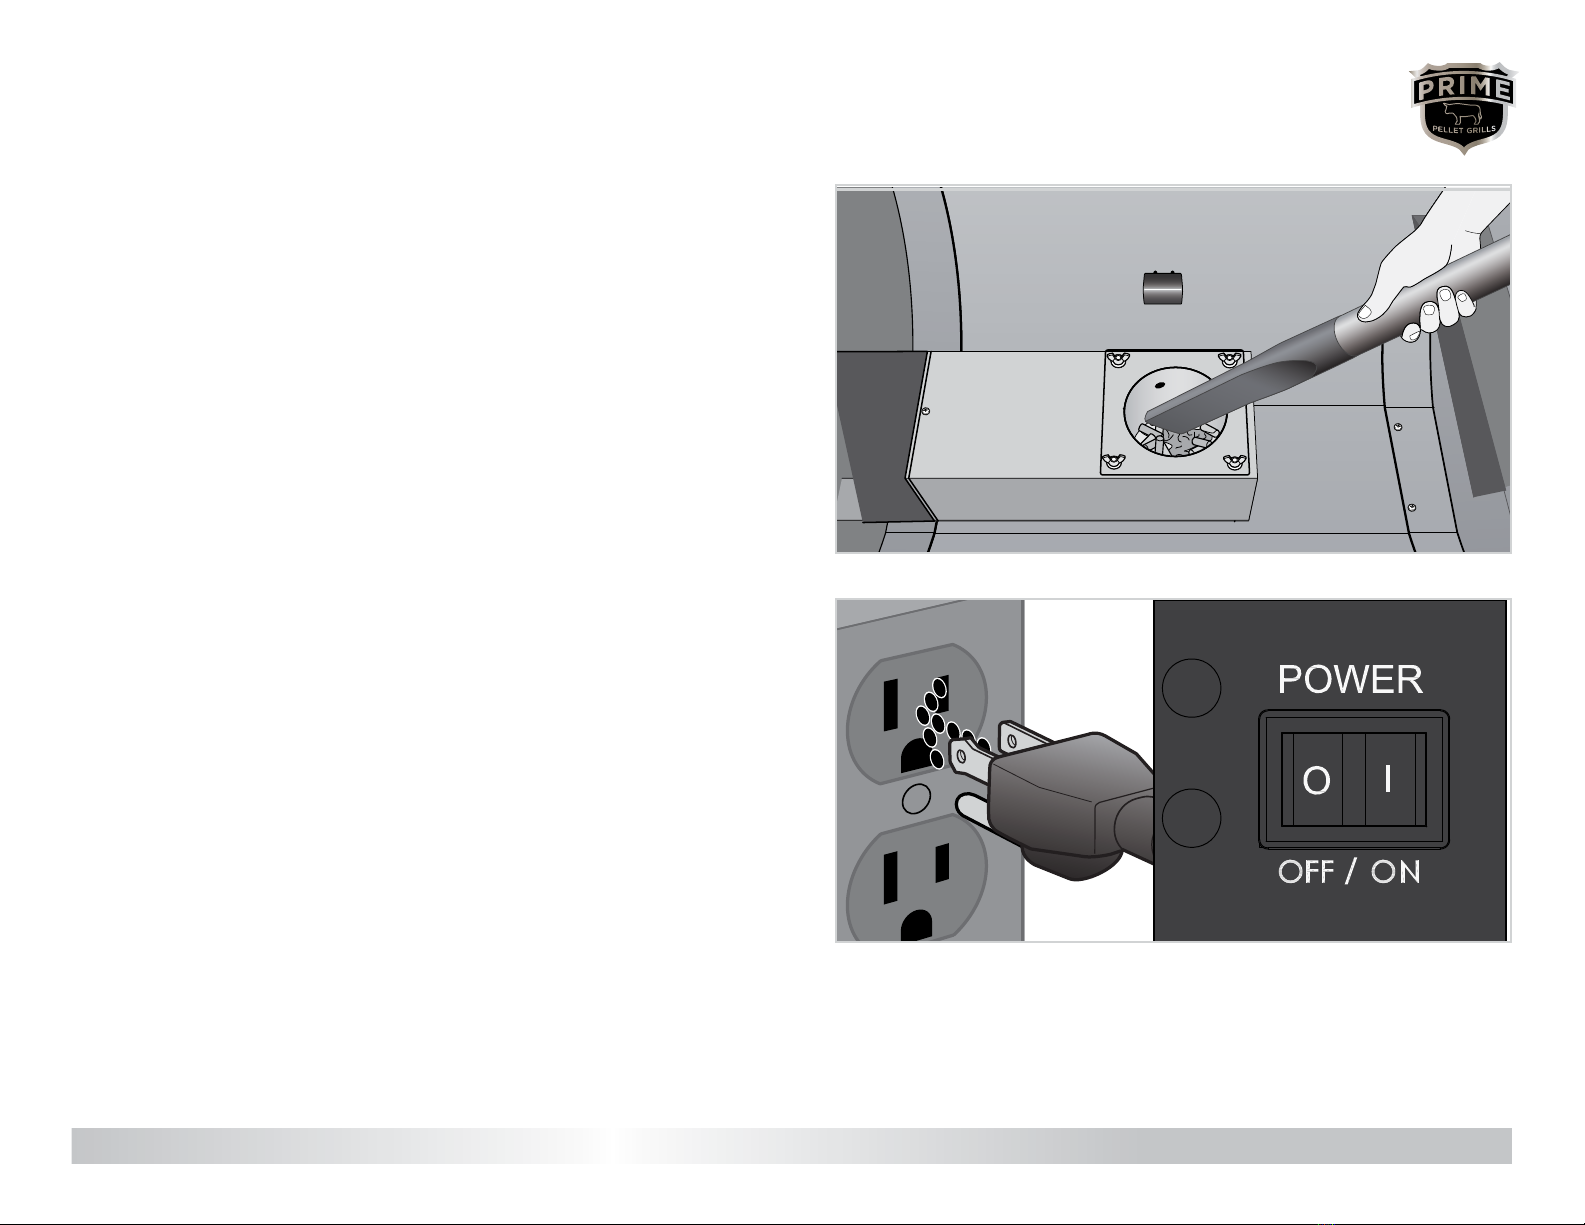
Check that there is air movement from
the draft inducer fan by placing your
is getting hot, it will turn red.
CAUTION! Do not touch the hot rod.
Turn the temperature dial to
SHUT DOWN CYCLE.
3 4
66102_Century20_v08.indd 10 2/3/16 2:11 PM
Contact us for assistance: (866) 985-7877 | www.primepelletgrills.com GRILL OPERATION | 11
FIRST START-UP
INITIAL FIRING INSTRUCTIONS
Remove the porcelain-coated grill
grate, grease drain pan, and both
the inside of the grill.
With the switch in the OFF ( O)
position, plug the power cord into an
appropriate grounded electrical outlet.
ellets.
auger tube to be “charged” with pellets.
1 2
INITIAL FIRING INSTRUCTIONS
375Smoke
Shut Down
Cycle High
Power
OFF
ON
Smoke
Shut D
Cy
Po
Remove the porcelain-coated grill
grate, grease drain pan, and both
the inside of the grill.
auger tube to be “charged” with pellets.
1
1Take out the interior components including cooking grates, grease
2Turn the switch to OFF (O) and plug the power cord into a
grounded household outlet.

Contact us for assistance: (866) 985-7877 | www.primepelletgrills.com
3Check the pellet hopper and the auger for foreign objects, which
can jam the auger. Turn the switch to ON (I) and rotate the dial to
IGNITE. Verify that the auger is rotating inside the hopper.
4Carefully extend your hand over the re pot to conrm air
movement from the draft fan. The heating rod in the re pot will
begin to redden as it heats up. CAUTION! Do not touch the heating rod.
After conrming air ow, rotate the temperature dial to BURN OFF.
Prime Pellet Pro-Tip: We recommend our highest-quality
Prime Pellet Grill Hardwood Fuel pellets for your grilling
and smoking needs. Never use pellet fuel with additives or
pellet fuel designed for heating.
Dampness and humidity are the enemy! Store your pellets
in an air-tight container to prevent mold, mildew, and poor
burn. A clean, empty pickle bucket works great!
FIRST START-UP
OPERATION | 12
Contact us for assistance: (866) 985-7877 | www.primepelletgrills.com
3Check the pellet hopper and the auger for foreign objects, which
can jam the auger. Turn the switch to ON (I) and rotate the dial to
IGNITE. Verify that the auger is rotating inside the hopper.
4
begin to redden as it heats up. CAUTION! Do not touch the heating rod.
Prime Pellet Pro-Tip: We recommend our highest-quality
Prime Pellet Grill Hardwood Fuel pellets for your grilling
and smoking needs. Never use pellet fuel with additives or
pellet fuel designed for heating.
Dampness and humidity are the enemy! Store your pellets
in an air-tight container to prevent mold, mildew, and poor
burn. A clean, empty pickle bucket works great!
FIRST START-UP
OPERATION | 12

Contact us for assistance: (866) 985-7877 | www.primepelletgrills.com OPERATION | 13
FIRST START-UP
5Pour Prime Pellet Grill Hardwood Pellets into the hopper and set
the temperature dial to MAX.
6Pellets will begin to be deposited into the re pot. When the rst
pellets reach the re pot, reset the heating rod by turning the
temperature to BURN OFF. Wait a moment, then with pellets still in the
re pot, set the dial to IGNITE.
Contact us for assistance: (866) 985-7877 | www.primepelletgrills.com OPERATION | 13
FIRST START-UP
5Pour Prime Pellet Grill Hardwood Pellets into the hopper and set
the temperature dial to HIGH.
6
temperature to BURN OFF. Wait a moment, then with pellets still in the
F
225
180
325
275
375Smoke
Shut Down
Cycle High
Power
OFF
ON
CALL
SERVICE
Fill t he hopper with Traeger H ardwood
Pellets and turn the temperature dial
to HIGH .
When the pellets begin to fall into the
SHUT DOWN CYCLE to reset the hot
turn the temperatu re dial back to
SMOKE.
5 6
Contact us for assistance: (866) 985-7877 | www.primepelletgrills.com OPERATION | 13
FIRST START-UP
5Pour Prime Pellet Grill Hardwood Pellets into the hopper and set
the temperature dial to HIGH.
6
temperature to BURN OFF. Wait a moment, then with pellets still in the
F
225
180
325
275
375Smoke
Shut Down
Cycle High
Power
OFF
ON
CALL
SERVICE
Fill t he hopper with Traeger H ar dwood
Pellets and turn thetemperature dial
to HIGH .
When the pellets begin to fall into the
SHUT DOWN CYCLE to reset the hot
turn the temperatu re dial back to
SMOKE.
5 6

Contact us for assistance: (866) 985-7877 | www.primepelletgrills.com OPERATION | 14
FIRST START-UP
Prime Pellet Pro-Tip: Make cleanup easier by lining
the grease pan with heavy-duty aluminum foil. The
edges of the foil should be wrapped securely to
the edges of the grease drain pan. Replace foil after
each grilling session or as needed to reduce the risk
cleaning and maintenance.
7Wait until the rst ames are visible in the re pot. Then set the
dial to BURN OFF and turn the switch to OFF (O). Let the grill cool.
8The interior components can now be placed in their proper
positions. First, insert the Heat Bafe, ensuring that it is properly
seated over the repot. Then position the Grease Drip Pan, aligned
with the grease drain tube. Add the Main Cooking Grate and nally
the Upper Cooking Grate.
Contact us for assistance: (866) 985-7877 | www.primepelletgrills.com OPERATION | 14
FIRST START-UP
Prime Pellet Pro-Tip: Make cleanup easier by lining
the grease pan with heavy-duty aluminum foil. The
edges of the foil should be wrapped securely to
the edges of the grease drain pan. Replace foil after
each grilling session or as needed to reduce the risk
cleaning and maintenance.
Recommendation:
g
foil. Be su
tight against the bottom of the g
pan. Replace foil after each cook to
for mo
SHU T DOWN C YC LE and switch to
OFF. Let the grill cool down.
7
225
180
325
375Smoke
Shut Down
Cycle High
Power
OFF
225
180
325
375Smoke
Shut Down
Cycle High
Power
OFF
225
180
325
375Smoke
Shut Down
Cycle High
Power
OFF
ON
Fill t he hopper wit h Traeger H ardwood
Pellets and turn the temperature dial
to HIGH .
When the pellets begin to fall into the
SHUT DOWN CYCLE to reset the hot
turn the temperatu re dial back to
SMOKE.
5 6
F
225
180
325
275
375Smoke
Shut Down
Cycle High
Temperature
Power
OFF
ON
Now you’re ready to place the
drain pan, and po rcelain-coated grill
grates back into the grill.
SHU T DOWN C YCLE and switch to
OFF. Let the grill cool down.
7 8
7dial to BURN OFF and turn the switch to OFF (O). Let the grill cool.
8The interior components can now be placed in their proper
the Upper Cooking Grate.
traege rgrill s.com
|
11
225
180
325
275
375Smoke
Shut D own
Cycle
High
Power
OFF
225
180
325
275
375Smoke
Shut D own
Cycle
High
Power
OFF
F
225
180
325
275
375Smoke
Shut D own
Cycle
High
Power
OFF
ON
CALL
SERVICE
Fill the hopper with Traeger Hardwood
Pelletsand turn the temperature dial
to HIGH.
When the pellets begin to fall into the
SHUT DOWN CYCLE toreset the hot
turn the temperature dial back to
SMOKE.
5 6
F
225
180
325
275
375Smoke
Shut D own
Cycle
High
Temperatu re
Power
OFF
ON
Recommendation: For easy cleanup, line the
grease drain pan with heavy-duty aluminum
foil. Be sure the edges and ends of the foil are
tight against the bottom of the grease drain
pan. Replace foil after each cook toreduce the
for more details.
Now you’ re ready to place the
drain pan, and porcelain-coated grill
grates back into the grill.
SHUT DOWN CYCLEandswitch to
OFF. Let the grillcool down.
7 8
66102_Century20_v08.indd 11 2/3/16 2:11 PM
Contact us for assistance: (866) 985-7877 | www.primepelletgrills.com OPERATION | 15
FIRST START-UP
9Leaving the grill door up, turn the switch to ON (I) and the dial to
IGNITE. Within minutes, pellets will begin to ignite and give off light
gray smoke. Once smoke rises, close the door and turn the dial to your
desired cooking temperature, or if this is the rst ring, complete the
following step.
10Before cooking your rst meal on your Prime Pellet Grill, be sure
to properly season it: after following the steps for Initial Firing,
turn the temperature dial to MAX and let it run for 45 minutes with the
door closed.
Contact us for assistance: (866) 985-7877 | www.primepelletgrills.com OPERATION | 15
FIRST START-UP
225
180
325
275
375Smoke
Shut Down
Cycle High
Power
OFF
ON
With the door open, turn the switch
ON ( I) and the temperature dial to
SMOKE. In about 2 minutes, the pellets
will ignite and whitish-gray smoke will
come out of the grill. After the pellets
have ignited, close the door and turn
the temperature dial to any cooking
setting desired.
Before
time, it will need to be seasoned.
Turn the temperature dial to HIGH
and let run for 45 minutes with the
door closed.
910
INITIAL FIRING INSTRUCTIONS (cont.)
WARNING!
·Start the grill on SMOKE setting with the door open. Once the pellets a
the temperature dial to any desired cooking temperature.
·When operating this grill, maintain a minimum clearance of 30.48 cm / 12 in f
·
in the grill.
·
more details.
225
180
Smoke
Shut D
Cy
P
With the door open, turn the switch
ON ( I) and the temperature dial to
SMOKE. In about 2 minutes, the pellets
will ignite and whitish-gray smoke will
come out of the grill. After the pellets
have ignited, close the door and turn
the temperature dial to any cooking
setting desired.
910
INITIAL FIRING INSTRUCTIONS
CONTROLLER SHUT D
9Leaving the grill door up, turn the switch to ON (I) and the dial to
IGNITE. Within minutes, pellets will begin to ignite and give off light
gray smoke. Once smoke rises, close the door and turn the dial to your
following step.
10to properly season it: after following the steps for Initial Firing,
turn the temperature dial to HIGH and let it run for 45 minutes with the
door closed.

Contact us for assistance: (866) 985-7877 | www.primepelletgrills.com OPERATION | 16
GRILL FUNCTIONS
WARNING!
Always start the grill with the door open and the dial set to IGNITE. After
pellets ignite and produce smoke, close the lid and adjust the dial to your
preferred cooking temperature.
• Whenever the grill is in use or cooling down after grilling, you must
maintain a minimum of 30.48 cm / 12 in between the grill and any
combustibles, including stored pellets.
• For best smoke avor and results, we recommend only food-grade
Prime Pellet Grill Hardwood Pellets. NEVER use heating fuel pellets to
cook food.
• Keep the grease drain pan and the interior of your grill clean to reduce
the risk of grease re. See pages 23 & 24 for more information.
Shutting Down the Grill: Burn Off Setting
This grill features an automatic shut down cycle. When you’re done cooking,
set the dial to BURN OFF. This will burn any pellets remaining in the re pot
while running the circulation fan. In ten minutes, the grill will shut down and the
fan will stop.
DANGER! The power switch will shut off the control and the dial will shut
off the grill power. Before servicing or cleaning the grill, controller, or other
components, fully disconnect/unplug the grill from any power source to reduce
the risk of electrical shock.
Your Prime Pellet Grill has two emergency shutoff safety features.
LOW TEMPERATURE ALARM
If the RTD temperature sensor detects sustained temperatures below 125°F, the control will trigger an alarm state and the display will show “LEr.” Power will be cut
to the internal components of the grill (auger and heating rod) until the main power switch is turned OFF (O).
HIGH TEMPERATURE ALARM
If the RTD temperature sensor detects an internal temperature exceeding 550°F, the control will trigger an alarm state and the display will show “HEr.” Power will
be cut to the internal components of the grill (auger and heating rod) until the main power switch is turned OFF (O).
If either of these alarm conditions arises, investigate to nd out what caused the low or high temperature. Contact Customer Service if you are unable to pinpoint
and remedy the issue.
SAFETY FEATURES

Contact us for assistance: (866) 985-7877 | www.primepelletgrills.com TITLE | 17
NOTE: If the temperature reading has not reached the set temperature
after ten minutes of preheating, turn the dial to BURN OFF. Now re-set to
your preferred temperature.
If the grill still fails to reach set temperature, consult Troubleshooting
(pages 25-26) for more information on grilling issues.
1Open the door and turn the grill power to ON (I). Set the
temperature dial to IGNITE. The pellets in the re pot should ignite
within about two minutes, creating light gray smoke. Once you see
smoke, close the door and turn the dial to your preferred cooking
temperature.
Prior to adding food, let the grill preheat for 10 minutes with the
door closed.
OPERATION | 17Contact us for assistance: (866) 985-7877 | www.primepelletgrills.com
EVERYDAY GRILLING
Contact us for assistance: (866) 985-7877 | www.primepelletgrills.com TITLE | 17
NOTE: If the temperature reading has not reached the set temperature
after ten minutes of preheating, turn the dial to BURN OFF. Now re-set to
your preferred temperature.
If the grill still fails to reach set temperature, consult Troubleshooting
(page 16) for more information on grilling issues.
225
180
325
275
375Smoke
Shut Down
Cycle High
Power
OFF
ON
With the door open, turn the switch
ON ( I) and the temperature dial to
SMOKE. In about 2 minutes, the pellets
will ignite and whitish-gray smoke will
come out of the grill. After the pellets
have ignited, close the door and turn
Before
time, it will need to be seasoned.
Turn the temperature dial to HIGH
and let run for 45 minutes with the
door closed.
910
INITIAL FIRING INSTRUCTIONS (cont.)
WARNING!
· Start the grill on SMOKE setting with the door open. Once the pellets a
the temperature dial to any desired cooking temperature.
· When operating this grill, maintain a minimum clearance of 30.48 cm / 12 in f
·
in the grill.
·
more details.
225
180
Smoke
Shut D
Cy
Po
With the door open, turn the switch
ON ( I) and the temperature dial to
SMOKE. In about 2 minutes, the pellets
will ignite and whitish-gray smoke will
come out of the grill. After the pellets
have ignited, close the door and turn
the temperature dial to any cooking
setting desired.
910
INITIAL FIRING INSTRUCTIONS
CONTROLLER SHUT D
1 Open the door and turn the grill power to ON (I). Set the
within about two minutes, creating light gray smoke. Once you see
smoke, close the door and turn the dial to your preferred cooking
temperature.
2 Prior to adding food, let the grill preheat for 10 minutes with the
door closed.
OPERATION | 17Contact us for assistance: (866) 985-7877 | www.primepelletgrills.com
EVERYDAY GRILLING
WARNING!
· Start the grill on SMOKE setting with the door open.
the temperature dial to any desired cooking temperature.
· When operating this grill, maintain a minimum clearance of 30.4
·
in the grill.
·
more details.
With the door open, turn the switch
ON ( I) and the temperature dial to
SMOKE. In about 2 minutes, the pellets
will ignite and whitish-gray smoke will
come out of the grill. After the pellets
have ignited, close the door and turn
the temperature dial to any cooking
setting desired.
91
INITIAL FIRING INSTRUCTIONS
CONTROLLER SHUT D
Contact us for assistance: (866) 985-7877 | www.primepelletgrills.com
REIGNITING YOUR GRILL
1If the grill fails to light or goes out unexpectedly, turn the switch
OFF (O) and unplug the grill from power. Allow the grill to cool
completely.
After the grill is cool, remove any food and the grates, drain pan,
and heat bafes.
WARNING! If your grill fails to light, or if the re in the re pot goes out while cooking (and there are still pellets in the hopper), take the following action to avoid “over-ring”
your grill with excess unburned pellets in the re pot.
Contact us for assistance: (866) 985-7877 | www.primepelletgrills.com
REIGNITING YOUR GRILL
1 If the grill fails to light or goes out unexpectedly, turn the switch
OFF (O) and unplug the grill from power. Allow the grill to cool
completely.
2 After the grill is cool, remove any food and the grates, drain pan,
375Smoke
Shut Down
Cycle High
Power
OFF
ON
DANGER! If the grill failed to light or
(O) and disconnect the power cord.
If the grill is still hot, allow it to cool
thoroughly.
Open the door and remove all food,
the porcelain-coated grill grates, the
grease drain pan, and the upper and
WARNING!
1 2
REIGNITING YOUR GRILL
DANGER! If the grill failed to light or
(O) and disconnect the power cord.
If the grill is still hot, allow it to cool
thoroughly.
WARNING!
1
REIGNITING YOUR GRILL
OPERATION | 18
OPERATION | 18
Contact us for assistance: (866) 985-7877 | www.primepelletgrills.com
3WARNING! You must remove all unburned pellets and ash
from the re pot and surrounding areas. See page 24 for more
information on ash removal.
Plug the grill back in to a grounded power outlet. Turn the grill
back to ON and the dial to IGNITE. The auger should push pellets
into the re pot and the heating rod will turn red. CAUTION! Do not
touch the heating rod. Wait for ames to appear in the re pot.
Contact us for assistance: (866) 985-7877 | www.primepelletgrills.com
WARNING! Remove all unburned
pellets and ash from inside and
for proper handling and disposal of
ash on page 19.)
Plug power cord into an appropriate
grounded electrical outlet and restart
the grill. Pellets should fall into the
to heat (it will start to turn red).
CAUTION! Do not touch the hot rod.
3 4
Power
ON
DANGER! If the grill failed to light or
(O) and disconnect the power cord.
If the grill is still hot, allow it to cool
thoroughly.
Open the door and remove all food,
the porcelain-coated grill grates, the
grease drain pan, and the upper and
1 2
20
WARNING! Remove all unburned
pellets and ash from inside and
for proper handling and disposal of
ash on page 19.)
3
3 WARNING! You must remove all unburned pellets and ash
information on ash removal.
4 Plug the grill back in to a grounded power outlet. Turn the grill
back to ON and the dial to IGNITE. The auger should push pellets
REIGNITING YOUR GRILL
OPERATION | 19
REIGNITING YOUR GRILL
OPERATION | 19
Contact us for assistance: (866) 985-7877 | www.primepelletgrills.com
Prime Pellet Pro-Tip: If your grill fails to reignite, see
TROUBLESHOOTING on pages 25-26 for more tips, or
contact Prime Pellet Grills Customer Service to diagnose
the problem.
5After verifying that there are ames in the re pot, turn the switch
to OFF (O) and let the grill cool. After the grill is cool you can
replace the heat bafes, drain pan, and grills.
Leaving the grill door open, turn the switch ON (I) and the dial
to IGNITE. The pellets will ignite and light gray smoke will rise.
After seeing smoke, close the door and adjust the dial to your desired
cooking temperature.
REIGNITING YOUR GRILL
OPERATION | 20
Contact us for assistance: (866) 985-7877 | www.primepelletgrills.com
O).
Let the grill cool down. Now you’re
ready to place the upper and lower
porcelain-coated grill grates back into
the grill.
NOTE: If the procedure is not successful, see “FREQUENTLY ASKED QUESTIONS” on page 22 for
troubleshooting tips or contact Traeger's VIP-365 Customer Service (see page 26) to help diagnos
problem.
5
375
Shut Down
Cycle High
ower
OFF
ON
With the door open, turn the switch
ON ( I) and the temperature dial to
SMOKE. In about 2 minutes, the pellets
will ignite and whitish-gray smoke will
come out of the grill. After the pellets
have ignited, close the door and turn
the temperature dial to any cooking
setting desired.
O).
Let the grill cool down. Now you’re
ready to place the upper and lower
porcelain-coated grill grates back into
the grill.
5 6
Prime Pellet Pro-Tip: If your grill fails to reignite, see
TROUBLESHOOTING on page 16–18 for more tips, or
contact Prime Pellet Grills Customer Service to diagnose
the problem.
5 to OFF (O) and let the grill cool. After the grill is cool you can
6 Leaving the grill door open, turn the switch ON (I) and the dial
to IGNITE. The pellets will ignite and light gray smoke will rise.
After seeing smoke, close the door and adjust the dial to your desired
cooking temperature.
REIGNITING YOUR GRILL
OPERATION | 20
225
180
325
275
Shut Do
Cycle
Power
ON
This manual suits for next models
1
Table of contents
Other Prime Grill Grill manuals

Popular Grill manuals by other brands

Char-Broil
Char-Broil LUCKENBACH 04301107 Assembly instructions

Napoleon
Napoleon FREESTYLE Series Assembly guide

Megamaster
Megamaster 720-0905D Assembly & operating instructions

Bestron
Bestron Asia Lounge ABP603BB instruction manual

PK Grills
PK Grills Original PK Owner's handbook

George Foreman
George Foreman GR0036W Champ use and care manual


