Princess 01.352718.01.001 User manual

EN Instruction manual
NL Gebruiksaanwijzing
FR Mode d’emploi
DE Bedienungsanleitung
ES Manual de usuario
PT Manual de utilizador
IT Manuale utente
SV Bruksanvisning
CS Návod na použití
PL Instrukcja obsługi
SK Návod na použitie
Air Conditioner
01.352718.01.001
RU Руководство по эксплуатации
Ai
Ai
Ai
r
Co

13
1
2
4
11
6
3
7 9
8
12
10
5
PARTS DESCRIPTION / ONDERDELENBESCHRIJVING / DESCRIPTION DES PIÈCES
/ TEILEBESCHREIBUNG / DESCRIPCIÓN DE LAS PIEZAS / DESCRIÇÃO DOS
COMPONENTES / DESCRIZIONE DELLE PARTI / BESKRIVNING AV DELAR /
OPIS CZĘŚCI / POPIS SOUČÁSTÍ / POPIS SÚČASTÍ / ОПИСАНИЕ ЗАПЧАСТИ

Instruction manual
3
SAFETY
• Please read this user’s manual carefully to
ensure proper use, maintenance and
installation.
• By ignoring the safety instructions the
manufacturer cannot be held responsible for
the damage.
• The appliance is for indoor use only.
• Do not use the unit on a socket that is
damaged or that has not been installed
correctly.
• Do not use the unit:
– near a source of fire.
– in an area where oil is likely to splash.
– in an area exposed to direct sunlight.
– in an area where water is likely to
splash.
– near a bath, a shower or a swimming
pool.
• Never insert your fingers or objects into the
air outlet. Take special care to warn children
of these dangers.
• Keep the unit upright during transport and
storage.
• Before cleaning the unit, always turn off or
disconnect the power supply.
• Always turn off and disconnect the power
supply before moving the unit.
• WARNING: To avoid the risk of fire, do
not cover the unit.
• All the unit sockets must comply with the
local electric safety requirements. If
necessary please check.
• If the supply cord is damaged, it must be
replaced by the manufacturer, its service
agent or similarly qualified persons in order
to avoid a hazard.
• This appliance can be used by children aged
8 years and above, persons with reduced
physical, sensory, and mental capabilities or
persons with a lack of experience and
knowledge if they have been given correct
supervision or instruction concerning the use
of the appliance in a safe way and
understand the hazards involved. Children
should not play with the appliance. Cleaning
and user maintenance should not be carried
out by children without supervision.
• This appliance is only to be used for
household purposes and only for the
purpose it is made for.
• Notes:
EN

Instruction manual
4
– In the case of any damage, please
disconnect the power supply and contact
the dealer or a designated repair shop.
– In any case, the power cord shall be
firmly grounded.
– To avoid the possibility of danger, if the
power cord is damaged, please
disconnect the power supply. It must be
replaced by the dealer or a designated
repair shop.
Warning
• Please use the recommended defrosting and
cleaning process from the manufacturer
only. Do not accelerate the defrosting or
cleaning process in any other way.
• The appliance shall be stored in a room
without continuously operating ignition
sources (for example: open flames , an
operating gas appliance or an operating
electric heater).
• Do not pierce or burn.
• Be aware that refrigerants may not contain
an odor.
• The appliance should be installed, operated
and stored in a room with a floor area larger
than X m2. (X=15 for 12000/18000Btu/h)
• Only contact an authorized service
technician for repair or maintenance of this
unit.
• Do not pull , deform or modify the power
supply cord or immerse in water . Pulling or
misuse of the power supply cord could result
in damage to the unit and cause an electrical
shock.
• Compliance with national gas regulations
should be observed.
• Keep ventilation openings clear of
obstructions.
• Servicing should only be performed as
recommended by the equipment
manufacturer. Maintenance and repair
requiring the assistance of other skilled
personnel should be carried out under the
supervision of a person(s) competent in the
use of flammable refrigerants.
• Do not stop the unit by pulling out the power
plug whilst in operation as this may cause an
electric shock or fire due to heat generation
unless strange sounds are heard or if
strange smells or smoke appear from the
unit.

Instruction manual
5
Specific information regarding appliances with R 290 refrigerant gas.
• Thoroughly read all of the warnings.
• When defrosting and cleaning the
appliance , do not use any tools other than
those recommended by the manufacturing
company.
• The appliance should not be stored in a
room with continuously operating ignition
sources (for example: open flames , an
operating gas appliance or an operating
electric heater).
• Do not puncture and do not burn.
• This appliance contains Y g (see rating label
back of unit ) of R290 refrigerant gas.
• R290 is a refrigerant gas that complies with
the European directives on the environment.
Do not puncture any part of the refrigerant
circuit.
• If the appliance is installed, operated or
stored in a non-ventilated area, the room
must be designed to prevent to the
accumulation of refrigerant leaks that could
result in a fire risk or explosion due to
ignition of the refrigerant caused by electric
heaters, stoves, or other sources of ignition.
• The appliance must be stored in such a way
as to prevent mechanical failure.
• Individuals who operate or work on the
refrigerant circuit must have the appropriate
certification issued by an accredited
organization that ensures competence in
handling refrigerants according to a specific
evaluation recognized by associations in the
industry.
• Repairs must be performed based on the
recommendation from the manufacturing
company. Maintenance and repairs that
require the assistance of other qualified
personnel must be performed under the
supervision of an individual specified in the
use of flammable refrigerants.
EN

Instruction manual
6
Batteries
• Do not expose the battery to high
temperatures or direct sunlight. Never throw
batteries into the fire. There is a danger of
explosion!
• Keep batteries away from children. Batteries
are not a toy!
• Do not open the batteries by force.
• Avoid contact with metallic objects.(Rings,
nails, screws et cetera) there is a danger of
short-circuiting!
• As a result of a short-circuit batteries may
heat up consider-ably or even catch fire. this
may result in burns.
• For your safety the battery poles are covered
with adhesive strips during transport.
• Do not touch a ruptured and/or leaking
battery. If the liquid from the battery gets into
your eyes, rinse your eyes as soon as
possible with clean water, without rubbing
your eyes. Immediately go to the hospital. If
it is not treated properly, it can cause eye
problems.
Refrigerant
(CE) N 842/2006: This unit contains the refrigerant R290. The amount
of refrigerant is less than 1kg, and is in a closed cooling circuit. The
coolant does have zero ozone depletion potential, but is a so-called
greenhouse gases under the Kyoto Protocol and may thus contribute
to global warming, if it is released to the atmosphere. Therefore only
trained technicians with refrigerant certificate make a filling or
emptying. Your appliance does not have be refilled with refrigerant if
used properly and has an undamaged coolant circuit. GWP: R290: 3
PARTS DESCRIPTION
1. Air inlet 8. Hose connector (window end)
2. Air filter 9. Hot-air exhaust hose
3. Control panel 10. Hose connector (Air conditioner end)
4. Power cord 11. Window seal + Velcro
5. Air outlet 12. Remote control
6. Castor 13. Batteries
7. Drainage hole

Instruction manual
7
FUNCTION OF CONTROL PANEL
1 Power on/off 8 Sleep mode
2 Fan speed 9 Auto indicator
3 Temperature up 10 Cooling indicator
4 Temperature down 11 Dehumidifying indicator
5 Mode button 12 Fan indicator
6 Timer on/off 13 High/Medium/Low fan speed
indicator
7 Swing on/off 14 Water full indicator
REMOTE CONTROL
1 Power on/off
2 Timer on/off
3 Mode
4 Temperature down
5 Temperature up
6 Fan speed
7 Sleep mode
8 Auto swing
EN

Instruction manual
8
• 2xAAA size batteries are required.
• Ensure batteries are inserted in the correct direction.
• When replacing, ensure both batteries are changed
simultaneously.
• Press the corresponding buttons as explained in the control panel
part to operate the fan.
BEFORE THE FIRST USE
Before starting operations in this section:
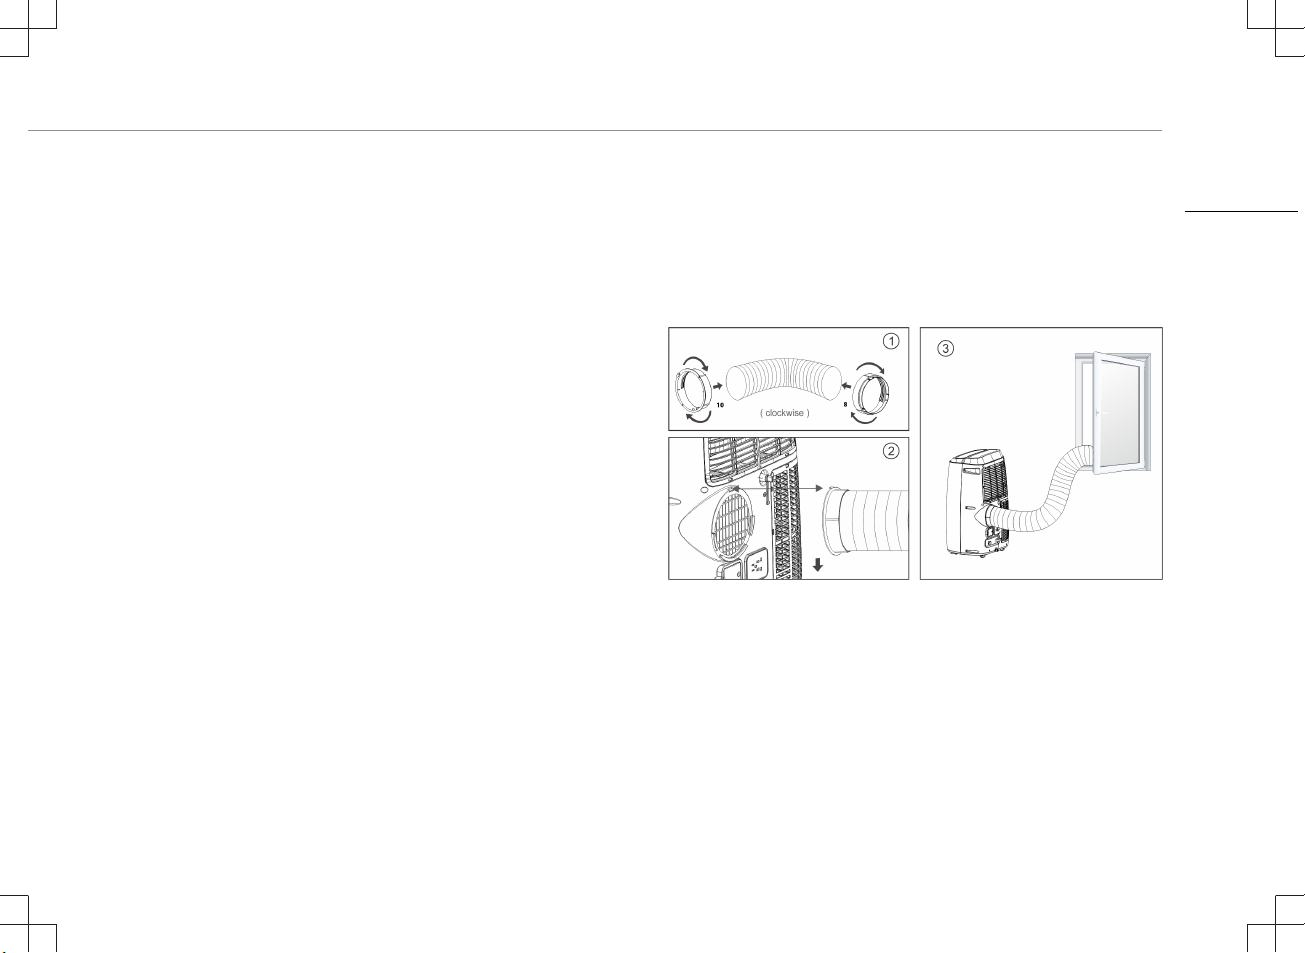
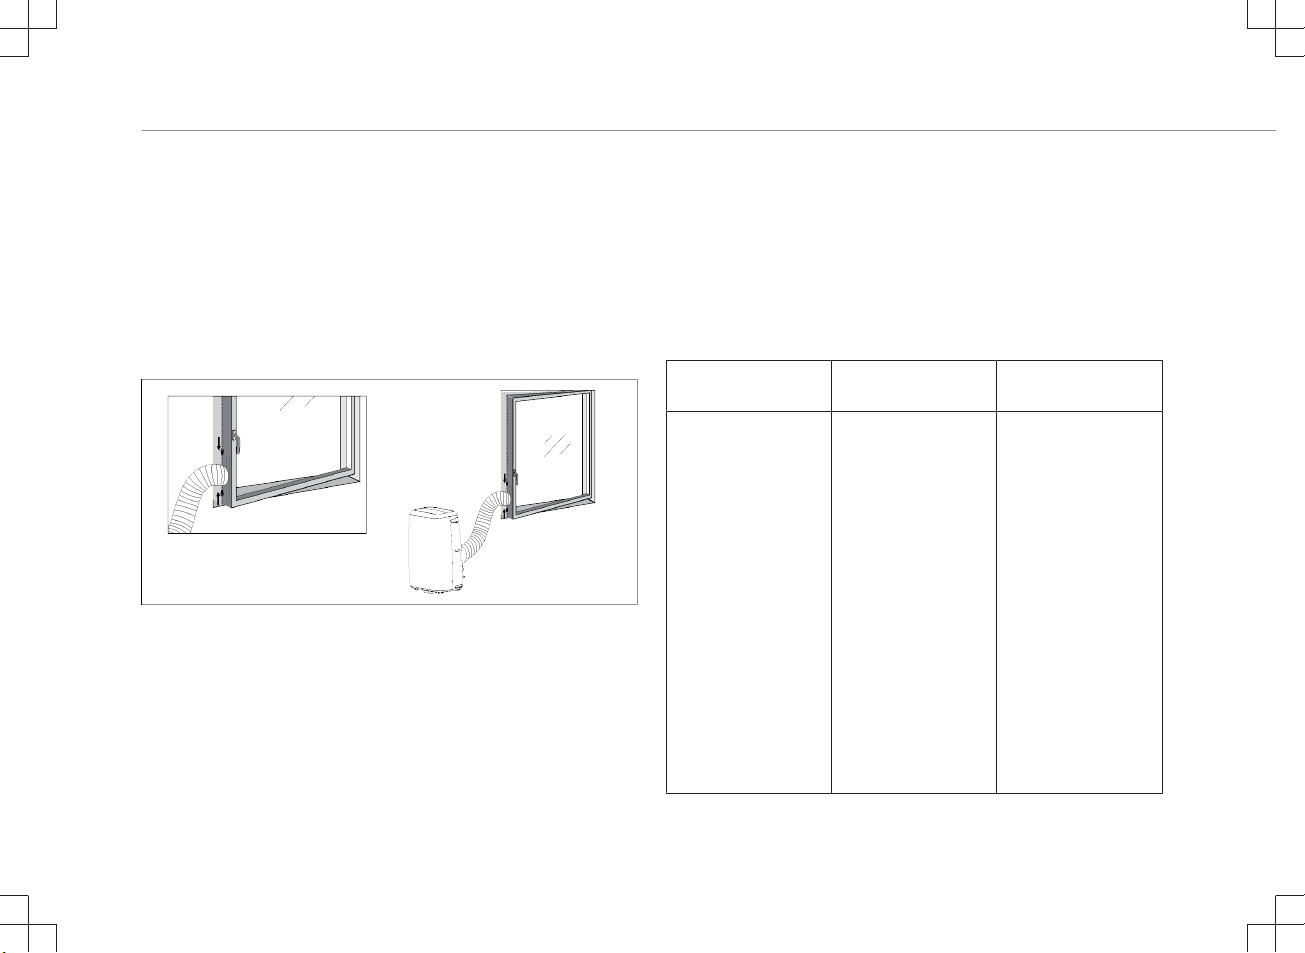
• Find a place where there is power supply nearby.
• Install the exhaust hose and adjust the window position well.
• Insert the power cord into a grounded AC220~240V/50Hz socket.
• Press the power button to turn on the air-conditioner.
• Check whether the exhaust hose has been mounted properly.
• Set the temperature range: 16°C-31°C.
• When using functions on cooling and dehumidifying, allow at least
3 minutes between powering off and powering on.
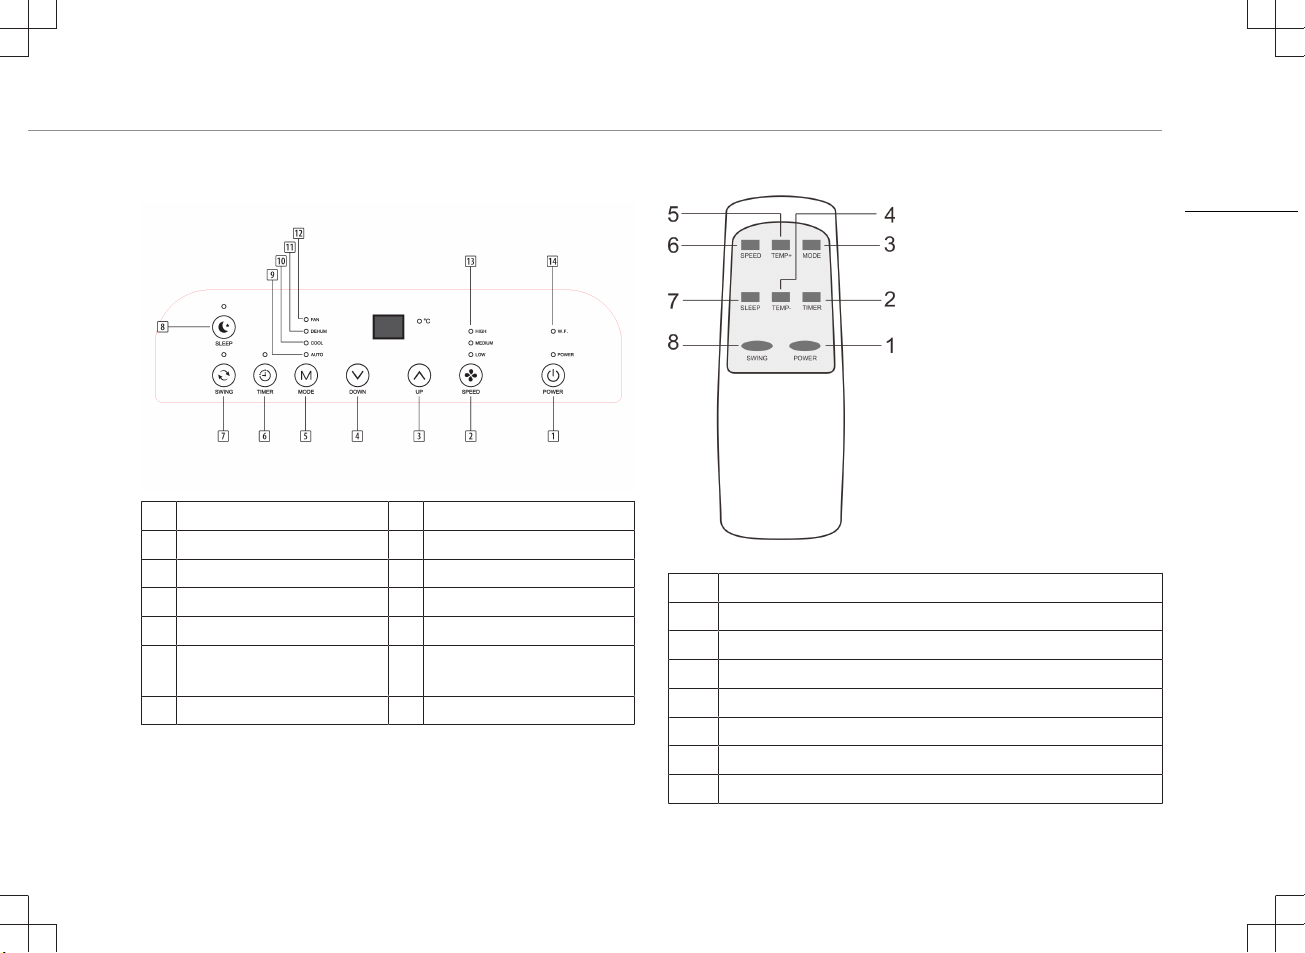
USING THE ON DEVICE BUTTONS
Auto mode
• According to the current room temperature, automatically select
the mode: cooling, dehumidifying or fan.
Room
temperature
<23°C 23°C-26°C >26°C
Mode Heating Dehumidify Cooling
Set temperature 21°C 23°C 25°C
Cooling operation
• Press the “Mode“ button till the “Cool“ icon appears.
• Press the + <Temperature up> or - <Temperature down> button
to select a desired room temperature.
• Allow around 5 minutes for the cooling to start.
• Press the “Fan speed” button to adjust airflow speed.
Dehumidifying operation
• Press the “Mode“ button until the “Dehumidify” icon appears.
• The temperature will automatically be selected.
• The fan speed will automatically be selected.
Fan operation
• Press the “Mode“ button till the “Fan“ icon appears.
• Press the “Fan speed” button to adjust airflow speed.
Timer operation
Timer ON setting
• When the air-conditioner is OFF, press the “Timer“ button and
select a desired ON time and adjust by using the <Temperature
up> and <Temperature down> buttons.
• The ON time can be adjusted to anytime in 0-24 hours.
Timer OFF setting
• When the air-conditioner is ON, press the “Timer“ button and
select a desired OFF time and adjust by using the <Temperature
up> and <Temperature down> buttons.
• The OFF time can be adjusted to anytime in 0-24 hours.
Swing operation (oscillation mode)
• Press this button to start the oscillation mode, the louver will
swing continuously up and down. Press button again to stop the
operation.

Instruction manual
9
Sleep operation
• In cooling mode, press the "Sleep" button to set the temperature.
The set temperature is increased by 1 degree within one hour to
a maximum of 2 degrees after 2 hours.
• Press “Sleep” button to cancel the operation.
Drainage
• After a lengthy operation and before storage, you will need to
drain the water that has been collected. Please prepare a
suitable location or tray to collect the water and remove the
rubber stop from the drainage hole at the bottom of the unit. The
water will then begin to drain. After this has stopped, you can
insert the drain stop.
Internal Tank Water Full Alarm Function
• The inner water tank in the air-conditioner has one water level
safety switch that controls the water level. When the water level
reaches an anticipated height, the water full indicator lamp lights
up. Follow previous steps to drain the water.
INSTALLATION
• The air-conditioner should be installed on a flat and stable
surface. Do not block the air outlet and allow at least 30cm
around the unit.
• Socket wiring should be in accordance with the local electric
safety requirements.
Exhaust Hose Installation
• Twist both ends of the hot-air exhaust hose(9) into the hose
connector window end(8) and the hose connector air conditioner
end(10).
• Insert the hose connector air conditioned end(10) into the
openings at the back of the air conditioner.
• Fix the hose connector window end(8) to the nearest windowsill.
Universal Window Kit Installation
• Clean the window and window frame with soap or detergent and
make sure the entire window frame is dust and grease free.
• Cut the Velcro to the dimensions of the window with scissors.
• Attach the Velcro around the entire window. Note: don’t stick the
Velcro onto the glass.
• Attach the cloth to the Velcro tape. Start with the narrow part and
work from the center towards the rest of the Velcro tape, which is
attached on the window frame and around the window.
EN

Instruction manual
10
• It may be useful to open the window while attaching the cloth.
Make sure to leave enough room in the corners so the cloth won’t
get stuck in the window.
• Open the window kit’s zipper by about 50 centimeters.
• Place the air conditioning hose in the opening of the cloth. After
that, close the zipper until the air condition hose is placed.
CLEANING MAINTENANCE
• Before cleaning, disconnect the unit from any electric supply
outlet.
• First clean the surface with a neutral detergent and wet cloth, and
then wipe it with a dry cloth.
• Do not use gasoline or other chemicals to clean the unit.
• Do not wash the unit directly.
Air filter
• The air filter should be cleaned once every two weeks.
• Open the air inlet grille and take off air filter.
• Clean the air filter with neutral detergent in lukewarm 40°C water
and allow to dry (not in direct sunlight).
• Re-install the air filter into the inlet grille.
TROUBLESHOOTING
Troubles Possible Causes Suggested
Remedies
The unit does not
start when pressing
power button.
• Water full
indicator lamp
blinks and water
tank is full.
• Room
temperature is
higher than the
setting
temperature.
(Electric heating
mode)
• Room
temperature is
lower that the
setting
temperature.
(Cooling mode)
• Drain the water
out of the water
tank.
• Adjust the
temperature.

Instruction manual
11
The unit doesn’t cool
enough.
• The doors or
windows are not
closed.
• There are heat
sources inside the
room.
• Hot air exhaust
hose is not
connected or
blocked.
• Temperature
setting is too high.
• Air inlet in
blocked.
• Make sure all the
windows and
doors are closed.
• Remove the heat
sources if
possible.
• Connect or clean
the hot air
exhaust hose.
• Reset the
temperature.
• Clean the air inlet.
Noisy. • The ground is not
level or not flat
enough.
• The sound comes
from the flowing
of the refrigerant
inside the air
conditioner.
• Place unit on a
flat, level ground
if possible.
E0 Code • Room
temperature
sensor failed.
• Replace room
temperature
sensor.
E1 Code • Condenser
temperature
sensor failed
• Replace
condenser
temperature
sensor.
E2 Code • Water tray full
when cooling
• Take off rubber
stopper and
empty the water.
E3 Code • Pipe temperature
sensor failed.
• Replace pipe
temperature
sensor.
E4 Code • Water tank full • Please empty the
water tank.
THE PRODUCT OR EQUIPMENT CONTAINS
FLUORINATED GREENHOUSE GAS.
Art.nr. 352718
Coolant: R290
Quantity in kg: 0.3
Global Warming Potential: 9
CO2 Equivalent in tonnes: 0.0009
EN

Instruction manual
12
ENVIRONMENT
This appliance should not be put into the domestic
garbage at the end of its durability, but must be offered at a central
point for the recycling of electric and electronic domestic appliances.
This symbol on the appliance, instruction manual and packaging puts
your attention to this important issue. The materials used in this
appliance can be recycled. By recycling of used domestic appliances
you contribute an important push to the protection of our environment.
Ask your local authorities for information regarding the point of
recollection.
The European directive for batteries (2006/66/EC) states that it is not
permitted to throw batteries away with the household waste. They
may contain substances which are harmful to the environment. Empty
batteries can be handed over to a local, public collection point or a
local recycling centre. To avoid overheating as a result of a short
circuit, lithium batteries must be removed from the product and the
poles must be protected using insulation tape or some other means
against short-circuiting.

Gebruiksaanwijzing
13
VEILIGHEID
• Lees deze gebruiksaanwijzing zorgvuldig
door voor een correct(e) gebruik, onderhoud
en installatie.
• Als u de veiligheidsinstructies negeert, kan
de fabrikant niet verantwoordelijk worden
gehouden voor de mogelijke schade.
• Het apparaat is alleen geschikt voor gebruik
binnenshuis.
• Sluit het apparaat niet aan op een
stopcontact dat beschadigd is of niet correct
is geïnstalleerd.
• Gebruik het apparaat niet:
– in de buurt van vuur.
– in een gebied met een grote kans op
spattende olie.
– in een gebied dat wordt blootgesteld aan
direct zonlicht.
– in een gebied met een grote kans op
spattend water.
– in de buurt van een bad, douche of
zwembad.
• Steek nooit uw vingers of voorwerpen in de
luchtuitlaat. Waarschuw vooral kinderen
voor deze gevaren.
• Zorg dat het apparaat rechtop blijft staan
wanneer u het vervoert en opbergt.
• Zorg dat u altijd de stroomtoevoer
uitschakelt en loskoppelt voordat u het
apparaat reinigt.
• Zorg dat u altijd de stroomtoevoer
uitschakelt en loskoppelt voordat u het
apparaat verplaatst.
• WAARSCHUWING: Om brandgevaar te
voorkomen raden we u aan het apparaat
niet te bedekken.
• Alle aansluitingen van het apparaat moeten
voldoen aan de lokale
veiligheidsvoorschriften voor elektriciteit.
Controleer zo nodig of dit het geval is.
• Als het netsnoer beschadigd is, moet het
worden vervangen door de fabrikant, de
onderhoudsmonteur van de fabrikant of door
personen met een soortgelijke kwalificatie
om gevaar te voorkomen.
• Dit apparaat mag door kinderen jonger dan
8 jaar, personen met verminderde
lichamelijke, zintuiglijke of verstandelijke
capaciteiten of gebrek aan kennis worden
gebruikt, mits dit gebeurt onder goed
toezicht of zij juiste instructies hebben
NL

Gebruiksaanwijzing
14
gekregen over het gebruik van het apparaat
en de gevaren van het gebruik begrijpen.
Kinderen mogen niet spelen met het
apparaat. Het apparaat mag niet zonder
toezicht worden gereinigd of onderhouden
door kinderen.
• Dit apparaat is uitsluitend voor huishoudelijk
gebruik en voor het doel waar het voor
bestemd is.
• Opmerkingen:
– In geval van schade schakelt u het
apparaat uit, koppelt u de stroomtoevoer
los en neemt u contact op met de dealer
of een aangewezen reparatiebedrijf.
– Het netsnoer moet altijd stevig worden
geaard.
– Om gevaarlijke situaties te voorkomen,
moet u de stroomtoevoer loskoppelen als
het netsnoer is beschadigd. Laat het
snoer vervangen door de dealer of een
hiertoe aangewezen reparatiebedrijf.
Waarschuwing
• Volg uitsluitend het aanbevolen ontdooi- en
reinigingsproces van de fabrikant. Probeer
het ontdooi- of reinigingsproces op geen
enkele andere manier te versnellen.
• Het apparaat moet worden opgeslagen in
een ruimte zonder voortdurend werkende
ontstekingsbronnen (bijvoorbeeld: open
vlammen, een werkend gasapparaat of een
werkende elektrische verwarming).
• Doorboor of verbrand het apparaat niet.
• Houd er rekening mee dat koelmiddelen
geurloos kunnen zijn.
• Het apparaat moet worden geïnstalleerd,
gebruikt en opgeslagen in een ruimte met
een vloeroppervlak van meer dan Xm2.
(X=15 voor 12000/18000Btu/u)
• Neem uitsluitend contact op met een
bevoegde onderhoudsmonteur voor
reparatie- of onderhoudswerkzaamheden
aan dit apparaat.
• Trek niet aan het netsnoer en vervorm of
wijzig het niet. Dompel het ook niet onder in
water. Door aan het netsnoer te trekken of
het verkeerd te gebruiken, kunt u het
apparaat beschadigen en een elektrische
schok veroorzaken.
• Het is verplicht de nationale gasvoorschriften
in acht te nemen.
• Zorg dat de ventilatieopeningen niet worden
geblokkeerd.

Gebruiksaanwijzing
15
• Reparatiewerkzaamheden mogen alleen
worden uitgevoerd voor zover deze zijn
aanbevolen door de fabrikant van de
apparatuur. Onderhouds- en
reparatiewerkzaamheden waarbij de hulp
van ander geschoold personeel nodig is,
moeten worden uitgevoerd onder toezicht
van een of meer personen die bekwaam zijn
in het gebruik van brandbare koelmiddelen.
• Stop het apparaat niet door het netsnoer uit
het stopcontact te trekken terwijl het
apparaat is ingeschakeld. De warmte die
hierbij ontstaat, kan namelijk een elektrische
schok of brand veroorzaken. De enige
situaties waarin u dit wel mag doen, is als u
vreemde geluiden hoort, een vreemde geur
ruikt of er rook uit het apparaat komt.
Specifieke informatie over apparaten met R290-koelgas.
• Lees alle waarschuwingen zorgvuldig door.
• Bij het ontdooien en reinigen van het
apparaat mogen alleen de hulpmiddelen
worden gebruikt die door het productiebedrijf
worden aangeraden.
• Het apparaat mag niet worden opgeslagen
in een ruimte met voortdurend werkende
ontstekingsbronnen (bijvoorbeeld: open
vuur, een werkend gasapparaat of een
werkende elektrische verwarming).
• Doorboren of verbranden is niet toegestaan.
• Dit apparaat bevat Y g (zie het typeplaatje
aan de achterkant van het apparaat) R290-
koelgas.
• R290 is een koelgas dat voldoet aan de
Europese milieurichtlijnen. Doorboor geen
enkel deel van het koelcircuit.
• Als het apparaat wordt geïnstalleerd,
gebruikt of opgeslagen in een niet-
geventileerde ruimte, moet de ruimte zijn
ontworpen om de ophoping van koelmiddel
in geval van lekkages te voorkomen.
Koelmiddellekkages kunnen de kans op
brand of explosies vergroten doordat
elektrische verwarmingen, fornuizen of
andere ontstekingsbronnen ervoor zorgen
dat het koelmiddel ontbrandt.
NL

Gebruiksaanwijzing
16
• Het apparaat moet dusdanig worden
opgeslagen dat mechanische storingen
worden voorkomen.
• Mensen die werken aan het koelcircuit of het
bedienen, moeten in het bezit te zijn van de
juiste certificering, die is verleend door een
geaccrediteerde organisatie en die
garandeert dat ze vaardig zijn in de omgang
met koelmiddelen in overeenstemming met
een specifieke evaluatie die wordt erkend
door brancheverenigingen.
• Reparaties moeten worden uitgevoerd op
basis van de aanbevelingen van het
productiebedrijf. Onderhouds- en
reparatiewerkzaamheden waarbij de hulp
van ander geschoold personeel is vereist,
moeten worden uitgevoerd onder het
toezicht van degene die kundig is in het
gebruik van brandbare koelmiddelen.
Batterijen
• Stel de batterijen niet bloot aan hoge
temperaturen of direct zonlicht. Werp
batterijen nooit in open vuur. Dit kan leiden
tot explosies.
• Houd batterijen buiten bereik van kinderen.
Batterijen zijn geen speelgoed.
• Forceer de batterijen niet open.
• Vermijd contact met metalen objecten
(ringen, spijkers, schroeven, enzovoort). Dit
kan namelijk leiden tot kortsluiting.
• Door kortsluiting kunnen batterijen zeer heet
worden of zelfs ontbranden. Dit kan leiden
tot brandwonden.
• Voor uw veiligheid worden de batterijpolen
afgedekt met plakstrips tijdens het transport.
• Raak gebarsten en/of lekkende batterijen
niet aan. Als de vloeistof uit de batterij in
contact komt met uw ogen, moet u uw ogen
zo snel mogelijk spoelen met schoon water.
Wrijf hierbij niet in uw ogen. Ga direct naar
het ziekenhuis. Als dit niet juist wordt
behandeld, kan dit leiden tot oogproblemen.
Koelmiddel
(CE) N 842/2006: Dit apparaat bevat het koelmiddel R290. De
hoeveelheid koelmiddel bedraagt minder dan 1kg en het koelmiddel
bevindt zich in een gesloten koelcircuit. Het koelmiddel draagt niet bij
aan ozonafbraak, maar is volgens het Kyotoprotocol wel een
broeikasgas en kan daardoor bijdragen aan de opwarming van de
aarde wanneer het in de atmosfeer terechtkomt. Daarom mogen vul-
en leegwerkzaamheden alleen worden uitgevoerd door
gekwalificeerde technici met een koelcertificaat. Het apparaat hoeft
niet opnieuw met koelmiddel te worden gevuld als het correct wordt
gebruikt en het koelcircuit onbeschadigd is. GWP
(aardopwarmingsvermogen): R290: 3

Gebruiksaanwijzing
17
BESCHRIJVING VAN ONDERDELEN
1. Luchtinlaat 8. Slangaansluiting (raamuiteinde)
2. Luchtfilter 9. Afvoerslang voor warme lucht
3. Bedieningspaneel 10. Slangaansluiting (airconditioner-uiteinde)
4. Netsnoer 11. Raamafdichting + klittenband
5. Luchtuitlaat 12. Afstandsbediening
6. Zwenkwiel 13. Batterijen
7. Afvoergat
WERKING VAN HET BEDIENINGSPANEEL
1 Aan/uit 8 Slaapstand
2 Ventilatorsnelheid 9 Indicator voor automatische
werking
3 Temperatuur omhoog 10 Indicator voor koelen
4 Temperatuur omlaag 11 Indicator voor ontvochtigen
5 Modusknop 12 Indicator voor ventilator
6 Timer aan/uit 13 Indicator voor hoge/
gemiddelde/lage
ventilatorsnelheid
7 Zwenken aan/uit 14 Indicator voor vol
waterreservoir
NL

Gebruiksaanwijzing
18
AFSTANDSBEDIENING
1 Aan/uit
2 Timer aan/uit
3 Modus
4 Temperatuur omlaag
5 Temperatuur omhoog
6 Ventilatorsnelheid
7 Slaapstand
8 Automatisch zwenken
• Er zijn 2 AAA-batterijen vereist.
• Controleer of u de batterijen in de juiste richting hebt geplaatst.
• Vervang altijd beide batterijen tegelijk.
• Druk op de toetsen die overeenkomen met de uitleg voor het
bedieningspaneel om de ventilator te bedienen.
VÓÓR HET EERSTE GEBRUIK
Voordat u de handelingen in dit gedeelte uitvoert:
• Kies een geschikte locatie in de buurt van een stroomvoorziening.
• Installeer de afvoerslang en zorg dat het raam in de juiste stand
staat.
• Sluit het netsnoer aan op een geaard stopcontact van
AC220~240V/50Hz.
• Druk op de aan/uit-knop om de airconditioner in te schakelen.
• Controleer of de afvoerslang correct is gemonteerd.
• Stel het temperatuurbereik in: 16°C-31°C.
• Wanneer u koel- en ontvochtigingsfuncties gebruikt, moet u
minstens 3 minuten wachten tussen het uit- en inschakelen.
DE TOETSEN OP HET APPARAAT GEBRUIKEN
Automatische stand
• Afhankelijk van de huidige kamertemperatuur wordt automatisch
de juiste modus gekozen: koeling, ontvochtiging of ventilator.
Kamertemperat
uur
<23°C 23°C-26°C >26°C
Modus Verwarming Ontvochtiging Koeling
Temperatuur
instellen
21°C 23°C 25°C

Gebruiksaanwijzing
19
Bediening van koelfunctie
• Druk op de modusknop tot het pictogram voor koeling wordt
weergegeven.
• Druk op de toetsen + <Temperatuur omhoog> en - <Temperatuur
omlaag> om de gewenste temperatuur voor de ruimte te
selecteren.
• Het duurt ongeveer 5 minuten voordat het koelen wordt gestart.
• Druk op de toets voor de ventilatorsnelheid om de snelheid van
de luchtstroom aan te passen.
Bediening van ontvochtigingsfunctie
• Druk op de modusknop tot het pictogram voor ontvochtiging
wordt weergegeven.
• De temperatuur wordt automatisch geselecteerd.
• De ventilatorsnelheid wordt automatisch geselecteerd.
Bediening van ventilator
• Druk op de modusknop tot het pictogram voor de ventilator wordt
weergegeven.
• Druk op de toets voor de ventilatorsnelheid om de snelheid van
de luchtstroom aan te passen.
Bediening van timer
Inschakeltijd van timer instellen
• Wanneer de airconditioner is uitgeschakeld, drukt u op de
timertoets en selecteert u de gewenste inschakeltijd met behulp
van de toetsen + <Temperatuur omhoog> en - <Temperatuur
omlaag>.
• De inschakeltijd kan worden ingesteld tussen 0 en 24 uur.
Uitschakeltijd van timer instellen
• Wanneer de airconditioner is ingeschakeld, drukt u op de
timertoets en selecteert u de gewenste uitschakeltijd met behulp
van de toetsen + <Temperatuur omhoog> en - <Temperatuur
omlaag>.
• De uitschakeltijd kan worden ingesteld tussen 0 en 24 uur.
Bediening van zwenkfunctie (oscillatiemodus)
• Druk op deze toets om de oscillatiemodus te starten. De
ventilatiejaloezie beweegt voortdurend omhoog en omlaag. Druk
opnieuw op de toets om het bewegen te stoppen.
Bediening van slaapstand
• Druk in de koelmodus op de slaapstandknop om de temperatuur
in te stellen. De ingestelde temperatuur wordt binnen een uur met
1graad verhoogd tot een maximum van 2graden na 2uur.
• Druk op de slaapstandknop om de werking te annuleren.
Water afvoeren
• Wanneer u het apparaat lange tijd hebt gebruikt en voordat u het
opslaat, moet u het opgehoopte water afvoeren. Bereid een
geschikte locatie of bak voor om het water op te vangen.
Verwijder vervolgens de rubberen stop uit het afvoergat aan de
onderkant van het apparaat. Het water loopt nu uit het apparaat.
Als er geen water meer uit het apparaat loopt, kunt u de
afvoerstop aanbrengen.
Alarmfunctie voor vol intern waterreservoir
• Het interne waterreservoir van de airconditioner is uitgerust met
een veiligheidsschakelaar om het waterpeil te controleren.
Wanneer het waterpeil een verwachte hoogte bereikt, gaat er een
indicator branden om aan te geven dat het waterreservoir vol is.
Voer de vorige stappen uit om het water af te voeren.
NL

Gebruiksaanwijzing
20
INSTALLATIE
• De airconditioner moet op een vlak en stabiel oppervlak worden
geïnstalleerd. Blokkeer de luchtuitlaat niet en houd minstens
30cm ruimte vrij rond het apparaat.
• De bedrading moet voldoen aan de lokale veiligheidsvoorschriften
voor elektriciteit.
Installatie van afvoerslang
• Draai beide uiteinden van de afvoerslang voor warme lucht (9) in
het raamuiteinde van de slangaansluiting (8) en in het
airconditioner-uiteinde van de slangaansluiting (10).
• Steek het airconditioner-uiteinde (10) van de slang in de opening
aan de achterkant van de airconditioner.
• Zet het raamuiteinde (8) van de slangaansluiting vast aan het
dichtstbijzijnde raamkozijn.
Montage van universele raamset
• Maak het raam en het kozijn schoon met zeep of een
schoonmaakmiddel en zorg dat het hele kozijn stof- en vetvrij is.
• Knip het klittenband met een schaar in de afmetingen van het
raam.
• Breng het klittenband aan rond het hele raam. Opmerking: plak
het klittenband niet op het glas.
• Bevestig het doek aan de klittenbandtape. Begin met het smalle
deel en werk vanaf het midden in de richting van de overige
klittenbandtape die op het kozijn en rond het raam is
aangebracht.
• Het kan handig zijn om het raam te openen terwijl u het doek
aanbrengt. Zorg dat u in de hoeken voldoende ruimte overlaat,
zodat het doek niet vast komt te zitten tussen het raam.
• Open de ritssluiting van de raamset zo'n 50 centimeter.
• Steek de slang van de airconditioning in de opening in het doek.
Sluit vervolgens de ritssluiting totdat de slang op zijn plaats zit.
This manual suits for next models
1
Table of contents
Languages:
Other Princess Air Conditioner manuals
Popular Air Conditioner manuals by other brands

mundoclima
mundoclima CL23420 installation manual

Toshiba
Toshiba RAS-18SKV-E Series Service manual

Haier
Haier HWF05XC3 user manual

Honeywell
Honeywell HL10 Series user manual

Olimpia splendid
Olimpia splendid maeStro Pro Instructions for installation, use and maintenance

Snap-On
Snap-On POLARTEK EEAC330B manual