Pro-Idee 233441 User manual

Illuminated
solar glass ball
USER ANUAL
BELEUCHTETE
SOLAR GLASKUGEL
BOULE DE VERRE
SOLAIRE ÉCLAIRÉE
VERLICHTE
ZONNEGLAZEN BAL

INSTALLATION
1. ontieren Sie die Lampe und klappen Sie den Lampenfuß auf.
2. Setzen Sie den runden etallring auf den Lampenfuß.
3. Ziehen Sie die Schrauben fest (über und unter der Stange).
4.Verbinden Sie die Stecker und sichern Sie sie mit der Plastikkappe.
5. Setzen Sie die osaikglaskugel auf den etallring.
2.
1.

INSTALLATION
Verbinden Sie
die Stecker!
4.
5.
Schrauben
festziehen!
3.
RODUKTEIGENSCHAFTEN
Spezikation des Solarmoduls:
Größe: 96mm x 140mm
Solar Panel: 5 V / 300 mA
Batterie: 18650 - 3.7 V, 1200 mAh
Funktionsdauer: 8-36 Stunden, wenn es voll aufgeladen ist
Funktion: Helligkeitsregelung, 8 anpassbare odi, Timing
odus: 1. Kombination, 2. In Wellen, 3. Sequentiell, 4. Langsam, 5. Blitz, 6. Langsames Verblassen
7. Funkeln, 8. Dauerhaft an
Wasserdichtigkeits Stufe: IP65
Spezikation der Mosaikkugel:
Größe: 10 Zoll / 25,4 cm
aterial: Glas mit osaik
100% Handarbeit
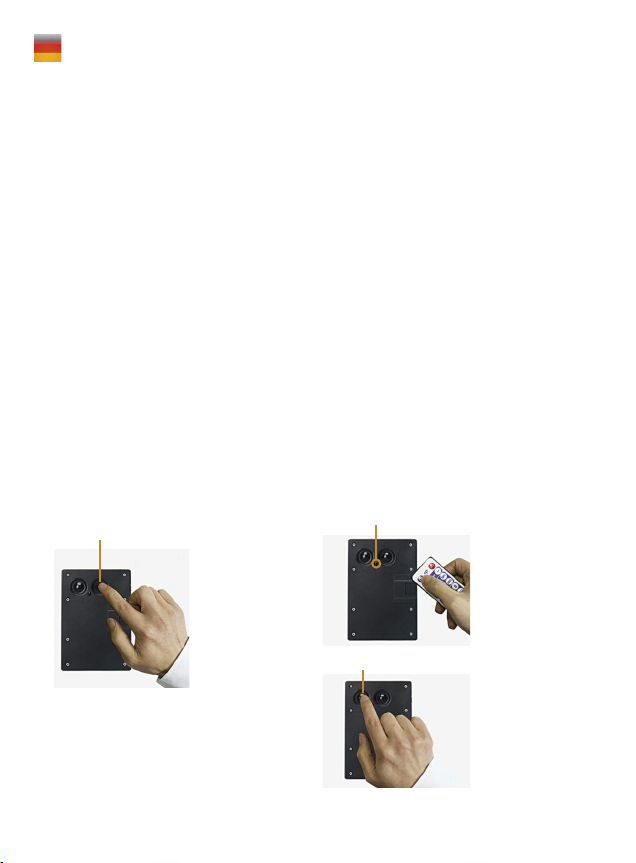
LEISTUNGSMERKMALE
Hauptschalter
Drücken Sie den Hauptschalter
(AN/AUS)
Infrarot-Empfänger
odustaste
Lichtmodus, Helligkeit,
Timing per Fernbedienung
einstellen
Stellen Sie den Lichtmodus
ein, indem Sie die
odustaste drücken
Fernbedienung
Tasten-
steuerung

VERWENDUNG DER FERNBEDIENUNG
AUS
MODUS-
50% Helligkeit
100% Helligkeit
Dauer 5 Stunden
ohne Zeit
AN
MODUS+
25% Helligkeit
75% Helligkeit
Dauer 3 Stunden
Dauer 8 Stunden
Batterietrenner vor Gebrauch entfernen
BEI DER FERNBEDIENUNG BEACHTEN
Dies ist ein Infrarot-Empfänger. Stellen Sie sicher, dass Sie
die Fernbedienung in die richtige Richtung richten und die
Vorderseite des Fernbedienungsempfängers sichtbar ist.
Table of contents
Languages:
Popular Outdoor Light manuals by other brands

Kichler Lighting
Kichler Lighting HELEN 37536 instructions

Thorn
Thorn OXANE L installation instructions

esotec
esotec Solar Globe Light multicolor 20 operating instructions

mitzi
mitzi HL200201 ELLIS Assembly and mounting instructions

HEPER
HEPER TILA S AFX 3 Module Installation & maintenance instructions

Designplan
Designplan TRON 180 installation instructions


BEGA
BEGA 84 253 Installation and technical information

HEPER
HEPER LW8034.003-US Installation & maintenance instructions

HEPER
HEPER MINIMO Installation & maintenance instructions

LIGMAN
LIGMAN BAMBOO 3 installation manual

Maretti
Maretti TUBE CUBE WALL 14.4998.04 quick start guide

Maxim Lighting
Maxim Lighting Carriage House VX 40428WGOB installation instructions