Probox PBR-500 User manual

USER MANUAL
ProboxPBR-500

1
Contents
Introduction........................................................................ 3
Usage Precautions.......................................................................................................3
Specifications................................................................................................................4
Recording Function ......................................................................................................5
MultiMedia Player Function.........................................................................................6
Package Contents........................................................................................................7
Product Descriptions of Each Part.............................................................................8
1. Use as External USB HDD.............................................11
1.1 Insert Hard Disk........................................................................................11
1.2 Format Built-in HDD................................................................................12
1.3 Copy & Paste the files through USB...................................................13
1.3.1 Windows 98SE..................................................................................................13
1.3.2 Windows ME...................................................................................................... 14
1.3.3 Windows 2000, XP...........................................................................................15
1.3.4 Linux................................................................................................................... 16
1.3.5 Mac.....................................................................................................................17
2. Connect to a PC(s) through Network connection........................19
2.1 Wired LAN Connection........................................................................................19
2.2 Wireless Connection............................................................................................ 23
3. Shared File Playback (Stream)......................................28
3.1 Windows 98SE, ME.............................................................................................28
3.2 Windows 2000...................................................................................................... 30
3.3 Windows XP.......................................................................................................... 32
3.4 Windows Vista...................................................................................................... 35
4. Use USB Host.....................................................................39
5. Connect to TV or an External AV Device...................................41
5.1 Connect Video Cable........................................................................................... 41

2
5.2 Connect Audio Cable ...........................................................................................42
6. How to use the Remote Control?.................................. 44
6.1 Explanations of the remote buttons....................................................................44
7. Initial Set-up.................................................................. 46
7.1 Format HDD...........................................................................................................46
7.2 Initial basic setup ..................................................................................................48
8. The Main Menu Explanations of Probox PBR-500........ 49
8.1 Record Analogue & Digital TV Channels ..........................................................49
8.2 REC. LIST..............................................................................................................55
8.3 Multimedia..............................................................................................................59
8.4 Setup ......................................................................................................................60
9. Remote Web-Access & Torrent Download ................... 68
9.1.1. System Info.......................................................................................................69
9.1.2. File List...............................................................................................................70
9.1.3. Record List........................................................................................................71
9.1.4. History List.........................................................................................................75
9.1.5. Torrent Download.............................................................................................76
10. FTP Server .................................................................. 79
10.1.1. Access to the PBR-500(FTP Server) by using the web-browser............80
10.1.2. Access to the PBR-500(FTP Server) by using FTP Client Program.......81
11. Firmware Upgrade....................................................... 83

3
Introduction
Usage Precautions
Please read the followings carefully and refer to [Cautions] in the manual for the proper use.
Copyright
* Probits Co. Ltd has no responsibilities for the recorded programs or files made or distributed for the purpose of
illegal commercial or transactional activities. The party or parties who record or distribute the contents bear all
the responsibilities (Civil or Criminal) direct or indirect..
Supported codec * The Probox PBR-500 may not play some media files. Please check the codec types. Also it may not play or
run improperly depending on file characters or circumstance.
USB Device
* Connect thepower adapter as well when you connect the ProboxPBR-500 to a PC.
Probox PBR-500 may not be connected if theUSB cable is more than 3 meters(9.8 feet).
Recommended length is 3 meters (9.8 feet) (recommend you to usethe supplied USB cable.)
If the USB cable is too long, the transfer speed and the connection may notbe good.
If you connect this device to USB 1.1 Host Adapter, the speed is USB 1.1 (Max. 12Mbps), so we recommend
you to connect to USB2.0 forfull speed of max. 480Mbps.
USB Host * The USB Host may not be matched with all USB storages. Please check the compatibility before you
purchase oruse the USB storage.
HDD Type * Only 3.5” SATA type HDD can be used.
Radio Waves Cross * The Probox PBR-500 may have the possibility of radio waves cross, so recommend not to use the service
related to human safety.
Data Backup * We strongly recommend you to back up the data to another safe media. We are not responsible for data
damage or loss in built-in HDD.
Drop, shock * Do not drop the device. It may cause critical damage to the hard drive
Strange Materials * Don’t insert steel materials (coin, etc) or other materials that may causetheProbox PBR-500 defect..
Disassemble / Remodel * Don’t try to disassemble or remodel the ProboxPBR-500. It may cause malfunction
Stack Up * Don’t stack another heavymaterial on the ProboxPBR-500.
Exposure to water,
moisture, etc
* Don’t expose the ProboxPBR-500 to oil, water, dust, moisture orrainand wind.
If the ProboxPBR-500 is wet then unplug the power cable fromthe unit right away.
Heat * Keep the Probox PBR-500 away from heatedareas. Set it up in well-ventilatedplaces.
Magnetic Materials * Keep all magnetic materials away from the Probox PBR-500. Magnetic materials such as speakers or
magnets mayerase or cause damage to the data stored in the hard disk.
* Probits Co. Ltd has no warranty of responsibility for the broken HDD.

4
Specifications
Product Name Probox PBR-500
Main CPU RealTek RTD 1282 200Mhz processor
Power 12V 3A
Weight Approx. 450g (without HDD inside)
Dimension & Weight 185(L) x 158(W) x 57(H) mm & Weight (g) 450
Front VFD Display Colorful VFD Display
Available OS USB Device Compatible: Windows 98SE/ME/2000/XP, Mac OS 9.0 higher, Linux 2.4 higher
USB Device Device Portx 1pcs, 480Mbps USB 2.0 (USB 1.1 compatible)
USB Host Host Port x 2pcs, 480Mbps USB 2.0 (USB 1.1 compatible)
Supporting to read USB devices like External USB HDD, ODD, Flash Drive, Card Reader
Wired LAN 10/100 MbpsLAN (RJ-45) x 1ea, 100BaseTx:UTP/STP Category 5 LAN cable compatible
Wireless USB Dongle (option) 54Mbps IEEE802.11g USB Dongle
HDD Type 3.5” SATA HDD
HDD File System NTFS / FAT32 (Recording, Time-Shift, EPGfunction is available on FAT only).
TV Type NTSC / PAL
Video Format
Mpg, mpeg,avi, vob, tp, ts, trp,dat, iso, ifo, m2t
AVI, MPEG1/2/4(xvid), IFO, ISO, VOB, DAT,TP
Up to 1920 x 1080i
Audio Format MP3, OGG,WMA, AAC, AC3,WAV
Photo Format JPG/JPEG, BMP, PNG
Subtitles Smi, sub, srt
Video Output
Composite
Component Y, Pb, Pr (480p, 720p, 1080i)
HDMI (480p, 720p, 1080i,)
Audio Output Analogue : Stereo L & R
S/PDIF Digital Output : Coaxial / Optical
AV-IN Composite, Component
Memory 64M Byte.
Cooling Fan 25 x 25 Brushless Micro Fan
Language English, Spanish, French, Germany, Italian, Dutch, Russian (Other languages will be added).
Working Temperature 0˚C ~ 60˚C
Working Humidity 10% ~ 50%
* VIDEO : Not support VC-1, MKV, H.264 or WMV (supported by the real-time transcoding)
* AUDIO : Not support FLAC, APE or WMA-Lossless

5
Recording Function
* In order to use the recording function (Direct Record, Time-Shift, Time-Schduling Record, EPG
Record), Remote Web-Access and Torrent Download, you should do the HDD Format on TV (Not
through a PC).
Probox PBR-500 has an internal TV tuner and fully records Analogue (PAL / NTSC) & Digital (DVB-T /
ATSC) TV channels as well as the media player functions.
Direct Record
The Probox PBR-500 has the direct recording function.
If you want to record the channel you are watching right now, then just
press [RECORD] button on the front panel or on the remote control then it
records the current channel.
Time-Scheduling Record You can record the programs you like by the Time-Scheduling Record on
the unit directly or through web-access to the unit remotely.
EPG The Probox PBR-500 supports ‘EPG Recording’ by the program names.
Time-Shift
‘Time-Shift’ function can give you the recording of programming to a
storage medium to be viewed or listened to at a more convenient time.
Being interrupted while watching live TV programs (such as pick up calls &
answer the door), all you need to is to press [TIMESHIFT] button on the
remote to record the program for a period of time and then later press
[TIMESHIFT] key again to pick up the location where you left off.
Torrent Download Probox PBR-500 supports Remote Torrent Download through the Remote
Web-Access Control.
AV-IN
You can convert the analogue contents such as VCR to a digital contents
into a HDD inside through AV-IN and record the digital signal from Cable
Set-Top-Box, Satellite Set-Top-Box, etc which has AV-Out.
Probox PBR-500 supports Composite / Component AV-IN.
* The Probox PBR-500 will detect a new HDD you insert and will give you a question whether you want to do
HDD format or not.
* Make sure that your TV mode is switched to the ‘AV input mode on TV.

6
MultiMedia Player Function
The Probox PBR-500 is a stand-alone, multimedia HDD (Hard Disk Drive) player that plays digital videos,
music, photos and DVD files on TV and home entertainment system. You can enjoy the digital contents at
home without having to burn discs or having to play it back on a DVD or CD player.
MultiMedia Player The Probox PBR-500 can play back the videos, music, photos from the
HDD inside, an external USB storage through USB.
High-Definition The Probox PBR-500 play the HD video (up to 1920 x 1080i) and photos by
using HDMI connection.
HDMI By using the single & simple HDMI connection, you can enjoy the high
quality of the digital video and audio.
LAN It provides 10/100Mbps network connection for the ‘Real-Time Transcoding’,
so you can stream the real-time transcoded contents from the PC.
Wireless With the 802.11g USB dongle connection, you can enjoy the contents
streaming by wireless.
USB 2.0 With the two USB 2.0 Host connections, you can attach additional external
USB storages to further extend the storage capacities.
7
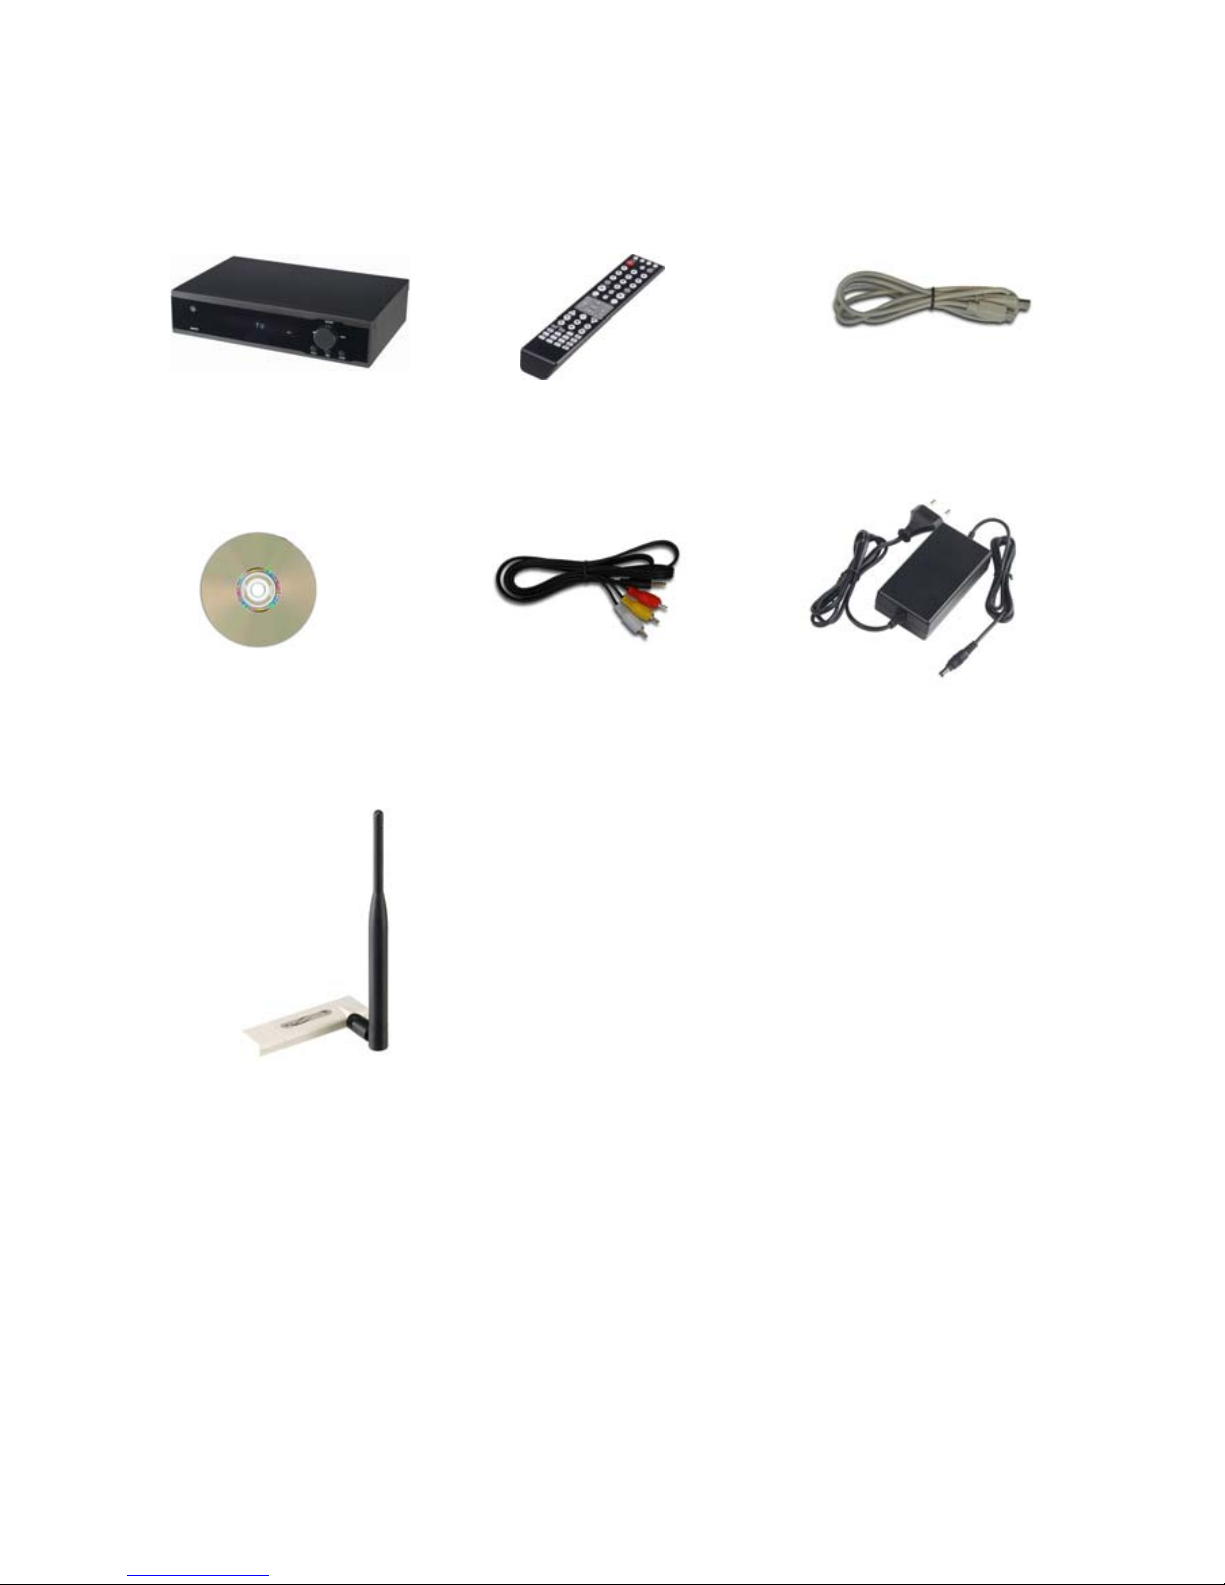
Package Contents
The Probox PBR-500 package includes the below items and it may be different from the actual contents.
PBR-500 Remote Controller USB Cable
Manual CD Power AdapterAV Cable
WiFi USB Dongle (Option)
8
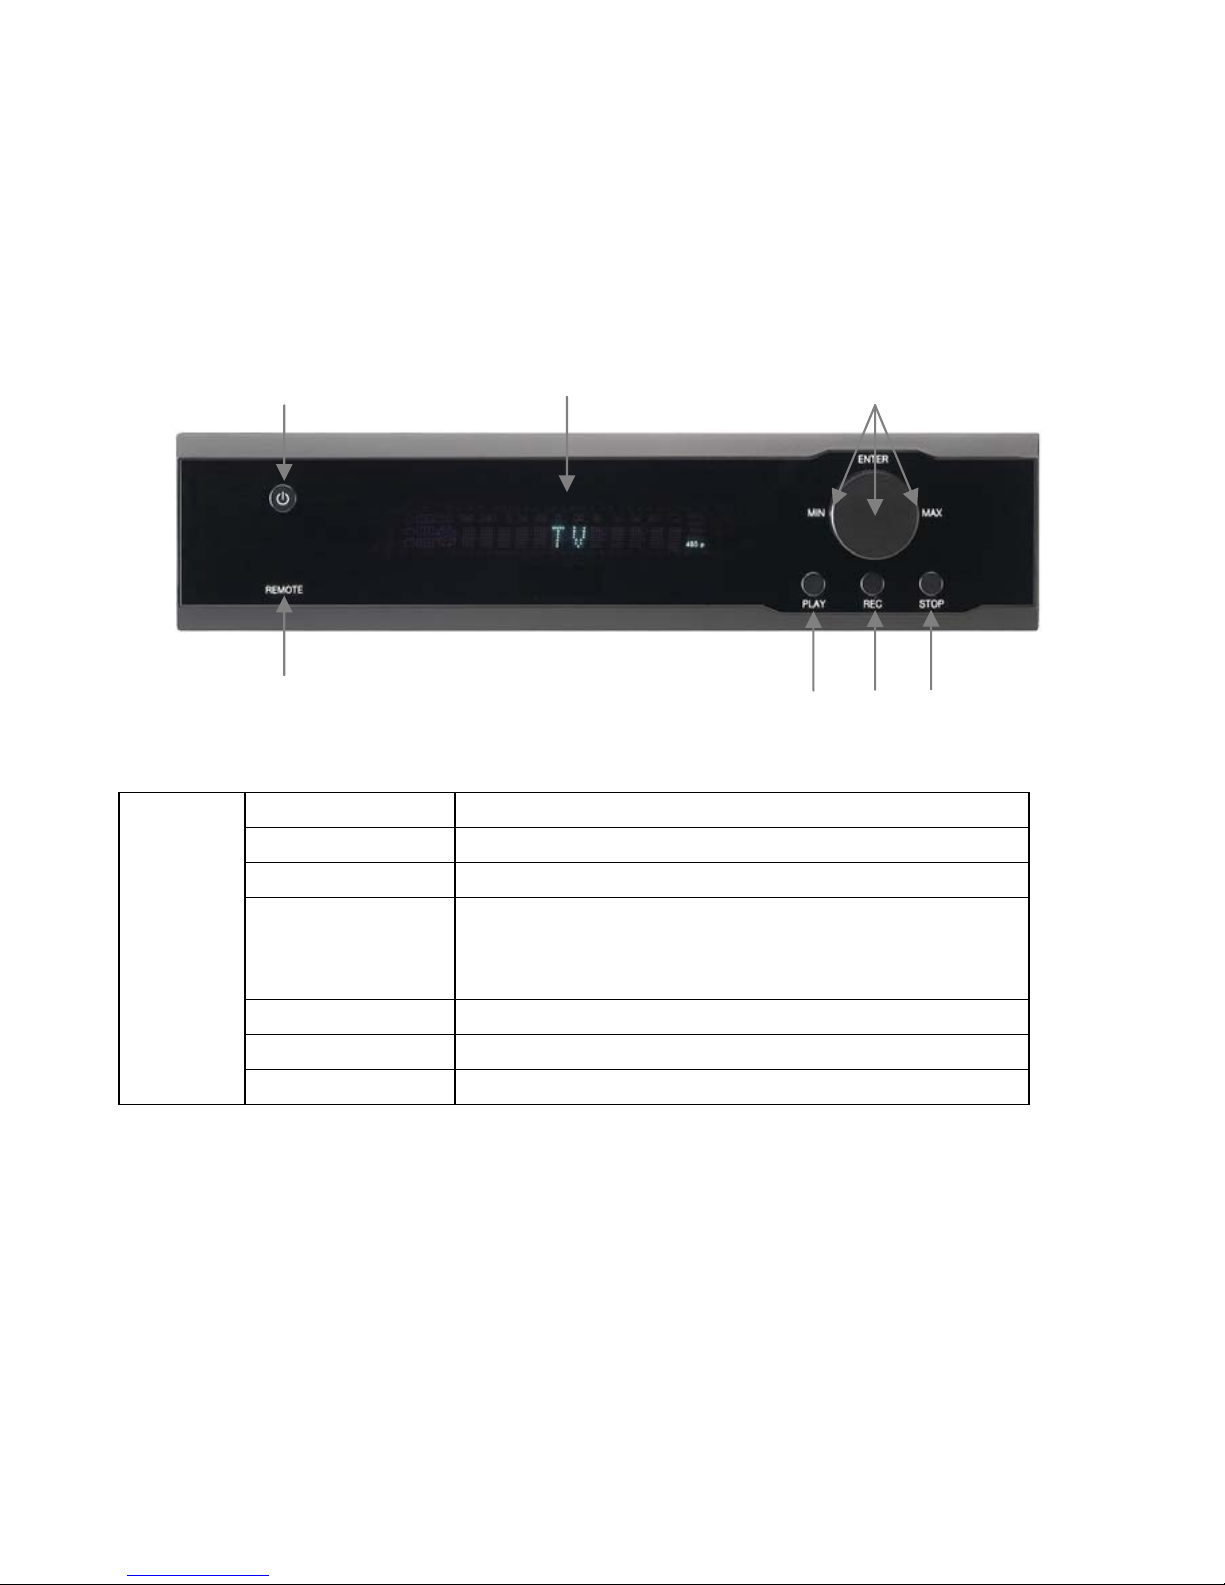
Product Descriptions of Each Part
The PBR-500 has its own button at the front panel as well as with the remote controller.
①POWER Power ON / OFF button
②IR Receives the remotecontroller signal
③VFD Display Colorful displayfor the status of the unit.
④OK [Enter]
Navigation
OK (Enter)or Selectbutton.
Volume Up / Down knob
Left / Right Navigation knob.
⑤PLAY Play the files (contents) button
⑥REC Direct Record Button
Front View
⑦STOP Stop the file playback button.
③④
⑥⑤
②
①
⑦
< Front View >
9
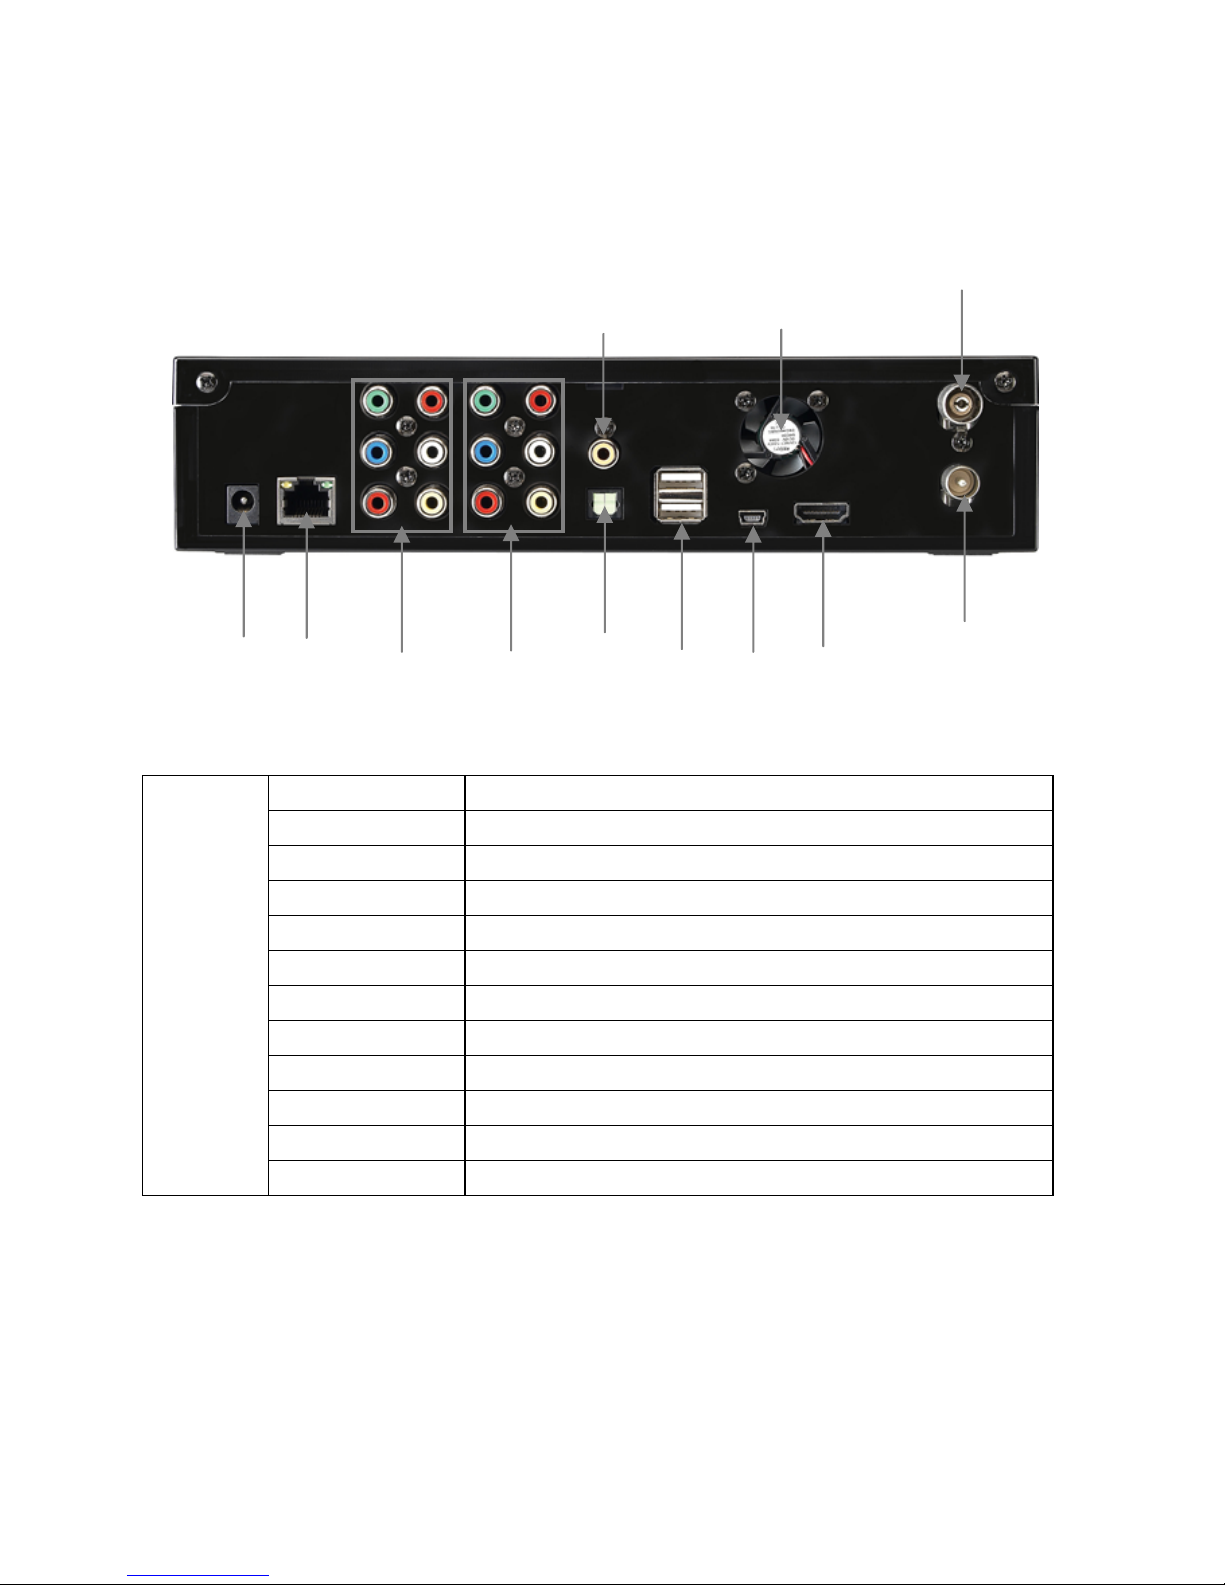
①Power Jack Connect the power adapter.
②LAN Wired LAN connection to a PC for the file streaming.
③AV-OUT Connect Probox to TV (Composite/ Component)
④AV-IN Connect an externalAV device for recording.
⑤Coaxial Coaxial cable for 5.1 ch. Digital audio output
⑥Optical Optical cable for 5.1 ch. Digital audio output
⑦USB Host Connect to an external WiFi USB dongle or storage.
⑧USB Device Connect Probox PBR-500 to a PC by USB cable.
⑨Cooling Fan Extract the heat air to outside
⑩HDMI Connect HDMI Cable to TV
⑪Antenna IN Connect the antenna cable from a wall intothis jack.
Back View
⑫Antenna OUT Connect the antenna cable from the PBR-500 to TV
< Back View >
⑤
⑥⑦⑧
⑨
⑩
⑪
④
①②③
⑫

10
Use as External USB HDD
11
1. Use as External USB HDD
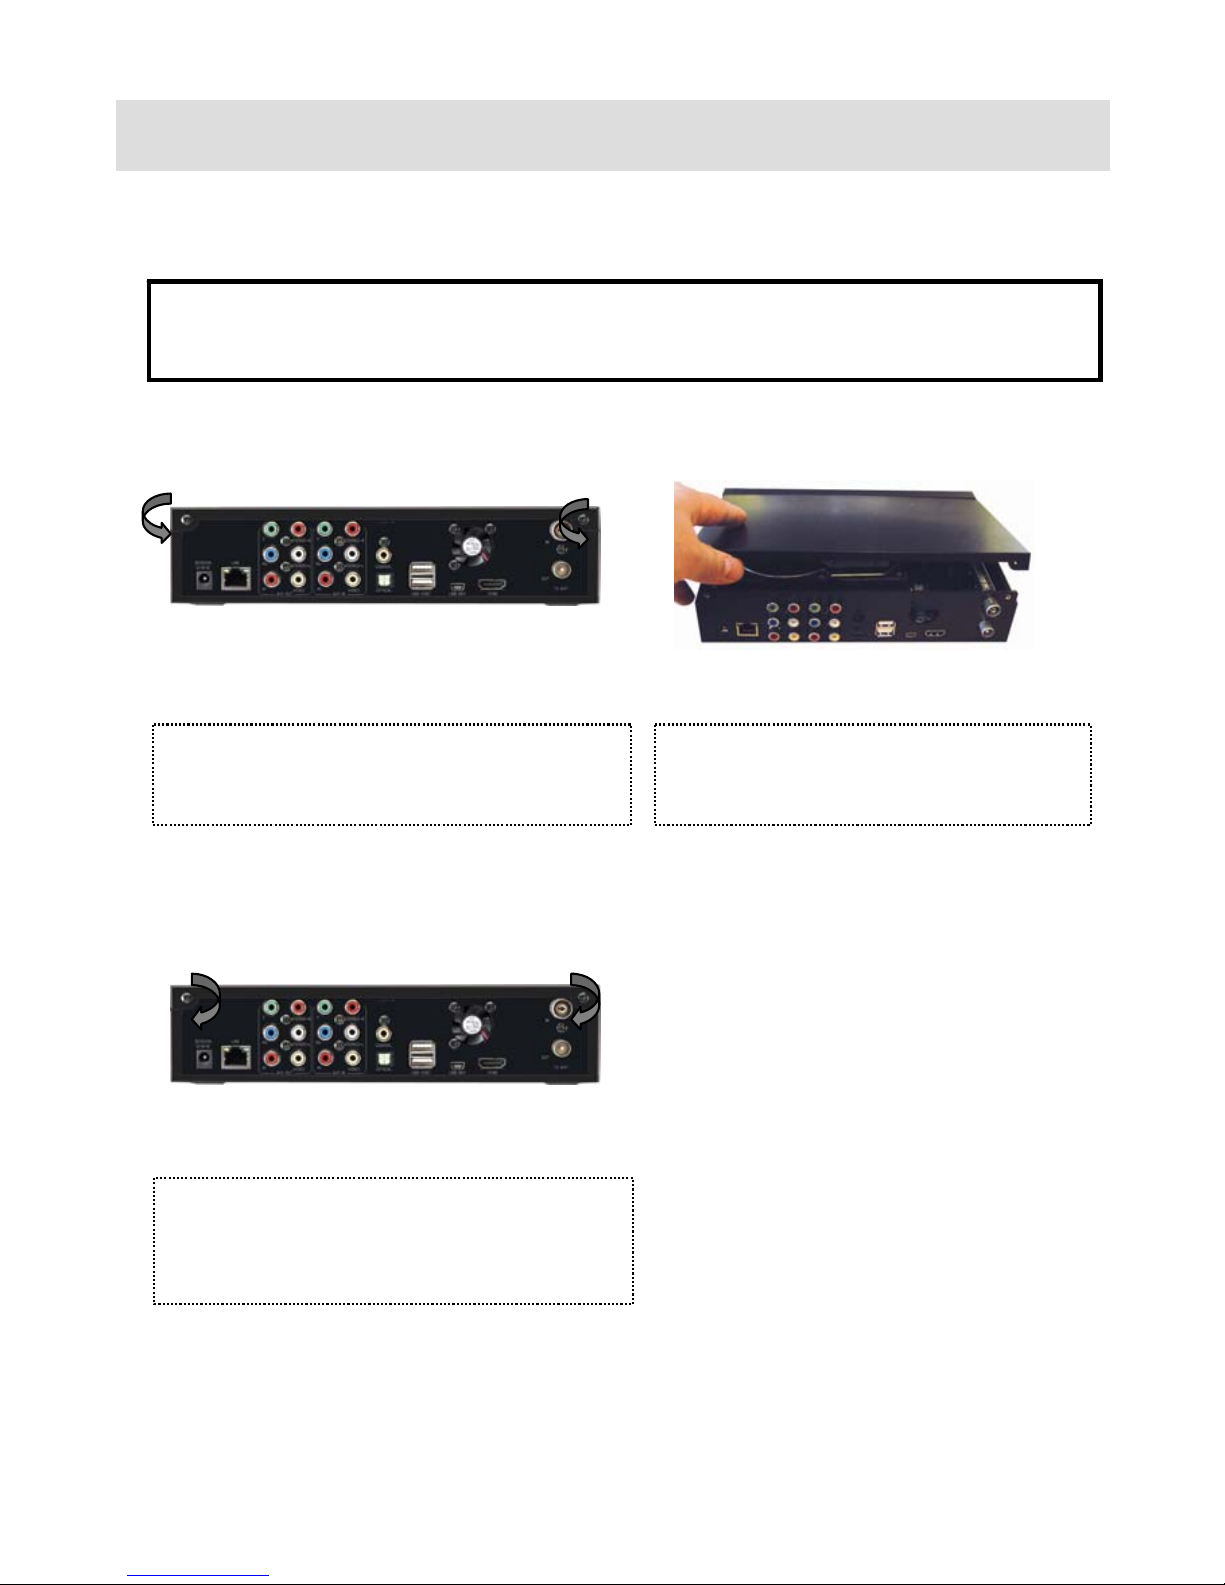
1.1 Insert Hard Disk
Use 3.5” SATA Hard Disk for Desktop.
①Unscrew 2-spot and open the top cover
with pulling up the arrow direction
②Connect Power and SATA connector to
Hard Disk.
③Finish assemble with screwing 2-spot,

12
1.2 Format Built-in HDD
You should do HDD Format while you are connecting the PBR-500 with TV (Not through PC) then the PBR-
500 will have some partitions.
Insert a HDD into PBR-500 and connect it to TV and then turn on PBR-500 & TV (select AV mode).
After turn the both devices, then you will have a question window on TV whether you want to do a HDD
format or not.
☞For the detail procedure, please refer to Chapter 7.
13
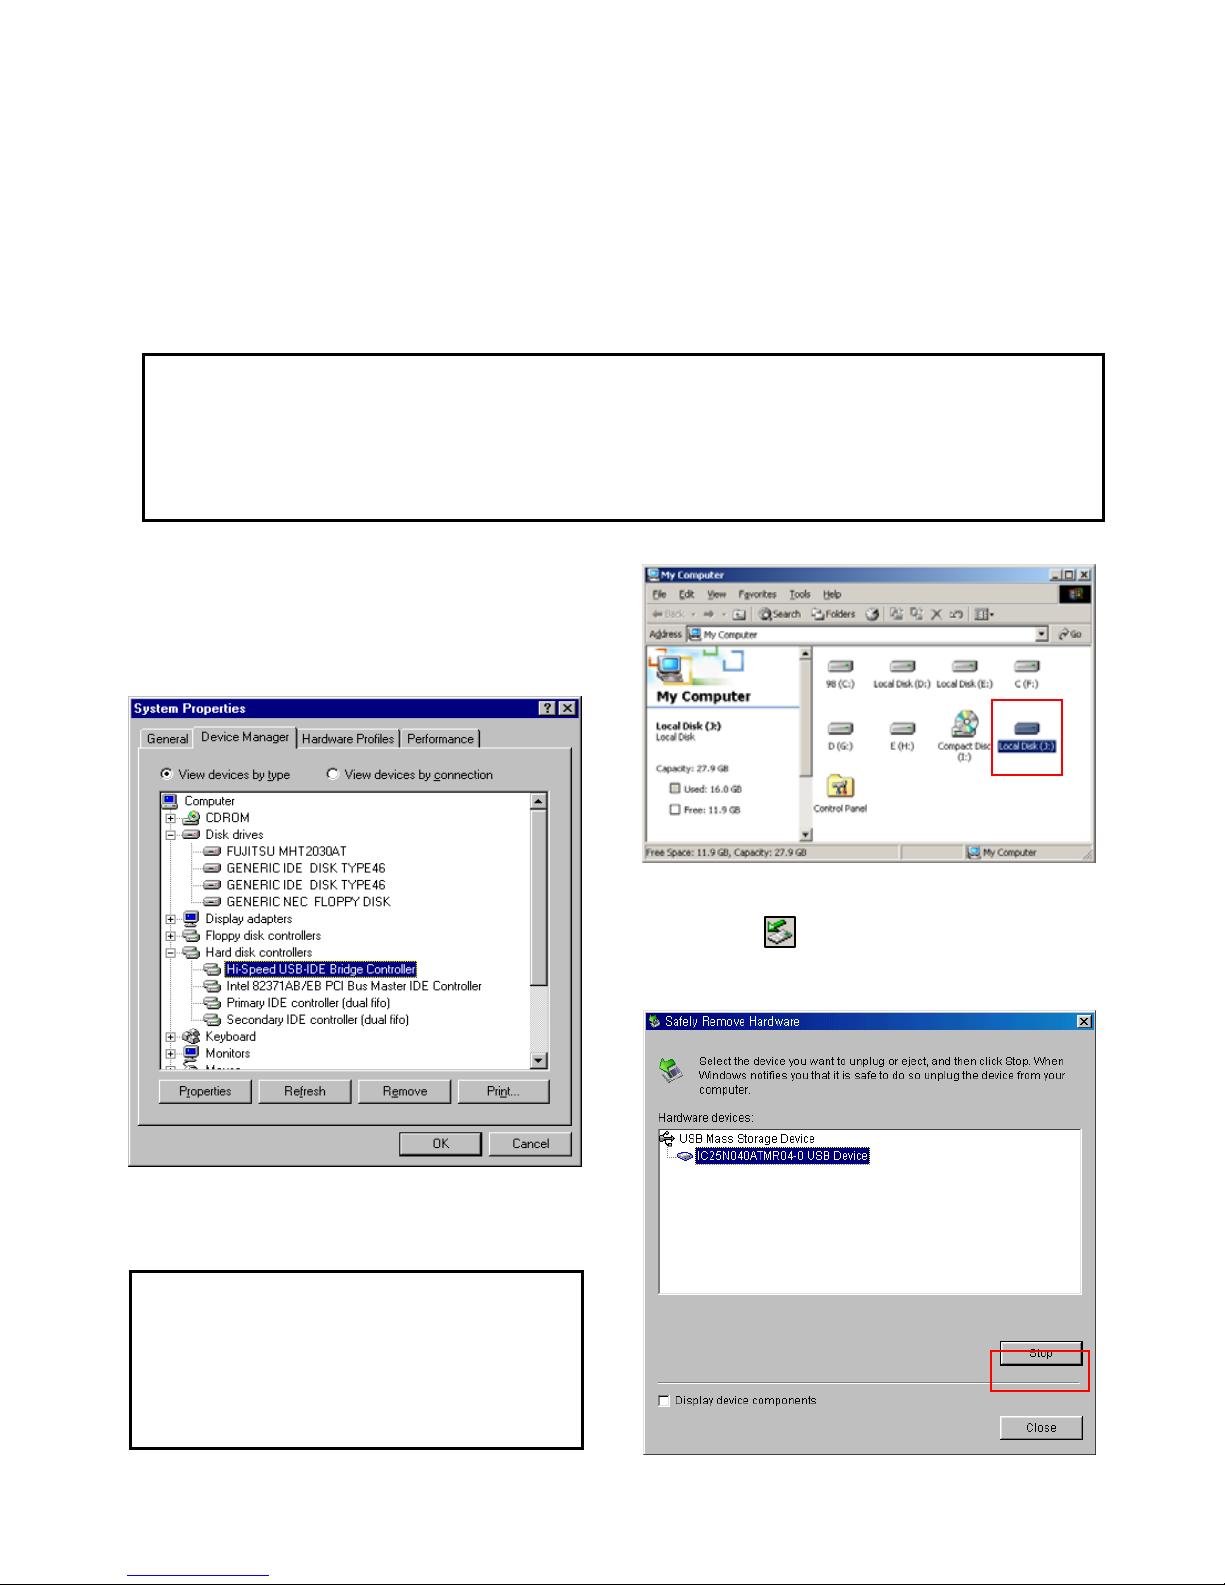
1) Click [Start > Settings>Control Panel >
System > Device Manager > Hard disk
controllers > Hi-Speed USB-IDE Bridge
Controller].
2) You can now find a new volume at ‘My
Computer’ or ‘Explorer’ and you can copy &
paste the files.
3) After file transfer, remove PBR-500 by using
remove icon at Windows right-down corner.
If you don’t follow this procedure, the transferred
files and PBR-500 may be damaged.
1.3 Copy & Paste the files through USB
PBR-500 can be an external hard disk drive in case when you connect it to a PC through USB connection
and you can copy & paste the files from / to your PC to / from built-in HDD in PBR-500.
* When you connect PBR-500 to a PC, you should connect power cable as well.
1.3.1 Windows 98SE
First, you have to install Windows 98 Driver before connecting to a PC.
Find the driver at the supplied CD.
After finishing installation, of Windows 98 Driver, connect PBR-500 to a PC through USB cable, and
plug power cable to PBR-500 as well.
If you can not find a new volume, then do
HDD format again.
Windows 98SE detects FAT32 file system
only.

14
1) After connecting PBR-500 and plug power
cable, Windows itself will install driver
automatically.
And then, check the driver installation at
Windows [Start > Settings > Control Panel >
(view all Control Panel options) > System >
Device Manager > Universal Serial Bus
controllers > USB Mass Storage Device]
2) You can now find a new volume at ‘My
Computer’ or ‘Explorer’ and you can copy &
paste the files.
3) After file transfer, remove PBR-500 by using
remove icon at Windows right-down corner.
If you don’t follow this procedure, the transferred
files and PBR-500 may be damaged.
1.3.2 Windows ME
If you can not find a new volume, then do
HDD format again.
Windows ME detects FAT32 file system
only.

15
1) After connecting PBR-500 and plug power
cable, Windows itself will install driver
automatically.
And then, check the driver installation at
Windows [Start > Settings > Control panel >
(switch to classic View on Windows XP) >
system > Hardware > Device manager >
Universal Serial Bus controllers > USB Mass
Storage Device].
2) You can now find a new volume at ‘My
Computer’ or ‘Explorer’ and you can copy &
paste the files.
3) After file transfer, remove PBR-500 by using
remove icon at Windows right-down corner.
If you don’t follow this procedure, the transferred
files and PBR-500 may be damaged.
1.3.3 Windows 2000, XP
If you can not find a new volume, then do
HDD format again.
Windows 2000, XP detects both FAT32
and NTFS file system.
When you see ‘Non High-Speed USB Hub
Message’
The message will be displayed On windows
XP when you plug PBR-500 into USB 1.1
spec. Host adapter.

16
1.3.4 Linux
ItcanbeavailableonLinux2.4higher.
[Automatic Mount]
After booting, do log-in.
Connect PBR-500 -> Power On PBR-500 -> Check the detection with [fdisk] -> make Mount Pointer (ex.
mediatest) at Folder Mount(/mnt) -> Edit [/etc/fstab] -> add the following;
/dev/sda /mnt/mediatest vfat noauto, user 0 0 (in case of FAT32 HDD)
/dev/sda /mnt/mediatest ntfs noauto, user 0 0 (in case of NTFS HDD)
Do Log-in again.
above example “sda” is assumed that the PBR-500 will be detected as “sda” on your system. If not,
you have to write the drive name which is detected as “USB Mass Storage”, not “sda”.
[Manual Mount]
Connect PBR-500 -> Power On PBR-500 -> Check the detection with [fdisk] -> make Mount Pointer (ex.
mediatest) at Folder Mount(/mnt) -> Edit [/etc/fstab] -> add the following;
mount –t vfat /dev/sda /mnt/mediatest (in case of FAT32 HDD)
mount –t ntfs /dev/sda /mnt/mediatest (in case of FAT32 HDD)
above example “sda” is assumed that the PBR-500 will be detected as “sda” on your system. If not,
you have to write the drive name which is detected as “USB Mass Storage”, not “sda”
[How to stop using]
Do [unmount] at Device Control.

17
1.3.5 Mac
It can be available on Mac 9.0 higher.
No need to install the installation driver at Mac OS 9.x version and the PBR-500 will be detected
automatically. If the PBR-500 is detected correctly, an icon is appeared at a monitor.
When removing PBR-500 safely, drag the icon to a trash and unplug PBR-500.

18
Connect to PC via Network
19
2. Connect to a PC(s) through Network connection
2.1 Wired LAN Connection
You can connect PBR-500 to a PC (PCs) for a file streaming by LAN or wireless and for using ‘Real-Time-
Transcoding’ streaming.
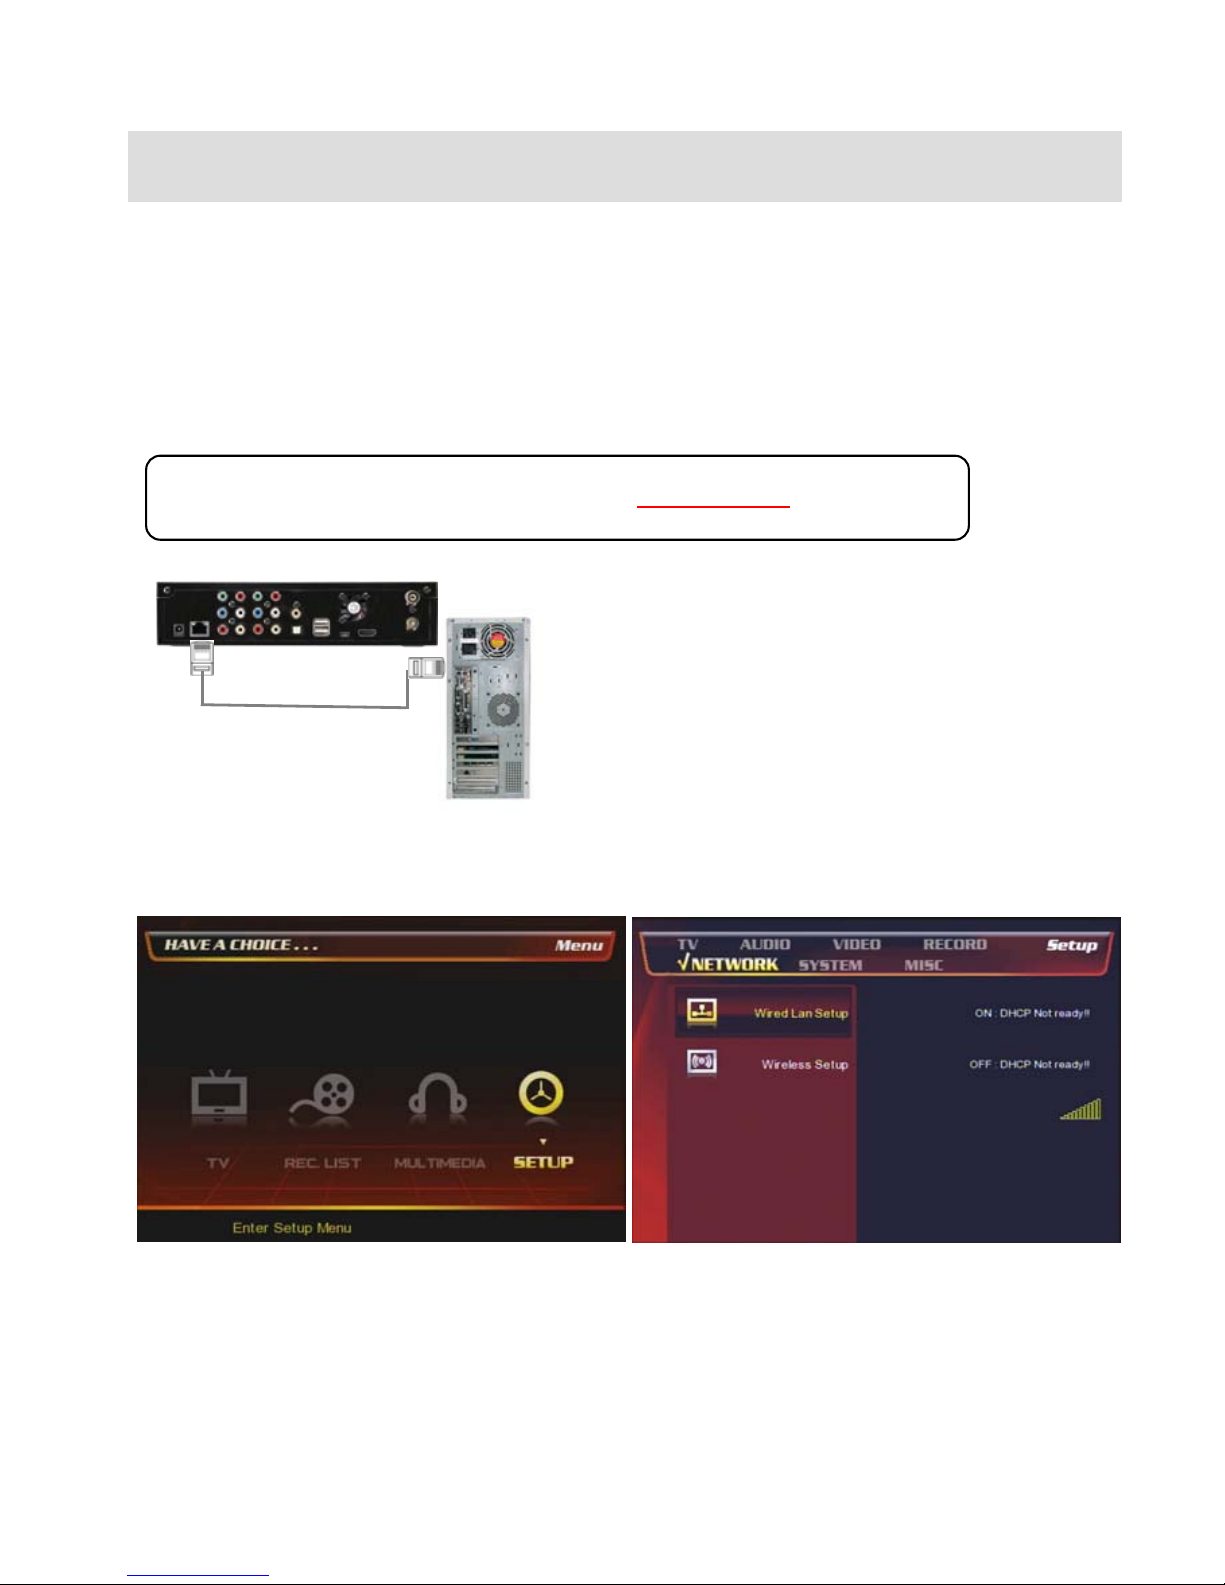
2.1.1 Direct connection between PBR-500 & a PC.
Follow up the below procedure.
Connect LAN cable to the LAN ports between PBR-
500 and PC.
[TIP] If the computer’s LAN card was connected to
Internet line, you can mount additional LAN card to
your PC and connect that additional LAN card to PBR-
500.
In case, connect a PC to PBR-500 directly (Have to use a ‘Cross-Over’ cable.)
①At the main page, select [Setup] icon or press
[Setup] button onthe remote.
②Select [Network] icon => [Wired Lan Setup]
Table of contents


