progressive automations NY-23 User manual

Page 1
USER’S GUIDE
Model: NY-23
1. Specification
1-1. Dimension
Length: 34.3 in
Height: 33.5 in
Width: 19.7 in
1-2. Installation Parts:
Notice 1:
Use originals only,any other
unapproved components may
result in the falling off of TV and this
bracket.
Notice 2:
Check all the parts as shown on the
manual included. If parts are missed
or damaged,do not use it and please
return to your local distributor.
1.3 Assembly tools (NOT INCLUDED)

Page 2
USER’S GUIDE
Warning:
1. Incorrect installation may result in fall off of TV and this bracket and personal injuries.
2. Ceiling mounting of this bracket is out of the responsibility of manufacturer shall be carried out
by competent persons, or licensed person, with using the attached anchors (Ø10-M8x70) only
to ensure the safety.
3. Use this bracket properly, please read the instructions carefully before installation. Keep this
guide well for further reference.
4. The user must pay attention to the weight of TV and This product, and only solid wall (the
wall must be make up of concrete or brick) can support the weight . Please complied with the
installation instruction of LCD/PDP to install them.
5. Do not attach the TV on the bracket before installations.
2-2. Motor
Motor Rated
Voltage
Current
(No load)
Current
(Rated load)
Operation
Temperature
DN3435-3046E DC24V ≤ 0.5 A ≤ 2 A -20 C ~ -50 C
PR545AG-12300-
IG32-721
DC24V ≤ 0.3 A ≤ 0.5 A -20 C ~ -50 C
2. Electric Specification
2-1. Input Voltage/Current/Frequency:
100-240VAC, 1.2A,50/60Hz
Output Current: DC24V ,3A
3-1. Firstly,please make sure the wall thickness for TV wall mount is at least 80mm and the
osition where you want to install the TV do not have any rigid materials(such as : reinforcing steel
bar , steel block ,etc) and any loose phenomena. Make the mark at the place of ceiling that you
ant to mount the TV. Use percussion borer to drill 9 holes on the mark, at Φ10mm and 75 depth
.Take out 9 pcs (6) expansion screws from the tting bag, insert them through the holes of cart into
the hole of ceiling by hammer and fasten them by wrench. (See diagram 1)
3. Installation Instruction

Page 3
USER’S GUIDE
3-2. Screw off 8pcs nuts from the mounting plate, lift the main body by two poeple, aim at the
8pcs screws on the mounting plate, then fasten the main body to mounting plate by 8pcs nuts.
Take out the power plug from carton. Insert one end to TV cart and other end to power supply.
(See diagram 2)
3-3. Insert square tube into conjunctive bracket and fasten them by 2pcs (7) plastic-head Screw.
Install the TV bracket to square tube, adjust the distance according to the hole position of the TV,
fasten them by 4pcs (7) plastic-head screws; Then press the “ON” on the remote control to make
the TV bracket to vertical position. (See diagram 3)
Page 4
USER’S GUIDE
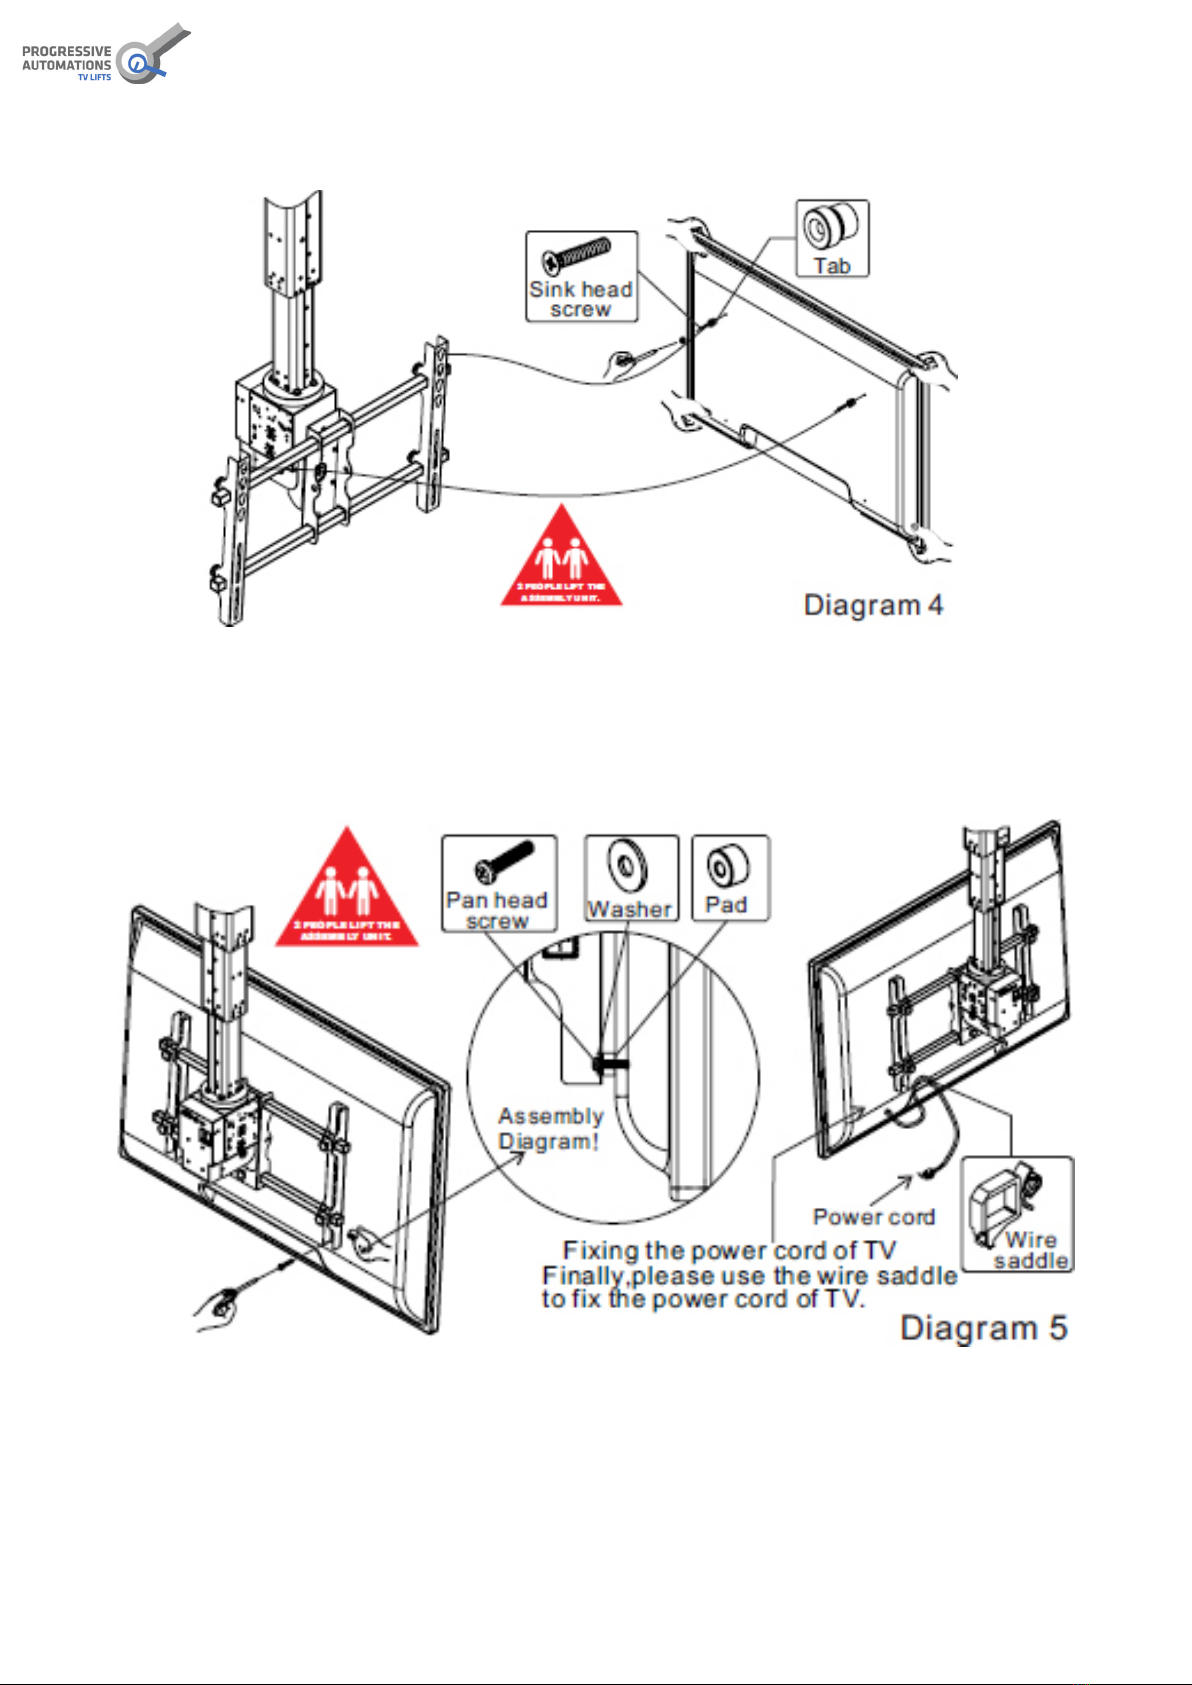
3-4. Fasten (2) tab on the upper end of TV back panel by (1) sink head screw. Check
fastness,then hook TV on the cart’s TV bracket. (see the diagram 4)
3-5. Through (4) washer and slot of TV bracket and (5) pad, (3) pan head screw fasten the down
side of TV. (5) Pad should be placed between TV bracket and TV. (see the diagram 5)
Page 5
USER’S GUIDE
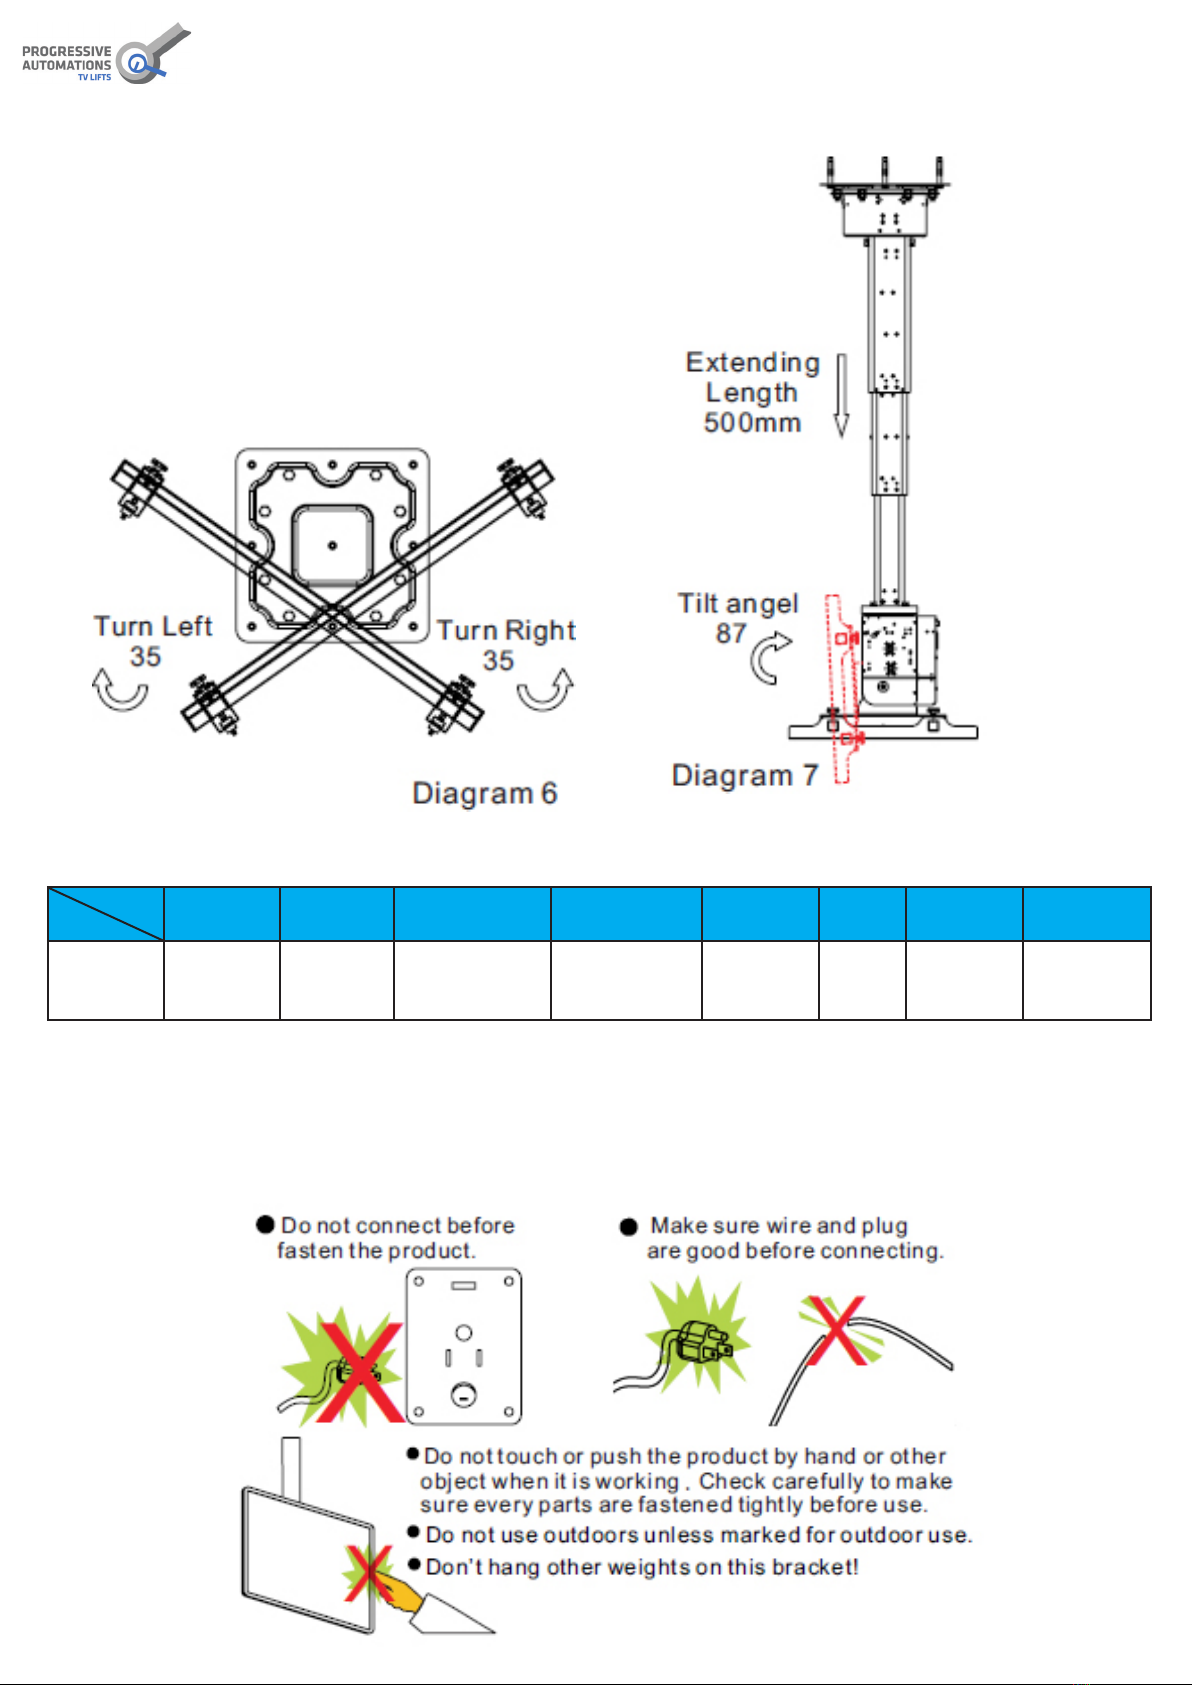
4-1. Function
Using remote control can turn TV left or
right to angel 35 and tilt up or down to 87
angel (vertical or horizontal),lower length
is 500mm. (See diagram 6&7)
4. Operating Instruction.
Item
Model
TV Screen
Size (inch)
Cart
Dimension
Max Installation
Size (inch)
Min Installation
Size (inch)
Loading
(lbs)
L/R
angle ()
Extending
Length(in)
Net
Weight (lbs)
NY-23 46~50” 34.3”x
19.7”x
33.5”
32.3 x 17.7 15.7 x 7.9 110.2 ± 35 0~19.7 75.6 ±1
4. Technical Parameters:
WARNING:
This ceiling mount is intended for indoor use only with the maximum weights indicated ,Use with
heavier than the maximum weights indicated may result in instability causing possible injury!
5. Caution:

Page 6
USER’S GUIDE
6-2.2. Operation instruction
1. Aim the LED indicator on remote control at TV. The remote range is 3-10m.
2. When you press one of the function key on remote control straightly (raise, lower, left, right, up,
down) the mount will move to the direction you expected. Loosening, the mount will stop.
3. Insert one 23A,12V battery in the remote control. If the battery ran out, please open the back
cover of the remote control and put in the new one.
6-2.3. Notice:
If any remote control of our product was lost or damaged, you can buy a new remote control with
the same frequency which produced by our company and do following operation:
1. Memory cleaning: pressing coding key about 10 seconds, the memory will be cleaned after the
indicator closed. (The memory is the coding memory of the previous remote control)
2. Use new remote control: pressing any key of remote control and the coding key 1-2 seconds at
the same time, loosening remote control rstly, then loosen the coding key, nally, you can operate
the product with new remote control. (Coding key, Indicator, Please see diagram 2)
6.2. Remote Control (See diagram 6):
6-2.1. Key Function
1. LEFT: Hold on to turn TV left
2. RIGHT: Hold on to turn TV right
3. UP: Hold on to tilt TV up
4. DOWN: Hold on to tilt TV down
ON: One push to extend cart to the programmed
operating position automatic all. (Vertical position)
OFF: One push to back cart to the programmed
storage position automatically. (Horizontal position)
Warning: The top insert holes of main body is
for power input, TV signal input, VIDEO and AUDIO
signal input. The outside signal can be send to main
body through it, do not connect with the inserts holes
of TV directly. Please operate it strictly according to the
installation instruction, otherwise manufacturer will not
bear compensation and law obligation for any damage
and safety problem.
Warning: The base insert holes of main body is
only to connect the terminal of power input, TV signal
input, VIDEO and AUDIO signal input of TV. Please
operate it according to the installation instruction,
otherwise manufacturer will not bear compensation and
law obligation for any damage and safety problem.

Page 7
USER’S GUIDE
7. Maintenance
Unplug the powers of this bracket& FPD before maintenance is engaged in and follow the
instructions described in FPD ‘s manual for daily maintenance of TV& bracket. Do not use
corrosive agent or alcohol or chemical cloth to clean!
4. Reliability
Temperature and humidity condition: -20 C - +50 C, 80%HR
Warning:
1. Do not disassemble the product to repair by yourself. Warranty for electricity is void after
disassembled!
2. After you installed the apparatus, please check the expansion screws and all fastening devices
every 3 months,and please do not use it and contact the local dealer if gets loose, rusty or lost.
3. The drive component of this product is uncontinual drive component. If need to work
continually, you must stop 2 hours after working 8 hours!
4. This appliance is not intended for use by persons (including children) with reduced physical,
sensory or mental capabilities, or lack of experience and knowledge, unless they have been
given supervision or instruction concerning use of the appliance by a person responsible for
their safety.
5. Children should be supervised to ensure that they do not play with the appliance.
• Do not dispose of electrical appliances as unsorted municipal waste, use separate collection
facilities.
• Contact your local government for information regarding the collection systems available.
• If electrical appliances are disposed of in landlls or dumps, hazardous substances can leak
into the groundwater and get into the food chain, damaging your health and well-being.
• When replacing old appliances with new once, the retailer is legally obligated to take back your
old appliance for disposal at least for free of charge.
Hint of how to dispose:
Table of contents
Other progressive automations TV Mount manuals

progressive automations
progressive automations TY-05-50 User manual

progressive automations
progressive automations TY-01 User manual

progressive automations
progressive automations TY-05-30 User manual

progressive automations
progressive automations TY-05 User manual

progressive automations
progressive automations TY-01 User manual


