Steren STV-048 Operating instructions


Before using your new wall bracket for LCD and plasma TV
read this instruction manual to prevent any damage. Put it
away in a safe place for future references.
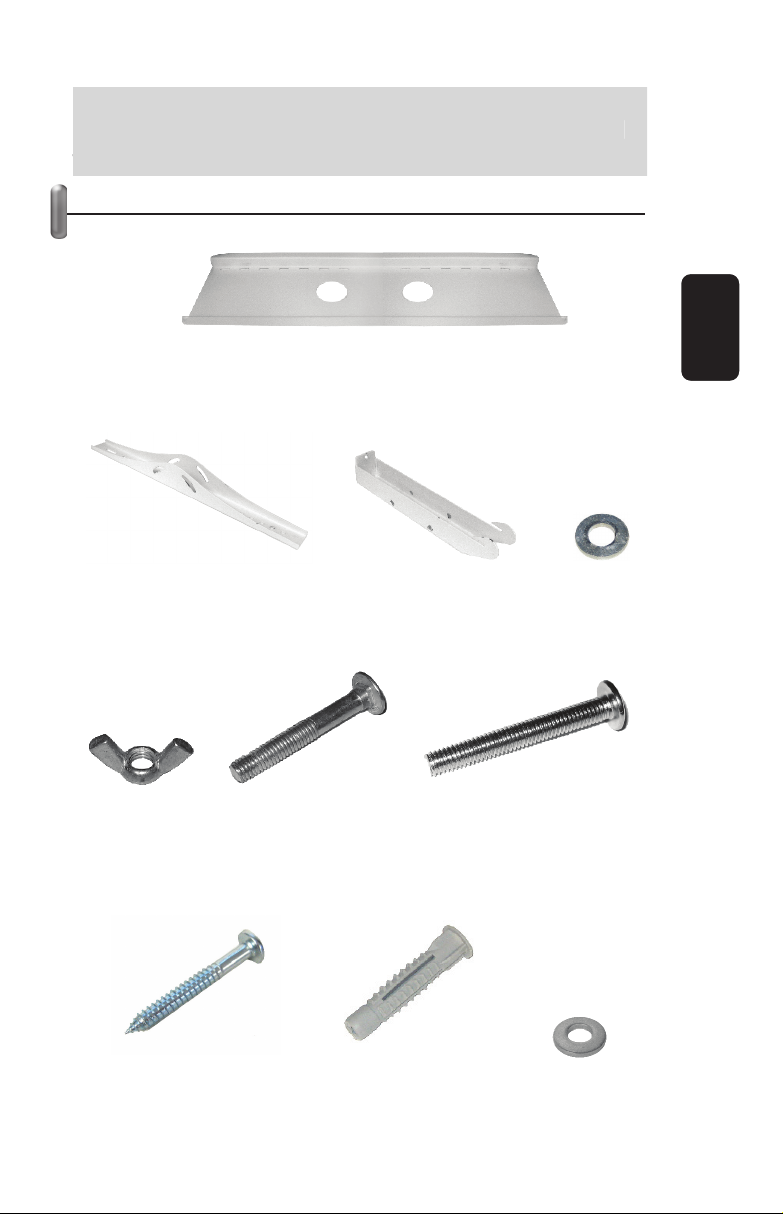
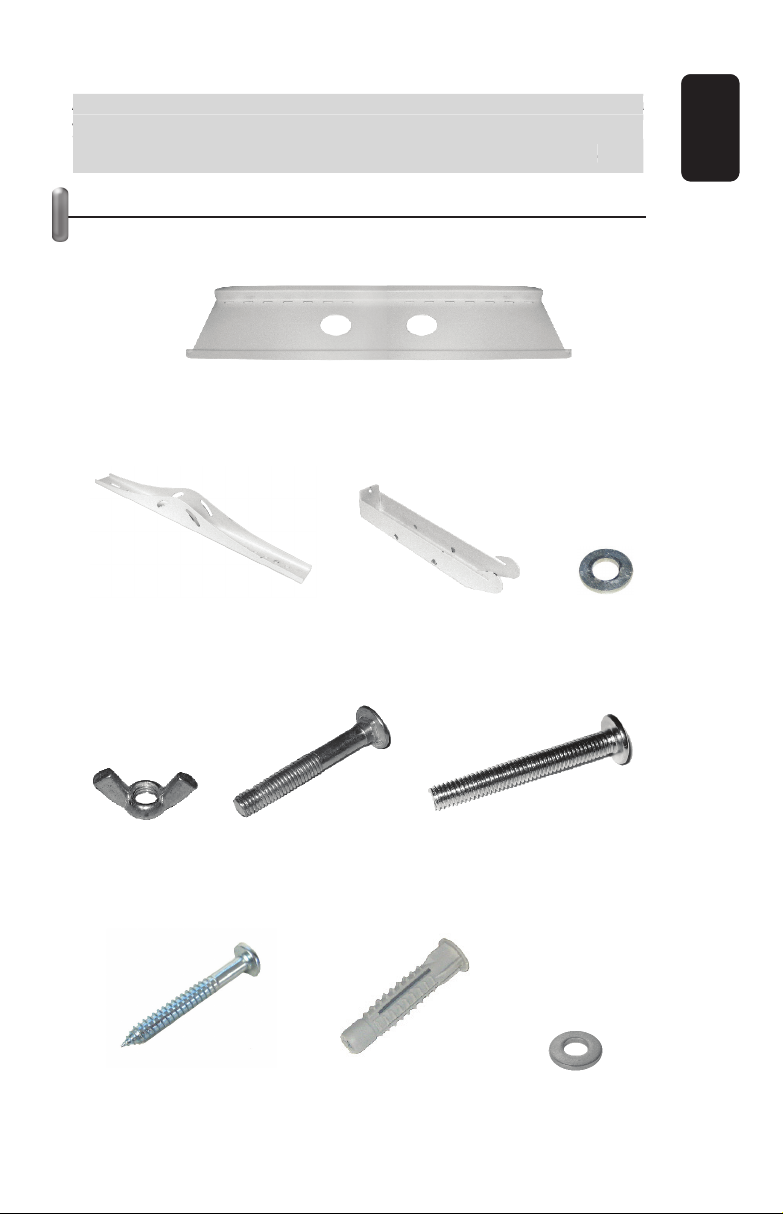
PACKAGE CONTENT
ENGLISH
ENGLISH-2
Before usin
g
y
our new wall bracket for LCD and plasma TV
read this instruction manual to prevent an
y
dama
g
e. Put it
a
wa
y
in a safe place for future references
.
1 Wall bracket
2 fastening bars
2 movement bars 4
washers
4 butterfly
nuts
4 screws for
fastening bars 2 screws for holders
8
washers
8 wall screws 8 wall anchors

WARNING: If you do not accomplish these
instructions may cause several damages on
the user.
CAUTION: Do not accomplish this
instructions may cause damages in the unit
and several damages on it.
This wall bracket must be mounted in order to resist
earthquakes or long periods of vibration.
Only use the supplied pieces and fasten them tightly.
Do not forget to use all pieces. Install all pieces as
shown on this manual.
Do not try or modify any piece.
Care about the weight of the bracket (22kg) while
mounting in a wall.
If you mount the bracket in a concrete wall, make sure to
use the supplied anchors.
If you mount the bracket in a wooden wall, it is possible
that you need an additional support, in order to bear the
weight of the plasma / LCD TV.
At least two people are needed for installing the bracket.
Choose a flat wall, in order to fix the TV, securely.
ENGLISH
ENGLISH-3

Place a cover protection over the working surface, while
you manipulate the monitor and the wall bracket.
Make sure the wall bracket is securely fixed to the wall,
after the installation.
Leave at least 15cm around the unit, and remove all kind
of objects.
If you don’t have the necessary space, the plasma / LCD
monitor may overheat, and may cause fire or damages
to the unit.
ENGLISH
ENGLISH-4

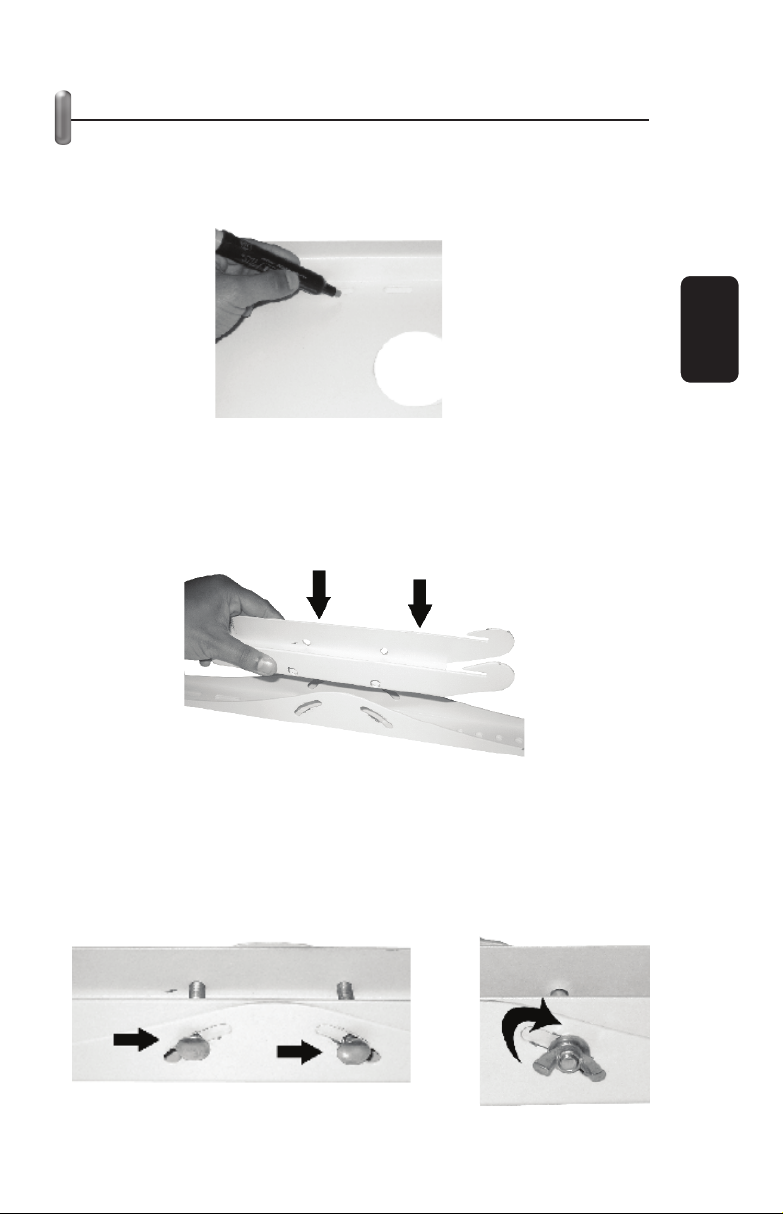
HOW TO INSTALL THE WALL BRACKET
1.- Locate the place where you want to install the monitor.
2.- Place the wall bracket over the wall, and mark where you
need to drill holes for a secure installation.
3.- Then, insert the anchors in the holes.
4.- Place the wall bracket over the holes and insert screws and
washers, make sure to tight them firmly.
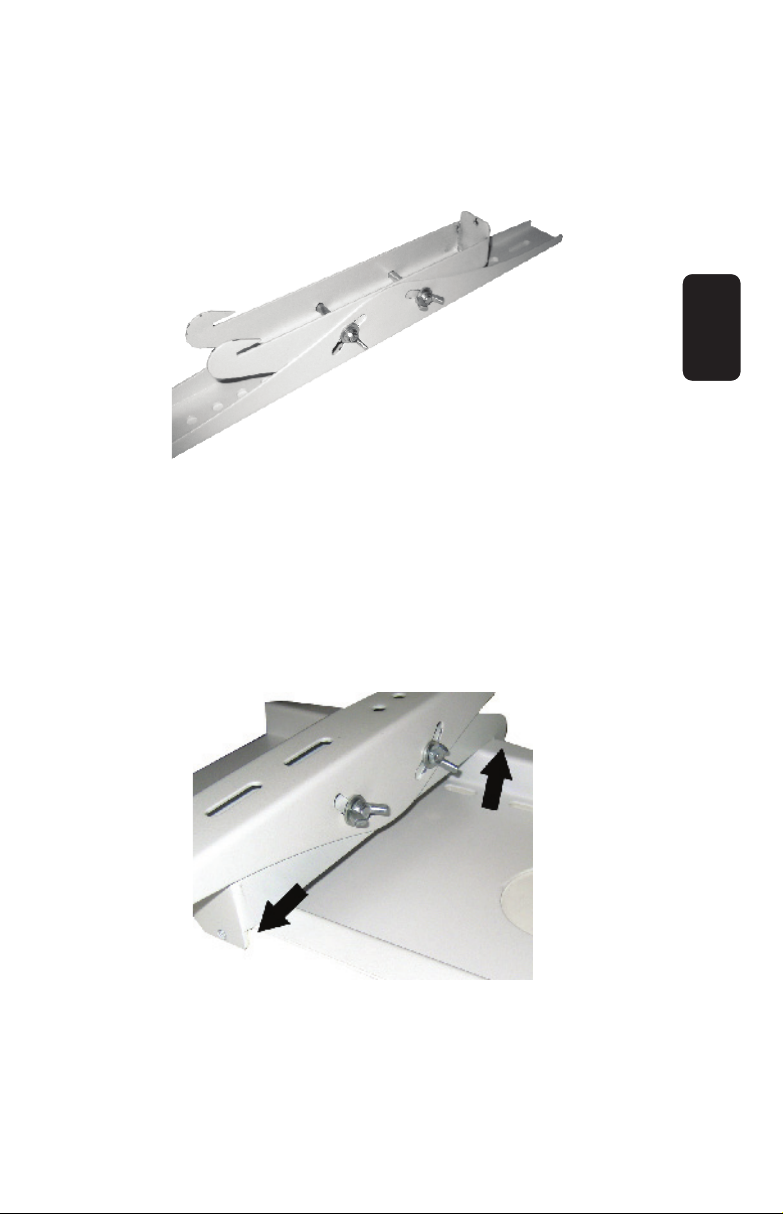
5.- Next step is to assemble the movement and fastening bars.
6.- Insert the fastening bar into the movement bar.
7.- Insert the screws to join and fasten the movement and
fastening bars (to place this screws, it is necessary that both
holes are aligned). Finally place the butterfly nuts in each screw.
ENGLISH
ENGLISH-5

8.- Repeat this process for next pair of movement and
fastening bars. Fastening and movement bars must be
assembled as follow.
9.- After the holders has been assembled, put them in the rear
side of the monitor (please, refer to the monitor’s instruction
manual for details). Use some screws (not included) to fasten the
monitor.
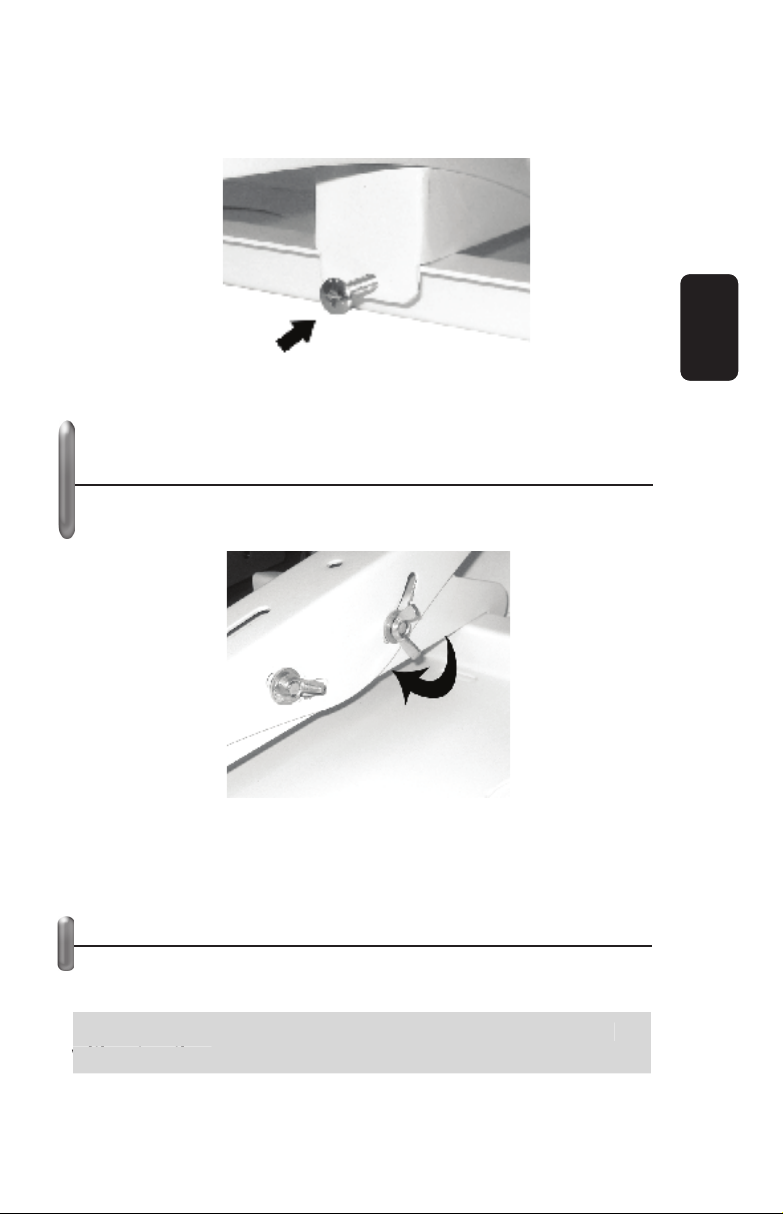
10.- When the monitor is securely mounted in the holders, hook it
up to the wall bracket. Note the hook must be placed in the upper
side of the wall bracket.
ENGLISH
ENGLISH-6

11.- Finally, screw on the holders, using the screws for fastening
bars.
ADJUSTING THE VIEW ANGLE AFTER THE
INSTALLATION
1.- After installing the monitor, locates the butterflies nuts.
2.- You need to loosen them, then you can move the bars.
3.- Place the screen in the desired angle.
4.- Now, re-tight the bar secures.
SPECIFICATIONS
Dimensions: 80x 24 x 8,5cm
Weight: 22kg
Product design and specifications are subject to change,
without notice.
ENGLISH
ENGLISH-7
P
roduct desi
g
n and specifications are sub
j
ect to chan
g
e,
wi
t
h
out not
i
ce
.


Antes de utilizar su nuevo Soporte para pantallas de plasma
y LCD de 32” a 48”, lea este instructivo para evitar cualquier
mal funcionamiento. Guárdelo para futuras referencias.
CONTENIDO
ESPAÑOL
ESPAÑOL-2
A
ntes de utilizar su nuevo So
p
orte
p
ara
p
antallas de
p
lasm
a
y
LCD de 32” a 48”, lea este instructivo para evitar cualquie
r
m
al funcionamiento. Guárdelo
p
ara futuras referencias
.
1 placa de soiporte
2 barras de sujeción
2 barras de movimiento 4
rondanas
4 roscas de
mariposa
4 tornillos
para barras de
sujeción
2 tornillos sujetadores
8 rondanas para
pared
8 tornillos de pared 8 taquetes para pared

ADVERTENCIA: El incumplimiento de estas
instrucciones puede comportar lesiones
graves.
CUIDADO: El incumplimiento de estas
instrucciones puede provocar el deterioro de
la unidad y daños de la misma
La unidad de soporte en pared debe estar instalada de
modo que resista terremotos o períodos prolongados de
vibraciones.
Durante el montaje, utilice sólo las piezas suministradas
y fije todas las piezas firmemente.
No olvide ninguna pieza durante el montaje. Instale
todas las piezas tal como se indica.
No altere ni modifique ninguna pieza.
Hay que tener un cuidado especial cuando se instala en
una pared a causa de su peso (22Kg).
Cuando la instale en una pared concreta asegúrese de
utilizar los tacos adjuntos suministrados.
Cuando la instale en una pared de madera tenga un
cuidado especial ya que la unidad puede necesitar un
soporte adicional para aguantar el peso de la pantalla de
plasma / LCD.
Intente tener al menos 2 personas para la instalación.
ESPAÑOL
ESPAÑOL-3

Elija una pared recta para poder fijar con seguridad la
pantalla de plasma.
Coloque una cubierta de protección sobre la superficie
en la que trabajará mientras manipula la pantalla de
plasma y la nidad de soporte en pared.
Tras la instalación, compruebe que la unidad está
firmemente fijada.
Durante la instalación, deje al menos 15cm libres
alrededor y quite los objetos que pueda haber en el
espacio de la unidad.
Si no tiene el espacio necesario, la pantalla de plasma se
puede sobrecalentar, lo que, a su vez, puede provocar
fuego o daños en la unidad.
ESPAÑOL
ESPAÑOL-4

INSTALACIÓN DEL SOPORTE DE PANTALLA
1.- Localice el lugar donde desea instalar la pantalla.
2.- Coloque la placa de soporte en la pared y marque con un
plumón los lugares donde se van a realizar las perforaciones, de
tal forma que la placa quede firmemente fija a la pared.
3.- Una vez que realizó las perforaciones, inserte taquetes en
cada una de ellas.
4.- Posteriormente coloque la placa de soporte e inserte
tornillos y rondanas en los taquetes correspondientes,
asegurándose de que quede firme.
5.- El siguiente paso es armar las barras de sujeción y
movimiento que sostendrán a la pantalla.
6.- Inserte la barra de sujeción entre la barra de movimiento,
como lo indica la figura.
7.- Para asegurarlas, utilice los tornillos para barras de sujeción
a fin de evitar que se muevan (para colocar estos tornillos, los
orificios de las barras de sujeción y movimiento deberán estar
alineados). Y finalmente coloque los seguros de mariposa en
cada uno de los tornillos.
ESPAÑOL
ESPAÑOL-5

8.- Repita el proceso para el segundo par de barras de sujeción y
movimiento. Estas quedarán de la siguiente forma.
9.- Una vez que los sujetadores han quedado armados,
colóquelos sobre la parte trasera de su pantalla de plasma / LCD
en los orificios correspondientes (refiérase al manual de su
pantalla para más información). Utilice tornillos (no incluidos)
para sujetar la pantalla.
10.- Una vez que los sujetadores están colocados en la pantalla,
engánchelos en la placa de soporte de la pared. Note que el
gancho va en la parte superior.
ESPAÑOL
ESPAÑOL-6

11.- Para asegurar los sujetadores a la pantalla, coloque los dos
tornillos sujetadores y apriete firmemente, como se muestra en la
figura.
AJUSTE DE ÁNGULOS DESPUÉS DE LA
INSTALACIÓN
1.- Una vez que instaló la pantalla y está firmemente sujeta,
localice los seguros de las barras de movimiento.
2.- Aflójelas ligeramente a fin de que la pantalla tenga
movimiento.
ESPAÑOL
ESPAÑOL-7

3.- Coloque la pantalla en el ángulo que desee.
4.- Vuelva a apretar las roscas de mariposa de las barras de
movimiento.
ESPECIFICACIONES
Dimensiones: 80x 24 x 8,5cm
Peso: 22kg
El diseño del producto y las especificaciones pueden
cambiar sin previo aviso.
ESPAÑOL
ESPAÑOL-8
E
l diseño del producto
y
las especificaciones pueden
c
ambiar sin
p
revio aviso
.

WARRANTY
This Steren product is warranted under normal usage against defects in workmanship and materials
to the original purchaser for one year from the date of purchase.
CONDITIONS
1.- This warranty card with all the required information, invoice or purchase ticket, product box or
package, and product, must be presented when warranty service is required.
2.- If the product stills on the warranty time, the company will repair it free of charge.
3.- The repairing time will not exceed 30 natural days, from the day the claim was received.
4.- Steren sell parts, components, consumables and accesories to costumer, as well as warranty
service, at any of the addresses mentioned later.
THIS WARRANTY IS VOID IN THE NEXT CASES:
If the product has been damaged by an accident, acts of God, mishandling, leaky batteries, failure
to follow enclosed instructions, improper repair by unauthorized personnel, improper safe keeping,
among others.
a) The consumer can also claim the warranty service in the purchase establishment.
b) If you lose the warranty card, we can reissue it, if you show the invoice or purchase ticket.
RETAILER INFORMATION
Name of the retailer
Address
Product
Brand
Part number
Serial number
Date of delivery
In case your product fails or have any doubt, please contact your nearest retailer. If you are in
Mexico, please give a call to our Call Center.
Call Center
Mexico City: 53 54 22 90
Province: 01 800 500 9000
Product: Wall bracket for LCD and plasma TV
Part number: STV-048
Brand: Steren

PÓLIZA DE GARANTÍA
Esta póliza garantiza el producto por el término de un año en todas sus partes y mano de obra,
contra cualquier defecto de fabricación y funcionamiento, a partir de la fecha de entrega.
CONDICIONES
1.- Para hacer efectiva la garantía, presente ésta póliza y el producto, en donde fue adquirido o en
Electrónica Steren S.A. de C.V.
2.- Electrónica Steren S.A de C.V. se compromete a reparar el producto en caso de estar defectuoso
sin ningún cargo al consumidor. Los gastos de transportación serán cubiertos por el proveedor.
3.- El tiempo de reparación en ningún caso será mayor a 30 días, contados a partir de la recepción
del producto en cualquiera de los sitios donde pueda hacerse efectiva la garantía.
4.- El lugar donde puede adquirir partes, componentes, consumibles y accesorios, así como hacer
válida esta garantía es en cualquiera de las direcciones mencionadas posteriormente.
ESTA PÓLIZA NO SE HARA EFECTIVA EN LOS SIGUIENTES CASOS:
1.- Cuando el producto ha sido utilizado en condiciones distintas a las normales.
2.- Cuando el producto no ha sido operado de acuerdo con el instructivo de uso.
3.- Cuando el producto ha sido alterado o reparado por personal no autorizado por Electrónica
Steren S.A. de C.V.
El consumidor podrá solicitar que se haga efectiva la garantía ante la propia casa comercial donde
adquirió el producto. Si la presente garantía se extraviara, el consumidor puede recurrir a su
proveedor para que le expida otra póliza de garantía, previa presentación de la nota de compra o
factura respectiva.
DATOS DEL DISTRIBUIDOR
Nombre del Distirbuidor
Domicilio
Producto
Marca
Modelo
Número de serie
Fecha de entrega
ELECTRONICA STEREN S.A. DE C.V.
Camarones 112, Obrero Popular, 02840, México, D.F. RFC: EST850628-K51
STEREN PRODUCTO EMPACADO S.A. DE C.V.
Biólogo MaximIno Martínez No. 3408 Int. 3 y 4, San Salvador Xochimanca, México, D.F. 02870,
RFC: SPE941215H43
ELECTRONICA STEREN DEL CENTRO, S.A. DE C.V.
Rep. del Salvador 20 A y B, Centro, 06000, México. D.F. RFC: ESC9610259N4
ELECTRONICA STEREN DE GUADALAJARA, S.A.
López Cotilla No. 51, Centro, 44100, Guadalajara, Jal. RFC: ESG810511HT6
ELECTRONICA STEREN DE MONTERREY, S.A.
Colón 130 Pte., Centro, 64000, Monterrey, N.L. RFC: ESM830202MF8
ELECTRONICA STEREN DE TIJUANA, S.A
Calle 2a, Juárez 7636, Centro, 22000, Tijuana, B.C.N. RFC: EST980909NU5
Producto: Soporte para pantallas de plasma y LCD de 32” a 48”
Modelo: STV-048
Marca: Steren
En caso de que su producto
presente alguna falla, acuda
al centro de distribución más
cercano a su domicilio y en caso
de tener alguna duda o pregunta
por favor llame a nuestro Centro
de Atención a Clientes, en
donde con gusto le atenderemos
en todo lo relacionado con su
producto Steren.
Centro de Atención a Clientes
Ciudad de México:
53 54 22 90
Interior de la República:
01 800 500 9000
Table of contents
Languages:
Other Steren TV Mount manuals

Steren
Steren STV-029 User manual

Steren
Steren STV-039 User manual

Steren
Steren STV-021 User manual

Steren
Steren STV-120 User manual

Steren
Steren STV-150 User manual

Steren
Steren STV-037 User manual

Steren
Steren STV-034 User manual

Steren
Steren Platinum STV-2000 User manual

Steren
Steren STV-305 User manual

Steren
Steren STV-031 User manual

Steren
Steren CCTV-350 User manual

Steren
Steren STV-062 User manual

Steren
Steren STV-041 User manual

Steren
Steren STV-021 User manual

Steren
Steren STV-024 User manual

Steren
Steren STV-036 User manual

Steren
Steren STV-125 User manual

Steren
Steren STV-066 User manual

Steren
Steren STV-040 User manual

Steren
Steren STV-033 User manual