PRONAS BN-4500 Installation and operating manual

Installation Reference Guide
Revision 1.1
P/N:PW0020000000071
IDE NAS SUBSYSTEM

Copyright
No part of this publication may be reproduced, stored in a retrieval system, or
transmitted in any form or by any means, electronic, mechanical, photocopying,
recording or otherwise, without the prior written consent.
Trademarks
All products and trade names used in this document are trademarks or regis-
tered trademarks of their respective holders.
Changes
The material in this documents is for information only and is subject to change
without notice.

FCC Compliance Statement
This equipment has been tested and found to comply with the limits for a
Class B digital device, pursuant to Part 15 of the FCC rules. These limits are
designed to provide reasonable protection against harmful interference in
residential installations. This equipment generates, uses, and can radiate ra-
dio frequency energy, and if not installed and used in accordance with the
instructions, may cause harmful interference to radio communications.
However, there is not guarantee that interference will not occur in a particular
installation. If this equipment does cause interference to radio or television
equipment reception, which can be determined by turning the equipment off
and on, the user is encouraged to try to correct the interference by one or
more of the following measures:
1. Reorient or relocate the receiving antenna
2. Move the equipment away from the receiver
3. Plug the equipment into an outlet on a circuit different from that to
which the receiver is powered.
4. Consult the dealer or an experienced radio/television technician for
help
All external connections should be made using shielded cables.

Table of Contents
0 Introduction.......................................................................................................
1 KeyFeatures....................................................................................................
2 Unpacking.........................................................................................................
3 TheFrontPanel.....................................................................................................
4 TheRearPanel......................................................................................................
5 InstallationOverview.........................................................................................
5.1 Necessary Equipment for Installation........................................................
5.2 Installing HardDiskDrives.........................................................................
5.3 ConnectingNAS Subsystem to YourNetwork...........................................
5.4 IPSetting....................................................................................................
6 Configuring theNAS subsystem.......................................................................
6.1 QuickSetup...............................................................................................
6.2 Menu..........................................................................................................
6.3 Manage Users...........................................................................................
6.4 Service......................................................................................................
6.5 Backup / Restore......................................................................................
6.6 System......................................................................................................
6.7 Interface.....................................................................................................
1
2
2
3
3
4
4
4
8
9
11
11
23
24
25
29
29
35

1
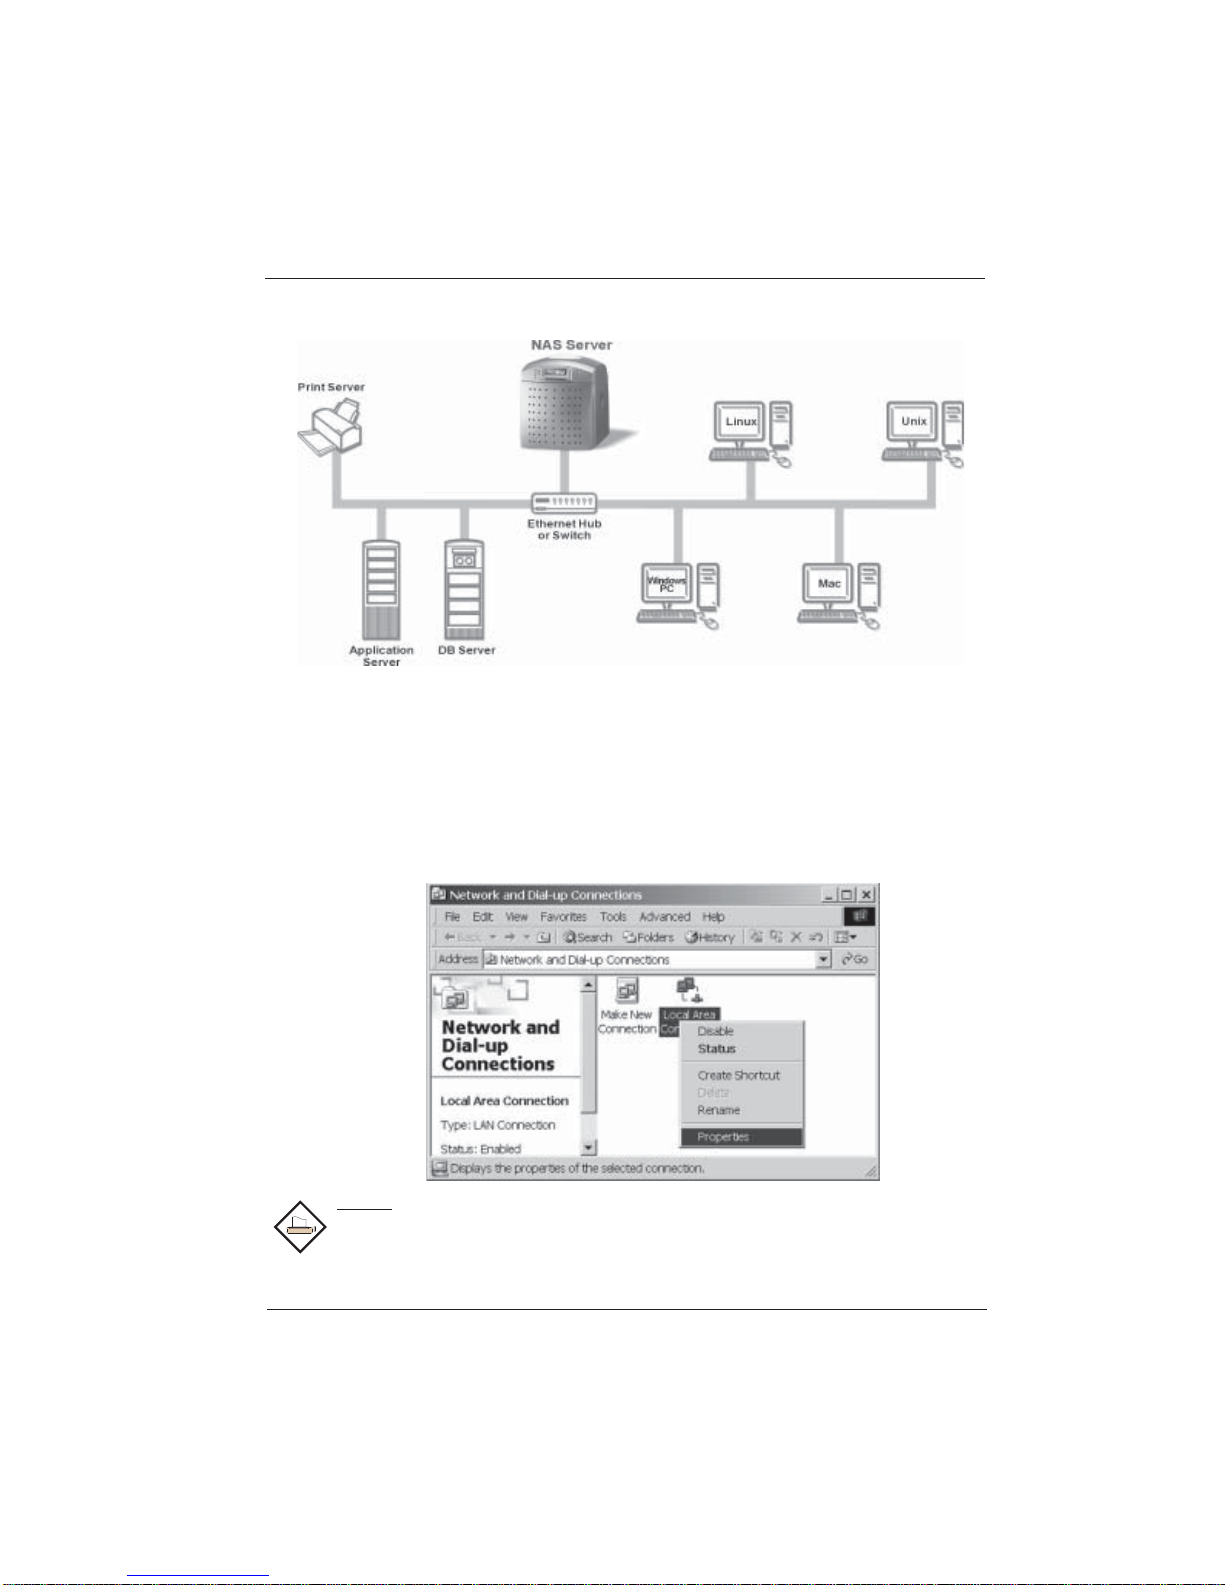
0. Introduction
If you need to easily expand storage capacity while providing uninterrupted
high-performance data access across your LAN. You may want to consider a
NAS (Network Attached Storage) appliance. When budgets are tight and a
quick fix is required, a NAS appliance is a low-cost, efficient solution to dodge
that network-to-storage logjam. That's why more and more users select NAS
architecture as their storage networking.
The BN-4500 (desktop IDE NAS subsystem) is a reliable, cost-effective way to
add storage to the network. It comes with 4 ultra DMA 100 drive bays support-
ing drive capacity up to 512GB. Built-in 667MHz CPU, 128MB SDRAM and
dual 10/100 Mb/s Ethernet ports offers high performance NAS platform. Based
on Unix based embedded OS design, it can boot without HDD, FDD or CD-
ROM to guarantee reliability and quick boot. The BN-4500 system is managed
and configured by browser based software, including pre-configure disk
capacity, users setting, volume management, quick installed on popular net-
work platform, Multi protocol support, etc... It also offers fault-tolerant RAID
levels 0, 1, 5, 0+1 and JBOD for data protection.
Before you begin to use your BN-4500NAS subsystem, read this installation to
learn about the major components installed in the subsystem and how they can
be used. We suppose that you know network setting and system administration
intimately. If any of setting or installing problem not included in this installation
is occur, please contact your network administrator or our distributor in your
territory for assistance.

2
1. Key Features
• The most compact and cute design
• Easy to deploy and easy to expand
• Lower initial cost and reduced installation, running and administration cost
• Increase reliability and reduce IT and end user hassles
• Unix based embedded OS design
• Provides file access services to multiple users over the LAN, the intranet
and/or the internet
• Multi protocol support ( TCP/IP, DHCP, Apple Talk, Mac zone, SMB, NFS,
AFP over TCP/IP, SNMP, FTP, HTTP, Telnet)
• Supports RAID levels 0, 1, 5, 0+1 and JBOD
• Multi-LanguageGUI interface support
2. Unpacking the Subsystem
Before we continue, you need to unpack the subsystem and verify that the
contents of the shipping carton are all there and in good condition. Before
removing the subsystem from the shipping carton, you should visually inspect
the physical condition of the shipping carton. Exterior damage to the shipping
carton may indicate that the contents of the carton are damaged. If any damage
is found, do not remove the components; contact the dealer where you pur-
chased the subsystem for further instructions.
The package contains the following items:
• BN-4500NAS subsystem unit
• One power cord
• Two CAT.5 10/100 Mbps Ethernet LAN cables
• Installation ReferenceGuide
• Spare screws, etc.
If any of these items are missing or damaged, please contact your dealer or
sales representative for assistance.

3
3. The Front Panel
Power LED
Access LED LED will blink when the hard drive is being accessed.
Power LED Green LED indicates power is on.
HDD
access LED
4. The Rear Panel
VoltageSelector
(115V/230V)
LAN2
LAN1
ACinlet
Reserve
Power Switch

4
5. Installation Overview
5.1 Necessary Equipment for Installation
To connect, install and administer your NAS BN-4500, you will need a network
hub or switch. You will also need the following capabilities on your workstation:
• Windows 95/98/NT (SP5) /2000/XP with network access
• Internet Explorer v4.01 or later
• TCP/IP Enabled.
• 10/100 Mbps EthernetNetwork Interface Card
5.2 installing Hard Disk Drives
1. Un-screw from rear and need to un-screw three (3) mounting
screws one each side. Then remove Fan module.
2
Fan Module
2
1
1

5
2. Un-screw from the back of the rear cover and sliding the rear cover
off.
2
1
Rear Cover
21
6
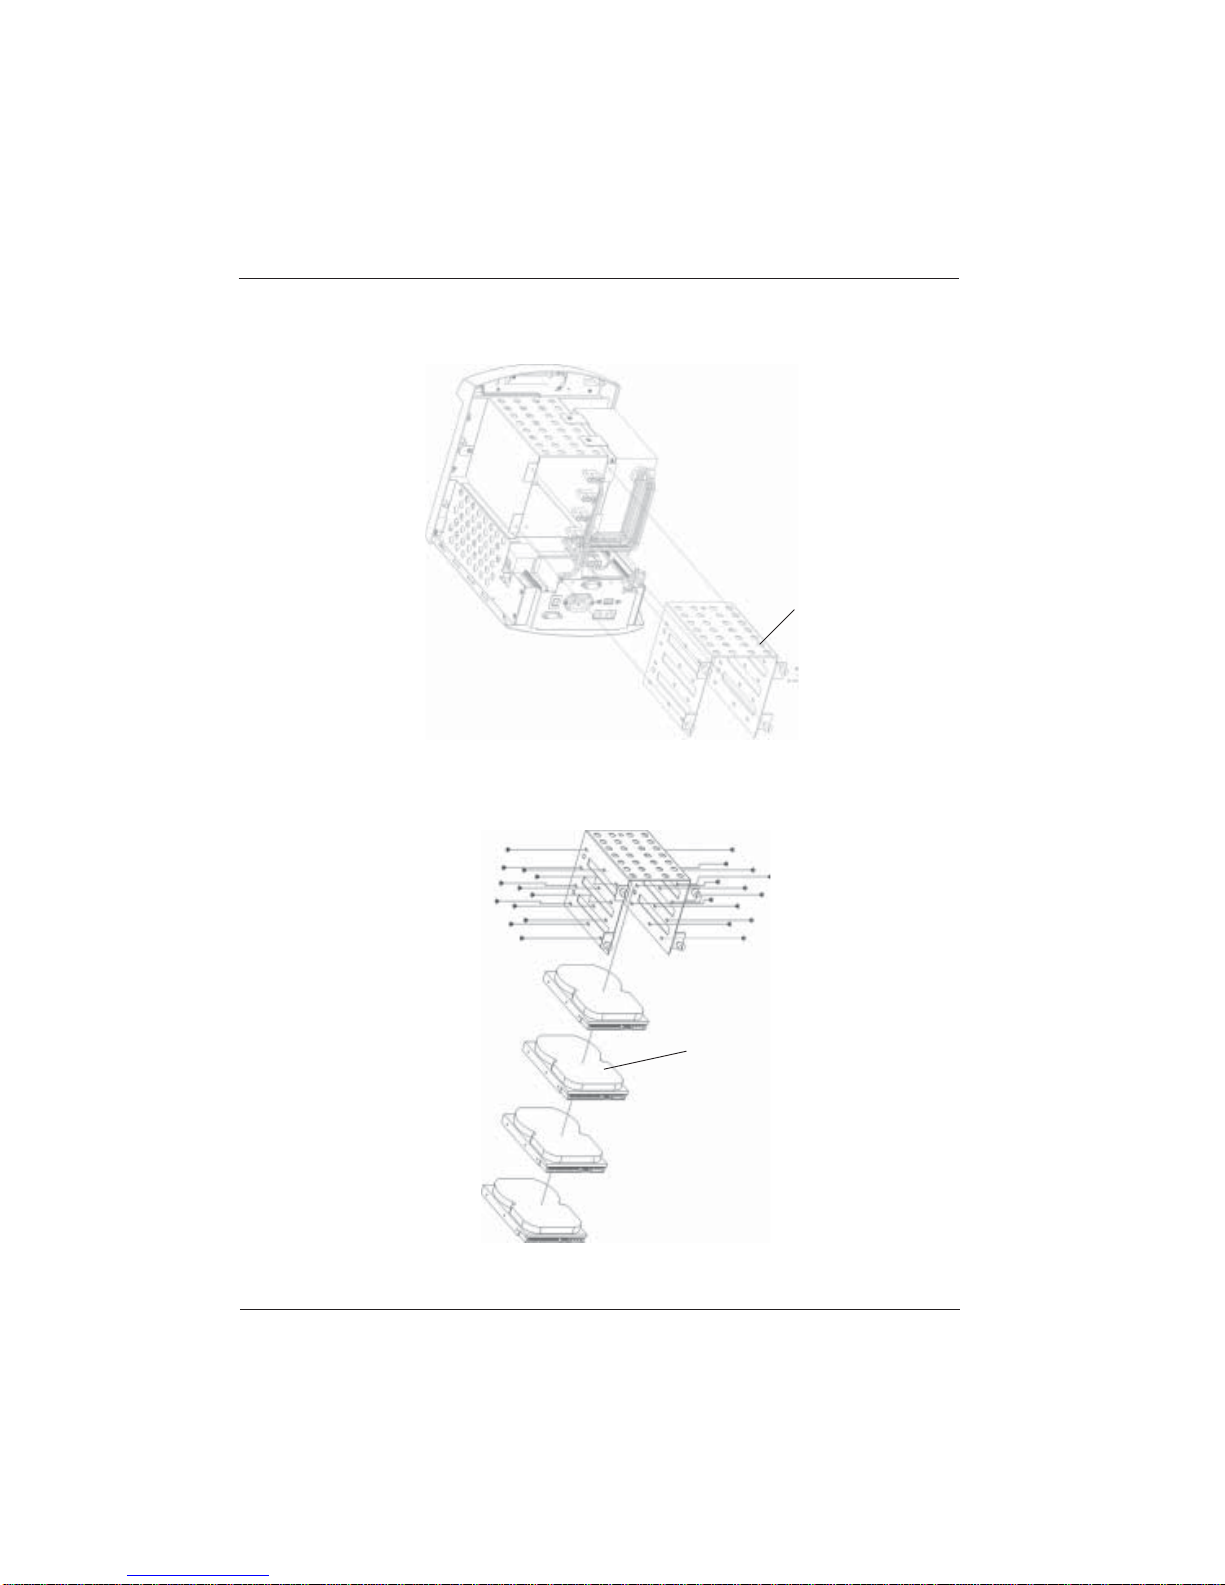
3. Take off Disk cage.
Disk cage
4. Stow hard disk into Disk cage and install the mounting screws on each side
to secure the drive.
hard drive

7
5. Put back disk cage and fix it.
6. Connect the power cable to the power connector on the hard drive.
7. Connect the 40-pin 80 conduction ATA-100 cable to the IDE connector on
the hard drive.
Power supply
Power cable
40-pin 80 conduction
ATA-100 cable
8. Put back rear cover and fix it.
9. Put back Fan module and fix it.

8
5.3 Connecting NAS subsystem to Your Network
1. To connect the NAS unit to the network, insert the cable that came with the
unit into the network connection (LAN1) on the back of NAS unit. Insert the
other end into a 10/100 BASE-T Ethernet connection on your network hub
or switch. Use the power cord to connect the NAS to a power source.
2. Plug the power cord or power connector, located at the rear of the NAS
subsystem.
Important:
Configure the “Voltage Selector” according to the type of voltage you
are using. Failure to do so may cause severe damage to the
subsystem. The power supplies installed in the subsystem is capable
of operating in 115V or 230V voltage.
3. Turn on the power.
Note:
The factory default setting is 230V voltage for power supply.
4. The “Power” LED at the front panel will turn green and an alarm will
sound.
!
Voltage Selector
(115V/230V)
Power Switch
ACinlet
9
5.4 IP setting
1. Please wait few seconds for system boot up.
2. Normally, BN-4500 is configured IP address “172.16.1.2” and subnet
mask “255.255.0.0” by factory default. Please change your workstation
setting to connect BN-4500 as below.
Note:
You can use the browser to reconfigure the new IP address. (Example,
http://172.16.1.1/nas/)

10
!
3. The username ‘admin’ and password ‘proware’. Please change the default
password when you login successful.
4. Enable the service (Windows/UNIX/Apple/DHCP) that you want to use in
the ‘Service’ menu when first time logon. The factory default will disable
all services.
Important:
•Please set correct “IP address”, “Netmask”, “Hostname”, “Default
router”, and “Nameserver” before use.
•Please remember your password if you using “Volume Password”.

11
6. Configuring the NAS subsystem
The subsystem has a setup configuration utility built in. It contains important
information about the configuration and settings for various optional functions in
the subsystem. This chapter explains how to use and make changes to the
setup utility.
6.1 Quick Setup
This Quick Setup Guide is intended as a shortcut so that experienced users
can get their NAS subsystem started as quickly as possible.
1. Start web browser. Type ‘ http://172.16.1.1/nas ’ and system will prompt
you to enter the username and password. The default username will be
‘admin’ and password will be ‘proware’. Please change the default pass-
word when you login successful. (Enter an easily remembered password
and/or write it down).

12
2. If this is your first time to configure the subsystem, the screen will show
the following message. Before configuring the NAS subsystem, make
sure the subsystem is able to detect all the hard drives in the subsystem.
This is to ensure that the hard drives are functioning normally, click
Format.
3. To select which RAID level and Stripe Size you want to create.

13
4. Select “OK” to format NAS and subsystem will now initialize for the set-
tings to become effective.

14
6. Use this panel to create an IP address and Netmask. When finished, click
Apply.
5. After the subsystem completes initialization, the screen will appear as
shown below. Select “OK” to running quick setup. It will walk you through
setting ethernet, assigning Hostname, Routing Table, Nameserver, Time
zone,Network time and service.

15
7. A warning that Clients will disconnect after change apply will appear, click
OK.
8. The setting becomes effective and will appear in your web browser
window. (Example, address change to 192.168.152.70).

16
10. Restart web browser. Type ‘ http://<changed IP>/nas ’ and system will
prompt you to enter the username and password. The default username
will be ‘admin’ and password will be ‘proware’. Please change the default
password when you login successful. (Enter an easily remembered pass-
word and/or write it down). (Example, address change to 192.168.152.70).
9. Please change your workstation TCP/IP setting as shown below.
(Example, address change to 192.168.152.71).
Table of contents
Popular Storage manuals by other brands


Samsung
Samsung MZ-5PA128 User Manual(SSD User Quick user manual

Seagate
Seagate BARRACUDA 18FC installation guide

Glyph
Glyph GT 050 Q quick guide

Salsbury Industries
Salsbury Industries S-54000 Series installation instructions

Exabyte
Exabyte Mammoth Field Instructions

Kis
Kis GULLIVER 9753000 Assembly instruction


