ProScan NOSTALGIA PRCD906BTT User manual

INSTRUCTION MANUAL
PLEASE READ CAREFULLY BEFORE OPERATION
This product has been manufactured and sold under the responsibility of
CURTIS INTERNATIONAL LTD.
PROSCAN, and the PROSCAN logo are trademarks used under license by CURTIS
INTERNATIONAL LTD. – further information at www.proscan-brand.com.
All other products, services, companies, trademarks, trade or product names and logos
referenced herein are the property of their respective owners.
ANALOG TUNER MIN MAX
MODE/REC
NOSTALGIA BLUETOOTH 7 IN 1 MUSIC SYSTEM


Cleaning The Music System
Wipe the music system with a soft ,dry, lint-free cloth.
Do not:
Immerse the music system in water or any other liquid.
Expose the media centre to liquid,moisture or humidity to avoid the unit’s internal circuit being
affected. Use any abrasive cleaning solvents to clean the music system, as this can cause damage.
Expose the music system to extremely high or low temperatures,as this will shorten the life of
electronic devices, destroy the battery or distort certain plastic parts.
Drop the music system,as the internal circuit may become damaged.
Attempt to disassemble the media centre,as this may cause damage to the unit.
Dispose of the music system in a fire ,as it will result in an explosion.
Getting Started
In the Box
Remove the unit from the box.
Remove any packaging from the unit.
Place the packaging inside the box and either store or dispose of safely.
Nostalgia Bluetooth 7 in 1 music system
AC Power Adaptor
RCA Cable
Instruction Manual
4 legs
5
Location Of Controls
Front View
AM
FM
ANALOG TUNER MIN MAX
MODE/REC
1
2
3
4
5
6
7
8
9
1110 12 13 14
15 16 17
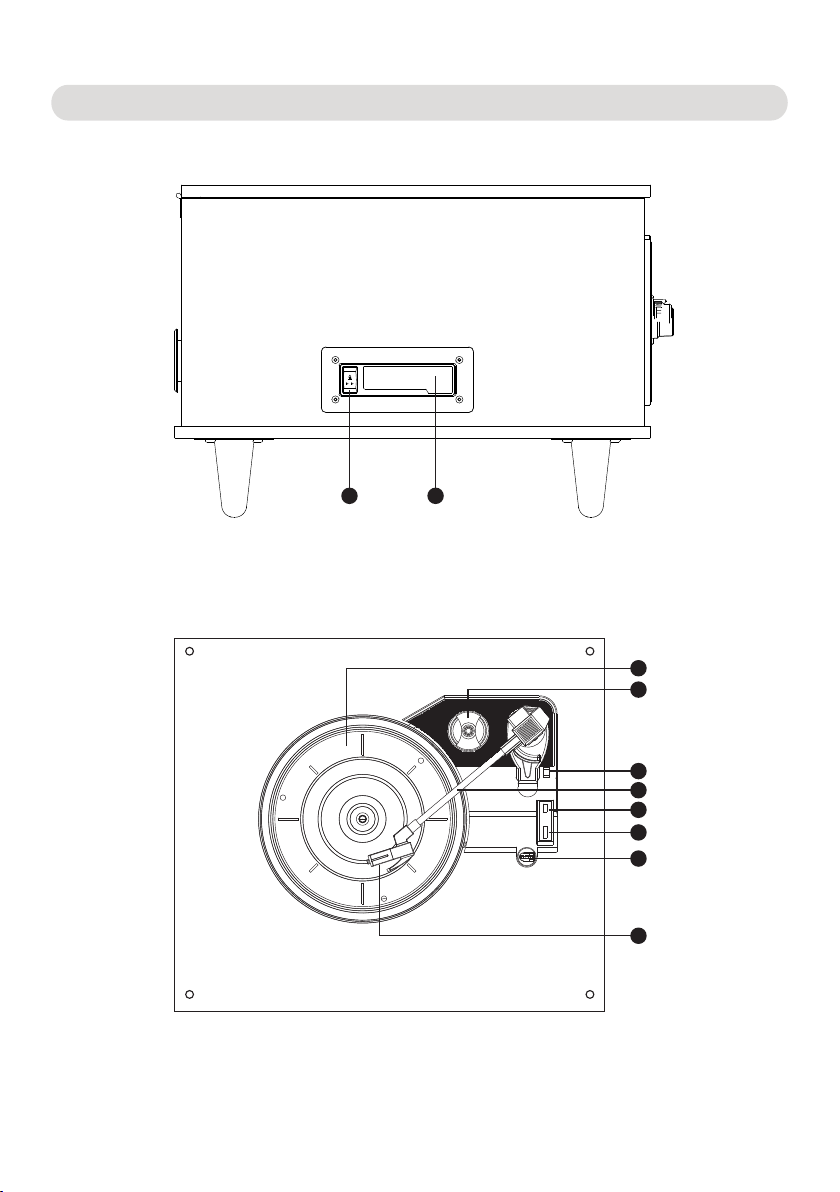
Back View
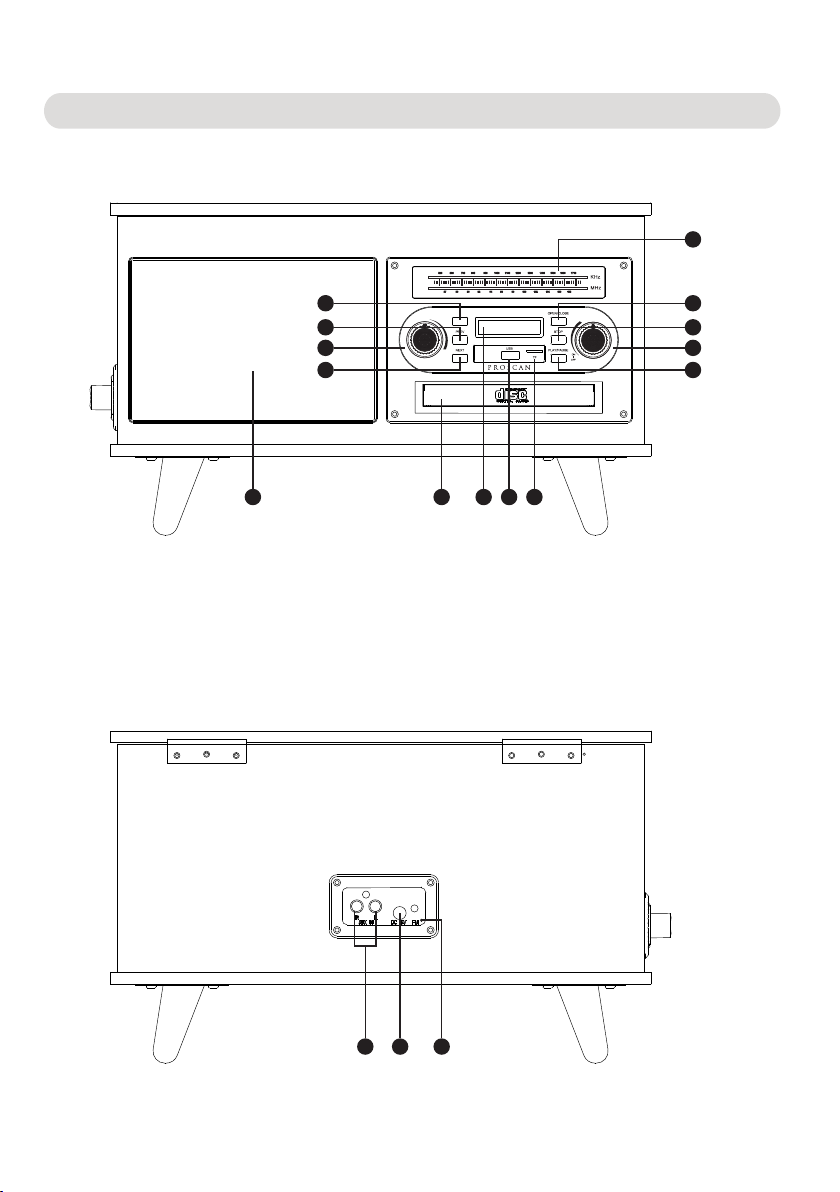
1: Frequency Display
2: Open / Close Button
3: Stop Button
4: On / Off / Volume Control Dial
5: Play/Pause Button
6: Mode / Encoding
Short press to switch mode
Long press to USB Encoding
7: Skip-Button (PREV)
8: AM/FM Radio Control Dial
9: Skip+Button (NEXT)
10: Speakers
11: Disc Tray
12: LED Display
13: USB Input Port
14: TF Card Input Port
15: RCA Input Ports 16: DC Input Socket 17: FM Antenna
6
Location Of Controls
1918
20
21
22
23
25
26
27
24
Side View
Turntable
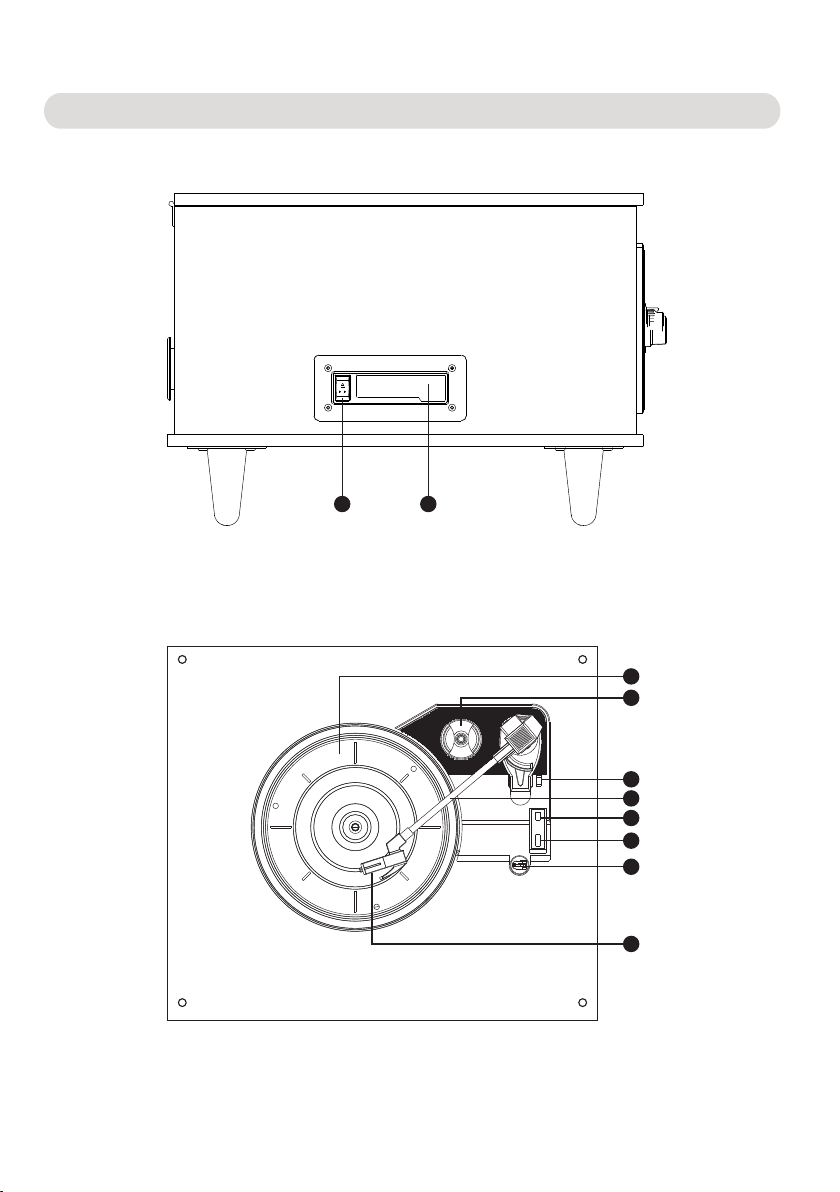
23: Tone Arm
24: Auto Stop On/Off Switch
25: Speed Selector
26: Tone Arm Holder
27: Turntable Pickup
20: Turntable
21: 45 RPM adapter
22: Lever
18: Tape Eject / Fast Forward 19: Cassette
7

Assembly
Carefully turn the Nostalgia Bluetooth 7 in 1 music system over so that lid is resting on the floor,place
it onto a soft surface to protect it from scratches.
Screw the four legs onto the underside of the 7 in 1 music system.
Stand the Nostalgia Bluetooth 7 in 1 music system on a flat ,stable surface
Using music system
Basic Functionality
Plug the DC input jack on the power adaptor into the DC input socket on the reverse of the music
system and then plug the adaptor into the mains power supply and switch it on .
Turn on the music system by rotating the on/off/volume control dial in a clockwise direction,until it
clicks .
Short Press “MODE/REC “ button until your desired operation is selected (Bluetooth,CD,Turntable,
FM,AM,Aux,USB,TAPE ).
Long press “MODE/REC “ button to USB encoding (Only encoding during turntable mode) .
Rotate the AM/FM Radio control dial in a clockwise direction to your desired radio mode
Adjust volume by rotating the on/off/volume control dial . Rotate in a clock direction to increase the
volume and Rotate in an anticlockwise direction to decrease the volume.
To pause the track,press PLAY/PAUSE button, push it again to resume the track.
Switch to next track by pressing “Next” button; play previous track by pressing “PREV” button.
To open the Disc tray by pressing “OPEN/CLOSE” button, press “OPEN/CLOSE” button again to
close Disc tray.
To Stop CD play by pressing “Stop” button.
To turn off the music system,rotate the on/off/volume control dial in an anticlockwise direction,until it
clicks.
Listening to a Record
STEP 1: Turn on the music system by rotating the ‘On/Off/ Volume Dial’ in a clockwise direction .
STEP 2: Short press the “MODE/REC “ button to turntable mode .
STEP 3: Remove the protective white needle cover by gently sliding it away from the tone arm.
STEP 4: Carefully place a record onto the turntable,remembering to apply the 45 rpm adapter first, if
listening to a 45 rpm record with a large centre hole.
STEP 5: Unlock the tone arm from the arm lock by pushing it aside.
STEP 6: Raise the tone arm using the arm raising lever or by carefully lifting it .
STEP 7: Move the tone arm across to the outlet edge of the record and gently lower it , the turntable
will begin to spin and play automatically.
STEP 8: Once the tone arm reaches the end of the record at the centre of the turntable,the turntable
will stop.Lift away the tone arm and place it back into the armrest.
STEP 9: Secure the tone arm once more by engaging the arm lock.
STEP 10: Rotate the “On/Off/ Volume Dial” in an anticlockwise direction unit it clicks ,to turn off
Turntable .
Note: Always ensure that the tone arm is secured before transporting .
Instructions For Use
8
Replacing The Stylus
The music system stylus should last approximately 400~450 hrs under normal use .However, it is
recommended that the stylus be replaced as soon as a change in sound quality is noticed.
Prolonged use of a wore-out stylus may damage any records and the highest speed 78rpm records
will wear out the stylus more quickly.
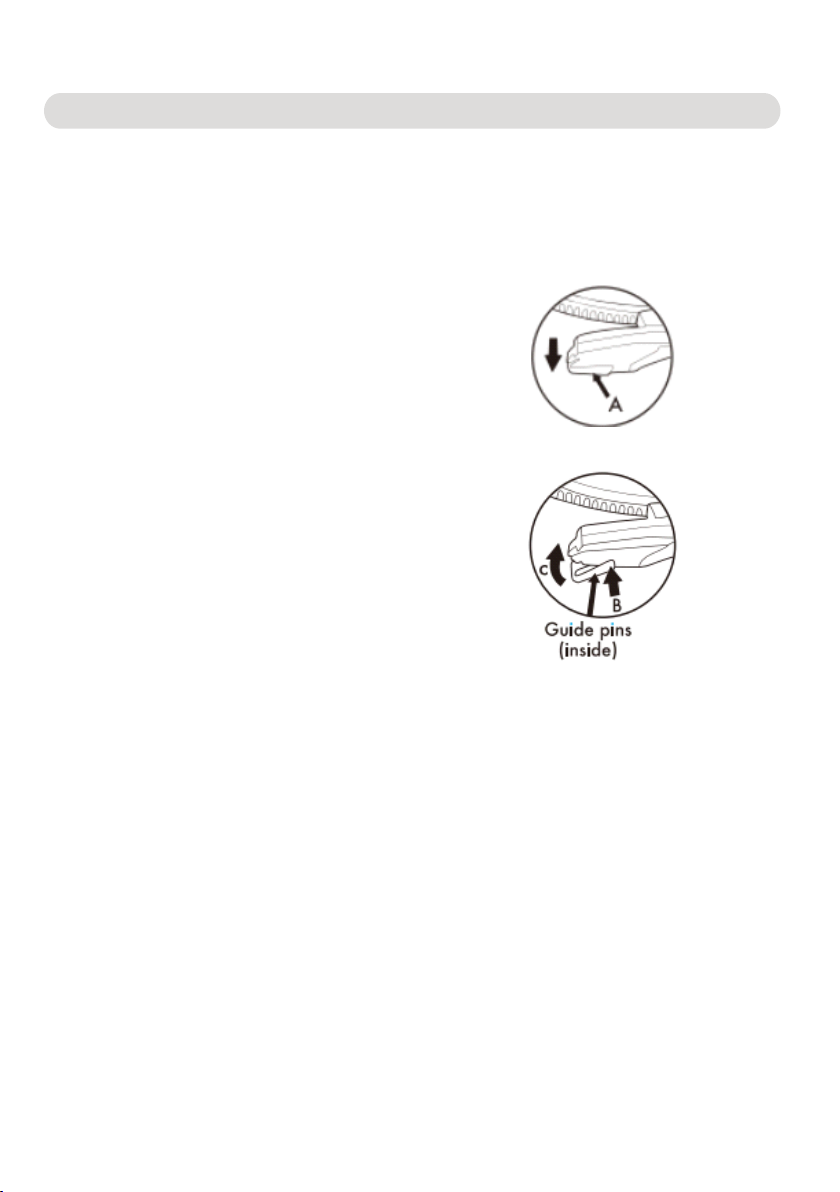
Removing the old stylus
STEP 1: Carefully place a screwdriver at the tip
of the stylus and push downward (A) .
STEP 2: Remove the old stylus by gently pulling
it down and forward simultaneously .
Installing a New Stylus
STEP 1: Hold the stylus at front edge(needle side)
and insert the rear edge onto the tone arm(B).
STEP 2: Push the stylus upward ,until it locks into position©.
Caution: The music system must be powered off using the
on/off /volume control dial before replacing the stylus.
Do not bend the stylus or touch the needle,as the may
cause injury.
Playing with CD
Inserting a CD
STEP 1: To access the built-in CD player, eject the disc tray by pressing “OPEN/CLOSE” button.
STEP 2: Insert the CD to be played with artwork visible.Gently press the CD into the disk tray and
then close the CD player
STEP 3: Short press the “MODE/REC “ button to CD mode
Warning: The CD player utilizes a class 1 laser.Always exit CD mode before opening the CD
player to remove or change CDs. Never look directly at laser pickup head .
Listening to a CD
STEP 1: To use the CD player,follow the instructions in the section entitled “Inserting a CD”.
STEP 2: To control the sound when a CD is inserted into the music system,follow the instructions in
the section entitled “Using Music System “ .
STEP 3: To end CD playback by pressing “STOP” button.
Listening to a Cassette Tape
STEP 1: Turn on the music system by rotating the ‘On/Off Volume Dial’ in a clockwise direction .
STEP 2: Short press the “MODE/REC “ button to TAPE mode .
STEP 3: Insert the Cassette tape into the Cassette Deck on the left side panel.
STEP 4: Turn the ‘On/Off/ Volume Dial to adjust the volume level
Instructions For Use
9

Quick press the tap Eject/Fast Forward button to fast forward.
.Full press the Tape Eject/Fast Forward button inward to eject.
.When tap has finished playing ,it will stop.
Listening through Bluetooth
STEP 1: Turn on the music system by rotating the ‘On/Off/ Volume Dial’ in a clockwise direction ,
short press the “MODE/REC “ button until Bluetooth mode is selected .
STEP 2: Search for the music system using a Bluetooth compatible device. Select “Pro
PRCD9060BT “ to connect and pair.
Note: Once connected ,the sound can be controlled using the control panel or the relevant
controls on the Bluetooth compatible device.
Listening through Aux
STEP 1: To use Aux mode, connect the RCA cable to RCA input port(ensuring that each plug is
correctly inserted according to the corresponding color(red and white), RCA port on the back of
the music system and the other end to an MP3 player or other compatible audio source.
STEP 2: Short press the “MODE/REC “ button to Aux mode.
Note: Once connected ,the sound can be controlled using the relevant controls on the
compatible audio device.
Listening through USB
STEP 1: To use USB mode, insert a compatible USB drive (not included) into the USB port on
the front of the unit.
STEP 2: Short press the “MODE/REC “ button to USB mode
Note: Once connected ,the sound can be controlled using the music system. The music system
will only recognize MP3 audio files; if other files are present on the USB drive, this may prevent
the music system from playing .
USB Encoding during Turntable Mode
STEP 1: Set to play the vinyl
STEP 2: Insert USB to USB port
STEP 3: Long press “MODE/REC “ button enter into USB encoding ,then you can encode the
music you like .
STEP 4: When you want to finish the USB encoding ,long press the “MODE/REC “ button to
finish the USB encoding.
Note: Only can proceeding the USB encoding function when at turntable model,can not
encoding at Bluetooth mode or other mode .
Listening to the Radio
STEP 1: Extend the antenna for the best possible reception.
STEP 2: Short press the “MODE/REC “ button to select your desired radio mode(AM/FM)
STEP 3: Select the desired station by rotating the analog tuner.
Instructions For Use
10

This product is warranted to be free from defects in material and workmanship for a period of
ninety (90) days from the date of original purchase. During this period, your exclusive remedy is
repair or replacement of this product or component found to be defective, at our option;
however, you are responsible for all costs associated with returning the product to us. If the
product or component is no longer available, we will replace with a similar one of equal or
greater value. Prior to a replacement being sent, the product must be rendered inoperable or
returned to us.
This warranty does not cover glass, filters, wear from normal use, use not in conformity with the
printed directions., or damage to the product resulting from accident, alteration, abuse, or
misuse. This warranty extends only to the original consumer purchaser or gift recipient. Keep
the original sales receipt, as proof of purchase is required to make a warranty claim. This
warranty is void if the product is used for other than single-family household use or subjected to
any voltage and waveform other than as on the specified rating on the label (e.g., 120V~60Hz).
We exclude all claims for special, incidental, and consequential damages caused by breach of
express or implied warranty. All liability is limited to the amount of the purchase price. Every
implied warranty, including any statutory warranty or condition of merchantability or
fitness for a particular purpose, is disclaimed except to the extent prohibited by law, in
which case such warranty or condition is limited to the duration of this written warranty.
This warranty gives you specific legal rights. You may have other legal rights that vary
depending on where you live. Some states or provinces do not allow limitations on implied
warranties or special, incidental, or consequential damages, so the foregoing limitations may
not apply to you.
For faster service, locate the model, type, and serial numbers on your appliance.
ATTACH YOUR PROOF OF PURCHASE HERE, PROOF OF PURCHASE IS REQUIRED TO
OBTAIN
WARRANTY SERVICE.
Please have the following information available when you contact the Support Team:
Name, address and telephone number.
Model number and serial number.
A clear, detailed description of the problem.
Proof of purchase including dealer or retailer name, address and date of purchase.
90 Day Warranty
To make a warranty claim, please email support2@curtiscs.com or call 1-800-968-9853
11
ANALOG TUNER MIN MAX
MODE/REC
NOSTALGIA BLUETOOTH 7 EN 1
SYSTEME DE MUSIQUE
MODELES PRCD906BT:
NORMES DE PROCESSUS
Veuillez lire attentivement avant Opérations
Ce produit a été fabriqué et vendu sous la responsabilité
de CURTIS INTERNATIONAL LTD.
PROSCAN, et le logo PROSCAN sont des marques utilisées sous licence par CURTIS
INTERNATIONAL LTD. – pour plus d’informations : www.proscan-brand.com.
Tous autres produits, services, dénominations sociales, marques, nom commerciaux, noms de
produits et logos référencés ici sont la propriété de leurs titulaires respectifs.


Système De Musique Propre
Essuyez le système de musique avec un tissu doux, sec et sans poils.
Non !:
Plongez le système de musique dans de l'eau ou tout autre liquide.
Exposez le centre multimédia à des liquides, à l'humidité ou à l'humidité afin d'éviter que les
circuits internes de l'appareil ne soient affectés. Nettoyez le système de musique avec
n'importe quel nettoyant abrasif, car cela peut causer des dommages.
Exposez le système de musique à des températures très élevées ou très basses, car cela
raccourcira la durée de vie des appareils électroniques, endommagera la batterie ou
déformera certaines pièces en plastique.
Éteignez le système de musique car les circuits internes peuvent être endommagés.
Essayez de démonter le Media Center, car cela pourrait endommager l’appareil.
Traitez le système de musique dans le feu, car cela peut provoquer une explosion.
Guide D'entrée
Retirez l'appareil de la boîte.
Retirez tout emballage de l'équipement.
Placez l'emballage dans une boîte pour le stockage ou la manipulation en toute sécurité.
Dans La Boîte
NOSTALGIA BLUETOOTH 7 EN 1 SYSTEME DE MUSIQUE
Adaptateur d'alimentation AC
Le câble RCA
Normes de processus
Quatre jambes
7

Position Du Contrôle
Vue avant
AM
FM
ANALOG TUNER MIN MAX
MODE/REC
1
2
3
4
5
6
7
8
9
1110 12 13 14
15 16 17
Vue arrière
1: Affichage de fréquence
2: Bouton OVRIR/FERMER
3: Bouton arrêter
4: Bouton MARCHE/ARRÊT/Volume Disque de contrôle
5: Bouton LECTURE/PAUSE
6: Modèles / Codes
Appuyez brièvement pour changer de mode
Appuyez sur Long jusqu'au codage USB
7: Sauter le bouton (précédent)
8: AM/FM Radio Disque de contrôle
9: Sauter le bouton (Suivant)
10: Haut-parleurs
11: Plateau porte-disques
12: Affichage DE
13: Port d’entrée USB
14: Port d'entrée de la carte TF
15: Port d'entrée RCA 16: Prise d'entrée DC 17: Antenne FM
8
Position Du Contrôle
1918
20
21
22
23
25
26
27
24
18: Éjection de bande / Avance rapide 19: Cassette
Vue latérale
Platine
20: Platine
21: Adaptateur 45 RPM
22: Levier
23: Bras de lecture
24: Arrêt automatique interrupteur marche / arrêt
25: Sélecteur de vitesses
26: Support des bras
de lecture
27: Picker Platine
9
Table of contents
Languages:
Other ProScan Stereo System manuals


