Prosonic TFD-1901 User manual

19″ TFT LCD TV & DVD COMBO
TFD-1901
Instruction manual
Dear Customers
Thanks for purchasin this TFT-LCD TV/Monitor. We stron ly recommend
that you carefully read the safety and operation instructions before
operatin your TV/Monitor. FOLLOW INSTRUCTIONS AND HEED ALL
WARNINGS on your TFT-LCD TV/Monitor and in this manual.
Safety information
__________________________________________________
Note:
Before connectin the AC power cord to the DC adapter outlet, make sure
that the volta e desi nation of the DC adapter corresponds to the local
electrical supply. If you are unsure a out your power supply, please
ask the local power company.
Caution:
To avoid electric shock, never touch the inside of the LCD TV/Monitor.
Only qualified technicians should open the case of the LCD TV/Monitor.
Warning:
Do not defeat the safety purpose of roundin -type. A roundin type plu
has two blades and a third roundin pin. The third pin is provided for your
safety. If the plu does not fit, ask the electrician to replace the obsolete
outlet. Do not modify the plu !
2

To reduce the risk of fire or electric shock, and annoyin interference, use
the recommended accessories only.
Precautions
________________________________________________________
Please read the below precautions carefully before operatin the unit.
Power cord protection:
1. Never use your LCD TV/Monitor if the power cord has been dama ed.
Do not put anythin on the power cord, and keep the power cord
away from where people can easily trip over it.
2. Be sure to hold the plu , do not pull the cord when disconnectin the
LCD TV/Monitor from an electric socket.
3. Locate your LCD TV/Monitor near an easy accessible AC outlet.
Placement:
1. Use only with the cart, stand, tripod, bracket, or table specified by the
manufacturer, or sold with the apparatus.
2. An appliance and a cart combination should be moved with care.
Quick stops, excessive force, and uneven surfaces may cause the
appliance and cart combination to overturn.
3. Never placin the LCD TV/Monitor in areas under direct sun-li ht, with
hi h temperature or with hi h humidity or hi h level of dust which may
cause dama es on the internal parts of the LCD TV/Monitor.
4. Place the LCD TV/Monitor on a solid surface and treat it carefully. The
screen is made of thin lass with a plastic front surface and can be
dama ed by droppin , hittin or scratchin .
Non-use periods:
Unplu the LCD TV/Monitor when it will no be used for a lon period.
Foreign o jects:
Never insert anythin metallic into the cabinet openin s of the TV/Monitor.
Doin so may cause the dan er of electric shock.
3

Keep away from water/magnetic fields:
1. Do not expose the LCD TV/Monitor to rain or use it near water source.
If the LCD TV/Monitor ot wet, unplu it and contact an authorized
dealer immediately.
2. Do not clean the front panel with Ketone-type materials, ethyl alcohol,
toluene, acid, methyl, or chloride since they may cause dama e on
panel.
3. Keep the unit away from flower vases, tubs, sinks etc. if liquids spill
into the unit, serious dama e will occur.
4. Do not place ma netic objects close to the LCD TV/Monitor.
Stacking:
Openin in the LCD TV/monitor cabinet are provided for ventilation. To
prevent overheatin , these openin s should not be blocked or covered.
Never use the unit on a bed, sofa, ru , or other uneven surfaces. Doin so
may block the ventilation openin s in the bottom of the unit. If you place
the LCD TV/Monitor in a bookcase or some other enclosed place, please
make sure to provide adequate space for ventilation.
Servicing:
1. If the LCD TV/Monitor does not operate normally – In particular, if
there are any unusual sounds or smells comin from the unit – just
unplu it immediately and contact an authorized dealer or service
center.
2. Unplu the LCD TV/Monitor from the AC outlet before any service.
3. Make sure the service technician uses authorized replacement parts
or their equivalents. Unauthorized parts any cause fire, electrical
shock, or other hazard.
4. Followin any service or repair, be sure the service technician
4

performs safety checks to certify that the TFT LCD TV/Monitor is in
safe operatin order.
Unpacking
____________________________________________
Please make sure that the followin items are included with your LCD
TV/Monitor. If any item is missin , please contact your dealer.
TFT LCD TV/ Monitor
Remote control Operation manual
DC adapter Power cord
RCA cable
5

I. View of the monitor
Side view Front view
Back view
1. Remote sensor
2. Power indication li ht
3. Headphone jack
4. CH+/up direction button
5. CH-/down direction button
12. VGA jack
13. SCART jack
14. S-video jack
15. Video in jack
16. Audio in (left) jack
6

6. VOL up/RIGHT direction button
7. VOL down/LEFT direction button
8. Menu button
9. TV/AV button (Function switch button)
10. Power button
11. DC input jack/ Car Cord input jack
17. Audio in (ri ht) jack
18. TVRF jack
19. DVD Play/Pause button
20. DVD Stop playin button
21. DVD open/close button
22. DVD disc slot in
II. Remote control reference guide
(1) Remote control function
1. DVD open/close
2. Video out mode button
3. SLEEP button
4. 0-9 Numerical button
5. Pro ram play button
6. Volume down button
7. Unit system menu button
8. Display status messa e button
9. DVD stop button
10. DVD ENTER/PLAY button
11. DVD fast rewind button
12. DVD fast forward button
13. DVD MENU display button
14. Direction button (Up)
15. Direction button (Left)
16. DVD system setup button
17. ANGLE button
18. Direction button (Down)
19. RANDOM play button
20. SUBTITLE function button
21. TELETEXT buttons
22. Key lock button
23. ZOOM function button
24. Search disc play mode
7
33. CH- button
34. Audio effect button
35. Volume up button
36. CH+ button
37. DVD function button
38. -/- - button
39. TV/AV function switch button
40. RECALL button
41. MUTE button
42. STANDBY button

25. TITLE/PBC button
26. SLOW PLAY button
27. Direction button (Ri ht)
28. REPEAT A-B button
29. REPEAT button
30. DVD skip backward
31. DVD skip forward
32. DVD PAUSE/STEP button
● TELETEXT BUTTONS
(If TV has teletext function. You may enjoy it y using these uttons)
Name Function Name Function
To select TXT/TV mode To show the sub pa e
Enter into TXT list mode Keep the pa e display
Display the hidden
information
INDEX Menu display
Screen zoomin Pa e display or cancel
RED Display red screen GREEN Display reen screen
YELLOW Display yellow screen BLUE Display blue screen
(2) Remote control attery installation and cautions
Replace battery by followin the below steps:
Requires one pair of AAA batteries.
1. Open the battery cover as shown below:
2. Install the battery into the battery tray.
3. Close the battery cover
8

Caution:
1. Keep the battery out of children’s reach.
2. Don’t attempt to rechar e, short-circuit, disassemble, heat or throw the
batteries into the fire.
3. Always replace both batteries at the same time. Never mix new and old
batteries or batteries of a different type.
4. If you don’t intend to use the remote controller for an extended period,
remove the batteries to prevent possible leaka e and corrosion.
Notes:
1. Do not drop, apply shock or step on the remote control.
2. Do not spill water on the remote control.
3. Do not use the remote control for other equipments at the same
time
4. If the TV does not operate even when operatin the remote
control from a close ran e, you need to replace the batteries.
Refer to the label on the back of the remote control for directions for
replacin batteries.
III. Installation and connection
Connect the LCD TV/monitor
9

1. Connect the TVRF source with the antenna port. TVRF si nal
includin : Receivin antenna /satellite TV/CATV net. You can use
75Ω coaxial cable to connect the outdoor antenna.
Outdoor Antenna Connection:
Use 75Ωcoaxial cable plu or 300-75Ωimpedance converter to plu
in antenna input terminal on the rear of the cabinet.
2. Connect the audio sources (Includin DVD, VCDR, CAMCORDER
and PC) to the proper AUDIO input jacks ‘L’ and ‘R’.
3. Connect the video source to the VIDEO jack by RCA cable.
4. If the video source has a SCART output jack, you can connect the
si nal to the monitor by the SCART cable.
5. Connect the video source to the S-VIDEO input jack of the monitor
by the S-video cable (Pretended the video source has S-video output
jack).
6. Insert the AC power to the DC adapter, then connect 12V input jack
of the monitor to it’s DV output jack.
7. When use as computer screen, connect the PC to the VGA jack of
the monitor by the relevant cable.
10
75ΩCo-axis cable
Antenna in jack
75ΩCo-axis cable
VHF antenna
Mixer
UHF antenna
Input terminal of
antenna
Co-axis antenna
plu

IV. TV/Monitor screen operation
(1) Basic operation
1. Press the POWER button on the unit or the STANDBY button on the
remote control to switch on the power, the indication li ht will be in
blue color . Press the POWER or STANDBY button a ain to switch off
the power, and the li ht will be in red color.
2. The Picture setup, Sound setup, Previous channel can be memorized
before you switch off the TV/Monitor. The TV/Monitor will re-start
under the previous state when you switch on it a ain.
3. If you unplu the power cord to cut off the power supply completely,
all previous settin will be lost.
4. Press the V - or V + button to adjust the volume output. Press the V -
button repeatedly to decrease the volume; press the V + button
repeatedly to increase the volume from 0 to 100.
5. Press the SLEEP button to set the sleep time as 15,30, 45,60, 90,
120 minutes or off.
(2) View the TV plays.
1. Press the TV/AV button on the unit or the remote control to select the
TV function mode. The TV will appear the initial channel ‘1’ on the top
ri ht corner when the function is on. Press the P- or P+ button to
select the previous or next channels; or press the 0-9 buttons to enter
a channel number directly, or press the -/-- button until the screen
display ‘--’ or ‘---’, then use the 0-9 numerical buttons to enter a
channel number from 10 to 200.
2. Press the RECALL button on the remote control to select from the
present channel and the previous channel.
3. Press the PP button to select picture mode from the below 4 types
11
User Normal Soft Vidid

4. Press the MUTE button to cut off the sound output, then the screen
will show “ “ mark , press this button a ain to resume sound
output..
5. Press the DISPLAY button to display the preset channel mode.
(3) View the AV signal sources (DVD/VCR/CAMCORDER)
Press the TV/AV button on the remote control, there will be a menu
displayed on the screen as followed:
Select the suitable input to pickup the AV si nal.
Press P+ or P- button to select source, then press
V + button to confirm your selection. Or press DVD
Button on the remote control to select DVD source
directly.
Note:
When no disc in the DVD mechanism,if you want to change the mode
from DVD to TV, please wait several seconds until the LCD screen
shows "No Disc".
(4) View the TELETEXT program
(Optional. If TV has this function.)
1. Press the TV/AV button to select the TV mode. Then press the P- or
P+ button on the remote control to select TV channel in order to pick
up the picture si nal of TELETEXT. (Firstly you must view the second
part of chapter V to complete the TV channel searchin ).
2. Press button to enter into picture showin mode. The button can
allow you:
3. Press the P- or P+ button to select the previous pa e or the next
12
Enter into the
picture showin
mode Exit
TV
AV
SVideo
DVD
SCART
PC
pa e; use the 0-9 numerical buttons and the -/- - button to enter into a
numerous pa e.
4. Refer to the chapter of ‘Remote control reference uide’ to rasp
other functions of the TELETEXT buttons.
(5) PC screen
Press the TV/AV button to select the VGA input (TV into PC) mode. The
will be a ‘PC’ mark appears on the ri ht of the top corner of the monitor.
The unit has a VGA jack for a normal computer. Connect the monitor with
a PC by this jack and the unit can be used as the monitor of the PC.
V. Menu setting and adjustment
1. PICTURE SETTING
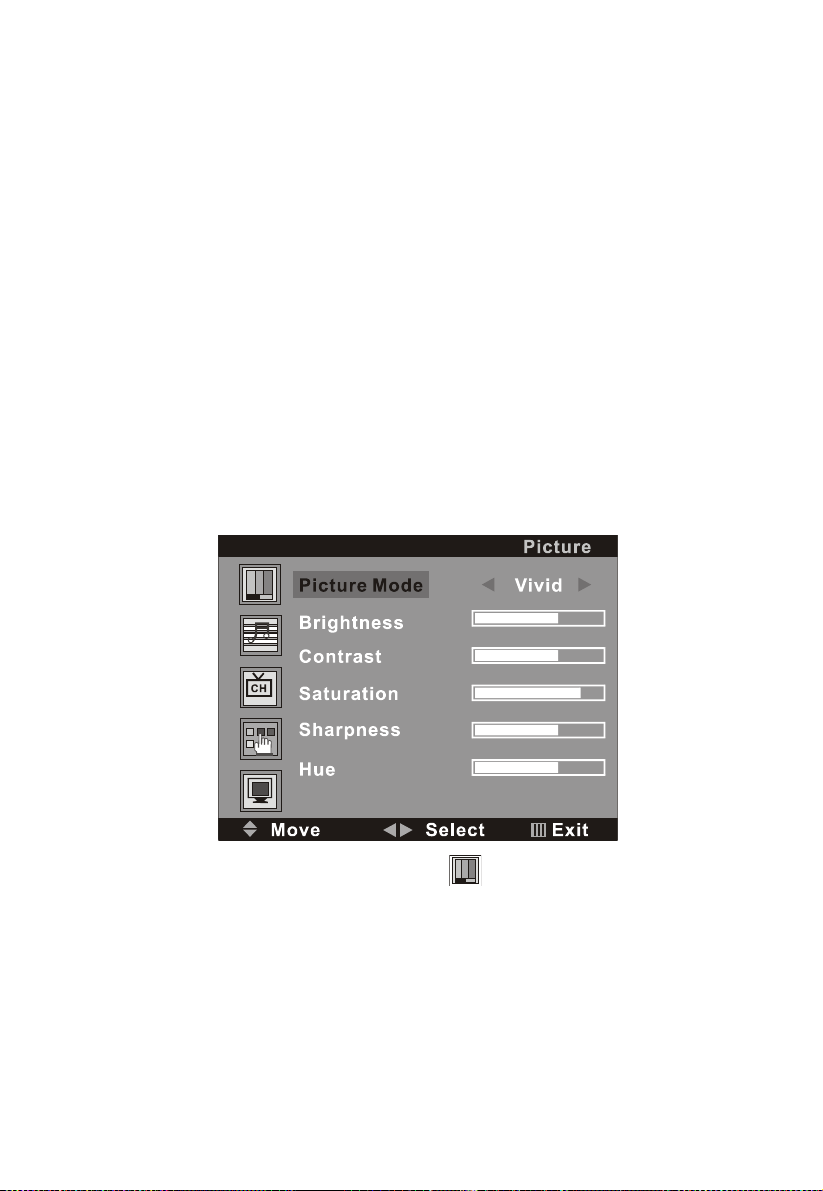
Press the MENU button on the remote control, there will be a menu
displayed on the screen as below:
On this menu, the Picture settin icon of is in red frame.
(1). Use the V+ button firstly, the cursor will be on the line of “Picture
Mode: Vivid”. And then, press the V+ or V - button repeatedly to select
the picture mode from Vivid, User, Normal or User.
(2). After select the Picture Mode, you can use the P- or P+ button to
select the item of Bri htness, Contrast, Saturation, Sharpness and
Hue. And then use the V- or V+ button to adjust the value of each item
13

respectively from 0~100.
Note:
Only the the item of Brightness and Contrast could e operated
in the PC signal source.
After settin , press the MENU button to return to the root menu or exit the
settin
2. SOUND SETTING
Press the MENU button on the remote control, and then press the P-
button to select the Sound settin , the Menu will be shown as below:
On this menu, the Audio settin icon of is in red frame.
(1). Use the V+ button firstly, the cursor will be on the line of “Sound
Mode: Normal”. And then, press the V+ or V - button repeatedly to
select the picture mode from Normal, News,Movie or User.
(2). After select the Sound Mode, you can use the P- or P+ button to select
the item of Volume, Bass,Treble and Balance. And then use the V- or
V+ button to adjust the value of each item respectively from 0~100.
After settin , press the MENU button to return to the root menu or exit the
settin menu.
14

3. CHANNEL SETTING( FOR TV SIGNAL SOURCE ONLY)
Press the MENU button on the remote control, and then press the P-
button to select the Channel settin , the Menu will be shown as below:
On this menu, the Channelsettin icon of is in red frame.
(1). Auto Tune
Use the V+ button firstly, the cursor will be on the line of “Auto Tune”.
And then, press the V+ button a ain, a menu will be displayed as followed:
As shown on the menu, the TV will automatically search stations. When
searchin , press the MENU button to cancel searchin . After the
searchin , the TV will be in to play the station 1.
(2). Manu Tune
Select the ‘Manu Tune’ first, and then press the V+ button:
As shown on the menu, the channel number will displayed on the screen.
Press the V- or V+ button repeatedly until you search a required station.
15

Press the P+ or P- button to move cursor to Search, and press V- or V+
button to search TV si nal .At last press the P+ or P- button to move
cursor to store, and press MENU button to save your selected channel.
(3) .Fine Tune
Select the ‘Fine Tune’ first, and then press the V+ or V- button:
As shown on the menu, the TV si nal could be fine tuned by V- or V+
button repeatedly until you et the best playin effect. Press the P+or P-
button to move cursor to Store, and press MENU button to save
(4).Skip
Press the P- or P+ button to select the skip settin , and press the V- or V+
button repeatedly to select On or Off.
Settin to “On”, the channel will not be selected by Channel Up/Down
keys.
(5).Sound SYS.
Press the P- or P+ button to select the Sound SYS. settin , and press the
V- or V+ button repeatedly to select .You could choose D/K,L,LL ,B/G or I
accordin to your local TV sound system.
After settin , press the MENU button to return to the root menu or exit the
settin menu.
4. FUNCTION SETTING
Press the MENU button on the remote control, and then press the P-
button to select the Function settin , the Menu will be shown as below:
16
On this menu, the Channel settin icon of is in red frame.
(1).Language
Use the V+ button firstly, the cursor will be on the line of “Lan ua e
En lish ”. And then, press the V+ or V - button repeatedly to select
the lan ua e you need
(2).Blue Back
Move the cursor to the line of “Blue Back On ”. And then, press the
V+ or V - button repeatedly to select the On or Off
(3).TXT LANGUAGE
Move the cursor to the line of “TXT LANGUAGE WEST ”. And then,
press the V+ or V - button repeatedly to select the
WEST,RUSSIAN,ARABIC,FARSI or EAST accordin to your meanin .
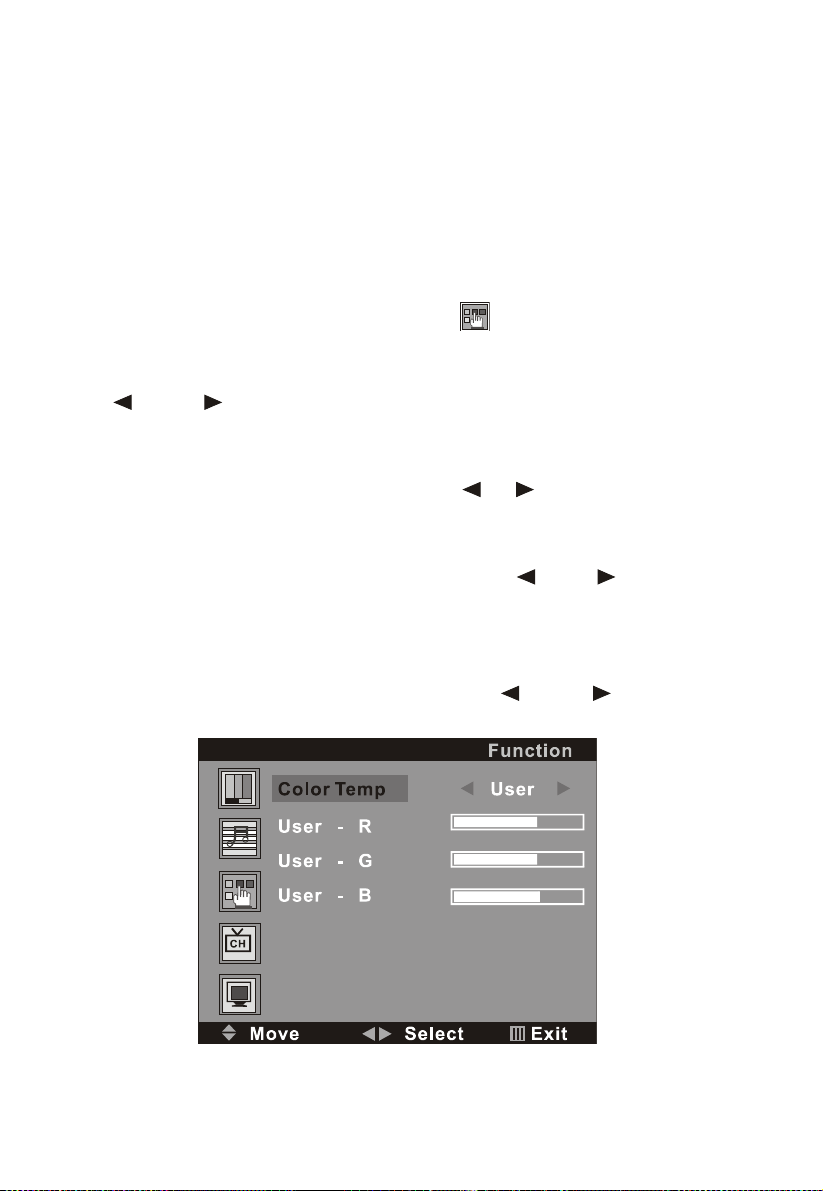
(4).Color Temp.
Move the cursor to the line of “Color Temp. Normal ”. And then,
press the V+ or V - button , a menu will be displsyed as followed:
17
Press the V+ or V - button repeatly, you could select User, Normal, Warm
or Cool accordin to your request.
Note:
Only the item of User-R , User-G or User-B could e adjusted from 0
~100 in the Color Temp User .
(5).DNR
Press the V+ or V - button repeatly, you could select Stron , Normal or
Weak
(6)Reset
Press the V+ or V -button to reset
After settin , press the MENU button to return to the root menu or exit the
settin menu.
Note:
a. Only the item of Language , Color Temp. and Reset could e
operated in the PC signal source.
. The the item of Blue Back could not e operated in AV,Svideo.DVD
and SCART singal source.
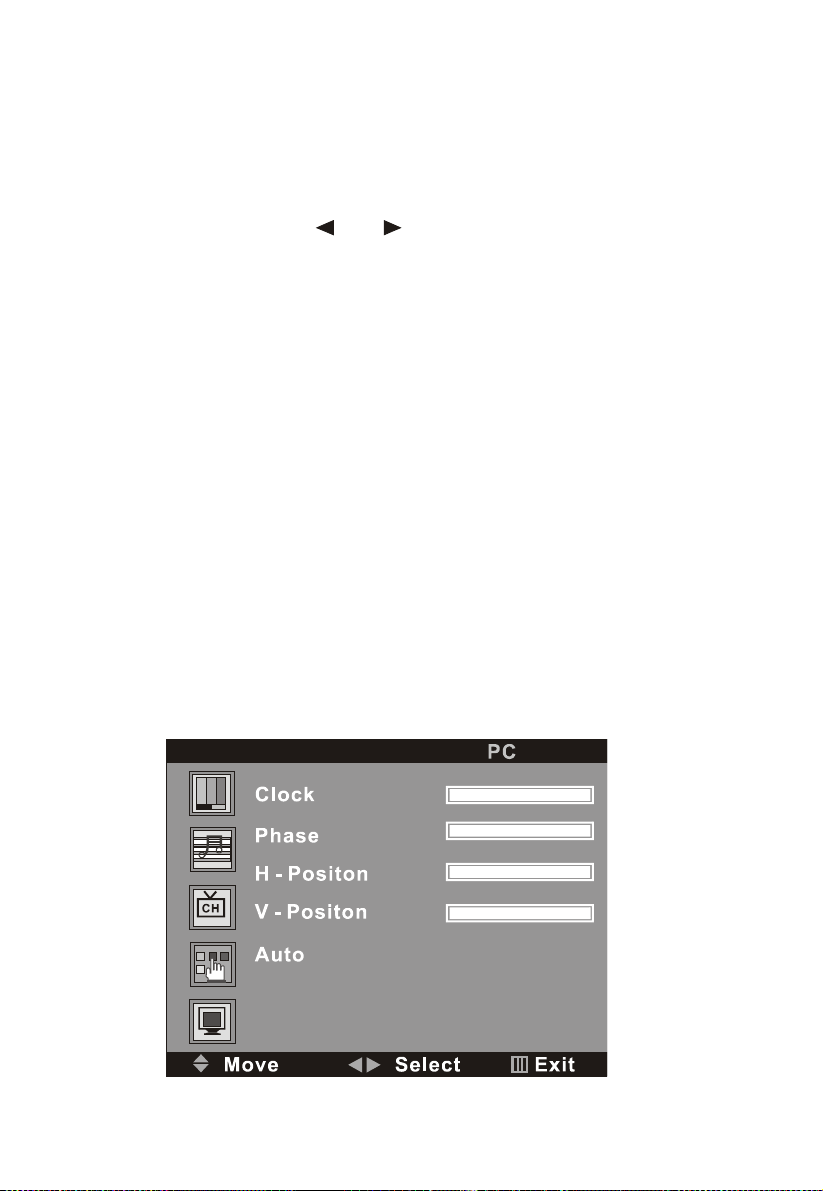
5. PC SETTING ( FOR PC SIGNAL SOURCE ONLY)
Press the MENU button on the remote control to display the menu, and
then press the P- button to select the PC settin , and the menu will be
shown on the screen as below:
18

On this menu, the Channel settin icon of is in red frame.
You can use the P- or P+ button to select the item of Clock, Phase,H-
Position or V-Position. And then use the V- or V+ button to adjust the value
of each item respectively from 0~100.
VI. DVD PLAYER OPERATION
a. Basic play
1. Press the TV/AV button on the unit or the remote control to select the
DVD function mode. Or press DVD button of the remote control
directly.
2. Insert a disc into the slot of DVD player and it will be read
automatically.
3. Press ”OPEN/CLOSE” button of remote control or the button on
the unit ,the disc will be ejected automatically
Note: Insert disc with reflective data side facing the front of the TV.
19

Some slight picture noise and some sounds are produced
when the disc is loading, unloading and during play ack, this
is normal and can e ignored.
HOW TO SELECT THE TRACK
If you want to play the second track or chapter, please press the number
button “2” directly. And press ENTER/PLAY button to play.
HOW TO PAUSE PLAYBACK (STILL PLAYBACK)
Press the PAUSE/STEP button one time only durin playback .
Press the ENTER/PLAY button to resume normal playback.
HOW TO REMOVE THE DISC
Press the OPEN/CLOSE button on the remote control.
Wait until the disc is completely ejected before removin any discs.
HOW TO STOP PLAYBACK
If press the STOP button once, the DVD video player is stopped. At
this
point, press the ENTER/PLAY button to re-start the disc from the
same
point.
If press the STOP button twice, the disc will stop completely.
FAST FORWARD/ REWIND
Press the 8or 7 button once, the disc will be played forward or
backward. With each subsequent press, the disc will be played back at 2x,
4x, 8x, 16x or 32X speed. Press ENTER/PLAY button to return to normal
play.
SKIP NEXT/ PREVIOUS
Press the : or 9/ button to select the next track or the previous track.
20
Table of contents
Other Prosonic TV DVD Combo manuals


