Provent OAMANAFF1860100 User manual
1392 E. Palomar St., #403-234
Chula Vista, CA 91913
Ph: (619) 498-9246 Fax: (619) 872-9799
INSTALLATION INSTRUCTIONS
OAMANAFF1860100 0-100% Manual Outside Air Package
OA2POAFF1860100BL 0-100% Selectable 2 Position Outside Air Package
for York Affinity 1½ - 5 Ton Units
Before Starting Installation
Form: OA-05-R1 1
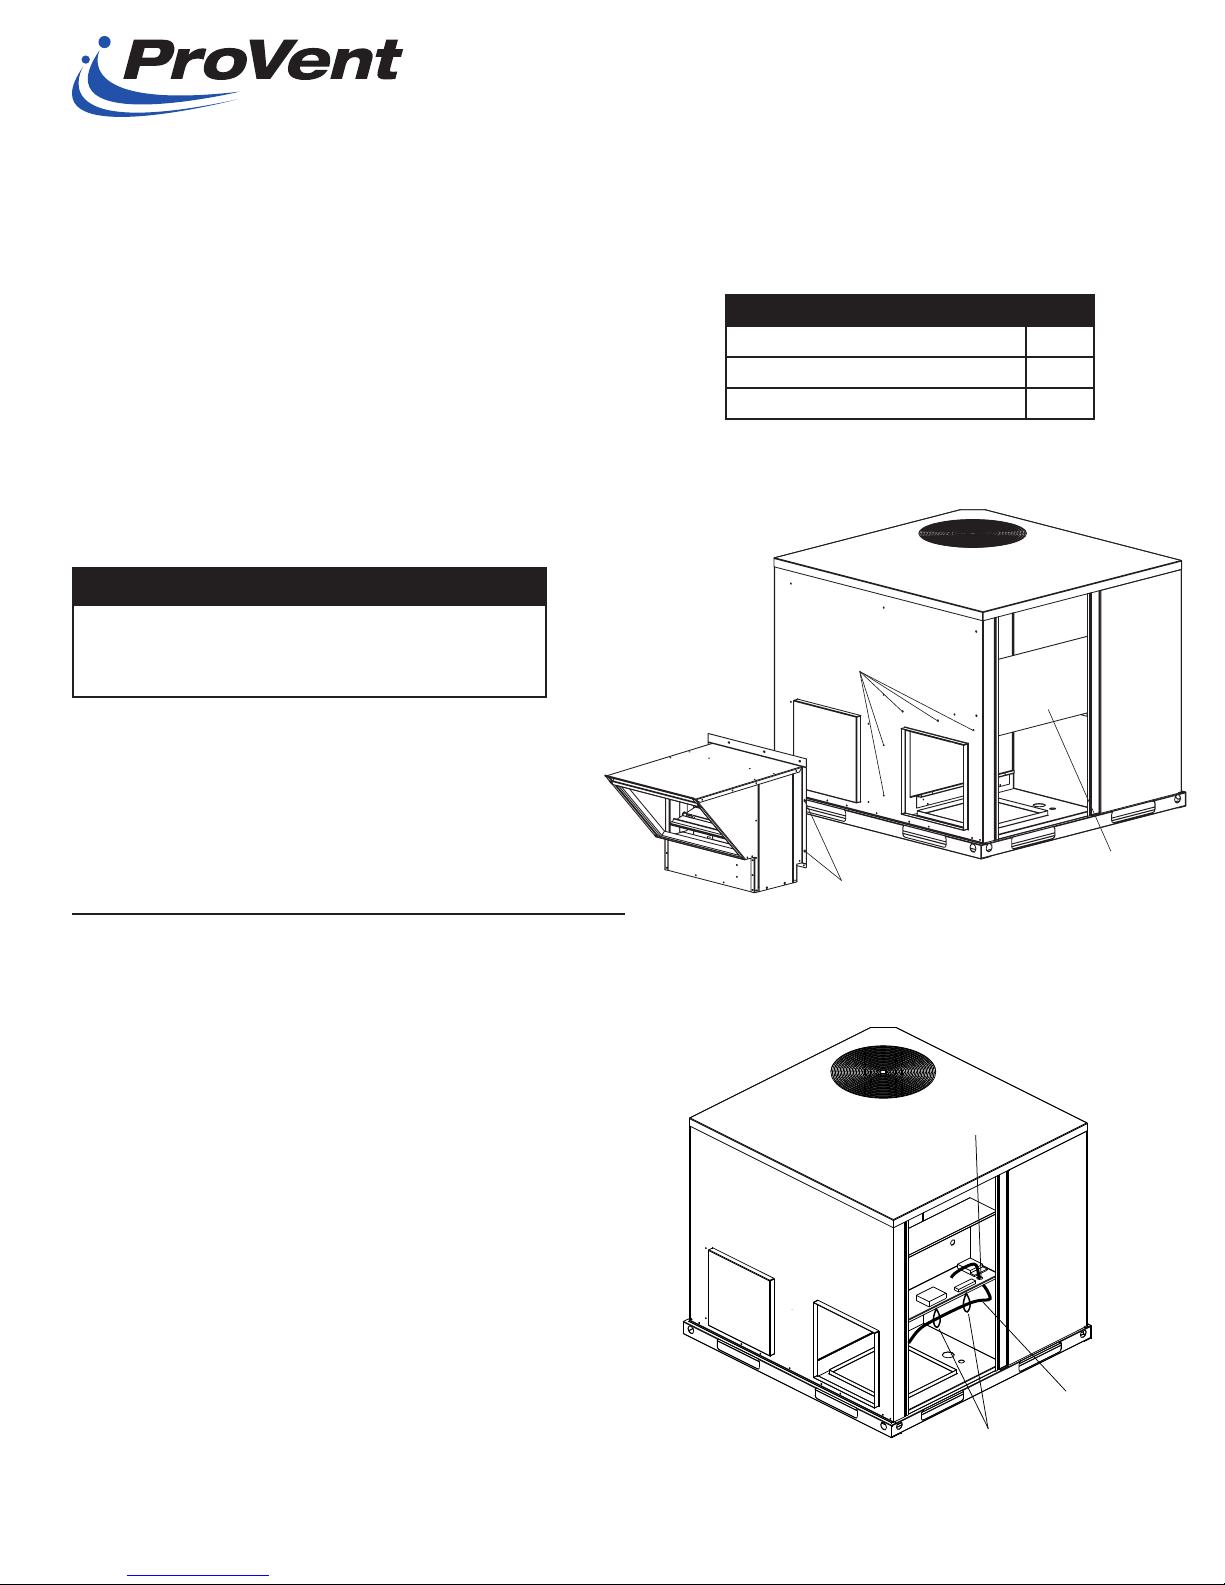
1. Remove electrical/filter access panel. (ILL. 1)
2. Remove the (5) screws shown in ILL. 1.
Save these screws. They will be reinstalled
later.
Please note: If a filter rack is to be
installed, do it at this time.
3. Open the electrical access panel. (ILL. 1)
4. Set outside air package in place aligning
prepunched holes to the (5) screws
removed earlier. Secure in place. Install (2)
additional #10 screws provided. (ILL. 1)
5. For OAMANAFF1860100 manual outside air
package, set damper to desired open area
and tighten locking quadrant located on
the left side when facing the opening.
ILL. 2
ILL. 1
Only qualified HVAC service personnel
should install, troubleshoot, repair or service
HVAC and related HVAC equipment.
Warning
Shut power to unit prior to any work
being done. Personal injury or death
could result.
Installation of Cooling Only & Heat Pumps
PLEASE NOTE: If the unit is 208/230V,
single phase, power supply, the installed
40VA transformer may need to be replaced
with a 75VA transformer and circuit
breaker. All other factory units have the
75VA transformer installed standard.
Install with (2) #10 screws provided.
(Use (5) existing screws on remaining holes.)
Control Box
(5) Existing Screws
(To be removed and reused.)
Actuator Wiring
Existing Grommet
Wire Ties
PARTS INCLUDED QTY..
#10 x 1/2 Sheet Metal Screw 3
#8 x 1/2 Sheet Metal Screw 3
Wire Clamp 3

Form: OA-05-R-1 2
6. For OA2POAFF1860100BL 2-position outside air package, route actuator wiring through the
two ties found under the control box. (ILL. 2) Additional wire clamps are provided for securing
wire after completion, if needed
Route actuator wiring through prepunched grommet into control box. (ILL. 2)
Connect actuator wiring to terminal block in control box. (ILL. 3)
The actuator is factory set to minimum open position. To increase open position, loosen set
screw on limitor of actuator (Be careful not to remove screw completely. Just loosen.). Move
limitor to desired open position and secure set screw. (ILL. 4)
ILL. 3
ILL. 4
Fully Open Position
Minimum Open Position
(Factory Set)
Limitor
O C R G W2 Y
Transformer
Terminal Block
On Unit Fan Control
Air Conditioning Unit
Red
Black
To Room Thermostat
Actuator
Fan Relay
24V
PLEASE NOTE:
If the unit is 208/230V, single phase,
power supply, the installed 40VA
transformer may need to be replaced
with a 75VA transformer and circuit
breaker. All other factory units
have the 75VA transformer installed
standard.

Form: OA-05-R-1 3
1. Remove control panel from the unit as shown in ILL. 5.
2. Follow previous instructions 1 through 4 from cooling and heat pump instructions.
3. Install three wire clamps (provided) along the bottom of heating coil section. (ILL. 5)
4. Remove grommet holding the fan wiring between panel and control box. (ILL. 5) Route
actuator wiring through removed grommet. Reinstall grommet.
5. Connect actuator wiring to terminal block in control box. (ILL. 3)
6. The actuator is factory set to minimum open position. To increase open position, loosen set
screw on limitor of actuator (Be careful not to remove screw completely. Just loosen.). Move
limitor to desired open position and secure set screw. (ILL. 4)
Installation of Cooling with Gas Heat Units
ILL. 5
(3) Wire Clamps
Grommet
Actuator Wiring
Control Box
This manual suits for next models
1
Popular Air Conditioner manuals by other brands

Fujitsu General
Fujitsu General ASH9LSBCW Service manual

Fujitsu
Fujitsu Inverter Halcyon ASU24CL1 Design & technical manual

Airwell
Airwell VAR 9 Service manual

Carrier
Carrier 40WAU Series Installation and maintenance instructions

EdgeStar
EdgeStar AP13500G owner's manual

Fujitsu
Fujitsu AIRSTAGE ASTH18CNTA Operation manual

GE
GE AGM24DJ - 23 600 BTU Electronic Room Air... Owner's manual and installation instructions

Hantech
Hantech 4619277 operating instructions

Samsung
Samsung AC026JNNCEH Service manual

Dometic GROUP
Dometic GROUP WAECO CoolAir CA850S installation manual

TCL
TCL AC12000E user manual

Carrier
Carrier 42TGF BP Series owner's manual


