Proview PA-15BA7 User manual

BA152
2006/11/15
2.0
210.00 mm
1 4 8 . 0 0 m m 1 4 8 . 0 0 m m
USER MANUAL COVER
Water-resistant TV
PA-15BA7
002-U00-56PROV-AH
封面:157 g双铜 过光胶
内页:80g书 纸
1
LCD TV User Guide
FCC
This equipment has been tested and found to comply with the limits of a class B
digital device, pursuant to Part 15 of the FCC Rules. These limits are designed to
provide reasonable protection against harmful interference in a residential
installation. This equipment generates, uses and can radiate radio frequency energy
and, if not installed and used in accordance with the instructions, may cause harmful
interference to radio communications. However, there is no guarantee that
interference will not occur in a particular installation. If this equipment does cause
harmful interference to radio or television reception, which can be determined by
turning the equipment off and on, the user is encouraged to try to correct the
interference by one or more of the following measures:
1. Reorient/Relocate the receiving antenna.
2. Increase the separation between the equipment and receiver.
3. Connect the equipment into an outlet on a circuit which is different from what
the receiver is connected to.
4. Consult the dealer or an experienced radio/TV technician for help.
Changes or modifications not expressly approved by the manufacturer responsible
for compliance could void the user authority to operate the equipment.
FEDERAL COMMUNICATIONS COMMISSION
(FCC) STATEMENT
CAUTION

2LCD TV User Guide
SAFETY INSTRUCTIONS
IMPORTANT SAFETY INSTRUCTIONS
To reduce the risk of fire or electric shock, do not expose this equipment to rain or
moisture.
This symbol is intended to alert the user to the presence of
uninsulated ”dangerous voltage“ within the product ’s enclosure
that may be of sufficient magnitude to constitute a risk of
electrical shock to persons.
This symbol is intended to alert the user to the presence
of important operating and maintenance instructions
in the literature accompanying the appliance.
RISK OF ELECTRIC SHOCK
DO NOT OPEN
CAUTION
CAUTION: TO REDUCE THE RISK OF ELECTRIC SHOCK,
DO NOT REMOVE COVER (OR BACK).
NO USER-SERVICEABLE PARTS INSIDE.
REFER SERVICING TO QUALIFIED SERVICE PERSONNEL.
■ Use of controls, adjustments or performance of procedures other than those
specified herein may result in hazardous radiation exposure.
WARNING
CAUTION
Operating temperature range:
1 . Temperature
Operating 5 °C ~ 40 °C
Storage -20 °C ~ 60 °C
2. Humidity
Operating 20% ~ 85% non - condensing
Storage 10% ~ 90% non- condensing
3. Altitude
Operating 25 °C 0 ~ 3048 M (10000 ft)
Storage 25 °C 0 ~ 12192 M (40000ft)

3
LCD TV User Guide
SAFETY INSTRUCTIONS
To prevent any injuries, the following safety precautions should be observed in the
installation, use, servicing and maintenance of this equipment.
Before operating this equipment, please read this manual completely, and keep it
nearby for future reference.
IMPORTANT SAFETY INSTRUCTIONS
Important Safety Instructions
▪ Do not place the equipment on any uneven or unstable carts, stands, tables,
shelves etc. The equipment may fall, causing serious injury to children or adults
and serious damage to the equipment itself.
▪ Use only with the cart, stand, tripod, bracket, or table specied by the
manufacturer, or sold with the apparatus TV. When a cart is used, use caution
when moving the cart / apparatus with the TV to avoid injury from tipping over.
▪ Do not disable the 3-wire grounding type plug. The grounding pin on the 3-prong
plug is an important feature. Removing the grounding pin will increase the risk of
damaging the equipment.
▪ If you can not t the plug into the electrical outlet, contact an electrician to install a
grounding outlet.
▪ Always operate this equipment from the type of power source indicated on the
rear of the serial/model plate.
▪ Never overload wall outlets and extensions.
▪ Use and handle the power cord with care. Do not place any heavy objects on the
AC power cord.
▪ Do not pull the AC power cord. Do not handle the AC power cord with a wet hand.
▪ Do not touch the power cord and antenna cable during lightning.
▪ Remove the plug from the wall outlet, if the equipment will not be used for a long
period of time.
▪ Do not place, use or handle this equipment near water.
▪ Never expose the equipment to liquid, rain, or moisture.
Seek for service if any of the above is spilled into the equipment.
This symbol indicates caution points.
This symbol indicates actions that should not be done.
This symbol indicates actions that must be performed.

4LCD TV User Guide
SAFETY INSTRUCTIONS
▪ To reduce the risk of re or electric shock, Do not expose this appliance to rain
or moisture.
▪ Do not install the equipment near any heat sources such as radiators, heat
registers, stoves, or any other apparatus that might produce heat.
▪ Do not attempt to service the equipment yourself.
▪ Opening and removing the covers may expose you to dangerous voltage or other
hazards and may void your warranty. Refer service to qualied personnel.
▪ Do not place or drop any other objects on top.
▪ Do not insert anything into the ventilation holes of your equipment.
Inserting any metal or ammable objects may result to re or electric shock.
▪ Protect the power cord from being walked on or pinched particularly at plugs,
convenience receptacles, and the point where they exit from the apparatus.
▪ Always place the equipment on the oor or on a surface that is sturdy, level,
stable and strong enough to support the weight of the equipment.
▪ Do not block any ventilating openings. Leave an open space around the
equipment.
Never place the equipment :
on a bed, sofa, rug, or any other similar surfaces; too close to drapes/curtains/
walls, in a bookcase, built-in cabinet, or any other similar places that may cause
poor ventilation.
▪ Unplug this apparatus during lightning storms or when unused for long periods of
time.
▪ Refer all servicing to qualified service personnel. Servicing is required when the
apparatus has been damaged in any way, such as power-supply cord or plug is
damaged, liquid has been spilled or objects have fallen into the apparatus, the
apparatus has been exposed to rain or moisture, does not operate normally, or
has been dropped.
▪ Always remove the power cord from the outlet before cleaning the equipment.
▪ Never use liquid or aerosol cleaners on the equipment.
Clean only with a soft dry cloth.
▪ Only use attachments/accessories specified by the manufacturer.
▪ Apparatus shall not be exposed to dripping or splashing and no objects filled
with liquids, shall not be placed on the apparatus.
▪ The shock hazard marking and associated graphical symbol is provided on the
bottom panel of unit.

5
LCD TV User Guide
SAFETY INSTRUCTIONS
Matters need to attend to regarding water-resistant :
Water- resistant LCD TV has been handled with normal household water- resistant
processing (which equals to JIS 4th protection level for main body), and can still function
well after being splashed by water. But when using, please note the following:
1. Please DO NOT immerse the TV in water.
2. If the TV drops accidentally in a bathtub filled with water, please disconnect the
power source from the unit and retrieve the unit immediately.
3. If the TV adheres with massive water, rain, or water droplets, please wipe it clean
with a dry cloth.
4. Please do not use the TV in a place where water may penetrate the unit. When
using, please make sure the connector cover is closed securely.
5. When closing the connector cover, please note not to enclose any particles or
dusts, which will prevent a tight seal around the cover.
6. The water-resistant rubber ring around the connector cover is a crucial component
to maintain water-resistant functions. Please do not remove or damage it.
7. To maintain the water-resistant functions, please inspect the TV periodically, once
every two years by a certified Proview service center. The inspection will acquire a
nominal charge.
PLEASE NOTE:
If used in the water, or used under the circumstance that the connector cover is not
closed, and therefore causing water to penetrate the unit, the malfunctions caused
by water are not warranted even if the TV is within the warranty period.
The remote is not weather resistant.
6LCD TV User Guide
ANTENNA CONNECTION
Antenna lead-in wire
Antenna discharge unit
(NEC section 810-20)
Grounding conductors
(NEC section 810-20)
Ground clamps
Power service grounding
(NEC Art250 part H)
Ground clamps
Electric service
equipment
NEC : National Electrical code
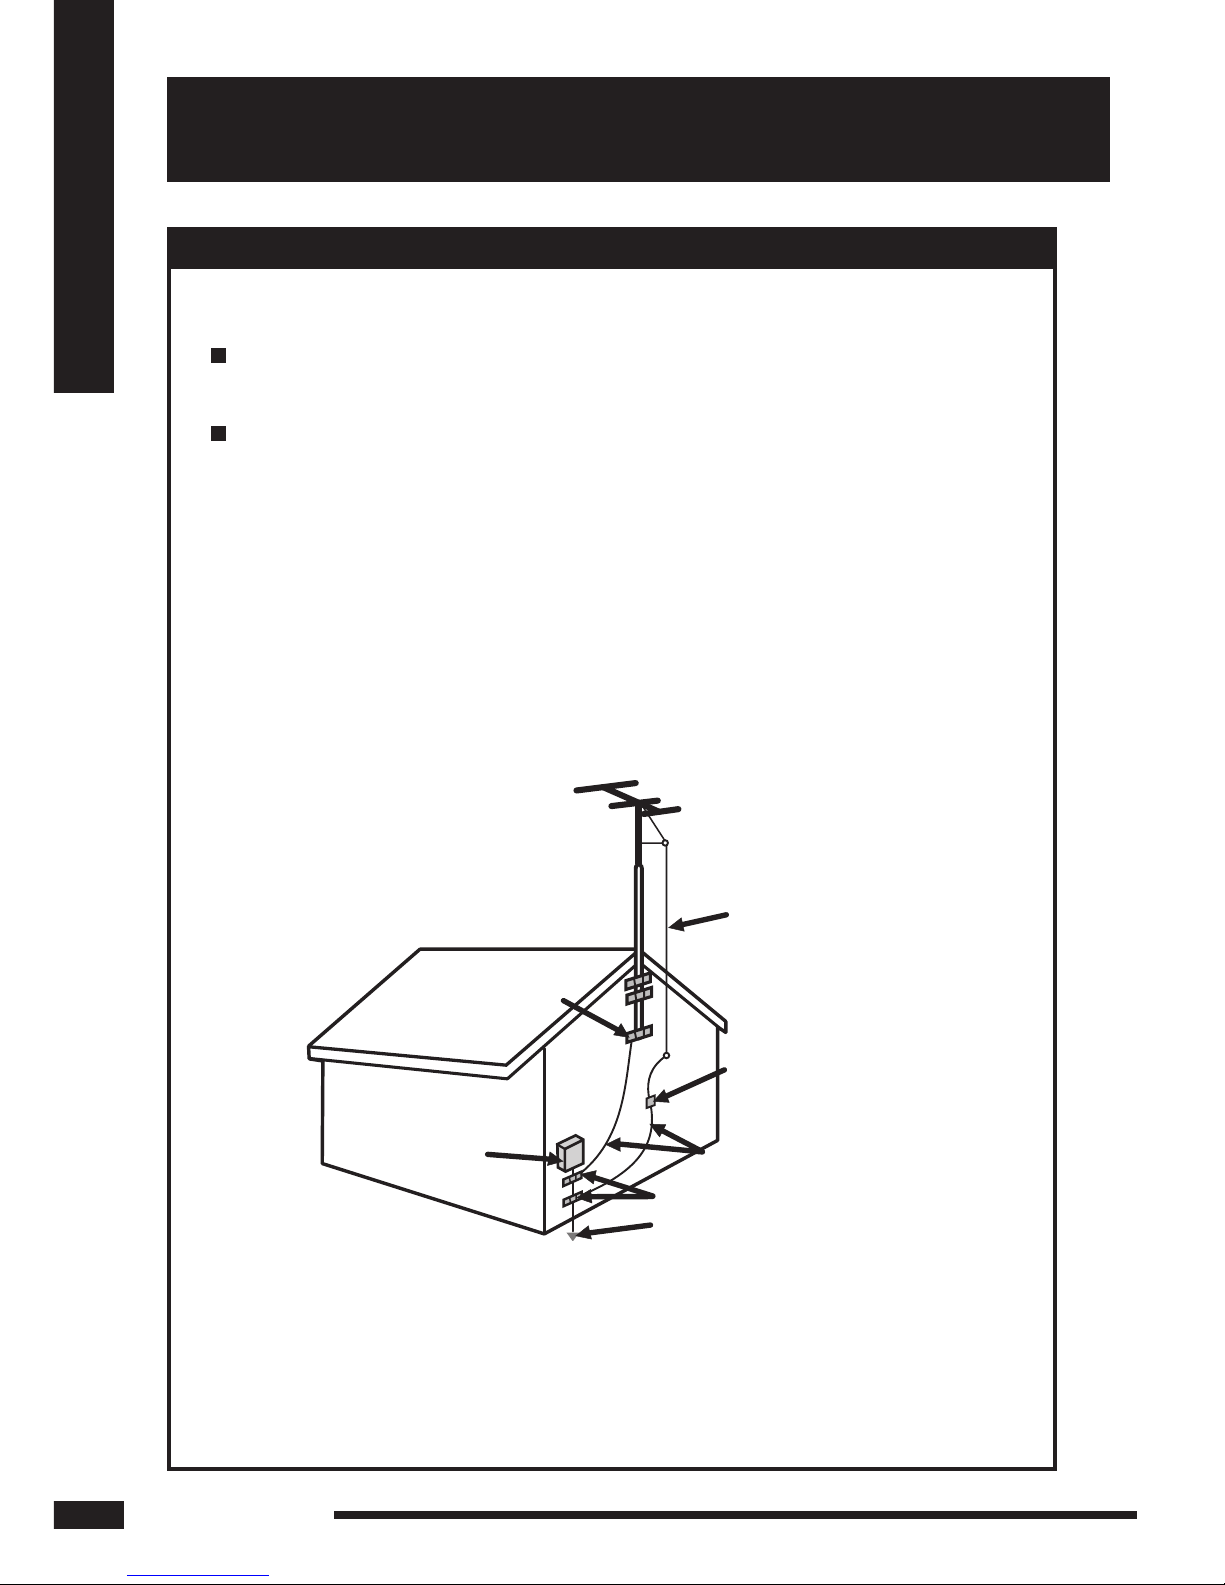
ANTENNA CONNECTION
If an outdoor antenna is connected, follow the precautions below:
An outdoor antenna should not be located in any area where it could come in
contact with overhead power lines, or any other electric light or power circuits.
When installing an outdoor antenna system, extreme caution should be taken
to prevent contact with power lines. Direct contact with power lines may be
fatal and should be avoided at all costs.
Section 810 of National Electrical Code (NEC) provides information with respect to
proper grounding of the mast and supporting structure, grounding of the lead-in wire
to an antenna discharge unit, size of grounding conductors, location of antenna
discharge unit, connection to grounding electrodes, and requirements for the
grounding electrode.
EXAMPLE OF OUTDOOR ANTENNA GROUNDING

7
LCD TV User Guide
CONTENTS
CONTENTS
FEDERAL COMMUNICATIONS COMMISSION (FCC) STATEMENT..................................... 1
IMPORTANT SAFETY INSTRUCTIONS ................................................................................ 2
ANTENNA CONNECTION.................................................................................................. 6
CONTENTS ......................................................................................................................... 7
PREPARATION
Features ........................................................................................................................ 8
Package Contents ......................................................................................................... 9
Your LCD TV
Front View ............................................................................................................ 10
Rear View ..............................................................................................................11
Remote Control........................................................................................................... 12
Installing the Batteries in Your Remote Control ........................................................... 13
INSTALLATION
Connecting a TV Cable or Antenna.............................................................................. 14
Connecting an external A/V Device.............................................................................. 18
USING THE FEATURES
Setting up the Channel List ......................................................................................... 20
Editing the Channel List .............................................................................................. 20
Watching Your LCD ..................................................................................................... 21
Using the Menu .......................................................................................................... 22
VIDEO ADJUSTMENT Menu ....................................................................................... 23
CHANNEL SETTING Menu .......................................................................................... 24
C.C./V-CHIP Menu...................................................................................................... 25
AUDIO SETUP Menu................................................................................................... 28
SETUP Menu ...................................................................................................................29
TROUBLESHOOTING........................................................................................................ 30
SPECIFICATIONS .............................................................................................................. 31

8PREPARATION
PREPARATION
▪ Various Audio/Video terminals for external equipment connection
1 A/V terminal
1 S-VIDEO terminal
1 set of Audio input terminals
1 NTSC/cable TV tuner input terminal
▪ BUILT TO LAST
A TV used in bathroom must survive a wide range of operating conditions,
including steamy showers and accidental spills. Your Water-resistant TV handles
these hazards with ease. With hundreds of hours of rigorous testing -- including
humidity, temperature and electric safety tests – The Water-resistant TV is the
most reliable choice for your bathroom.
▪ BRILLIANT IMAGE
The Water-resistant TV provides a brilliant image, and thus is less susceptible to
ambient lighting. Colors appear vibrant and lifelike, even under wet and steamy
bathroom conditions, enhancing your viewing experience.
▪ HIGH CONTRAST
PROVIEW technology brings you a higher contrast ratio, resulting in clearer,
richer images appearing against a darker background.
▪ SLIM, SPACE-SAVING DESIGN
The Water-resistant TV is far more compact than traditional designs, taking up
just a third of the space. It saves even more space with two built-in high quality
speakers, eliminating the need for external audio component.
▪ WIDE VIEWING ANGLE
Watching attractive digital video from anywhere in the room, thanks to
PROVIEW’s wide viewing angles. Viewing angles range up to 160º in both the
horizontal and vertical planes, increasing mounting options. Lie in the bathtub or
stand up for a shower – your TV still looks great.
PREPARATION
Features
Relax and enjoy your privacy; the Water-resistant TV will bring you into the most
exciting visual entertainment place where you have never dreamed about before. Its
superior quality and reliability easily handle the bathroom environment to present
excellent AV performance. The sleek appearance conceals a robust and safe design
suited to your kitchen viewing needs. PROVIEW’s superlative engineering delivers all
your favorite features in a compact package with a simple & easy-to-use interface.

9
PREPARATION 9
PREPARATION
LCD TV
Package Contents
Make sure all of the following contents are included.
If you are missing any items, please return this product to the original place of purchase.
User Guide
Remote Control
These items are all you need to set up and operate the LCD TV
in its basic configuration.
Most devices (VCRs, DVD players etc.) come with the necessary cables for connection.
If you want to set up a complex system, you may need to purchase extra cables,
connectors etc.
SOURCE DIGEST MANUAL
DISPLAY
MENU
OK
123
456
789
RETURN
MUTE MTS C.C. AUTO
0
ENTER
EXIT
EPG INFO LIST
CH.
VOL.
AC-DC Adapter
Video Cable Audio Cable
Quick Set up Guide
Warranty Card Attention Card
1-877-5 32-8176, Mo nday thru Fri day 8:00 am to 6: 00 pm (PST)
To obtain cus tomer servi ce and techni cal support b y phone:
7373 Hunt Av e.
Please ca ll(1-877- 5 32-8176)t o locate you re n earest
10 PREPARATION
PREPARATION
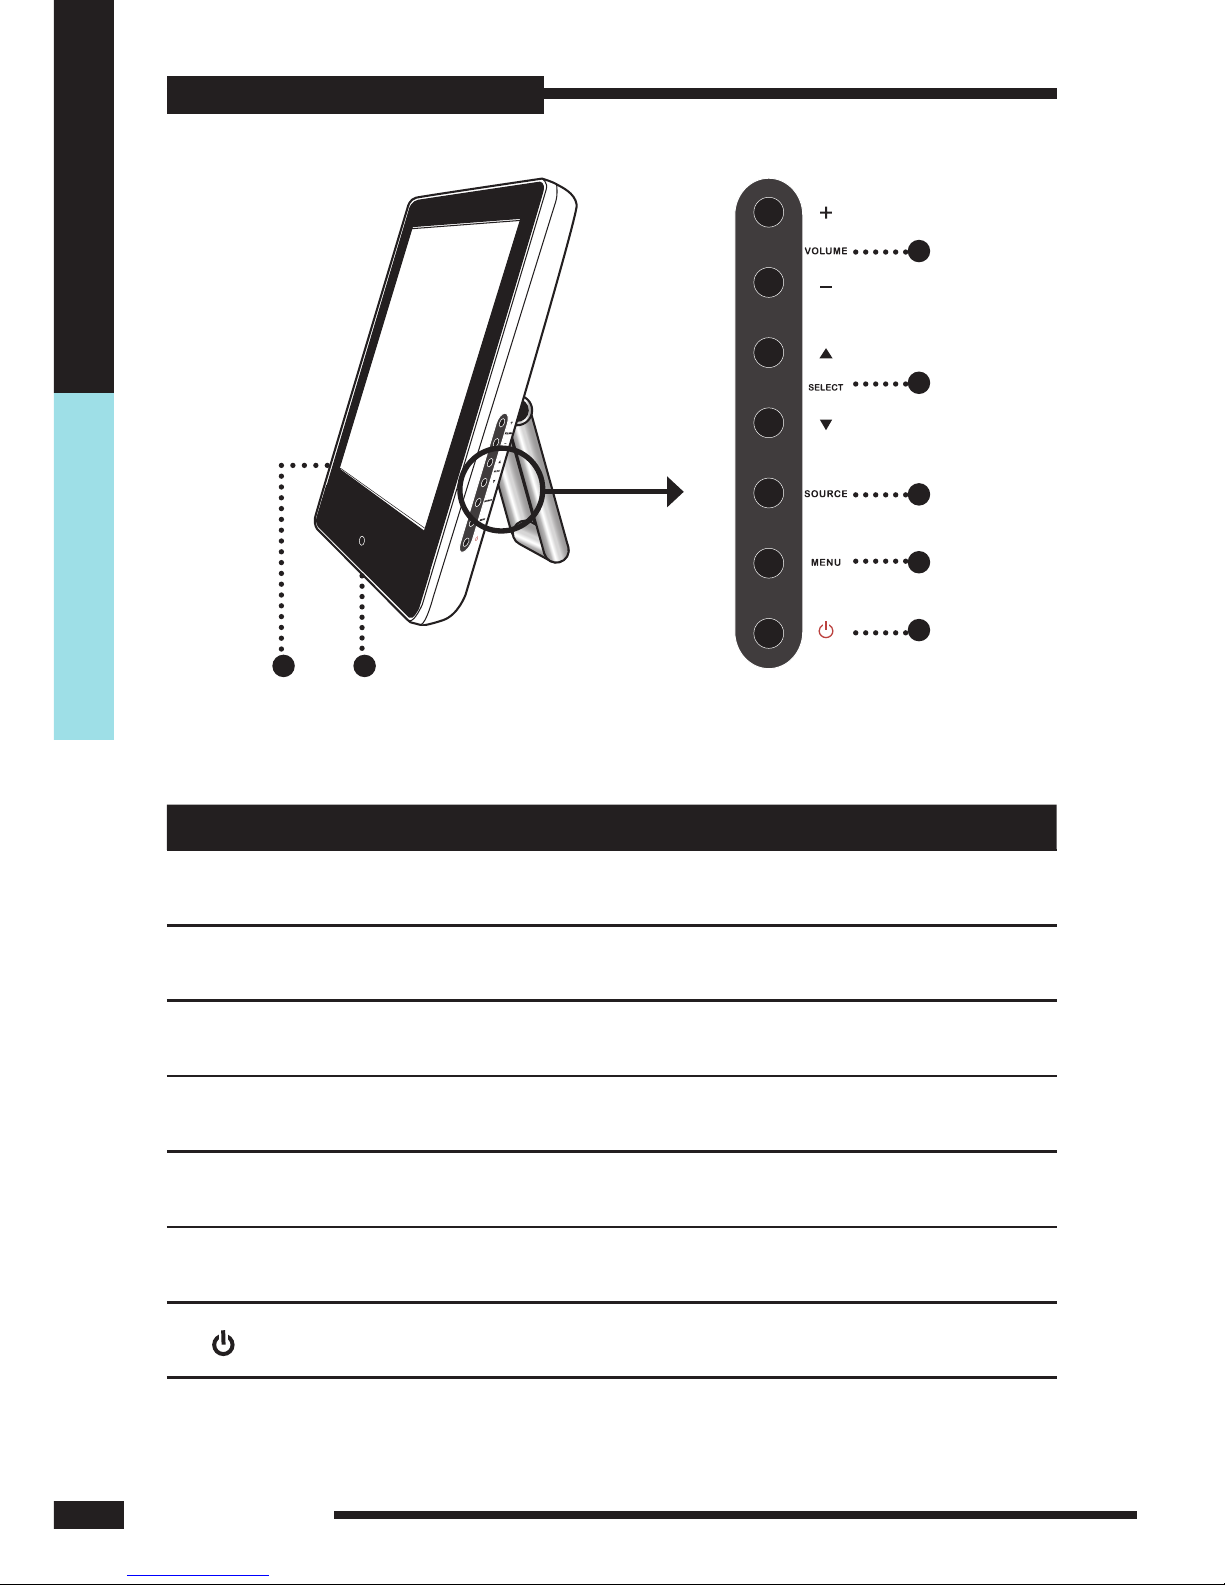
ITEM DESCRIPTION
1 LED The LED light indicates when the LCD TV is activated (blue
light indicates on and amber indicates off).
2 IR Infrared Receiver
3 VOLUME Adjusts the volume up and down. Selects the main menu item
and change values for items when in the OSD mode.
4 SELECT Scans up and down through channels. Selects sub-menu item
when in the OSD mode.
5 SOURCE This is to select from different input signal sources.
6 MENU Press once to display the OSD (on screen display).
7 Turns the LCD TV on and into standby mode.
Your LCD TV
7
6
5
4
21
3
Front View
11
PREPARATION 11
PREPARATION
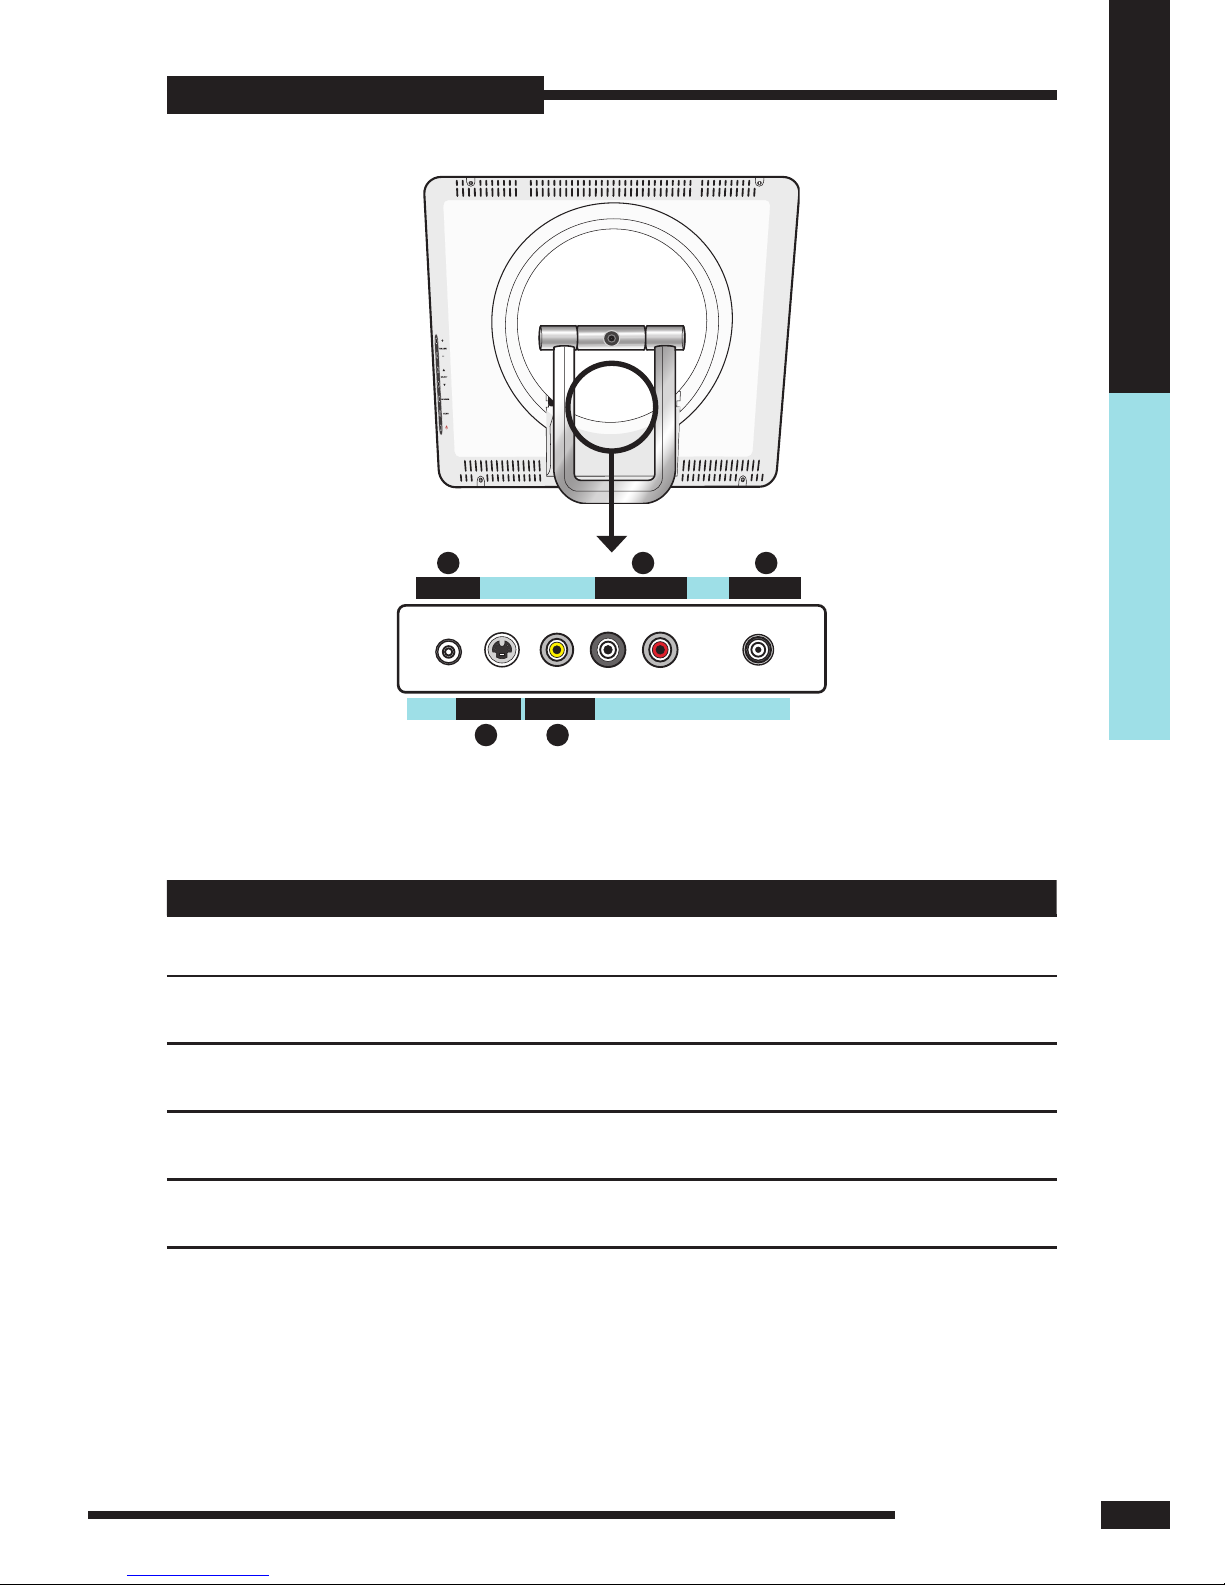
ITEM DESCRIPTION
1 DC IN Connects to a wall outlet via the included power adapter.
2 S-VIDEO Connects to the S-VIDEO output jack on external video
equipment.
3 VIDEO Connects to the VIDEO output jack on external video
equipment.
4 AUDIO IN Connects to the audio or video equipment with left and
right audio output jacks of the Video or S-Video.
5 TV ANT. The RF input that connects to a VHF/UHF antenna or cable.
DC IN TV ANT.
2 3
541
AUDIO IN
VIDEOS-VIDEO
Rear View
Your LCD TV

SOURCE DIGEST MANUAL
DISPLAY
MENU
OK
123
456
789
RETURN
MUTE MTS C.C. AUTO
0
ENTER
EXIT
EPG INFO LIST
CH.
VOL.
12 PREPARATION
PREPARATION
Turns your LCD TV on and off.
SOURCE
Selects the video equipment connected
to the video input of your LCD TV:
TV/VIDEO/S-VIDEO
DISPLAY
Displays information on the Carry TV
screen such as channel and channel
label.
DIGEST/MANUAL/DISPLAY/EPG/
INFO/LIST
For DVB-T only
MENU
To display the OSD (on screen display)
menu.
EXIT
Exits the OSD menu.
▲▼►◄, OK
Allows to move, select and set up the
OSD options.
0-9, ENTER
Select and switch to a channel by using
0-9 buttons and ENTER, or wait three
seconds after entering a channel.
RETURN
Returns to the previous channel in TV
mode.
CH▲▼
Scans up and down through channels.
VOL▲▼
Adjusts the volume.
MUTE
Mutes and restores your LCD TV
sound.
MTS
Cycles through the multi-channel TV
sound(MTS) options: SAP/STEREO/
MONO
AUTO
Press to automatically adjust the display
settings to optimize performance.
Remote Control
1
2
3
4
5
6
7
8
9
10
11
C.C
To turn the Closed Caption on and
off.(For NTSC TV system)
TELETEXT (RED, GREEN, YELLOW, BLUE)
Displays the color-coded teletext
content, where available.(For European
TV System)
12
13
16
15
6
4
7
11
10
14
15
16
9
5
8
12
13
1
2
3
14

13
PREPARATION 13
PREPARATION
Installing the Batteries in Your Remote Control
1Use a coin to open the back cover to
remove the battery compartment of
the remote control.
2Insert one CR2032 size battery. Make sure to
match the (+) and ( - ) sides of the battery with
the (+) and ( - ) sides indicated in the battery
compartment.
3Slide the cover back into place.
Note :
Do not use caustic cleaners (porcelain, stainless steel, toilet, or oven cleaner
etc.) on the remote, as it may suffer damage.
5M
30o30o
Effective range
The remote can control the LCD TV from up to 5m away, if pointed directly at the receiver.

14 INSTALLATION
INSTALLATION
INSTALLATION
Refer to the owner’s manual of any external equipment to be connected.
When connecting any external equipment, do not connect any AC power cords to wall
outlets until all other connections are completed.
Connecting a TV Cable or Antenna
Basic Connection: Connect the supplied antenna cable.
The antenna requirements for good color TV reception are more important than those for a
black &white TV reception. For this reason, a good quality outdoor antenna is strongly
recommended.
The following is a brief explanation of the type of connection that is provided with the
various antenna systems.
75-ohm coaxial cable (round)
F-type connector
300-ohm twin-lead cable (flat)
A 75-ohm system is generally a round cable (not included) with F-type
connector that can easily be attached to a terminal without tools.
A 300-ohm system is a flat twin-lead cable (not included) that can be attached
to a 75-ohm terminal through a 300-75-ohm adapter (not included).
Use one of the following two diagrams when connecting an outdoor antenna.
A: Shows how to use a VHF/UHF combination outdoor antenna.
B: Shows how to use a separate VHF and/or UHF outdoor antenna.

15
INSTALLATION 15
INSTALLATION
A. Combination VHF/UHF antenna
B. Separate VHF and/or UHF antennas
300-ohm twin-
lead cable
75-ohm
coaxial cable
VHF/UHF
Antenna
VHF/UHF
Antenna
300/75-ohm adapter
(not included)
Combiner
(not included)
OUT IN
300-ohm twin-
lead cable
300-ohm twin-
lead cable
75-ohm
coaxial cable
UHF
Antenna
VHF
Antenna

16 INSTALLATION
INSTALLATION
A
IN
B
OUT
Cable TV Line
2 set signal
splitter
(not included)
RF switch
(not included)
Cable TV converter/
descrambler
(not included)
NOTE TO CATV SYSTEM INSTALLER
This reminder is provided to call the CATV system installer’s attention to Article 820-40 of the
National Electrical Code (NEC) that provides guidelines for proper grounding
and, in particular, specifies that the cable ground shall be connected to the grounding
system of the building accurately, or as close to the point of cable entry as possible.
Use of this TV for other than private viewing of programs broadcasted on UHF, VHF
or transmitted by cable companies for the use of the general public may require
authorization from the broadcast/cable company, and/or program owner.
This converter/descrambler is necessary for normal viewing of scrambled channels.
(Set your TV to channel 3 or 4, typically one of these channels is used. If this is unknown,
consult your cable TV company.)
For more specific instructions on installing cable TV, consult your cable TV company.
One possible method of connecting the coverter/descrambler provided by your cable TV
company is shown in the diagram below.
CABLE TV (CATV) Connecton
A 75-ohm coaxial cable connector is built into the set for easy hookup.
When connecting the 75-ohm coaxial cable to the set, connect the 75-ohm cable
into the ANT. terminal.
Some cable TV companies offer premium pay channels. Since the signals of these
premium pay channels are scrambled, a cable TV converter/descrambler is
generally provided to the subscriber by the cable TV company.
Please note:
The RF switch (not included) is required to provide two inputs (A and B).
Setting the RF switch to position A allows viewing of all unscrambled channels
by using the TV channel keys.
Setting the RF switch to position B allows viewing of all scrambled channels via
the converter/descrambler by using the converter channel keys.

17
INSTALLATION 17
INSTALLATION
1In order to ensure a healthy and relaxed body position when using the TV at visual
display workstations, you are able to adjust the monitor’s angle of the stand.
The stand angle of the LCD TV may be adjusted as shown:
2Use a antenna cable to connect the VHF/UHF signal to the LCD TV’s ANT. terminal.
3Connect the DC plug of the AC-DC adapter to the DC IN socket at the back of the TV.
Connect the AC-DC adapter to wall outlet.
4Press the button on the remote to turn on the LCD TV.
5Press the SOURCE button on the remote to select TV .

18 INSTALLATION
INSTALLATION
Connecting an External A/V Device
VIDEO
Audio
(R)
Audio
(L)
1
S-VIDEO Cable
AUDIO Cable
A/V Cable
DVD PLAYER
1Method 1:
Use an AV cable to connect the external A/V device’s audio and video output jacks to
the LCD TV’s audio and video inputs.
Method 2:
Use an audio cable to connect the A/V device’s audio output jacks to the LCD TV’s
audio inputs. Use an S-Video cable to connect the A/V device’s S-video output jack to
the LCD TV’s S-video input jack.
2
2Connect the DC plug of the AC-DC adapter to the DC IN socket at the back of the TV.
Connect the AC-DC adapter to wall outlet.
Note: Not all cameras have the ability to connect to a TV. Please check your
video camera user guide for compatibility.

19
INSTALLATION 19
INSTALLATION
3Press the button on the remote to turn on the LCD TV.
4To view the A/V device’s input, press the SOURCE button on the remote repeatedly
to select AV(METHOD 1), or S-VIDEO(METHOD 2).
Table of contents
Other Proview TV manuals


