Prowise EduBook 360 User manual
Prowise EduBook 360 - User manual
It is easy to work with the new EduBook 360 in your school or working environment. Thanks to the familiar and
intuitive Windows operating system you can easily get started with installing your favourite programmes on your
device. The EduBook 360 has a 360 degree tiltable screen, meaning it can be used for various purposes. The
device can be used as a laptop, but also as a tablet or in the presentation or tent mode for facilitating group
assignments.
Create a Microsoft account and gain access to all applications (apps) in the Microsoft Store. New apps can be
downloaded or existing apps can be updated here.

Disclaimer
The functions and features described in this user guide apply to most of the models. It is possible that not all the
functions and features are available on this model.
By installing, downloading or otherwise making use of a software product that has been previously installed on
the EduBook 360, you confirm that you agree to the terms and conditions of the related software manufacturer.
www.prowise.com
2 / 22

Table of Contents
1. Get to know your EduBook 360 4
1.1 In the box 4
1.2 Right-hand side 5
1.3 Left-hand side 6
1.4 Display 7
1.5 Keyboard & Touchpad 8
1.6 Bottom & Labels 9
2.Operating your EduBook 360 10
2.1 Keyboard 11
2.2 Touchpad 12
2.3 Touchscreen 14
3. Charger & Battery 16
3.1 Charger 16
3.2 Battery 16
4. Cleaning your EduBook 360 17
4.1 Cleaning the screen 17
4.2 Cleaning the casing 17
5. Prowise 18
5.1 Prowise GO 18
Web applications 18
Educational processing 18
Class management 18
Preparation 18
5.2 Prowise Presenter 19
5.3 Touchscreens & Personal Devices 19
Get started immediately with Prowise Chromebooks 20
Notebooks that are prepared for anything 20
All-in-One PCs that can actually do everything 21
6. More information 22
6.1 Wireless LAN 22
6.2 VPN 22
6.3 Bluetooth 22
www.prowise.com
3 / 22

1. Get to know your EduBook 360
1.1 In the box
1. Prowise EduBook 360
2. Quick Start Guide & Safety Instructions
3. Active pen with 1x AAAA battery
4. Adapter with power cord
PLEASE NOTE!
Check whether the delivery is complete. If not, please contact our service desk in writing
within five days after delivery. Please advise the serial number and a copy of the packing slip.
DANGER!
Keep the packaging material, such as the foils, out of the reach of children. Improper use can
cause suffocation hazard.
www.prowise.com
4 / 22

1.2 Right-hand side
1
Active pen
The pressure-sensitive active pen can be used on the EduBook 360 to
navigate, write and design.
2
Pen holder
You can secure the active pen to the EduBook 360 with the help of this
holder.
3
Pen safety cord
Connect the active pen to the EduBook by tying the cord to the intended
safety relay.
www.prowise.com
5 / 22

1.3 Left-hand side
1
USB Type C
Connect the supplied adapter to the USB Type C connector to charge the
Prowise EduBook 360.
The Type C port can also be used for potential data transfers.
2
Battery indicator
Blue: the adapter is connected and the battery is fully charged.
Red: the adapter is connected and the battery is charging.
Off: the EduBook 360 is on and is running on battery power.
3
MicroSD card reader
You can read SD cards instantly by inserting them into the card reader (with
the connectors facing down and turned towards the EduBook 360).
4
USB 2.0
Via the USB 2.0 port you can easily transfer data, or connect devices such as
a mobile phone, camera or smartwatch.
5
Combo port for
headphones and
microphone
Connection for audio devices (loudspeakers, for example) or a headset with
microphone.
www.prowise.com
6 / 22

1.4 Display
1
Microphone
The internal microphones take care of the EduBook 360's sound
recording.
2
180° camera
You can record videos, take photos or hold a video conversation with the
camera. In addition, you can rotate the camera 180° so that it can also take
pictures straight ahead.
www.prowise.com
7 / 22

1.5 Keyboard & Touchpad
1
On/off button
You can switch the EduBook 360 on or off with this button and carry out a
forced shutdown.
2
Keyboard
For entering data in your computer (how to use shortcuts is addressed in a
later section of this user manual).
3
Touchpad
This enables you to move the cursor over the screen and activate or select
items on the screen.
www.prowise.com
8 / 22

1.6 Bottom & Labels
1
Carry handle
The EduBook 360 can be easily carried thanks to this handle.
2
Label
Labels provide important information for identifying your EduBook 360.
This is where you can find data such as serial number, product number and
Prowise contact information that you will need in case you wish to contact
the Prowise Customer Service desk.
www.prowise.com
9 / 22
2. Operating your EduBook 360
The EduBook 360 is intended for digital communication and for the use, management and editing of electronic
documents and multimedia content. Do not use the EduBook 360 for other purposes.
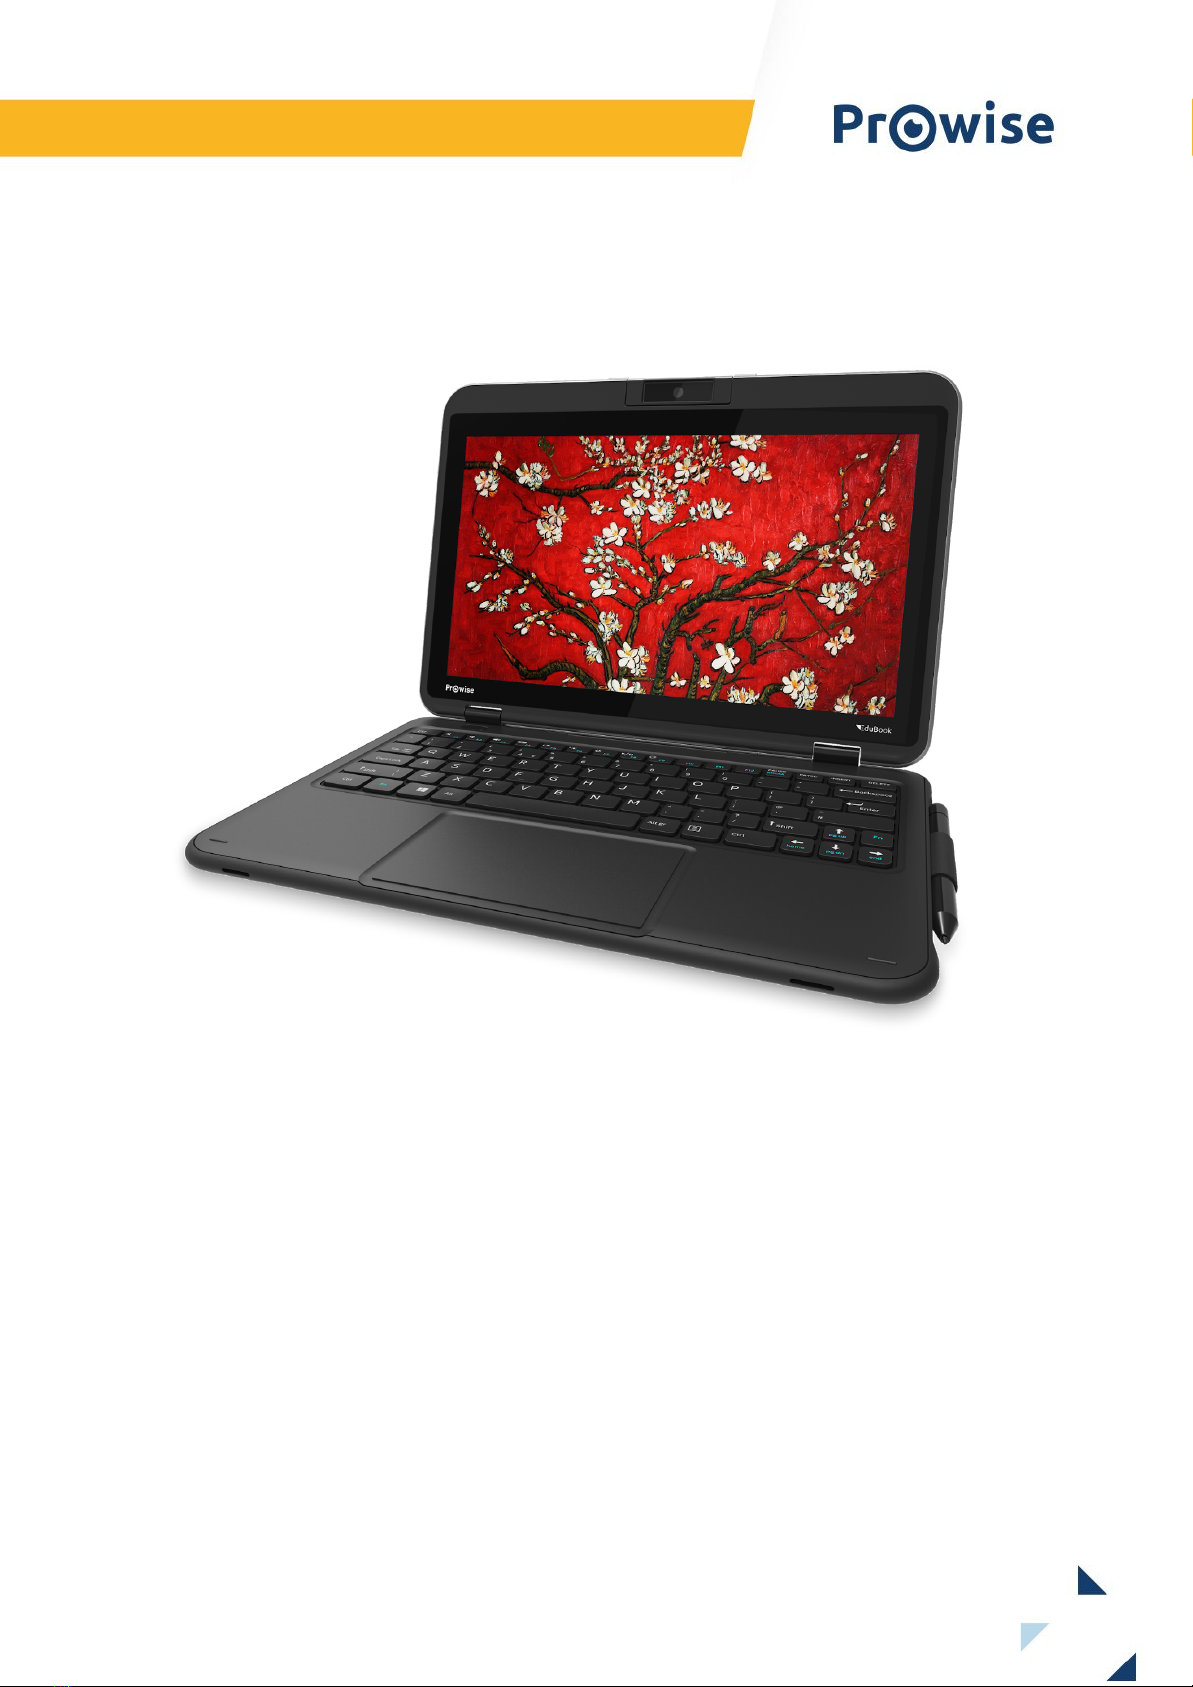
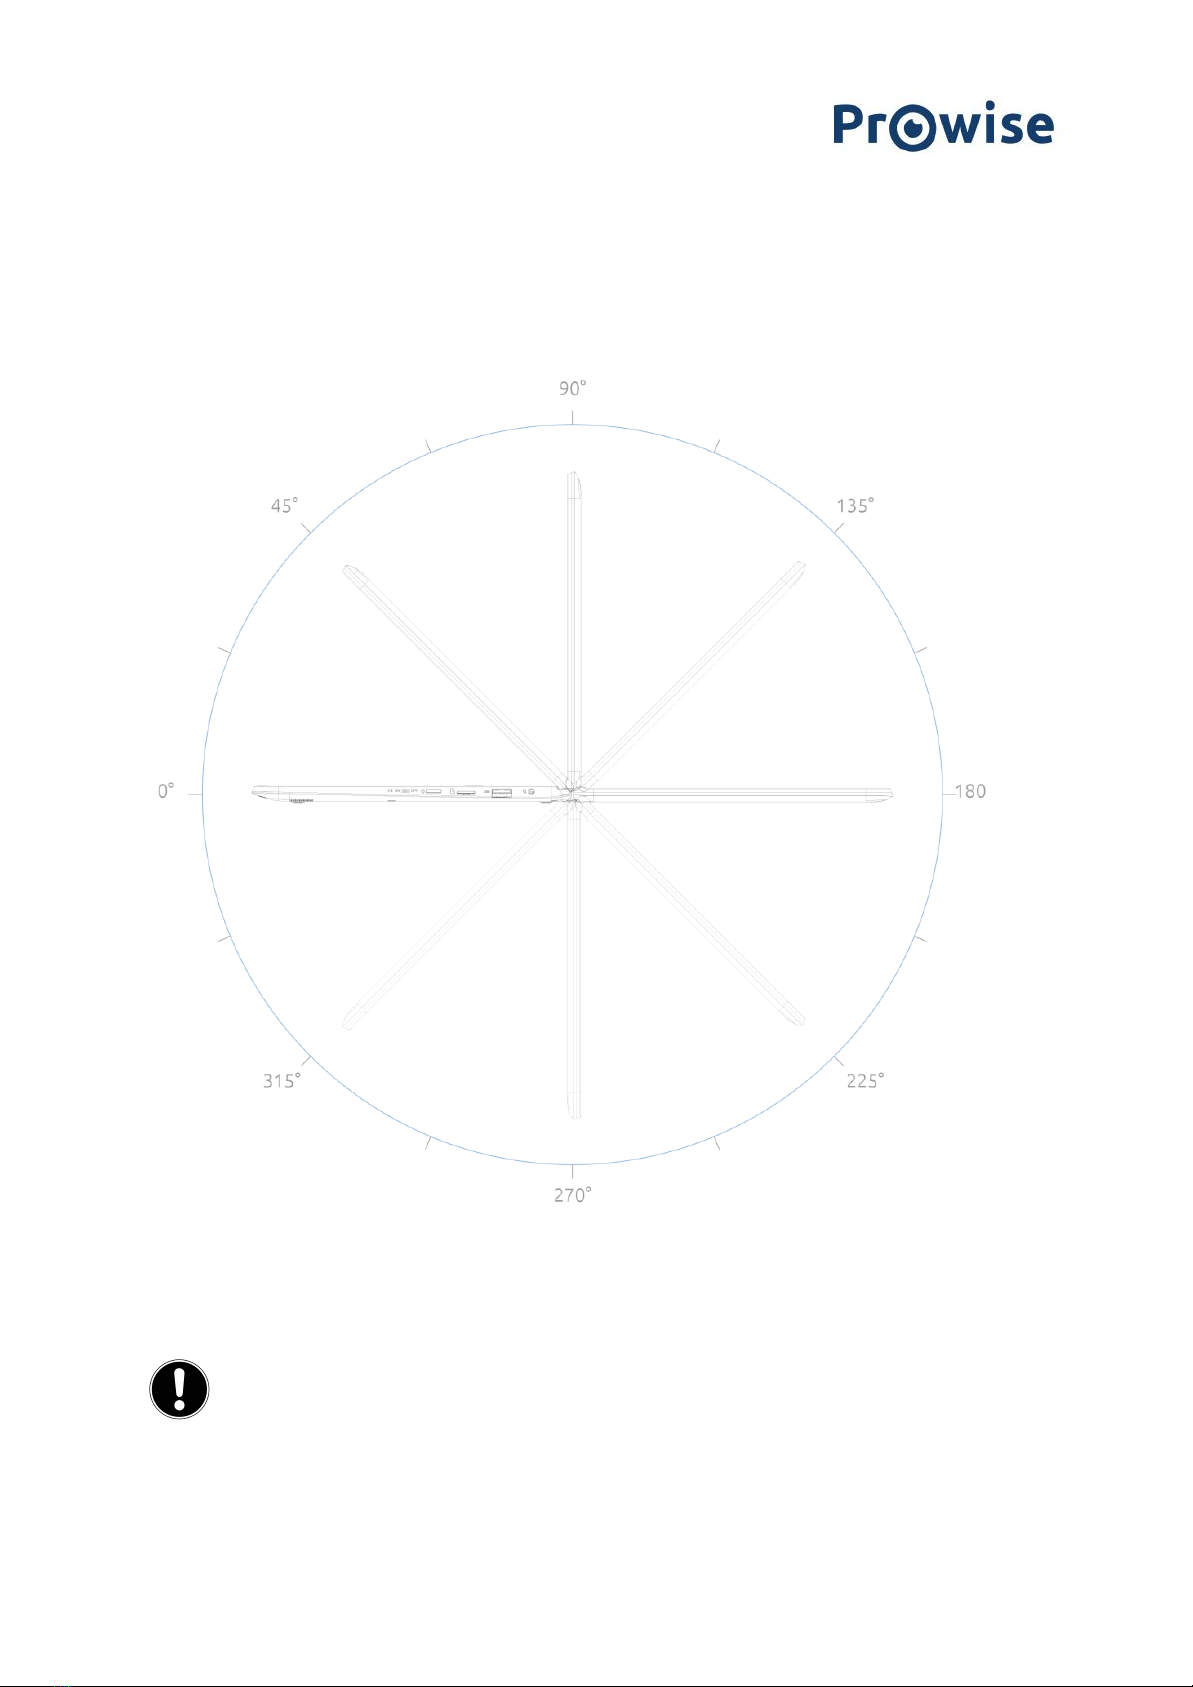
The EduBook 360 can be flipped open 360 degrees, enabling it to be used in many different ways. Besides using
is as a laptop, you can completely flip the screen around and use the EduBook 360 as a tablet. You can also use it
in tent mode or get started in portrait mode.
PLEASE NOTE!
The EduBook 360 is protected to a limited degree against being dropped as well as spillage
(IP5X dust proof, 70cm drop protection). Read the safety instructions for more information.
www.prowise.com
10 / 22

2.1 Keyboard
The EduBook 360 supports the standard Windows shortcuts:
Fn + F1
Help
Open the Windows help tab in your browser
Fn + F2
Rename
Rename selected icon, file or folder
Fn + F3
Search
Open search option for the page
Fn + F4
Windows URL bar
Open the URL bar in Windows Explorer and Microsoft Edge
Fn + F5
Refresh
Reload the webpage
Fn + F6
Browser URL bar
Open URL bar in browser
Fn + F7
Spelling
Open spelling and grammar check in MS word
Fn + F9
Save
Save changes in current document
F10
Menu
Open the menu bar in current application
F11
Full screen
Enable or disable full-screen mode
F12
Page source
Open page source for popular web browsers
www.prowise.com
11 / 22

2.2 Touchpad
Move the cursor
Move your finger over the touchpad.
Click
Click the bottom-left half of the touchpad or tap the
touchpad.
Right mouse click
Click on the bottom-right half of the touchpad or use
two fingers to tap the touchpad simultaneously.
Scroll
Place two fingers on the touchpad and slide them up or
down to scroll.
www.prowise.com
12 / 22

Swipe
Swipe two fingers to the left to return to the previous
page and to the right to proceed to the next page.
Back to desktop
Swipe three fingers downwards to return to the
desktop instantly.
Drag and drop
Press one finger on the item you wish to move. Move
the item with a second finger. Remove both fingers
from the touchpad to drop the item in its new place.
Zooming in / out
Move two fingers towards or away from each other.
www.prowise.com
13 / 22
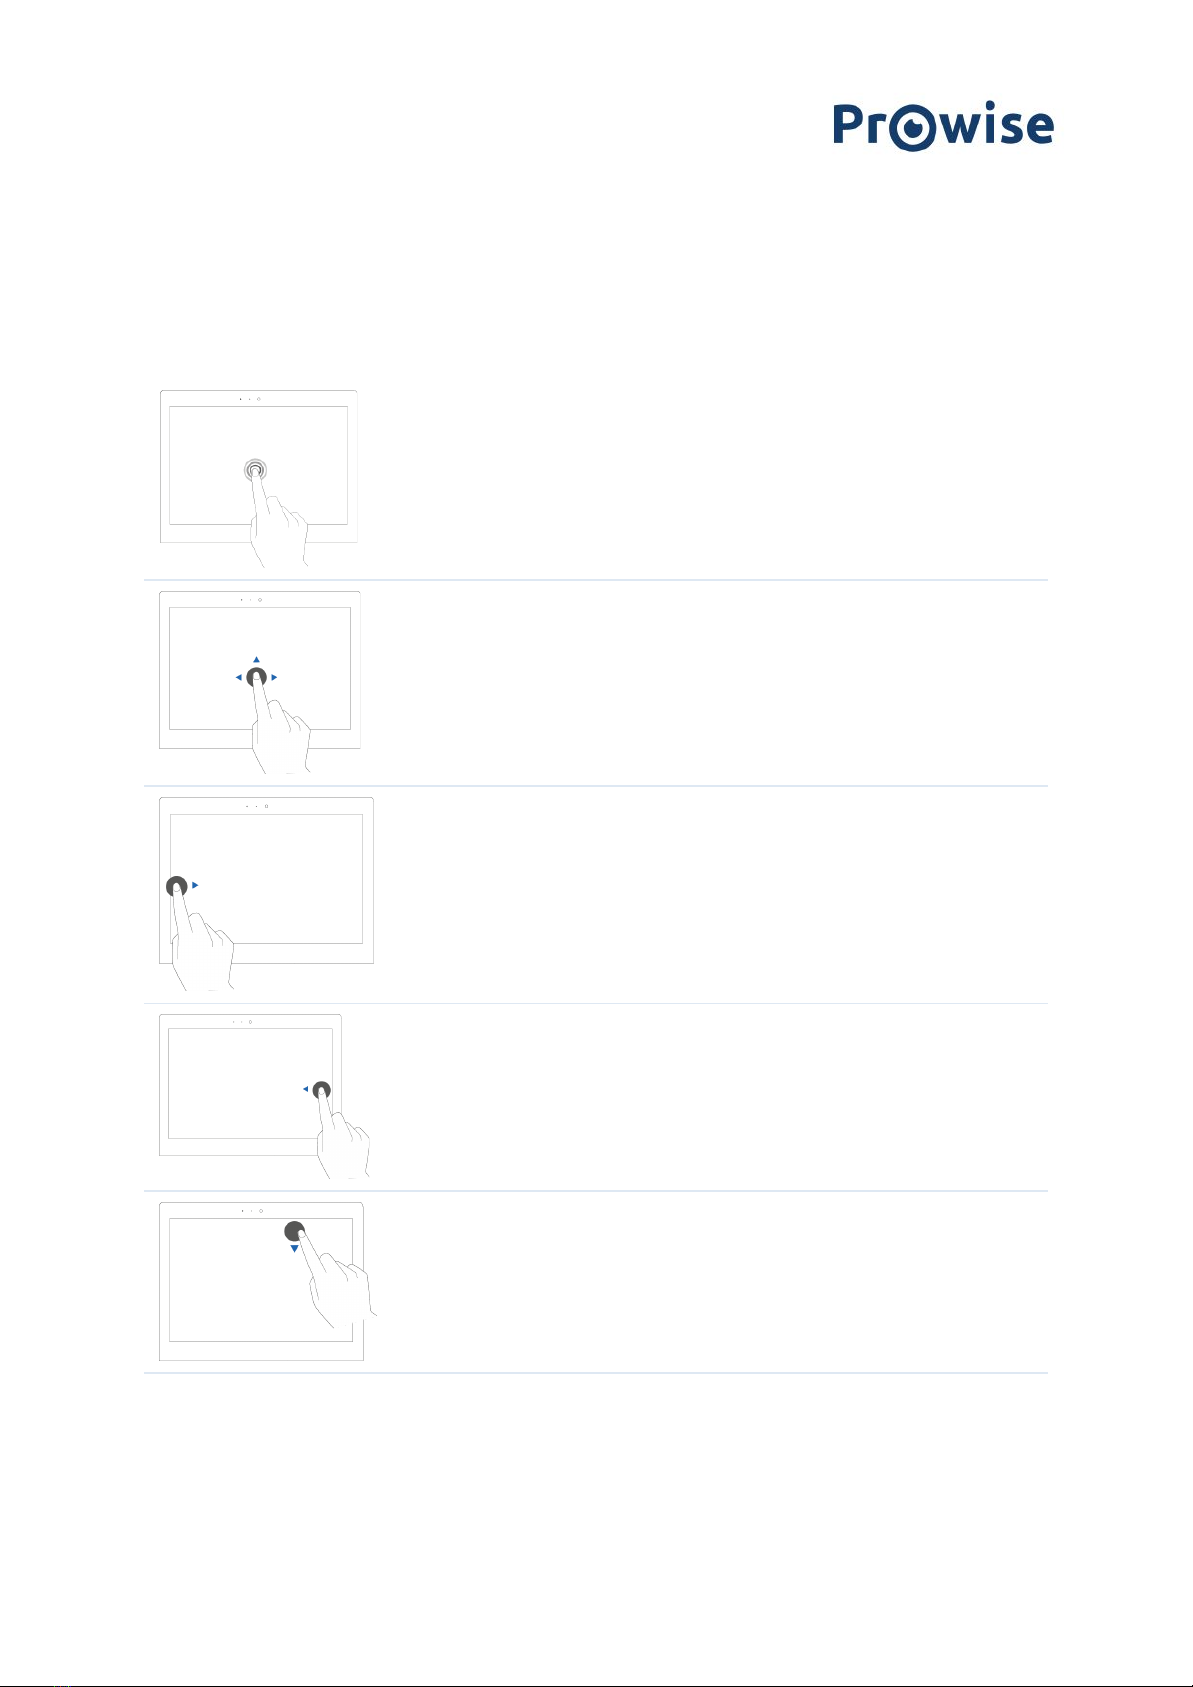
2.3 Touchscreen
The EduBook 360 is equipped with a touchscreen. This can be used in various ways, together with the 360 degree
tilting screen. The touchscreen has a number of specific operating actions at its disposal.
Click
Tap on the screen.
Drag
Press and hold your finger down on an item and drag it
to the desired location without lifting your finger off
the screen. Remove your finger from the touchpad to
drop the item in its new place.
Display all opened
windows
Swipe from the left-hand side of the screen to the
right.
Display action menu
Swipe from the right-hand side of the screen to the
left.
Close full screen
Swipe down from the top of the screen.
www.prowise.com
14 / 22
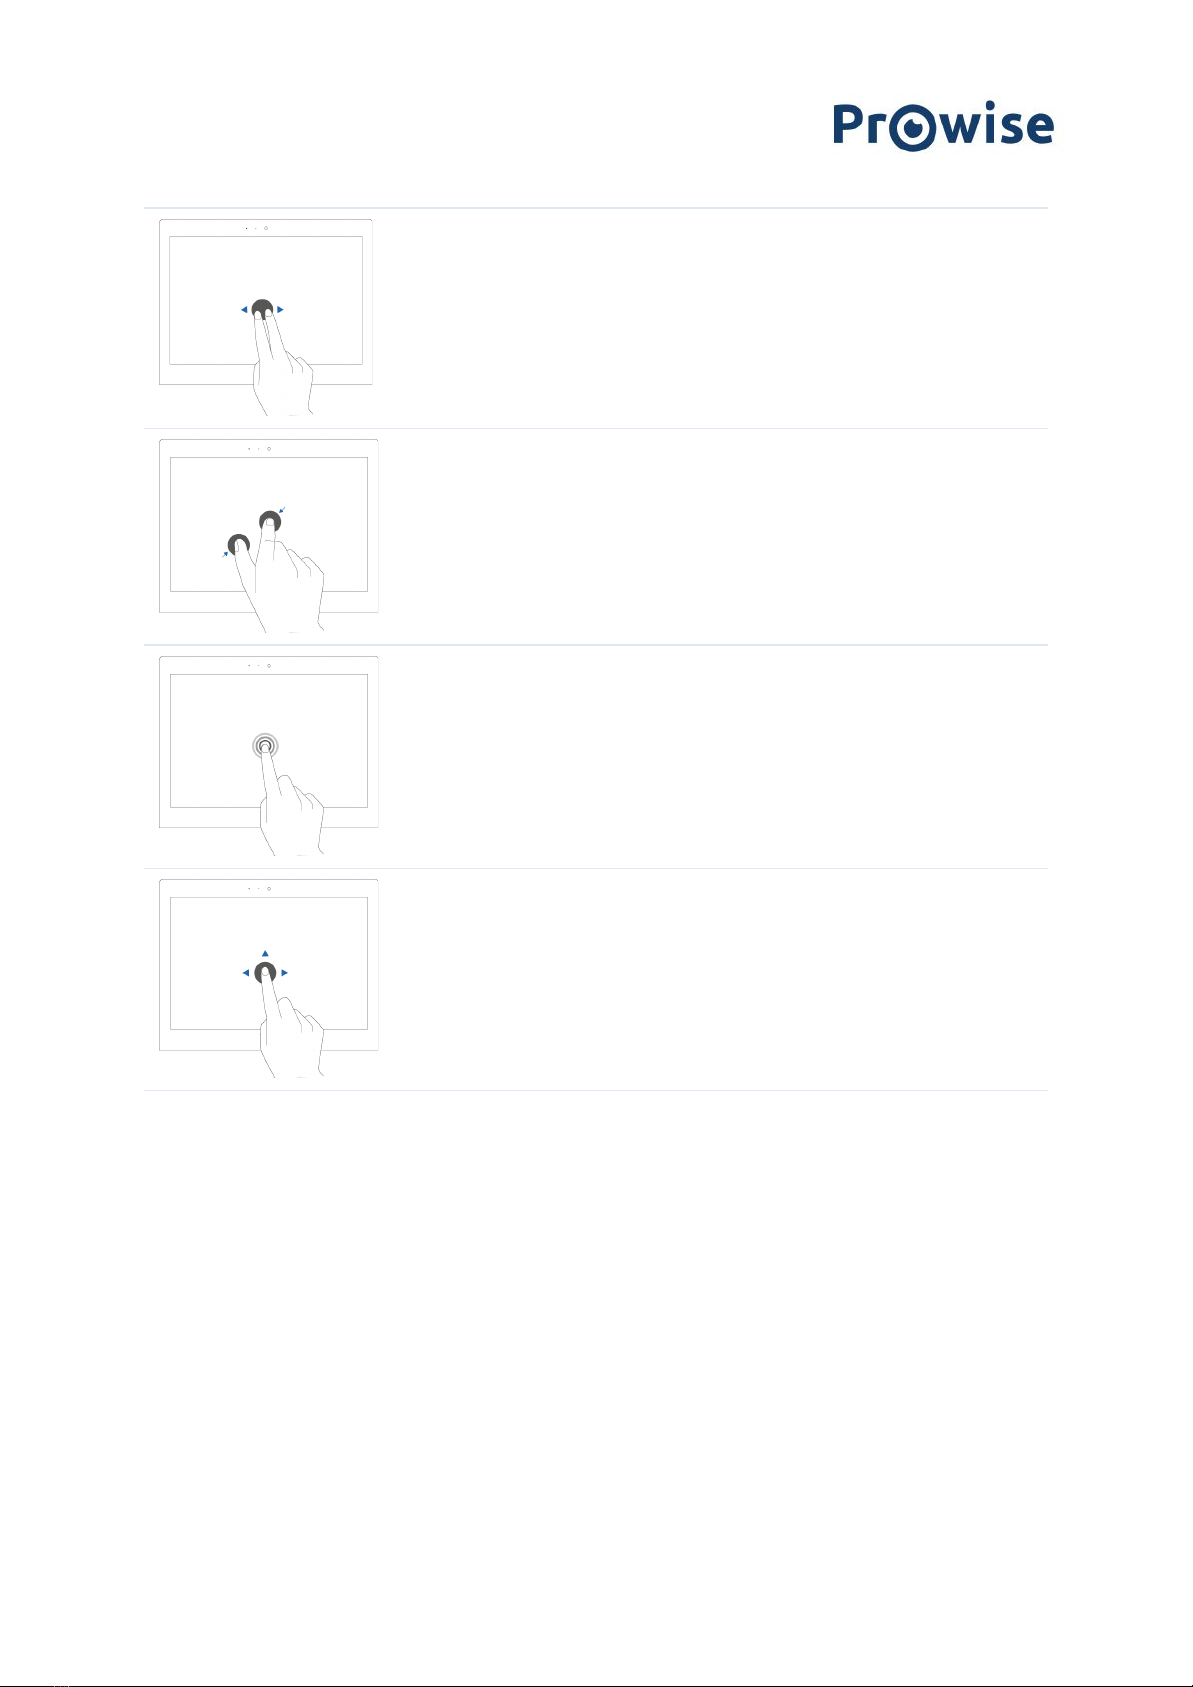
Swipe
Swiftly use two fingers to swipe left to go to the
previous webpage and right to go to the next. The
same applies for apps.
Zooming in / out
Move two or more fingers towards each other and
away from each other to zoom out or in.
Right-click (context
menu)
Press and hold down the item you want to select for
several seconds to activate the right-click menu.
Scroll
Press and hold down one finger on the screen and drag
towards the direction you want to scroll.
www.prowise.com
15 / 22
3. Charger & Battery
3.1 Charger
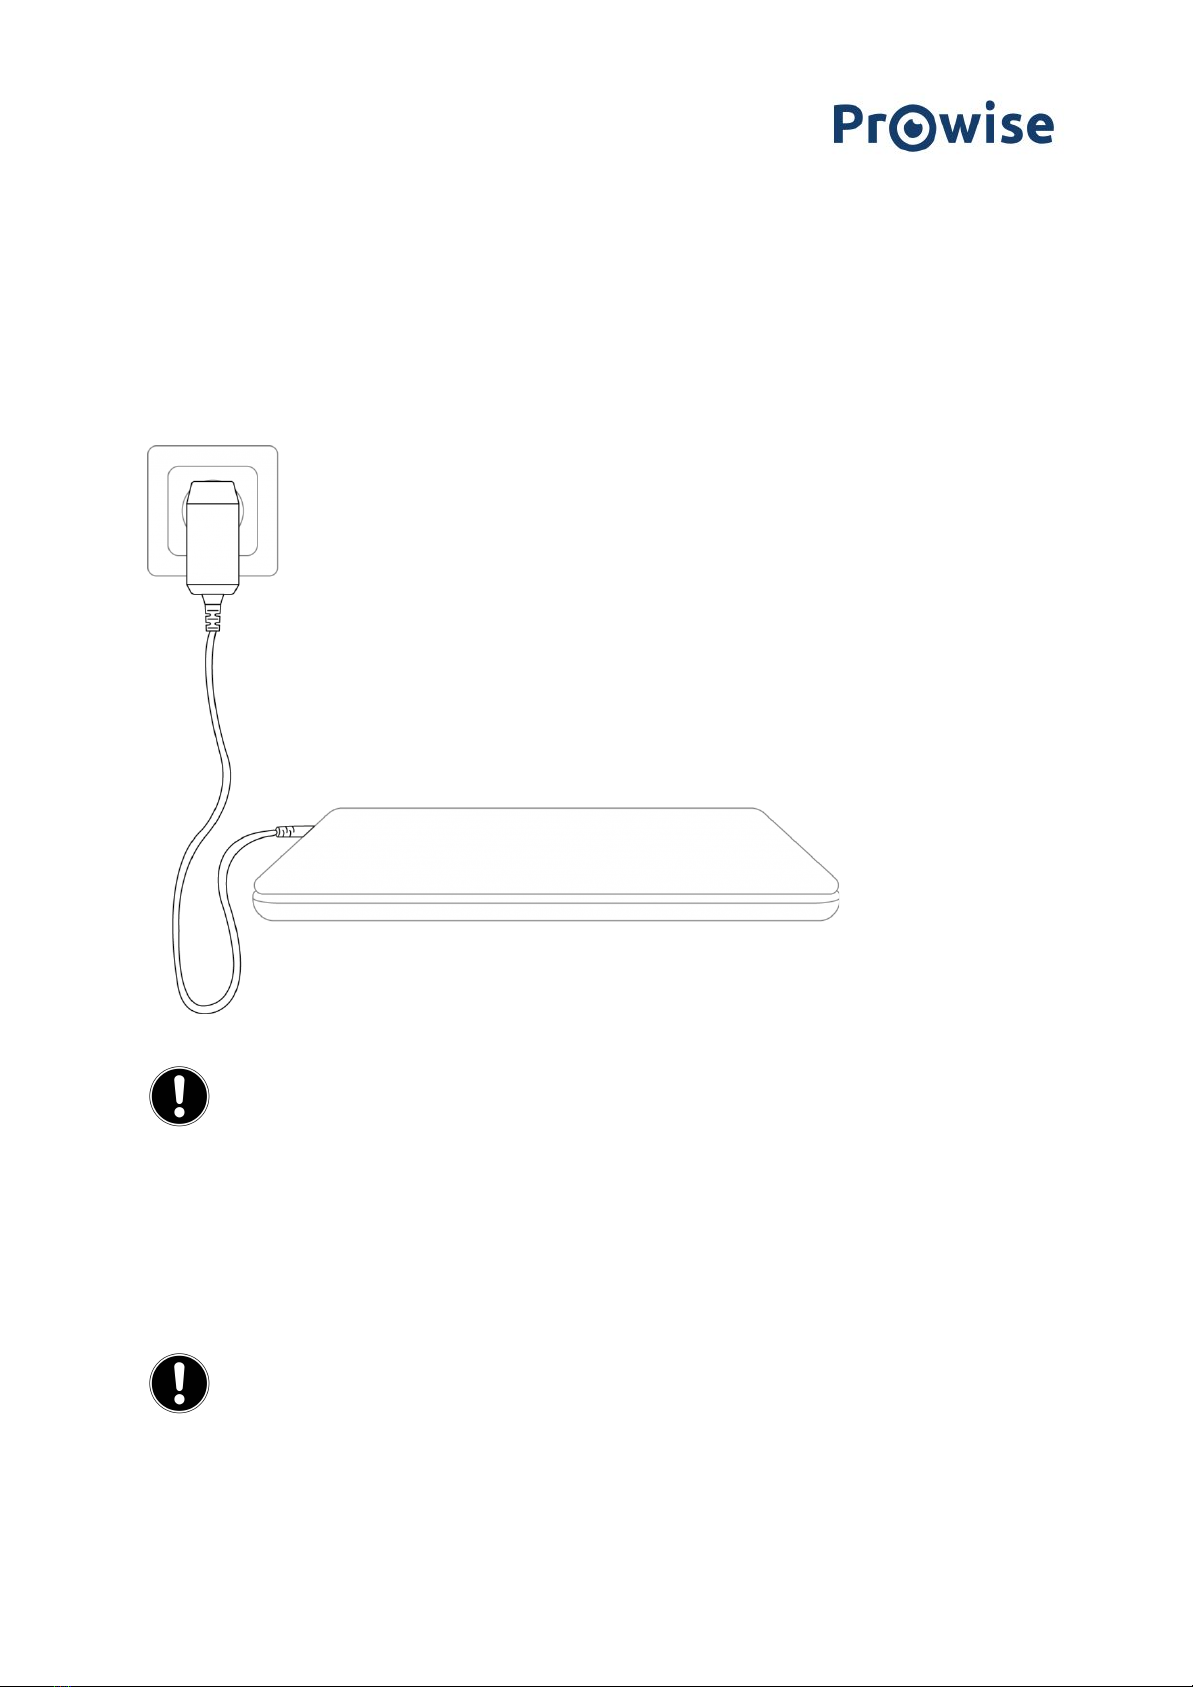
To charge the EduBook 360, only use the charger supplied with your purchase. Plug the charger in and connect it
to the EduBook 360 through the USB C port (charger port).
PLEASE NOTE!
Only plug the power cable into grounded electrical outlets with AC 100-240V ~,50-60Hz.
Consult your energy company if you are unsure about the power supply at the installation site.
3.2 Battery
The EduBook 360 has an internal battery. This battery has been integrated in the casing and cannot be removed
or replaced without the help of a professional.
PLEASE NOTE!
In case the battery is replaced by a third party, the warranty lapses. In case of battery
defects, always contact Prowise or a certified Prowise partner. Contact details are available at www.prowise.com
www.prowise.com
16 / 22

4. Cleaning your EduBook 360
4.1 Cleaning the screen
Cleaning the screen
Use a soft, dry and lint-free microfibre cloth to clean the screen. Double check whether the cloth is actually clean.
If you want to use a cleaning agent, only use one recommended by Prowise. Under no circumstance use
aggressive chemical cleaning agents, as they can damage the screen.
Always apply the cleaning agent to the cloth first. Never apply it directly to the screen of the
EduBook 360. The cloth you use may be slightly damp, but certainly not wet. This can damage your
EduBook 360.
Carefully wipe the screen with the lint-free cloth. Do not apply excessive pressure, for this can
damage the screen. For the optimal result, gently wipe the screen in a circular motion.
4.2 Cleaning the casing
Use a soft, dry and lint-free micro fibre cloth to clean the casing of the EduBook 360. Double check whether the
cloth is actually clean and make sure the EduBook is switched off.
Always apply the cleaning agent to the cloth first. Never apply it directly to the casing of the
EduBook 360. The cloth you use may be slightly damp, but certainly not wet. This can damage your
EduBook 360.
PLEASE NOTE!
Always disconnect all cables leading to the All-in-One PC before cleaning, including the
power cable.
WARNING!
In case the EduBook 360 comes in contact with water, do not switch it on and do not plug in the
charger. This can cause electric shocks.
www.prowise.com
17 / 22

5. Prowise
Together with you, Prowise aims to achieve better education. Therefore, together with our passionate team,
Prowise continues to develop software and hardware solutions that make an actual difference in the classroom.
5.1 Prowise GO
Prowise GO is the most complete learning environment for schools in The Netherlands. Think of adaptive
learning programmes, preparing web applications, a class management system and access to Prowise Presenter
for all pupils:
Web applications
Determine which educational programmes, applications and links are visible in the online learning environment.
As a teacher, you decide which Prowise GO educational programmes, applications or links are visible for students
by using 'tiles'. This can vary per class or grade.
Educational processing
Gain insight in the results and progress of each student with the adaptive online exercise programmes by
Oefenweb. With the acquisition of Oefenweb, now integrated in Prowise GO, students have access to the Math
Garden, Ocean of Languages and Words&Birds. These unique Oefenweb programmes enable students in primary
and secondary school to progress at their own level in maths, language and English. Each student follows their
own exercise pathway automatically and thereby succeeds more often than not.
Class management
Follow and manage what students do on their personal devices during class. You are in control over what the
students do on their Chromebooks. Monitor and determine the sites students use, follow live how they are
getting on with an assignment or test and broadcast a student's work on the big screen. Share your screen with
some students to give additional instructions, while the rest of the group continues working.
Preparation
Prowise takes care of the entire school's technical implementation of Prowise GO and IT administration.
Together, we consider the best solution for your school and then make sure Prowise GO and the potentially
acquired touchscreens and personal devices work perfectly. Our Prowise service department is always there to
www.prowise.com
18 / 22
assist in case of unforeseen problems. In addition, the Prowise service team supports the school in terms of
administration and service.
For more information, please consult www.prowise.com/en/prowise-go.
5.2 Prowise Presenter
Thanks to Prowise Presenter, lessons and presentations can be created quickly, easily and interactively. Presenter
is packed with educational content and interactive options for teachers (instruction), groups (collaborative
learning) and students (processing). For both primary and secondary education. Consider, for example: images,
videos, tools, Touch Table tools and 3D models, but also ready-made curriculum strands, quizzes and mind maps.
Prowise Presenter is the education software that is used by over 400,000 users to easily create interactive
lessons.
Teach and let students get started with Prowise Presenter. It offers many possibilities for both teacher and
student: create lessons or essays, work with innovative tools and explore 3D models.
The entire Prowise Presenter version is free for all users.
For more information, please consult www.prowise.com/en/presenter-software.
5.3 Touchscreens & Personal Devices
With the Prowise Touchscreen, you can carelessly enjoy the world's highest audiovisual quality. The
top-of-the-line materials in combination with the hardware and software developed by Prowise for unique
education and presentation possibilities. Prowise Touchscreens are available in the sizes 55", 65", 75" and 86”.
- The 4K Ultra HD IPS Panel guarantees the best possible visual experience. Only the very best top-quality
LG panels are used for this purpose.
- The fully-integrated 2.1 soundbar ensures crystal-clear sound. The two integrated speakers (front) and
subwoofer (back) are Dolby Audio certified.
- The four microphones integrated in the Prowise Touchscreen recognise voices and people from as far
away as 8 metres. This means you can invite external experts to your class via Skype or similar VoIP
applications and let students communicate with him or her through the touchscreen.
www.prowise.com
19 / 22

- With the two ergonomic pens, two students can simultaneously complete exercises or other tasks on
the Prowise Touchscreen. The pens remember two colours (front and back) and provide a smooth and
realistic writing experience.
For more information, please consult www.prowise.com/en/touchscreens.
In addition, you can further expand the functionality and possibilities of your touchscreen by combining the
Prowise Touchscreen with the Prowise iPro lift. Prowise iPro Lift Systems have been developed with the
fundamental purpose of usability.
- Safety is provided by the brake that is automatically applied once the screen is no longer in its lowest
position. Sensors recognise obstacles when the lift moves up and down. The lift stops immediately once
the sensors detect resistance.
- Prowise offers several lift systems, each for different situations, thus safeguarding usability. For
instance, the Tilt & Toddler lifts offer the possibility to set the touchscreen to table mode, enabling
even the shortest pupils to participate.
For more information, please consult www.prowise.com/en/prowise-ipro-lift-series/.
The Prowise personal devices are exceptionally suitable for secondary education. All devices have been designed
specifically for classroom use, with features and functionality that optimally support the Prowise software. Due
to the robust casing and the rapid WiFi connection, using software such as Prowise Connect is easy, enabling you
to smoothly switch between different devices. Prowise has developed several types of devices, each with their
own user applications.
Get started with the Prowise Chromebooks instantly
Open up your Chromebook and it launches rapidly. Students log in with their own details and since the Prowise
Chromebook operates in the cloud, they have direct access to documents. With Chrome OS, Google's operating
system, you can get the most out of your Chromebook.
Notebooks that are prepared for anything
Powerful notebooks, equipped with Windows 10, designed to be able to take a knock. Moreover, with Prowise
notebooks you can easily collaborate via Office 365 and Microsoft Azure (cloud) via Windows.
All-in-One PCs that can actually do everything
The Prowise All-in-One PC is a computer as well as a tablet. You can use this versatile device for any situation in
the classroom. What makes the Prowise All-in-One PC so unique, is that it is equipped with an integrated battery
and can also be placed flat on the table. This way, you can use the Prowise All-in-One PC as a normal PC, as well as
a powerful tablet for small group exercises.
www.prowise.com
20 / 22
Table of contents


