Puch Magnum II MKII User manual


Dear
Puch
Owner
This
is
your
riding, maintenance
and
warranty guide. By following the instructions
described in this booklet,
we
at
Puch know you will enjoy many miles
of
pleasurable
Moped Riding.
Should a need
ever
exist for parts
or
service, simply contact your Puch dealer.
He
also
hasavailablefor
your
purchaseaServiceManualunder
the
partNr
.
907
.2.
71
.894.5 0180
Thank you for joining the Puch family, please ride safely and have fun.
P.O.
BOX
7777
Greenwich, Ct. 06830
CONTENTS
Preface . .
..
.
..
.
Warranty-
Terms& Conditions
Extent
of
Coverage
Exclusions
Registration . . . .
A. Serial
number
location
B. Operating controls
C. Tire pressure . . . .
D . Oil,
Gas/oil
mixture .
E. Operating instruction
F. Riding instruction
..
G. Trouble shooting
H.
Owner
maintenance
I.
Suggested maintenanceand lubrication chart
J.
Consumer
information
2
PAGE
3
4
5
6
7
9
14
14
17
20
21
23
25
26
THE
WARRANTY-
Terms
&
Conditions
Subject to the terms set forth below, the
Puch
motorized bicycle is warranteed
to
be
free from defects
in
material
and
workmanship for a period of 6 months from the date
of original consumer purchase. While under this warranty, Steyr Daimler Puch of
America, hereafter SDPA, will, at its descretion, replace or repair without charge, any
product or part which
an
authorized service representative determines is defective
in
material or workmanship.
This warranty applies to the original consumer purchaser only.
This warranty gives the original consumer purchaser specific legal rights. The original
consumer purchaser may also have other rights which vary from state
to
state
3
EXTENT
OF
WARRANTY
COVERAGE
The warranty will not
be
extended to any machine that
has
been subject to mis-use,
negligence, alteration, use
of
non-authorized spare parts, improper maintenance
(including improper fuel mix ratio, lack of oil, or use
of
poor quality oil) or modification
of
assemby. Additionally, this warranty will not apply if the machine
is
damaged
by
fire,
flood, accident, acts of God or any other cause
of
a similar nature beyond SDPA's
control.
Under
no
circumstances will SDPA be liable for damages due to loss of use, loss of
business or profits or for any other incidental or consequential damages. Some states
do
not allow the exclusion or limitation or incidential
or
consequential damages,
so
the above limitation may not apply.
This warranty will
be
null
and
void
if:
1.
Any part of the serial numbers are removed, defaced
or
altered;
2.
If
any unauthorized modification or alteration
is
made;
3.
If
any unauthorized or non-standardized spare part
is
installed;
4.
If
any maintenance or repair
is
perfomed dur
in
g
the
warranty period
by
anyone
other than
an
authorized
Puch
Dealer.
4

EXCLUSIONS:
Normal wear parts are excluded from this warranty.
Normal wear parts include:
Tires, tubes, spark plugs, brake linings, clutch hub, chains, spokes, sprockets,
ignition points, condenser, brake cables, throttle cable, air filter.
Routine maintenance.
No
one
has
the authority
to
orally change the terms, conditions or exclusions of this
warranty
or
make any representations or express warranties other than those
contained here.
SDPA
is
proud
and
confident
of
its dealers
and
products,
and
wants to assure that
each new
Puch
owner receives full satisfaction.
In
the event satisfaction
is
not
obtained
at
the dealer level however, the original consumer
is
invited to contact
SDPA directly
at
P.O
.
Box
7777, Greenwich, Connecticut 06830
5
l
WARRANTY
REGISTRATION
The Warranty Registration form should
be
completed
by
the dealer
and
the consumer
purchaser
at
the
time of sale.
Part 1 shall
be
kept
by
the selling dealer.
Part 2 should
be
kept
by
the original purchaser
in
his/her possession.
ANY CLAIM MADE UNDER THIS WARRANTY MUST
BE
ACCOMPANIED
BY
PART
2 OF THE WARRANTY REGISTRATION FORM.
Part 3 which
is
self-addressed
and
stamped, must
be
mailed
to
Steyr Daimler
Puch
of
America Corporation,
P.O.
Box 7777, Greenwich, Connecticut 06830 not later than
ten
(1
0)
days after purchase of vehicle.
All
information
on
the
Form
must
be
written legibly. The serial numbers
on
the
Registration
Form
must agree with those
on
the Moped.
6
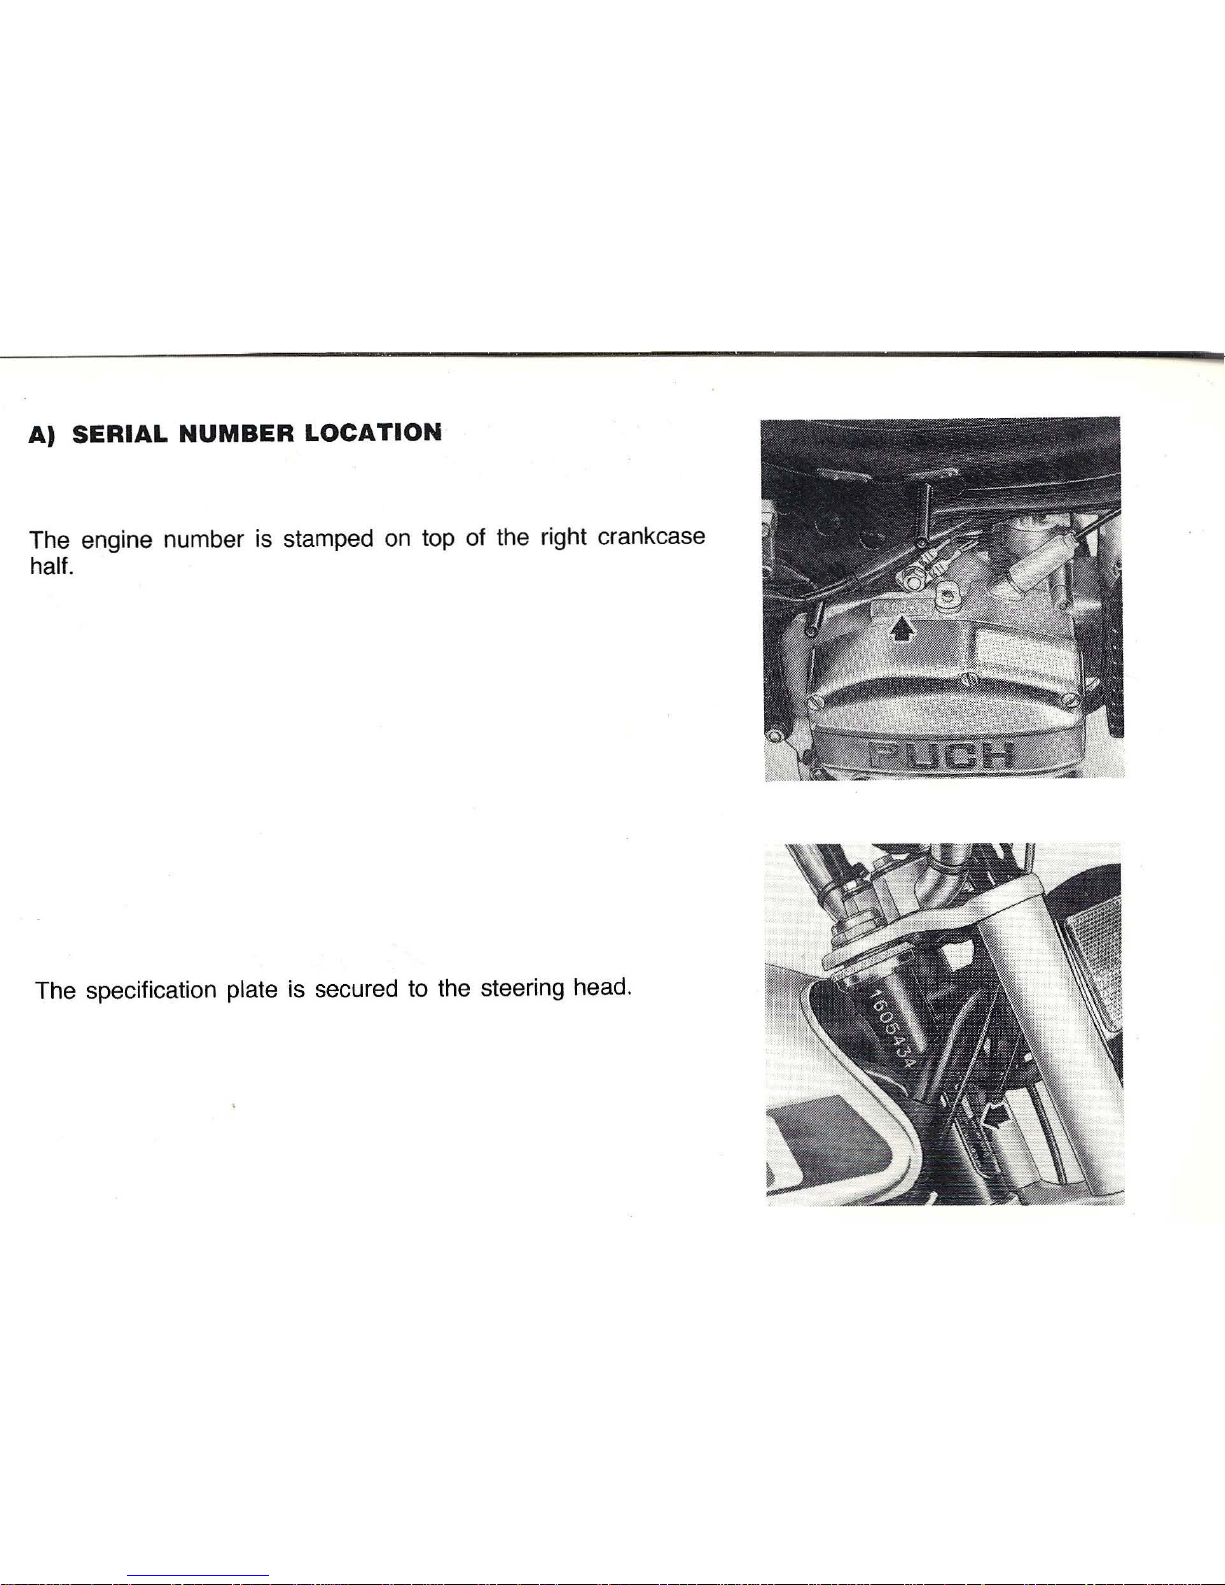
A)
SERIAL
NUMBER
LOCATION
The engine number is stamped on top of the right crankcase
half.
The specification plate is secured to the steering head.
l
8
0
c=::2
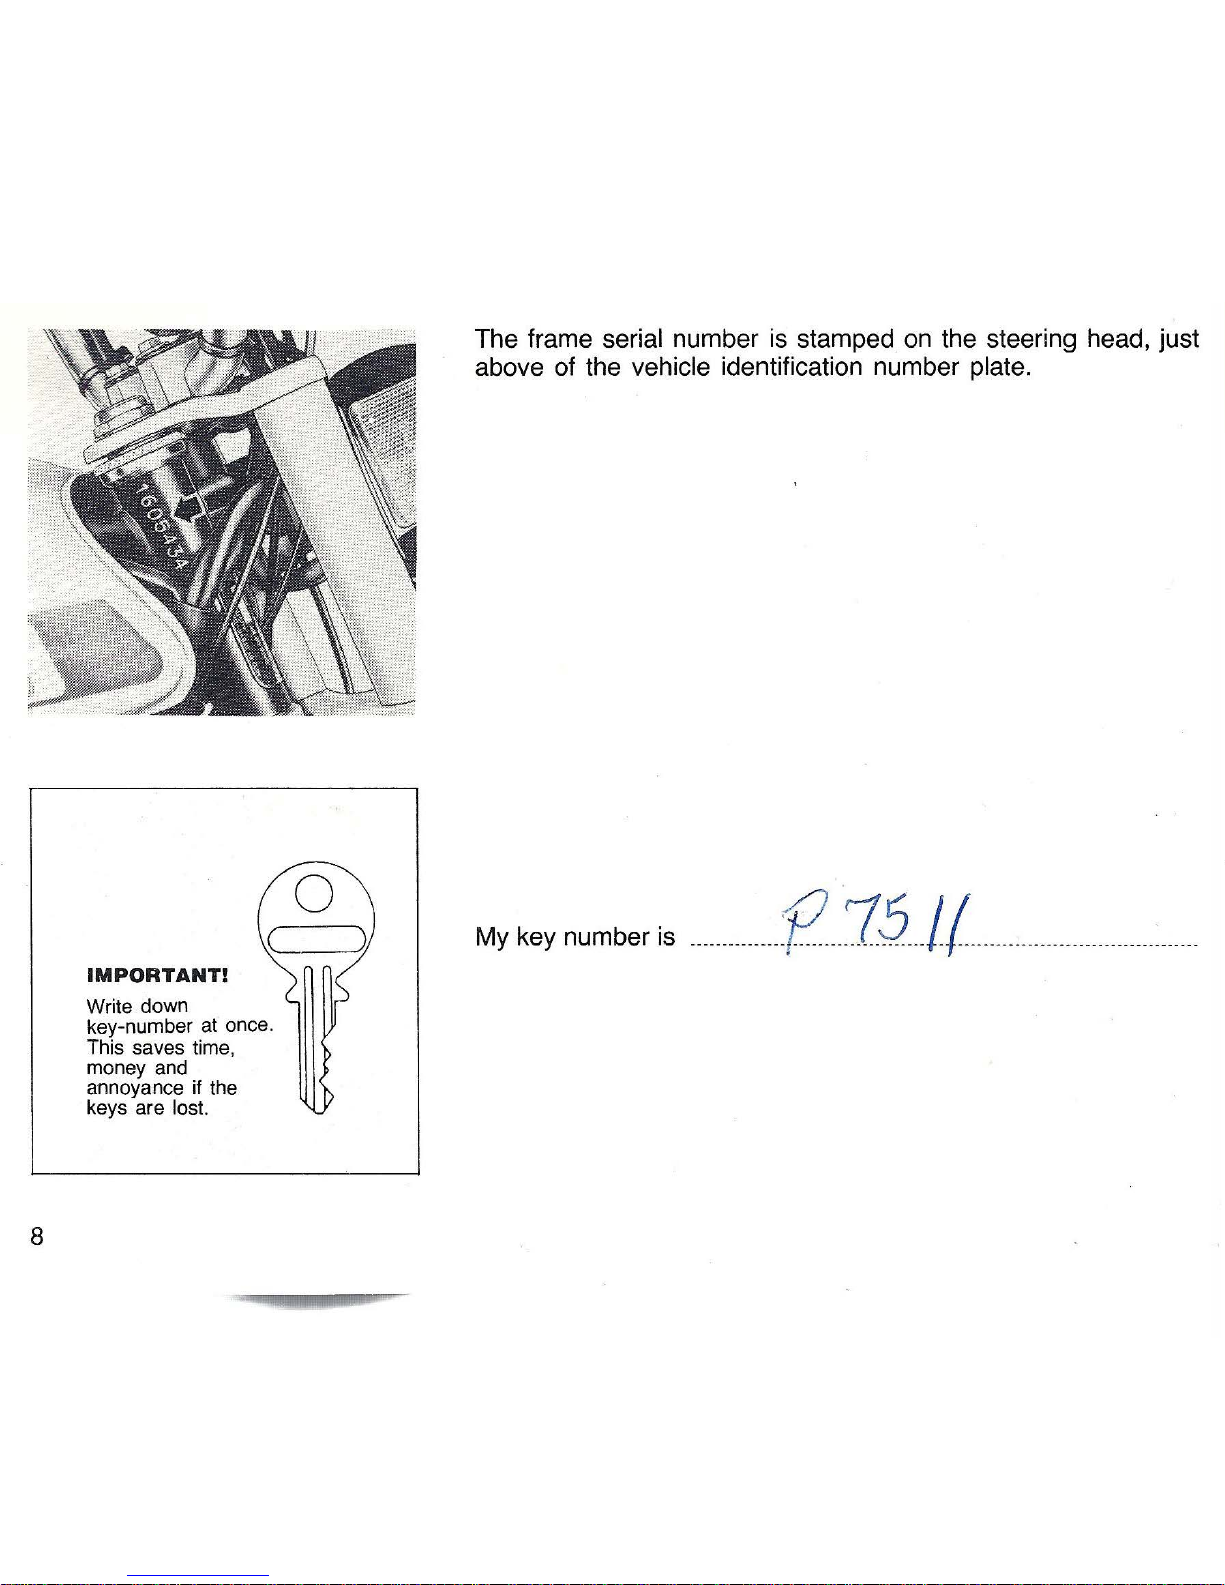
IMPORTANT!
Write down
key-number
at
once.
This saves time,
money
and
annoyance
if
the
keys are lost.
The frame serial number
is
stamped
on
the steering head, just
above of the vehicle identification number plate.
My
key number
is
______________
<(Z
__
1Q
__
J(
___
--
---
--
-----
----------------
·
--

B)
OPERATING
CONTROLS
The positions of the controls are shown
in
the enclosed technical
data sheet.
Following some operating controls described
in
detail:
Locking
and
unlocking
your
moped
To
lock, move
the
handlebar
to
the right. Insert key into lock.
Turn key to the left, push
in
and
turn key to the right.
Remove
key.
Unlock
in
reverse order.
Fuel
tank
filler
cap
TO
open, turn filler
cap
counter clockwise.
9

10
Fuel
valve
The fuel valve
is
located
on
the left side of the fuel tank.
The positions are clearly indicated
on
the tank.
In
the
event
you
should
run
out of fuel, the reserve position
should give
you
adequate range
to
get
you
to a filling station.
Always turn the fuel valve
to
the "Off" position when the moped
is
not
in
use.
Carburetor
1)
The primer
is
operated
by
depressing the black rod extending
through the left engine cover.
2)
The choke is operated
by
depressing the metal thrust pin
which extends upward toward the opening in the left
engine cover.

Air
pump
and
tools
The air pump is located
on
the left side of the luggage carrier.
The tool kit is stored behind the cover
in
the rear of the seat.
Brake
levers
The brake control levers are mounted
on
the handlebar.
Left (1) lever controls the rear wheel brake.
Right
(2)
lever controls the front wheel brake.
11

12
Starting
lever
The starting lever
is
located
on
the left side of the handlebar
and
is
used for starting the engine.
Please refer to operating procedure
on
page
17.
Light
and
ignition
switch
The Magnum MK
II
has a two step combination key switch
located
on
the right top side of the instrument panel.
A key
is
needed for switching.
Fully
to
the left -ignition
and
lights off
Step 1 to the right -ignition.
on
Step 2
to
the right -ignition and lights
on
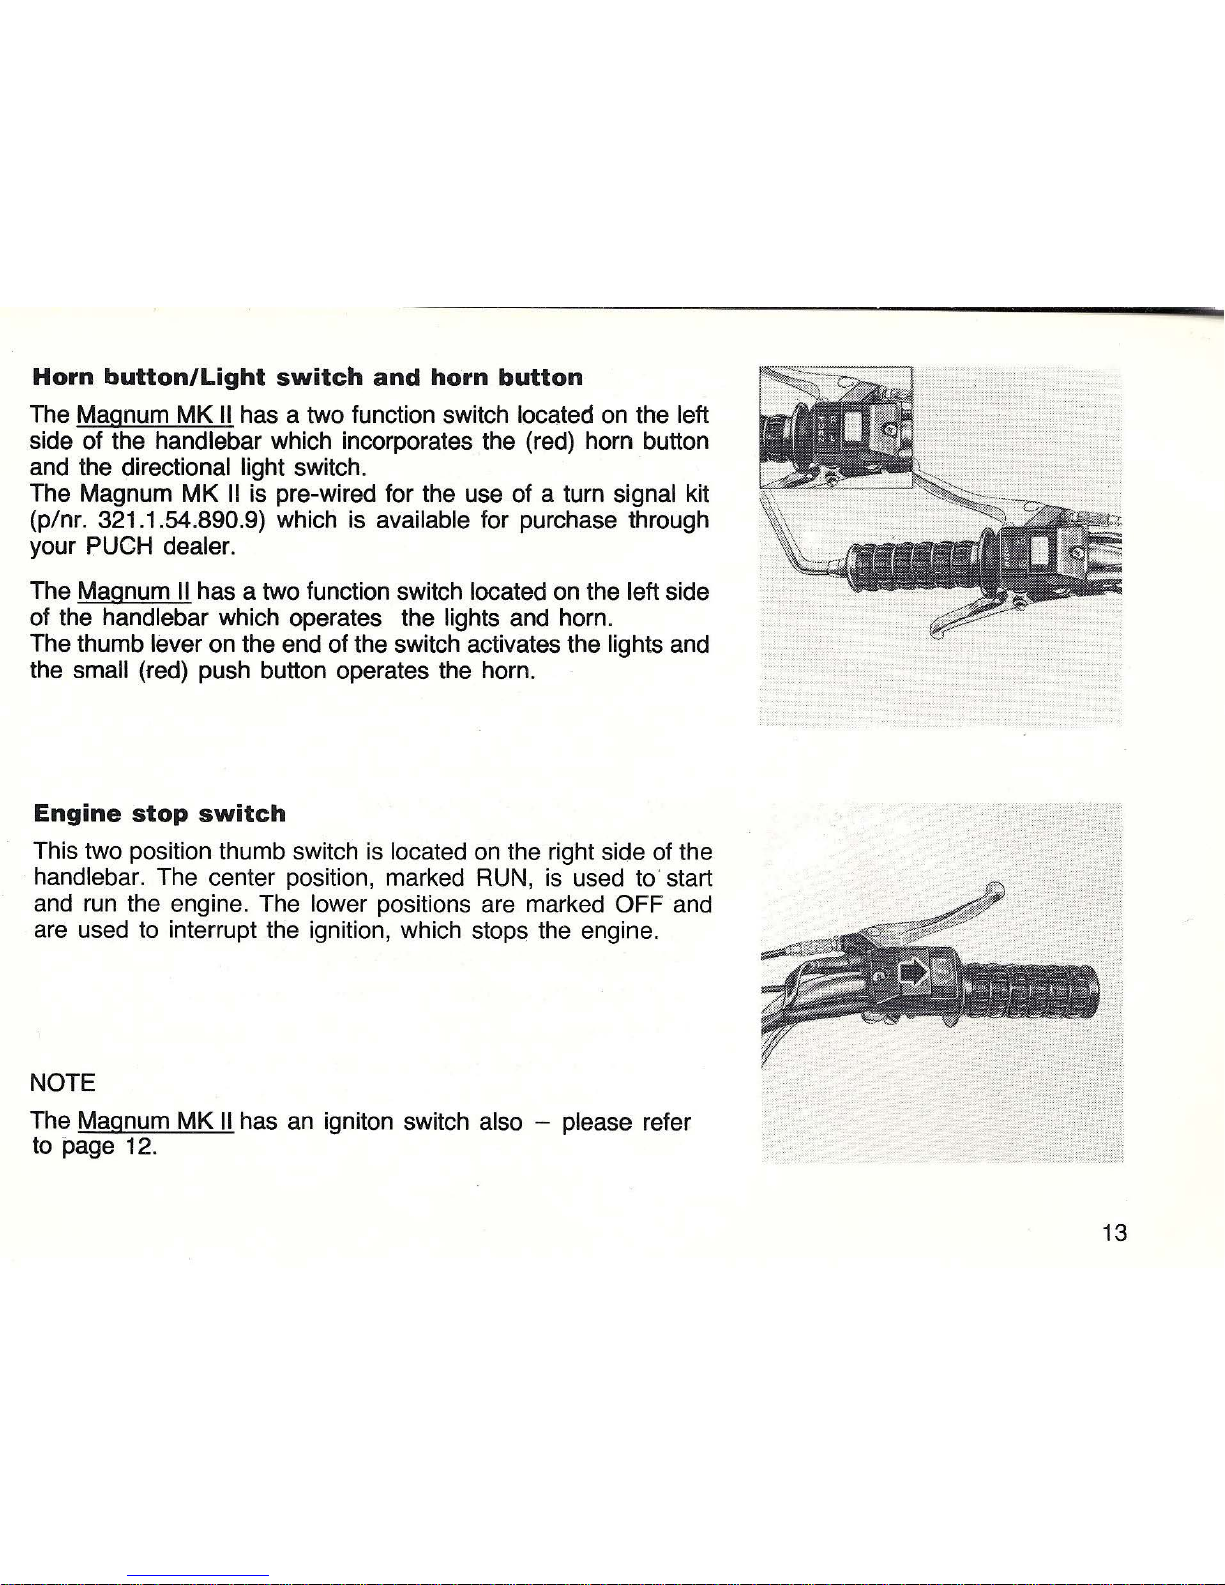
Horn
button/Light
switch
and
horn
button
The Magnum
MK
II
has a two function switch located on the left
side of the handlebar which incorporates the (red) horn button
and the directional light switch.
The Magnum
MK
II
is pre-wired for the use of a turn signal kit
(p/nr. 321.1.54.890.9) which is available for purchase through
your PUCH dealer.
The Magnum
II
has a two function switch located on the left side
of the handlebar which operates the lights and horn.
The thumb lever on the end of the switch activates the lights and
the small (red) push button operates the horn.
Engine
stop
switch
This two position thumb switch is located
on
the right side of the
handlebar. The center position, marked RUN, is used to·start
and
run
the engine. The lower positions are marked OFF and
are used to interrupt the ignition, which stops the engine.
NOTE
The Magnum
MK
II
has
an
igniton switch also -please refer
to page 12.
13

14
C)
TIRE
PRESSURE
Recommended ti(e pressure
Front 26 psi
(1
.8
bar)
Rear 32 psi (2.25 bar)
D)
OIL,
GAS/OIL
MIXTURE
Checking
transmission
oil
level
The oil level control screw
(1)
on
the 2-speed automatic,
is
located
on
the clutch cover. The oil filler hole (2) is trough the top
of the right crankcase half. The drain plug (3) is located
on
the
lower portion of the right crankcase half.
91/2
fl.
oz
. (280
cc)
of ATF "TYPE
F"
is
used for refill.
CAUTION
The moped must
be
upright when filling oil. Do not overfill. Leave
oil level control screw removed until excessive ATF drains off.
Oil change after the first 300 miles of operation is highly recom-
mended.

-------
--
---
--
-----
--------
---
-
--
Filling
up
with
two
stroke
mixture
Gas/oil mixture
on
model without
oil
pump-
Magnum
II
The
Magnum
II
engine must
be
run
with a gas/oil mixture
(regular gas). The recommended mixing ratio
is
50:
1when using
speci
al
Maxi Mix two stroke moped
oil.
If
another
oil
is
used
please refer to the fuel mixing chart.
NOTE:
DO
NOT
USE
UNLEADED GASOLINE r
50
: 1 OIL MIXING TABLE WI
TH
PUGH
MAXI MIX
To
5 gallons gasoline
add
12
fl.
oz. (355 cc)
oil
To
1 gallon gasoline
add
2,4
fl.
oz.
(71
cc) oil
To
1 quart gasoline add
,6
fl.
oz
. (18
cc)
oil
NOTE
To
reduce carbon build-up within the engine
and
exhaust system,
we
strongly recommend
the
use of the special 2 stroke
MAXI
MIX oil,
50
: 1 ratio. However
as
an
emergency measure,
a regular 2 stroke
oil
can
be
mixed in a
25
: 1 ratio
as
shown
below.
25
: 1 OIL MIXING TABLE WITH REGULAR TWO STROKE OIL
To
5 gallons of gasoline
add
24
fl.
oz
.
(71
0 cc) oil
To
1 gallon
of
gasoline
add
4,8
fl.
oz.
(142 cc) oil
To
1 quart of gasoline
add
1
,2
fl.
oz.
(36 cc)
oil
15

16
Us\ng
cup
to
measun~
gasl
o\\
m\x\ng
ra\\o
MAGNUM
n lwithout
oi1
pump)
When measuring
oil
for the gas/oil mixture, use
one
cupful
of
Maxi Mix
to
one gallon
of
fuel.
NOTE: When using other grades of 2 stroke oil, please refer
to
previous page.
MAGNUM MK
II
only (with
oil
pump)
Use
pure regular grade gasoline only. Check
oil
level
in
the
oil
tank each time
you
refuel your machine.
CAUTION
If oil level
in
oil
tank drops to half, top off with Maxi Mix.
Should
you
notice that
no
oil
is
passing through
oil
feeder hose,
although sufficient
oil
is
in
tank, stop engine. Drain gas
and
refuel
with gas/oil mixture. See
Oil
Mixing Table
on
page
15.
WARNING
NEVER REFUEL WITH THE ENGINE RUNNING!
DO
NOT SMOKE
OR
ALLOW OPEN FLAMES
OR
SPARKS
IN
THE AREA, WHERE YOUR MOPED
IS
REFUELED
AND/OR WHERE GASOLINE
IS
STORED!

E)
OPERATING
INSTRUCTION
1. Prop the moped
on
its stand.
2. Unlock fork.
3. Magnum MK
II
only. Turn
on
ignition -
1st
step to the right
on
the switch.
4.·Turn fuel valve
to
the
ON
position.
5.
Be
sure that the engine stop switch
is
in
the
RUN
position.
6.
If
engine
is
cold, depress the choke and depress
the
primer
button on the carburetor until fuel drips from carburetor.
CAUTION:
After completing step 6
do
not open the throttle
control,
as
this will deactivate the choke. After the engine
has
started
and
warming
up,
open throttle gently to the full
position briefly. This will disengage choke. Avoid racing
engine.
7. Keep both hands
on
the handlebar with the weight
of
the
moped centered
on
the
front wheel. Apply the front brake
and
fully depress the starting lever located
on
the left side of the
handlebar. Position the pedal approx. parallel
to
the chain
guard. While holding the starter lever, push the pedal to start
engine.
8. Alternate starting method:
The moped may also
be
started
by
pedalling
as
a bicycle.
When momentum has been gained, pull the start lever
and
gently open the throttle. Release the start lever after the
engine starts.
1
17
18
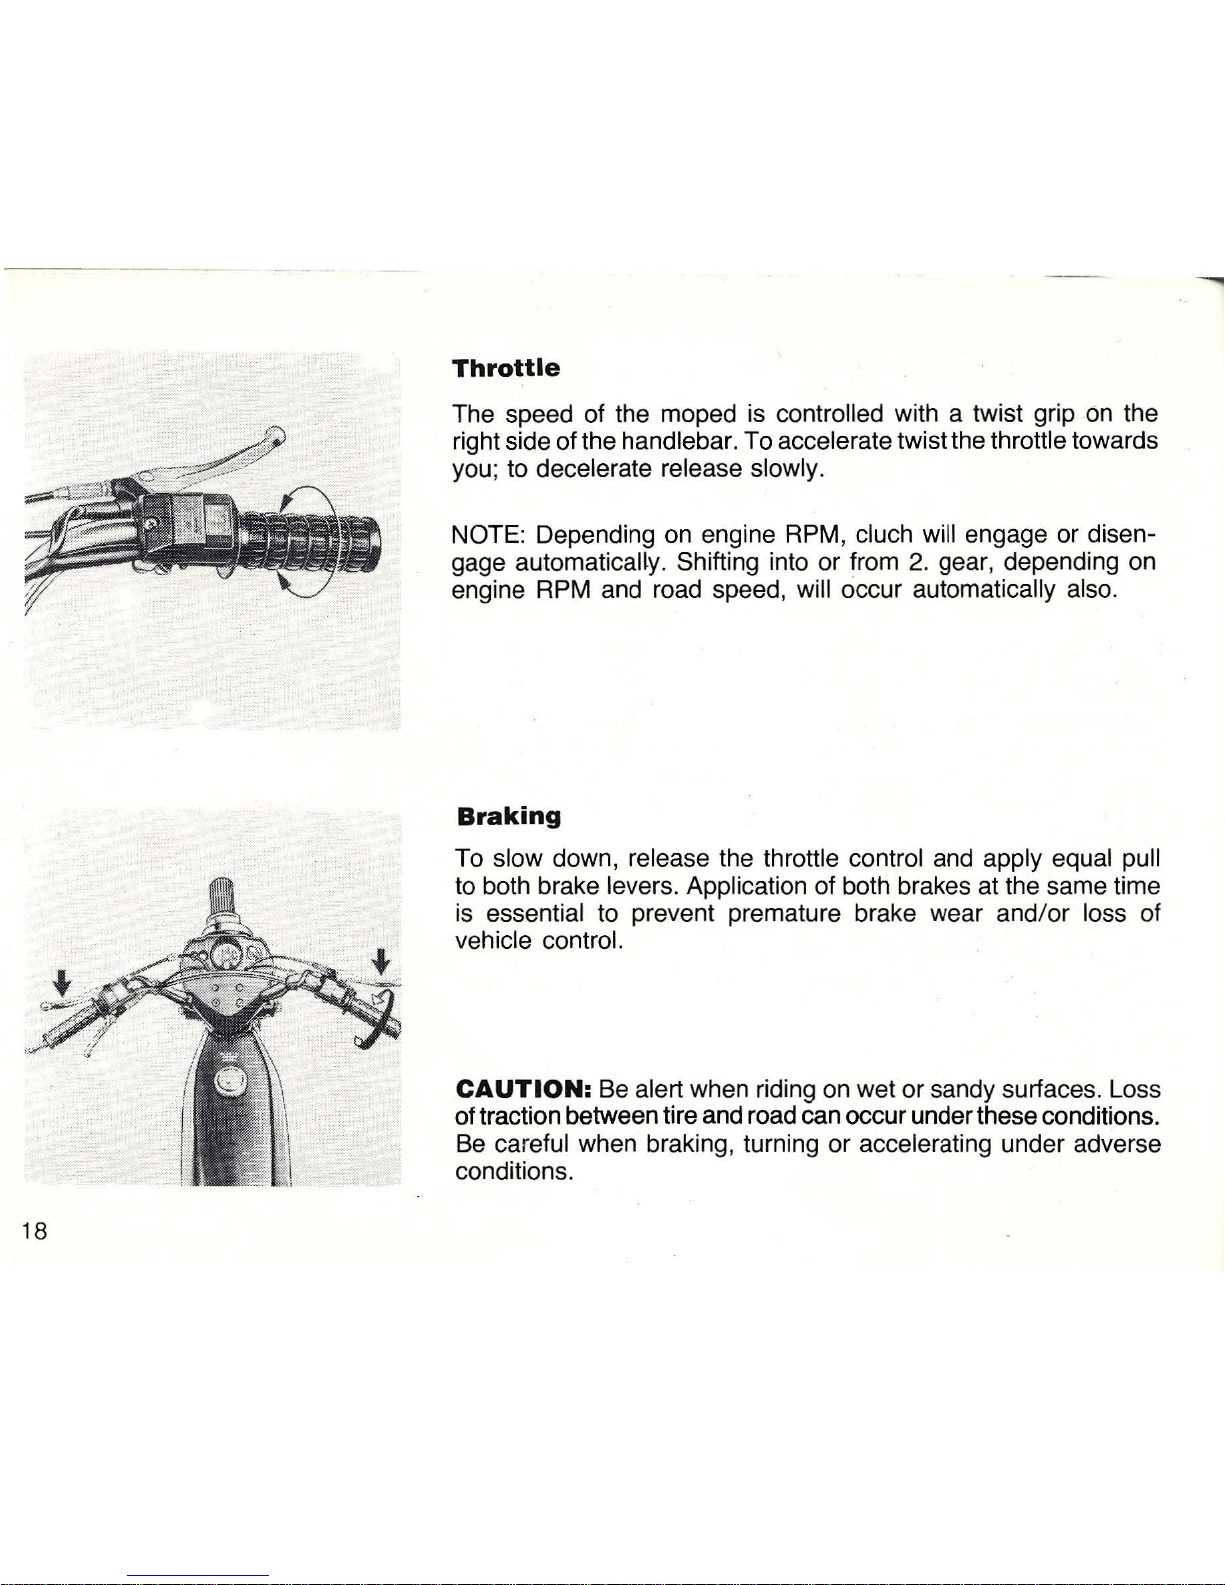
Throttle
The speed of the moped is controlled with a twist grip on the
rightsideofthe handlebar. To accelerate twistthe throttle towards
you; to decelerate release slowly.
NOTE: Depending on engine RPM, cluch will engage or disen-
gage automatically. Shifting into or from
2.
gear, depending on
engine RPM and road speed, will occur automatically also.
Braking
To slow down, release the throttle control and apply equal pull
to both brake levers. Application of both brakes at the same time
is essential to prevent premature brake wear and/or loss of
vehicle control.
CAUTION:
Be alert when riding on wet or sandy surfaces. Loss
oftractionbetweentireandroad can occurundertheseconditions.
Be careful when braking, turning or accelerating under adverse
conditions.

To
stop
and
park
Release the throttle and simultaneously apply both brakes to stop.
Switch off engine with stop switch..
Magnum MK
II
only. Turn off ignition
and
remove key.
Close fuel valve.
Rest moped
on
stand
and
lock.
Securing
your
moped
Please refer to page
9.
A high security locking device
is
recommended. See your Puch
dealer for advice.
WARNING
After the engine has been
run
, the exhaust pipe and muffler
will become hot, avoid contact with them.
1
19
Table of contents
Other Puch Motorcycle manuals


