Pulsar PTG1220DBM User manual

Gasoline Powered Lawn Mower
OPERATOR’S MANUAL
Model: PTG1220DBM

You may contact Midland directly at 1-877-528-3772
for product and accessory information and help
finding a dealer. To register your product please
register online at: www.midlandpowerinc.com
Warning
Important:
Propsition 65 Warning
The engine exhaust from this product contains
chemicals known to the State of California to cause
cancer, birth defects, or other reproductive harm.
Imp-
ortant

Do not operate this machine while under the influence of
alcohol or drugs.
Uneven terrain could cause a slip or fall resulting
in severe injury.
Poor footing could cause a slip or fall.
the engine
Disconnect the spark plug wire and ground the
center electrode to a metal part of the engine.
(if equipped)
WARNING
fuel
gasoline-powered
help ensure

Setup
Folding or unfolding the handle improperly can
damage the cables, causing an unsafe operating
condition.
Product Specification
Side Discharge Installation
1. Insert bolts into the deck and side discharge hole with
2 x M6 x20 flange bolts and fasten it with 2 x M6 screw
nuts. Fig. 5
Component
Rated Speed
Displacement
Cutting Width
Height Adjustment
Wheels
Weight
Safety & Instruction Decals
Important: Safety & instruction decals are located near
areas of potential DANGER. Replace damaged decals.
1. WARNING: Read the Operator’s Manual.
2. Thrown Object Hazard: Keep bystanders a safe distance
from the mower.
3. Cutting/Dismemberment Hazard of Hand or Foot, Mower
Blade: Disconnect the spark plug wire and read the
instructions before servicing or performing maintenance.
4. Cutting/Dismemberment Hazard of Hand or Foot, Mower
Blade: Stay away from all moving parts and keep all
guards and shields in place.
5. Cutting/Dismemberment Hazard of Hand or Foot, Mower
Blade: Do not mow up and down slopes, only mow
across; stop the mower and engine, pick up debris before
operating; look behind and down before reversing.
·Do not pinch or bend the cables when folding or
unfolding the handle.
·If a cable is damaged, contact an Authorized Service
Center by calling 1-877-528-3772.
Specification
2800RPM
150cc
20”
Toolless Height Adjustment
7” Front 7” Rear
lbs
3
Fig. 1
Fig. 3
Handle Installation
1. Align lower handle section with rear bracket pins, then
insert cotter pins to secure.
.
2. Position the upper mower handle to match the lower
handle pre-drilled holes. Insert the bolt with a washer and
handle knobs. Hand tighten to secure the handle.
1. Install the washer wheels and nuts onto the
bolts. Fig. 3
2. Then place wheel cover by tapping it in.Fig. 4
Fig. 4
Fig. 5
Fig. 2
Wheel Installation
WARNING
flange

5
2
1
3
4
Product Overview
2. Fuel Tank Cap
4. Height Adjustment
Checking the Engine Oil Level
Service Interval: Before each use.
1. Remove dipstick, wipe it clean, and fully re-insert it,
check to see if oil is needed by the oil mark that is left
on the dipstick. (Fig. 9)
Remove the dipstick and check the oil level (Fig. 9) If
the oil level is low on the dipstick, slowly pour oil into
the oil fill hole to raise the oil level to the full range on
the dipstick. Do not overfill. Max fill 1 oz (0.4 L),
type SAE 30 weight oil with an API service rating
of SF or higher.
Install the dipstick and tighten the screw threads.
Fig. 9
4
Fig.6
1. Air Filter
3. Oil Fill / Dipstick
5. Handle Loosening Knob
Operation
Filling the Fuel Tank
Gasoline is extremely flammable with explosive vapors.
A fire or explosion from gasoline can burn you or others.
To prevent a static charge from igniting the gasoline,
place the container and/or mower directly on the
ground before filling, not in a vehicle or on an object.
Fill the tank outdoors when the engine is cold; wipe
Do not handle gasoline while smoking or near open
flame or sparks.
Store gasoline in an approved fuel container, out of
the reach of children.
Fill the fuel tank with fresh unleaded regular gasoline
from a filling station. (Fig. 8)
Important: To reduce starting problems, add fuel
stabilizer to the fuel, mixing it with gasoline less than
30 days old. (Fig. 8)
up spills.
Attachments / Accessories
A selection of Pulsar approved attachments and
accessories are available for use with the machine to
enhance and expand its capabilities. Contact your
Authorized Service Center or Distributor.
Filling the Engine with Oil
Your mower engine does not come filled with oil. Use
SAE 30 engine oil
1. Remove the dipstick. (Fig. 7)
2. Slowly pour oil into the dipstick/fill hole until the oil level
Fig. 7
Fig. 8
WARNING

Cutting Height Adjustment
Adjusting the cutting height may bring you into
contact with the moving blade, causing serious injury.
·Stop the engine and wait for all the moving parts
to stop.
·Do not put your fingers under the mower deck when
adjusting the cutting height.
Starting the Engine
2. Hold the blade control bar (Fig. 11) against
the handle.
Important: When you release the blade control bar, both
the engine and the blade should stop within 3 seconds. If
they do not stop properly, stop using your mower
immediately and contact an authorized service center.
5
If the engine has been running, the muffler will be hot
and can severely burn you. Keep away from the hot
muffler.
Adjust the cutting height as desired. Set all four wheels
to the same height.
TO ADJUST CUTTING HEIGHT (Fig. 10)
Raise wheels for low cut and lower wheels for high cut,
adjust cutting height to suit your requirements. Medium
position is best for most lawns.
Tochange cutting height, pull adjuster lever toward wheel.
Move wheel up or down to suit your requirements.
Be sure all wheels are in the same setting.
NOTE: Adjuster is properly positioned when plate tab inserts
into hole in lever. Also, 5-position adjusters (if so equipped)
allow lever to be positioned between the plate tabs.
LEVER
PLATE
TAB
Fig. 10
Fig. 11
Fig. 12
Note: If the mower does not start after several attempts,
please contact your authorized service center.
Stopping the Engine
To stop the engine, release the blade control bar (Fig.13)
Fig. 13
WARNING
WARNING
FRONT WHEEL: Move lever forward to raise mower
Move lever rearward to lower mower
REAR WHEEL: Move lever backward to raise mower
Move lever forward to lower mower
1.Press the primer three times
3. Hold blade control bar then pull the cord to start
the mower. (Fig. 12)
Primer

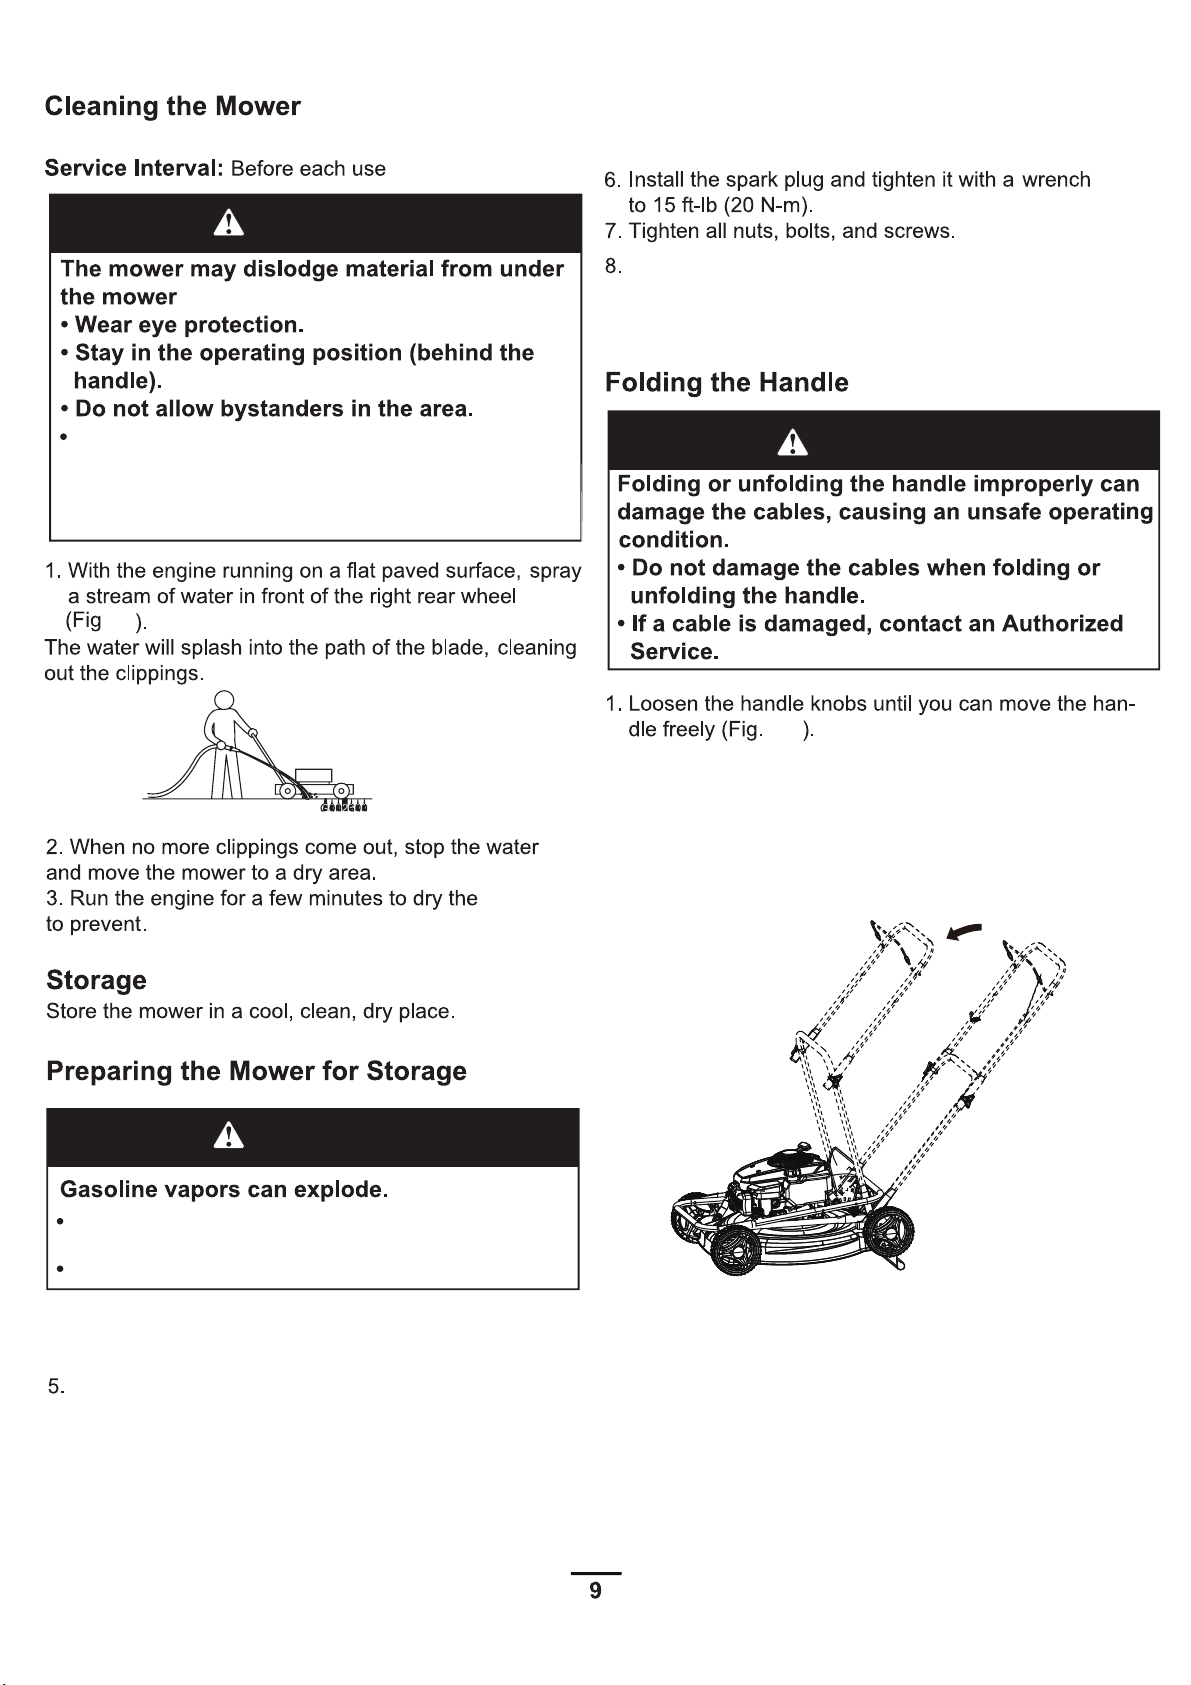
A worn grass catcher could allow small stones and
or
bystanders direction and result in serious personal
injury or death to the operator or bystanders.
The blade is sharp. Contact with the blade can cause
serious personal injury.
Stop the engine and wait for all moving parts to stop
before leaving the operating position.
Operating Tips
General Mowing Tips
Clear the area of sticks, stones, wire, branches, and
other debris that the blade may hit.
Avoid striking solid objects with the blade. Never
deliberately mow over an object.
If the mower strikes an object or starts to vibrate,
immediately stop the engine, disconnect the spark
plug cable and examine the mower for damage.
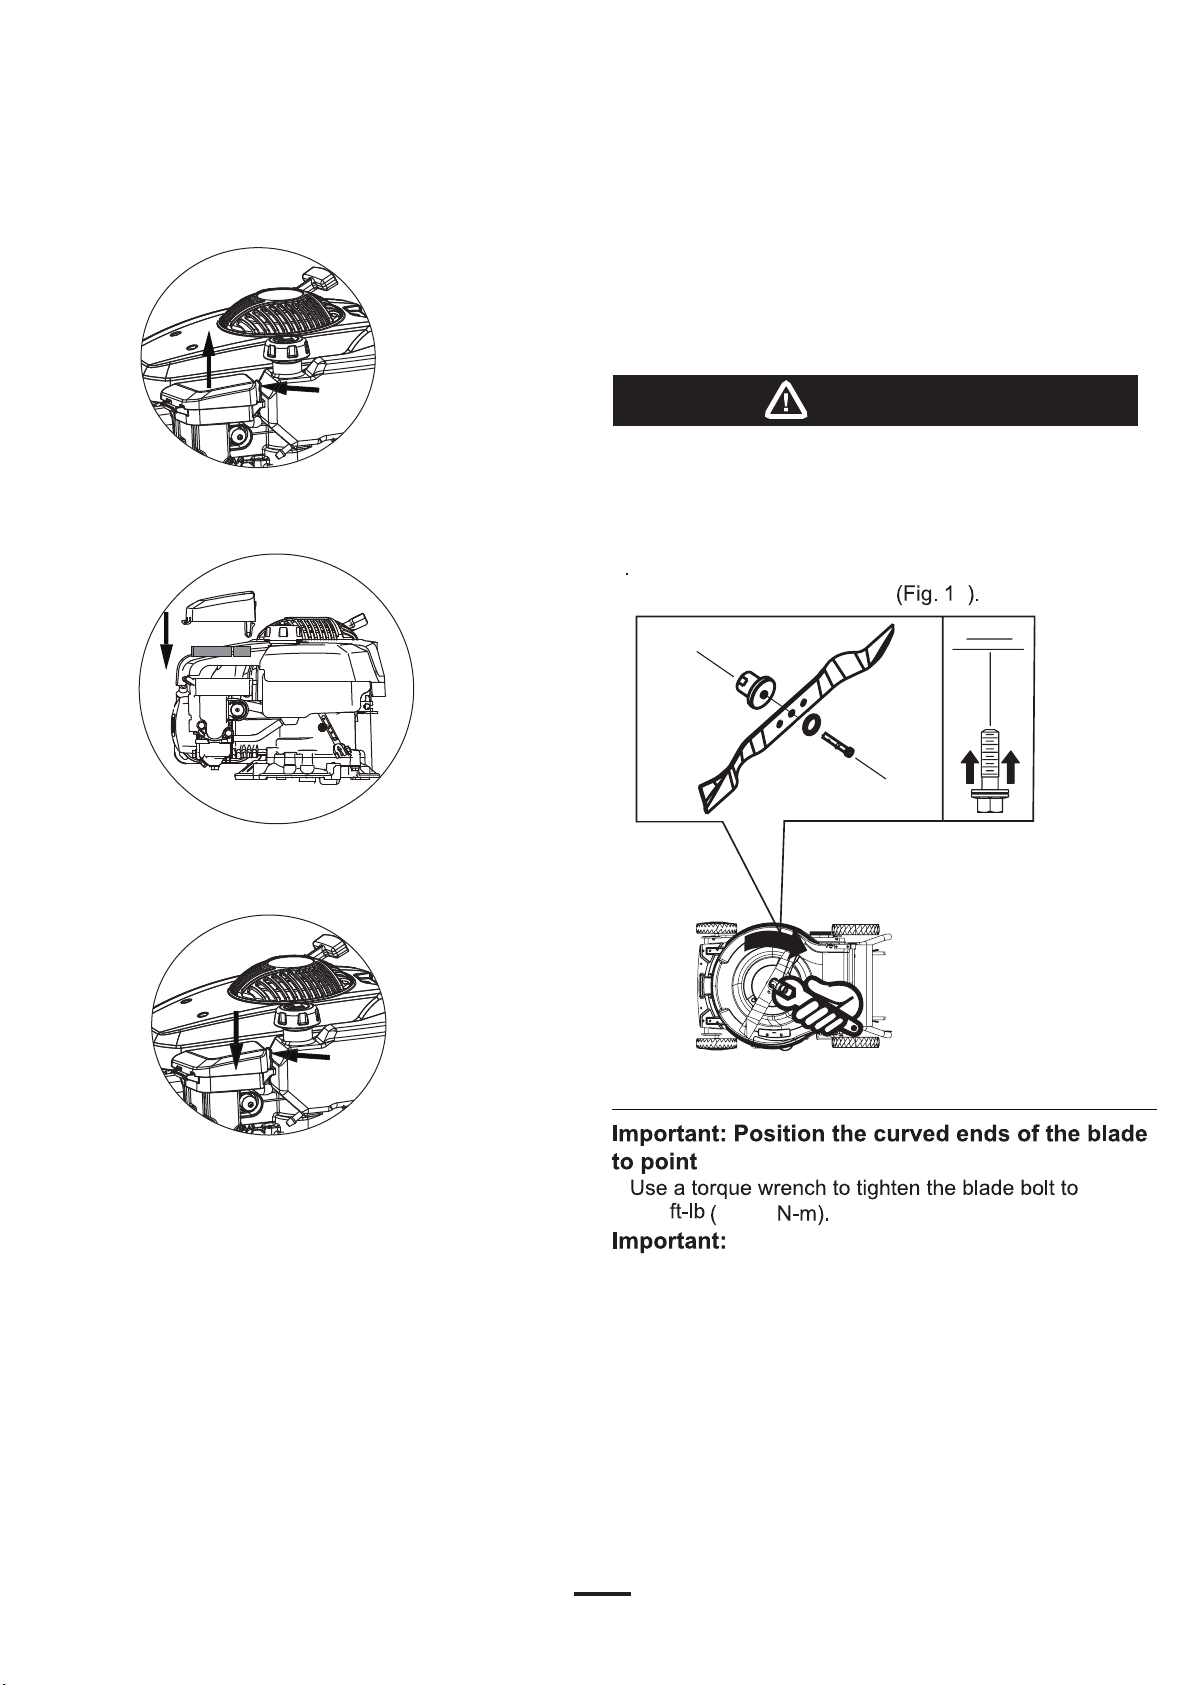
Replace the blade when necessary with a genuine
Pulsar replacement blade.
Cutting Grass
When cutting grass over 6 inches tall, mow at the
highest cut setting and proceed slowly. After the first
pass, set your cutting height as desired and mow the
area again.
Wet grass or leaves can cause serious injury if you
slip and contact the blade. Mow only in dry conditions.
6
Alternate the mowing direction. This helps disperse
the clippings over the lawn for even fertilization.
If the finished lawn is unsatisfactory, try one or more
of the following.
Replace the blade or have it sharpened.
Walk at a slower pace while mowing.
Raise the cutting height on your mower.
Cut the grass more frequently.
Overlap cutting swaths instead of cutting a
full swath with each pass.
High Altitude Operation
Most small engines with carburetors are designed to
work efficiently from sea level to around 5,000 feet
elevation. As altitude increases, the air becomes thinner
with less available oxygen. This causes the air/fuel
mixture to become overly rich which can cause reduced
performance, spark plug fouling, difficult starting and
increased emissions.
A competent small engine shop can modify the carburetor
altitude operation. If your lawn mower is typically operated
at an altitude of 5,000 feet or above, you should ask your
mixture to maximize performance at the altitude where it
is to be used. You will realize better overall performance,
while reducing excess emissions that occur when the
air/fuel mixture is too rich. This modification need only
be done once and should last for the life of the mower.
Keep in mind that any engine, even with properly
calibrated carburetor jets, will realize a decrease in
horsepower of about 3.5% for every 1,000 feet
(300 meter) increase in altitude, simply due to thinner
air. But an engine with a properly jetted carburetor will
always run cleaner and more efficiently at high altitude
than an identical unit with standard jets.
WARNING
WARNING
WARNING

Spark Plug Maintenance
1. Once the engine has cooled, remove the spark plug wire.
2. Remove the spark plug using a spark plug wrench.
3. Clean the spark plug with a wire brush (not supplied).
4. Using a feeler gauge set the gap to 0.75mm.
5. Install the spark plug carefully by hand, to avoid cross-threading.
6. After the spark plug is seated, tighten with the spark plug wrench to compress the washer.
operator position.
Customer Service
Online: www.midlandpowerinc.com
E-mail: [email protected]
Toll Free: 1-877-528-3772
To order parts, receive warranty assistance, or other service inquiries, contact us at:

The blade is sharp. Contact with the blade can result
in serious personal injury.
·Disconnect the spark plug wire.
·Wear heavy gloves when servicing the blade.
8
Replacing the Blade
Service Interval: Yearly
Important: You will need a torque wrench to install the
If you do not have a torque wrench or are
uncomfortable performing this procedure, contact an
Authorized Service Center.
Examine the blade whenever the mower runs out of fuel.
If the blade is damaged or cracked, replace it immediately.
If the blade edge is dull or nicked, have it sharpened or
replace it.
Fig. 14
2. Replace the air filter element. (Fig.15)
Fig. 15
4. Install new blade with all mounting hardware; tighten
blade bolt by turning clockwise.
5.
Replacing the Air Filter
Service Interval: 25 Hours
2
1
Fig. 16
Fig 17
WARNING
up toward the mower deck.
40-50
30-38
7
Correct blade hub bolt torque is very
important. Use proper tools only!
blade properly.
1.Unlock the latch (1) and pull upward to open the air filter
compartment (2). (Fig.14)
3.Press down and lock the latch on the air filter
compartment. (Fig.16)

STORAGE
Do not store the mower in an enclosed area,
near any source of ignition (flame, spark, etc)
Allow the engine to cool before storing it.
Leave spark plug cable disconnected.
1. Loosen handle knobs.
2. Move handle forward and fold it as shown.
Fig. 19
Fig. 18
18
deck
19
deck.
WARNING
WARNING
WARNING
4. Always add fuel atabilizer to the fuel as directed by
the
fuel stabilizer manufacturer.
Do not turn the lawn mower over, or fuel
and oil will leak, causing a hazardous
condition and possible malfunction of the
lawn mower
Remove spark plug and spray a light fog of penetrating
oil, such as WD-40 into the spark plug hole; Then pull
the starter rope……..
Table of contents
Other Pulsar Lawn Mower manuals

Pulsar
Pulsar PTG1221T User manual

Pulsar
Pulsar PTG1221SE User manual

Pulsar
Pulsar PTG1221 User manual

Pulsar
Pulsar PTG1221SA2 User manual

Pulsar
Pulsar PTG12205 User manual

Pulsar
Pulsar PTG12205BM User manual

Pulsar
Pulsar PTG1220D5A User manual

Pulsar
Pulsar PTG1221S User manual

Pulsar
Pulsar PTG1221A2 User manual

Pulsar
Pulsar PTG1220D5 User manual