Purkeys SafeFreight User manual

DELIVERY TRUCK ALARM
INSTALLATION GUIDE
300-6 Doc 3.01


1
P: 479.419.4800 | F: 479.419.4801 | www.purkeys.net
CONTENTS
General Information ..........................................................................................2
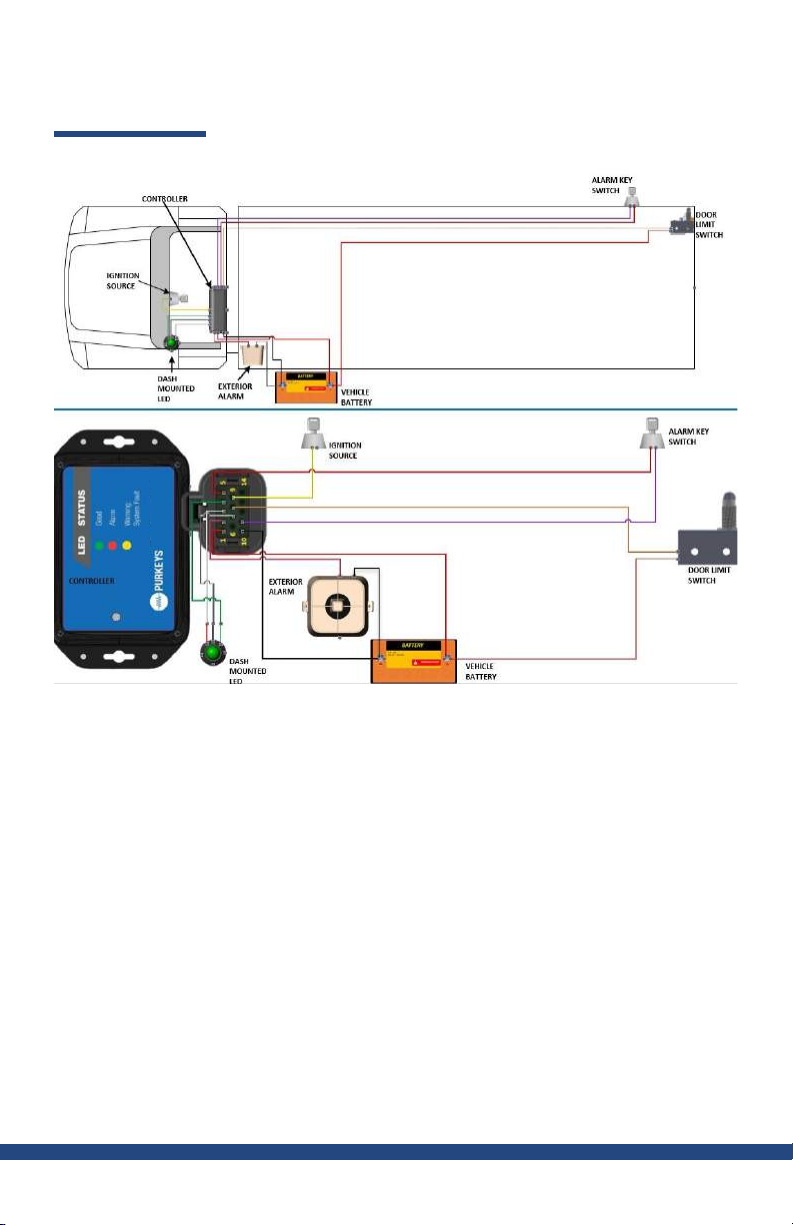
Diagram...............................................................................................................3
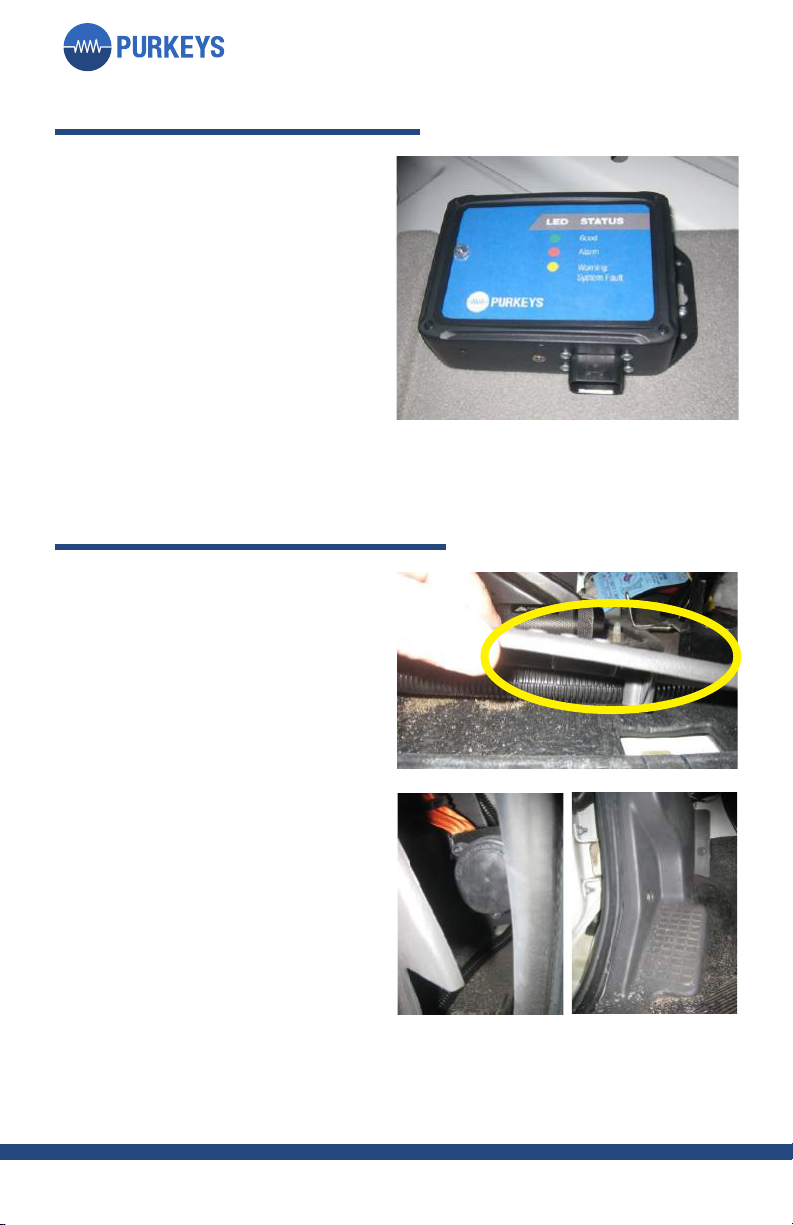
Module Installation............................................................................................4
Main Harness Routing.......................................................................................4
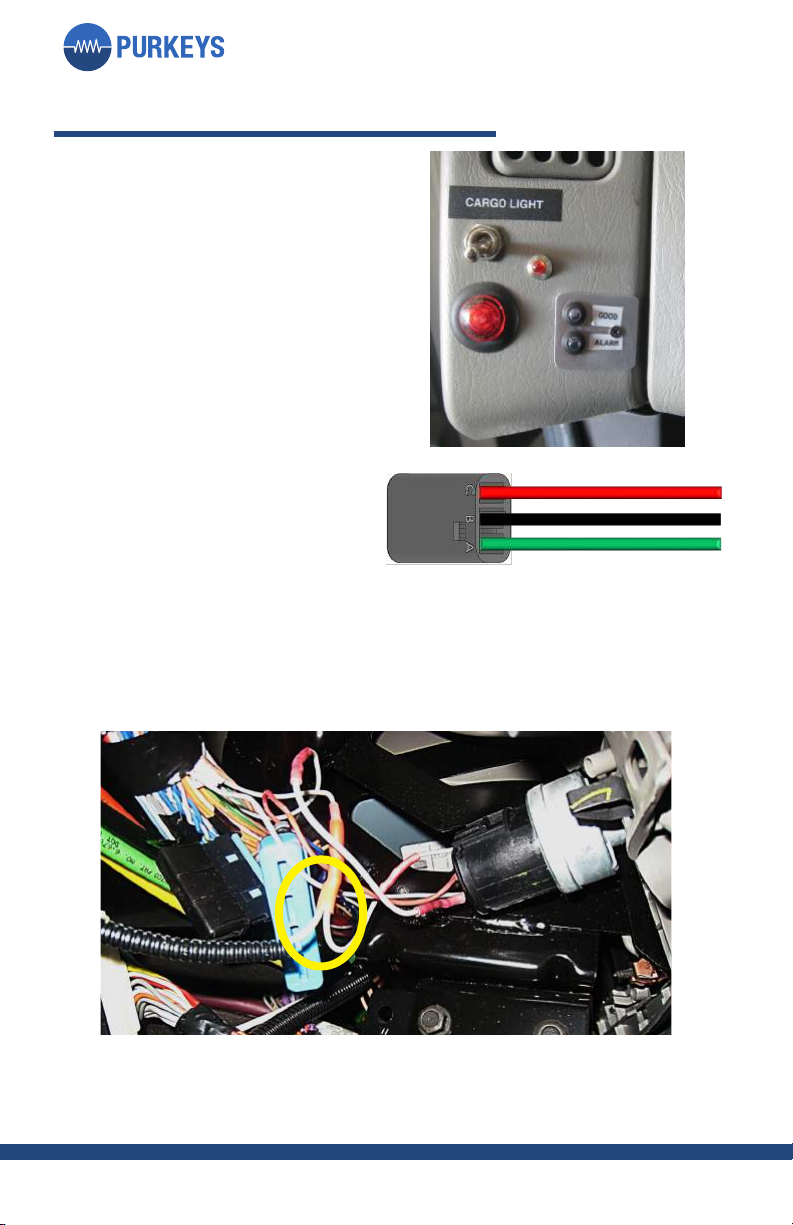
LED/Ignition Installation..................................................................................6
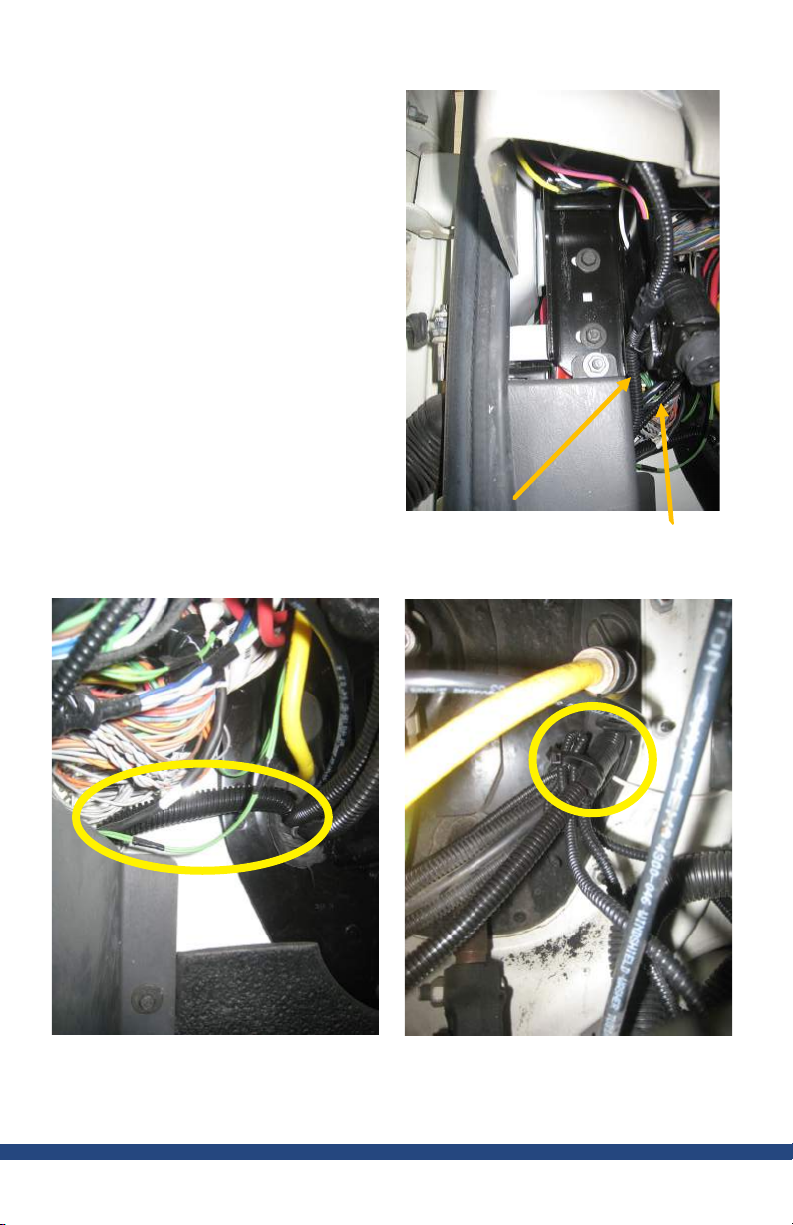
12 Volt Power and Buzzer Installation.............................................................7
Main Harness/Sensor Power Routing..............................................................8
Key Switch Installation ......................................................................................9
Key Switch/Door Sensor Wiring....................................................................10
Door Limit Switch............................................................................................11
LED Alarm Logic .............................................................................................12
Part List..............................................................................................................15
Limited Commercial Warranty Policy...........................................................19

2
e Purkeys SafeFreight delivery truck alarm system provides an audible
alarm if the roll-up door on a vehicle is opened without authorization.
GENERAL INFORMATION

3
P: 479.419.4800 | F: 479.419.4801 | www.purkeys.net
SAFEFREIGHT INSTALLATION GUIDE
DIAGRAM

4
MAIN HARNESS ROUTING
Step 1: Li up the door trim that
runs along the driver door.
Step 2: Begin routing the harness
under the seat belt, along the
track where the door trim will be
replaced back and through behind
the kick panel of the truck.
Installation Complete.
Seat Belt Kick Panel
MODULE INSTALLATION
Step 1: Locate a spot behind the
driver seat to mount the control
module.
Step 2: Use mounting screws to
fasten the module to the truck.

5
P: 479.419.4800 | F: 479.419.4801 | www.purkeys.net
SAFEFREIGHT INSTALLATION GUIDE
Step 3: All wires with exception of
the LED wires and Ignition wire
will travel through the rewall.
Harness pushed through rewall grommet already on truck.
LED Wires Ignition Wire
Installation Complete.

6
LED/IGNITION INSTALLATION
Step 1: Locate a spot on the
dashboard of the vehicle where the
driver can see the LED, but not be
distracted by it while driving. Drill
an appropriate hole to place the
LED.
Step 3: Identify a good ignition source by identifying a wire that gets power
AFTER the vehicle key is placed in ignition/on position.
Step 4: Splice the wire labeled Ignition from the main harness to the wire
found from previous step.
Installation Complete.
Yellow ignition wire spliced into ignition switch.
Step 2: Plug the LED wires into the
connector as shown.
A - Green
B - Black
C - Red

7
P: 479.419.4800 | F: 479.419.4801 | www.purkeys.net
SAFEFREIGHT INSTALLATION GUIDE
12 VOLT POWER AND BUZZER INSTALLATION
Step 1: Connect the two wires from the main harness that are labelled Module
Power, to the closest battery power and ground sources available. Make sure
to route wires out of the way of moving parts.
Step 2: Mount the buzzer in a
location outside the truck that
is between the truck cab and the
truck battery box.
Step 3: Connect the buzzer ground to the truck battery ground and the
positive to the main harness (quick connector).
Installation Complete.

8
Step 2: Route the wires down the channel of the truck. Wire tie with existing
wires or fasten wires with provided clamps. Avoid sharp edges.
Step 1: Take the jacketed two-conductors and connect one end to the truck
batteries. Remove fuse from fuse holder until aer installion of the door
sensor. Aer doing so, take the conductor and group it with the wires that
are le to be routed from the main harness (key switch wires, and door
sensor wire).
MAIN HARNESS/SENSOR POWER ROUTING
Installation Complete.

9
P: 479.419.4800 | F: 479.419.4801 | www.purkeys.net
SAFEFREIGHT INSTALLATION GUIDE
Step 1: Find a good spot on the side of the truck near the back where the door
access key will be installed.
Step 2: Drill a hole that the key switch can be mounted through.
Step 3: Install the key switch in the
hole.
KEY SWITCH INSTALLATION
Installation Complete.

10
Step 1: If wiring was routed from
inside of the box of the truck,
bring the wiring down to the
bottom of the box. ere is a red
wire, purple wire, and orange wire,
in addition to a two-conductor
cable with red and black wires
for the door sensor. If wiring was
routed outside of the box truck
all the way to the back, a hole
will need to be drilled in the area
described (very back of the box by
the door rail).
Step 2: e red and purple wires
should have the mating connector
to the key switch added (wires
have been preterminated). en
connect the two connectors
together. Use supplied clamps to
reinforce routing of wire.
KEY SWITCH/DOOR SENSOR WIRING
Installation Complete.
Note: All wires have been preterminated to eliminate crimping. Extra
terminals have been supplied in case terminals are damaged during wire/
cable routing.

11
P: 479.419.4800 | F: 479.419.4801 | www.purkeys.net
SAFEFREIGHT INSTALLATION GUIDE
DOOR LIMIT SWITCH
Step 1: Find a suitable location to
mount the Limit Switch. e
design is made to accommodate
having a switch mounted at the
bottom of the door, but the switch
can be mounted anywhere.
Step 2: Mount the Limit Switch with
the bracket.
Step 3: Locate and position the
press-down plate in a location of
the door where the plate will push
the switch down when the door
is closed. Mount the press-down
plate to the door of the truck.
Step 4: Open and close the door multiple times. Verify that the spot located in
the picture below is pressed down onto the switch when the door is down.
Adjust as needed.
Note: e push-down plate should rest on switch with the door closed enough
to push the circular knob down into the switch.
Step 5: Crimp the orange wire from the main harness to the orange wire on
the door switch. Crimp the red wire from the black conductor to the red
wire on the door switch. Solder and heat shrink each connection.
Installation Complete.

12
LED/Alarm Status
Logic
Inside Cab Outside Cab
Green LED
blinking
Green light
blinking
Default OKAY Conditions:
Ignition .................................................................................................. O
Door Access Key................................................................................... Armed
Door (sensor)........................................................................................ Closed
Siren Status............................................................................................ Okay
Door Sensor Status............................................................................... Okay
Buzzer
warning
Red LED
ashing
Alarm siren
sounds
Red light
ashing
Alarm Conditions: Door Open without Door Access Key
Ignition ................................................................................................. O
Door Access Key................................................................................... Armed
Door (sensor)........................................................................................ Open
Siren Status............................................................................................ Okay
Door Sensor Status............................................................................... Okay
Green LED
blinking
Green light
blinking
Cargo Loading Conditions: Okay
Ignition ................................................................................................. O
Door Access Key................................................................................... Disarmed
Door (sensor)........................................................................................ Open
Siren Status............................................................................................ Okay
Door Sensor Status............................................................................... Okay
LED LOGIC

13
P: 479.419.4800 | F: 479.419.4801 | www.purkeys.net
SAFEFREIGHT INSTALLATION GUIDE
LED/Alarm Status
Logic
Inside Cab Outside Cab
Buzzer
warning
Red LED
ashing
Alarm siren
sounds
Red light
ashing
Alarm Conditions: Ignition On while Door is Open
Ignition ................................................................................................. On
Door Access Key................................................................................... On or O
Door (sensor)........................................................................................ Open
Siren Status............................................................................................ Okay
Door Sensor Status............................................................................... Okay
Yellow LED
blinking
Yellow light
blinking
Siren Hardware Error:
Ignition .................................................................................................. O
Door Access Key................................................................................... Armed
Door (sensor)........................................................................................ Closed
Siren Status............................................................................................ Error
Door Sensor Status............................................................................... Okay
Yellow LED
blinking
Yellow light
blinking
Door Sensor Hardware Error:
Ignition .................................................................................................. O
Door Access Key................................................................................... Armed
Door (sensor)........................................................................................ Closed
Siren Status............................................................................................ Okay
Door Sensor Status............................................................................... Error

14
LED/Alarm Status
Logic
Inside Cab Outside Cab
Note: Alarm Condition and Alarm outputs are unchanged by hardware error detection.
However, when no alarm condition is present, the LEDs indicate the hardware error condition with blinking
yellow lights.
Solid green LED Solid green
LED
Truck ignition is on, door is closed, and the door access
key is armed.
For normal door access:
1. Turn the ignition o
2. Turn door access key to disarmed
3. Open the door
To secure the door:
1. Close the door
2. Turn door access key to armed
3. Turn the ignition on

15
P: 479.419.4800 | F: 479.419.4801 | www.purkeys.net
SAFEFREIGHT INSTALLATION GUIDE
PART LIST
Part # 800-23
Harness, Main for SafeFreight Alarm
Sytstem
Part # 800-24
Bag Kit, SafeFreight Alarm System
Terminal/Connectors
Part # 800-25
Harness, Door Sensor Power and
Ground
Part # 800-26
Assembly, SafeFreight Buzzer with
Pigtail Power and Ground

16
Part # 800-27
Assembly, Keyswitch for SafeFreight
Alarm
Part # 800-29
Asembly, Dashboard LED for
SafeFreight Alarm
Part # 800-80
Module, SafeFreight
Part # 800-100
Sub Assecbly, SafeFreight Plunger
Style Limit Switch w/Wires and
Brackets

17
P: 479.419.4800 | F: 479.419.4801 | www.purkeys.net
SAFEFREIGHT INSTALLATION GUIDE
Part # 300-6
Guide, Installation, Delivery Truck
Alarm System
Part # 800-106
Bag Kit, SafeFreight Cable Routing
and Mounting

18
NOTES
Table of contents
Popular Car Alarm manuals by other brands

Clifford
Clifford IntelliStart quick start

CrimeStopper
CrimeStopper CS-2002DPII Installation and operating instructions

Code Alarm
Code Alarm ELITE Series owner's guide

Audiovox
Audiovox Prestige Platinum 128-8549 owner's manual

Viper
Viper 671XV owner's guide

Prestige
Prestige Prestige 128-7853 installation manual