PZRacing Start Micro ST200-M User manual

Start Micro ST200-M
Manuale Utente – v1.0 – 21/09/2017
Installazione
N.B: ' IMPORTANT POSIZIONAR IL CRONOM TRO CORR TTAM NT P R ASSICURARSI UNA BUONA RIC ZION .
Il ricevitore GPS si trova nella parte superiore della scocca, per questo motivo è N C SSARIO POSIZIONAR IL CRONOM TRO IN
POSIZION V RTICAL o con un’angolazione massima di 45° in modo tale che la parte superiore del prodotto sia rivolta verso il cielo.
Non coprire il ricevitore GPS con parti metalliche o in carbonio in quanto sono materiali che schermano il segnale satellitare.
na volta trovata la posizione ideale si potrà fissare l’indicatore tramite l’apposito materiale adesivo che troverete nella confezione.
Utilizzo
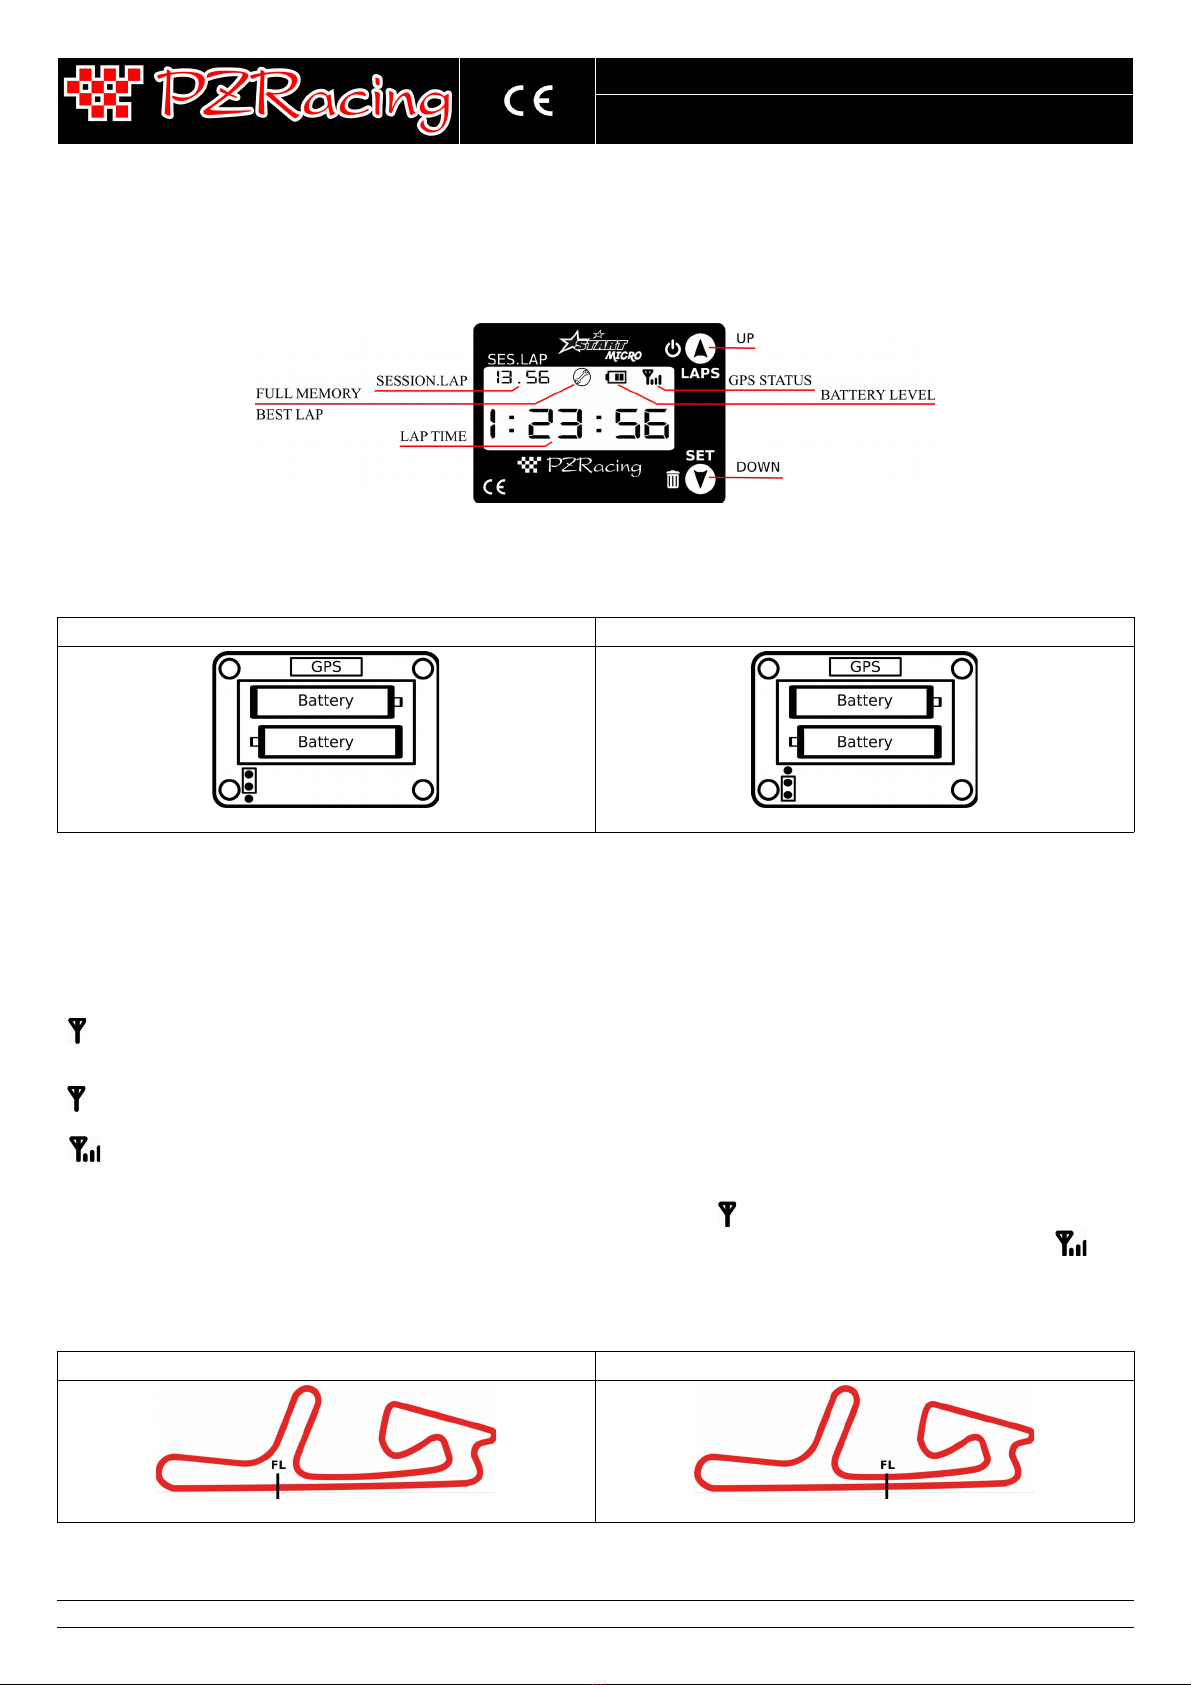
Impostazione della larghezza del traguardo: nel caso di utilizzo su kartodromo o pista di minimoto è necessario posizionare il “jumper” (che si
trova a fianco del porta batterie) inserendolo nei due pin più lontani alle batterie.
Nel caso in cui il “jumper” si trovi nei due pin vicini alle batterie oppure non venga inserito verrà impostata la larghezza del traguardo per gli autodromi
(DEFA LT).
AUTODROMI (default) KARTODROMI - MINIMOTO
Accensione: tenere premuto per circa due secondi il tasto P fino a quando non comparirà la scritta START (LAP TIME) e la versione del firmware
installata (SESSION.LAP); in seguito rilasciare il pulsante, il cronometro entrerà nella schermata principale in attesa di agganciarsi ai satelliti.
Spegnimento: tener premuto per circa due secondi il tasto P fino a quando non comparirà la scritta OFF (LAP TIME). Nel caso in cui non venga
rilevato un traguardo o premuto un pulsante il cronometro si spegnerà automaticamente dopo 10 minuti.
Stato del GPS: lo stato della ricezione satellitare è identificato dal simbolo GPS STAT S nella parte in alto a destra del display:
- lampeggiante: il segnale ricevuto non è sufficiente per determinare la posizione. Se dall'ultima accensione è trascorso molto tempo o avete
percorso diversi chilometri, per la ricezione del segnale potrebbe essere necessario aspettare anche 4-5 minuti, negli altri casi, il ricevitore impiegherà
circa 1 minuto. Se il ricevitore non cambia il suo stato spostare il cronometro in un punto più libero in quanto potrebbe non avere una ricezione ottimale.
- fisso: ricezione del segnale dei satelliti. Ora è possibile memorizzare la linea del traguardo, tali coordinate rimarranno in memoria fino ad una
nuova memorizzazione.
- : la posizione rilevata risulta essere entro una distanza di 3 Km dalle coordinate del traguardo in memoria, in tal caso non è necessario
memorizzare nuovamente la linea del traguardo.
Memorizzazione del traguardo: accendere il cronometro ed attendere che il simbolo smetta di lampeggiare, posizionare il cronometro nel punto
in cui si desidera rilevare il tempo sul giro e premere il pulsante DOWN; sul display comparirà la scritta SET e lo stato del GPS verrà aggiornato . Nel
caso in cui il ricevitore GPS non sia ancora agganciato ai satelliti comparirà la scritta NO GPS.
Le coordinate memorizzate verranno mantenute in memoria fino alla memorizzazione di un nuovo traguardo.
La larghezza del traguardo impostata per gli autodromi è di 20mt (10mt a destra e 10mt a sinistra) punto memorizzato, 10mt (5MT+5MT) per i
kartodromi e minimoto; posizionare il traguardo in modo che non venga rilevato in altri punti della pista.
POSIZIONAM NTO CORR TTO POSIZIONAM NTO RRATO
PZRacing Via de Gasperi 5 – 61032 Fano (P ) Italy - Tel: +39 0721 820434 – Email: [email protected]

Memorizzazione dei tempi sul giro: Quando il traguardo è memorizzato e viene visualizzato il simbolo si potrà procedere all’utilizzo del
cronometro; al primo passaggio sotto il traguardo il cronometro attiverà il conteggio del tempo (LAP TIME) e visualizzerà il numero del giro e della
sessione corrente (SESSION.LAP), al successivo passaggio sul traguardo incrementerà il numero del giro e visualizzerà il tempo effettuato per 10 secondi
per poi visualizzare nuovamente il tempo scorrere.
Visualizzazione tempi sul giro: dalla schermata principale premere il pulsante P, comparirà sul display prima il numero totale dei giri
memorizzati, poi l’ultimo tempo effettuato (LAP TIME) con l’indicazione del numero del giro e della sessione (SESSION.LAP); premere i pulsanti P e
DOWN per scorrere i tempi sul giro memorizzati.
Per ogni sessione quando viene visualizzato il miglior giro si accenderà il simbolo della chiave inglese (BEST LAP)
Memoria piena: Start è in grado di memorizzare un massimo di 82 giri, a memoria piena visualizzerà al posto del numero della sessione, del numero
del giro e del tempo sul giro dei trattini orizzontali -.- -.- - (LAP TIME) - -.- - (SESSION.LAP), si accenderà il simbolo della chiave inglese (F LL
MEMORY) e disabiliterà il "conteggio" fino alla cancellazione della memoria.
Cancellazione dei tempi sul giro memorizzati: dalla schermata principale premere il pulsante P per entrare nella visualizzazione dei tempi sul
giro memorizzati, premere e tenere premuto il pulsante DOWN fino alla visualizzazione della scritta DELETE (LAP TIME).
- Sostituzione delle batterie: Start Micro è dotato di un indicatore di livello delle batterie (BATTERY LEVEL), quando la spia comincia a lampeggiare
significa che il livello delle batterie è basso ed è necessario sostituirle. Rimuovere le quattro viti nella parte posteriore del cronometro, estrarre le due
batterie scariche tipo “AAA” alloggiate sotto il display, inserire le nuove batterie e richiudere il cronometro; non serrare troppo le viti per evitare di
danneggiare la scocca.
PZRacing Via de Gasperi 5 – 61032 Fano (P ) Italy - Tel: +39 0721 820434 – Email: [email protected]

Start Micro ST200-M
User Manual – v1.0 – 21/09/2017
Installation
N.B: IT IS IMPORTANT TO POSITION TH CHRONOM T R CORR CTLY TO NSUR GOOD R C PTION.
The GPS receiver is situated on the upper part of the casing, for this reason it is N C SSARY TO PUT TH CHRONOM T R IN A V RTICAL
POSITION or at a maximum angle of 45° so that the upper part of the product is pointing towards the sky.
Do not cover the GPS receiver with metallic or carbon parts as they are materials that block the satellite signal.
Once you have found the ideal position you can fix the indicator using the special adhesive material found in the package.
Usage
Setting the width of the finishing line: if you are using this product on a go-kart or pocket-bike track it is necessary to place the “jumper” (located
next to the battery holder) by inserting it into the two pins farthest from the batteries.
If the “jumper” is in the two pins near the batteries or it is not inserted, the width of the finishing line for racetracks will be set at (DEFA LT).
MOTORBIK & CAR CIRCUIT (default) KART & POCK T BIK CIRCUIT
Starting: press and hold the P button for about two seconds until the START (LAP TIME) appears and the firmware version is installed
(SESSION.LAP); then release the button, the chronometer will enter into the main screen while waiting to be connected to the satellites.
Shutdown: press and hold the P button for about two seconds until the OFF (LAP TIME) appears. If no finishing line is detected or no button is
pressed the chronometer will turn off automatically after 10 minutes.
GPS status: the status of satellite reception is identified by the GPS STAT S symbol in the upper right hand part of the display:
- flashing symbol: the signal you receive is not sufficient to determine the position. If it is a long time since you last turned it on or if you have
clocked several kilometres, in order to receive the signal you may need to wait 4-5 minutes, in other cases, the receiver will take about 1 minute. If the
receiver does not change its status move the chronometer to a more unrestricted position as it might not have optimal reception.
- fixed symbol: reception of satellite signals. Now it is possible to memorize the finishing line, these coordinates will remain memorized until new
memorization.
- : the recorded position is within a distance of 3 Km from the coordinates of the memorized finishing line, in this case it is not necessary to
memorize the finishing line again.
Memorization of the finishing line: turn on the chronometer and wait for the symbol to stop flashing, place the chronometer at the point in
which you would like to record the lap time and press the DOWN button; SET will appear on the display and the GPS status will be updated . If the
GPS receiver does not connect to the satellites NO GPS will appear.
The memorized coordinates will remain in the memory until the memorization of a new finishing line.
The finish line width for racetrack is 20mt (10mt to the right and 10mt to the left) from the point recorded, 10mt (5mt + 5mt) for kart and pocket bike;
place the finish line in point that cannot be revealed in other point of the track.
PROP R POSITIONING FAULTY POSITIONING
PZRacing Via de Gasperi 5 – 61032 Fano (P ) Italy - Tel: +39 0721 820434 – Email: [email protected]

Memorization of lap times: When the finishing line is memorized and the symbol appears, it is possible to use the chronometer; during the first
passing of the finishing line the chronometer will activate lap timing (LAP TIME) and it will show the lap numbers and the current session
(SESSION.LAP), during the next passing of the finishing line it will increase the number of laps and show the previous lap time for 10 seconds and then
show the running time again.
Visualization of lap times: press the P button on the main screen, at first the total number of memorized laps will appear on the display, then the
last lap time (LAP TIME) indicating the number of the lap and of the session (SESSION.LAP); press the P and DOWN buttons to scroll the memorized
lap times.
Memory full: Start can memorize a maximum of 82 laps, when the memory is full the display will show instead of the session number, lap number and
lap time some horizontal dashes -.- -.-- (LAP TIME) - -.-- (SESSION.LAP), a wrench symbol will light up (F LL MEMORY) and will disable the
“counting” until cancellation of the memory.
Cancellation of memorized lap times: on the main screen press the P button to visualize the memorized lap times, press and hold DOWN the
button until the DELETE (LAP TIME) appears.
- Battery replacement: Start Micro is equipped with a battery level indicator (BATTERY LEVEL), when the light starts flashing it means that the
battery power is low and it is necessary to replace them. Remove the four screws on the rear part of the chronometer, remove the two spent “AAA”
batteries placed under the display, insert the new batteries and close the chronometer; do not over tighten the screws to avoid damaging the casing.
PZRacing Via de Gasperi 5 – 61032 Fano (P ) Italy - Tel: +39 0721 820434 – Email: [email protected]
Table of contents
Languages: