Qualcast AQP-PC 4645 User manual

Important - Please read these instructions fully before starting assembly
These instructions contain important information that will help you get the best from
your chainsaw, ensuring it is assembled correctly and safely.
If you need help or have damaged or missing parts, call the Customer Helpline
on 0151 649 1500.
Qualcast
46 cc Petrol Chainsaw
Original Assembly Instructions
Feb 2011
UK/Ireland 0151 649 1500
Republic of Ireland 1890 946 244
Web www.einhell.co.uk
After Sales Support
Assembly Manual

Contents
2
Safety Information............................................................................................................................................3
Warnings Symbols.......................................................................................................................................3
General Safety .............................................................................................................................................3
Personal Safety............................................................................................................................................3
In the Box .........................................................................................................................................................4
Parts .............................................................................................................................................................4
Tools .............................................................................................................................................................4
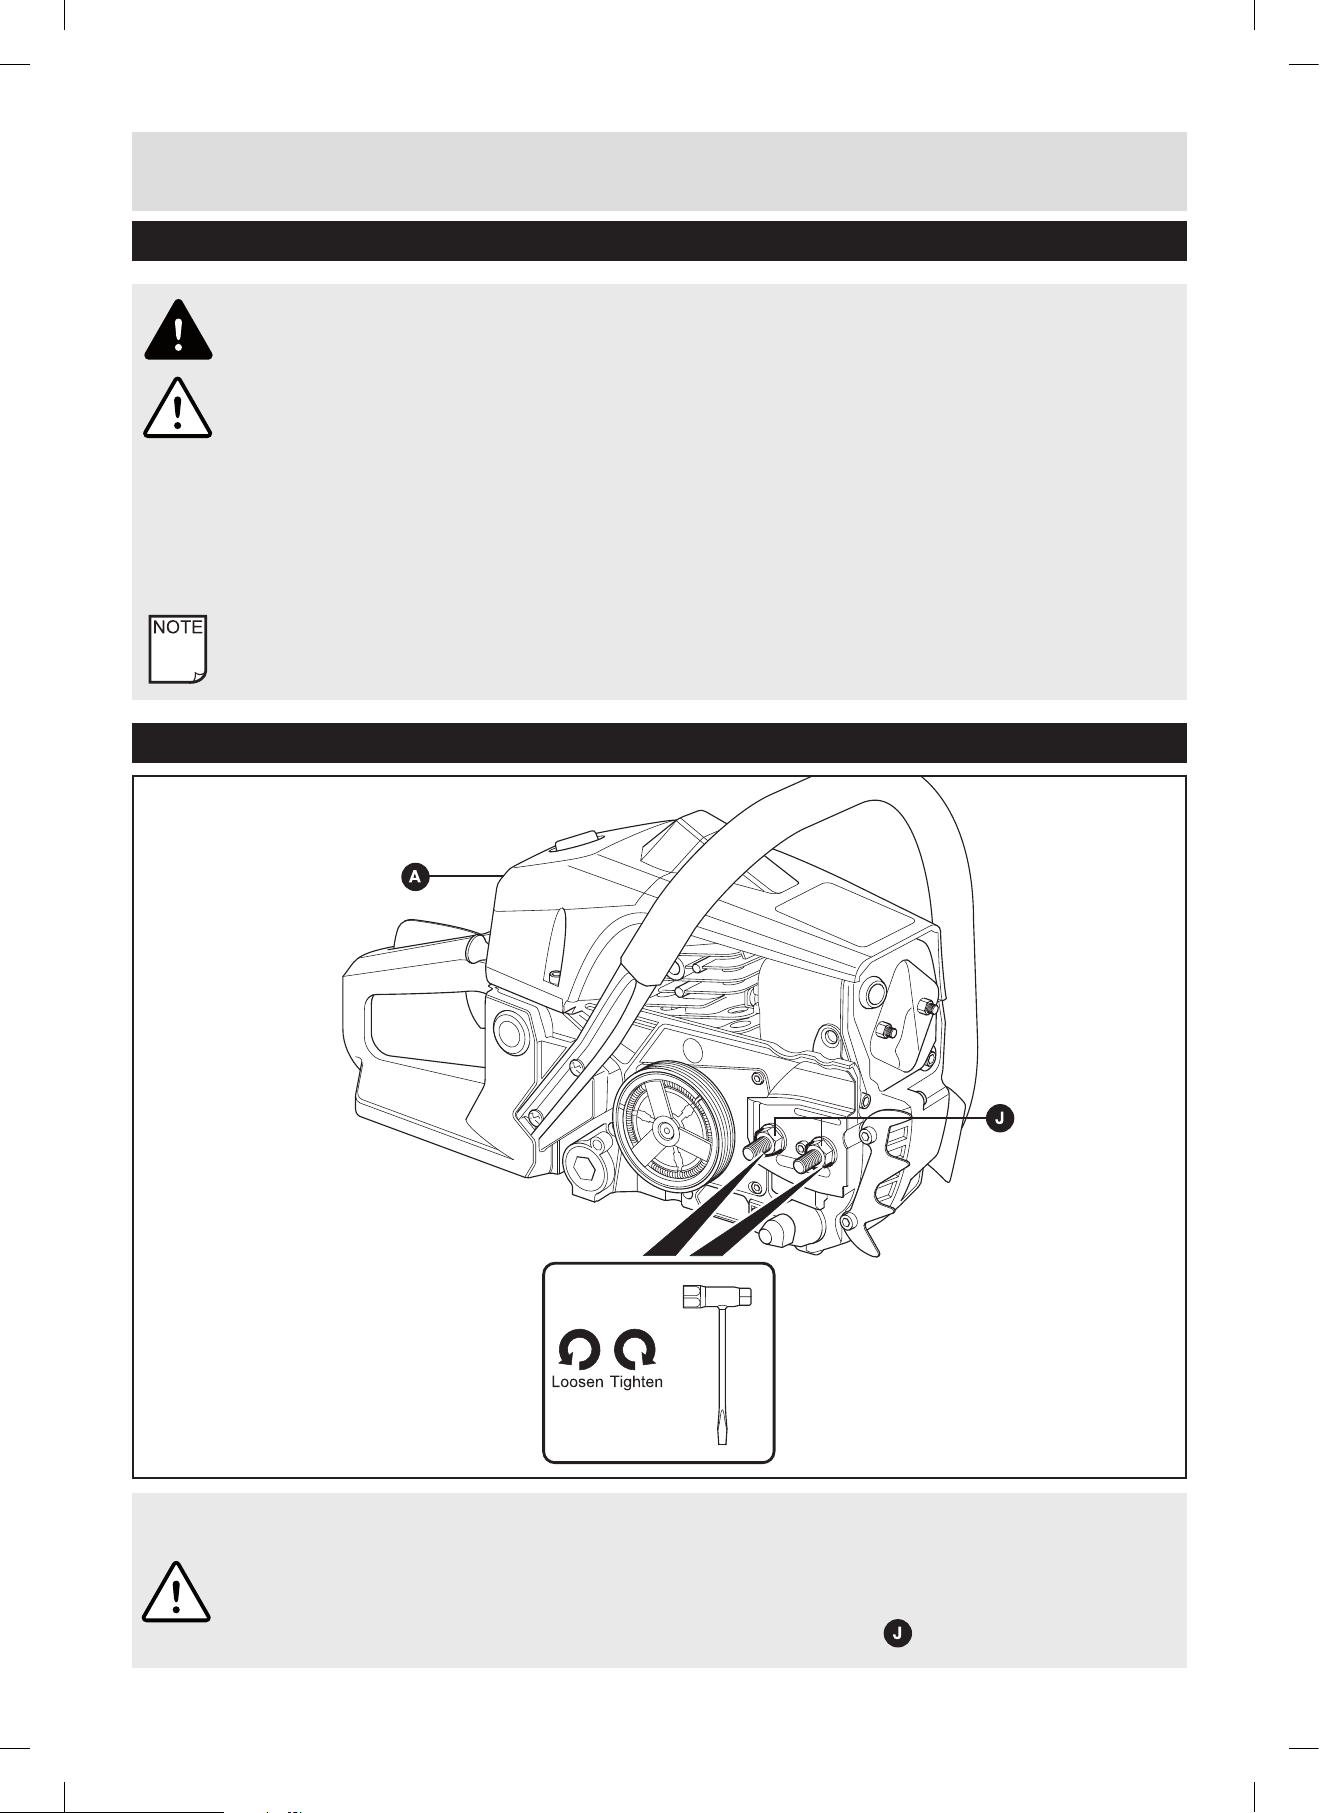
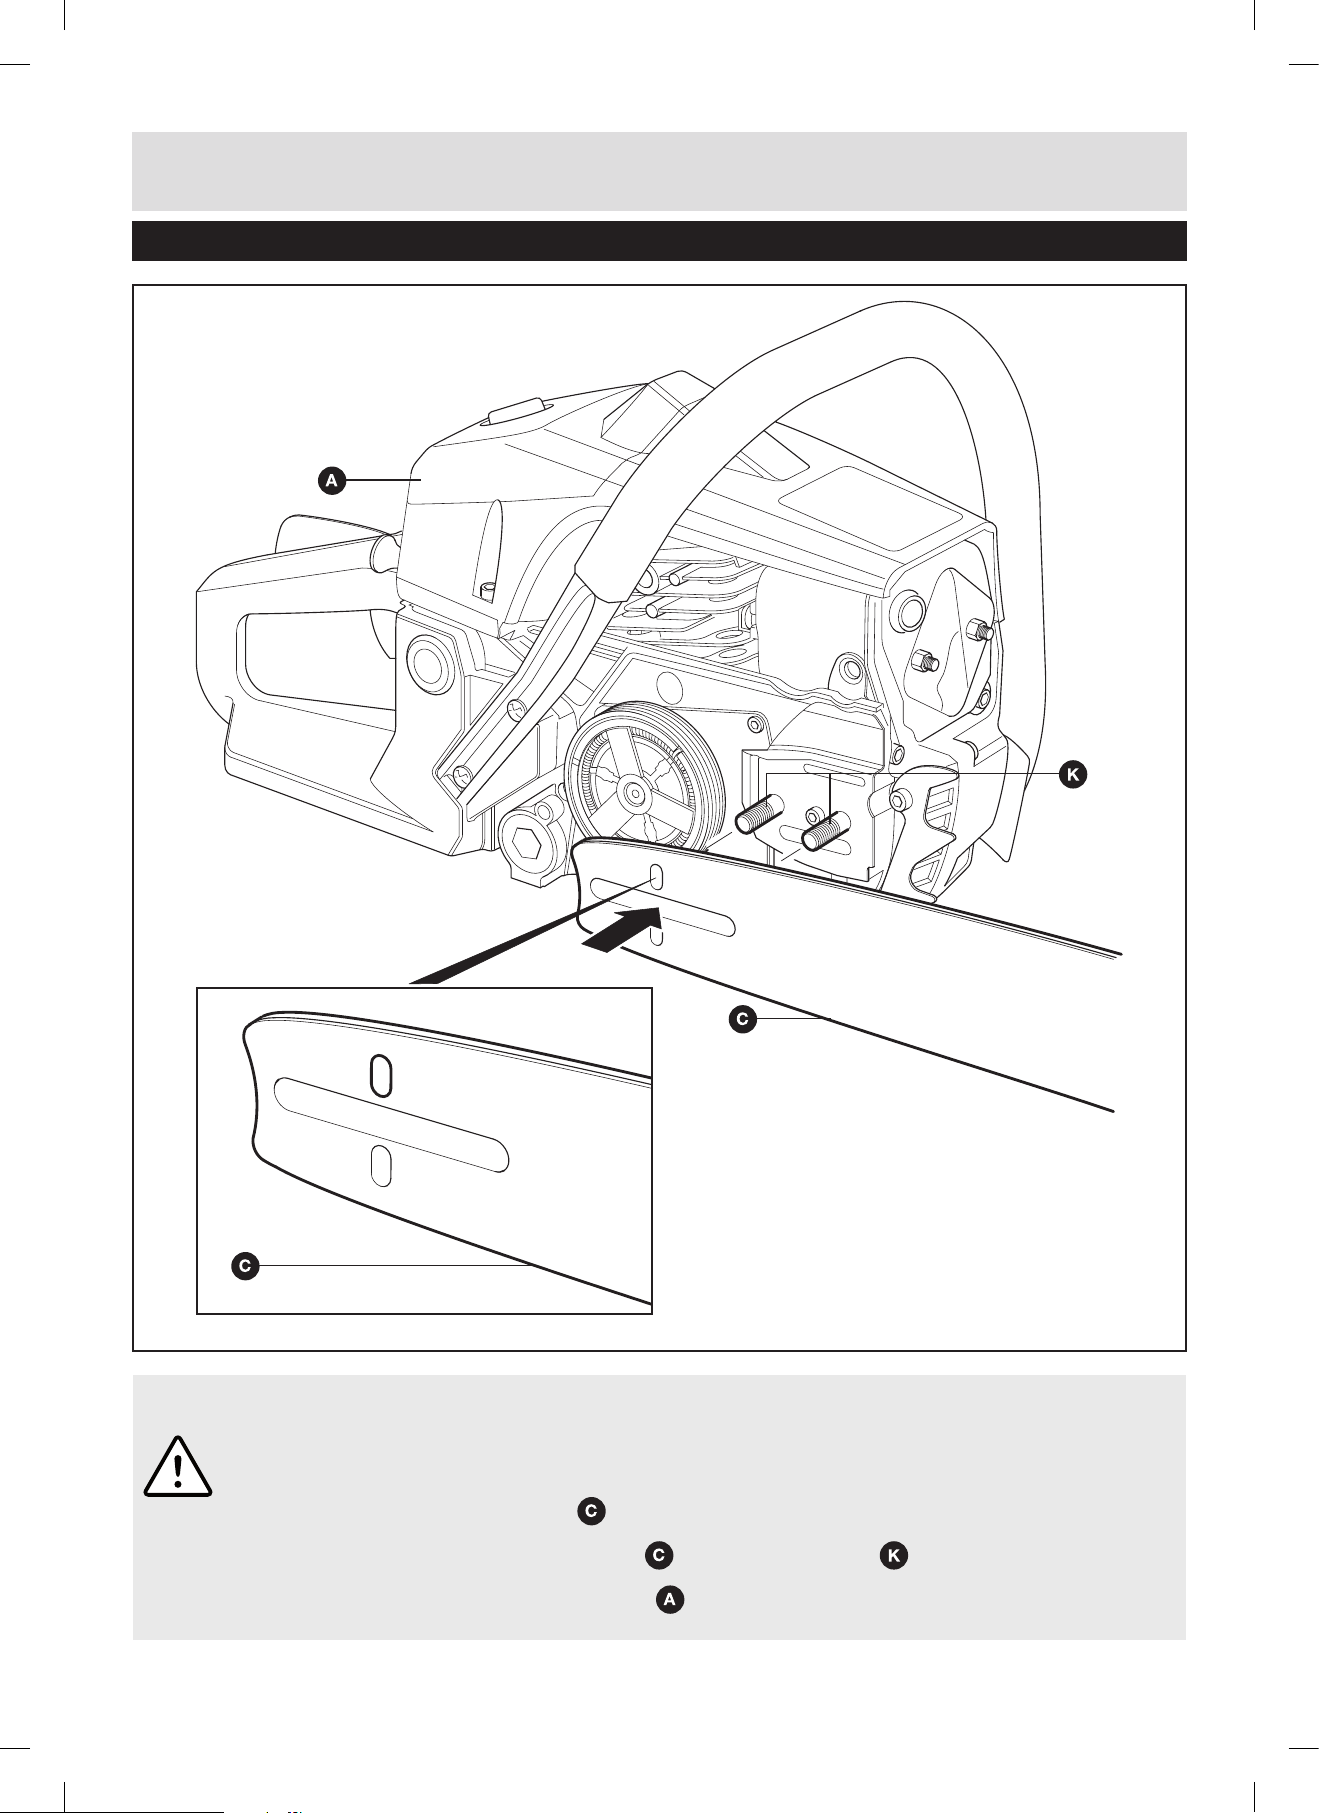
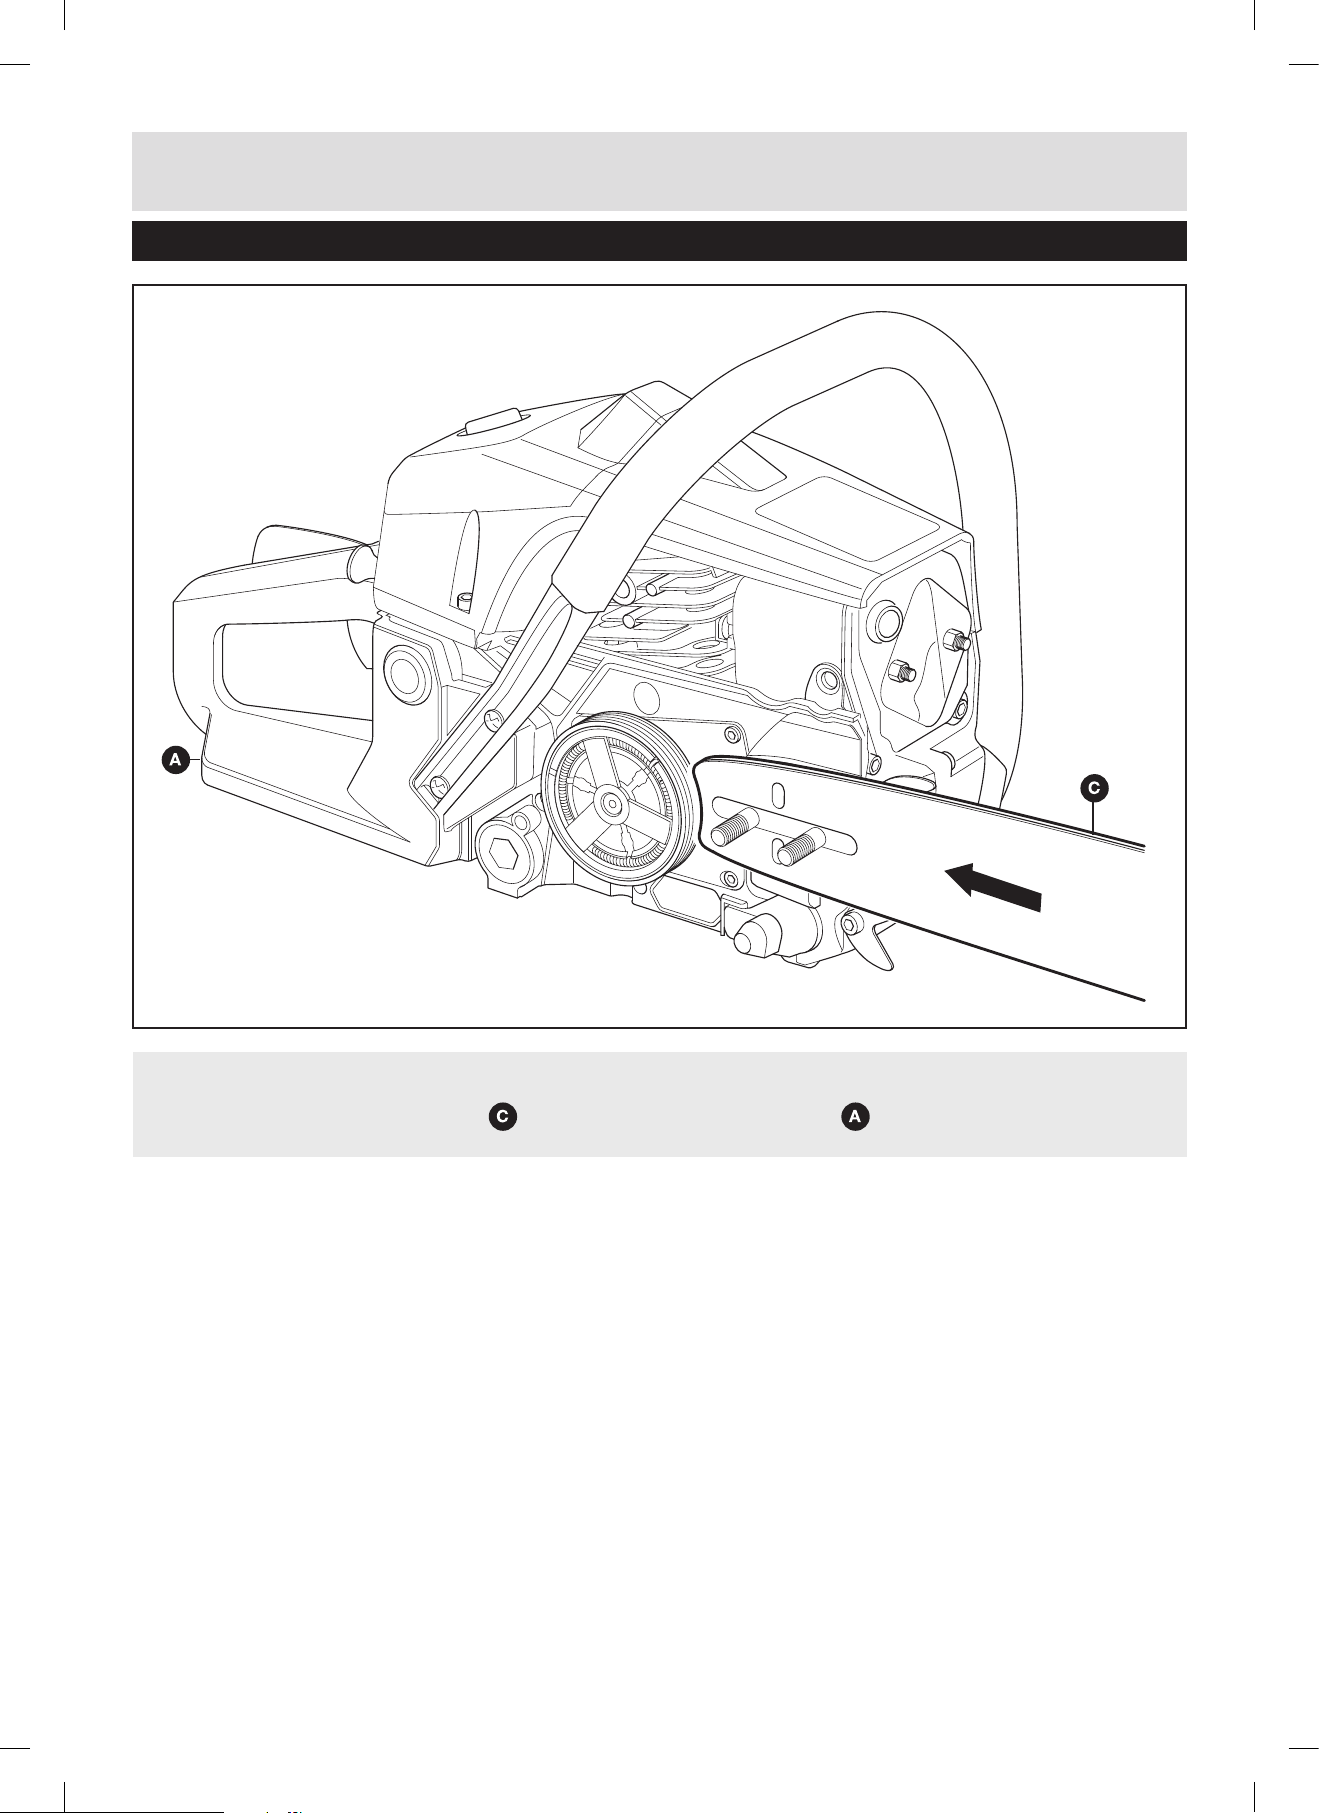
Assembly ..........................................................................................................................................................5
Preparing to assemble the chainsaw.........................................................................................................5
Step 1 ...........................................................................................................................................................5
Step 2 ...........................................................................................................................................................8
Step 3 ...........................................................................................................................................................9
Step 4 .........................................................................................................................................................11
Step 5 .........................................................................................................................................................13
Step 6 .........................................................................................................................................................14
Step 7 .........................................................................................................................................................16
Getting Help...............................................................................................................................................16
Useful Information
Useful Information
Type of Machine AQP-PC 4645
Article Number of Machine 45.016.62
Identification Number of Machine 11011
Customer Helpline 0151 649 1500

Important - Please read these instructions fully before starting assembly
3
The following warning symbols appear throughout this assembly manual and indicate the appropriate
safety measures you should take when assembling and operating the chainsaw.
This symbol indicates there is a danger of serious personal injury or death if you do not observe
the warning.
This symbol indicates that there is a danger of damaging your hands if you do not wear thick,
hard wearing gloves.
Warnings Symbols
General Safety
Personal Safety
WARNING! Keep this assembly manual in a safe place following assembly for reference at
a later date.
WARNING! Always ensure anyone intending to operate this chainsaw is fully conversant with the
contents of this assembly manual prior to assembling, maintaining or operating the chainsaw.
WARNING! Perform assembly operations described in this manual. Failure to observe this warning
may lead to serious injury, death, or damage to the chainsaw.
WARNING! Always take care when removing the packaging to prevent damage to yourself
or to the chainsaw.
IMPORTANT! Before assembling the chainsaw, check all the parts indicated in the manual are in
the box. Inspect all the parts for signs of damage. Do not assemble the chainsaw if you observe any
damaged components.
IMPORTANT! Do not start the engine until the saw is fully assembled.
NOTE! This chainsaw complies with the Noise Emission Directive 2000/14/EC.
WARNING! Only operate the chainsaw if you are wearing the correct Personal Protective
Equipment (PPE) as described in the following warnings.
WARNING! Always wear suitable gloves when operating chainsaw to protect your hands from flying
debris and/or sharp objects. It is particularly important to wear protective gloves when assembling
or maintaining the saw chain.
Safety Information
Customer Helpline 0151 649 1500

4
Customer Helpline 0151 649 1500
Main body assembly
Chain brake lever
assembly
Guide bar
Saw chain
Fuel mixing canister
Chain oil
2-stroke engine oil
Protective cover
Small Screwdriver
Multi tool
Chain file
In the Box
Parts Tools
1
2

5
Customer Helpline 0151 649 1500
WARNING! Always take care when removing the packaging to prevent damage to yourself or to
the chainsaw.
IMPORTANT! Before assembling the chainsaw, check all the parts indicated in the manual are in
the box. Inspect all the parts for signs of damage. Do not assemble the chainsaw if you observe any
damaged components.
1. Remove all parts of the chainsaw from the box and carefully remove all packaging. Take care not
to lose any instructions which may be affixed to the parts. These provide important information
which will be required while assembling the chainsaw.
2. Keep all packaging until the chainsaw is fully assembled and has been operated successfully.
NOTE! Always recycle the packaging in accordance with local recycling schemes.
1a. Remove the guide bar fastening nuts
IMPORTANT! Take care when removing the guide bar fastening nuts not to lose the information
label. This provides important information relating to the fitting of the saw chain.
Using the supplied multi tool, unscrew the two guide bar fastening nuts .
Preparing to assemble the chainsaw
Assembly
Step 1
1a

6
Customer Helpline 0151 649 1500
Step 1 (continued)
Assembly
1b
1b. Fit the guide bar
CAUTION! The guide bar is not securely fixed to the main body when this step is completed.
Take care when carrying out the next steps not to drop the guide bar.
Ensure the oiling hole of the guide bar is kept clear of dirt and any build-up of residue.
Align the large horizontal slot of the guide bar with the location pins .
Push the guide bar fully against the main body .

7
Customer Helpline 0151 649 1500
1c. Position the guide bar backwards
Carefully push the guide bar towards the rear of the main body as far as it will go.
Step 1 (continued)
Assembly
1c

8
Customer Helpline 0151 649 1500
Step 2
Assembly
2. Check the saw chain orientation
Unravel the saw chain and spread it out on a flat and level surface.
Check the orientation of the cutting edges. These must be facing forwards in the direction of rotation
as shown above and on the information label.
CAUTION! If the saw chain is in the incorrect orientation, the chainsaw may operate but it will fail to
cut. In addition, the chainsaw may be irreparably damaged.
2

9
Customer Helpline 0151 649 1500
Step 3
Assembly
3a
3a. Place the saw chain onto the drive sprocket
WARNING! Always wear suitable gloves when assembling or maintaining the saw chain.
NOTE! Ensure the saw chain is in the correct orientation as described in step 2 before fitting to the
drive sprocket.
Wearing suitable gloves, carefully lift one end of the saw chain over the clutch and place onto
the drive sprocket L. Ensure the teeth on the underside of the saw chain fit correctly into the slots
on the drive sprocket L.

10
Customer Helpline 0151 649 1500
3b. Feed the saw chain around the guide bar
Once the saw chain is correctly fitted onto the drive sprocket , continue to feed the saw chain
along the upper surface and nose of the guide bar . The teeth of the saw chain must be
correctly seated in the groove of the guide bar .
NOTE! The saw chain may hang off the bottom of the guide bar. This is normal.
Step 3 (continued)
Assembly
3b

11
Customer Helpline 0151 649 1500
Assembly
Step 4
4a. Adjust the tensioning bar position
Before the chain brake lever assembly can be fitted to the main body assembly , the
tensioning bar (part of the chain brake lever assembly) must be adjusted.
Using a screwdriver or the multi tool blade, turn the tension adjustment screw anti-clockwise
until the tensioning bar is at the end of its travel towards the circular brake band .
4a
Q

12
Customer Helpline 0151 649 1500
Step 4 (continued)
Assembly
4b. Ensure the chain brake is disengaged
NOTE! The chain brake lever assembly may be supplied with chain brake lever in the
disengaged position.
Place the chain brake lever assembly Bon a firm and level surface.
While grasping the back of the chain brake lever assembly Bfirmly with one hand, pull the chain
brake lever Rfully backwards with your other hand.
IMPORTANT! Disengaging the chain brake when not fully assembled requires considerable force.
R
B
4b

13
Customer Helpline 0151 649 1500
5. Fit the chain brake lever assembly
IMPORTANT! When fitting the chain brake lever assembly B, take care not to trap the rubber strip
against the side of the main body assembly . The rubber strip must remain perpendicular to the
side of the chain brake lever assembly.
IMPORTANT! While fitting the chain brake lever assembly B, the guide bar Cand saw chain
must not move.
Step 5
Assembly
B
5
CS
J

14
Customer Helpline 0151 649 1500
IMPORTANT! Do not fully tighten the guide bar fastening nuts J. They must remain loose enough to
allow the position of the guide bar Cto be adjusted in the following step.
Align the holes in the chain brake lever assembly Bwith the location pins K.
Push the chain brake lever assembly B fully against the main body .
NOTE! If the chain brake lever assembly Bproves difficult to fit, check the alignment of the
tensioning bar N(see step 5a) with the lower slot Sin the guide bar C. If necessary, adjust the
position of the tensioning bar Nwith the tension adjustment screw .
Refit the two guide bar fastening nuts Jonto the location pins Kand tighten by hand.
6a. Adjusting the saw chain tension
WARNING! Always wear suitable gloves when assembling or maintaining the saw chain.
Step 5 (continued)
Assembly
Step 6
P
6a

15
Customer Helpline 0151 649 1500
Step 6 (continued)
Assembly
CAUTION! The saw chain will stretch after as little as five cuts following initial tensioning. Refer to the
operation and maintenance manual for instructions on adjusting the saw chain tension.
CAUTION! It is essential that the correct saw chain tension is maintained. This will ensure that the saw
chain D, drive sprocket, guide bar Cand engine do not wear prematurely.
The saw chain Dmust be correctly tensioned before it is used for the first time.
When the guide bar fastening nuts have been loosened, using a screwdriver or the multi tool blade,
turn the tension adjustment screw clockwise or anti-clockwise to adjust the saw chain tension.
• Turn the tension adjustment screw anticlockwise to decrease the tension.
• Turn the tension adjustment screw clockwise to increase the tension.
The saw chain Dmust fit snugly all the way around the guide bar Cas shown.
Using a gloved hand, ensure the saw chain Dis free to move. If the saw chain Ddoes not move,
decrease the tension.
NOTE! Re-tighten the guide bar fastening nuts.
NOTE! Always check the saw chain tension before attempting to operate the chainsaw.
NOTE! Proper tension of the the saw chain is extremely important and must be checked before
starting, as well as during any cutting operation. Taking the time to make needed adjustments to
the saw chain will result in improved cutting performance and prolonged chain life

16
Customer Helpline 0151 649 1500
If you need help or have damaged or missing parts, call the Customer Helpline on 0151 649 1500.
7. Safe storage
If you are not going to use the chainsaw straight away, fit the protective cover Hover the saw chain
and the guide bar C.
Assembly is now complete. Please refer to the operation and maintenance manual for detailed
instructions on how to use and maintain the chainsaw.
Getting Help
Step 7
6b. Fully tighten the guide bar fastening nuts
Once the saw chain is at the correct tension, fully tighten the guide bar fastening nuts using the
supplied multi tool.
Step 6 (continued)
Assembly
J
6b
Table of contents
Other Qualcast Chainsaw manuals
Popular Chainsaw manuals by other brands

Makita
Makita XCU02 instruction manual

Makita
Makita EA3601FG instruction manual

Premier
Premier MS-4815 instruction manual

Elem Garden Technic
Elem Garden Technic TRE2042SO-OR Original instructions

Batavia
Batavia MAXXPACK BT-CSC001 operating instructions

Homelite
Homelite CSP3816 - UT74123A Operator's manual