Rajani VOD-50 User manual

VOD-50
Owner’s Manual

Precautions & Warnings
USE COMMON SENSE AND ALWAYS OBSERVE THESE PRECAUTIONS:
Amplifiers get hot and require adequate ventilation. Do not obstruct the top ventilation grille and
leave at least 10 cm of space behind the rear of the amplifier cabinet.
Do not expose the amplifier to rain, moisture, dripping or splashing water. Do not place objects filled
with liquids on or near the amplifier.
Do not expose the amplifier to high levels of dust, sand or salt.
Do not expose the unit to extended periods of direct sunlight or extremely high temperatures.
Ensure the supply voltage does not differ by more than 10 % from the value selected on the back
panel voltage switch. Do not under any circumstances power on the amplifier if this condition is
not met.
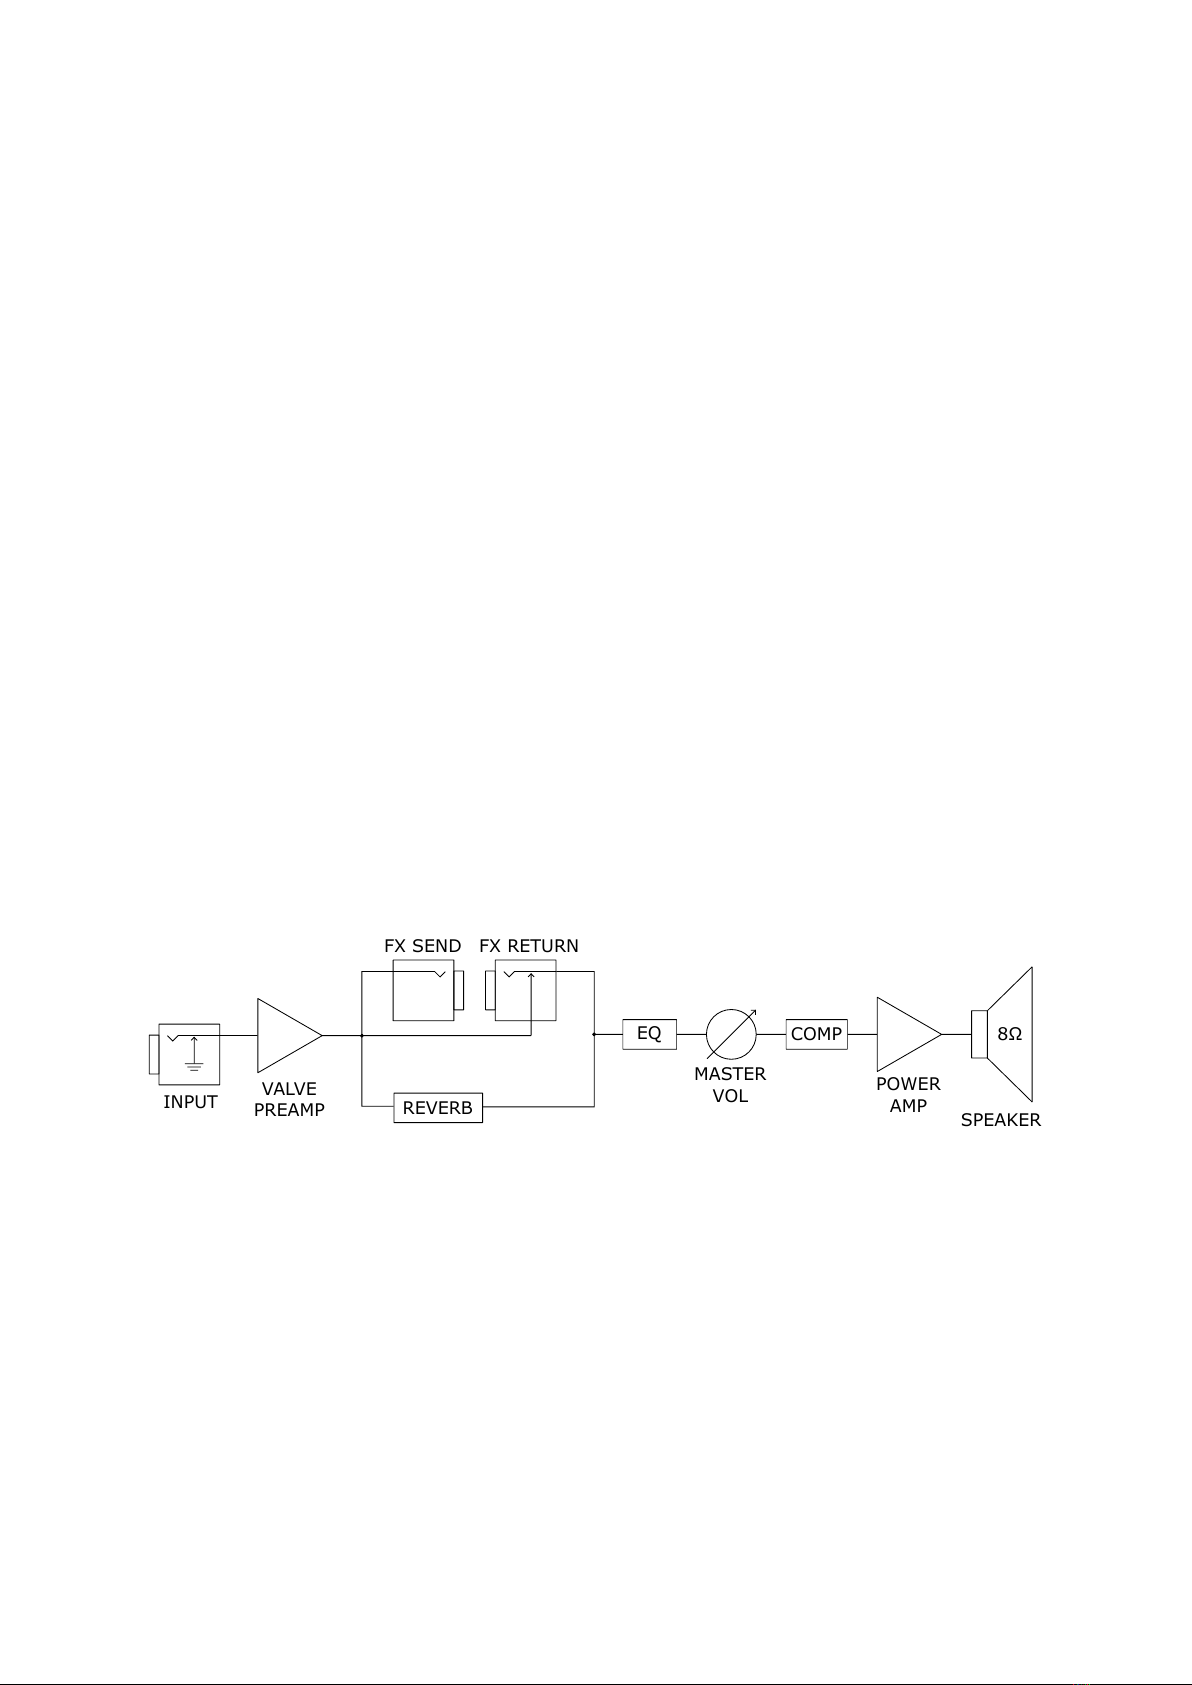
Do not connect a speaker with impedance less than 8Ω.
Always ensure the amplifier is properly grounded.
Do not disassemble or modify anything by yourself unless instructed to do so in the Owner’s Manual.
Any repairs or servicing should be carried out by Rajani Amplifiers or by an authorised service centre.
Immediately turn the unit off, remove the power cord from the outlet, and request servicing by your
nearest authorised service centre when:
–The power cord has been damaged; or
–If smoke or unusual odor occurs; or
–Objects have fallen into, or liquid has been spilled onto the unit; or
–The unit has been exposed to rain (or otherwise has become wet); or
–The unit does not appear to operate normally or exhibits a marked change in performance.
Remove the power plug from the AC mains socket if the unit is to be stored for an extended period
of time. If there is any danger of lightning occurring nearby, disconnect the unit from the mains in
advance.
Do not drop the unit or subject it to strong impact.
Keep the amplifier away from children or drunk people.
Do not touch hot valves. Allow time for valves to cool before replacing them.
Use of the unit at high volume for extended periods of time may cause hearing loss. If you ever
experience any hearing loss or ringing in the ears, you should immediately stop using the unit and
consult a specialized physician.
2

Overview
Congratulations on your purchase of the VOD-50. You will not be disappointed with
this extremely high quality, versatile, all-analogue guitar amplifier. Its truly unique cir-
cuit features a valve preamp that produces both triode and pentode harmonics for the
rich overdrive sound you normally associate with a cranked all-valve amp. But the
VOD-50 does not need to be cranked to sound that way, making it equally suited to
studio or practice sessions as big stages.
The boost and lead channel switches, as well as the gain controls, have been designed
as wide-band mid-boosts and act to keep your tone balanced at all settings. An active
2-band EQ lets you dial in a master voicing to suit your guitar and room, and the spring
reverb adds a lush, complex three dimensionality to your sound.
Further professional features include a serial effects loop and a mains voltage selector
switch. The latter, combined with a sturdy but lightweight pine cabinet, make the VOD-
50 a perfect choice for the touring musician.
Block Diagram
REVERB
EQ COMP
INPUT VALVE
PREAMP
FX SEND
MASTER
VOL POWER
AMP
8Ω
SPEAKER
FX RETURN
3

Front Panel
INPUT FT SW
CLEAN DRIVE LEVEL
LEAD
BASS TREBLE REVERB VOLUME
BOOST LEAD
From left to right:
INPUT High impedance input for connecting an electric guitar.
FT SW TRS output for connecting the supplied dual button footswitch or for con-
necting to a third party pedal switching system.
BOOST Adds 6 dB of mid boost on the clean channel and treble boost on the lead
channel. Gives you grit and presence to cut through mix on the clean channel
and brings out a little bit more edge/bite and lots of sustain on the lead channel.
LEAD Engages the lead channel. Voiced to sound rich and creamy, to cut through a
mix without ever getting fizzy or harsh, and to give you that big open sound that
you can only get from overdriven valves.
CLEAN A wideband mid boost control which adds volume and crunch on the clean
channel. Meticulously voiced to maintain your tonal balance throughout its range.
For a totally clean sound set this low and use the MASTER control to get your
volume.
LEAD DRIVE Another wideband mid boost control which adds saturation on the lead
channel. Designed to keep your tone balanced throughout its range so it doesn’t
sound dull when set low, or harsh when set high.
LEAD LEVEL A straight volume control for the lead channel. Once you have adjusted
the balance of CLEAN and MASTER for just the right amount of dirt and the right
volume for the clean channel, your master will be set, and you would typically
then set the balance of DRIVE and LEVEL to dial in the amount of saturation and
volume for the lead channel.
4

BASS Adjust for 13 dB of shelving boost or cut below 500 Hz. Flat at 12 o’clock.
Your tone does not get muddy when boosting and your upper midrange is unaf-
fected by this control. Great for compensating for the variations in bass energy
of different guitars and pickups.
TREBLE Adjust for 13 dB of shelving boost or cut above 1 kHz. Flat at 12 o’clock.
Your tone does not get harsh when boosting and your upper midrange does not
lose presence when cutting. Try turning this up as well as the bass for a sparkly
scooped sound.
REVERB Adjusts the level of the return signal from the spring reverb tank. The re-
verb tank is driven by a mixed feedback discrete amplifier and has been carefully
voiced to add a lot of sparkle and depth while eliminating mud. This makes the
reverb equally suited to the lead as the clean channel, and it is intended to be
used as an “always on” effect.
VOLUME This master volume control drives a high quality compressor situated at the
input of the power amplifier. At high volume the compressor is engaged and
acts to transparently prevent hard clipping of the power amp. The compressor is
designed to be defeated by loud transient peaks so they can be clipped cleanly by
the custom engineered discrete power amplifier circuit which continues to sound
amazing when pushed hard, like a guitar amplifier should.
POWER Switch for turning the unit on or off. It is normal for there to be no sound
immediately after powering on the amp (while the valves are heating up). This
warm-up period may last 10-15 seconds. Turn the amplifier off if it is not being
used for longer than 45 minutes.
5

Back Panel
230
EFFECTS
SEND RETURN
INSTR
LINE
SPEAKER
8ΩMIN
CAUTION
RISK OF ELECTRIC SHOCK
DO NOT OPEN
DO NOT EXPOSE UNIT TO
RAIN OR MOISTURE
CHASSIS CAN GET HOT
ENSURE SELECTED VOLTAGE
MATCHES MAINS VOLTAGE
BEFORE POWERING ON
50 - 60 Hz
125 VA
From right to left:
EFFECTS RETURN High impedance input to the EQ section. The preamp signal
is routed through the SEND when a jack is plugged into this input. When the
LINE/INSTR switch is set to INSTR this input has an additional 25 dB of gain.
EFFECTS SEND Low impedance buffered output from the valve preamp.
EFFECTS LEVEL Switchable loop level between LINE and INSTR (instrument). IN-
STR delivers a signal that is perfectly suited to guitar effects pedals and the input
of a second guitar amp, whereas LINE is for professional rack effects units or the
input of an audio interface or cabinet simulator. When not using the effects loop,
set the level to LINE for lowest noise operation.
SPEAKER Jack output for connecting a speaker. The minimum allowable speaker
impedance is 8Ω. You may connect a higher impedance speaker such as 16Ω
but you will only get the full 50 Watts of power with an 8Ωspeaker.
DO NOT CONNECT A SPEAKER WITH IMPEDANCE LESS THAN 8Ω. DOING
SO WILL VOID THE WARRANTY.
VOLTAGE SELECTOR Variable voltage switch for operating the unit on several dif-
ferent mains voltages found around the world. Set it to 230 V for mains voltages
in the range 220-240 V and set it to 115 V for voltages in the range 110-120 V.
DO NOT UNDER ANY CIRCUMSTANCES POWER THE UNIT ON 230 V MAINS
WITH THE SWITCH SET TO 115 V. DOING SO WILL VOID THE WARRANTY.
If you will be touring with the amp we recommend that you stick some tape over
6

the power socket after each use to help you remember to set the voltage to the
correct mains value when you next attempt to plug in a power cord.
POWER SOCKET Standard 3-pin socket for IEC mains cable.
ALWAYS ENSURE THE UNIT IS EARTHED.
We recommend that you plug the unit into a surge protector rather than directly
into a wall socket.
Maintenance
Replacing Valves
It is likely that the valves will need replacement after a few years. If you hear a new
noise such as crackling, sputtering, ringing, squeeling, white noise/hiss or hum, or if the
amplifier stops producing sound altogether, you should try to replace one of the valves
to see if that fixes the problem. The VOD-50 uses two double triode valves, an ECC83
(a.k.a. 12AX7) and an ECC82 (a.k.a. 12AU7). To begin valve replacement, unplug the
amplifier, and allow the valves to cool for ten minutes. Unscrew and remove the back
metal grille.
EFFECTS
SEND RETURN
INSTR
LINE
ECC83
ECC82
Looking at the chassis from the back, the ECC83 is on the
far right as in the picture on the right. Make sure the back
of the amplifier cabinet is well lit and and that you can
clearly see the valve sockets. We recommend sitting be-
neath a bright light and placing the amplifier upside down
on your lap. Twist anticlockwise and slide the screen off
the valve that you want to replace. Pull the valve out
while gently rocking it back and forth. When reinserting a new valve, make sure you
can clearly see that the pins are lined up with the socket slots and push it in slowly to
avoid damaging the valve or socket.
7

Replacing Fuses
All fuses in the amplifier are located in the chassis and are not acccessible without
removing the chassis from the cabinet. There are a fair number of fuses - all of the time-
delay (slo blo) type - and they should last many years provided no fault has developed
with the amplifier. If a fuse has blown within the first 5 years of service there might be
a fault with the amplifier and the unit should be returned to us under the warranty. In
any other circumstances, blown fuses should be replaced with ones of the same type
and rating, only by a qualified engineer.
Cleaning
To clean the unit, use a soft, dry cloth, or one that is slightly dampened. Try to wipe the
entire surface using an equal amount of pressure. Rubbing too hard in the same area
can damage the finish.
Never use benzine, thinners, alcohol or solvents of any kind.
Warranty
If there is a fault with the amplifier that a valve replacement has not been able to fix,
you may be elligible for our warranty service. You can check our warranty terms online
at rajaniamps.com/warranty.
8
Table of contents