RAYTAC VH2400R User manual

Wireless USB Phone
User’s Manual
Version 2.0 , May. 2009
Be sure to carefully read this User’s Manual for the proper use of the Wireless
USB Phone and kee
p
it for future reference.

2
Safety and General Information:
zYour phone is designed to use AAA Ni-MH rechargeable battery only.
Warning! Never attempt to charge non-rechargeable battery.
zThe battery can be charged and discharged hundreds of times, but it will gradually wear out,
when the operation time (standby time and talk time) is noticeably shorter than normal, then
it is probably time to replace batteries.
zReplace all the batteries at the same time.
zDon’t drop or knock the phone, rough handling may damage the internal circuit.
zDon’t expose your device to dampness, dust or corrosive liquids.
zDigit encryption scrambles all communications transmitted between the phone and the
USB dongle to keep them private.
Chapter 1 Package Contents
1. Wireless USB Phone 1 4. USB Charging Cable 1
2. USB Dongle 1 5. Installation CD 1
3. Ni-MH Rechargeable AAA Battery 3 6. Carrying case (Optional) 1
Chapter 2 System Requirements
zWindows® 2000 / XP / Windows VistaTM or Mac OS®10.4 or later
zAn available USB port on PC
zInternet connection and SkypeTM account
zA minimum CPU of 1GHz is suggested
Chapter 3 Getting Started
Note: Before you can use the phone with your computer, you must install the driver.
Note: SkypeTM icons and figures may vary in different SkypeTM versions.
Before installation, please ensure the following:
zDo not connect the USB dongle to your computer before the driver installation completed.
zMake sure that you have SkypeTM software installed on your computer.
zYour computer is connected to Internet.

3
3.1 Software Installation for Windows®
Step 1 Insert the driver CD, click the Install Driver button.
Note: you may be asked to install the .NET Framework, please click Yes to continue the
installation.
Step 2 Click Next and refer to the following steps to complete the installation.
Step 3 Select Allow access to allow the driver to use SkypeTM:
When the installation is completed, please check the driver icon shown in the task bar at
the bottom right of your desktop, right click on the icon to know more.
A.GREEN : the phone works well with SkypeTM.
B. GRAY : the phone cannot talk to SkypeTM, please check the battery power of the
phone, USB dongle is connected to the computer properly, Internet and SkypeTM status.
Note: the driver will be activated automatically whenever you start the computer.
(Please go to “3.3 Install the batteries”)

4
3.2 Software Installation for Mac OS®
Step 1 Insert the CD, browse to the Install Driver for MAC.dmg folder.
Step 2 The “WirelessUSBPhone Driver OSX _._._” icon will appear on your desktop, please
find it and click the icon.
Step 3 Click the “WirelessUSBPhone Driver Install.pkg” folder.
Step 4 Click Continue and refer to the following steps to complete the installation.
Step 5 Allow the driver to use SkypeTM, select Allow this application to use Skype and click
OK:
Note: Please check the driver icon shown in the task bar at the top right of your desktop.
Note:
The
driver
will
be
activated
automatically
whenever
you
start
the
computer.

5
3.3 Install the batteries
Note: Always use AAA Ni-MH rechargeable batteries only.
Slide the battery cover and insert the three batteries with the correct polarity as indicated.
Replace the battery cover firmly back into place.
Note: The phone will automatically turn on after inserting batteries.
3.4 Insert the USB Dongle into the USB Port
Note: SkypeTM will automatically detect the phone as new audio
device “USB Headset”. Please click “OK” to set the phone as default
audio device of SkypeTM.
3.5 Pair the Phone and USB Dongle
Note: You only need to pair the phone and USB dongle the first time with any computer you
use the phone with. Refer to the following instructions to pair the phone and USB dongle:
zPress the square connect button on the USB dongle until the light turns on.
zHold the phone 10 cm from the dongle until the light on the dongle blinks.
zPlease wait for 5 seconds and check that the indictor is shown on the handset
display.
Note: Please do not use other VoIP USB device after connecting the USB dongle on your
computer. Please do not remove the dongle from the USB port while a call is in progress.

6
Chapter 4 How to use Wireless USB Phone

7
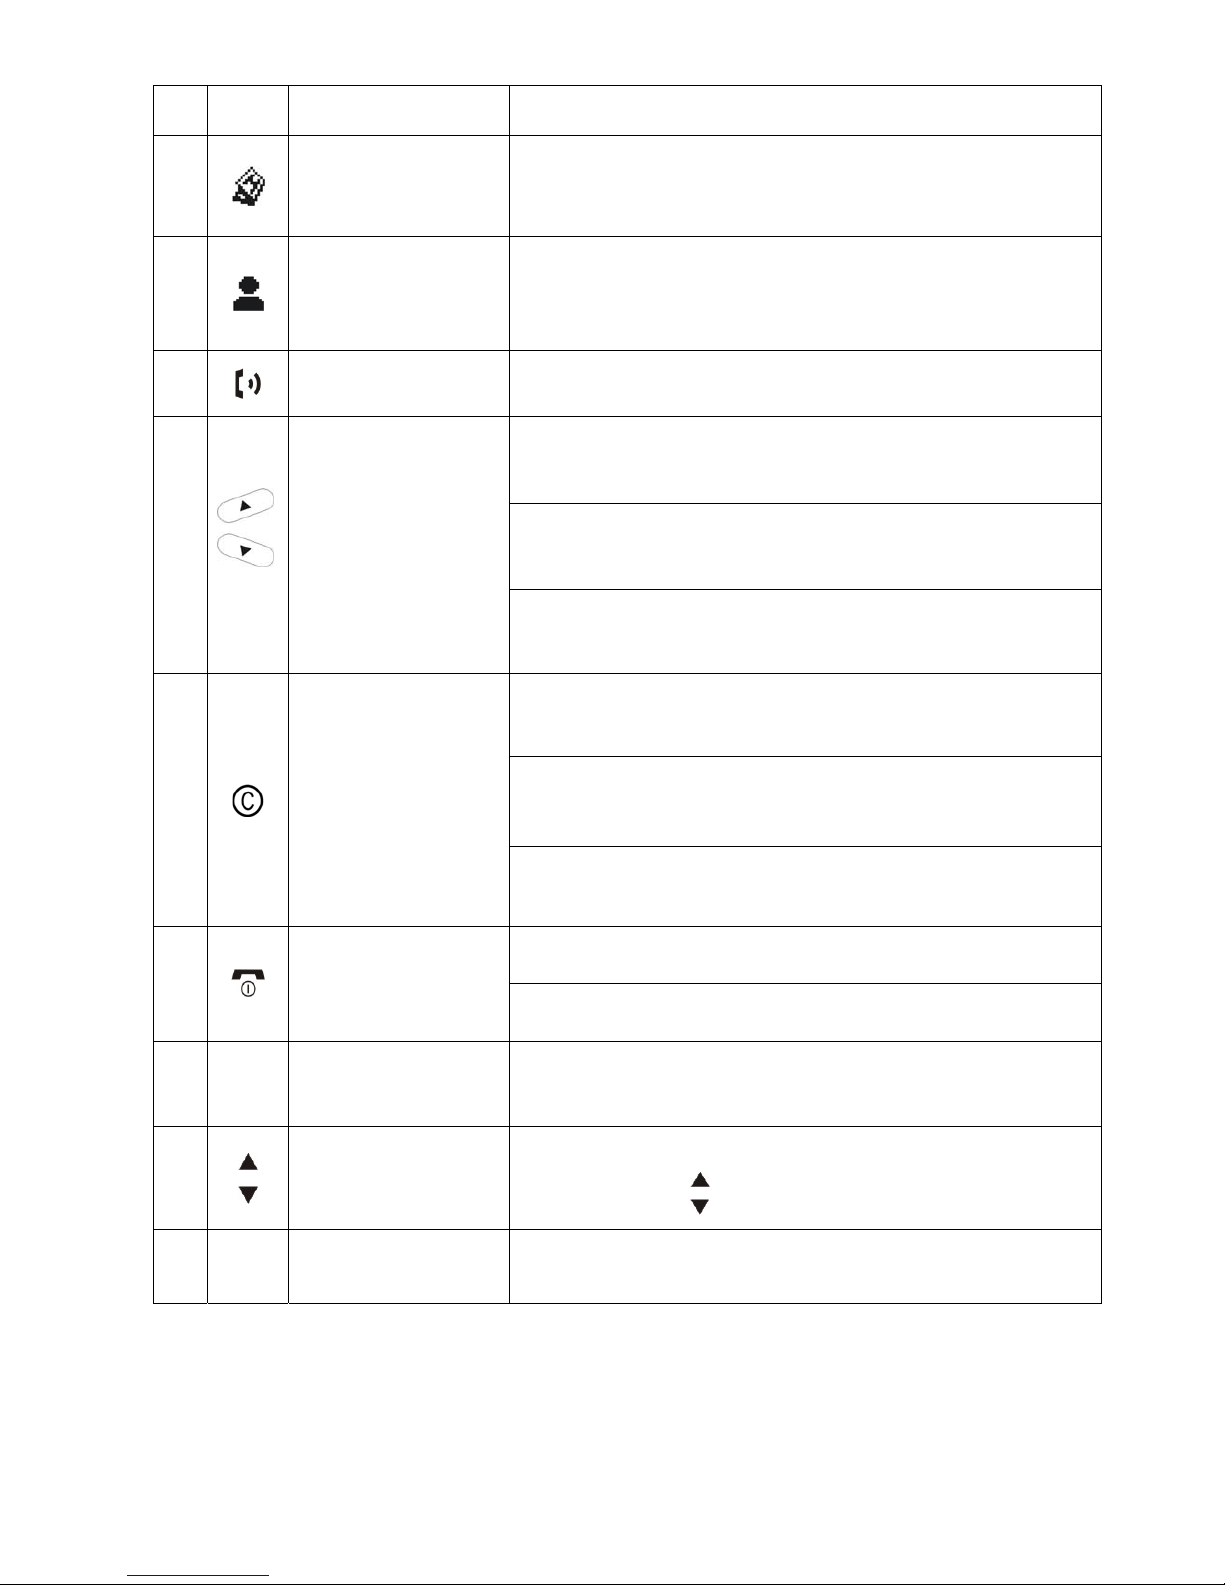
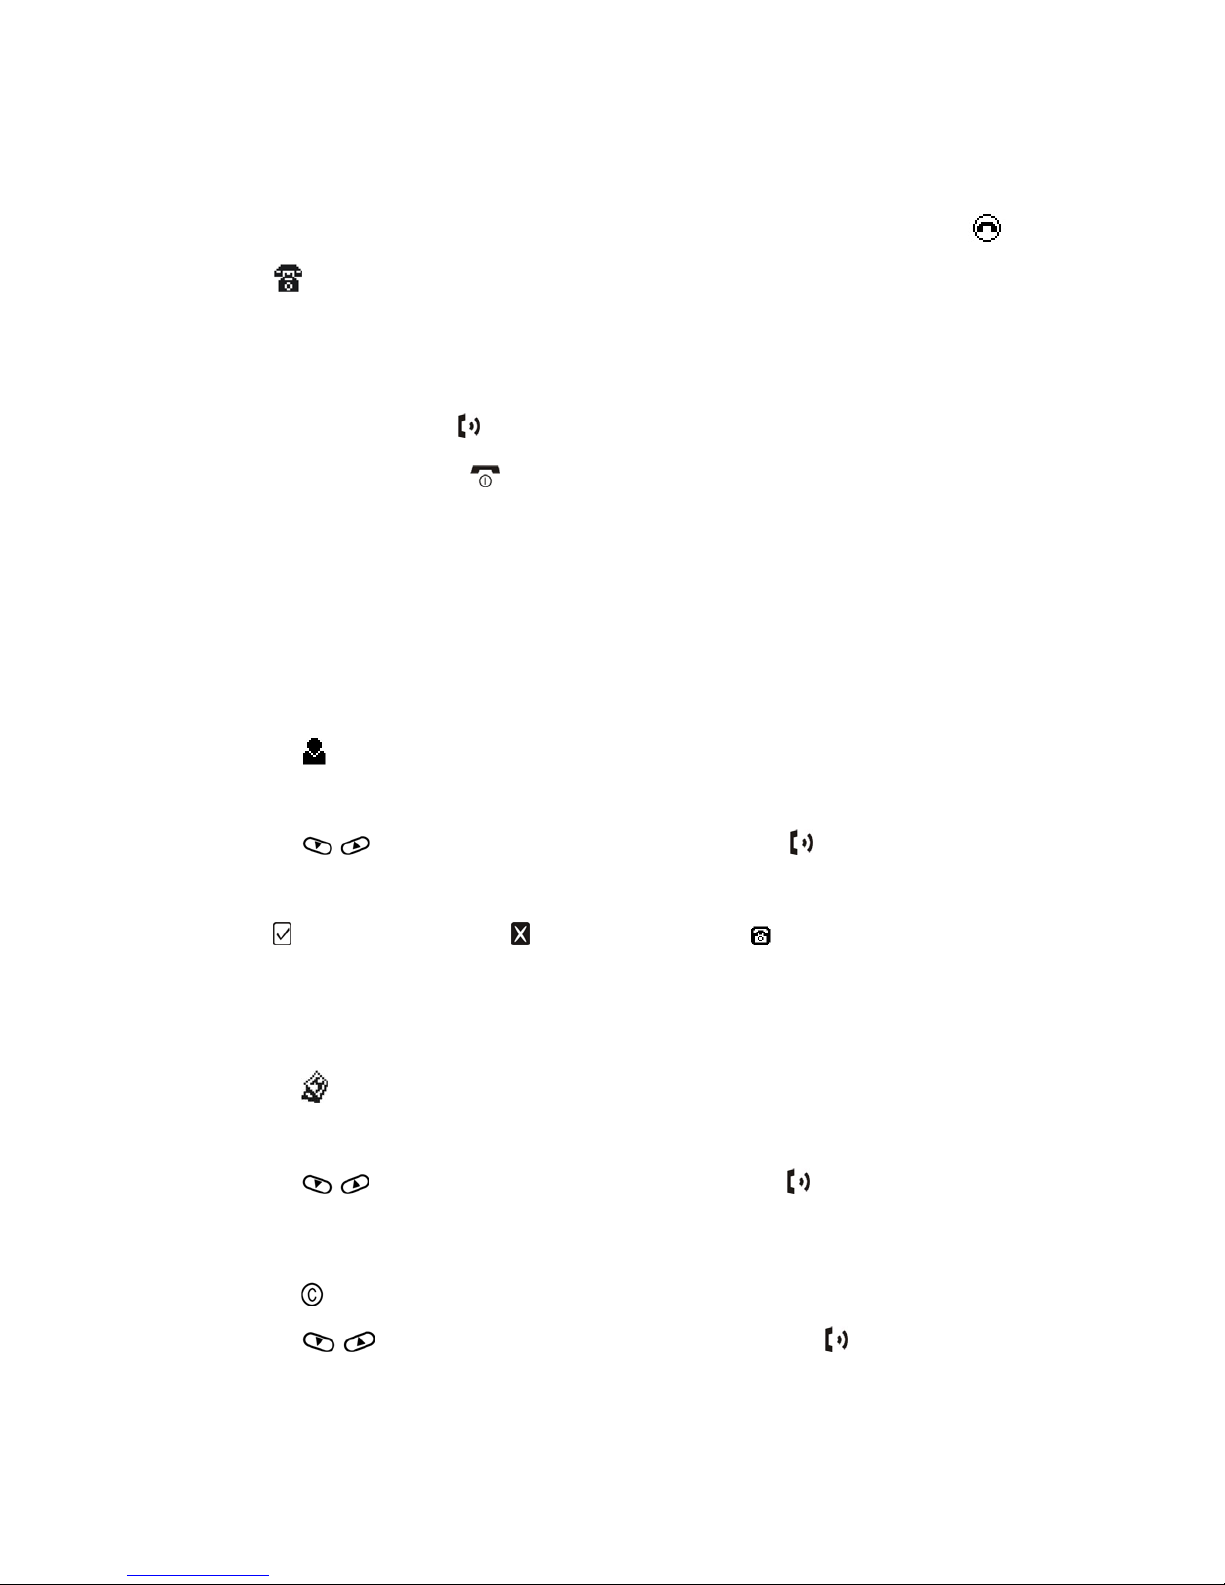
No. Icon Name Function
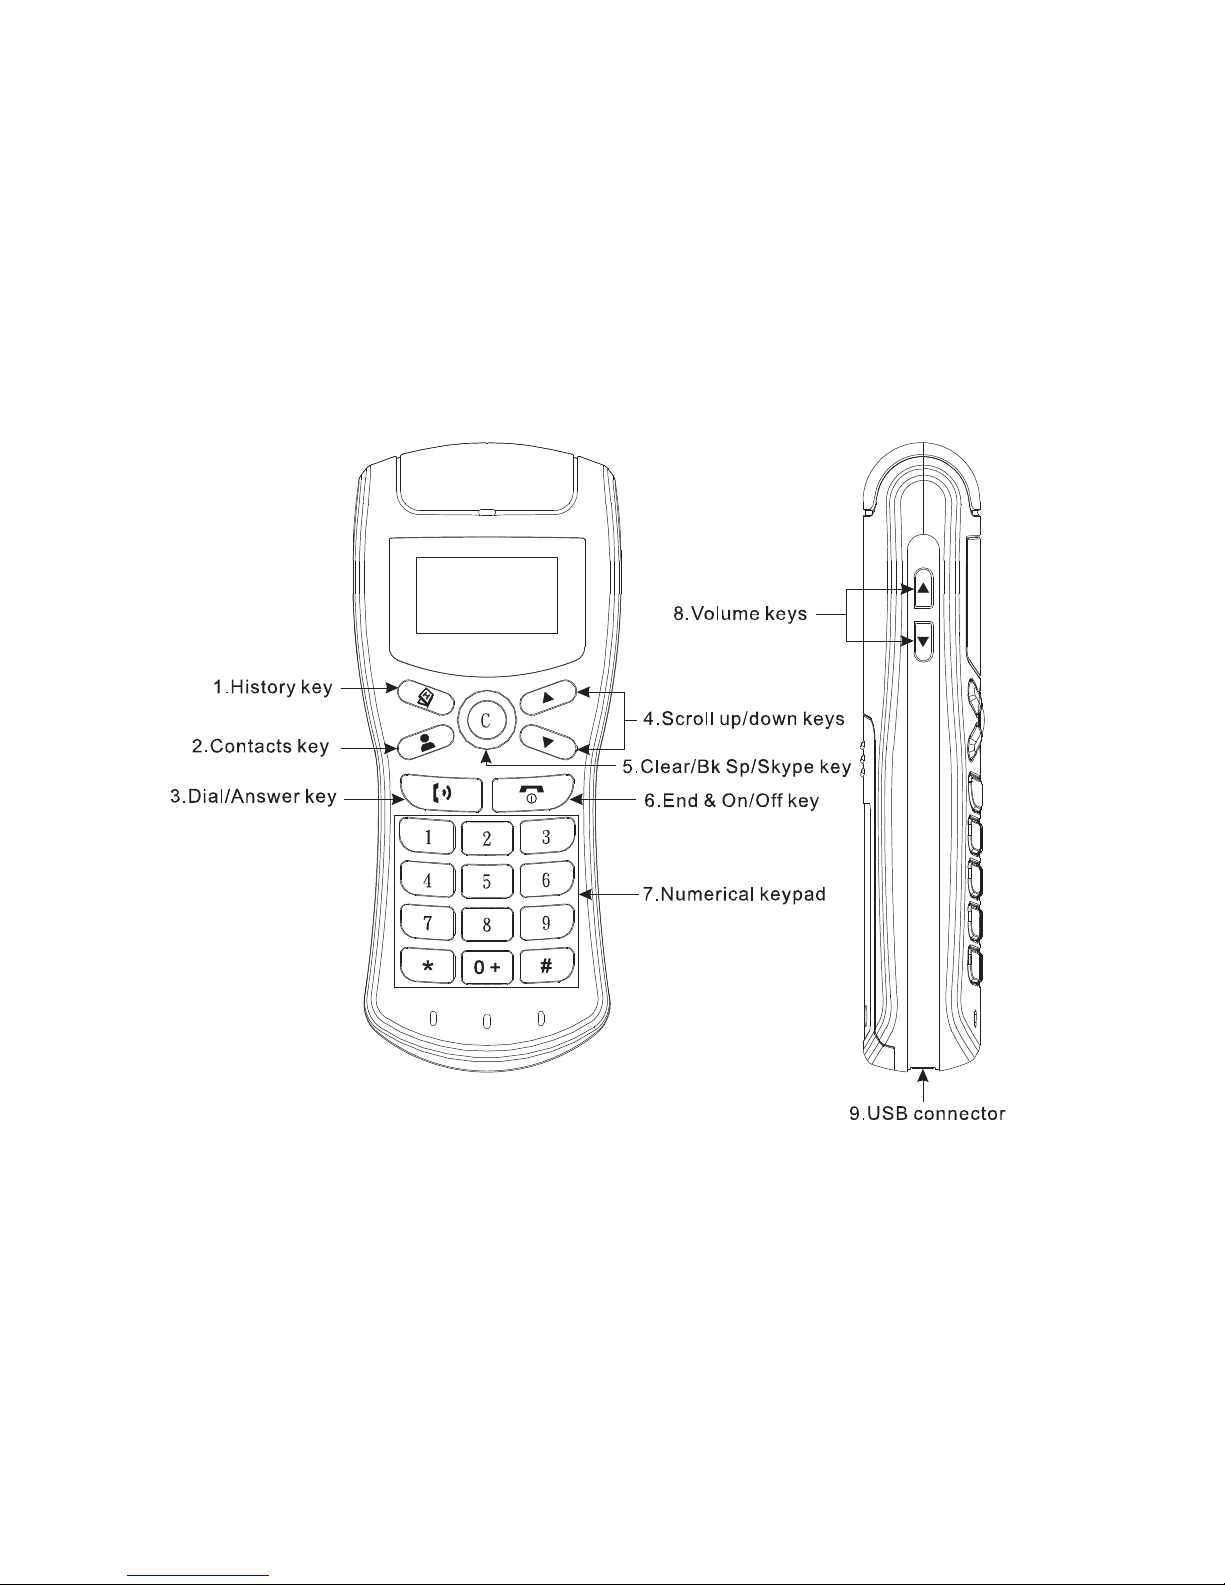
1 History
Press to enter History mode, you can check your call history
and loop through Incoming, Outgoing and Missed calls on the
display screen. (Use scroll up/down keys to scroll lists)
2 Contacts
Press to enter Contacts mode, you can access your SkypeTM
contact list and switch between Online contacts and All
contacts on the display screen. (Use scroll up/down keys to
scroll lists)
3 Dial/Answer Press to answer or make calls.
1. In main screen, press and hold this button for one second to
change SkypeTM online status.
2. Show SkypeTM window on the Desktop, press to scroll
up/down in Contacts or History to the entry you wish on the
SkypeTM window.
4
Scroll up/down
3. In Contacts or History mode, press to scroll up/down to the
entry you wish on the phone display. (SkypeTM window is still)
1. In main screen, click this key to open SkypeTM window.
Press and hold for one second to close SkypeTM window.
2. In Contacts or History mode, press this button to clear
History or Contacts entries on the phone display.
5 Clear/Bk Sp/SkypeTM
3. In SkypeOutTM mode, click this key to erase the last digit,
press and hold for one second to clear all digits.
1. Press and hold this button for 3 seconds to turn the phone
power on/off.
6 End & On/Off 2. Press this button to end calls or exit Contacts and History
mode.
7 0 ~ 9,
+, *, # Numeric keypad Enter number when using SkypeOutTM.
8
Volume keys
1. Press to increase or decrease the volume.
2. Press and hold for one second to maximize volume.
3. Press and hold for one second to mute volume.
9 USB Connector
Use for charging batteries only.

8
Chapter 5 Indicators shown on the display
5.1 LCD Main Screen:
No. Indictors Meaning Description
Connected, vertical bars show the signal strength.
1
Phone-to-PC
Connection Disconnected, you cannot make or receive calls.
Hang up
Dialing/Ringing
During call
2
Call Status
On hold
The bar goes lower as the volume goes down.
Boost speaker volume (press volume up for 1 sec.)
3
Volume Level
Speaker mute (press volume down for 1 sec.)
( ) Offline or Invisible
( ) Online
( ) Away
SkypeTM
online status
Do Not Disturb
4
Note:The icon shown with ( ) means it’s no longer use at SkypeTM 4.0 for Windows
5 Battery Level The bar goes lower as the battery charge runs low.

9
5.2 History Mode:
No. Indictors Meaning Description
6 History Indicate the phone is in History mode.
Missed Calls Show missed calls.
Incoming Calls Show incoming calls.
7
Outgoing Calls Show outgoing calls.
5.3 Contacts Mode:
No. Indictors Meaning Description
8 Contacts Indicate the phone is in Contacts mode.
Online contacts Show all online contacts.
9
All contacts Show all contacts.
5.4 SkypeOutTM Mode:
No. Indictors Meaning Description
10 SkypeOutTM Indicate the phone is in SkypOutTM mode.

10
Chapter 6 Using the Wireless USB Phone
6.1 Answering/Ending a Call:
¾When you receive a call, your phone rings, the phone status icon changes from
to and the caller’s SkypeTM name will be shown on the display.
Note: The phone can only show English SkypeTM name, if you add your SkypeTM
contacts in other languages, the phone will show SkypeTM ID.
¾Press the Dial/Answer button to answer the call.
¾Press the End & On/Off button to end a call.
6.2 Making Calls:
6.2.1 Making PC-to-PC Calls:
Calling “Contacts” from the Phone:
¾Press button to enter Contacts mode, press again to switch between Online
contacts and All contacts.
¾Press to select the entry you want, and then press to make the call.
Note: In “Contacts” mode, the icon on the left of each entry shows the online status of the
contact: means online contact; means offline contact; means SkypeOutTM
contacts.
Calling “History” from the Phone:
¾Press to enter History mode, press again to switch between incoming, outgoing
and missed calls.
¾Press to scroll through the entries, and then press to make the call.
Calling from SkypeTM Window:
¾Press to open SkypeTM window on your PC
¾Press to select an online contact you want, and press to make the call.

11
6.2.2 Calling an Ordinary Phone Number from SkypeOutTM:
Note: You have to purchase SkypeOutTM credits to call landlines or mobile phone, please
go to http://www.skype.com/ for more details. If you subscribe to SkypeOutTM, refer to the
following to make a SkypeOutTM call.
¾It is necessary to dial 00 or + as a prefix of the phone number you are calling. Press
and hold the 0+ button till the international sign + appears on the display or dial 00.
¾Enter the country code, area code and phone number, for example:
When making call to Taiwan: +886-2-3234XXXX or 00-886-2-3234XXXX
¾Press to make the call.
6.3 Putting a Call On Hold:
During a call, press to put the call on hold, press again to resume the call.
6.4 Receiving Second Incoming Call:
¾During a call, you can press to pick up the second incoming call, the first call will
hold on automatically.
¾After the second incoming call is connected, you can press to toggle between the
two calls.
¾Press to end the call you are talking and press to resume the other call.
6.5 Volume Control:
¾Press and releasing the volume control button on the left side of the phone to
adjust the normal volume up and down.
¾Press and hold the button over one second to maximize the volume, the volume
indicator changes to .
¾Press and hold the button over one second to mute the volume, the volume
indicator changes to .

12
6.6 Powering the Phone on and off, Standby and Sleep Mode:
¾Press and hold for 3 seconds until the display turn on/off.
¾Standby mode: To extend battery life, the backlight turns off automatically when no
activity is detected for 15 seconds ( shown on display ). The backlight turns back
on when you press any key.
¾Sleep mode: If the computer loses connection to Internet or the phone is out of range
with USB dongle ( shown on display) for 1 minute, the phone will automatically
enter Sleep mode and the display screen shuts off.
To recovery from Sleep mode, follow the steps below:
1. Confirm the computer is connected to Internet.
2. Move back within the range from USB dongle.
3. Press any key to recovery from Sleep mode.
4. Check the connection icon is displayed.
6.7 Charging the Batteries:
¾Plug the small connector on the supplied USB charging cable into the USB connector
port on the bottom of your phone.
¾With your computer turned on, plug the other end of the cable into a USB connector
on the computer, the phone will begin recharging automatically.
¾The charging indicator appears on the display, you can make/receive calls while
charging.
¾When the charging indicator stays in full charge remove the charging cable.
Note: The charging time depends on the battery discharging condition, load and the
temperature, it takes approximately 5 hours to full charge the batteries.

13
Chapter 7 Specifications
Frequency 2400 ~ 2483MHz
Channel Number 36
ID Per Channel 65535
Modulation FSK
Antenna Type PIFA ANT
LCD Display 128 x 64 Dot-matrix, Black/White
Wireless Range 330 feet (100m) in open space
160 feet (30m) indoors
Working Voltage DC 3.0V ~ 4.5V
Battery Three AAA Ni-MH Rechargeable Batteries
Tx Power Under 10mW
Communication mode 50mA
Standby mode under 0.5mA
Power Consumption
Sleep mode under 100µA
Weight Phone:96 grams (with batteries)
USB dongle:10.2 grams
Dimension Phone:116.7mm(L) * 50.3mm (W) * 25.5mm(D)
USB dongle:75.0mm(L) * 19.0mm (W) *10.3mm(D)
Temp. Operation : 0 (32 )~60 (140 )℃℉ ℃ ℉
Storage : -10 (14 )~65 (149 )℃℉ ℃ ℉
Humidity Operation : 10%~85% RH
Storage : 10%~95% RH

14
Chapter 8 Other information
CARE AND MAINTENANCE
zDon’t leave the phone in hot or cold places.
zFor cleaning, use a soft, slightly moistened cloth, avoid using solvents or abrasive
substances.
zDon’t attempt to open the device, only qualified personnel may repair this product.
TRADEMARKS
Skype, SkypeOut, the Skype Logo and the S logo are trademarks of Skype Limited. Windows,
Microsoft and Windows Vista are registered trademark of Microsoft Corporation. Mac is
registered trademark of Apple, Inc. Other trademarks and registered trademarks are used
herein for identification purpose only and belong to their respective companies.
FEDERAL COMMUNICATIONS COMMISSION
This device complies with Part 15 of the FCC Rules. Operation is subject to the following two
conditions:(1) this device may not cause harmful interference, and (2) this device must accept
any interference received, including interference that may cause undesired operation.
NOTE
This equipment has been tested and found to comply with the limits for a Class B digital
device, pursuant to Part 15 of the FCC Rules. These limits are designed to provide reasonable
protection against harmful interference in a residential installation. This equipment generates,
uses and can radiated radio frequency energy and, if not installed and used in accordance
with the instructions, may cause harmful interference to radio communications. However,
there is no guarantee that interference will not occur in a particular installation If this
equipment does cause harmful interference to radio or television reception, which can be
determined by turning the equipment off and on, the user is encouraged to try to correct the
interference by one or more of the following measures:
zReorient or relocate the receiving antenna.
zIncrease the separation between the equipment and receiver.
zConnect the equipment into an outlet on a circuit different from that to which the
receiver is connected.
zConsult the dealer or an experienced radio/TV technician for help.
Changes or modifications not expressly approved by the party responsible for compliance
could void the user‘s authority to operate the equipment.
EU DECLARATION OF CONFORMITY
This product: is carrying the CE-Mark in accordance with the related European Directives.

15
Appendix: Troubleshooting
This appendix provides common problems and solutions that may occur during the operation of
the phone, whenever you have problems with your phone, please check the followings first:
zThe phone’s power is turned on and the volume control is normal.
zThe USB dongle is properly connected to the PC.
zMake sure that you have a phone signal (the phone signal strength should have
at least 1 segment showing), if the indicator shows , please try to move the phone
closer to the USB dongle, and check your PC is connected to Internet.
A. There is no sound when you pick up a call or your SkypeTM contact
cannot hear you. (No sound delivered through the phone)
1. For Windows®:
Open SkypeTM , click “Tools →Options”. Then select “Audio Settings” on the left menu, set
Microphone, Speakers and Ringing as “USB Headset”, and tap the check box “Let Skype
adjust my sound device settings”, click Save:
2. For Mac OS®:
Open SkypeTM , click “Skype→Preferences…”. Click “Audio”, check Audio output,
Audio input and Ringing are set in “USB Headset”:

16
B. No phone ring when incoming call or dialing.
1. For Windows®:
Open SkypeTM , click “Tools →Options”. Then select “Sounds” on the left menu, make sure
you have tap the check box “ringtone” and “dial tone”. You can choose which sound to play
here. Then cick “Save”:
2. For Mac OS®:
Step 1: Open SkypeTM , click “Skype→Preferences…”. Click “Notifications”, make
sure you have tapped the check box “Play sound” at Event : “Incoming call” and
“Outgoing call”:
Step 2: Click the driver icon , select Ring… , then tap the check box “Enable Call-In
Ring”. You can select “Default Ringtone” or select “Custom Ringtone” and click
“Choose” to set your own ringtone. Then click “OK”.

17
C. Cannot send/receive calls or the keys do not function.
1. For Windows®:
Step 1: Open SkypeTM , click “Tools →Options”. Then select “Advanced settings” on the left
menu, and click “ Manage other program’s access to Skype” in the related tasks:
Step 2: Select “Name: WirelessUSBPhone.exe”, and click “Change”:
Step 3: Select “Allow this program to use Skype”, click OK and save the setting.

18
2. For Mac OS®:
Step 1: Open SkypeTM , click “Account →Manage API Clients…”, select
“WirelessUSBPhone”, then click “Change”:
Step 2: Select “Allow this program to use Skype”, click Done and save the setting.
D. The speaker too quite/loud/Cannot hear the phone rings clearly.
Step 1: Your phone maybe muted, press the volume up key to unmute the phone.
Step 2: The speaker volume on your PC or on the phone maybe set too low, please adjust the
volume on your PC or the phone.
Step 3: If you select a mp3 or wav file as your ringtone, try to change a louder one. (Please
refer to Troubleshooting B)
E. No Indictors on the display/Press the power key, but nothing happened.
Step 1: Be sure to press and hold the power key for 3 seconds, until the display appears.
(Please refer to 6.6 Powering the Phone on and off, Standby and Sleep Mode)
Step 2: Charge the battery, the battery level should have at least 1 segment showing, if it does
not, recharge your battery. (Please refer to 6.7 Charging the Batteries)
F. Poor reception or drops calls (bad audio quality).
Step 1: The phone maybe too far from the USB dongle, try to move the phone closer to the
USB dongle or move to an area with a stronger signal to use your phone.
Step 2: There may be strong interference signals nearby, implement the paring of the phone
and USB dongle. (Please refer to 3.5 Pair the Phone and USB Dongle)

19
G. Cannot make SkypeOutTM calls. Cannot place outgoing calls to
landlines.
Step 1: You have to enter “00” or “+” (press and hold the “0” key for 2 seconds) before calling
ordinary phone number.
Step 2: Check your SkypeTM account credits.
(Please refer to 6.2.2 Calling an Ordinary Phone Number from SkypeOutTM)
H. “No Driver” message on handset LCD:
Please make sure if you have successfully installed the driver of this product? If so, please
take following steps to activate the driver:
1. For Windows®
Please click “Start”ÆPoint to “All Programs” ÆChoose “Wireless USB Phone API”
Æclick ” Wireless USB Phone API”.
2. For Apple Mac OS®
Open "Applications" folder and click twice on “WirelessUSBPhone” icon.

20
I. “No Signal” message on handset LCD:
Step 1: Please make sure the USB dongle has been firmly plugged in computer’s USB port.
Step 2: If the USB dongle has been firmly plugged in, please conduct the pairing between
handset and USB dongle to make sure they are connected.
(Please refer to 3.5 Pair the Phone and USB Dongle)
J. “No Skype” message on handset LCD:
Please make sure if you have downloaded and installed SkypeTM software and logged in? If so,
please tick “Allow this program to use Skype.” and then click “OK”.
(Please refer to Troubleshooting C)
Table of contents
Other RAYTAC Cordless Telephone manuals