Nexotek NT-P600S User manual


TABLE OF CONTENTS i
Table of Contents
Chapter 1: Introduction 1
o What is Skype? 1
o What about my NexoTek phone? 1
o Product Features 1
o Package Contents 2
o System Requirements 2
Chapter 2: Setting Up Skype 3
o Download and Installation 3
o Creating a New Skype Account 7
o Making a Test Call 10
Chapter 3: Installing SkyMagic 12
o Installing the Software 12
Chapter 4: Connecting Your Phone 17
Chapter 5: Getting to Know Your Phone 18
o Keypad Buttons 18
Chapter 6: Using Your Phone 19
o General Operation 19
Choosing Your Ring Tone 19
Changing the Face Slip 19
o Making And Receiving Calls 20
Answering and Refusing Calls 20
Calling From Your Contacts List 20
Calling From Your Call History 21
Calling Using Speed Dial 21
Making SkypeOut Calls 22
o Advanced Features 23
The Hold Function 23
The Call Waiting Function 23
The Mute Function 23

Chapter 7: Troubleshooting 24
o SkyMagic Icon Indicators 24
Enabling SkyMagic to use Skype 25
o Your Computer Audio Settings 27
o Contacting NexoTek 30
Appendices 31
o Appendix A: Managing Skype Contacts 31
Adding a Skype Contact 31
Removing a Skype Contact 34
o Appendix B: Assigning a Speed Dial Number 35
o Appendix C: Purchasing Skype Credit 37
o Appendix D: Updating SkyMagic 41

CHAPTER 1: INTRODUCTION 1
What is Skype?
Skype is a program that essentially turns your computer into a phone and allows you to
make calls over the Internet to other Skype users. Because the connection is established
over the Web, Skype-to-Skype calls are completely free of charge, and this is why phone
companies do not want you to know about Skype. You can use Skype to call people as
close by as your neighbors or as far away as someone on the opposite side of the globe.
It’s simple, efficient, and gets rid of long-distance calling costs.
What about my NexoTek phone?
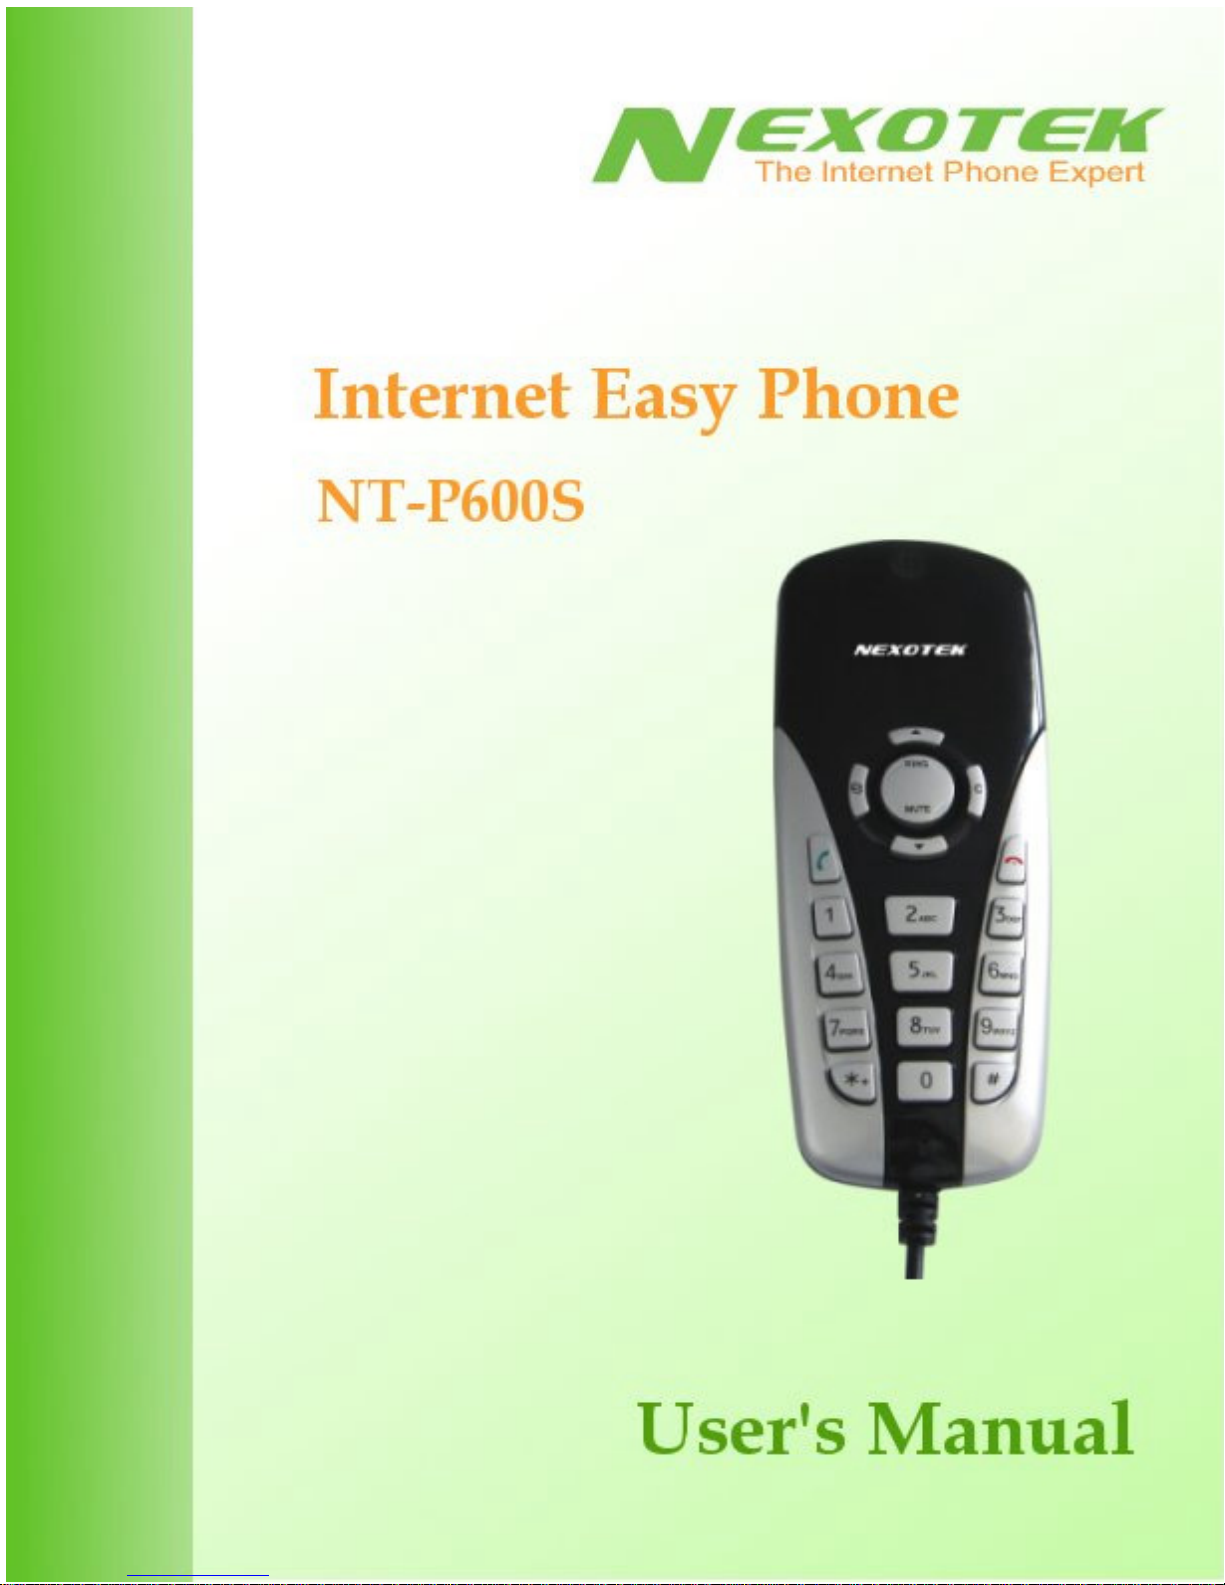
Your NexoTek phone has been designed to be used with Skype for a more convenient
Internet calling experience. The NT-P600S USB Internet Easy Phone provides you with
all the basic necessities of an Internet phone at an affordable price, and it is as
comfortable to use as your regular home phone. It is a versatile product that supports
Windows 2000 or XP, Macintosh OS X, and Linux platforms, and its compact size and
changeable face slip make it both a practical and personal model for a variety of users.
Additionally, it has hold, call waiting, and mute functions for your convenience. The
phone will ring for all of your incoming calls, and it includes five different ring styles
each at two volume levels. NexoTek’s noise reduction and echo cancellation technology
ensure that you will have only the best quality calls.
Product Features
• Supported by Windows 2000 or XP, Macintosh OS X, and Linux platforms
• Changeable face slip for a sleek, personalized look
• Mute, hold, and call waiting functions
• Easy to use and inexpensively priced
• Rings for all incoming calls
• Five different ring styles each at two volume levels
• Noise reduction and echo cancellation technology deliver clear, high-quality calls

CHAPTER 1: INTRODUCTION 2
Package Contents
Your NT-P600S box contains the following items:
NexoTek NT-P600S Internet Easy Phone
SkyMagic installation CD
Quick Start Guide
User Manual on CD
Changeable face slip
System Requirements
In order to use your phone and the necessary software that accompanies it, your computer
must have the following:
One (1) of the following compatible platforms:
o Windows 2000
o Windows XP
o Macintosh OS X
o Linux (Fedora Core 3)
Minimum 400 MHz processor
128 MB RAM
15 MB free disk space
One (1) of the following compatible USB ports:
o USB 1.1
o USB 2.0
Broadband Internet connection: cable, DSL

CHAPTER 2: SETTING UP SKYPE 3
How do I set up Skype?
In order to use your phone, you will need the Skype program installed on your computer.
If you already have Skype installed, please skip to Chapter 3.
There are three main parts of the Skype setup process. First, you must download the
program for free from the Internet and install it to your computer. Then you will create a
Skype account by picking out a user name and password. Finally, you will make a test
call to ensure that Skype is running successfully on your computer.
Download and Installation
The first part of setting up Skype involves downloading the program from the Skype Web
site and installing it on your computer. You must be connected to the Internet to do this.
1. To begin, open your Web browser. In the address bar, type in the URL for the
Skype home page: http://www.skype.com and press your Enter key.
2. When the Skype Web page has fully loaded, click on the link that says
Download Skype.

CHAPTER 2: SETTING UP SKYPE 4
3. On the next page that loads, press the Download button.
4. Another page will load. Press the Download button once again.
5. When the download window opens, choose the Run option.

CHAPTER 2: SETTING UP SKYPE 5
6. Your computer will now download a file called SkypeSetup.exe. This may
take a few seconds.
7. When the download finishes, you will see a window asking what you want to do
with the file. Again, press the button that says Run.

CHAPTER 2: SETTING UP SKYPE 6
8. A window containing the Skype End User License Agreement will
appear. Check the box that says Yes, I accept the EULA and I have
read the Privacy Statement. Then click Install. The Skype files
will now be copied to your computer.
9. You will now see the sign-in window, signifying that you have completed the
download and installation of the program. If you already have a Skype account,
sign in and skip to Chapter 3. If you do not, continue to the next part of the setup,
creating a new account.

CHAPTER 2: SETTING UP SKYPE 7
Creating a New Skype Account
1. Now you will begin the second part of setting up Skype, creating a new account.
You will make a user name and a password to log in and use the program. This is
the name exclusive to you that you will use to talk to other people in the Skype
community. To set up a new account, begin by clicking on the link in the sign-in
window that says Don’t have a Skype Name?
2. When you do this, a new window titled Create a New Skype Account
will appear. Enter the required information, taking note to remember what you
choose to put in Choose Skype Name and Password. This is the account
name you will use to talk to other Skype users, and you need the password to sign
into your account. Check the box indicating that you accept the Skype End User
License Agreement and the Skype Privacy Statement. Then hit Next>.

CHAPTER 2: SETTING UP SKYPE 8
3. In the next window, you have the option of entering your e-mail address and
country or region and city of residence. This information is optional. If you
choose to give your e-mail address, you also have the option of receiving news
and special offers from Skype. You may also choose whether or not you want
Skype to sign you in automatically when the program is run. When you have
finished configuring your preferences, press the Sign In button.
4. You should now be successfully logged in to the Skype program. The Skype icon
– a white checkmark on a green background – should appear in your system tray
to indicate that Skype is connected to the Internet and that you are signed in.
If the Skype icon has a white ‘X’ on a grey background, please check your
Internet connection and make sure that you have signed into Skype.

CHAPTER 2: SETTING UP SKYPE 9
5. When you sign in, your main Skype window will appear.
6. A Getting Started window will also pop up. Check the box that says Do
not show this guide at startup and then close the window. Now
you have finished the second of the Skype setup process. Please proceed to the
last step, making a test call.

CHAPTER 2: SETTING UP SKYPE 10
Making a Test Call
1. You are on the final part of the Skype setup process. To confirm that Skype works
properly, you can make a test call to its automated user, Echo123. This account
name is in your Contacts tab as Skype Test Call. Select the user by
single-clicking on it. Then press the green phone to send the call.
2. The automated voice guides you through making the test call by prompting you to
record a message and then playing it back to you. On your screen, you should see
a tab for the Skype Test Call.

CHAPTER 2: SETTING UP SKYPE 11
3. When the call is finished, you will be brought back to the Contacts tab of your
Skype window. If you were able to hear your message played back to you, then
you have successfully finished setting up Skype.
If you were not able to hear the message you left, there may be something wrong
with your computer’s audio devices. Please refer to the Skype Web site for help
by going to http://www.skype.com in your Internet browser.

CHAPTER 3: INSTALLING SKYMAGIC 12
What is SkyMagic?
SkyMagic is a piece of software that NexoTek created to be used with Skype. It comes in
your phone package on a CD and essentially builds the bridge between your phone and
Skype, allowing them to work together so you can make Internet calls with the
convenience of your phone.
Installing the Software
Before installing, please be sure that Skype is running and you are signed in. You should
see the green Skype icon in your system tray.
If you do not know how to set up Skype and sign in, please refer to Chapter 2.
1. Remove the SkyMagic CD from the package and place it into your computer’s
CD drive. Your Internet browser should open with the SkyMagic window. Click
on the option that says Install SkyMagic Software.

CHAPTER 3: INSTALLING SKYMAGIC 13
2. If a window asking you about running the CD on your computer appears, press
the Yes button.
3. When the download window appears, choose the Run option.
4. A security warning may appear. Again, press the Run button.

CHAPTER 3: INSTALLING SKYMAGIC 14
5. When the Installing SkyMagic window appears, you may choose where
on your computer you want to save the program files. Then click Next>.
6. Next, configure your options about how you would like SkyMagic to run. Then
click Next>.

CHAPTER 3: INSTALLING SKYMAGIC 15
7. Installation should take a few seconds. When a window telling you that SkyMagic
has been installed successfully appears, press the Finish button.
8. After you close this window, SkyMagic will begin running automatically, and a
window will pop up saying Another program wants to use Skype.
Choose the first option that says Allow this program to use Skype
and then press OK. If you accidentally select the wrong option, please see the
Enabling SkyMagic to use Skype portion of Chapter 7.

CHAPTER 3: INSTALLING SKYMAGIC 16
9. The SkyMagic icon should appear in your system tray as a red phone on a light
green background. You have now completed installation of SkyMagic and can
proceed to connect your phone. You may remove the SkyMagic CD from your
computer.
If the SkyMagic icon has a red phone on a grey background, please make sure that
Skype is running. If not, log in and run the program. If you are logged in to Skype
and the background is still gray, please refer to the Enabling SkyMagic to use
Skype portion of Chapter 7.
10. Please check the NexoTek Web site to obtain the latest version of SkyMagic.
Having the most upgraded version of our software will allow you to enjoy the
latest features of your phone. For instructions about how to download the most
recent version of SkyMagic, see Appendix D.

CHAPTER 4: CONNECTING YOUR PHONE 17
How do I connect my phone?
Once you have Skype and SkyMagic up and running, you can hook your phone up to
your computer. The phone’s cord is designed to plug into an open USB port. Connecting
your phone will take only a matter of seconds.
1. Take the cord of the phone and make sure it is oriented correctly to plug into an
open USB port on your computer. Then carefully insert it into the port.
2. You will see balloons appear near your system tray indicating that your computer
has detected the phone and installed the drivers. This is normal. If you have used
a NexoTek phone before, the balloons might not appear because the necessary
drivers are already installed.
3. Wait until a balloon appears that says Your new hardware is
installed and ready to use.
4. You will see the SkyMagic icon become a green phone against a light green
background.
Other manuals for NT-P600S
1
Table of contents
Other Nexotek Cordless Telephone manuals