manuals.online logo
Brands
  1. Home
  2. •
  3. Brands
  4. •
  5. RCA
  6. •
  7. DVD VCR Combo
  8. •
  9. RCA DRC8295N User manual

RCA DRC8295N User manual

m
ging Entertainment,
This symbol indicatesthat this product incorporates double
ins@adonbetween hazardousmainsvoltage anduser
accessibleparts.
This symbol indicates"dangerous
voltage" insidethe product that
presentsa risk of electric shock or
personal iqury.
This symbol indicates
important instructions
accompanyingthe product.
FCC JNFORHATmON
This equipment has been tested and found to comply with the limits for a Class B digital device,
pursuant to Part 15of the FCC rules.Theselimits are designedto provide reasonableprotection
againstharmful interference in aresidential installation.This equipment generates,usesand can radiate
radio frequencyenergy and, if not installed and usedin accordance with the instructions, maycause
harmful interference to radio communications. However,there is no guaranteethat interference
will not occur in aparticular installation.If this equipment does causeharmful interference to radio
or television reception,which canbe determined by turning the equipment off and on, the user is
encouragedto try to correct the interference byone or more of the following measures,
Reorient or relocate the receivingantenna.
Increasethe separationbetween the equipment andreceiver.
Connect this equipment into an outlet on a circuit different from that to which the receiver is
connected.
Consult the dealer or an experienced radio/TV technician for help.
This classBdigital apparatusmeets al!requirements of the CanadianInterference - CausingEquipment
Regulations.ThisclassBdigital apparatuscomplieswith CanadianCES-O03.
Cet appareil num6rique de la classBest conforme _ lanorme du NHB-O03 du Canada.
ieferto the identification/rating labellocated on the backpar@ofpur product for its proper
operating voltage.
Product Registration
Pleasefill out the product registration cardandreturn it immediately,Returning the product registration
cardallows usto contactyou if needed,
Keep},our salesreceipt to obtain warranty parts and service andfor proof of purchase.Attach it here and
record the serialand model numbers in caseyou needthem,The numbers are located on the backof the
DVD Recorder,
Model No. DRC8:_eSN
Purchase Date:
Serial No.
Dealer/Address/Phone:
WARNIING
To reduce the risk of fire or shock hazard,do not expose
this DVD Recorder to rain or moisture,
CAUTION
THIS PRODUCT UTILIZESA LASER,USEOF
CONTROLS OR ADJUSTHENTS OR PERFORMANCE
OF PROCEDURESOTHERTHAN THOSE SPECIFIED
HEREIN HAY RESULTIN HAZARDOUS RADIATION
EXPOSURE.DO NOT OPEN COVERSAND DO NOT
REPAIRYOURSELEREFERSERVICJNGTOQUALIFIED
PERSONNEL.
CAUTION
FCC Regulationsstate that unauthorized changesor
modifications to this equipment mayvoid the user's
authority to operate it.
Note:
This DVD Recorder isdesignedandmanufacturedto
respond to the RegionNanagementInformation. Ifthe
Regionnumber of a DVD disc does not correspond to the
Regionnumber of this DVD Recorder this DVD Recorder
cannot playthe disc.The Regionnumber for this DVD
Recorder isRegion No I,
Note:
This device is protected by U.S.patent numbers4,631,603
and4,577,216and4,819,098 andother intellectual property
rights,The useof Macrovision'scopy protection technology
in the devicemust be authorized by !lacrovision and is
intended for home andother limited pay=per-viewusesonly,
unlessotherwise authorized in writing by Hacrovision.
Reverseengineeringor disassemblyis prohibited.
The apparatusshall not be exposed to dripping or splashing
andthat no objects filled with liquids,suchasvases,shallbe
placed on the apparatus.
Ventilation:
You must adequatelyventilate the product, Hake sure there isadequatespacearound the DVD
RecorderNCR to provide proper air flow for ventilation, Seediagram,
TheAC power cord ispolarized (one blade iswider than the other) and only fits
into AC outlets one way,Ifthe plugwon't go into the outlet completely,turn the
plugover and try to insert it the other way,Ifit still won't fit, contact a qualified
electrician to changethe outlet or usea different one. Do not attempt to bypass
this safetyfeature,
Table of Contents
Chapter I: Connections and Setup
Types of Discs ....................................................... 2
Thin_s to consider before yoe connoct ................................. 2
UnpasB tho Box ..................................................... 2
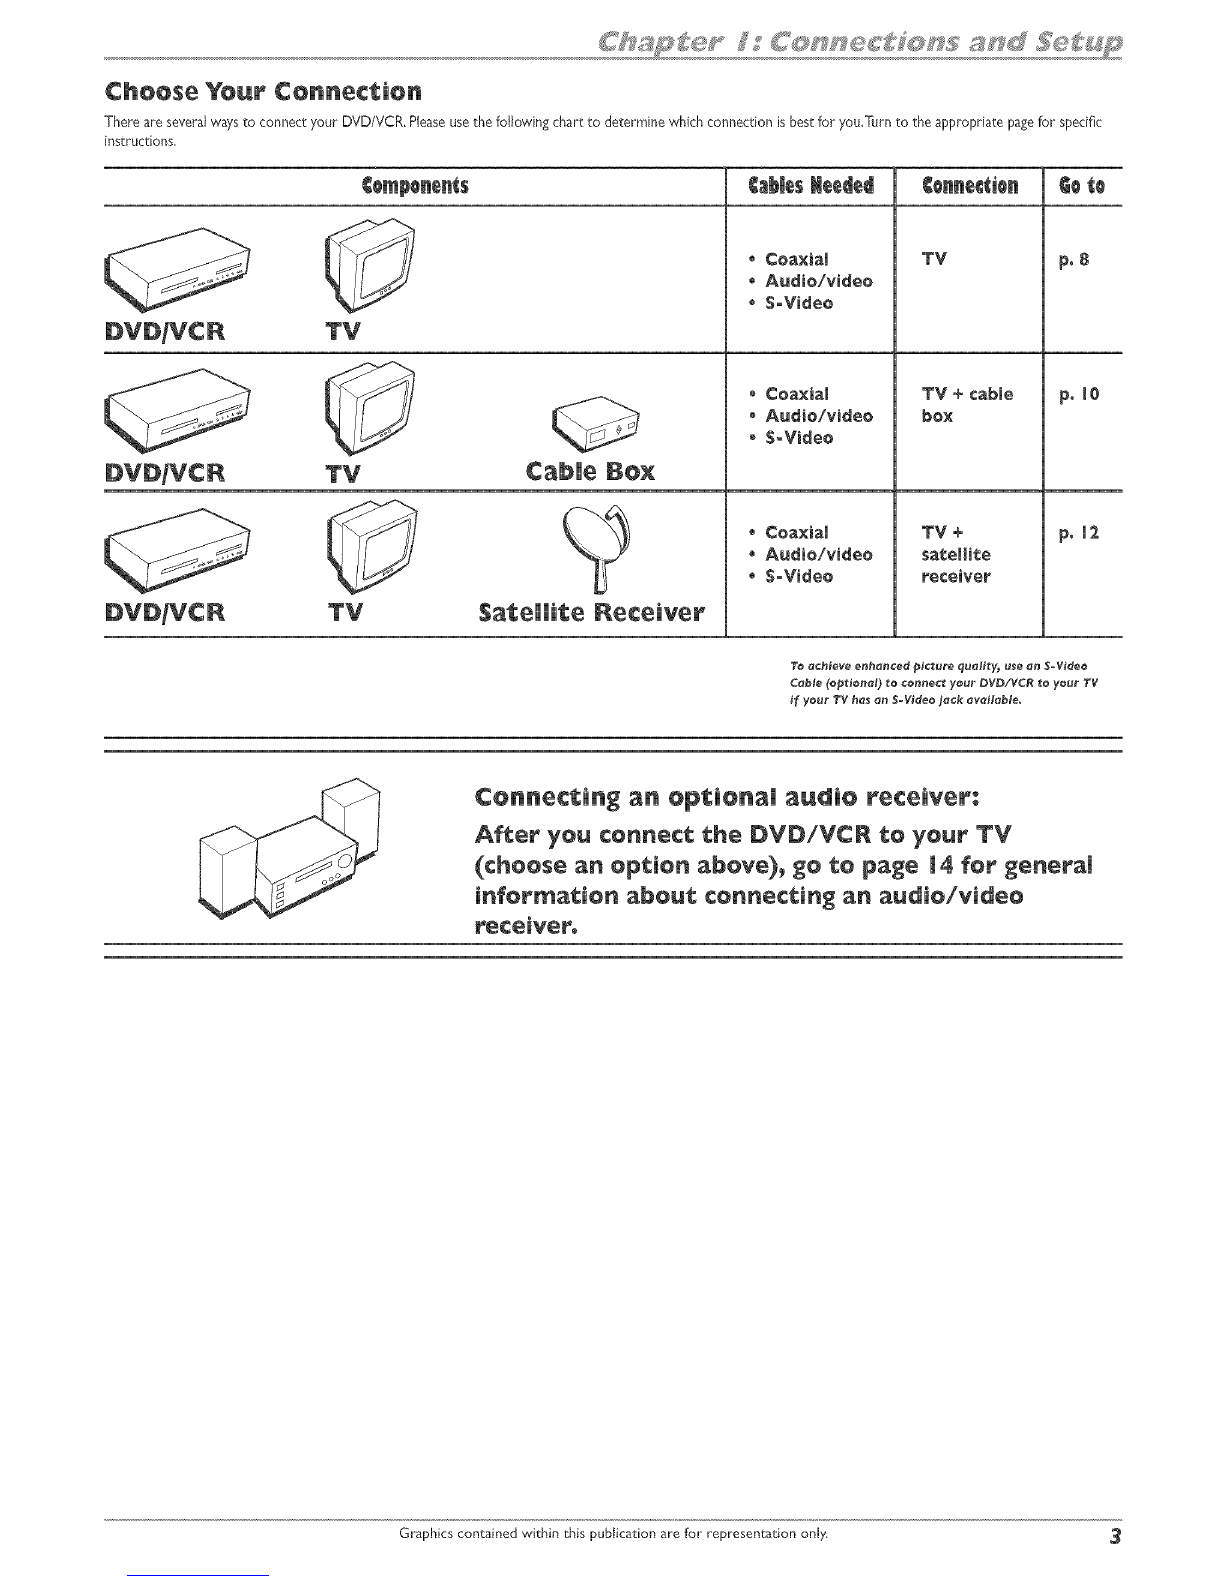
Choose yoor connection .............................................. 3
E×plenetion of jacks end Cebles ....................................... `$
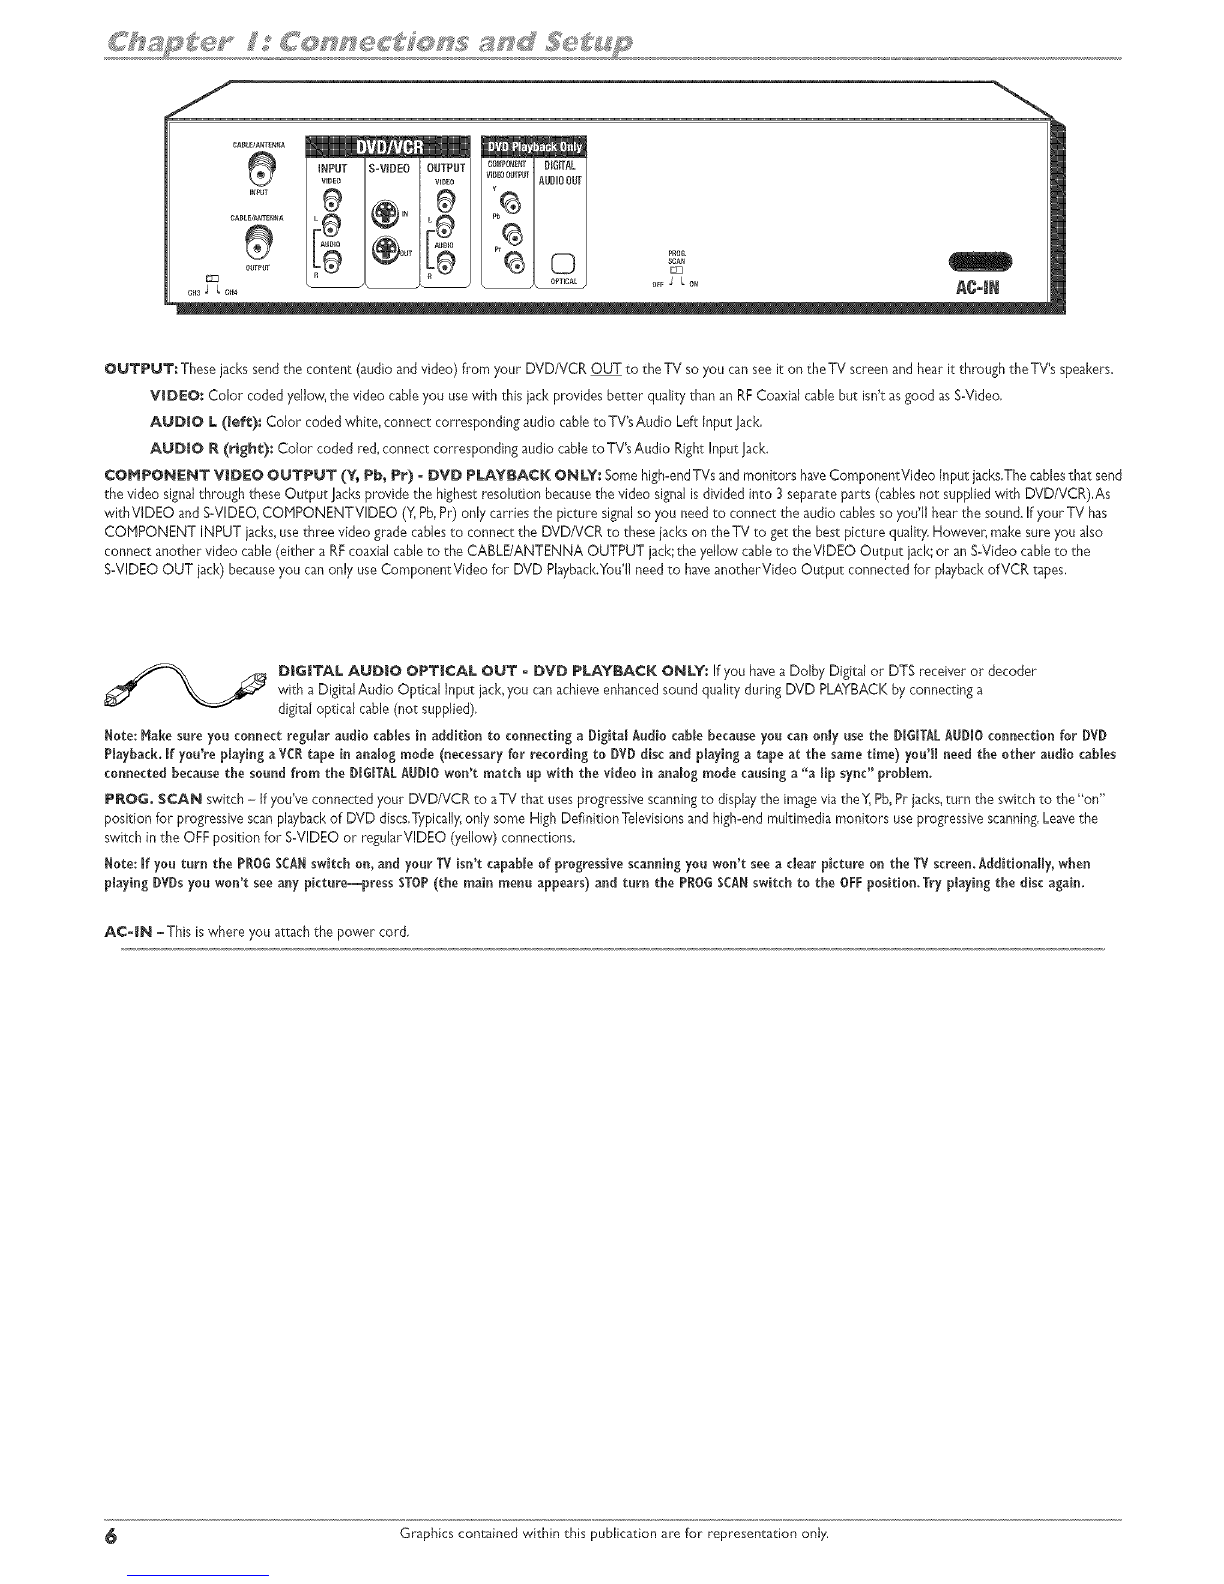
Back of the DVD/VCR ................................................ 5
Front of the DVD/VCR ............................................... 7
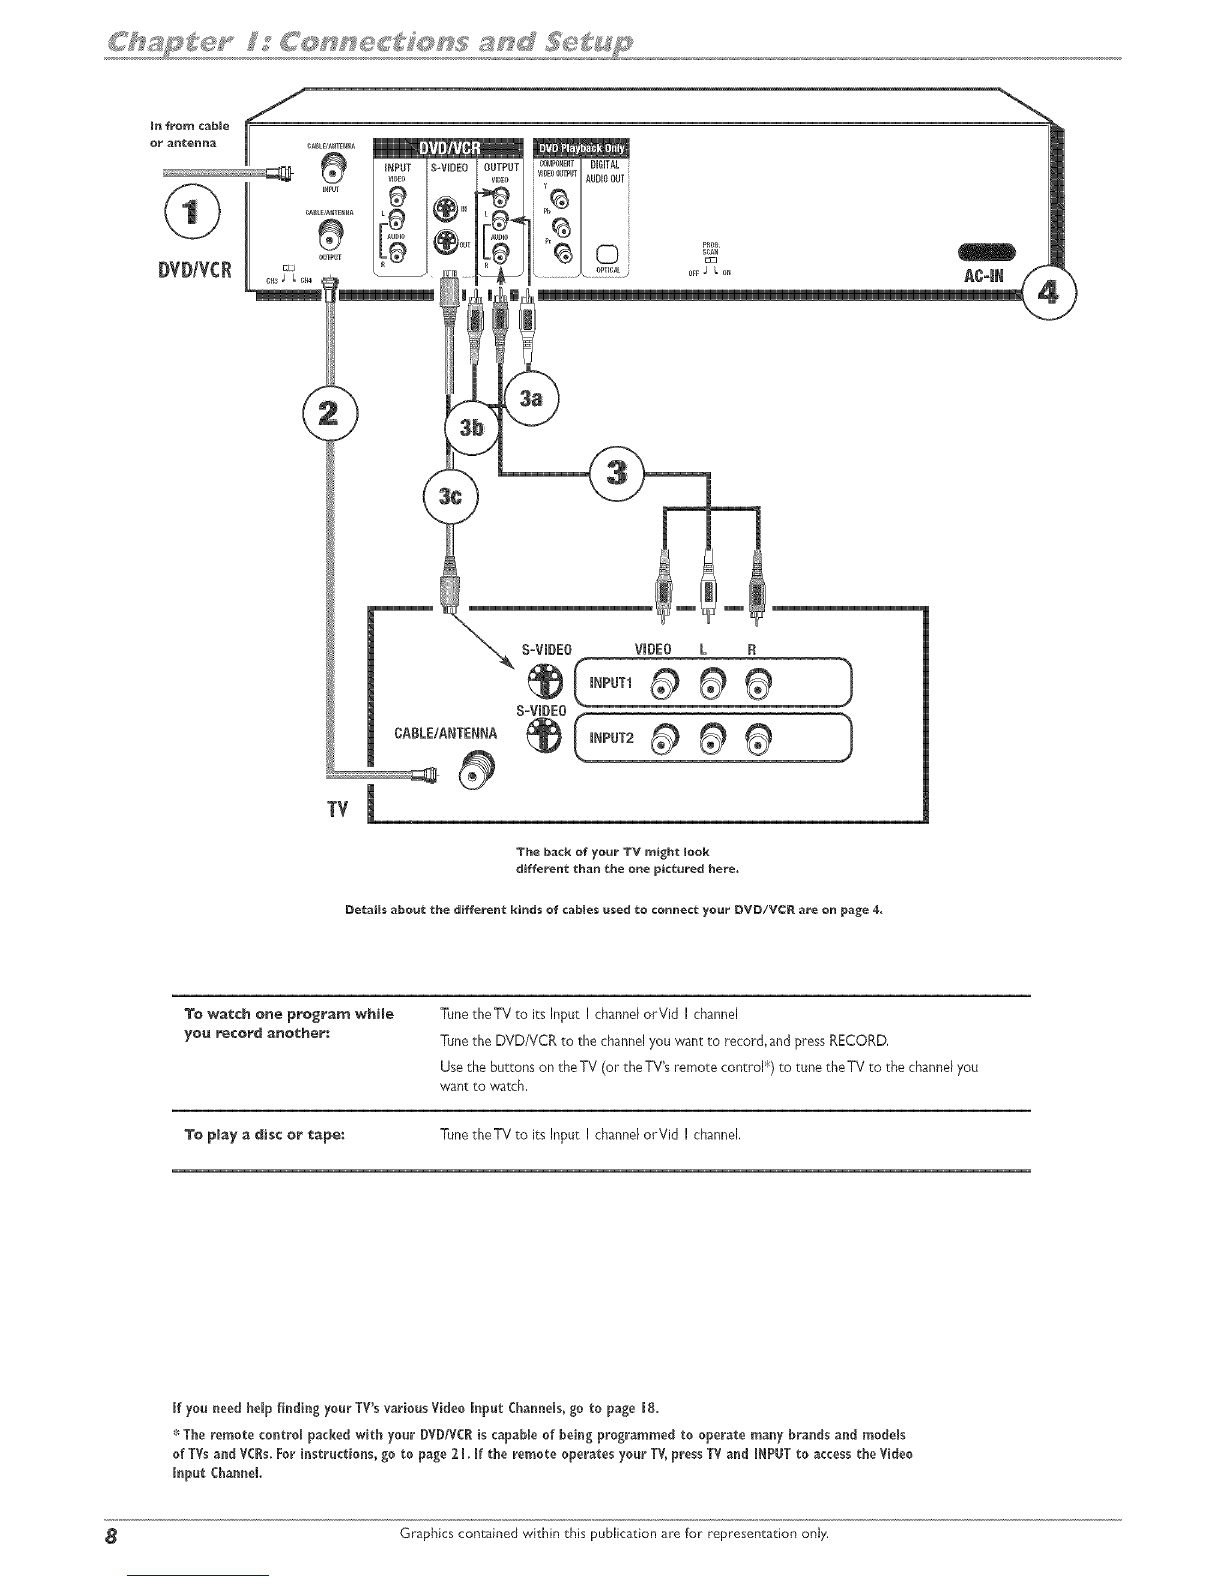
¢onnoctiom DVD/VCR ÷ TV ........................................... 8
Connection: DVD/VCR +TV +Coble Bo× .............................. 18
Connection: DVD!VCR ÷ TV ÷Satellite Receiver ........................ t2
Advanced Aedio Connection Information .............................. I`$
Instaff batteries in tho remote control ................................. t5
Turn on the TV and the DVD/VCR .................................... J5
Complete Intoractive Setup .......................................... 15
What to Expect ..................................................... i 7
How to find your TV_s Video Input Channel ............................ 18
Next Steps ........................................................ 18
Chapter 2: The Remote Controt
Explenetion of buttons .............................................. 28
Find oot if the remote can bo programmed to operate your TV ........... 21
Programming the remote to operate yoor TV .......................... 21
Programming the remote to operate other components ................. 22
Usin_ the remote to operate other components ........................ 28
Code list for programmin_ the remote control ......................... 23
Chapter 3: Using the Re¢order_s Features
Watching TV ...................................................... 28
The Chonne_ Banner ............................................. 28
DVD Recording ..................................................... 28
Express recording ................................................ 28
Watching one channol while you record another channel ............. 28
Watchin_ e xideocessette tape while you record to disc .............. 28
Copyin_ eDVD disc (DVD+R or DVD+RW) to tape ................... 29
Timer Recordings .................................................. 30
Disc Library ....................................................... 3 t
Editing the Genro of aTitle ....................................... 3l
Findin_ a title (movie_ pro_ram_ etco) by using tho 8oft Foeture ........3 i
DVD Playback ...................................................... 32
Editing DVD÷R and DVD+BW discs ................................ 33
Editin_ ti_esusin_ the Hide Chapter Feature ........................ 3`$
VCR Basics ........................................................ 3,$
Besic Playback .................................................. 3`$
Besic Rocording ................................................. 3`$
Advanced VCR Featoros ............................................. 35
Advenced Pleyback .............................................. 35
VCR Info Display ................................................ 35
VCR Recordin_ ..................................................... 36
Express Recordin_ ............................................... 36
Watchin_ one ¢hanno_whffe you recordanother channe_ ............. 36
WatchBt_ eDVD discwhile you record to tepe ...................... 38
¢opyin_ e videocessette tape to a DVD disc (DVD+R or DVD+RW) .....36
Chapter 4:Pi_yingDiscs
Be_ionel ¢odin_ .................................................... 38
Types of discs you can play .......................................... 38
How to Load end Pley Discs .......................................... 38
Usin_ Difforent Henus .............................................. 39
Search Options ..................................................... 39
Pleyback Options ................................................... 39
Usin_ the On-Screen Info Display ..................................... 39
Time Display ................................................... `$I
Selectin_ e Title on DVDs or eTrack on Audio CDs or VCDs ........... `$1
¢hepter Icon ................................................... `$I
SebDtle leon ................................................... `$I
Repeat Icon .................................................... `$_
Audio Icon ...................................................... 4;_
Demote Angle Icon ............................................... 43
PlayHods Icon ................................................. 4`$
IntroScan (Audio CD only) ........................................ 44
PieyBeckControl (PBC)_Video CD only ............................44
Pleyin_rap3end/orJPBGB_es ........................................44
Viewin_ _PEGfi_es .................................................. `$5
Chapter 5: The Hen_ System
Overview of the _onu System ....................................... `$7
The Moin Henu .................................................... 47
Watch TV ......................................................... `$8
Disc .............................................................. 48
Play Disc ....................................................... 48
Disc Title Hone ................................................. `$8
PleyerHenu .................................................... 48
Pleylist ........................................................ `$8
Copy Disc ...................................................... 48
Disc Options .................................................... `$9
Autoplay .................................................... 49
Screen Eormat ............................................... `$9
An_e Icon ................................................... 49
Tape .............................................................. 49
Pley Tape ...................................................... 49
P_eyfrom Stert ................................................. 49
Copy Tape ..................................................... 49
Review A-B Edits ................................................ `$9
De_ete A-B Edits ................................................ `$9
Tape Options ................................................... `$9
Tape AutoPIay ............................................... 49
Pleybeck Hode (Digitel or Analog) ............................... 49
AutoRewind .................................................. `$9
Disc Library ....................................................... 50
Timers ............................................................ 50
Setup ............................................................. 50
Parente_ Controls ............................................... 58
Lock/Un_ock ................................................. 50
Bering Limits ................................................. 50
Unreted Titles ............................................... 51
System Options ................................................. 5l
Digital Ootput ................................................ 5l
SR$/TroSurround ............................................. 5l
Block Level .................................................. 51
Display Dimmer ............................................... 5l
Audio Broadcast .............................................. 5l
Rocording Options .............................................. 5_
Becord Destination ........................................... 5:_
Becording Quelity ............................................. 5'_
Tape Speed .................................................. 52
Smart Record ................................................. $_
Disc Options ..................................... note to see pa_e `$_
Tape Options .................................... note to see pa_e 4_
Lan_ua_os ...................................................... 5'_
Display ...................................................... 5_
Aodio ....................................................... 5_
Subtitles .................................................... 5_
Disc ......................................................... 5'_
Instellation Heno ............................................... 53
Interactive Setop ............................................. 53
Channel Soorch ............................................... 53
Clock Sotop .................................................. 53
Channel List ................................................. 53
Chapter 6: Addition_()nfor_tion
TroobleshooDn_ .................................................... 55
Hendlin_ Ceutions .................................................. 58
Heintenanse of Cabinet ............................................. 58
Limited Werranty .................................................. 59
Accessories ........................................................ 80
Types of D_scs
_PHol OVlEVV
$o_e discs may not be compatible
due to I_ser pickup end disc design°
RECORDING; TYPES OF DISCS YOU CAN USE FOR RECORDING
DVD+R 2,4×_4×_ or 8x ONLY; DVD+RW 2Ax and 4× ONLY.
NOTES:
ItisNOT possibleto recordon CD-RorCD_RW discs.
IF_PORTANT:ItisNOT possibletorecordcontentthatiscopy-protected.Thisisusuallytrueformost premecordedDVD discsand
most pre-recordedVHS tapes.
PLAYBACK_ TYPES OF DISCS YOU CAN PLAY
DVD discs - DVD movie discs(DVD=ROH); DVD+R; DVD+RW; DVD=RW (must be recorded usingvideo mode orVH)', DVD-R
(must be recorded using video mode orVH and mus_befinalized).
¢Ds (Audio ¢Ds, ODOR, ¢D-RW) -Audio CDs contain musicalor sound content only.rap3 discsare CDs (CDoR or CDoP,W)
thor contain rap3 files.Thisproduct alsoplaysCDs that containJPEGfilesand HuNisessionCDs.
Video ¢D O/¢D) and Super Video ¢D ($-VCD) discs - Like DVD video discs,VCDs contain picture andsound content.The
difference issheamount of information thac canbe stored on the disc,VCDstypically havelower picture and sound quality than DVD
discs,SuperVideo CDs (S°VCDs) can beusedto record up_o70 minutes of digital soundandvideo,wizh HPEGo:Zs_andardvideo
andHPEG-I s_andardaudie---bu_you must use DVD+R or DVD+RW discsto record on your DVD/VCR nor S-VCDs.Addizionally,
SoVCDdisc compatibility is dependenton which HPEGcoding software, disc designsoftware, and discwriter software are used',and
the discs_hemselves,
Things to co_sid÷r before yo_ co_ect
Pro_ec_ components fr_r_ overhea_in_
Don'_ block ventilation holes on artyof the components.Arrange the components so that air cancirculate freely.
Don'_ stack components.
When you placecomponents in a stan& makesure you allow adequateventilation.
Ifyou connect anaudio receiver or amplifienplacei_on the top shelf.
P_si_ion ¢_b[_s properly _o avoid_udio interference
Insert eachcablefirmly into _hedesignatedjack.
Ifyou placecomponents above theTV,rouEeall cablesdown the sideof Ehebackof theTV insteadof s_raigh_down Ehemiddle of the backof theTV_
If yourTV hasanantenna_hat uses300oohmtwin leadcables,do no_coil the cables.Also,keep _he_win leadcablesawayfrom audio/video cables.
Con_ect4on Pictures
Audio/video cablesare usually bundledtogether. For better visibility,the connection pictures in this book show eachcable separately (audio left, audio right, and video).
Graphics containedwithin this publication are for represenr4tion onl4
U_pack the Box
Your DVD/VCR camewith the following items: :@L
Remote ¢or_tro[ and
batteries (p_rt Bumber
26 [387)
set of audio video c_bles (p_rt _u_ber _33086)
RF C@gxial c_ble(p_rt
number 2g [396) P_wer cord (part _urnber _8_04)
Graphics contained within chis publication are for representation onJy.
Choose Your Connection
There are several ways to connect your DVD/VCR, Please use the following chart to determine which connection is best for you,Turn to the appropriate page for specific
instructions,
TV
TV
TV Satellite Receiver
CablesHeeded OeOe
• Coaxial
• Audio/video
• S-Video
Coaxial
Audio/video
S-Video
,, Coaxial
,' Audio/video
• S-Video
YV
YV +
satellite
receiver
po8
p01e
po12
Connecting an opt;ionai audio receiver:
Aft:or yell connect the DVD/VCR to your YV
(choose an option abeve)_ ge te page 14 for generaH
information about; connecting an audio/video
receivero
Graphics contained within this publication are for representation only 3
Explanation of mnput jacks and Cables
This section describesthe jacksaridcablesyou can usetomakeconnections (only a coaxial cableanda set of audio/video cablesare packedwith your DVD/VCR--you can
purchaseother cablesby calling 1-800-338-0376,order onfne at s_*w.rca,com, or goto your local electronics store),There are several 'waysto connect your DVD/VCR to
yourTV dependingupon the cablesyou haveandthe jacksthat are on the back ofyour TV.
Different jacksandcablesprovide a different levelof performance, It'simportant to remember,we're r_lking about degrees of picture improvement for comparison. Ifyour TV
hasComponent iacks (Y,Pb,Pr),S-VIDEO,andcomposite video (often color-coded yellow andgrouped with Audio Leftand Rightjacksthat arewhite and red); Component
(Y,Pb,Pr),would be considered excellent, S-Videowould bevery good, andthe composite video jack (yellow) would beconsidered good,
y
PI
P_
Component Video (Y_ Pb, Pr) Jacks and Cables
TheY,Pb,Priacks provide optimum picture qualitybecausethe video is separatedinto three signals
(two signalsare dedicatedto the color portion of the image,andthe other signalisdedicated to the
black andwhite part of the image).
To ensure maximum picture quafty, usethree video-gradecables(no_ supplied)for the connection.
You can purchasebundled component video cables(not supplied) that are color-coded to match the
Y,Pb,Pr jacks (red,green, andblue),ComponentVideo Input iacksare usually found on high-endTVs,
suchas HDTVs; multimedia monitors; andsome of the"flat" LCD and PlasmaTVs or monitors,
Notes;
Also,remember to connectthe left and right audio cablesbecause the Y, Pb, Pr jacks and cables
carry on_ythe picture signal, not the sound,
Nse the ComponentVideo connection (¥,Pb, Pr) for DVDplayback a_d watching TV.Yo_must
a_soco_ect yelow video came or S-Video for VCRp_aybad_i_ analog mode,
S-WDEO
$=Vi_eo jacks a_ Cables
The S-Video (separatevideo) jack providesbetter picture quality thana composite video jack
(sometimes labeledVIDEO and color<oded yellow onTVs) becauseS-Videokeepsthe color part
of the picture separatefrom the black and white part of the picture. Ifyour TV hasan S-VIDEOjack,
connect the DVD/VCR to theTV with anS-Videocablefor a better quality picture.
Note; ler_mmber to co_ect the left a_d right audio cablesbecause tEe S-Video cable carries
o_y the picture signal, _ot the sound,
A_di_lVideo jacks a_d Cables (P,CA°_ype)
Video
The basicVideo jack (usua/y color-coded yellow) isalso referred to as composite video. Composite
video doesn't keepcolor information separated (likeS-Video),but it's better than the video quality
you get from anRF coaxialcable(the type usedto connect a cablesignalor off-air antenna).
A_io
These jacksare usedto sendthe audio from the disc or tape you're playingin the DVD/VCR to the
TVThe audio jacksandcables(supplied)are often color-coded (red for right audio,andwhite for
left audio),Youmust connect audio cablesto theAUDIO L andR jacksonthe DVD/VCR arid the
correspondingAudio Input Jackson theTV no matter whichVideo jackyou connect (VIDEO',
S-VIDEO;Y,Pb,Pr),
Note; If yOlr TVhasonly one input for audio (molo}, conlect it to the left (white L/Mono}
audio lack on the DVD/VCIa_d dol't collect the right audio part of the cable.
Graphics contained within _his publication are for representation only,
Back of the DVDiVCR
The backof your recorder might look alittle overwhelming at first,This section explainswhat goes where andwhy.There are two sets of jackson the back of your DVD/
VCR--INPUT jacksand OUTPUT jacks,
Eachjack is explained individuallybelow',but the basicidea is about sendingandreceiving information to beplayedon or through your DVD/VCR and displayingthat
information on your TV screen,
iNPUT The cablesconnected to INPUT jacks bring the signalthat carries the content INTO the DVD/VCR, suchas the cable signal(programming)from the cable company
or satellite programming from a satellite receiver.
OUTPUT The cablesconnected to the OUTPUT jacksare sendingthe signalfrom the DVD/VCR OUTTO your TV so you can seeit on the screen,Thecorrect cables
must be connected to the DVD/VCP.'sOutput jacksandthe corresponding Input Jacl<son theTV so you canseethe program on theTKYou must also tune theTV to the
correct channelcalled aVideo Input Channel(for details,go to page 18),
Expmanationof_ack_ (fe_ meltto _i_h9
CH3/Ch4 Switch This switch is alsofound onVCRs--it correspondsto the TV channelyou would useto watch atape ifyou only haveyour TV connected to the DVD/
VCRwith an RFCoaxial Cable via the CABLE/ANTENNA OUTPUT iack (if the switch is set to CH3, you would tune theTV to channel3). However,the connections
illustrated in the User's Guide show a preferred connection usingaudio/video cablesor an S-Videocable.
CABLE/ANTENNA INPUT: Connect an RFCoaxial cablefrom anoff-air antenna,cablebox,or cable outlet to this jack.The cable issendingthe programming from the
source to the DVD/VCR.
CABLE/A_TE_A OU'|"POT: Connect an RFCoaxial cable(provided) to this jack and to the Cable/Antenna Input jack on your T_L
INPUT: Thesejacks receiveaudio and video from acompatible component, suchasa satellite receiver.Another set of Input Jacks(INPUT 2) are on the front of the DVD/
VCRfor temporarily connecting components suchas a camcorder or a video game unit.
VIDEO, Color coded yeJJow_the video cableyou usewith this jack provides better quality thanan RFCoaxialcable but isn't asgood as S-Video.Connect
corresponding video cable to a compatible component suchas asatellite receiver or cablebox.
AgD|O L(lefe): Color coded white,connect corresponding audio cableto acompatible component suchasa satellite receiver or cablebox.
AUDIO _ (right.): Color coded red,connect corresponding audio cableto acompatible component suchasa satellite receiver or cablebox.
$_V_DEO
iN: If your satellite receiver or cablebox hasanS-VIDEOoutput jack,cormect anS-Video cableto this jack becauseit provides better picture quality than standard
video (the yellow jack).
OUT: If yourTV hasartS-Videojack,connect anS-Video cableto the TWsS-VIDEOjack andto this S-VlDEO OUT jack on the DVD/VCR to achieveberber picture
quality than sr4ndardvideo (the yellow lack).
Graphics contained within this publication are for representa':ion only.
OUTPUT: These jacksseedthe content (audio andvideo) flora your DVD/VCR OUT to theTV so you can seeit on the TV screenand hear it through the TV'sspeakers.
VIDEO: Color coded yellow, the video cableyou usewith this jack provides better quality thanan RFCoaxial cable but isn't asgood as S-Video.
AUB|O L (_ef_): Color coded white, connect corresponding audio cable to TV'sAudio Left InputJack,
AUDIO R (right): Color coded red,connect corresponding audio cable toTV's Audio Right Input lack.
¢OHPON_T VJBEO OUTPUT (% Pb_P_) - BVD PLAYBACK O_LY: Somehigh-endTVsand monitors haveComponentVideo input jacks.Thecablesthat send
the video signalthrough these Output lacks provide the highest resolution becausethe video signalis divided into ] separate parts (cablesnot suppliedwith DVD/VCR),As
withVlDEO and SoVIDEO,CONPONENTVIDEO (Y,Pb,Pr) only carries the picture signalso you need to connect the audio cablesso you'll hear the sound. Ifyour TV has
COHPONENT INPUT jacks,usethree video grade cablesto connect _heDVDNCR to thesejacks on theTV to get the best picture quality.However, makesureyou also
connect another video cable(either a RFcoaxialcableto the CABLE/ANTENNA OUTPUT jack;the yellow cableto theVlDEO Output bck; or anSoVideocableto the
SoVlDEOOUT jack) becauseyou can only use ComponentVideo for DVD Playback.You'llneedto haveanotherVideo Output connected for playbackofVCR tapes,
D|G|TAL AUDIO OPTICAL OUT -DVD PLAYBACK ONLY: Ifyou havea Dolby Digital or DTS receiver or decoder
with a DigitalAudio Optical input bck, you canachieveenhancedsound quality during DVD PLAYBACKby connectinga
digital optical cable (not supplied),
Note: _ake sure you connect regn_araudio cables in addition to connecting a Digital Audio cable because you can on_yuse the D_G_TALAUD_Oconnection for DVD
Playback. Jf you'repJayinga VCRtape in analog mode (necessary for recording to DVDdisc and p_ayinga tape at the same time) you'll need the other audio cables
connected because the sound from the D_G_TALAUDIOwon't match up with the video in analog mode causing a "a ffp sync" problem.
P_OG. SCAN switch - if you've connected your DVD/VCR to aTV thac usesprogressive scanningto displaythe imageviathe_ Pb,Pr bcks,turn the switch to the "on"
position for progressivescanplaybackof DVD discs,Typically,only some High Definition Televisionsandhigh-end mukimedia monitors use progressivescanning.Leavethe
switch in the OFFposition for S-VIDEO or reguJarVlDEO(yellow') connections.
Note: Jf you tern the P_0G SCANswitch on, and your TV isn't capable of progressive scanning you won't see a dear picture on the TVscreen.Additionally, when
ptayingDVDsyou won't see any pkture--press STOP(the main menu appears) and turn the PROGSCANswitchto the OFFposition.Try ptayingthe disc again.
A¢-_N -This iswhere you attach the power cord.
Graphics contained within this publication are for representation only.
6 6 6 6 o :Sc: 6666
Front of the DVDiVCR
COPY - Shortcut to transfer tapes (VCR) to disc (DVD), which is great for converting your camcorder recordings that are on videocassette tape to a DVD disc,When
you have a recordable DVD+R or DVD+RW disc in the DVD disc tray and a videocassette tape in theVCR, press COPY (theVCR starts playingand the DVD/VCR starts
recording automatically).
$TAND_Y/O_ -Turns the DVD/VCR on andoff,
V¢_ B_t_ons
_ECO_D - Records to a videocassette tape,
STOP/EJECT -When playingatape, stopsplayback,When tape isn't playing,ejects the tape.
_EV - Rewindsthe tape
FWD - Fast forwards the tape
PLAY/PAUSE - Starts pbybacl<,During playback, pauses playback,
I_PUT -Just like aTV hasVideo Input Channels(page 16),the DVD/VCR hasoneVideo Input Channelfor eachset of INPUT jacks,TheVideo Input Channelis the
"channeF'to which you tune the DVD/VCR so you can seethe picture andhear the sound that%comingfrom the component that isconnected to the DVD/VCR's INPUT
jacks.For exampie_if you connected your camcorder to theAudio andVideo Inputjacks on the front of the DVD/VDR, you *wouldpressthe INPUT button until INPUT2-
Frontappears,
_V_ _ttons
¢_°/SI(|P- (cha_el _ew_/skip reverse) - Goes to the previous channel in the channel list when you're watchingTV.When playinga disc,goes to the
beginning of the current chapter or track unless you're within the first minute of a chapter or the first IS seconds of a track--then, you'll skip to the beginning of the
preceding chapter or track_
CH÷/SKIP÷ (channel up/skip forward) - Goes to the next channel in the channel list when you're watchingTV.When playinga disc,goes to the beginning of
the next title, chapter,or track on a disc (in effect,"skipping" the title, chapter,or track).
OPEN/CLOSE -Opens andclosesthe disc tray,
_E¢O_D - Records content to a DVD disc (DVD+R or DVD+RW discsonly).
STOP -Stops playback and/or recording.
_EV (reverse) - Searchesbackwards through the disc.
FWD (forward) - Searchesforwards through adisc.
PLAY/PAUSE -Starts playbackof adisc. Pausesrecording or playback.
Fron_ lnp_ Jacks:
_NPUT _.: Audio/Vi_eo jacks -These Input Jacksare provided for conveniencewhen you are connectingatemporary component, suchas acamcorden
S-VIDEO - If acomponent youYeconnecting,suchasa camcorder,hasanS-VideoOutput jack connect it to this jack for picture quality that is better than regular
video (yellow), Remember,you still haveto connect audio cablesto hear sound.
Graphics contained within this publication are for representation only 7
/
mnfro_ cable
OI= antenna
®
O_T
DVD/VC_
i
TV
CABLE!ANTENNA
The back of yo_ TV might look
diffe_'_ than _:be one pic_:ured here.
Deeaib; _bo_l_ the diffe_e_ kinds of ¢ab_e_ _ed 1_oco_e¢_: your DV_/V¢_ _e on page 4_
3=0wa_:¢h one prog_a_ while
yo_ record another: TunetheTV to itsInput I channelorVid I channel
Tunethe DVD/VCR to the channelyou want to record, and press RECORD,
Use the buttons on theTV (or the TV_sremote control ¢) to tune the TV to the channel you
want to watch,
To play a _isc er ¢ape: TunetheTV to its Input I channelorVid I channel,
If yo_ need help finding your TV's various Video Input Cban_els, go to page 18.
_:_The remote control packed with your DVD/VC_ is capable of being programmed to operate many brands a_d models
of TVs and VCRs. _or i_structions, go to page 2 I. If the remote operates your TV, press TV and INPUT to access the Video
Input Channel
Graphics contained within this publication are for representation onJy.
RF Co_ial cable
Audio video cables _re usually color_
coded _d_ white_ and yellow,
Connection: DVD/VCR ÷ TV
I. Connect the signaJ(cabJeor antenna):
Note: Depending upon howyou currently have your TVconnected,you'll haveto disconnect the
came from yourTV'sAntenna Input iack (sometimes tabe_edCABLE/ANTENNA)or your VCR's
Input iad_ before you connect the cableas explained below.
Cable service." Ifyou havecableservice viaa cablethat comes out of the wall,connect the end
of that cableto the CABLE/ANTENNA INPUT jack on the DVD/VCR.
Note: If you haveacable box, go to page l0 for comlectioninstructions.
Off-airant:enna: If you useanoff=airantennato getTV prograrnrning,connect the antenna'sRF
coaxialcableto the CABLE/ANTENNA INPUT jack on the DVD/VCR.
2. Connect the DVD/VCR 1:othe TV
You need to connect cablesfrom the DVD/VCR's OUTPUT jacksto the TV's INPUT jacksin order to
seethe content horn the D'v'D/VCR.
Use the RFCoaxial cablethat was packedwith your DVD/VCR, and connect one end to the
CABLE/ANTENNA OUTPUT jack on the DVD/VCR. Connect the other end to the Cable/
Antenna Input iacl<on the backof your TV (sornetirneslabeled CABLE/ANTENNA).
3, If you want to beable to record oneTV program while you watch adifferent prograrn,you need
to connect the audio/video cablesinaddition to connecting the RFCoaxial cabledescribed in
Step 2.
3a, Connect the audio cables.
A set of audio/video cableswas packedwith your DVD/VCR. Connect the audio cablesto
the OUTPUT AUDIO L(left - white) and R(right - red) jackson the backof your DVD/
VCR,andto the correspondingAudio Input jackson yourTV (sometimes labeledAUDIO IN
L andR).
3b. Connect the video cable.The cablesyou usefor the video determine the quality of the
picture you'll see on your TV when you're playingDVDs.For more information about cables
andsignalquality,go to page4.Connect the video cable(yellow) to the OUTPUTVIDEO jack
on the backof your DVD/VCB, andto theVideo Input jack on your TV (sornetirnes labeled
VIDEO IN).
3e. if your TV hasanS-Videojack, useanS-Video cable(optional). Connect one end of the
S°Videocable to the S=VIDEOIN iack on the backof the TV andthe other end
to the S=VIDEOOUT iack on the backof the DVD/VCR.
COHPONENT OUT % Pb, Pr (nee shown) Ifyour TV hasCornponent Input Jacks
(Y,Pb,Pr),you canachieveevengreater picture quality (DVD playbackonly) by connecting
the DVD/VCR to theTV usingthese jacks(COHPONENTVIDEO OUTPUT,Y,Pb,Pr on the
DVD/VCR). For more explanation,go to page4.CornponentVideo cablesnot suppliedwith
the DVD/VCR.
Notes:
If your TV is capableof progressivescan,connectthe DVD/VCRto the TV using the COHPONENT
VIDEOOUTPUTiacks, and slide the PROGSCANswitch to the ON position to see DVDtit_es
(movies) in progressivescan format. If you need more explanation, go to page 6,
If you use the COMPONENTVIDEOconnection (Y,Pb,Pr),you must connectanother video cable
(yellow or S-Video)for VCRp_ayback.TheComponent Out iacks are only for DVDplayback.
4, Attach theAC power cord to the unit.
5, Insert the other end ofthe AC power cord into anAC outlet (or power strip).
Go i:o page II_;
Graphics contained within this publication are for representa_:ion only 9
Box
Notesaboutcame boxes:
[f you have questionsaboutusing acablebox withtie DVDIVCI,consultyourcame company.IDA canonlyprovidegeneral
instructionsbecausecame servicesand cableboxesdifferinvariousareas.Thisconnectiono_[yshowsa basicIF CoaxialCaMe
co_ectio_,},ourcab{ebox may haveAudioVideoor S-Videoiacks.
Ifyou connect your components as described,you must accessdifferentVideo Input Channels onyour TV to see programming.If you don't know how to
aceessVideoInput Channelsonyour TV,go to page 18for heIp,A general explanation,basedon the connection shown above,follows:
To watch one pro_ra_ whNe TunetheTV to its Input I channelorVid Ichannel.
Tunethe DVDNCR to the cable box channel(usuallychannel 2, 3,or 4),
Use the channel buttons onthe cablebox to tune to the channelyou want to record. Pressthe
RECORD button on the DVD/VCR,
Use the buttons on theTV (or theTV's remote control _)to tune theTV to the channelyou 'want
to watch.
To play a _isc o_ tape: TunetheTV to its Input I channelorVid Ichannel.
Ifyou _eed helpD_di_gyour TV'svariousVideoI_putChar_eis,go topage Ig.
*The remotecontrolpackedwithyour DVDIVCRiscapableofbeingprogrammed tooperatema_y bra_dsa_d modelsofTVs.Fori_structio_s,go topage 21,Ifthe
remoteoperatesyourTV,pressTV a_d INPUTto accesstheVideoI_putCha_eL
OGraphics contained within this publication are for representation only.
Connection: DVDiVCR + TV + Basic Cable Box
RF Coaxial cable
Audio video cables are usualy
color=coded red_whiee_ andyelow,
Red= righ_ audio; White = _eft
audio; Y_IIow = video.
ff your TV has an S-Video
jack_ ¢onne*:t an S-Video cable
(optional)o S=Video provides
better video qualty than
composite video (the yetow
inch).
I+ Connect the cable box signal
Note: tefore you connect the DVD/VCl,you'! need to tisconnect some of the cables first in order to reconnectthem.
i b. Connect the RFCoaxial cablethat isconnected to the cable box'sOutput jack (sometimes labeledCABLE OUT) to the
CABLE/ANTENNA INPUT jack on the backof the DVD/VCR,
2+ Connect the DVD/VCR to the TV
You need to connect cablesfrom the DVD/VCRg OUTPUT jacksto theTV's INPUT jacksin order to seethe content from the
DVD/VCR (whether ifs aTV program or a disc you% pbying),
2a. Use the RFCoaxial cablethat was packed with your DVD/VCR, and connectone endto the CABLE/ANTENNA OUTPUT jack
on the DVD/VCR. Connect the other end to the Cable/Antenna Input jack on the back of your TV (sometimes labeled CABLE/
ANTENNA).
If you want m beable to record oneTV program while you watch adifferent program,you need_oconnect the audio/video cables
(provided) in addition to connecting the RFCoaxial cable described in Step 2a.
2b. Connect the audio cables.
A set of audio/video cableswas packedwith your DVD/VCR. Connect the audio cablesto the OUTPUTAUDIO L (left - white)
and R(right - red) jackson the back ofyour DVD/VCR, andto the corresponding Audio Input jacks on yourTV (sometimes
labeledAUDIO IN Land R).
2e. Connect the video cable.The cablesyou usefor the video determine the quality of the picture you'll seeon your TV when
you% playingDVDs. For more information about cablesandsignalquality,go to page4,
Connect the video cable(yellow) to the OUTPUTVIDEO jack on the back of your DVD/VCR,and to theVideo Input iack on
yourTV (sometimes labeledVIDEO IN),
2d. S-VIDEO If yourTV hasanS-VIDEO jacl<,connect one end of anS-Video cable(optional) to the S-VIDEO IN iack on the back
of theTV andthe other endto the S-VIDEO OUT jack on the backof the DVD/VCR.
COMPONENT OUT ¥_Pb_ Pr (not shown) if yourTV hasComponent Input Jacl<s('_',Pb,Pr),you can achieveeven
wearer picture quality (DVD playbackonly) by connectingthe DVD/VCR to theTV usin_these jacks(COHPONENTVIDEO
OUTPUT,Y_Pb,Pr onthe DVD/VCR). For more explanation,go to pa_e4,ComponentVideo cablesnot suppliedwith the DVD/
VCR,
Notes:
If your TV is capableof progressivescan,connect the DVI)/VCI to the TV using the COMPONENTVI)EO OUTPIT iacks,an_ slMe the
PBOGSCANswitch to the ON position to see DVDtitles (movies) in progressivescan format. _fyou need more explanation, go to
page 6.
If you use the COMPONENTVIDEOconnection (V,Pb,Pr),you must connect another video cable (yelow or S-Video) for VC!
#aybaek.The Component Out iacks are only for DVDplayback.
3. Attach theAC power cord to the unit.
4. k_sert the other end of the AC power cord into an AC outlet (or power strip).
Go to page _l$
Graphics contained within this publication are for representation only _
The back of your
satellite r_¢eiver might
look diffe_=en¢ than the
one pid:ured here,
DVDIVCR
The back of your TV _i_ht l_k
differ_mt _h_ _he o_e pict_r_ he_,
Details abo_ _he differem_ kimds of c_bles _sed to c_mmect your DVD/VCR are om page 4,
To w_:¢h TV (s;_eHi_;e TunetheTV to its Input I channel orVid I channeJ
Tunethe DVD/VCR _othe INPUT I channel(pressthe iNPUT bu[ton on _heremote).
Tune_he satellite receiver to the channelyou w_nt _owatch.
T_ w_:¢h TV (s_eHi_e
pro_rmmmim_) wi_h _he
DVD/VC_ _rmed off:
"Fdnethe TV to its CABLE/ANTENNA iNPUT channeJ(usu_Hy@anne}2,3,or 4).
Tune_he sateJJitereceiver to the channelyou w_nt _owatch.
T_ pJ_y _disc or _pe: :F_netheTV to Input I channel orVid I channel,
_ Graphics contained within this publication are for representation onJy.
RP ¢oa×ial cable
Audio video cables are usually
color-coded _d_ white_ and
yellow. Red =r+gh_ audio;
White = melt audio_ Y_IIow =
video.
Connection: DVDiVCR + TV +Satellite Receiver
The foJJowinginstructions enableyou to record the programs from your satellite receiver.Becausethe _ _uration andlabelsvar4I
on different satellite receivers and televisions,the stepsprovided are _ guidelines.ConsuJtyour SateJJJteReceiverand/orTelevision
User'sGuides for additional information. Ifyou havecableTV serviceAND satellite TV]you canconnect the cablesignalto the DVD/
VCR'sCABLE/ANTENNA INPUT jack.
J. SateHit:e signah Leavethe cablein place that comesfrom the satellitedish andgoesto the satellite receiver,
2,. Connect the satellite receiver to the DVD/VCR
2a. Connect acoaxial cableto the satellite receiver'sOUT TO TV jack,and to the CABLE/ANTENNA INPUT jack on the
DVD/VCR.
2b. Connect audio cabJes(red and white) to the satellite receivedsoutput jacks[sometimes labeledAudio Left (white) andAudio
Right (red)], Connect the other endsof these cablesto the corresponding INPUT AUDIO LandAUDIO R jackson the backof
the DVD/VCR.
2c. Connect the video cabJe(yellow) to theVideo Output jack on the satellite receiver (sometimes labeledVIDEO) to the INPUT
VIDEO jack onthe backof the DVD/VCR.
If your sateJJitereceiver,hasanS-VIDEOOUT jaclqconnect anSoVideocable to that jack and to the SoVIDEOIN jack on the
DVD/VCR for increasedpicture quality (not shown in connection diagram),
3. Connect the DVD/VCR to the TV
You need to connect cables from the DVD/VCR's OUTPUT jacks to theTV's INPUT jacks in order to see tile content from the
DVD/VCR (whether it's asatellite program or a disc you're playing).
3a. Connect an RFcoaxialcable to the DVD/VCR's CABLE/ANTENNA OUTPUT jack and to the TV'sAntenna Input jack
(sometimes labeledCABLE/ANTENNA),
3b. Connect the audio cables.
A set of audio/video cableswas packedwith your DVD/VCR. Connect the audio cablesto the OUTPUTAUDiO L (left - white)
and R(right - red) iacl<son the back ofyour DVD/VCR, andto the corresponding Audio Input jacks on yourTV (sometimes
labeledAUDIO IN Land R),
3¢. Connect the video cable.The cablesyou usefor the video determine the quality of the picture you'll seeon your TV when
you're playingDVDs. For more information about cablesand signalqualit_ go to page4,
Connect the video cable(yellow) to the OUTPUTVlDEO jackon the back of your DVD/VCR,and to theVideo Input jack on
yourTV (sometimes laheledVIDEO IN),
S-VIDEO (not shown) Ifyour TV hasan SoVlDEOinput iack,connect one endof an SoVideocable(optional) to the
S-VIDEO input jack onthe backof the TV andthe other endto the EoVlDEOOUT jack on the backof the DVD/VCR.
COMPONENT OUT Y_ Pb_ Pr (not shown) Ifyour TV hasComponent InputJacks(Y,Pb,Pr),you canachieveeven
greater picture quality (DVD playbackonly) by connectingthe DVD/VCR to theTV usingthese jacks(COHPONENTVlDEO
OUTPUT,Y_Pb,Pr onthe DVD/VCR), For more explanation,go to page4,ComponentVideo cablesnot suppliedwith the
DVD/VCR.
Notes:
If your TV is capableof progressivescan, connect the DVD/VCRto the TV usin_ the CO_,IPO_E_TVIDEOOUTPUTiac_s,a_d s_idethe
P_OG$CA_switch to the O_ position to see DVD¢it_es (movies} i_ p_egressive scan format. If you _eed moFe explanation, go to
pa_e 6.
If you use the COHPONE_TVIDEOconnection (¥, Pb, Pr), you mus_:connecta_ethe_ vi_ee cable (yellow or S-Vi_eo) for VC_
playback.The Co_ponent Out iaeks are on_yfor _V_ p_ayback.
8. Attach theAC power cord to the unit. Insert the other end of theAD power cord into anAD outlet (or power strip),
_o i:o p_e _
Impo_an_
You can't watch one satellite program andrecord another satellite program at the sametime,
This connection scenario illustrates abasic connection--you canachievebetter video quality by connecting the components with
S-Videoor ComponentVideo options, dependingupon the cablesyou haveandthe jacksavailableon your components,Seepage4
for more information about acksandcables,
Graphics contained within this publication are for representation only _ 3
Advanced A_dio Connection Info_'mation
Both Dolby Digital® and DTS® are audio formats usedto record 5.I=channelaudio signalsonto the digital track of film (while the film is beingmade).Both of these formats
provide up to six separatechannels:left, right, center,left rear,right rear,and common subwoofer,The discwill play 5,!ochannelsoundonly if you've connected a DTS or
Dolby Digital receiver or decoder,and if the disc isencoded in the Dolby Digital or DTSformat.
PleaseReadThisBefore Bsing the DIGITALAUDIOjack!
Thisunit's digita_ audio output iack is designed for a connectionto a Bo_byBigRal or DTSrecdver or decoder. Older digital equipment may not be compatible with
the Dolby Digital hitstream. Sucha connectioncan create a high level of noise that may be harmful to your ears, and could damage headphones or speakers, it b
important to choosethe correct Digital Ootput setting in the System Options meno. For more information, go to page 51.
AdditionaBy, the DiGiTALABDIOOBTconnection isfor DVDplaybackonly. Hake sore yon connect aodio cables (white and red) for VCRplayback.
Connecting your DVDiVCR to a_ audio/video receiver
Y_u'B need te consult instructions tha_ came with yo_ audio video receive_ in order to commect it prope_y_ The information below provides general
guidelinesfor the DVD/VCR'sAudio Output Jacks.
For abasicconnection, connect the left andright audio cablesto your audio/video receiver and_o_heOUTPUT AUDIO L (left - white) and R (righ_- red) jackson the
backof },our DVD/VCR.
If you havea Dolby Digital or DTS receivecconnect anoptical cable(SPDIF)_othe DIGITAL AUDIO OUT jack on the DVD/VCR and _he Digital Audio Input lack on the
receiver (cablesnot suppibd with DVD/VCR).You must alsoadjust_heD_'#_e_Ou_pu_ setting (go _opage51for information).
Rote: Removethe protecdve cover that's in the DIGITALABDIOOUTOPTICAL}ack before connectingthe cable,
Hanut_c_,ured under Icense flora E)ob XLaboratories "E)olbr" anti t_e cloub{e D s' mbol are nademarl, s of E)obr Laboratories C:onficlentia unpublis led wori<s
(<) c_c/21997 Do[b? Laboratores, nc Ai dghe reseP,,ed
DTS is a registered trademark of D gital HomeTl_eate_ Systems, nc
14 Graphics contained within this publication are for representation only.
install Batteries in the Remote
Is Removethe battery compartment cover on the backof the remote.
2. insert new batteries,Hatch the polarities (+ and-) on the batteries with the diagram on the remote,
3. Put the battery compartment cover backon the remote.
lmpor1:ant Ba1:tery Informal:ion
if you're not going 1:ouse 1:he remo1:e for a mon1:h or more_ be sure 1:o remove 1:he hal:reties because they can leak an_ cause _ma_e,
* Dispose of b_;_eries in1:heproper manner, according1:ofederal,s1:a1:e,and localregu|a1:ions.
, Anyba1:1:erymay_eake_ec1:roly1:eifmixedwi1:hadifferen1:ba1:1:ery1:ype_ifinse_edin¢orren1:ly,ifa_Iba_1:eriesareno1:rep_ateda1:1:hesame1:ime_if
disposed of infire_or ifan a_emp1: ismade I:ocharge aba%1:ery no1:in1:ended1:obe recharged.
*Discard leaky ba1:1:eries immedia1:ely, Leaking ba1:1:eries can cause skin burns or o1:her persona_ injury,
Poin% _he Remo_:e in _he Right: Direct:ion and P_ i_: in DVD/V¢_ Hode
Wben you want the remote to operate the DVD/VCR, point the remote _t the DVD/VCR, not the TV.The remote hasto bepointed intbe correct direction and toward the
correct component in order for the remote control's signalto communicate with the sensor on the component. Hake surethere is aclear path between the remote control
andthe component you want to operate,so the signalisn't blocked.
Hake sure the remote is in DVD/VCR mode--press the DVD/VCR button,
Turn on _he TV _d DVDiVCR
Is Turn on the DVD/VCg--press the DVDNCR button on the remote.
2. Turn on theTV andtune it to the correctVideo Input Channel--if you haveanRCA,GE,or ProscanTV,presstheTV button on the remote (if the TV doesn't turn on,
pressthe ON.OFF button) and then pressthe INPUT button on the remote until you getto theVideo Input Channelthat matches how the DVD/VCR is connected to
theT\{
Ifyou haveanother brandof TViturn on the TV and tune theTV to the correct Video Input Channel (ifyou don't Imow how to accesstheVideo Input Channelon your
TV,goto page18for help).
Note:Youcan programyourremotetooperatemost brandsofremotecontrollableTVs.instructionsareon page2 i.
L@_ oft_pa'
butto_
DoII/,I OtTOIi// --
button
O_-OFF
SAT A_X
O
ZO_ ANALO_ _PE_ A_ Up afro',,','bt,JttOl
Ri,_l_tarrow
button
_"OKbutton
Comple_ce _he interactive Setup
The next few pagesstepyou through the seriesof screensthat will appearthe first time you turn on
your DVD/VCR,
Use the remote control to follow the omscreen instructions,The arrow buttons move the on-screen
highlight in the corresponding directions on the screen (up,down, left, right),
Pressthe OK button to seJectahighlighted item,
Notes:
You can accessthesetupscreens from themain menu.ifyou move,geta differentprogram
providerforTVshows,or changeyourconnections,you'llneed to completethe interactiveSetup
again.
if you don't seethe Languageselection screen (below) the first time you turn on the DVD/VCR,
make sureyou'vetunedyourTV to theVideoinputChannelthatcorrespondstotheway you've
connectedtheTV tothe DVD/VCR.if you need he_p,go topage 18.
Use the aF_ow buttons on the re_o%e to move %h_ou_h
on=screen menus and highlight different optio_, Press the
OK bu_ton to select a menu item Ichor:is highli_hted_
I) Selec* on-screen men_ ian_:_a_e
Hake surethe remote is in DVD/VCR mode (press the DVD/VCR button), If you want the on-
screen menusto appear in English,pressthe OK button on the remote control, If you prefer
another language,pressthe arrow' down button until that languageis highlighted.PressOK to
seJectthe language.Next, the connection screen appears,
Note: if you don't see the Languageselection screen the first time you t_rn on the DVD/VC_,
make sureyou'vetunedyourTVto theVideoinputCbanne}thatcorrespondstotheway you've
connectedtheTV tothe DVD/VCR.ifyou need he_p,go topage 18.
Graphics contained within chis publication are for representation only, _
2) Semect the Signal that's connected _o _he CABLE/ANTENNA
_NPUT jack
Completing this information letsthe DVD/VCR know what program signalsare beingsent to it.
Choose the type of signalthat isconnected to the CABLE/ANTENNA INPUT jack.Pressthe
right arrow button to accessthe choices:
Here: If you'veconnectedacablebox or satellite receiver to the CABLEfAHTE_A I_PUT]ack,
torn on the camebox or satellite receiver before completingthis step,
Co_le-An_enn_ (cableservice)
Antenno Only (no cableservice,just off-air antenna)
_ote: If the DVDIVCBdoesn't start searching for channels after you've selected the type
of signa_connectedto the CA_LE/AHTE_A I_PUT iack, pressthe down arrow botton to
highlight Done and pressOK.
3) Chan_el Search
The DVD/VCR automatically scansthe signalcoming through the cableconnected to the CABLE/
ANTENNA INPUT jack and prepares the channel list.The channel list determines what channels
appearwhen you pressthe CH+ and CH- buttons.
A progressindicator appearson theTV screen.When the Channel Searchreaches lOB%,press
OK (the Channel List appears).Ifthe Channel List doesn't appear,check the CABLE/ANTENNA
INPUT iack to makesure the cable is connected properly.
_ote: If yoo are osing on_ya came box or satellite receiver, there wi_ be few,if any,channels in
the channel list.
Chan_el Lis_:
The Channel List containsthe channelsyou tune to when you pressthe CH+ andCH= (channel
up andchanneldown) buttons on the remote control. From the Channel Lis; screen,you can
delete channelsyou rarely watch.You'Hstill beableto tune to the "deJe;ed"channelsdirectly by
usingthe number buttons on the remote control, but the DVD/VCR won't tune to a channelyou
delete when you pressthe CH+/CH= buttons on the remote control.
Pressthe down arrow button to scrol!through the channels.A checkmark in the box next to the
channel meansit hasbeen stored in the channel list.Highlight the channeland pressOK to check
or uncheckthe box.Youcan alsolabel channelsby pressingthe INFO button.
To skip editingthe channellist,pressthe right arrow button.
5) Time Ze_e
Use the down arrow button to highlightyour time zone,and pressOK (the Daylight SavingsTime
screenappears).
6) Dayli_h_ Savi_s Ti_e
Ifyou live an atea that recognizesDaylight SavingsTime,pressOK (the DVD/VCR's internal clock
will automatically advancethe time by I hour in the spring and set the clock backby I hour in
the f_ll).
Ifyou live in anareathat doesn't useDaylight SavingsTime, pressthe right arrow button to
highlight No,andpress OK,
_ Graphics contained within chis publication are for representation only.
........ _ ___ ................%_
7) Time and Date
Your DVD/VCR hasan automatic clock, but it maytake awhilefor the DVD/VCR to find the
correct channelfor the dock.Therefore, you might want to set up the clock manuallyhere.
Use the number buttons on the remote to enter Yeor,Date,and Time.Tochangethe AM/PM setting
when you're entering theTime, pressthe right arrow button,
Notes:
If this screen doesn't appear,you can set the time later from the main menu--with the remote
in DVD/VCRmode, pressMENU,select Setup,select Installation, select ClockSetup and foffow the
on-screen instructions.
The DYD/VCRis equipped with a dod_ that automaticaffy keepsthe time accurate. If you have
any problemwith the time being accurate, simply turn off the AutoCJockoption (page53).
Accessthe main menu,choose System Options, and then Auto(:Jock. FoWIowthe instructions to
disable it, and set the time manuaffy using the ClockSetup menu option that you accessvia the
Setup/Installation menu.
Watch TV
When the set-up procedure iscomplete, the mainmenuappearswith the WatchTVmenu highlighted,
To watchTV,just pressthe OK button on the remote,
What to E×pece
T_rn on the DVD/VCR _e Wa¢ch TV
In order to usethe features of the DVD/VCR, you'll haveto get usedto turning on your DVD/VCR to 'watchT_A
Youalso need to tune theTV to theVideo Input Channel--instead of changingchannelswith theTV's channel upand channeldown buttons,you changechannelsvia the
DVD/VCR's channelup anddown buttons (or number butmns).The TV stayson theVideo Input Channelthat corresponds to the Input Jackson theTV you usedto connect
theTV to the DVD/VCR, If you need helpfinding theTV'sVideo Input Channel,goto page18.
The Hai_ _er_ Appears
The main menuappearswhenever you turn on the DVDIVCR,Towatch TV_pressthe OK button when the WatchTVmenu is highlighted.When you chan_echannels,the
channelbanner appearsto giveyou programming information that isavailable(for more information, go to page28),
Cha_ging ¢ha_e_s
You might notice a slight delaywhen you're changingchannelsbecausethe signalgoesto the DVD/VCR andisthen sent out to theT_A
Discs t_or Recording
Recordingto DVD discsis new to manypeople,There are severaldifferent formats of DVD discs.For your DVD/VCR, only DVD+R 2,4x,4x,or 8x and DVD+RW 2.4x
and4x type discscan be usedfor recording.A DVD+RW disc is"rewritable" which meansyou can usethe discover and over again(similar to how you useVCR tapesto
record),Additionall}; DVD+RW discshavemany"digital features" for editingthe disc'scontent. DVD+R discscanonly be usedone time--you can'_record over existing
programsandyou must get usedto"finalizing the disc" in order for other DVD playersto be ableto playDVD+R discs.Throughout this User'sGuide,you'll notice that
somefeatures and menu options are only availablefor aspecific type of disc.
Hake sure you use discsfrom a reputable manufacturenManyproblems encountered when recording (or playing)discsare related to the wide variation in discquality dueto
the largenumber of brandsand manufacturers,Ifyou encounter problems with one brand of disc,pleasetry another brand.
VCA (Digital vs. Analog)
YourVCR is equippedwith two modes:digital andanalog,Thedigital mode (or path) enablesyou to use anon=screenInfoDisplay during playback,ThisDVD/VCR isalso
designedwith ananalog mode (or path) so you areable to record to a DVD disc while watchingaVCR tape;or record to aVDR tape while watching a DVD disc.The DVD
functions alwaysgothrough the digital path,There isonly one digital path,Therefore, if you are usinganyVCR functions at the sametime you're usingDVD functions,the
DVDNCR switches to the analogpath, Ifyou are playingaVDR tape and the DVD functions aren't in use,you can switch theVDR playback between the analogpath and the
digital path by pressingthe ANALOG.DIGITAL button on the remote.
Note:The DVD!VCRwill change to the analogVCR path automatically when needed.When the VCRis in analog mode, the on-screen InfoDisplay isn't avaffab_eand
the VCRmenu systemwiff _ookdifferent than the menus represented in this _ser's _uide.
Smote Play
Your DVD/VCR is anintegrated product,The DVD/VCR intuitively knows whether"aVCR tape or a DVD dischas beenloaded,andactsaccordingly when you pressthe
PLAYbutton on the remote. Ifyou haveboth aVDR tape and a DVD disc in the DVD/VDR, the main menu appearsand you must select the appropriate media(tape or disc)
by highlightingthe appropriate menu (Tapeor Disc)so the DVD/VCR knows what to do,
Graphics contained within _his publication are for representation only _ 7'
How to find your TV's V_deo input Channe!
In order to see what'spbying on your DVD/VCR, you need to tune theTV to theVideo Input Channelthat corresponds to the Input Jackson your TV that you usedto
connect the DVD/VCR to theTVTheVideo input Channel(s) variesfor different brands anddifferent models ofTVs.
P,CA_ GE_ and Proscan TVs
If ),our brand ofTV is RCA, GE,or Proscan,the remote control packedwith your DVD/VCR will most likely accesstheTWsVideo Input Channel--with the DVD/VCR turned
on,presstheTV button, andthen pressINPUT until you seethe DVD/VCR's menu on yourTV screen.
Other Brands of TVs
Sinceaccessto aTWsVideo Input Channelvariesfrom one manufacturer to the next, it's difficult to provide specific instructions for your particular brand,However,a list of
suggestionsis provided below.
Consult the Instruction lqanualthat camewith your TV
Ifyou can't find the information in the manual,or can't find the manual,review the following list,
• There might bea button on theTV's remote control that accessestheVideo Input Channel (seetable below for examples),
• YOumight select theVideo Input Channelfl om the TWs menu system,
• You might tune to it by pressinga specific channelnumber (see table below).
•Pressthe Channel up and/or down buttons on theTV's remote control (sometimes theVideo Input Channelis stored in your TV's channellist).
o_ the TV
VIDEO
SIGNAL
VID I
VID 2.
B_tte_ e_ the
TV remete
VID I S-VlD
LINE INPUT
VID SOURCE
VIDEO AUX
Cha_eJ
Number
O0 93
90
91
92
VID I
VID 2
INPUT
_e×t Steps
This chapter isdedicacedto connecting your DVD/VCR. Choose what you want 1:odo next, andgo to the appropriate chapter for instructions,
Chapter :_:The _e_ete Ce_reJ (page _9)
A description of eachbutton is in Chapter 2.Additionally, the universalremote control canbe programmedto operate many brandsandtypes of components.Go to page19
for instructions,
Chapter 3: _ecor_i_g_ Ptayback &Features (page 27)
This chapter tells you how to record andplaybackprograms,how to use the Disc Library andspecialeditingfeatures,Instructions for copyingaVHS tapeto aDVD disc are
in this chapter.
Chapter 4: PJayi_g Discs (page 37)
If you're ready to pop in a DVD (or a CD), this chapter explains how different discsfunction in the DVD/VCR and describesthe featuresyou can usewith different types
of discs,
Chapter 5: The DVD/VCR's He_ Sys_e_ (page 46)
Sincethis product ismuitiofunctionaJ,there are many on=screenmenusto control settingsandaccessfeatures.Chapter S describesthe menusand why you would want to
usethem.
Chapter €: Ad_i_ie_a_ |_formatie_ (page 54)
If you're havingtrouble, go to Chapter 6,It includes troubleshooting information,the product's warranty,and accessoriesyou might want to purchase.
_ Graphics contaMed within this publication are for representation only.

Other manuals for DRC8295N

1

Other RCA DVD VCR Combo manuals

RCA DRC6100N User manual

RCA

RCA DRC6100N User manual

RCA DRC8320N User manual

RCA

RCA DRC8320N User manual

RCA DRC6300N User manual

RCA

RCA DRC6300N User manual

RCA VC125HF User manual

RCA

RCA VC125HF User manual

RCA DVD Recorder/VCR Combo User manual

RCA

RCA DVD Recorder/VCR Combo User manual

RCA DRC8320N User manual

RCA

RCA DRC8320N User manual

RCA DRC6200N User manual

RCA

RCA DRC6200N User manual

RCA DRC8295N User manual

RCA

RCA DRC8295N User manual

RCA DVD/VCR User manual

RCA

RCA DVD/VCR User manual

RCA DRC8335 - DVD Recorder & VCR Combo User manual

RCA

RCA DRC8335 - DVD Recorder & VCR Combo User manual

RCA DRC6350N User manual

RCA

RCA DRC6350N User manual

RCA DRC8320N User manual

RCA

RCA DRC8320N User manual

RCA DRC6300N User manual

RCA

RCA DRC6300N User manual

RCA VC125HF User manual

RCA

RCA VC125HF User manual

RCA DRC8300N User manual

RCA

RCA DRC8300N User manual

RCA DRC6355N User manual

RCA

RCA DRC6355N User manual

Popular DVD VCR Combo manuals by other brands

Philips DVP721VR/05 Quick use guide

Philips

Philips DVP721VR/05 Quick use guide

Toshiba SD-K531SU2 owner's manual

Toshiba

Toshiba SD-K531SU2 owner's manual

Magnavox ZV450MW8 - DVD Recorder And VCR Combo owner's manual

Magnavox

Magnavox ZV450MW8 - DVD Recorder And VCR Combo owner's manual

Samsung DVD-V4800 instruction manual

Samsung

Samsung DVD-V4800 instruction manual

Philips DVP3055V/19 quick start guide

Philips

Philips DVP3055V/19 quick start guide

Samsung DVD-V940K instruction manual

Samsung

Samsung DVD-V940K instruction manual

Philips DVD740VR Technical specifications

Philips

Philips DVD740VR Technical specifications

LG V390HP owner's manual

LG

LG V390HP owner's manual

GoVideo DVR 4200 Specifications

GoVideo

GoVideo DVR 4200 Specifications

GoVideo DVR4300 user guide

GoVideo

GoVideo DVR4300 user guide

GoVideo DVR4400 Start here

GoVideo

GoVideo DVR4400 Start here

Samsung SV-DVD1E Service manual

Samsung

Samsung SV-DVD1E Service manual

Daewoo HVR-DX625 instruction manual

Daewoo

Daewoo HVR-DX625 instruction manual

Philips ShowView DVD757VR user manual

Philips

Philips ShowView DVD757VR user manual

Palsonic DVDV100 instruction manual

Palsonic

Palsonic DVDV100 instruction manual

Polaroid TBX-2000AF instruction manual

Polaroid

Polaroid TBX-2000AF instruction manual

Sony SLV-D910B operating instructions

Sony

Sony SLV-D910B operating instructions

Samsung DVDVR375 - 1080p Up-Converting VHS Combo DVD... Quick setup guide

Samsung

Samsung DVDVR375 - 1080p Up-Converting VHS Combo DVD... Quick setup guide

manuals.online logo
manuals.online logoBrands
  • About & Mission
  • Contact us
  • Privacy Policy
  • Terms and Conditions

Copyright 2025 Manuals.Online. All Rights Reserved.