Reavon UBR-X100 User manual

i
USER MANUAL
READ CAREFULLY BEFORE OPERATION
ULTRA HD Blu-ray Disc Players
UBR-X100 / UBR-X200

ii
Table of Contents
IMPORTANT INFORMATIONS .................................................. 1
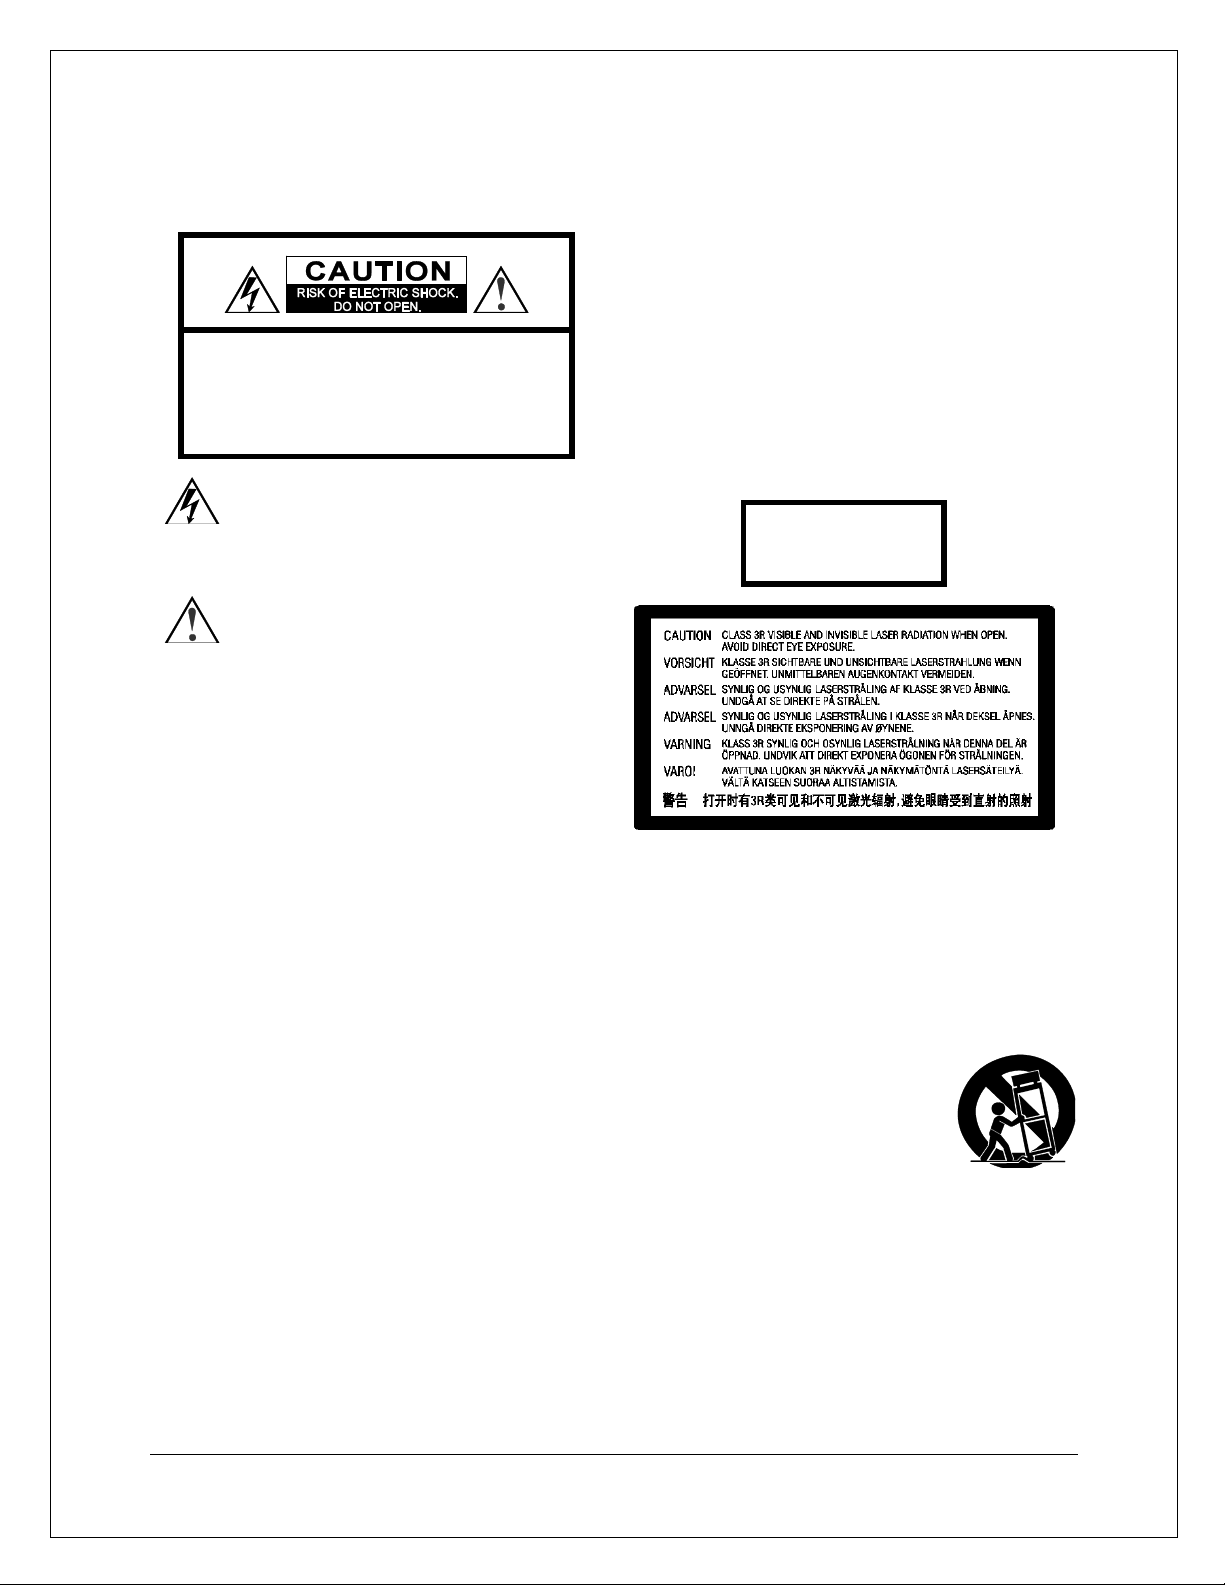
Important Safety Instructions ................................................................................... 1
Precautions ................................................................................................................ 2
Trademarks ................................................................................................................ 3
Compatible Disc Types .............................................................................................. 3
Discs that cannot be played ................................................................................ 4
Notes about BD-ROM compatibility ...................................................................... 4
Disc care and handling ......................................................................................... 4
Cinavia Notice ............................................................................................................ 4
Region management information .............................................................................. 5
Accessories ................................................................................................................ 5
COMMON CONNECTION METHODS .......................................... 6
Connecting to an A/V Receiver via HDMI .................................................................. 6
Connecting to a TV via HDMI ..................................................................................... 7
Connecting to a TV and an A/V Receiver via dual HDMI ........................................... 7
Connecting to a stereo audio system via RCA-style cables (UBR-X200 only) ......... 8
Connecting to a stereo audio system via XLR balanced cables (UBR-X200 only) .. 8
Connecting to an A/V Receiver or Amplifier via Analog Outputs (UBR-X200 only) .. 8
Connecting to an A/V Receiver or Amplifier via S/PDIF (Coaxial / Optical) .............. 9
Connecting to the Internet ...................................................................................... 10
Internet Connection via Ethernet Cable ............................................................ 10
BASIC OPERATIONS ................................................................ 11
Disc Playback ........................................................................................................... 11
OPTION Menu ........................................................................................................... 11
Fast Forward and Reverse ....................................................................................... 12
Pause and Frame-by-Frame ..................................................................................... 12
Blu-ray Disc Menu Navigation .................................................................................. 13
DVD Menu Navigation .............................................................................................. 13
On-Screen Display .................................................................................................... 13
Volume Control ......................................................................................................... 14
Mute .......................................................................................................................... 14
Audio Language ........................................................................................................ 14
Subtitle Selection ..................................................................................................... 14
BD-Live ..................................................................................................................... 15
ADVANCED OPERATIONS ....................................................... 16
Zoom Control ............................................................................................................ 16

iii
Subtitle Shift ............................................................................................................ 16
Repeat Playback ...................................................................................................... 17
Repeat a Selected Section ...................................................................................... 17
Shuffle and Random Playback ................................................................................. 17
Playback by Chapter or Track Number ................................................................... 18
Memory and Automatic Resume .............................................................................. 18
Pure Audio Mode ...................................................................................................... 18
MEDIA FILE PLAYBACK ........................................................... 19
Playback from a USB Flash Drive ............................................................................ 19
Playback from a Local Network .............................................................................. 19
HOME Menu .............................................................................................................. 21
Playing Music Files .................................................................................................. 21
Playing Video Files ................................................................................................... 21
Viewing Photo Files ................................................................................................. 22
SETUP MENU OPTIONS ........................................................... 23
Using the Setup Menu System ................................................................................. 23
Display ...................................................................................................................... 25
Video parameter ................................................................................................. 27
Select the Best Output Resolution .................................................................... 28
Audio ........................................................................................................................ 29
Audio Signal Reference Chart ............................................................................ 31
Recommended Audio Format Options ............................................................... 32
HDMI ......................................................................................................................... 34
Network ................................................................................................................... 36
Language .................................................................................................................. 38
Playback ................................................................................................................... 38
Options ..................................................................................................................... 39
Useful Notes ............................................................................ 41
Troubleshooting ...................................................................... 41
Specifications .......................................................................... 43
RS-232 Control Protocol (UBR-X200) & IP Control ................. 44
Limited Warranty ..................................................................... 45

1
IMPORTANT INFORMATION
CAUTION: TO REDUCE THE RISK OF
ELECTRIC SHOCK, DO NOT REMOVE COVER
(OR BACK). NO USER-SERVICEABLE PARTS
INSIDE. REFER SERVICING TO QUALIFIED
SERVICE PERSONNEL.
The lightning flash with arrowhead symbol, within
an equilateral triangle, is intended to alert the user
to the presence of uninsulated “dangerous voltage”
within the product's enclosure that may be of sufficient
magnitude to constitute a risk of electric shock to persons.
The exclamation point within an equilateral
triangle is intended to alert the user to the
presence of important operation and
maintenance (servicing) instruction in the
literature accompanying the appliance.
WARNING:
TO REDUCE THE RISK OF FIRE OR ELECTRIC
SHOCK, DO NOT EXPOSE THIS APPLIANCE TO RAIN
OR MOISTURE. DANGEROUS HIGH VOLTAGES ARE
PRESENT INSIDE THE ENCLOSURE. DO NOT OPEN
THE CABINET. REFER SERVICING TO QUALIFIED
PERSONNEL ONLY.
THE APPARATUS SHALL NOT BE EXPOSED TO
DRIPPING OR SPLASHING AND THAT NO OBJECTS
FILLED WITH LIQUIDS, SUCH AS VASES SHALL BE
PLACED ON THE APPARATUS.
CAUTION:
DANGER OF EXPLOSION IF BATTERY IS INCORRECTLY
REPLACED. REPLACE ONLY WITH THE SAME OR
EQUIVALENT TYPE.
THIS PRODUCT UTILIZES A LASER. USE OF CONTROLS
OR ADJUSTMENTS OR PERFORMANCE OF
PROCEDURES OTHER THAN THOSE SPECIFIED HEREIN
MAY RESULT IN HAZARDOUS RADIATION EXPOSURE.
DO NOT OPEN COVERS AND DO NOT REPAIR
YOURSELF. REFER SERVICING TO QUALIFIED
PERSONNEL.
CLASS I LASER
PRODUCT
This label is located on the laser protective housing inside the
product.
Important Safety Instructions
1) Read these instructions.
2) Keep these instructions.
3) Heed all warnings.
4) Follow all instructions.
5) Do not use this apparatus near water.
6) Clean only with dry cloth.
7) Do not block any ventilation openings. Install in
accordance with the manufacturer’s instructions.
8) Do not install near any heat sources such as
radiators, heat registers, stoves, or other apparatus
(including amplifiers) that produce heat.
9) Do not defeat the safety purpose of the polarised or
grounding-type plug. A polarised plug has two blades
with one wider than the other. A grounding type plug
has two blades and a third grounding prong. The wide
blade or the third prong is provided for your safety. If
the provided plug does not fit into your outlet, consult
an electrician for replacement of the obsolete outlet.
Protect the power cord from being walked on or
pinched, particularly at plug, receptacle, and the point
where it exits from the apparatus.
10) Only use attachments/accessories specified by the
manufacturer.
11) Use only with the cart, stand, tripod,
bracket, or table specified by the
manufacturer, or sold with the
apparatus. When a cart is used, use
caution when moving the
cart/apparatus combination to avoid
injury from tip-over.
12) Unplug this apparatus during lightning storms or when
unused for long periods of time.
13) Refer all servicing to qualified service personnel.
Servicing is required when the apparatus has been
damaged in any way, such as power-supply cord or
plug is damaged, liquid has been spilled or objects
have fallen into the apparatus, the apparatus has been
exposed to rain or moisture, does not operate normally,
or has been dropped.
14) Batteries (battery pack or batteries installed) shall not
be exposed to excessive heat such as sunshine, fire or
the like.

IMPORTANT INFORMATION
2
Precautions
• Before connecting the AC power cord to the
appliance, make sure the voltage designation of
the appliance corresponds to the local electrical
supply. If you are unsure of your power supply,
contact your local power company. The acceptable
power input range is AC 110V–120V~ / 220V–
240V~, 50/60Hz. (UBR-X100)
• The apparatus with CLASS I construction shall be
connected to a MAINS socket outlet with a
protective earthing connection.
• The player is still receiving power from the AC
power source as long as it is connected to the wall
outlet, even if the player itself has been turned off.
• Unplug the power cord if you are not going to use
the product for an extended period of time. Hold
the power plug when unplugging. Do not pull on the
cord.
• The main plug is used as the mechanism for
cutting off power, therefore make sure it is easy to
unplug.
• To ensure proper ventilation around this product, do not
place this product on a sofa, bed or rug. When installing
this product on a wall or bookshelf, you need to provide
appropriate space: we recommend leaving 4 inches (10
cm) of free space at the top, the sides and the rear.
• High temperature will lead to abnormal operation of this
unit. Do not expose this unit or batteries to direct sunlight
or near other heating objects.
• When moving the player from a cold location to a warm
one, or vice versa, moisture may condense on the laser
pickup unit inside the player. Should this occur, the player
may not operate properly. In such a case please turn the
unit on for 1-2 hours (without a disc) to facilitate moisture
evaporation.
This product compiles with European Low Voltage
(2006/95/EC), Electromagnetic Compatibility (2004/108/EC)
and Environmentally-friendly design of Energy-related
Products (2009/125/EC) Directives when used and installed
according to this instruction manual.
This equipment complies with CE radiation exposure limits
set forth for an uncontrolled environment. This equipment
should be installed and operated with minimum distance
20cm between the radiator & your body.
Correct Disposal of This Product. (Waste Electrical
& Electronic Equipment) Applicable in the European
Union and other European countries with separate collection
systems. This marking on the product, accessories or literature
indicates that the product and its electronic accessories
(e.g.remote handset) should not be disposed of with other
household waste at the end of their working life. To prevent
possible harm to the environment or human health from
uncontrolled waste disposal, please separate these items from
other types of household waste and recycle them responsibly to
promote the sustainable reuse of material resources. Users
should contact either the retailer where they purchased this
product, or REAVON for details of where and how they can
arrange for environmentally safe recycling.

IMPORTANT INFORMATION
3
Trademarks
• “ULTRA HD Blu-ray”, “Blu-ray Disc”, “Blu-ray 3D”,
“BONUSVIEW” and “BD-Live” are trademarks of Blu-
ray Disc Association.
• Java and all Java-based trademarks and logos are
trademarks or registered trademarks of Sun
Microsystems, Inc. in the United States and other
countries.
• DVD Logo is a trademark of DVD Format/Logo
Licensing Corp., registered in the U.S., Japan and
other countries.
• Super Audio CD, SACD and the SACD logo are joint
trademarks of Sony Corporation and Philips
Electronics N.V. Direct Stream Digital (DSD) is a
trademark of Sony Corporation.
• “AVCHD” and the “AVCHD” logo are trademarks of
Panasonic Corporation and Sony Corporation.
• For DTS patents, see http://patents.dts.com.
Manufactured under license from DTS Licensing
Limited. DTS, the Symbol, DTS in combination with
the Symbol, the DTS-HD logo, and DTS-HD Master
Audio are registered trademarks or trademarks of
DTS, Inc. in the United States and/or other countries.
© DTS, Inc. All Rights Reserved.
• Manufactured under license from Dolby Laboratories.
Dolby, Dolby Audio and the double-D symbol are
trademarks of Dolby Laboratories.
• HDMI, the HDMI logo and High-Definition Multimedia
Interface are trademarks or registered trademarks of
HDMI Licensing LLC.
• “Cinavia” is trademark of Verance Corporation.
• All other trademarks are the properties of their
respective owners.
Compatible Disc Types
Logo
Features
Manual Icon
BD: Supports 4K Ultra HD Blu-ray and Blu-ray with Bonus View and BD-Live
content, including Blu-ray 3D discs. A 3D-capable display with compatible
glasses is required for 3D playback. BD-R/RE, both single- and dual-layer are
also supported.
DVD: Plays commercially-released DVDs, as well as finalized DVD±R/RW.
DVD-A: High-resolution stereo or multi-channel audio. Some DVD-Audio discs
also contain a DVD-Video portion.
SACD: High-resolution stereo or multi-channel audio. Note: some SACDs use
a hybrid format with both a CD and a high resolution DSD layer.(UBR-X200)
CD: Supports standard Red Book CDs, as well as CD-R/RW.
AVCHD: High-definition digital video camera format, often in the form of a
DVD±R or flash memory.

IMPORTANT INFORMATION
4
Discs that cannot be played
• BDs with cartridge
• DVD-RAMs
• HD-DVDs
• Data portion of CD-Extras
• DVDs / Blu-Rays with a region code not matching the
player’s region code
• Some Dual-Discs: A Dual-Disc is a two-sided disc with
DVD-video on one side and digital audio on the other
side. The digital audio side does not meet the technical
specifications of the Red Book CD format so playback
is not guaranteed.
• Audio discs with copy-protection may not be playable.
Notes about BD-ROM compatibility
Since the Blu-ray Disc specifications are new and evolving, some discs may not play properly depending on the disc type, version
and encoding. It is possible that a Blu-ray Disc manufactured after the player uses new features of the Blu-ray Disc specifications.
To ensure the best possible viewing experience, the player may need a firmware or software update from time to time. Please visit
REAVON’s web site www.reavon.com to check if updates are available.
Disc care and handling
• To keep the disc clean from scratches or fingerprints,
handle the disc by its edge. Do not touch the recorded
surface.
• Blu-ray Discs record data in very high density and the
recorded layer is very close to the disc surface. For
this reason, Blu-ray Discs are more sensitive to dust
and fingerprints than DVD. Should you encounter
playback problems and see dirty spots on the disc
surface, clean the disc with a cleaning cloth. Wipe the
disc from the center out along the radial direction. Do
not wipe the disc in a circular motion.
• Do not use record cleaning sprays or solvents such
as benzene, thinner and anti-static spray.
• Do not attach labels or stickers to discs as this may
cause the disc to warp or become too thick, resulting in
playback issues and a potentially stuck disc.
• Avoid exposing the discs to direct sunlight or heat
sources.
• Do not use the following discs :
o Discs with exposed adhesive from removed
stickers or labels. The disc may get stuck inside
the player.
o Warped or cracked discs.
o Irregularly shaped discs, such as heart or business
card shapes.
Cinavia Notice
This product uses Cinavia technology to limit the use of unauthorised copies of some commercially-produced film and videos and their
soundtracks. When a prohibited use of an unauthorised copy is detected, a message will be displayed and playback or copying will be
interrupted.
This product incorporates proprietary technology under license from Verance Corporation and is protected by U.S. Patent 7,369,677 and
other U.S. and worldwide patents issued and pending as well as copyright and trade secret protection for certain aspects of such
technology. Cinavia is a trademark of Verance Corporation. Copyright 2004-2013 Verance Corporation. All rights reserved by Verance.
Reverse engineering or disassembly is prohibited.
This update includes Cinavia® content protection technology. Information about Cinavia technology is provided at the Cinavia Online
Consumer Information Center at http://www.cinavia.com.
More information about Cinavia technology is provided at the Cinavia Online Consumer Information Center at http://www.cinavia.com. To
request additional information about Cinavia by mail, send a postcard with your mailing address to: Cinavia Consumer Information Center,
P.O. Box 86851, San Diego, CA, 92138, USA.

IMPORTANT INFORMATION
5
Region management information
This player is designed and manufactured to respond to the region management information. If the region number of a BD-Video
or DVD disc does not correspond to the region number of this player, this player cannot play the disc.
BD-Video: Blu-Ray Discs with marks containing the region code B.
DVD-Video: DVDs with marks containing the region code 2 and ALL.
Accessories
Please check that the following parts are included in your UBR-X100 / X200 package :
User Manual
Power Cable, about 4.5 feet
Remote Control

6
COMMON CONNECTION METHODS
Connecting to an A/V Receiver via HDMI
• If you have an HDMI-capable receiver that supports 4K HDR video pass-through, you can simply
run an HDMI cable from the player’s HDMI OUT (Main) output into your receiver and enable
HDMI video pass-through on the receiver (see your receiver’s owner’s manual for more
information). The receiver usually has an HDMI output that you can connect to your TV to pass
the video signal.
• Some receivers contain a mixture of HDMI 2.0 and HDMI 1.4 ports. In order to view 4K UHD
content, ensure that you are connecting the UBR-X100 / X200’s HDMI OUT (Main) output into a
HDMI 2.0 and HDCP 2.2 compliant input of the receiver.
NOTE
• HDMI (High-Definition Multimedia Interface) is a single cable that can transport both audio and video
from your player to your display. However, be aware that HDMI is an evolving standard, and
compatibility issues may appear. A receiver that supports audio input over HDMI is required. Some
receivers offer HDMI ports solely for video switching. If your receiver does not have audio input
capability, please read the following sections regarding other connection methods.
• For Blu-ray Discs, a receiver that supports HDMI 1.4 or later with decoding capability for Dolby
TrueHD and DTS-HD Master Audio is recommended.
• For 4K UHD Blu-ray discs, a receiver that supports HDMI 2.0 and HDCP 2.2 or later is required. It is
recommended to use Premium High-Speed HDMI Cable to watch 4K UHD movies.
• The UBR-X100 / X200 support the latest object-based surround audio formats, such as Dolby Atmos
and DTS:X.
• Please check the specifications of your receiver to ensure that it meets these requirements.

7
Connecting to a TV via HDMI
• Use an HDMI cable to connect the player’s HDMI OUT (Main) output directly into your TV. This
connection method delivers both audio and video in a pure digital format via a single cable.
• In order to play 4K UHD content, you must connect the UBR-X100 / X200’s HDMI OUT (Main)
output into an HDMI 2.0 and HDCP 2.2 compliant input of the 4K UHD TV.
NOTE
• This connection method will output sound via the TV’s speakers. For optimal sound quality,
it is recommended that audio be transferred from the UBR-X100 / X200 to an A/V receiver
with connected speakers.
• You will need a UHD TV that supports HDMI 2.0 and HDCP 2.2 in order to watch UHD Blu-
Ray and other UHD content in 4K resolution.
• You will need an HDR-capable TV to watch HDR content.
• Do not connect the HDMI OUT (Audio Only) output to your TV.
Connecting to a TV and A/V Receiver via Dual HDMI
• The UBR-X100 / X200’s Dual HDMI connection mode ensures that you can enjoy the highest
possible video quality and resolution, in addition to high bit rate audio content. Use an HDMI cable
to connect the HDMI OUT (Main) output to your TV, and another HDMI cable to connect the HDMI
OUT (Audio Only) output to your receiver.
• This configuration is recommended when you have a 3D or UHD compatible display, but your
receiver is not 3D or UHD compatible. This configuration will allow you to send the video signal
(3D or UHD in this case) directly to the TV and send the audio signal to the receiver.
NOTE
• Please refer to the notes on HDMI connections available on pages 6 and 7.
• If your receiver does not have HDMI audio input capability, please try the alternate
connection methods discussed on pages 8 to 10.

8
Connecting to a Stereo Audio System via RCA-style Cables
(UBR-X200 only)
• If your audio system offers only stereo audio inputs, or if you would like to connect a dedicated
stereo audio system in addition to the surround audio system which is already connected to the
HDMI, coaxial or optical outputs, you can connect the dedicated stereo audio system to the
STEREO AUDIO OUT terminals of the player.(R, L)
• Two sets of dedicated stereo audio outputs are available on the UBR-X200 : the RCA-style
connectors and the XLR balanced connectors. Preference should be given to the XLR connectors
since they may provide better noise rejection and signal integrity.
NOTE
• The STEREO AUDIO OUT terminals (R, L) automatically down-mix the multi-channel
audio source into the stereo signals.
Connecting to a Stereo Audio System via XLR Balanced Cables
(UBR-X200 only)
• You can also connect the BALANCED STEREO AUDIO OUT (BAL) to your stereo audio system.
Three-pin (XLR3) cables are needed, and the XLR terminals on the player are male type.
NOTE
• Balanced audio connectors are used mostly in professional audio electronics, such as high
quality microphones and inter-equipment connections. The UBR-X200 uses the 3-pin XLR
connector which transmits a pair of differential signals (positive /negative). The amplifier
extracts the voltage difference between differential signals, thus the common noise can be
rejected and the signal integrity is improved.
Connecting to an A/V Receiver or Amplifier via Analogue Outputs
(UBR-X200 only)
• The UBR-X200 is equipped with a 7.1ch analogue audio output section that can be connected to the
7.1ch analogue input section of an A/V receiver or amplifier for audio output. This method is
required if the A/V receiver does not have HDMI inputs. It is also a preferred connection method for
taking advantage of the UBR-X200’s digital-to-analogue converter (DAC).
• Please use up to 8 RCA-style audio interconnect cables to connect the FL (Front Left), FR (Front
Right), SL (Surround Left), SR (Surround Right), C (Centre), SW (Subwoofer), SBL (Surround Back
Left) and SBR (Surround Back Right) analogue output terminals of the UBR-X200 to the
corresponding multi-channel analogue audio input jacks of your A/V receiver or amplifier.

9
• If the A/V receiver or amplifier only has 5.1ch audio inputs, you can omit the SBL (Surround Back
Left) and SBR (Surround Back Right) outputs. In the Setup Menu, set the Down Mix Mode to 5.x in
the Speaker Setting section of the Audio section (see page 30).
• If your audio system offers only stereo audio inputs, or if you would like to connect a dedicated
stereo audio system in addition to the surround audio system which is already connected to the
HDMI or S/PDIF outputs, you can connect the dedicated stereo audio system to the FL (Front Left)
and FR (Front Right) outputs of the player. In the Setup Menu, set the Down Mix Mode to Stereo
in the Speaker Setting section of the Audio section (see page 30).
Connecting to an A/V Receiver or Amplifier via S/PDIF (Coaxial /
Optical)
• Please use either a 75-Ohm coaxial digital audio cable with RCA-style connectors or an S/PDIF
optical digital audio cable to connect one of the digital audio outputs to the corresponding input
terminal on your A/V receiver. For detailed setup of coaxial/optical signals, refer to page 29.
NOTE
• Due to bandwidth limitations, high resolution audio formats such as Dolby Digital Plus, Dolby
TrueHD, DTS-HD High Resolution and DTS-HD Master Audio cannot be sent through the
coaxial or optical digital audio output. A reduced resolution version of the same audio track
will be output instead. To listen to high resolution audio formats in their best quality, please
use the HDMI connection if you have a receiver that handles HDMI audio (see page 6) or
use the multi-channel analog outputs if you don’t (see page 8).
• Due to copyright restrictions, SACD audio cannot be sent through the coaxial or optical
digital audio output. To listen to SACDs, please use the HDMI or analogue audio
connections.
• Due to copyright restrictions and bandwidth limitations, full resolution audio from DVD-
Audio discs cannot be sent through the coaxial or optical digital audio output. To listen to
DVD-Audio in full resolution, please use the HDMI or analogue audio connections.

10
Connecting to the Internet
The UBR-X100 / 200 players can play audio, video and photos via your home network. This feature supports
DLNA and SMB/CIFS protocols (Feature under development).
The UBR-X100 / 200 players also support the BD-Live feature offered on some Blu-ray Disc titles. BD-Live
offers extra downloadable content and additional online interactive programs. Content available on BD-Live
varies by disc and studio, and may include additional subtitles, commentaries, movie trailers, games, and
online chat.
In order to use the BD-Live feature, the player needs to be connected to a broadband Internet connection. It is
not necessary to connect to the Internet if you do not intend to use BD-Live.
Internet Connection via Ethernet Cable
• Plug one end of a network cable (Category 5/5E straight Ethernet cable) into the LAN port on the
back of the UBR-X100 / 200 players.
• Plug the other end of the network cable into a LAN port on the broadband router or modem.
• After physically connecting the player to a broadband Internet connection, some network
configuration may be required. Refer to the Network section on page 36 for details.
• Refer to the operating instructions supplied with the broadband router or modem, or contact the
Internet service provider for questions related to setting up the router or modem.
NOTE
• Only connect the LAN port of the player to an Ethernet port that supports 1000BASE-T or
100BASE-TX or 10BASE-T. Connecting to any other ports or jacks, such as a phone jack,
can damage the player.

11
BASIC OPERATIONS
Disc Playback
1. Press the POWER button to turn on the player.
2. Press the OPEN/CLOSE button to eject the disc tray.
3. Place the disc with the label side facing up and the recorded side facing down.
4. Press the OPEN/CLOSE button again to retract the tray.
5. The player will read the disc information and begin playback.
6. To stop playback, press the STOP button.
7. To turn off the player, press the POWER button.
OPTION Menu
1. During media file navigation and playback, press the OPTION button on the remote to enter the
OPTION MENU, which allows you to conveniently access various settings and playback
features.
2. When the OPTION MENU is displayed, press the UP/DOWN ARROW buttons on the remote to
highlight a particular item, then press the OK button to confirm.
The OPTION MENU selections may vary depending on the content being played. A summary of the
selections and their functionality is described as follows :
During Music File or Music Disc (CD, SACD [UBR-X200]) Playback :
• Track : Current and total tracks.
• Time : Current, elapsed and remaining track time.
• Normal : Select Shuffle, Normal or Random playback mode.
• Bitrate : Audio bitrate of the current track.
• Short Skip : Skip forward 30 seconds during playback.
• Replay : Skip back 10 seconds during playback.
During Video Discs (DVD, BD) or Video File Playback :
• File : Current and total files.
• Titles : Current and total title numbers.
• Chapter : Current and total chapters.
• Time : Current, elapsed and remaining file time.
• Normal : Activate Shuffle, Normal or Random playback mode.
• Audio : Choose the desired audio track from all available audio tracks.
• Angle : Change the viewing angle. This function is only available when the DVD/BD is recorded with
multiple angles.
• Subtitle : Choose the desired subtitle language from all available subtitles.
• Subtitle Style : Set the subtitle display options. (only available on external subtitle files).
• Secondary Video : Change the display mode to picture in picture mode. (PIP)

12
• Secondary Audio : Mix the Secondary Audio and menu sounds into the primary audio.
• Still off : Still off.
• Bitrate : Audio, Video and total bitrate of the current file.
• Short skip : Skip forward 30 seconds during playback.
• Replay : Skip back 10 seconds during playback.
During Photo File Playback :
• File : Current and total files.
• Play Mode : Select Normal, Shuffle or Random playback mode.
• Slide Show : Select the slideshow speed : slow, middle or fast.
• Transition : Change slideshow transition effect.
Fast Forward and Reverse
You may fast forward or reverse during playback.
1. Pressing the FWD button on the remote control to start fast
forwarding playback. Each press of the FWD button increases
the playback speed in the following increments :
2. Pressing the REV button on the remote control starts fast reverse playback. Each press of the REV
button reverses the playback speed in the following increments :
NOTE
• Some Blu-ray Discs using BD-Java technology may have their own fast forwarding and
reversing control. The actual speed varies by disc, and a progress scale may be displayed
by the disc.
Pause and Frame-by-Frame
1. During playback, pressing the PAUSE button
temporarily pauses the program. In this mode, a
PAUSE icon will appear on the TV screen.
2. While a DVD or Blu-ray Disc is paused, pressing the PREV or NEXT button moves back or forward
the video frame-by-frame.
3. Pressing the PLAY button resumes normal playback.
NOTE
• UBR-X100 / X200 players don’t support reverse video frame-by-frame or slow playback
while a 4K UHD Blu-ray Disc is paused.

13
Blu-ray Disc Menu Navigation
1. Blu-ray Discs usually contain a Top Menu and a Pop-up Menu. The Top Menu normally
appears at the beginning of playback, after the previews and copyright messages. The Pop-up
Menu can be accessed during the movie without interrupting playback.
2. During playback, press the POP-UP MENU button to access the Pop-up Menu. Press the
MENU button to access the Top Menu.
3. Navigate in the menu using the ARROW buttons, then press the OK button to make a selection.
4. Some menus make use of the COLOR buttons. You can select menu functions by pressing the
corresponding COLOR button on the remote control.
DVD Menu Navigation
1. Some DVDs contain title menu or chapter menu functions.
2. During playback, press the MENU button to return to the disc title menu. Press the POP-UP
MENU button to display the chapter menu. Depending on the disc, one or both menus may not
exist.
3. Navigate the menu using the ARROW buttons, and then press the OK button to make the
selection.
4. Press the RETURN button to return to the previous menu. The return location varies by disc.
On-Screen Display
1. During the playback of a DVD or Blu-ray Disc, press the INFO button on the remote control to
show its media information and HDMI output format. For CDs and SACDs, the status
information is shown automatically.
2. Press and hold the INFO button for 3 seconds to show more detailed Media Playback, Media
Information, and HDMI Output information.
3. Press the INFO button again to hide the on-screen display.
In addition to the playback time, the on-screen display may also contain the following information about
the content currently playing :
• Playback status: an icon showing play, pause, and fast forward/reverse status.
• Bitrate meter: an indication of the bitrate of the audio and video stream.
• Current and total chapter numbers of the current title. (DVD and Blu-ray Discs)
• Current and total tracks. (CDs and SACDs)
• Video format information : resolution, frame rate, HDR format, color space, codec, original
aspect ratio.
• Subtitle information : current and total available number of subtitle tracks and language.
• Audio information : current and total available number of audio tracks, language, format, and
channels.
• HDMI output information : resolution, frame rate, HDR format, color space, deep color, aspect
ratio, audio format, HDMI Audio Out, HDMI Mode, and HDMI2 State.

14
Volume Control
1. On the UBR-X200, the volume control only affects the analogue audio output. It does not apply
to digital audio output (HDMI, Coaxial and Optical) either in raw bitstream format or in PCM
format.
2. The VOL +/- buttons on the player’s remote control are provided as an alternative way of
controlling the audio volume. It is recommended that you use this control to make the audio
volume from the player the same as from other sources, such as TV programs or a VCR.
• Press the VOL – button to decrease the volume.
• Press the VOL + button to increase the volume.
Mute
1. Press the MUTE button on the remote control during content playback to turn off audio
output. The TV screen will display a mute icon.
2. Press the MUTE button again to resume audio output.
NOTE
• When there is no audio output, check for the presence of the "Mute" icon on the TV screen.
You can also press the MUTE button to check the mute mode status.
Audio Language
1. To select the audio language, press the AUDIO button on the remote control during playback.
2. Repeatedly press the AUDIO button or use the UP/DOWN ARROW buttons to choose from all
available languages.
Subtitle Selection
1. When playing a DVD, Blu-ray Disc or other video programs recorded with subtitles, press the
SUBTITLE button on the remote control to select the desired subtitle.
2. Repeatedly press the SUBTITLE button or use the UP/DOWN ARROW buttons to choose from
all available subtitles.
3. To turn off subtitles, select Off from the list.

15
BD-Live
Some Blu-ray Disc titles are released with the BD-Live feature. BD-Live offers extra
downloadable content and additional online interactive programs. BD-Live content varies by
disc and studio, and may include additional subtitles, commentaries, preview trailers, games,
and online chat. A Broadband internet connection is required to enjoy BD-Live content.
Depending on how the studios organize their BD-Live content, some Blu-ray Discs may start downloading BD-
Live content when playback starts, have BD-Live selection on the main menu, show a prompt asking whether
you would like to start downloading, or ask you to sign up for a membership or account. Please follow the
instructions that come with the disc to enjoy BD-Live contents.
Your Internet connection speed and the capacity of the BD-Live content servers can all affect how fast BD-
Live content is downloaded. If you encounter slow downloading or intermittent playback, please play the disc
without accessing the BD-Live features, or try again at a different time.
When you use the BD-Live feature, the player or disc ID and your IP (Internet Protocol) address may be sent
to the content provider via the Internet. Generally, no personally identifiable information is sent. However
technologies exist to match your IP address to a certain geographical area or service provider. Your Internet
service provider also has the knowledge of who is using a particular IP address. If the BD-Live content
provider requires you to log in using a membership or account, the content provider will have access to your
membership or account information. Check with your Internet service provider and the BD-Live content
providers for their privacy policy.
You can choose to restrict BD-Live Network Access in the Setup Menu (see details on page 37).

16
ADVANCED OPERATIONS
Zoom Control
This feature zooms in / out of the displayed frame and also changes the aspect ratio (image width vs.
height).
To change the zoom level, press the ZOOM button on the remote control. Each press of the ZOOM
button will switch the zoom level in sequence.
NOTE
• Some early DVD titles (released from 1997 until early 2000’s) use a 4:3 non-anamorphic
widescreen aspect ratio. When played on a 16:9 display, the content is shown in a small
window with black borders on all four sides. The top and bottom borders are encoded into
the video. The left and right borders are added by the player to maintain the correct aspect
ratio. For these types of discs, the Full Screen zoom mode can be used to eliminate the
borders.
• The ZOOM feature may not be available when certain DVD or Blu-ray Discs are played if
the disc’s author has chosen to disable ZOOM.
Subtitle Shift
For users of 2.35:1 “Constant Image Height” video projection system, subtitles may be cut off because
they are positioned outside the active video area.
The Subtitle Shift feature can be used to shift subtitles up or down so they can be displayed within the
active video area.
To shift the display position of subtitles, please follow these steps :
1. When playing a DVD, Blu-ray Disc or other video programs recorded with subtitles, select the desired
subtitle from the disc menu or by using the remote.
2. Press and hold the SUBTITLE button on the remote control until the Shift Subtitle Position prompt
appears on the screen.
3. Wait until subtitle text is shown on the screen, and then use the UP/DOWN ARROW buttons to move
the subtitle text to the desired position.
4. Press the OK button to set the subtitle display position.

ADVANCVED OPERATIONS
17
Repeat Playback
To repeat a certain chapter, title, track or disc, press the REPEAT button on the remote control.
Each press of the REPEAT button changes the repeat mode using the following sequence :
DVD and DVD-Audio :
Blu-ray :
CD and SACD :
NOTE
• Some Blu-ray discs may not accept the “Repeat” function.
Repeat a Selected Section
1. During normal playback, press the AB REPLAY button on the remote at the desired beginning point
(Point A) for the repeat play. The TV screen displays “A-”.
2. When playback reaches the desired ending point (Point B) for the repeat play, press the AB
REPLAY button again. The player now repeatedly plays back the specified section (A-B). The TV
screen displays “A-B”.
3. Press the AB REPLAY button for the third time to resume normal playback.
NOTE
• May not be available for all disc formats or content.
Shuffle and Random Playback
When playing a CD or SACD (UBR-X200), press the OPTION button on the remote control and select Mode
to activate the Shuffle and Random modes.
In normal playback mode, each track is played back in sequential order. As the name implies, the
Random playback mode randomly selects a track to play. The Shuffle mode also plays back the tracks
in random order, but it ensures that each track is played only once.
Selecting the Shuffle or Random mode cancels any Repeat mode you may be using. Similarly,
selecting a Repeat mode cancels any Shuffle or Random mode.
Other manuals for UBR-X100
1
This manual suits for next models
1
Table of contents