(L) Brown/
(N) Blue/
Main supply
Light source
(E) Green/yellow
(L) Brown/
(N) Blue/
(E) Green/yellow
1
2
www.regentlight.co.za
INSTALLATION INSTRUCTIONS
ALL CONNECTIONS TO BE CARRIED OUT BY A QUALIFIED ELECTRICIAN
ALL CONNECTIONS TO BE CARRIED OUT BY A QUALIFIED ELECTRICIAN
1
2
PLEASE READ CAREFULLY BEFORE STARTING INSTALLATION.
PLEASE READ CAREFULLY BEFORE STARTING INSTALLATION.
Regent Lighting reserves the right to change specifications modify designs and discontinue items without
incurring obligation and whilst every effort is made to ensure that descriptions, specifications and other
information in this catalogue are correct, no warranty is given in respect thereof and the company shall not be
liable for any error therein.
WARNING: TO AVOID FIRE, SHOCK OR DEATH
TURN OFF POWER AT CIRCUIT BREAKER OR FUSE AND TEST THAT THE POWER IS OFF BEFORE WIRING
ALL LUMINAIRES SUPPLIED AND TO BE INSTALLED ABOVE AND BELOW 5 METERS ARE IN COMPLIANCE WITH SANS
60598 SECTION 3.5.6 ACCORDING TO THE MANUFACTURER GUARANTEE AND WARRANTY
Electrical products can cause death, injury, or damage to
property. Installation of this product must be carried out by a
qualified electrician, in compliance with SANS 10142 or
corresponding regulations of the country of installation. On
completion of installation, the Certificate of Compliance must
be updated.
Tula Bulkhead
Electronic Control Device
WARNING
Electronic Control Device
WARNING
ELECTRIC SHOCK
HAZARD
This equipment is to be
serviced by trained
personnel only.
ELECTRIC SHOCK
HAZARD
This equipment is to be
serviced by trained
personnel only.
3 - 13 MAIN REEF SERVICE ROAD, CORNER
SPRINGBOK AND MAIN REEF ROAD, INDUSTRIA,
JOHANNESBURG. SOUTH AFRICA.
TEL : +27 11 474 0171
www.regentlight.co.za
RE GENT L I GHT ING A D IVIS ION OF WAH L
IN DUST RIES.
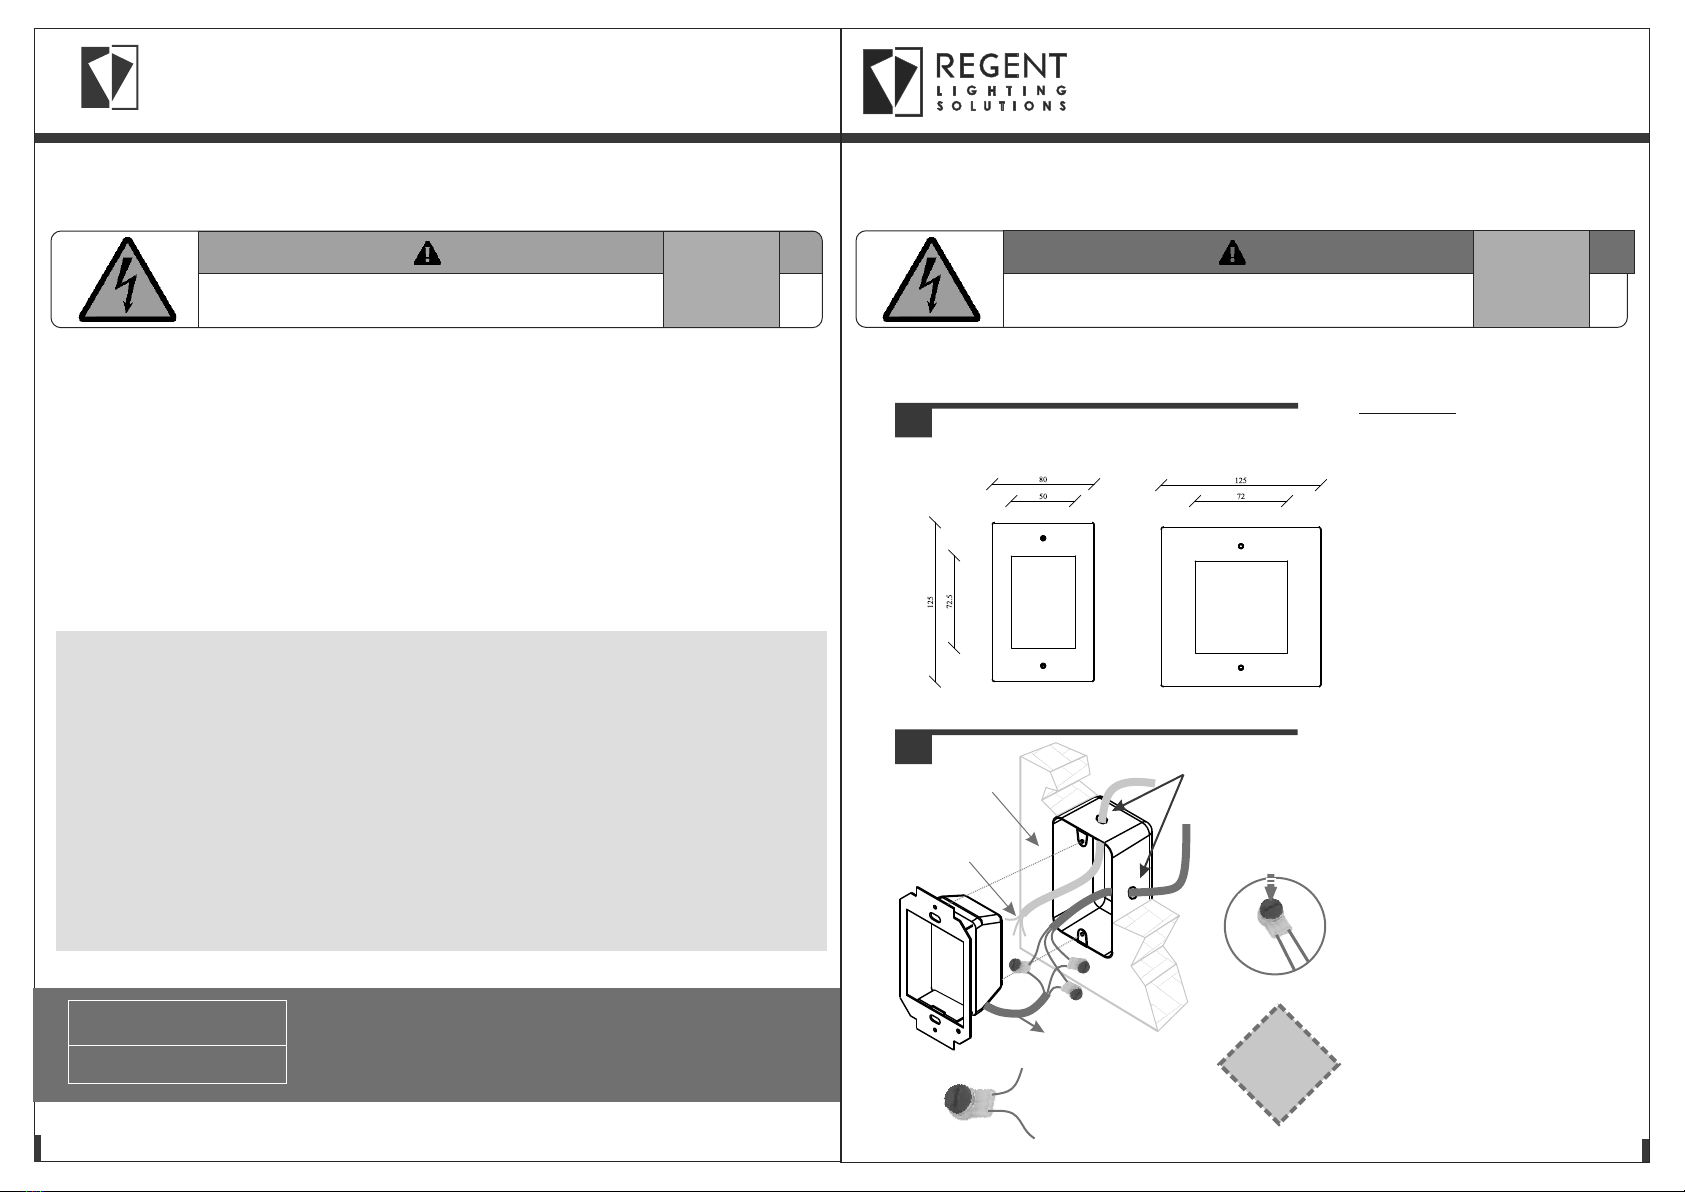
C
B
Supplied electrical
cable tail
Strip the cable
before connecting
Cable entry points
Flush electrical box
with wall
Press down to release
the gel resin, to retain the
IP rating once the cables
are securely fastened
into the connector.
Connector: 3M - J000788
x3 per bulkhead
DO NOT PLUG
(CONNECT) WHEN
LIVE AS IT WILL CAUSE
DAMAGE TO THE
LUMINAIRE.
Screw mount facia version shown
www.regentlight.co.za
save These Instruction for Future Reference
Save These Instructions for Future Reference
2. A. Feed the electrical cable
through the connector box. Ensure
the correct cable entry is selected.
B. Strip the main power supply
cable (Live, neutral and earth),
before connecting. Separately
connect the Live, Neutral and
Earth from the mains power supply
to the electrical cable tail supplied
o n t h e f i t t i ng u s i ng 3 r e s in
connectors (Connector: 3M -
J000788) to maintain the IP rating.
C. Inset the two corresponding
c ab le s c om p le t el y i nt o t h e
connectors. Push the button on the
c o n n e c t o r ( i n d i c a t e d i n
red/orange) to release the gel
resin once the electrical cables
are secure.
1. Select the required position for
the luminaire, and recess the
correct connector box into the
mounting surface.
Tula Bulkhead
Requirements:
Be sure the electricity to the
system you are working on is
isolated.
Two counter sunk screws/wall
plugs, if required*. Otherwise
magnets will be supplied.
Standard 2x4 or 4x4 electrical
connector box, either PVC or
galvanised steel. Ensure the
connector box is positioned
correctly.
4x4 Tula2x4 Tula
A
DO NOT CONNECT THE FITTING LIVE
September 2017


