RF Concepts CamEye SPORT User manual

Remote control for LANC equipped
video camera or VCR deck.
www.skytools.m.se
designed for use in extreme sports.
information and support on our products.
Works in CAMERA and VCR mode with
external video source (e.g. bullet camera)
Easy to use - one button for all functions
Record & standby, on & off control function
Indicator for recording, standby, low battery
and low tape status
1 meter (3.3 feet) LANC connection cable
Makes it easy to protect your video camera.
The long LANC connection cable makes it easy to store your
video camera or VCR deck safely. There is no need to access
the video camera for record and standby or power on / off
functions.
Extends the video camera battery life.
CamEye SPORT lets you turn on and off the power to the
video camera without the need to access the video camera.
Feed-back LED for status information.
A green light indicates power on and standby. A red light
indicates recording in progress. An alternating green/red
blinking light indicates low battery and if there is less than 5
minutes left on the tape. A blinking red light indicates that
the video camera is in PHOTO mode or not yet ready to start
recording.
One button for all functions.
You don’t need to learn complicated button combinations.
CamEye SPORT lets you focus on your sport activity.
Works with video cameras equipped with LANC.
All video cameras and VCR decks with a standard LANC
terminal can be controlled with CamEye SPORT.
RF Concepts Ltd
RF Concepts Ltd
INSTALLATION
Make sure your video camera is turned off before installing CamEye SPORT.
As a precaution, never insert or eject the LANC connector in or out
of the video camera when it is operating.
Turn OFF the video camera. Insert the LANC connector in
the LANC socket on the camera. It has a blue ring around it
or a LANC symbol next to it. Consult your manual if needed.
Place the control unit so that you can reach it easily and see
the indicator light. Use tape or velcro. Make sure that the cable
is well protected and securely attached.
OPERATION
Recording and Stand-by (Camera & Player/VCR Mode)
Turn on the video camera by setting the video camera mode
switch to ’CAMERA’ or ’PLAYER/VCR’ (’PLAYER/VCR’
is only applicable if your video camera has an analogue or a
digital input).
The green light, indicating stand-by, turns on when the video
camera is ready to start recording.
Press the control switch briefly and let go. The video camera
starts recording (indicator light changes to a red light). The
video camera alternates between stand-by and recording each
time you click on the control switch.
Power off (All modes)
Hold down the control switch for at least 2 seconds and the
light shifts to a quick flashing red light.
Release the control switch and the video camera turns off.
Power on (All modes except in ’OFF’ mode)
Hold down the control switch for 1 second and then let go.
(Note that the video camera mode switch should remain in
’CAMERA’ or ’PLAYER/VCR’ mode during all operations).
Fail-safe operation
You can still operate the video camera the normal way. The
indicator light will display the video camera status independently
of the control switch.
FCC Statement
This device complies with part 15 of the FCC Rules. Operation
is subject to the following two conditions: (1) This device may
not cause harmful interference, and (2) this device must accept
any interference received, including interference that may cause
undesired operation.
NOTE:
This equipment has been tested and found to comply with the
limits for a Class B digital device, pursuant to part 15 of the FCC
Rules. These limits are designed to provide reasonable protec-
tion against harmful interference in a residential installation. This
equipment generates, uses and can radiate radio frequency en-
ergy and, if not installed and used in accordance with the in-
structions, may cause harmful interference to radio communica-
tions. However, there is no guarantee that interference will not
occur in a particular installation. If this equipment does cause
harmful interference to radio or television reception, which can
be determined by turning the equipment off and on, the user is
encouraged to try to correct the interference by one or more of
the following measures:
• Reorient or relocate the receiving antenna.
• Increase the separation between the equipment and receiver.
• Connect the equipment into an outlet on a circuit different
from that to which the receiver is connected.
• Consult the dealer or an experienced radio/ TV technician
for help.
Responsible Party:
SkyTools AB
For Canada / Pour le Canada
This Class B digital apparatus complies with Canadian ICES-003.
Cet appareil numérique de la classe B est conforme à la norme
NMB-003 du Canada.
FOR HOME OR OFFICE USE
CamEye Product Family
Tested to Comply
With FCC Standards
INDICATOR LIGHTS
GREEN indicates that the video camera is in ’CAMERA’
or ’PLAYER/VCR’ mode and in stand-by.
RED indicates that the video camera is in ’CAMERA’ or
’PLAYER/VCR’ mode and recording.
QUICK FLASHING RED indicates that CamEye sport
will turn off the power to the video camera when the
control switch is released - (see power off instructions).
SLOW FLASHING GREEN light indicates that the video
camera is in stand-by mode and that one of the following
problems exists; low battery, less than 5 minutes of tape
remaining, record protected tape or no tape in the video
camera.
An alternating RED and GREEN light indicates that the
video camera is recording and that one of the following
problems exists; low battery or less than 5 minutes of
tape remaining.
A continuously SLOW FLASHING RED light indicate
that the video camera is in ’PHOTO’ mode or that the
video camera is not ready to start recording. The light will
also flash red in the transitions between power on and
off. This normally takes 1 to 3 seconds.
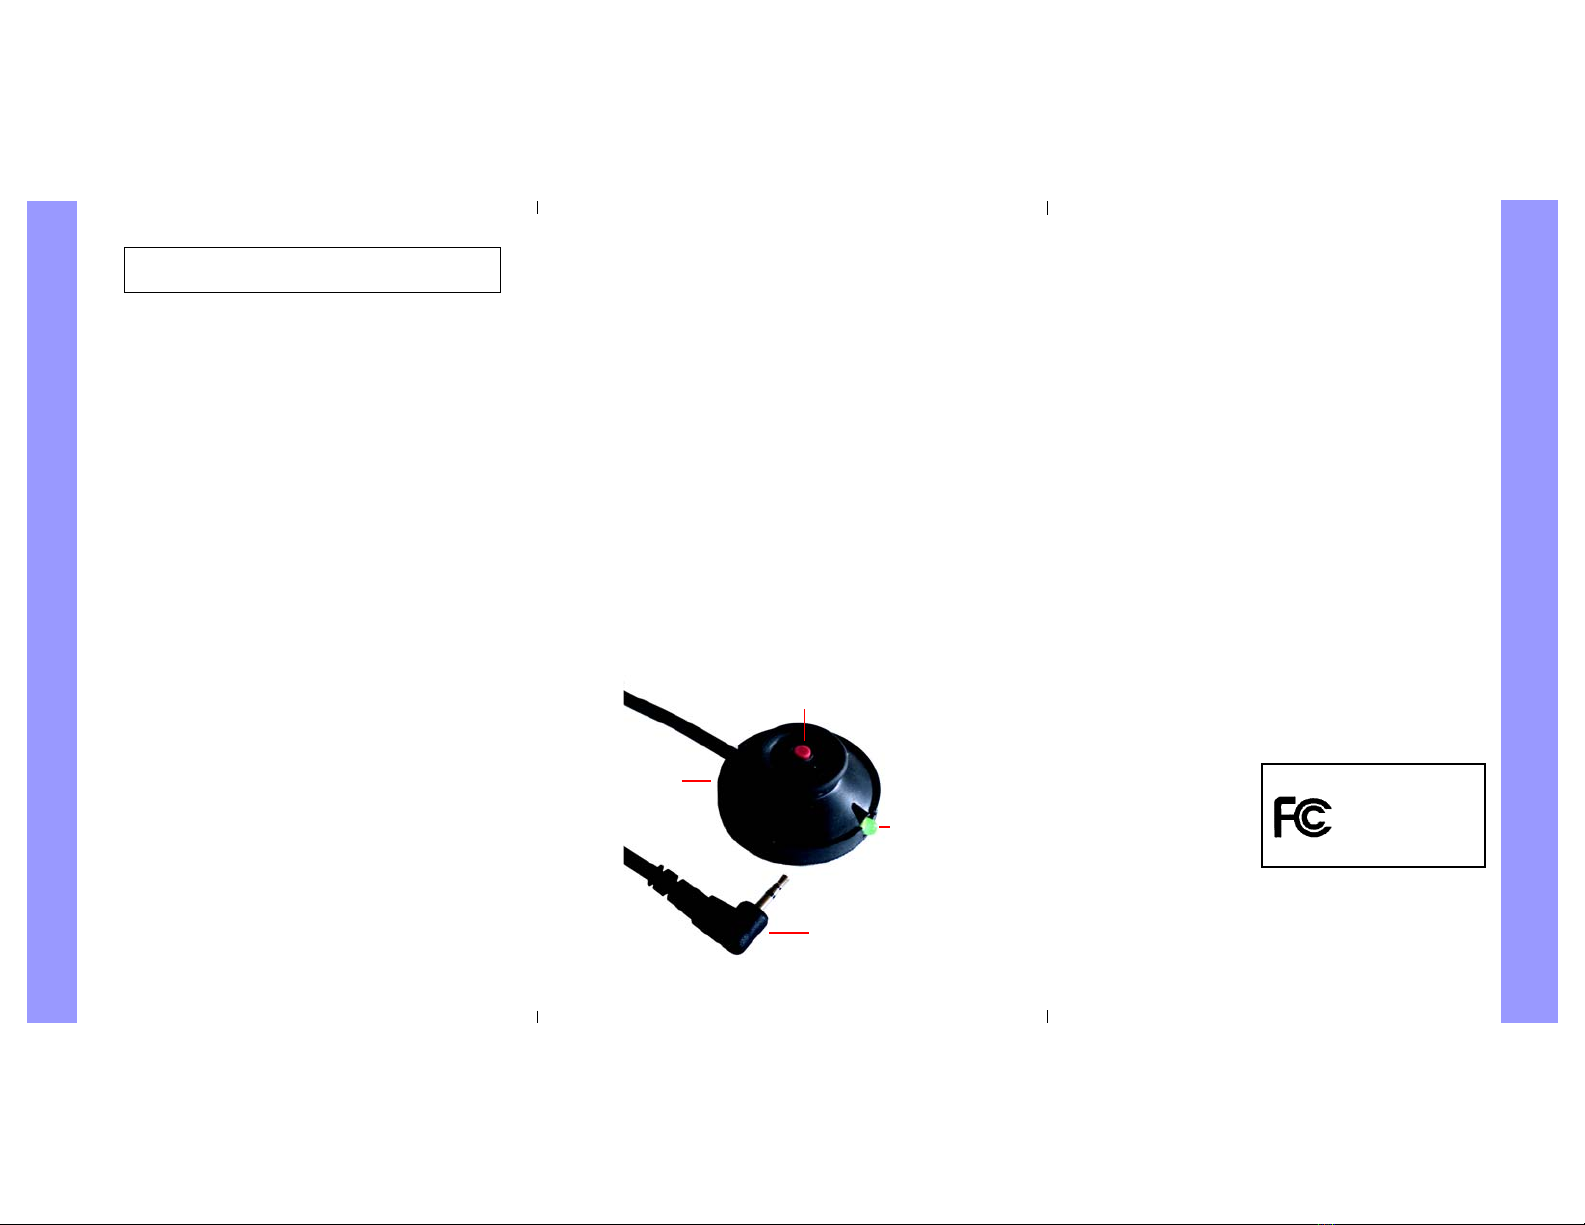
control switch
indicator light
LANC connector
control unit
This manual suits for next models
1


