ritm Voyager 3N User manual

Saint Petersburg, 2018
Voyager 3N
Quick start guide
Ver. 1.1

www.ritm.ru/en 2
Voyager 3N. Quick start guide.
Prepare your device
Prepare your device for connection according to the Data sheet.
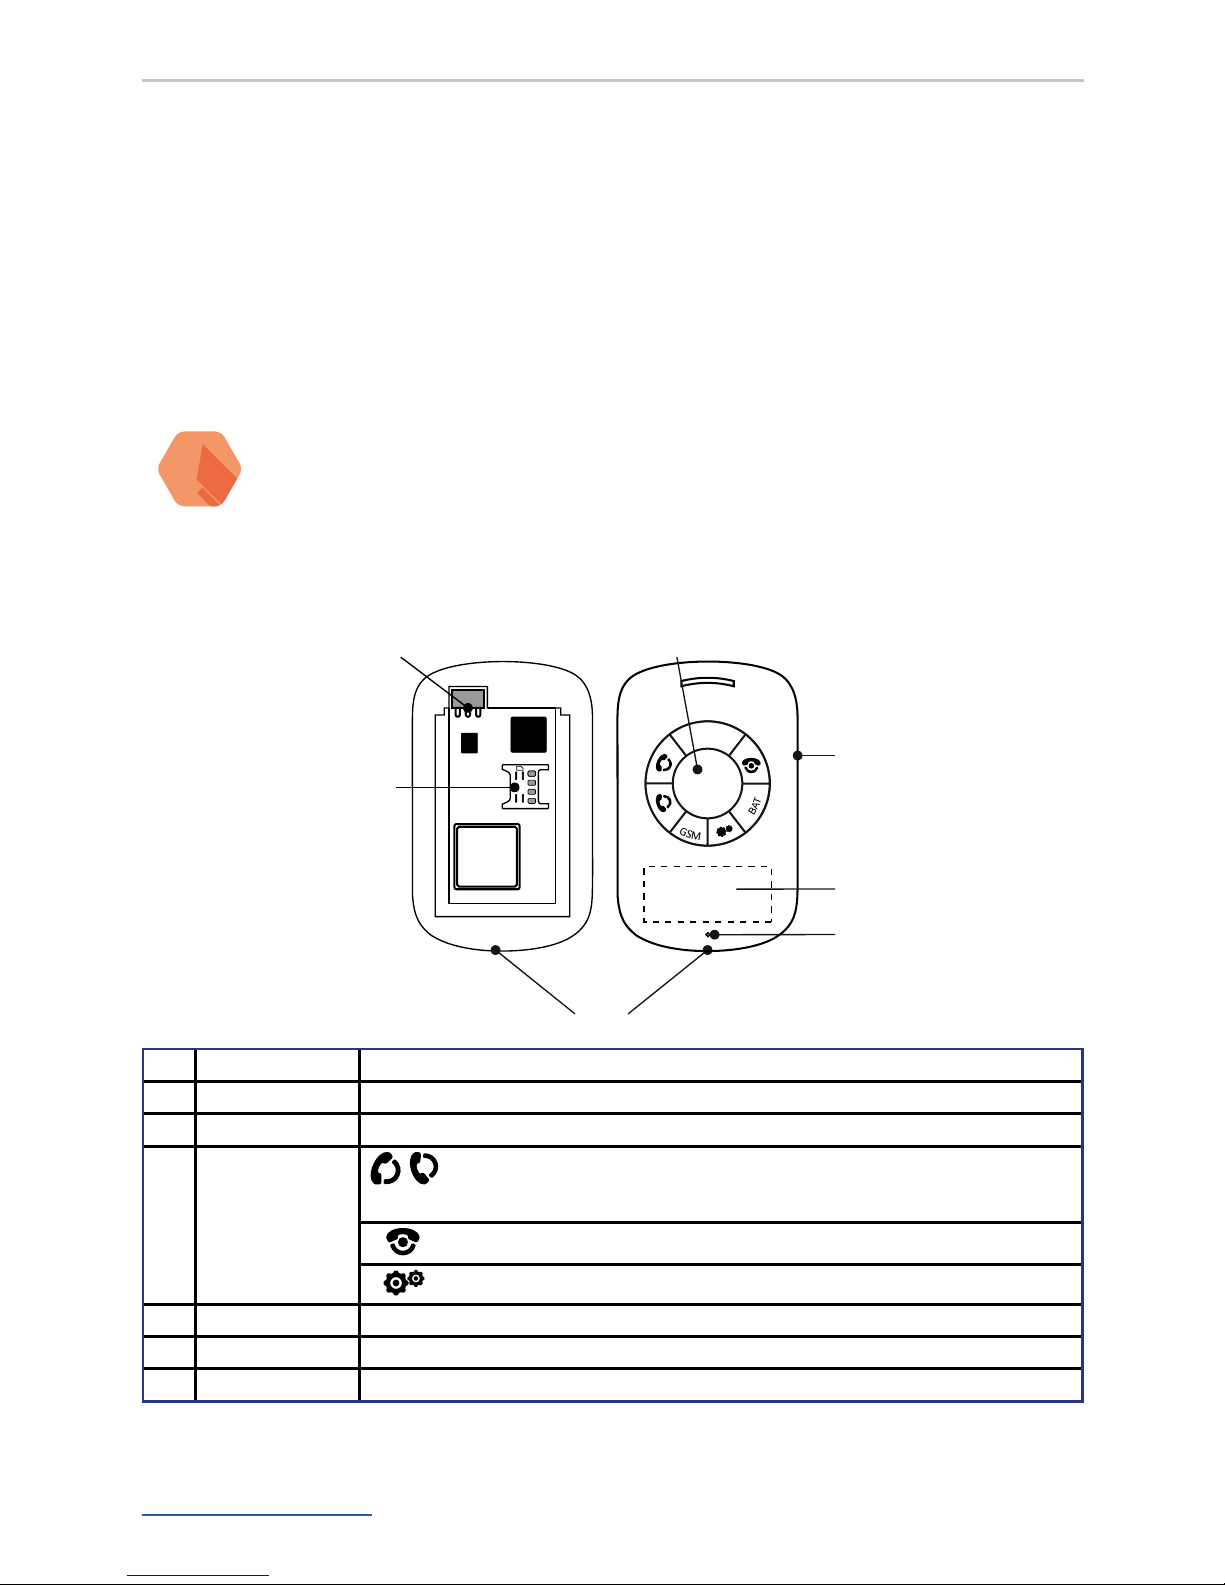
• Open your Voyager 3N.
• Put the SIM card to holder (under the battery). Make
sure, that your SIM card does not require a password.
• Put the battery inside (it maybe necessary
to charge the battery via micro USB).
!
Attention! For correct device operation, be sure
to install the battery in it. Otherwise, the device
will not connect to the monitoring server.
• Close the lid.
3
1
4
S
A
T
E
L
L
I
T
E
ALARM
1
2
5
6
2
7
1 MicroUSB Connection of USB2 cable or charger.
2 NanoSIM SIM card insertion.
3 BL-5C battery BL-5C battery installation location.
4Buttons
and LEDs
1
,
2
and ALARM — transmission of alarm signals to the monitoring
software or to the user in the SMS message/using voice call
— nishing of the voice call.
— unscheduled connection to the server.
5 Side switch Action setting in conguration software. To activate – lift it up.
6 GSP-antenna Internal GPS-antenna location.
7 Microphone Built-in microphone location.

www.ritm.ru/en 3
Voyager 3N. Quick start guide.
Online Conguration
The easiest and the fastest way to congure the device is via
Online Conguration.
Go to www.eu.ritm.ru. You can choose the language in the
upper right corner. Click the “Registration” link to sign up.
Fill out the registration form.

www.ritm.ru/en 4
Voyager 3N. Quick start guide.
After that you will get the e-mail for authorization, follow the
link in that e-mail and you will see this page.
Click on the button “Open Monitoring interface”. You can select
“Run Object Add Wizard automatically”, or open this wizard
later.
Now you should see the main page of GEO.RITM interface.

www.ritm.ru/en 5
Voyager 3N. Quick start guide.
If you didn’t open the “Add Object Wizard” yet, you can click on
“plus” button.
And add a group and an object. You will see this page.
Just click “Next”.

www.ritm.ru/en 6
Voyager 3N. Quick start guide.
Here you should put the IMEI of your device. You can nd it out
from the Data sheet of your device, or written on the modem in
your device.
Click “Next”.

www.ritm.ru/en 7
Voyager 3N. Quick start guide.
Click “Next“.
If you see this page, the server now identied your Voyager 3N.

www.ritm.ru/en 8
Voyager 3N. Quick start guide.
Here you can give a name for your object and add it to the
group. You can choose an existing group, or add a new one
right here.
Every object should be in one of the groups. You have 2 default
groups: Vehicles and Real Estate, so you can choose a Vehicle.
Click “Next”.
Your Voyager 3N is ready to work. You can see your device on
the map, when you put the tick on your device in the left menu.
Remember, that GPS should have good reception conditions.

www.ritm.ru/en 9
Voyager 3N. Quick start guide.
You can click on the image of your Voyager 3N on the map and
see the events, general report and object’s card (you can open
it from the left menu as well).
When you will open object’s card, you can choose the
“Equipment” section and under the picture of Voyager 3N you
will see the link “Setup a device”.
It will open the wizard of settings of your Voyager without USB
connection with your PC.

www.ritm.ru/en 10
Voyager 3N. Quick start guide.

www.ritm.ru/en 11
Voyager 3N. Quick start guide.
Congure your device
After the successful connection you will see this page.
If you have an item Available update (red color), you should
click on it. Then click on “start updating”, you will see updating
progress.
When everything is done, you should change the operation
mode. Online mode is good for rst conguration: when you
use this mode, your device is online all the time. But it
consumes a lot of battery power and GSM trafc.
For regular using, change operation mode according to your
needs.
!
All the batteries have depassivation, when you start
to use your device, you must wait for at least 30 to
120 minutes, in order for your batteries to work well.

www.ritm.ru/en 12
Voyager 3N. Quick start guide.
!
When you change some settings, you have to click on
“Save changes” before you leave the current page!

www.ritm.ru/en 13
Voyager 3N. Quick start guide.
Set-up via USB-cable
The alternative way to set-up your device is via the USB-cable.
Prepare your device for set-up:
• Connect your Voyager 3N to the PC by MicroUSB cabel.
Download the software
• Go to our website www.ritm.ru, in the right top
corner you can choose the English language.
• Then go to “Downloads”.
• Open the “Common software for the set-up of all of
Ritm’s devices”, click on the link and download le.
• Then open “A set of drivers for connecting Ritm’s
devices to the common setup software”, click on
the link and download this le as well.

www.ritm.ru/en 14
Voyager 3N. Quick start guide.
Install the software
Unzip archive Drivers, and Install the downloaded Driver
(Drivers\CP210x_VCP\CP210x_VCPInstaller_x64 or Drivers\
CP210x_VCP\CP210x_VCPInstaller_x32), depending on the
version of your operating system:
• Accept the agreement, click “Next”.
• Click “Finish”.

www.ritm.ru/en 15
Voyager 3N. Quick start guide.
Also, you will need to install driver of virtual COM port (from \
Drivers\ST_VCP\VCP_V1.3.1_setup, or \Drivers\ST_VCP\VCP_
V1.3.1_setup_x64), depending on your operating system:
• Same steps: click next, and nish.

www.ritm.ru/en 16
Voyager 3N. Quick start guide.
Check the connection of the device to your PC
Open the PC manager.
Click on the Device Manager and look at COM ports. Port for
RITM USB is called “Silicon labs CP210x USB to UART Bridge
(COM4)”.

www.ritm.ru/en 17
Voyager 3N. Quick start guide.
!
Please remember the number of your COM
port, it will be important in the future.
The number of your COM port may vary
from that shown in the illustration.
Open the conguration wizard
Run the downloaded conguration program from the le, it will
look like this:
In the right bottom corner you can choose the language.
After that, for the rst time, it may be necessary to download
the latest version of the software.
Here you can choose your COM port (use the port which you
saw in device manager), leave the “Master code” empty and
click “Connect”.
Thereafter, set-up the device as described previously.

www.ritm.ru/en 18
Voyager 3N. Quick start guide.
GPRS and Server Congurations
Go to Device Details, where you can nd common information
about your Voyager 3N.
Here you should copy the IMEI of your Voyager 3N, and check
the registration in GSM network. If you have bad reception
conditions of GSM, or SIM card doesn’t work, you will see, that
SIM has “No registration in GSM network”.

www.ritm.ru/en 19
Voyager 3N. Quick start guide.
You have to congure your GPRS connection.
Go to the section GPRS parameters and ll it accordingly to
your own settings. You can nd it out from your GSM provider.
Make sure, there is no tick for “Specify APN conguration
automatically”.
!
When you change some settings, you have to click on
“Save changes” before you leave the current page!

www.ritm.ru/en 20
Voyager 3N. Quick start guide.
Next step you will have to set up the connection to eu.ritm.ru
server.
1. Click on the Coordinate receipt servers.
2. Type the number of your object, leave the password as
default.
3. Then type in the box your “IP address of the main coordinate
receipt server or its domain name” dev1.eu.ritm.ru
4. And in the box “Port of the main coordinate receipt server”
port number 9426.
5. Then type in the box “IP address of the reserve coordinate
receipt server or its domain name” dev2.eu.ritm.ru.
6. And in the box “Port of the reserve coordinate receipt server”
port number 9426.
!
When you change some settings, you have to click on
“Save changes” before you leave the current page!
Now you can login into eu.ritm.ru and add your object to the
system.
Table of contents
Other ritm GPS manuals
Popular GPS manuals by other brands

Shenzhen v-sun Electronics
Shenzhen v-sun Electronics TLT-2H instruction manual

Garmin
Garmin RV 895 owner's manual

Cobra
Cobra 6100 Pro HD user manual

ACR Electronics
ACR Electronics VECTA 2 - REV A2 Product support manual

Goclever
Goclever Navio 515 owner's manual

Pioneer
Pioneer AVIC-6100NEX installation manual