ROBAND GT400 User manual

24/10/2017
Manufactured By
ROBAND AUSTRALIA PTY LTD
OPERATING INSTRUCTIONS
GRIDDLE / GRIDDLE TOASTER
Models:
G400, GT400, GT480
Version 1
G500, G500XP, GT500
Version 1
G700, GT700
Version 2
Includes
International models:
…-Bxx, …-Fxx, …-Gxx, …-Mxx
Special Features:
Single or Dual Thermostat Control
Stainless Steel Construction
Integrated grease Box and front drain gutter
Multiple toasting Rack positions (only on Griddle Toaster version)
Dedicated Toasting element (only on Griddle Toaster version)
These instructions cover the models of ROBAND®Griddle & Griddle Toasters only. Although there
are slight variances between models, the installation, operation, care and maintenance procedure
is the same for all.

®
®
®

CONTENTS
INTRODUCTION.....................................................................................................1
GENERAL PRECAUTIONS.....................................................................................1
PACKAGING ...........................................................................................................2
COMPLIANCE.........................................................................................................2
INSTALLATION.......................................................................................................3
OPERATION............................................................................................................5
SAFETY ......................................................................................................8
GENERAL SAFETY.................................................................................................8
CLEANING, CARE & MAINTENANCE ....................................................................9
TROUBLESHOOTING...........................................................................................10
SPECIFICATIONS.................................................................................................11
CIRCUIT DIAGRAM –GT480................................................................................12
CIRCUIT DIAGRAM –GT400 / GT500..................................................................12
CIRCUIT DIAGRAM –GT700................................................................................13
CIRCUIT DIAGRAM –G400 / G500 / G500XP......................................................13
CIRCUIT DIAGRAM –G700..................................................................................14
GT400 EXPLODED VIEW .....................................................................................15
GT480 EXPLODED VIEW .....................................................................................16
GT500 EXPLODED VIEW .....................................................................................17
GT700 EXPLODED VIEW .....................................................................................18
G400 EXPLODED VIEW .......................................................................................19
G500 / G500XP EXPLODED VIEW.......................................................................20
G700 EXPLODED VIEW .......................................................................................21
APPENDIX A.........................................................................................................22
EC DECLARATION OF CONFORMITY.................................................................23
WARRANTY..........................................................................................................24

INTRODUCTION
Congratulations on your purchase of this quality ROBAND®product. With proper
care and management your new purchase will give you years of trouble free
service.
By reading these instructions carefully you can ensure that this machine is used
and maintained properly, helping your new investment to perform well for you now,
and to continue performing in the many years to come.
GENERAL PRECAUTIONS
This machine must only be operated by qualified person(s) who are fully versed in the
operating and safety instructions described in this manual. Operators should be
instructed to familiarise themselves with any and all safety instructions described in
this manual prior to commencement of any maintenance or service.
These machines are heating units, and as with any commercial heating unit the
surfaces on these Griddle’s will get hot. Always be careful when near an
operating Griddle, and ensure that any risk to unwary customers or staff is
minimised with additional signage if necessary. Due to the obvious heat hazard
Roband recommends that these units be kept out of reach of children.
In the case of new personnel, training is to be provided in advance. These machines
should not be operated by persons (including children) with reduced physical, sensory
or mental capabilities, or lack of experience or knowledge, unless they are being
supervised or being instructed concerning the safe use of the appliance by a person
responsible for their safety.
The machine should be disconnected from all power and allowed to cool before
cleaning. Any damaged plug or cord should be replaced before further use.
These machines should not be cleaned with the use of a spray applicator, water jet or
any other method except those outlined in the Cleaning & Care section of these
instructions. No part of the machine should be immersed during cleaning.
Roband will accept no liability if;
Non-authorised personnel have tampered with the machine.
The instructions in this manual have not been followed correctly.
Non-original spare parts are used.
The machine is not cleaned correctly, with the right product.
There is any damage to the unit.

PACKAGING
All care is taken when packing and Roband ensures that every unit is functional and
undamaged at the time of packaging.
The Package of this Griddle should include:
1) One Griddle Or Griddle Toaster (appropriate model)
2) This manual
3) Grease Box
4) Toasting Rack (Toaster Version only)
5) Crumb Tray (Toaster Version only)
Any damage to the machine as a result of freight must be reported to the Freight
Company and to the agent responsible for the dispatch of said unit within 24 hours of
receipt. No claims will be accepted or entertained after this period.
RCM:
Roband®products have been designed and manufactured to comply with any and
all specifications set out by the Australian Communications and Media Authority
(ACMA) in regards to Electromagnetic Compatibility. As testament to such
compliance these units bear the RCM symbol.
For further information contact the Australian Communications Authority, PO Box
13112, Law Courts, Melbourne VIC 8010.
CE:
Roband®products bearing the CE compliance mark have been designed and
manufactured to comply with European Standards and Directives. A copy of the
CE Declaration of Conformity is located at the back of these instructions.
COMPLIANCE

INSTALLATION
Remove all the packaging materials and tape, as well as any protective plastic from
the machine. Clean off any glue residue left over from the protective plastic using
methylated spirit.
Place the Griddle / Griddle Toaster on a firm, level surface in the required position.
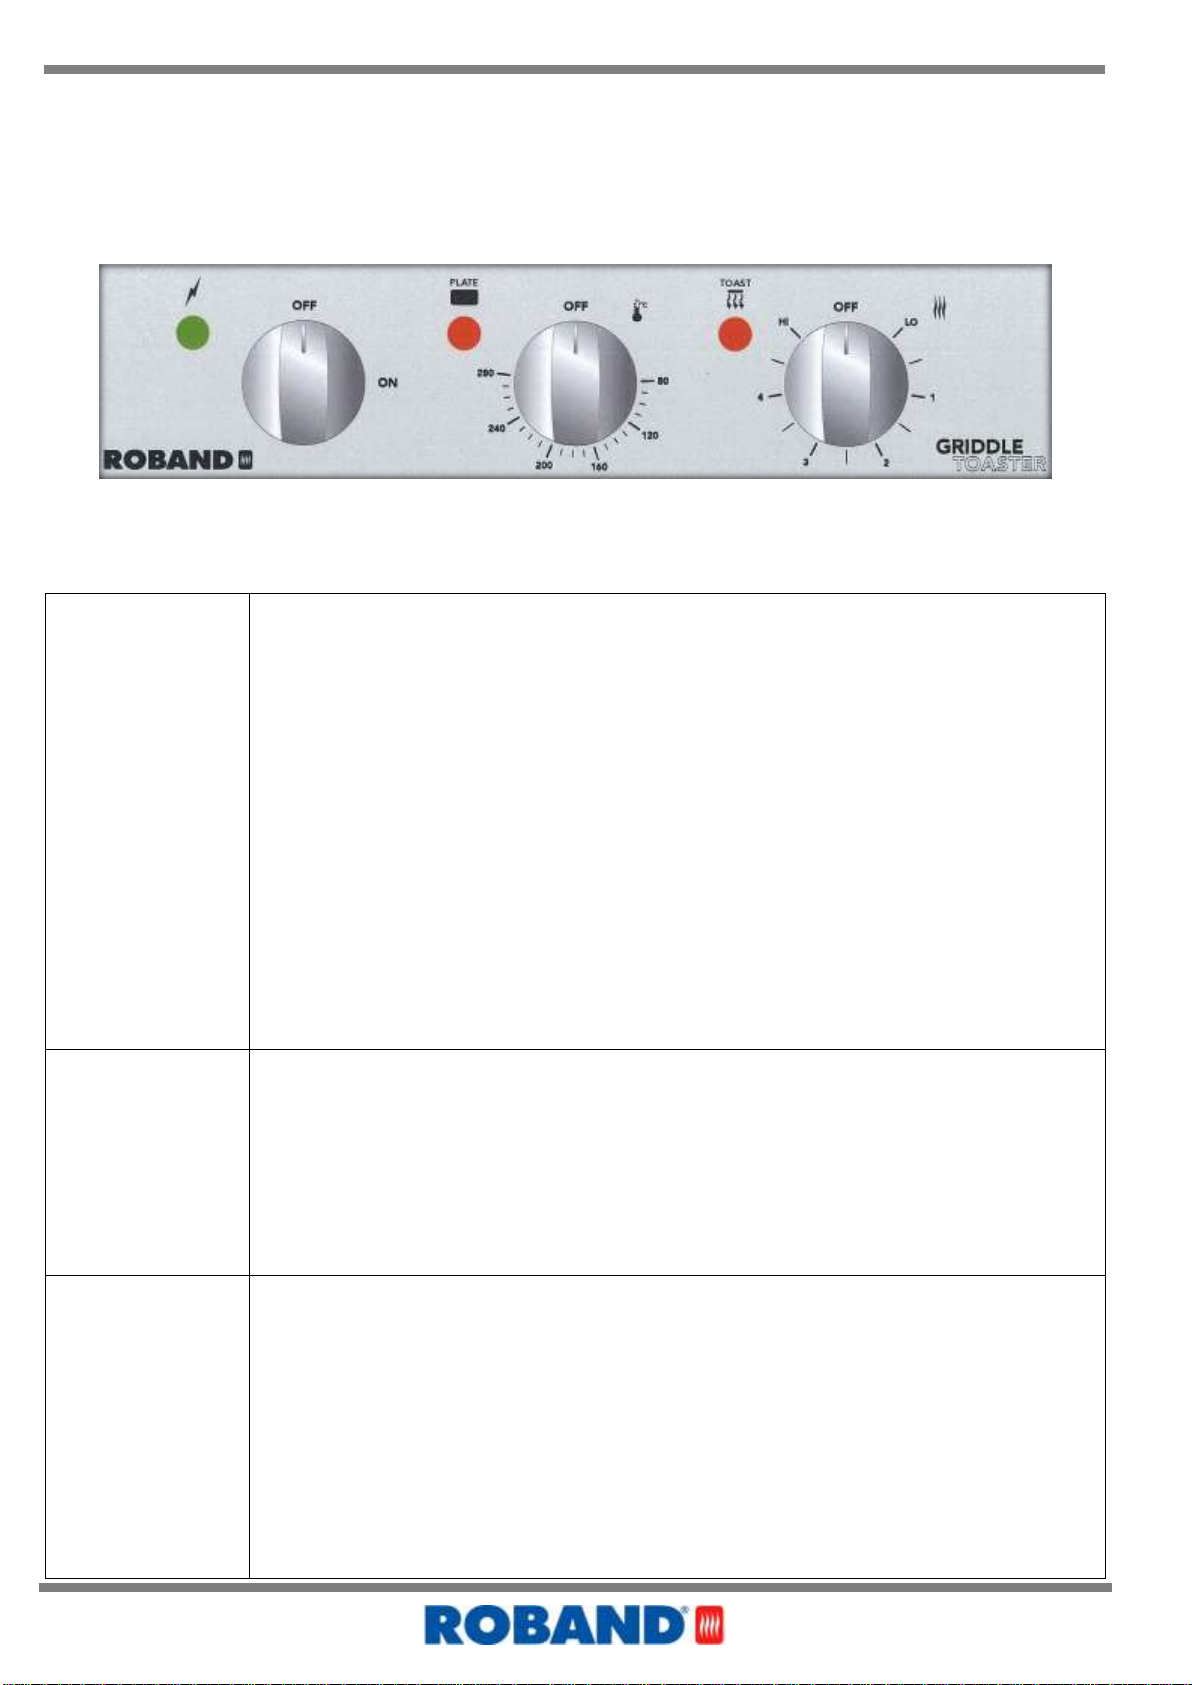
Before connecting the Griddle to the power supply ensure that all the controls are in
the “OFF” position. Turn all controls on and off to familiarise yourself with their
operation
National Standards exist outlining the positioning, spacing and ventilation
requirements when installing new appliances. These Standards should be
consulted and new equipment should be installed accordingly. In any situation
where specifications allow a distance of less than 100mm we would still
recommend that a well-ventilated air gap of not less than 100mm be maintained.
Caution: If clearances of 100mm are not maintained around the appliance, walls
partitions and finishes etc., must be made of a non-combustible material. Any
combustible material must be clad in suitable non combustible material. Fire
prevention regulations must be adhered to
Do not place the Griddle above other equipment that may give off heat.
POWER CONNECTION
G400, G500, G500XP, GT400, GT480 & GT500
Plug the machine into a power outlet matching the plug type supplied.
G700 & GT700
NOTE: GT700 and G700 models MUST be installed by a licenced electrician
in accordance with Australian wiring Standards.
Suitable means for disconnection from power supply must be incorporated in
the fixed wiring in accordance with the wiring rules.
Wiring to machine must be protected by suitable high temperature sleeving
and inlet bushes.
Ensure all panels and components are re-fitted to machine before use.
The GT700 is supplied ready for connection in a configuration of 3 Phase and
Neutral Mains Supply, minimum 10A per Phase.
If a single Phase 32A supply is to be used, connect the phase to L1 and a
bridge must be inserted between L1 and L2, and L2 and L3 on the Terminal
Block.
If a 2-Phase minimum 20A per Phase supply is to be used, connect one
phase each to L1 and L2 and a bridge must be inserted between L2 and L3
on the Terminal Block.

INSTALLATION CONTINUED…
The G700 is supplied ready for connection in a configuration of 2 Phase and
Neutral Mains Supply, minimum 10A per Phase.
If a single Phase 20A supply is to be used, connect the phase to L1 and a
bridge must be inserted between L1 and L2 on the Terminal Block.
We recommend the use of an RCD (Residual Current Device) rated at not less
than 30mA for circuit protection when using these units. Note that if one RCD is
used to protect multiple socket outlets, the RCD shall be appropriately rated so as
to allow up to 30mA from these machines alone.

OPERATION
INITIAL STARTUP
To turn on the unit, turn the Power switch to the right (see below).
CONTROLS DESCRIPTION
Power
Switch
The Power switch disconnects the mains power supply from the
machine. The green pilot light above and to the left of the switch
will illuminate whenever the unit is switched on, indicating that
power is being supplied to the unit.
Turning the switch to “ON” performs the following:
- GT480 Turns Toasting Elements on, activates hotplate
thermostat dial. NOTE: The hotplate element is not yet
activated until a control setting other than “OFF” is selected.
- G500, G500XP, GT500, GT700 All control dials are activated
including thermostat(‘s) (for cooking plate) and Energy
Regulator (for Toasting Element on Grill Toaster models).
NOTE: The cooking elements and/or toasting elements are
not yet activated.
Thermostat
The Thermostat controls the temperature of the cooking plate. The
thermostat will cycle on and off to maintain the pre-set
temperature. The temperature can be selected by using the dial
indicator. Most cooking is carried out between 180°C and 240°C.
When the thermostat is heating up, the amber pilot light closest to
the control will be illuminated. When the set temperature has been
reached, the pilot light will turn off.
Energy
Regulator
The Energy Regulator controls the toasting element. (GT500 and
GT700 Versions Only). Most efficient toasting is achieved when the
toasting elements are on maximum. Max setting “HI” will run the
toasting element continuously. An Idle setting of “2” can be used to
keep the elements warm while not in use. This allows for faster
heat up time when the toasting elements are required. When the
Energy Regulator is heating up, the amber pilot light closest to the
control will be illuminated. When the control is not heating, the pilot
light will turn off.
Power Thermostat Energy Regulator

SEASONING
All Models:
Before cooking for the first time the plates need to be seasoned as follows.
Remove the paper from the plate and wipe off excess fat.
Brush the plate liberally with frying oil and cover the surface with a layer of salt.
Set the thermostat to a temperature of around 180and heat for around 25
minutes.
Allow the oil and salt to cool, then remove it carefully without scratching the
surface.
Brush the plate with oil again and re-heat until the oil is burnt in. This will form a
skin on the surface of the plate.
Re-oil the surface once again.
Your Hot Plate is now ready for use.
OPERATION
Lightly grease or oil the plates and set the Thermostat to the desired cooking
temperature. Turn the Power switch ON. This will Illuminate the Green Pilot
Light
The Griddle Plate is thermostatically controlled. Rotate thermostat knob to select
the desired cooking temperature.
Allow a warm up time of around 20 minutes to pre-heat the plates before using
for the first time each day.
Select Desired Toasting rack position suitable for size of food to be toasted (If
applicable –Only available on GT400, GT480, GT500 & GT700 models).
Select desired toasting setting on Energy Regulator (If applicable –Only
available on GT400, GT500 & GT700 models).
GT480
The GT480 has the advantage of an additional toasting element and multi-level
toasting rack underneath the cooking plate. The toasting element is always on
when the Power Switch is on.
GT400 / GT500
The GT400 & GT500 have the advantage of an additional toasting element and
multi-level toasting rack underneath the cooking plate. The toasting element is
controlled by the Energy Regulator.

GT700
The GT700 is equipped with separate elements and controls for Left hand Side and
Right Hand Side Operation. Each Half is controlled by its own thermostat or energy
regulator. This means that each side and each function can be used simultaneously
or individually as required and different temperature settings can be set for each
side.
The GT700 has the advantage of dedicated cooking elements and dedicated
toasting elements as well as multi-level toasting rack underneath the cooking plate.
The toasting elements are controlled by Energy Regulators while the cooking
elements are controlled by Thermostats.
G400 / G500 / G500XP
The G400 & G500 features a hotplate which is temperature controlled by a
thermostat. The G500XP also offers the advantage of increased element power for
additional performance.
G700
The G700 is equipped with separate elements and controls for Left hand Side and
Right Hand Side Operation. Each Half is controlled by its own thermostat. This
means that they can be used simultaneously or individually as required and
different temperature settings can be set for each side.
NOTE: Toasting on GT models is intended to be done simultaneously with the
cooking plate. It is possible to use the toasting feature without the cooking plate,
however the performance will not be as efficient as the toasting relies on heat
generated by the cooking elements. If the primary purpose of the machine is
Toasting, then a separate toasting machine would be recommended.
GREASE BOX:
The Griddles and Griddle Toasters have integrated grease-box’s’. These can be
removed by tilting the grease box forward to release the catch while simultaneously
sliding forward.
CAUTION
Grease Box Contents should be checked at least once a day to ensure that
contents is not full.
Take care when removing grease box as the handle and contents may be
hot. We recommend emptying the grease box when the machine is cool.

SAFETY
GENERAL SAFETY
This machine contains no user-serviceable parts. Roband Australia, one of our
agents, or a similarly qualified person(s) should carry out any and all repairs. Any
repair person(s) should be instructed to read the Safety warnings within this manual
before commencing work on these units.
Steel cutting processes such as those used in the construction of this
machine result in sharp edges. Whilst any such edges are removed to the
best of our ability it is always wise to take care when contacting any edge.
Particular care should be taken when panels are removed (eg during servicing) as
this may expose sharp edges.
Do not remove any cover panels that may be on the machine.
This unit can get very hot, ensure everyone is aware that the machine is operating
and take care to avoid contact with hot surfaces. Hot surfaces should be left well
ventilated with an air gap of at least 100mm, though common sense should be used
if the machine is near heat-sensitive materials.
Always ensure the power cable is not in contact with hot parts of the machine
when in use. Ensure that any damaged power cord is replaced before further
use.
Do not clean this unit with the aid of a Spray Applicator or Water Jet.
These units are not suitable for cleaning in a dishwasher and no parts of these
machines (except the grease box) should ever be submerged in water.
Keep out of reach of children or the inept.

CLEANING, CARE & MAINTENANCE
Attention to regular care and maintenance will ensure long and trouble free
operation of your Griddle. Although scheduled servicing is not required we do
recommend you adopt a program of regular maintenance to ensure that the Griddle
is clean and functional and to avoid inadvertently damaging the unit.
Daily cleaning should be considered mandatory for all cooking equipment. In order
to ensure the cooking plates are cleaned properly and to avoid damage the
instructions below should be followed.
Plates should be seasoned as per the instructions when the machine is first
purchased. Generally, this should only ever need to be done once. This
“seasoning” of the plates reduces food product sticking, protects the plates, and
helps to maintain the foods flavour.
Do not operate without food at high temperatures as it may distort the hotplate.
Use a metal scraper in order to clean excess product from the plate during
service and before cleaning at the end of service.
Plates should be cleaned at the end of each day using a soft cloth dampened
with only hot soapy water, with the machine turned OFF but while the plates are
still warm. Do not under any circumstances use abrasive cleaning
compounds or caustic cleaning agents.
NEVER put cold water or ice on hot plates at a medium to high temperature.
This may cause the plates to buckle due to the sudden change in temperature.
Using the scourer in the heel of your palm, you can put the weight of your upper
torso behind the scrub and easily remove any built up residue. Do not scrub
back the plates too far! If you scrub them so far back that they are shiny
again, then you will need to re-season the plates. Remember that a light clean
regularly is much easier than trying to remove a large build-up of burnt on food
and carbon. Occasionally you may find that the plates have become very
difficult to clean. Should this occur, and only if necessary, use a NON-CAUSTIC
oven cleaner, leaving it on for no longer than 30 seconds and if necessary
repeat. Ensure all cleaner residue is removed.
(Note: some cleaning products are not as non-caustic as they say)
Wipe down the remainder of the machine with a cloth or sponge that is
only DAMP with soapy hot water, taking care to avoid water entering any
part of the Griddle. Do not clean with the use of a water jet, spray applicator or
place the unit in a dishwasher. Spray applicators can result in liquid penetrating
the switches on the machine, causing dangerous electrical situations, damage to
the machine, and voiding any warranty.
Use only soapy water on a damp cloth or sponge when cleaning (soapy
water is made by adding mild hand dishwashing detergents to water).
Other cleaning chemicals can result in damage to parts of the machine.
Many cleaning chemicals are unsuited to polycarbonates or plastics, and may
also damage stainless steel and aluminium.

Although every care is taken during manufacture to remove all sharp edges,
care should be taken when cleaning to avoid injury.
MAINTAINING APPEARANCE OF THE STAINLESS
For protection and cleaning of “brushed” stainless steel surfaces, it is best to use
a cleaner that will both remove grease and dirt while protecting the surface from
future marks. Whilst there are many possible products on the market, our tests
have shown that the following products work well on brushed stainless surfaces.
Stainless Steel Polish (Water based) - Supplied by Clean Plus
Detergents Pty Ltd
Simple Green Pro M cleaner –Supplied by Simple Green
TROUBLESHOOTING
If the Griddle does not heat up check the following points before calling for service.
The Griddle is plugged in or connected correctly and the power switched on.
The power point is not faulty.
The power supply circuit breaker or fuse is operating correctly
The Power supply to the Griddle has been switched on
The On/Off switch has been set to the ON position
The temperature has been set correctly and the green pilot light is illuminated
indicating the machine has power.
The Thermostat knob is not loose or broken, rendering the thermostat
inoperable.
Check Appendix A at the back of this manual - RCD’S
NOTE: A licenced Electrician must install or disconnect All G700 & GT700 models.

SPECIFICATIONS
GRIDDLE
Model
G400
G500
G500XP
G700
Power Supply
230V
230V
230V
400/230V 2P
Power Frequency
50 Hz
50 Hz
50 Hz
50 Hz
Power Consumption
2120W
2300W
3445W
4240W
Amps
9.2A
10A
13A
9.2A/P
Width mm
425
537
537
725
Height mm
260
263
263
255
Depth mm
500
443
443
527
Weight kg
25
27
27
38
Cooking Area mm
515x339
515x339
515x339
700x398
GRIDDLE TOASTER
Model
GT400
GT480
GT500
GT700
Power Supply
230V
230V
230V
400/230V 2P
Power Frequency
50 Hz
50 Hz
50 Hz
50 Hz
Power Consumption
2900W
2300W
3280W
5900W
Amps
13A
10A
14.3A
12.8A/P
Width mm
425
483
537
725
Height mm
374
374
374
375
Depth mm
500
425
457
527
Weight kg
27
28
32
45
Cooking Area mm
398x398
478x308
515x339
700x398
Constant research and development may necessitate specification changes at any
time.

CIRCUIT DIAGRAM –GT480
CIRCUIT DIAGRAM –GT400 / GT500

CIRCUIT DIAGRAM –GT700
CIRCUIT DIAGRAM –G400 / G500 / G500XP

CIRCUIT DIAGRAM –G700
Note: These circuit diagrams have been provided for reference and to assist
qualified service and repair agents only. Under no circumstances should persons
not suitably qualified attempt repairs to any electrical equipment.

GT400 EXPLODED VIEW

GT480 EXPLODED VIEW

GT500 EXPLODED VIEW
This manual suits for next models
7
Table of contents
Other ROBAND Griddle manuals
Popular Griddle manuals by other brands

Spectrum
Spectrum Winco EGD-24M Installation and operating instruction manual

Vollrath
Vollrath Cayenne FTA1024 Operator's manual

Black Stone
Black Stone AIRFRYER COMBO Parts & Assembly

Coleman
Coleman COOKOUT 36" GRIDDLE STATION Safe Use & Care Manual

Eagle Group
Eagle Group 335376 Operating and installation instructions

VENANCIO
VENANCIO CG18-2 Installation and operation manual