ROBAND DM21B series User manual
Instruction Manual
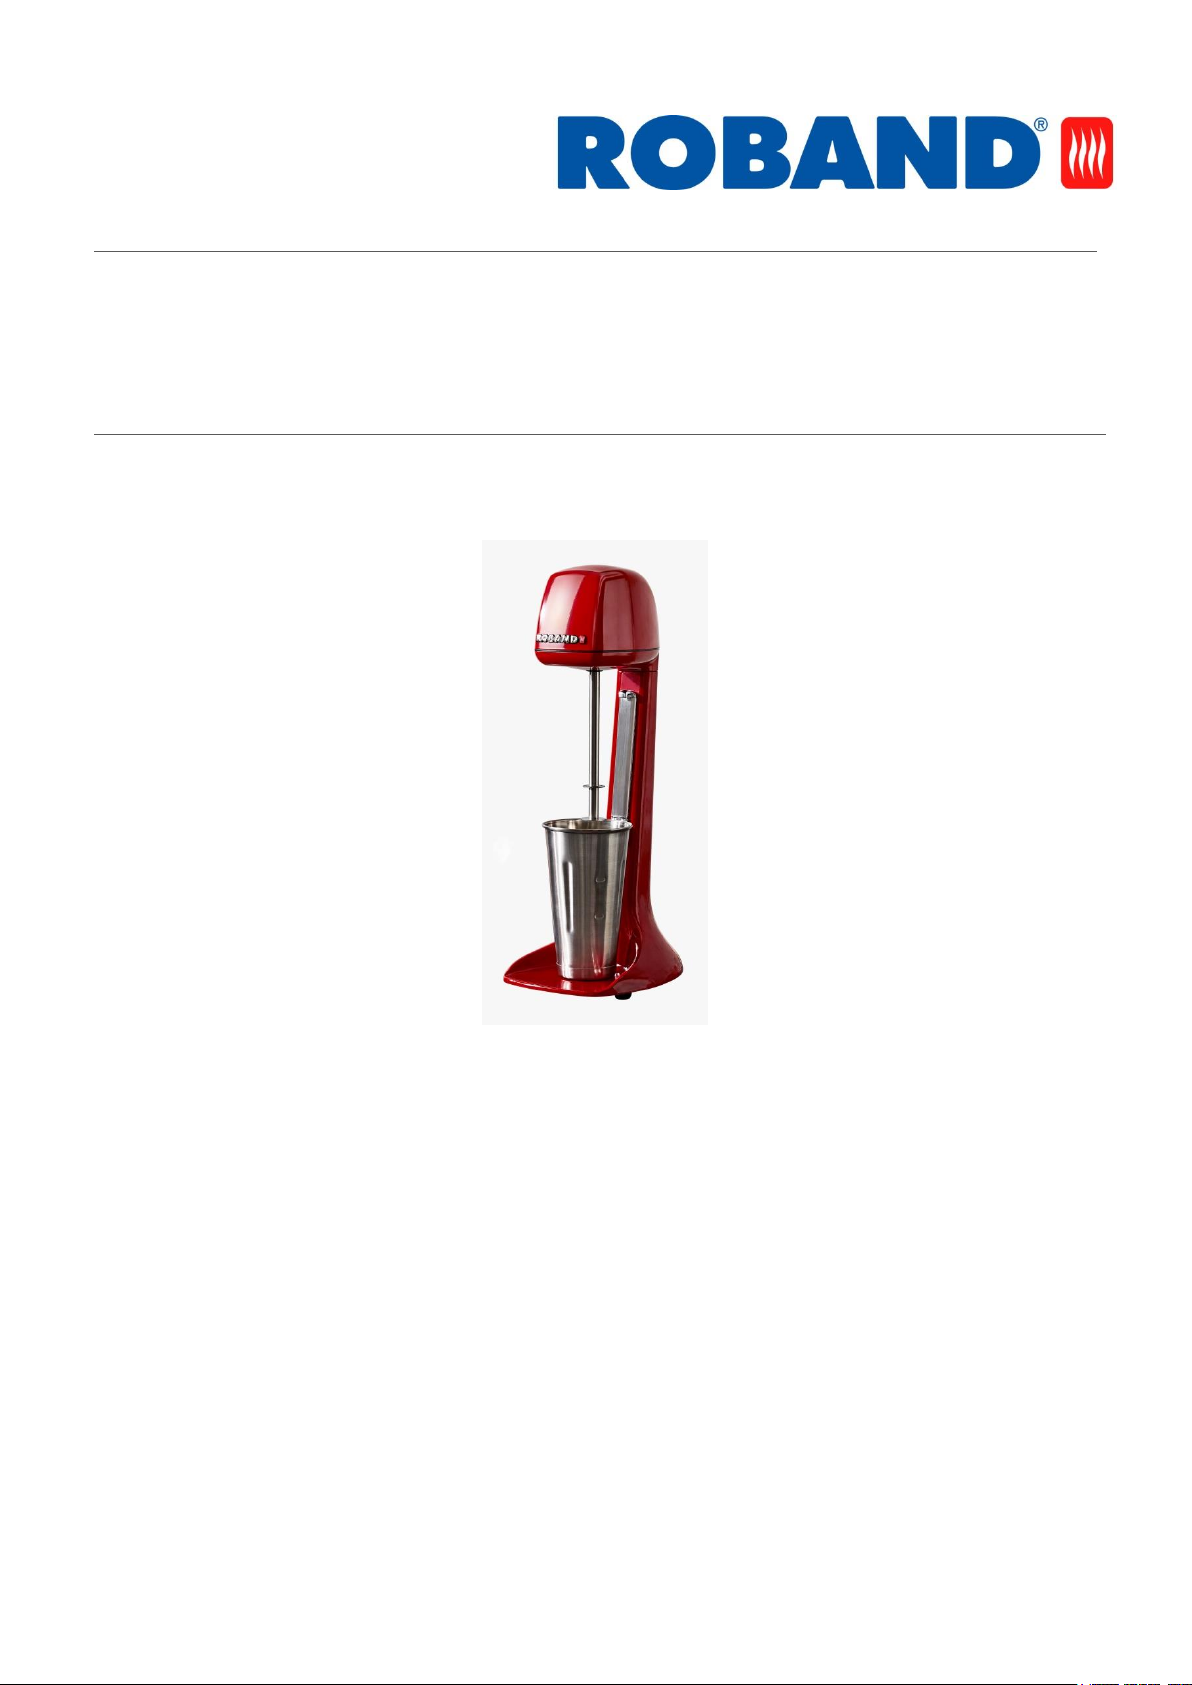
DRINK MIXERS
DM31
Version 1

2
CONTENTS
Product Features 2
Specifications* 2
Parts Included 2
Safety Instructions 2
Cleaning & Maintenance 3
Installation 3
Operation 4
Troubleshooting 5
Spare Parts 5
Circuit Diagram 6
Warranty 7
PRODUCT FEATURES
Powerful two speed motor, 18,000 rpm on
low and 22,000 rpm on high speed
High performance stainless steel beater for
use with milk and ice cream
Saturn beater for extra fluffy milkshakes
Internally sealed two peed on/off switch
Easy Clean base in case of any spillage
Takes standard 710ml. (24fl.oz.) cups
Includes stainless steel cup
Removable easy clean cup holder / switch
actuator
SPECIFICATIONS*
Model
Power
Watts
Size (mm)
Weight
W
D
H
Kg
DM31
150W @ 230V
180
220
485
4.2
*Specifications subject to change
PARTS INCLUDED
One Drink Mixer (appropriate model)
Universal beater
Saturn beater
One Stainless Steel Mixing Cup
Power cord
Instruction Manual
Any damage to the appliance as a result of
freight must be reported to the freight company
and to the agent responsible for the despatch of
the appliance within 24 hours of receipt. No
claims will be accepted after this period.
SAFETY INSTRUCTIONS
Read all Instructions and safety warnings prior to
use. Keep user manual for future reference.
Service and repair should only be performed by
qualified technicians who have read and
understand this manual.
Personnel must be trained prior to operating
this appliance.
This product is suitable for commercial use only.
This appliance should not be operated by
persons (including children) with reduced
physical, sensory or mental capabilities, or lack
of experience or knowledge, unless they have
been given supervision or instruction concerning
the safe use of the appliance by a person
responsible for their safety.
Keep out of reach from children.
Always disconnect the appliance from all power
before cleaning or servicing.
Regularly inspect the electrical supply cord and
plug and discontinue use immediately if
damage is found. Return to manufacturer or
authorised repairer for repair prior to use.

3
This appliance contains no user-serviceable
parts. Roband Australia, one of our agents, or a
similarly qualified person(s) should carry out
repairs.
Keep cord away from heated surfaces.
Do not remove any cover panels from the
appliance.
Never place your hand or any other object into
the cup while in operation.
Do not use anything other than a recommended
cup or collar to activate the switch.
Roband will accept no liability if:
Non-authorised personnel have tampered
with the appliance
The instructions in this manual have not
been followed
Non-original spare parts are used
The machine is not cleaned correctly, with
the right product
There is any damage to the unit
The machine has been modified in any
way.
CLEANING & MAINTENANCE
CAUTION: Disconnect before cleaning.
CAUTION: Steel cutting processes used in the
construction of this appliance can result in sharp
edges. Avoid contact with sharp edges during
cleaning and maintenance.
CAUTION: Do not carry or move the mixer by
holding the motor spindle or the motor housing.
Do not clean with the use of a water jet or
immerse in water.
Do not use caustic or abrasive cleaning products
as they will damage the appliance.
Do not use chloride based cleaners or
“Sanitizers” on these machines.
Wipe all surfaces of the appliance with warm
soapy water and a damp non-abrasive cloth.
The Drink Mixer should be cleaned after each
use.
Clean the motor spindle by placing warm water
in the cup and then mixing it is recommended
to do this after each use.
Several times each day remove the Cup holder /
Actuator and wash in warm soapy water to
maintain smooth operation.
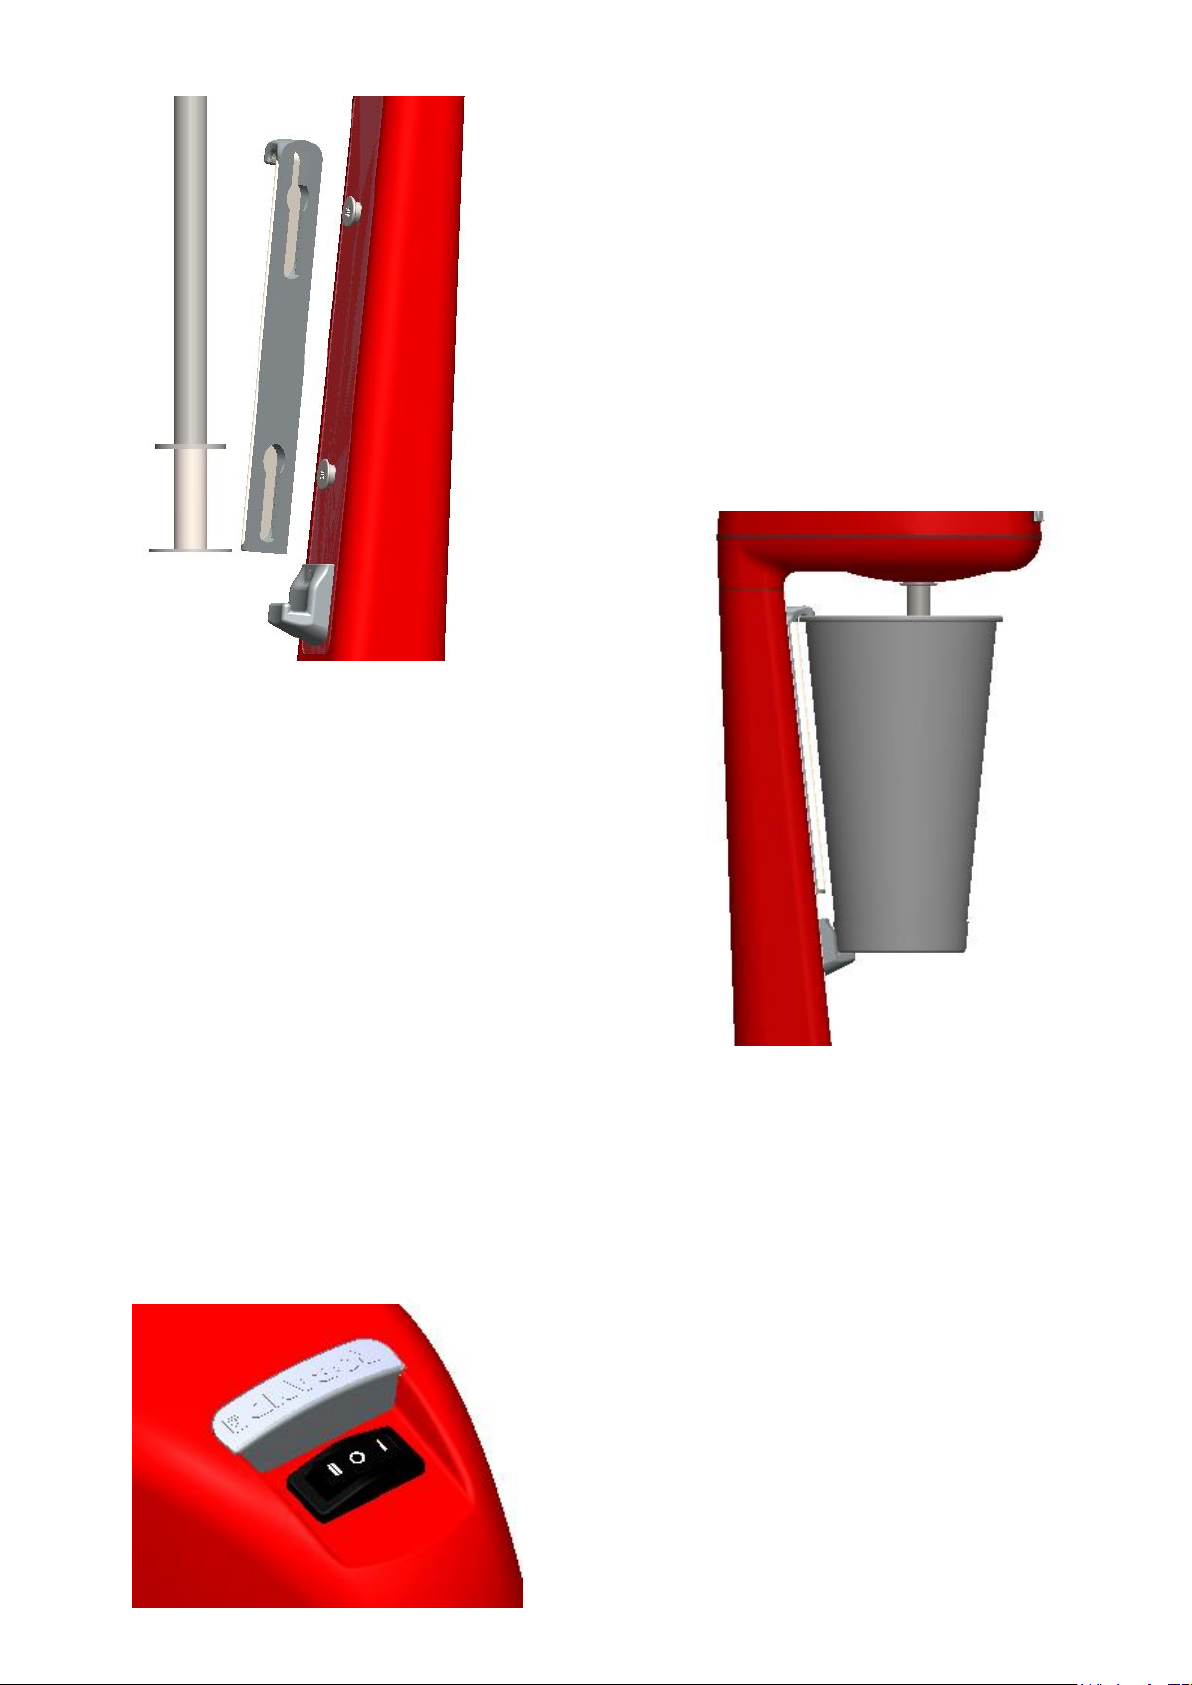
INSTALLATION
Remove all packaging materials, tape, and any
protective plastic from the appliance. Remove
any glue residue from the protective plastic or
tape using citrus cleaner.
Plug the IEC power connector into the base of
the unit ensuring the cordset retainer is clipped
in place retaining the plug
Position the cup holder / actuator as shown by
locating the cut outs in the back over the
screws; internal magnets will retain the cup
holder / actuator in the correct position. Check
operation by lifting the top cup hook up and
then releasing it; the magnets should pull the
cup holder / actuator back down to rest on the
lower cup support
4
Place the product on a firm, level surface in the
desired position.
Before connecting the appliance to the power
supply, ensure that all switches are in the OFF
position.
We recommend the use of an RCD (Residual
Current Device) rated at not less than 30mA for
circuit protection when using these units.
OPERATION
1. Plug into a standard, single phase power
point
2. The unit is operated by a 2 step system:
First, select the desired setting on the
Control Switch by pressing the switch to
either the LOW SPEED ( I ) position or HIGH
SPEED ( II ) position.
3. Next, place the ingredients to be mixed into
the supplied mixing cup or a standard 710ml
(24fl.oz.) milkshake cup, then feed the cup
over the mixing spindle and beater then
place the rim of the cup behind the top
hook of the cup holder / switch actuator. Lift
the cup up to start the mixing process. If
desired the bottom of the mixing cup can be
placed over lower cup support for hands
free mixing. Ensure that the top and bottom
rim of the cup are securely hooked so that
the cup will not slip during use
4. After the desired mixing duration, remove
the cup by first lifting and unclipping the
bottom of the mixing cup then lowering the
cup to release it from the upper cup support
clip. Wait for the mixer spindle and beater to
stop rotating before removing the cup
completely this will prevent mixture from
being thrown off the beater. The mixer is
designed to work best with a fluid volume of
180ml to 210ml. Increasing this volume
could cause product to be thrown from the
cup during mixing leading to possible
electrical problems
5. Cups smaller than 710ml (24fl.oz.) cannot be
used as they will not be tall enough to

5
engage the cup holder and lift it to start the
mixer.
6. The mixer comes fitted with a two piece
stainless steel Universal beater and a
moulded plastic Saturn beater as an
accessory. The two piece stainless steel
Universal beater is designed for best
performance when mixing combinations of
milk and soft ice cream. Removing the top
slotted disk and only using the lower plain
disk gives good results with milk only
shakes. The Saturn beater is best to produce
a thick fluffy milk only shake.
Notes to user: These units are not blenders
and will not make thick shakes from chunks
of frozen ice cream. To make a thick shake, it
is required that soft serve or soft ice cream
be used.
An important tip to remember is that the
colder the milk used, the thicker the shake.
Additionally, light milk and skim milk will
froth more than full-cream milk.
CHANGING BEATER HEADS
To remove a mixer head hold the mixer spindle
firmly and unscrew the beater by turning
clockwise when looking down on the beater.
To fit a new beater or beater assembly,
assemble the parts in the desired order then
hold the mixer spindle firmly and screw the
assembly to the spindle by turning it in an
anticlockwise direction note when installing the
Saturn beater for the first time it will need to be
pushed up at the same time as rotating it
anticlockwise when looking from the top.
TROUBLESHOOTING
If the Drink Mixer does not function check the
following points before calling for service.
The appliance is plugged in correctly and
the power switched on.
The IEC plug is pushed firmly into its socket
and retaining clip firmly in place
The on off / speed control switch has is not
set in the OFF position
The power point is not faulty.
The cup actuates the switch correctly.
Select the alternative speed setting.
If the drink mixture is thrown out of the mixer
cup
Check the speed setting
Check that the cup has not been overfilled
Check that the ice cream is not hard
SPARE PARTS
EC0267 Australian / NZ Plug & Cord 7.5
A - 3 Pin to IEC Appliance Socket
1.8m Black
ES0358 Motor and Spindle Assembly Kit
MS0585 Universal Beater
PC0354 Saturn Beater
VC0046 Cup holder / switch actuator
WA132 Stainless steel mixer cup
ES0408 On/Off speed control switch
assembly

6
CIRCUIT DIAGRAM

7
WARRANTY
The warranty conditions set out below are in addition to any warranties implied or governed by law.
Roband Australia warrants that this appliance shall be delivered free from defects in material and
workmanship. The warranty for this product is offered to the original purchaser, to be free of fault in both
workmanship and materials for a period of 12 months from date of purchase. Roband’s obligations pursuant
to this warranty are limited to the repair or replacement of the defective goods or materials, at its discretion
and subject to the terms contained within this Warranty statement.
The following conditions apply:
The product must be installed, maintained and used under normal operating conditions within the scope of
the operating instructions.
All warranty claims must be submitted to Roband or an authorised Roband dealer, and Roband authorisation
must be granted prior to repairs being carried out. Proof of purchase is required for any repair authorisation.
Warranty is back to base, meaning delivery to and collection of your product to Roband or an authorized
service agent is the responsibility of the purchaser.
Where a product cannot be returned back to base, on-site warranty can be arranged by prior agreement.
The following exclusions apply:
Claims or faults arising from misuse, neglect, transport damage or other mechanical damage, including but
not limited to; door’s, hinges & interlock switches etc., other than those arising from manufacture or material
defects. Where relevant, glass, Teflon® and lamps are not included in this warranty and RCD tripping due to
moisture absorption by Tubular Heating Elements is not a warranty fault.
Roband or any subsidiary company or Agent shall not be liable for loss of profit or damage to other
equipment and property except where it is in breach of the guarantees provided in accordance with
applicable legislation.
Roband reserves the right to reject a warranty claim if it is not satisfied with the circumstances under which the
fault occurred or where a product has been altered from its original specification.
For on-site repairs outside of capital city metropolitan areas, travel costs, service callout fee and related
labour costs etc. are the responsibility of the claimant.
Any costs incurred for false claims or faults due to incorrect usage etc. are the responsibility of the claimant.
Any attempt to repair the product by non-Roband approved service personnel or the use of non-genuine
parts will void the warranty agreement
Our goods come with guarantees that cannot be excluded under the Australian Consumer Law. You are
entitled to a replacement or refund for a major failure and compensation for any other reasonably foreseeable
loss or damage. You are also entitled to have the goods repaired or replaced if the goods fail to be of
acceptable quality and the failure does not amount to a major failure.
For the name of your nearest Australian authorised service agent, please contact:
Roband Australia Pty Ltd
1 Inman Road,
Cromer, NSW, 2099, Australia
Warranty: 1800 268 848
Tel: +61 2 9971 1788
Fax: +61 2 9971 1336
Web: www.roband.com.au
For your nearest International distributor,
please visit:
https://www.roband.com.au/worldwide/

4/06/2021
© Copyright 2021 –Roband® Australia Pty Ltd
All rights reserved. No part of this work may be reproduced or copied in any form or by any means,
electronic or mechanical, including photocopying or posting to a website, without the written permission
of the publisher. The material contained within this document is intended entirely for instructional
Purposes. Roband®Australia is a wholly Australian owned company and has been manufacturing quality
commercial catering equipment for the food service industry for more than 60 years.
Other manuals for DM21B series
1
This manual suits for next models
5
Table of contents
Other ROBAND Mixer manuals


Popular Mixer manuals by other brands

Oster
Oster FPSTSM3711 instruction manual

Saturn
Saturn ST-FP1022 manual

Koliber HOME&COOK
Koliber HOME&COOK ROBOMAX Premium X-2000-W Instruction manual & warranty

Klarstein
Klarstein 10008799 manual

Bravetti
Bravetti 300 WATT POWER MIXER EP545 Use and care instructions

Alesis
Alesis Multimix 8 USB 2.0 FX quick start guide

Stalgast
Stalgast 786023V01 instruction manual

Sunbeam
Sunbeam MX8800 - MIXMASTER PROFESSIONAL Service manual

EINHELL
EINHELL 42.585.97 operating instructions

MULTIQUIP
MULTIQUIP Whiteman WM-70S Operation manual

Bauer
Bauer 21507-BR Owner's manual & safety instructions

Wilfa
Wilfa Wilfa XPLODE 2GO WX-2GO operating instructions


