Rocks OK-04.0027 User manual

Instrukcja / Manual / Anweisung
OK-04.0027
ROOKS PNEUMATIC TOOLS
PL Klucz udarowy 1/2”, 1750 Nm, STRONG
EN Impact wrench 1/2”, 1750 Nm, STRONG
DE Schlagschlüssel 1/2”, 1750 Nm, STRONG

2
Bardzo dziękujemy za Twój doskonały wybór i zakup urządzenia ROOKS.
Prosimy przeczytaj instrukcję obsługi, w której znajdziesz wszystkie ważne
wskazówki dotyczące bezpieczeństwa i użytkowania.
Thank you very much for your excellent choice and purchase of the
ROOKS device. Please read the operating manual for all important safety
and usage instructions.
Vielen Dank für Ihre ausgezeichnete Wahl und den Kauf des ROOKS-
Geräts. Bitte lesen Sie die Bedienungsanleitung, in der Sie alle wichtigen
Sicherheits - und Anwendungshinweise finden.
PL
EN
DE
PL
EN
DE
PL
Przeczytaj
instrukcję
Chroń oczy Chroń słuch Pracuj w
rękawicach
Noś maskę Utylizuj zgodnie
z prawem
Read the
instructions
Protect your eyes Protect your
hearing
Work with gloves Wear a mask Dispose of in
accordance with
the law
Lesen Sie die
Anweisungen
Schütze deine
Augen
Schützen Sie Ihr
Gehör
Mit Handschuhen
arbeiten
Eine Maske tragen Vorschriftsmäßig
entsorgen
OPIS URZĄDZENIA
Klucz udarowy przeznaczony jest do dokręcania i odkręcania połączeń gwintowanych z zakresu
100-1750 Nm (śruby z łbem13-36 mm). Może być stosowany tylko w połączeniu z odpowiednim
typem nasadki udarowej 1/2”. Klucz przygotowany jest do pracy w serwisach motoryzacyjnych
i maszynowych oraz w serwisach opon. Do samochodów osobowych i dostawczych.
Używać tylko nasadek udarowych.
Dopuszcza się stosowanie odpowiednich przedłużek, uniwersalnych złączek i adapterów na-
sadek między kluczem a nasadką. Nie należy używać narzędzia do innych celów niż określone,
ponieważ może to być niebezpieczne.

3
ZASADY BEZPIECZEŃSTWA
PRZECZYTAJ ZE ZROZUMIENIEM WSZYSTKIE INSTRUKCJE DOTYCZĄCE UŻYWANIA I KON-
SERWACJI NARZĘDZI. NIEPRZESTRZEGANIE INSTRUKCJI MOŻE SPOWODOWAĆ USZKODZE-
NIE CIAŁA LUB MIENIA ORAZ UTRATĘ GWARANCJI
Narzędzia przeznaczone są do pracy przez wykwalifikowane osoby dorosłe. Podczas pracy na-
rzędzia wytwarzają iskry, które mogą zapalić pył lub opary. Nie używaj elektronarzędzi w nie-
sprzyjającym, łatwopalnym, wybuchowym i wilgotnym otoczeniu.
Nie narażaj Narzędzi na działanie deszczu lub wilgoci.
Do napędu używaj wyłącznie dobrze przygotowanego powietrza, które zostało osuszone oraz
nasycone olejem do narzędzi pneumatycznych. Zaleca się stosowanie rzadkiego oleju synte-
tycznego.
Nie używaj narzędzi, gdy jesteś zmęczony lub pod wpływem używek. Używaj artykułów ochrony
osobistej, w szczególności: okularów ochronnych, ochrony słuchu i rękawic ochronnych. Podczas
pracy w zapyleniu używaj dodatkowo masek chroniących drogi oddechowe.
Unikaj przypadkowego uruchomienia. Upewnij się, że przełącznik jest w pozycji wyłączonej
przed czynnościami konserwującymi.
Nie spiesz się. Utrzymuj właściwą postawę i równowagę przez cały czas. Pozwala to na lepszą
kontrolę narzędzia w nieoczekiwanych sytuacjach. Używaj odzieży ochronnej. Nie noś luźnej
odzieży ani biżuterii.
UWAGA!
Mimo zastosowania konstrukcji bezpiecznej z samego założenia, stosowania środków zabez-
pieczających i dodatkowych środków ochronnych, zawsze istnieje ryzyko szczątkowe dozna-
nia urazów podczas pracy.

4
Stanowisko robocze
Narzędzie powinno być stosowane jako podręczne. Zaleca się, aby zawsze używać narzędzia na
twardym gruncie, dopuszcza się różne pozycje ciała, ale w każdej pozycji, operator musi mieć
dobre oparcie i odpowiedni chwyt narzędzia. Należy pamiętać, że przy odkręcaniu narzędzie
może odsunąć się wstecz dość szybko od odkręconego połączenia.
Zawsze należy uwzględnić ruch wsteczny tak, aby uniknąć uwięzienia ręki / ramienia / ciała.
Stanowisko robocze musi być wyposażone w instalację pneumatyczną z sekcją przygotowania
powietrza (oczyszczanie, osuszanie i smarowanie).
Na stanowisku powinno być przygotowane odpowiednie, suche miejsce o walorach ochronnych
dla klucza udarowego z obudową kompozytową.
Użyj czystego, smarowanego dopływu powietrza, który dostarczy do narzędzia ciśnienie po-
wietrza równe 90 psi / 6.3 bar. Przed uruchomieniem należy przesmarować klucz olejem pneu-
matycznym (ok 1 ml) i uruchomić bez obciążenia przez 30 sekund. Należy użyć przewodu o
przekroju wewnętrznym min 10 mm i długości 5 do 10 m. Zaleca się, aby narzędzie było podłą-
czone do powietrza tak, jak pokazano na rysunku 1. Zalecany jest syntetyczny olej do narzędzi
pneumatycznych
Zaleca się podłączenie klucza za pomocą szybkozłączy przegubowych lub miękkiego przewodu
o długości ok 30 cm. W układzie pneumatycznym musi być zamontowany powietrzny zawór
odcinający. Dopływ powietrza powinien być smarowany. Zaleca się, aby filtr powietrzny, regu-
lator, olejarka (FRL) były używane zgodnie ze schematem przedstawionym na Rysunku 1, gdyż
w ten sposób powietrze dopływające do narzędzia będzie odpowiednio czyste, nawilżone i o
właściwym ciśnieniu.
Zaleca się, aby ciśnienie na narzędziu podczas pracy wynosiło 90 psi czyli 6,3 bar (MPa). Narzę-
dzie może pracować przy niższym lub wyższym ciśnieniu z maksymalnym dozwolonym ciśnie-
niem pracy równym 100 psi/7,3 bar. Przy niższym ciśnieniu powietrza narzędzie będzie słabsze.
Zaleca się, aby siła dokręcenia połączenia gwintowanego była sprawdzana przy użyciu klucza
dynamometrycznego.
Należy stosować się do krajowych przepisów o utylizacji

5
KONSERWACJA
1. Należy osuszyć filtr oraz wlot powietrza do narzędzia.
2. Nasmarować szybkozłączkę, aby zabezpieczyć ją przed blokowaniem.
3. Narzędzie pneumatyczne wymaga smarowania przez cały okres swoje żywotności. Silnik
pneumatyczny oraz łożysko używają skompresowanego powietrza do uruchomienia narzędzia.
Wilgoć w skompresowanym powietrzu spowoduje rdzewienie silnika. Należy codziennie smaro-
wać silnik.
4. Należy unikać przechowywania narzędzia w pomieszczeniu o dużej wilgotności. Jeśli narzę-
dzie zostanie pozostawione tak, jak było używane – wówczas wilgoć pozostała w urządzeniu
spowoduje jego rdzewienie. Należy przechowywać narzędzie rękojeścią skierowaną w dół, z od-
piętym przewodem pneumatycznym.
EN
DEVICE DESCRIPTION
The impact wrench is designed for tightening and unscrewing threaded connections in the range
of 100-1750 Nm (bolts with a 13-36 mm head). Can only be used in combination with a suitable
type of 1/2” impact socket. The wrench is prepared to work in automotive and machine services
as well as in tire services. For cars and vans.
Use only impact caps.
It is allowed to use appropriate extensions, universal fittings and adapters of sockets between
the key and the cap. Do not use the tool for purposes other than those specified, as this can be
dangerous.

6
SAFETY RULES
READ WITH UNDERSTANDING ALL INSTRUCTIONS FOR THE USE AND MAINTENANCE OF
TOOLS. FAILURE TO FOLLOW INSTRUCTIONS MAY RESULT IN INJURY TO BODY OR PROPERTY
AND VOID OF WARRANTY
The tools are designed to be worked by qualified adults. During operation, the tools produce
sparks that can ignite dust or fumes. Do not use power tools in unfavorable, flammable, explosi-
ve and humid environments.
Do not expose tools to rain or moisture.
Use only well-prepared air that has been dried and saturated with pneumatic tool oil. It is recom-
mended to use a rare synthetic oil.
Do not use tools when you are tired or under the influence of stimulants. Use personal protective
equipment, in particular: safety glasses, hearing protection and gloves. When working in dusty
environments , additionally use respiratory protection masks.
Avoid accidental launch. Make sure the switch is in the o position before maintenance.
Take your time. Maintain proper posture and balance at all times. This allows for better control
of tools and in unexpected situations. Use protective clothing. Do not wear loose clothing or
jewelry.
REMARK!
Despite the use of a safe design by design, the use of protective measures and additional pro-
tective measures, there is always a residual risk of injury during operation.
Workstation
The tool should be used as a handheld. It is recommended to always use the tool on hard gro-
und, dierent body positions are allowed, but in each position, the operator must have a good
support and a proper grip of the tool. It should be borne in mind that when unscrewing, the tool
may move back quite quickly from the unscrewed connection.
Always consider retrograde movement so as to avoid entrapment of the hand/arm/body.
The workstation must be equipped with a pneumatic system with an air preparation section
(cleaning, drying and lubrication).
A suitable, dry place with protective values for an impact wrench with a composite housing
should be prepared at the stand.
Use a clean, lubricated air supply that delivers 90 psi / 6.3 bar air pressure to the tool. Before
starting, lubricate the key with pneumatic oil (about 1 ml) and start without load for 30 seconds.
Use a cable with an internal cross-section of at least 10 mm and a length of 5 to 10 m. It is recom-
mended that the tool is connected to the air as shown in Figure 1. Synthetic oil for pneumatic
tools is recommended
It is recommended to connect the key using quick couplings or a soft cable with a length of abo-
ut 30 cm. An air shut-o valve must be installed in the pneumatic system. The air supply should
be lubricated. It is recommended that the air filter, regulator, oiler (FRL) be used according to
the diagram shown in Figure 1, so that the air entering the tool will be properly clean, humidified
and at the correct pressure.

7
It is recommended that the pressure on the tool during operation is 90 psi or 6.3 bar (MPa). The
tool can operate at lower or higher pressures with a maximum allowable operating pressure of
100 psi/7.3 bar. At lower air pressure, the tool will be weaker.
It is recommended that the tightening force of the threaded connection be checked using a
torque wrench.
National disposal regulations must be observed
MAINTENANCE
1. Dry the filter and the air inlet of the tool.
2. Lubricate the quick release to protect it from blocking.
3. A pneumatic tool requires lubrication throughout its lifetime. The air motor and bearing use
compressed air to start the tool. Moisture in the compressed air will cause the engine to rust.
Lubricate the engine daily.
4. It is necessary to avoid storing the tool in a room with high humidity. If the tool is left as it
was used – then the moisture remaining in the device will cause it to rust. Store the tool with the
handle facing down, with the pneumatic hose unfastened.

8
DE
GERÄTEBESCHREIBUNG
Der Schlagschrauber ist für das Anziehen und Abschrauben von Gewindeverbindungen im Be-
reich von 100-1750 Nm (Schrauben mit einem Kopf von 13-36 mm) ausgelegt. Kann nur in Kom-
bination mit einer geeigneten 1/2”-Schlagbuchse verwendet werden. Der Schlüssel ist für den
Einsatz in der Automobil- und Maschinentechnik sowie im Reifenservice vorbereitet. Für PKW
und Transporter.
Verwenden Sie nur Schlagkappen.
Es ist erlaubt, entsprechende Verlängerungen, Universalbeschläge und Adapter von Buchsen
zwischen dem Schlüssel und der Kappe zu verwenden. Verwenden Sie das Werkzeug nicht für
andere als die angegebenen Zwecke, da es gefährlich sein kann.
SICHERHEITSREGELN
LESEN SIE MIT VERSTÄNDNIS ALLE ANWEISUNGEN FÜR DIE VERWENDUNG UND WARTUNG
VON WERKZEUGEN. DIE NICHTBEACHTUNG DER ANWEISUNGEN KANN ZU KÖRPER- ODER
SACHVERLETZUNGEN FÜHREN UND ERLISCHT.
NWerkzeuge sind so konzipiert, dass sie von qualifizierten Erwachsenen bearbeitet werden kön-
nen. Während des Betriebs erzeugen die Werkzeuge Funken, die Staub oder Dämpfe entzünden
können. Verwenden Sie Elektrowerkzeuge nicht in ungünstigen, brennbaren, explosiven und fe-
uchten Umgebungen.
Setzen SieN-Werkzeuge nicht Regen oder Feuchtigkeit aus.
Verwenden Sie nur gut aufbereitete Luft, die getrocknet und mit pneumatischem Werkzeugöl
gesättigt wurde. Es wird empfohlen, ein seltenes synthetisches Öl zu verwenden.
Verwenden Sie keine Werkzeuge, wenn Sie müde sind oder unter dem Einfluss von Stimulanzien
stehen. Verwenden Sie persönliche Schutzausrüstung, insbesondere: Schutzbrille, Gehörschutz
und Handschuhe. Verwenden Sie bei Arbeiten in staubigen Umgebungen zusätzlich Atem-
schutzmasken.

9
Vermeiden Sie versehentliches Starten. Stellen Sie sicher, dass sich der Schalter vor der Wartung
in der ausgeschalteten Position befindet.
Lass dir Zeit. Behalten Sie jederzeit die richtige Haltung und das Gleichgewicht bei. Dies ermö-
glicht eine bessere Kontrolleder Werkzeuge und in unerwarteten Situationen. Verwenden Sie
Schutzkleidung. Tragen Sie keine lockere Kleidung oder Schmuck.
BEMERKUNG!
Trotz der Verwendung eines sicheren Design by Design, der Anwendung von Schutzmaßnahmen
und zusätzlichen Schutzmaßnahmen besteht immer ein Restrisiko von Verletzungen während
des Betriebs.
Workstation
Das Gerät sollte als Handheld verwendet werden. Es wird empfohlen, das Werkzeug immer auf
hartem Boden zu verwenden, verschiedene Körperpositionen sind erlaubt, aber in jeder Position
muss der Bediener eine gute Unterstützung und einen richtigen Gri des Werkzeugs haben. Es
ist zu beachten, dass sich das Werkzeug beim Abschrauben recht schnell von der abgeschraub-
ten Verbindung zurückbewegen kann.
Berücksichtigen Sie immer eine rückläufige Bewegung, um ein Einklemmen der Hand/des Arms/
des Körpers zu vermeiden.
Der Arbeitsplatz muss mit einem pneumatischen System mit einer Luftaufbereitungssektion
(Reinigung, Trocknung und Schmierung) ausgestattet sein.
Ein geeigneter, trockener Platz mit Schutzwerten für einen Schlagschrauber mit Verbundgehäu-
se sollte am Stand vorbereitet werden.
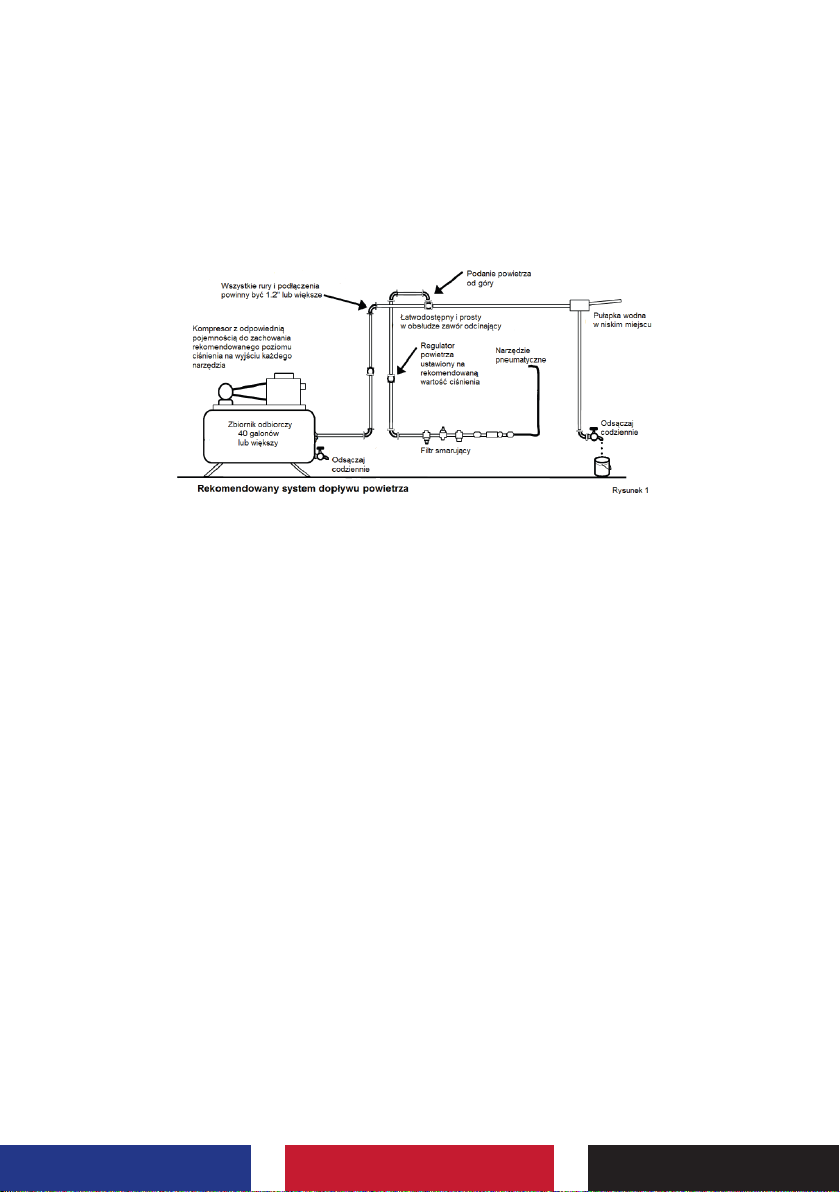
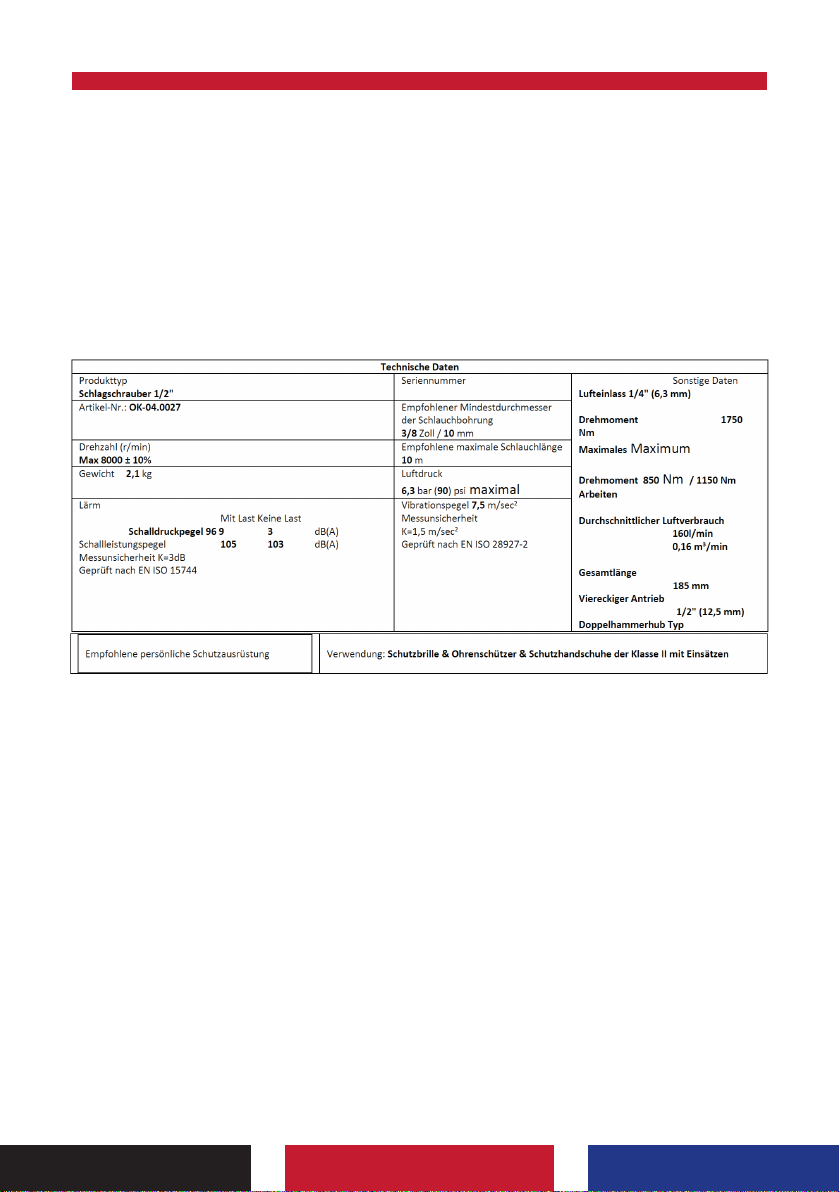
Verwenden Sie eine saubere, geschmierte Luftversorgung, die einen Luftdruck von 90 psi / 6,3
bar an das Gerät liefert. Vor dem Start den Schlüssel mit Luftöl (ca. 1 ml) schmieren und 30
Sekunden lang ohne Last starten. Verwenden Sie ein Kabel mit einem internen Querschnitt von
mindestens 10 mm und einer Länge von 5 bis 10 m. Es wird empfohlen, das Gerät an die Luft
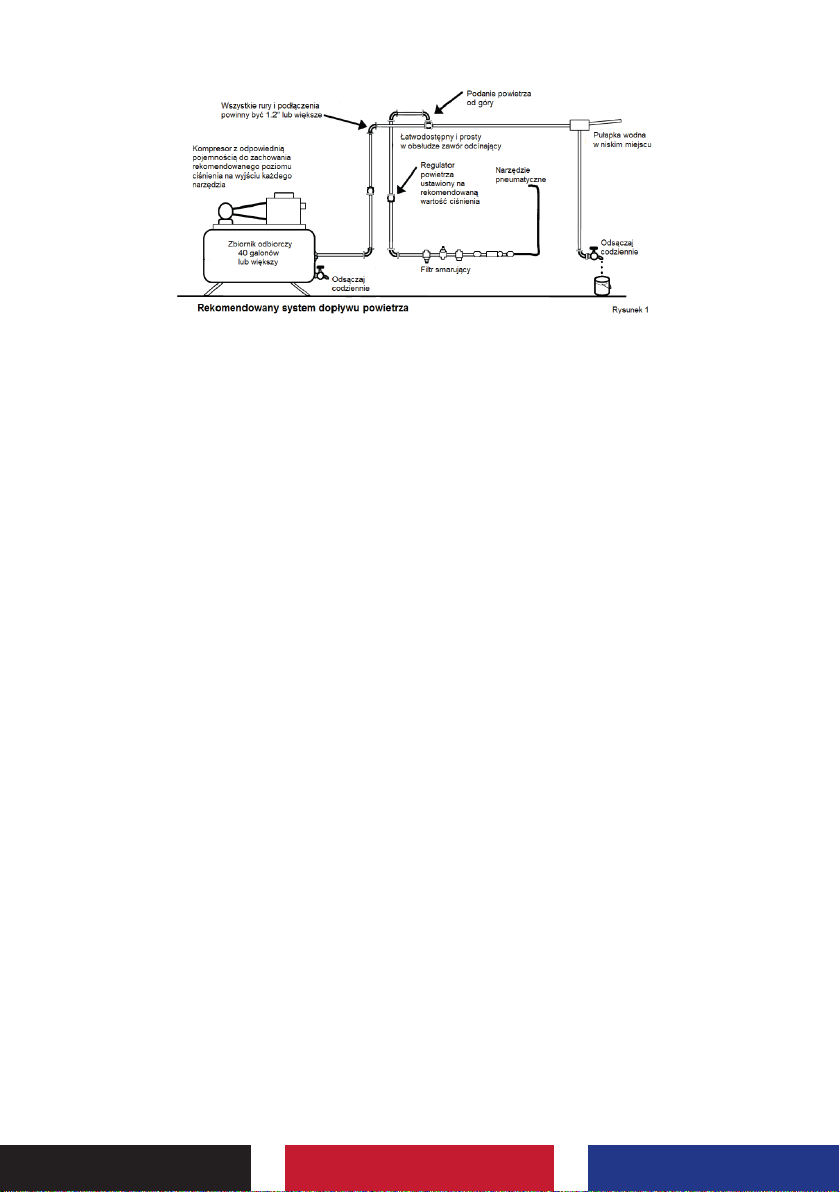
anzuschließen, wie in Abbildung 1 gezeigt. Synthetisches Öl für Druckluftwerkzeuge wird emp-
fohlen
Es wird empfohlen, den Schlüssel mit Schnellkupplungen oder einem weichen Kabel mit einer
Länge von ca. 30 cm zu verbinden. Die Luftzufuhr sollte geschmiert werden. Es wird empfohlen,
den Luftfilter, den Regler und den Öler (FRL) gemäß dem in Abbildung 1 gezeigten Diagramm zu
verwenden, damit die in das Werkzeug eintretende Luft ordnungsgemäß gereinigt, befeuchtet
und mit dem richtigen Druck versehen ist.
Es wird empfohlen, dass der Druck auf das Werkzeug während des Betriebs 90 psi oder 6,3 bar
(MPa) beträgt. Das Gerät kann bei niedrigeren oder höheren Drücken mit einem maximal zuläs-
sigen Betriebsdruck von 100 psi/7,3 bar betrieben werden. Bei niedrigerem Luftdruck wird das
Werkzeug schwächer.
Es wird empfohlen, die Anzugskraft der Gewindeverbindung mit einem Drehmomentschlüssel
zu überprüfen.
Nationale Entsorgungsvorschriften sind zu beachten

10
INSTANDHALTUNG
1. Trocknen Sie den Filter und den Lufteinlass des Werkzeugs.
2. Schmieren Sie den Schnellspanner, um ihn vor dem Blockieren zu schützen.
3. Ein pneumatisches Werkzeug muss während seiner gesamten Lebensdauer geschmiert wer-
den. Der Druckluftmotor und das Lager verwenden Druckluft, um das Werkzeug zu starten.
Feuchtigkeit in der Druckluft führt dazu, dass der Motor rostet. Schmieren Sie den Motor täglich.
4. Es ist notwendig, die Lagerung des Werkzeugs in einem Raum mit hoher Luftfeuchtigkeit zu
vermeiden. Wenn das Werkzeug so belassen wird, wie es verwendet wurde, führt die im Gerät
verbleibende Feuchtigkeit dazu, dass es rostet. Bewahren Sie das Werkzeug mit dem Gri nach
unten und ohne Druckluftschlauch auf.

11
Rysunek – Drawing – Zeichnung

12

13
Table of contents
Languages:
Other Rocks Impact Driver manuals
Popular Impact Driver manuals by other brands

Stanley
Stanley IW16 Series user guide

Beta
Beta 1927B Operation manual

Metabo HPT
Metabo HPT WH18DC instruction manual

Ingersoll-Rand
Ingersoll-Rand 2235QXPA Series Product information

Chicago Electric
Chicago Electric Owner's Manual & Safety Instructions Owner's manual & safety instructions

Chicago Pneumatic
Chicago Pneumatic RP9582 instruction manual

Makita
Makita DTD172 instruction manual

DeWalt
DeWalt DCF921 instruction manual

Paoli Avvitatori
Paoli Avvitatori DP 176 Operating and maintenance manual

RODCRAFT
RODCRAFT RC2444 Operator's manual

Parkside
Parkside 354254 2010 manual

Schneider Airsystems
Schneider Airsystems SGS-HW 141 Original operating manual