Ross RAVE User manual

RAVE
MIDI Controller
v08

Document Information
• Ross Part Number: 4850DR-301-08
• Release Date: January, 2021. Printed in
Canada
The information contained in this document is
subject to change without notice or obligation.
Copyright
©2021 Ross Video Limited, Ross®, MiniME™, and
any related marks are trademarks or registered
trademarks of Ross Video Limited. All other
trademarks are the property of their respective
companies. PATENTS ISSUED and PENDING. All
rights reserved. No part of this publication may
be reproduced, stored in a retrieval system, or
transmitted in any form or by any means,
mechanical, photocopying, recording or
otherwise, without the prior written permission
of Ross Video. While every precaution has been
taken in the preparation of this document, Ross
Video assumes no responsibility for errors or
omissions. Neither is any liability assumed for
damages resulting from the use of the
information contained herein.
Microsoft®, Windows®, and Windows XP®are
either registered trademarks or trademarks of
Microsoft Corporation in the United States
and/or other countries.
Macintosh®, and OS X®are trademarks of Apple
Inc., registered in the U.S. and other countries.
Google Chrome™, Google®, and the Google logo
are registered trademarks of Google Inc.
NVIDIA®and GeForce®are trademarks and/or
registered trademarks of NVIDIA Corporation
in the U.S. and/or other countries.
MIDI and MMA are trademarks of the MIDI
Manufacturers Association.
Audinate®, Dante®, and Dante Via™are
trademarks or registered trademarks of
Audinate Pty Ltd.
ii • Document Information — RAVE MIDI Controller (v08)

MIDI Controller
The MIDI controller is used to control the RAVE
audio mixer. The controller connects to the
switcher through DashBoard.
For these procedures you will need the following
files. They are available with these instructions
in your download.
•X-TOUCH-map###.controller
•Mapping Wizard.grid
•X-TOUCH-LayerA###.bin
•X-TOUCH-LayerB###.bin
Important: The revision numbers (####) of the
.controller
and
.bin
files must match.
MIDI and MMA are trademarks of the MIDI
Manufacturers Association.
Compatibility
The MIDI controller and bin files are only
compatible with specific versions of Graphite
software.
Switcher SoftwareX-TOUCH Files
Graphite 1.2Version 1:
• X-TOUCH-map001.controller
• X-TOUCH-LayerA001.bin
• X-TOUCH-LayerB001.bin
Graphite 2.0Version 2:
• X-TOUCH-map002.controller
• X-TOUCH-LayerA002.bin
• X-TOUCH-LayerB002.bin
Graphite 2.2Version 3:
• X-TOUCH-map003.controller
• X-TOUCH-LayerA003.bin
• X-TOUCH-LayerB003.bin
Graphite 2.3Version 4:
• X-TOUCH-map004.controller
• X-TOUCH-LayerA004.bin
• X-TOUCH-LayerB004.bin
Graphite 2.4 or
higher
Version 5:
• X-TOUCH-map005.controller
• X-TOUCH-LayerA005.bin
• X-TOUCH-LayerB005.bin
Ultra 4.0 or higher
To Connect the X-TOUCH COMPACT
to DashBoard
DashBoard allows you to configure the MIDI
controller connected to RAVE audio mixer.
Important: Refer to the documentation that came
with your X-TOUCH COMPACT for proper handling
and setup instructions.
1. Plug the MIDI controller into one of the USB
ports on Graphite or the DashBoard
computer connected to the switcher.
2. Launch DashBoard.
3. Click File >New >Other.
4. Click Input Devices >New MIDI Controller.
5. Click Next
6. Enter the settings for the MIDI Controller:
•Display Name — enter a name for the
controller
•Slot — select 1
•Controller — select X-TOUCH COMPACT
7. Click Finish.
The MIDI controller appears in the Tree
View.
To Configure the X-TOUCH
COMPACT Interface
A custom DashBoard panel is used to
automatically do all the mapping for the
X-TOUCH COMPACT.
You will need the Mapping Wizard.grid file
that came with your software.
1. Launch DashBoard.
2. Click File >Open File, navigate to the
Mapping Wizard.grid file and click Open.
3. In the MIDI field, select X-TOUCH COMPACT.
4. In the Graphite field, select Audio Mixer.
5. Click DO EVERYTHING FOR ME.
To Configure the Button Layers on
the X-TOUCH COMPACT
The Layer A and Layer B files assign the controls
on the X-TOUCH COMPACT to MIDI Commands
Default layer files are provided on the product
resources disk, or you can customize your own.
Note: The layer files must match the map file that you load in
DashBoard.
RAVE MIDI Controller (v08) — MIDI Controller • 3

1. Connect the X-TOUCH COMPACT to the
server.
2. Launch the X-TOUCH Editor application
that came with your controller.
3. Click the GLOBAL tab.
4. Click LOAD in the PRESETS ON COMPUTER
area and click Yes.
5. Select the X-TOUCH-LayerA####.bin file
and click Open.
6. Wait for the file to be loaded and click Close
on the success dialog box.
7. Click Dump A in the TO HARDWARE area.
8. Click Yes to start the upload and Close on
the success dialog box.
9. Repeat these steps to load the
X-TOUCH-LayerB####.bin file and click
Dump B.
To Map Buttons to Functions
The map file associates RAVE audio mixer
functions to buttons on the X-TOUCH COMPACT.
A default map file is provided on the product
resources disk, or you can customize your own.
1. Double-click the MIDI Controller node in
the DashBoard Tree View.
2. Click Load >Browse and select the
X-TOUCH-map####.controller file.
3. Click Open >Restore.
Default X-TOUCH COMPACT
Mapping
The default mapping comes from the map and
layer files that are included on the Product
Resources disk.
Note: The Clear button clears the Solo selections on Layer A
and the PFL selections on Layer B.
Fader Mapping
The faders are mapped differently on the A and
B layer.
Layer BLayer AFader
Audio 9Audio 11
Audio 10Audio 22
Audio 11Audio 33
Audio 12Audio 44
Audio 13Audio 55
Audio 14Audio 66
Audio 15Audio 77
Audio 16Audio 88
MONITORMAIN9
Note: The default assignment is based on the default fader
configuration. If you change what is assigned to any of the
assignable faders (Audio X) used on the default map, the audio
sources those faders control also changes. For example, if you
assign Audio 5 to SDI 5, the stripe on the midi panel will control
SDI 5 audio instead of the PC input.
Equalizer Control
The EQ/CL Sel buttons are used to select which
source the EQ is being adjusted for, and the
Layer A/B buttons are used select what range
is assigned to the knobs. The knobs are then
used to adjust the EQ values.
Compressor / Limiter Control
The EQ/CL Sel buttons are used to select which
source the Compressor is being adjusted for,
and the Layer B knobs are used to adjust the
compressor values.
Custom Mapping
You can change the current mapping of
functions to the buttons, knobs, and sliders on
4• MIDI Controller — RAVE MIDI Controller (v08)

the X-TOUCH COMPACT. The DashBoard
controller lists all the inputs on the MIDI
controller and allows you to assign a DashBoard
OID to them.
Important: Although you can assign different
functions to the knobs, sliders, and buttons on the
panel, some functions may require changes to the
layers in the X-TOUCH Editor application. Refer to
the documentation that came with your X-TOUCH
COMPACT for more information.
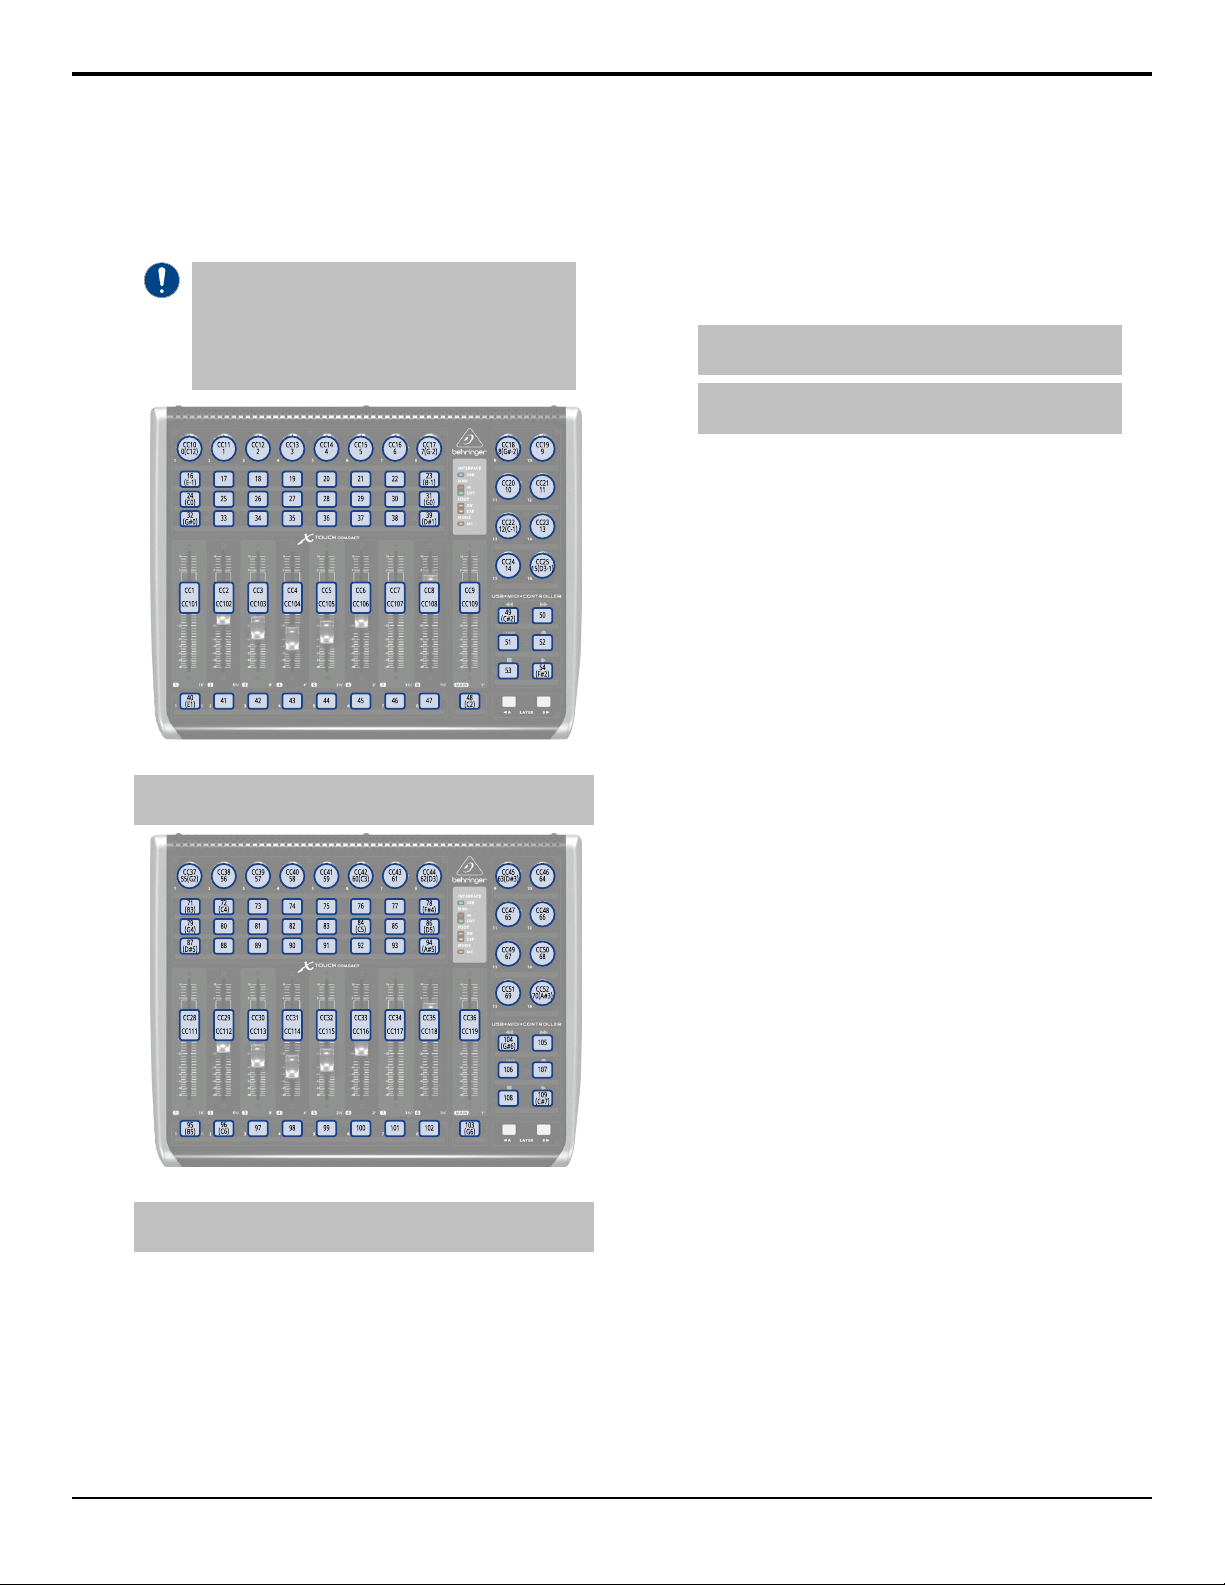
Figure 1: Layer A Button IDs
Note: Buttons CC27 and CC26 on Layer A are the Foot Switch
and Expression Pedal connections on the back of the panel.
Figure 2: Layer B Button IDs
Note: Buttons CC64 and CC63 on Layer B are the Foot Switch
and Expression Pedal connections on the back of the panel.
For the CC knobs and sliders, the top number is
the action when the knob or slider is turned or
moved, and the second is when it is pushed or
touched.
Refer to the documentation that came with your
Behringer X-TOUCH COMPACT for more
information on how MIDI IDs are assigned to
buttons.
To Create a Custom Button Mapping
You can assign any audio mixer function to a
button, slider, or knob on the X-TOUCH
COMPACT
1. Double-click the MIDI Controller node in
the DashBoard Tree View.
Tip: If you want to start with a blank list, click Load >
Factory Default.
Note: The Value column shows the current data coming
from the connected MIDI controller.
2. In the Continuous Controllers table, set up
the knobs and sliders you want to use on
the panel. The numbers for these has the CC
prefix.
a) Locate the ID for the knob or slider you
want to assign a function to. Refer to
Custom Mapping on page 4 for a
diagram to locate the knob or slider.
b) In the Mapped OID field, enter the OID
for the function you want to assign to
the knob or slider. Refer to MIDI Device
OID List on page 7 for a list of OIDs.
c) Click the Transformation list and select
the type of action for the knob or slider.
Sliders should be set to Volume dB and
knobs to Middle Point.
•Disabled — the knob or slider is
disabled.
•Volume dB — the slider is configured
for volume control.
•Middle Point — the knob is
configured for a 200 point range
value (-100 to 100).
d) Change the default parameters for your
knob or slider as required.
•Name — enter a new custom name
for the control.
•Min — the minimum value for the
selected function. This is the value
returned when the knob is at the
counter-clockwise stop, or the slider
it at the bottom stop.
•Max — the maximum value for the
selected function. This is the value
returned when the knob is at the
clockwise stop, or the slider it at the
top stop.
•Sensitivity — the number of points
between the minimum value and the
maximum value.
RAVE MIDI Controller (v08) — MIDI Controller • 5

•Speed % — 100% (other values not
supported at this time)
•Invert — invert the min and max
stops of the knob or slider.
3. In the Buttons table, set up the buttons you
want to use on the panel.
a) Locate the ID for the button you want
to assign a function to. Refer to Custom
Mapping on page 4 for a diagram to
locate the buttons.
b) In the Mapped OID field, enter the OID
for the function you want to assign to
the button. Refer to MIDI Device OID List
on page 7 for a list of OIDs.
c) Click the Action list and select the type
of action for the button.
•OFF — (not supported at this time)
•Stateless — basic button
functionality with no special state.
•GPI — (not supported at this time)
•Set Value — (not supported at this
time)
•Toggle — (not supported at this time)
•Increment — (not supported at this
time)
d) Change the default parameters for your
button as required.
•Name — enter a new custom name
for the control.
•Value (Off) — 0 (other values not
supported at this time)
•Value (On) — 1 (other values not
supported at this time)
•Min — 0 (other values not supported
at this time)
•Max — 1 (other values not supported
at this time)
•Hold — (not supported at this time)
4. Click the Force Panel Refresh list and select
the how often DashBoard syncs with the
panel.
5. Click Save.
6. Click Save again and select a file name and
location for your custom controller file.
7. Click Save.
8. Click Done.
6• MIDI Controller — RAVE MIDI Controller (v08)

MIDI Device OID List
The OID for the MIDI device is made of a number of parts separated by a period. These parts identify
things like the device class (audiomixer), audio source, audio destination, and control function.
For example, the OID audiomixer.aux.2.sdi2.volume translates to device class (audiomixer), audio
destination (aux.2), audio source (sdi2), and control function (volume). This is a continuous input that
allows you to control the volume of SDI 2 on the Aux 2 out.
Table 1: Audio Mixer OIDs
DescriptionSyntaxTarget
Volume
Volume for assignable audio channel 1 input on the
Main layer. Replace audio1 with the assignable audio
channel you want to set the volume for. Replace main
with the Aux layer you want set the volume for
(aux1-aux12).
audiomixer.main.audio1.volume
Assignable Audio
Channels
Master volume for the Main layer. Replace main with
the Aux layer you want set the volume for
(aux.1-aux.12) or the Monitor output (monitor).
audiomixer.output.main.volume
Output Mix
Balance/Pan
Balance for assignable audio channel 1 input on the
Main layer. Replace audio1 with the assignable audio
channel you want to set the balance for. Replace main
with the Aux layer you want set the balance for
(aux1-aux12).
audiomixer.main.audio1.pan
Assignable Audio
Channel
Equalization (EQ)
Select the audio channel that you want to set the EQ
for. This oid is assigned to a button on the same strip
as that audio channel you want to EQ. This tells the
mixer that the EQ values are to be applied to the
selected audio channel.
audiomixer.eqchannelselect
EQ Channel Select
Bypass the equalization for the selected audio channel.
audiomixer.eqbypasscommon
EQ Bypass
Gain setting for the Low Shelf EQ of the selected audio
channel.
audiomixer.lowshelfgaincommon
Low Shelf Gain
Gain setting for the Midrange 1 EQ of the selected audio
channel.
audiomixer.midrange1gaincommon
Midrange 1 Gain
Gain setting for the Midrange 2 EQ of the selected audio
channel.
audiomixer.midrange2gaincommon
Midrange 2 Gain
Gain setting for the High Shelf EQ of the selected audio
channel.
audiomixer.highshelfgaincommon
High Shelf Gain
Maximum Frequency setting for the Low Shelf EQ of the
selected audio channel. Frequency selection is
performed on a linear scale.
audiomixer.lowshelfmaxfreqcommon
Low Shelf Max
Frequency
(linear)
Center Frequency setting for the Midrange 1 EQ of the
selected audio channel. Frequency selection is
performed on a linear scale.
audiomixer
.midrange1centerfreqcommon
Midrange 1
Center Frequency
(linear)
Center Frequency setting for the Midrange 2 EQ of the
selected audio channel. Frequency selection is
performed on a linear scale.
audiomixer
.midrange2centerfreqcommon
Midrange 2
Center Frequency
(linear)
RAVE MIDI Controller (v08) — MIDI Device OID List • 7

DescriptionSyntaxTarget
Q Ratio setting for the Midrange 1 EQ of the selected
audio channel. Ratio selection is performed on a linear
scale.
audiomixer.midrange1qcommon
Midrange 1 Q
(linear)
Q Ratio setting for the Midrange 2 EQ of the selected
audio channel. Ratio selection is performed on a linear
scale.
audiomixer.midrange2qcommon
Midrange 2 Q
(linear)
Minimum Frequency setting for the High Shelf EQ of the
selected audio channel. Frequency selection is
performed on a linear scale.
audiomixer.highshelfminfreqcommon
High Shelf
Minimum
Frequency
(linear)
Maximum Frequency setting for the Low Shelf EQ of the
selected audio channel. Frequency selection is
performed on a non-linear scale.
audiomixer
.lowshelfmaxfreqscaledcommon
Low Shelf Max
Frequency
(scaled)
Center Frequency setting for the Midrange 1 EQ of the
selected audio channel. Frequency selection is
performed on a non-linear scale.
audiomixer
.midrange1centerfreqscaledcommon
Midrange 1
Center Frequency
(scaled)
Center Frequency setting for the Midrange 2 EQ of the
selected audio channel. Frequency selection is
performed on a non-linear scale.
audiomixer
.midrange2centerfreqscaledcommon
Midrange 2
Center Frequency
(scaled)
Q Ratio setting for the Midrange 1 EQ of the selected
audio channel. Ratio selection is performed on a
non-linear scale.
audiomixer.midrange1qscaledcommon
Midrange 1 Q
(scaled)
Q Ratio setting for the Midrange 2 EQ of the selected
audio channel. Ratio selection is performed on a
non-linear scale.
audiomixer.midrange2qscaledcommon
Midrange 2 Q
(scaled)
Minimum Frequency setting for the High Shelf EQ of the
selected audio channel. Frequency selection is
performed on a non-linear scale.
audiomixer
.highshelfminfreqscaledcommon
High Shelf
Minimum
Frequency
(scaled)
Compressor / Limiter (C/L)
Select the audio channel that you want to set the C/L
for. This oid is assigned to a button on the same strip
as that audio channel you want to C/L. This tells the
mixer that the C/L values are to be applied to the
selected audio channel.
audiomixer.clchannelselect
C/L Channel
Select
The level at which the compressor starts to be applied.
audiomixer.thresholdscaledcommon
C/L Threshold
The amount of time you want to pass between the level
surpassing the threshold and the full compression ratio
being applied
audiomixer
.attackcontrolscaledcommon
C/L Attack
The ratio for the amount of compression you want to
apply.
audiomixer.compressionscaledcommon
C/L Compression
The amount of time you want to pass between the level
falling below the threshold and the compression ratio
returning to 1:1 (no compression applied).
audiomixer
.releasecontrolscaledcommon
C/L Release
Increase the gain of the audio after compression.
audiomixer.makeupgainscaledcommon
C/L Makeup
Bypass the equalization for the selected audio channel.
audiomixer.clbypasscommon
C/L Bypass
Gain
Gain for the Analog 1 input. Replace analog1.1 with
the analog port on the ABM you want to set the gain for
(analog1.1-analog3.8). For example,
analog2.5 is the Analog 5 input port on ABM 2.
audiomixer.ABM1.1.gain
Analog
8• MIDI Device OID List — RAVE MIDI Controller (v08)

DescriptionSyntaxTarget
Pad
Toggle pad for analog 1 input on ABM 1. Replace
ABM1.1 with the analog port on the ABM you want to
set pad for (ABM1.1-ABM3.8). For example, ABM2.5
is the Analog 5 input port on ABM 2.
audiomixer.ABM1.1.pad
Analog
Phantom Power
Toggle phantom power for the analog 1 input port on
ABM a. Replace ABM1.1 with the analog port on the
ABM you want to set phantom power for
(analog1.1-ABM3.8). For example, ABM2.5 is
the Analog 5 input port on ABM 2.
audiomixer.ABM1.1.phantompower
Analog
Mute
Toggle mute for assignable audio channel 1 input on
the Main layer. Replace audio1 with the assignable
audio channel want to set mute for. Replace main with
the Aux layer you want set mute for (aux1-aux12).
audiomixer.main.audio1.mute
Assignable Audio
Channel
Solo
Toggle solo for assignable audio channel 1 input on the
Main layer. Replace audio1 with the assignable audio
channel input you want to set solo for. Replace main
with the Aux layer you want set solo for (aux1-aux12).
audiomixer.main.audio1.solo
Assignable Audio
Channel
Clear Solo
Clear solo for all sources on Main layer.
audiomixer.output.main.clearsolo
Main
Clear solo for all sources on Monitor layer.
audiomixer.output.monitor.clearsolo
Monitor
Clear solo for all sources on the Aux layers. Replace
Aux1 with the Aux layer you want set solo for
(aux1-aux12).
audiomixer.output.aux.1.clearsolo
Aux
Pre/Post
Toggle pre fader for assignable audio channel 1 input
on the Aux 1 layer. Replace audio1 with the assignable
audio channel input you want to set pre for. Replace
aux1 with the Aux layer you want set pre for
(aux1-aux12).
audiomixer.aux.1.audio1.pre
Assignable Audio
Channel
PFL
Toggle PFL for assignable audio channel 1. Replace
audio1 with the assignable audio channel input you
want to set solo for (sdi1-sdi12).
audiomixer.audio1.pfl
Assignable Audio
Channel
Clear PFL
Clear PFL on all sources.
audiomixer.clearpfl
All
RAVE MIDI Controller (v08) — MIDI Device OID List • 9
Table of contents
Other Ross Music Mixer manuals