RoyalTek RNS-3200 User manual

RoyalTek Contents Index
RNS-3200 Portable Navigation Device
Reference Manual
User instructions for operating
the RoyalTek RNS-3200

RNS-3200 GPS Receiver 2 Introduction
RoyalTek Contents Index
Legal Notices
COPYRIGHT
RoyalTek RNS-3200 Portable Navigation Device User’s Guide
Original issue: July 2006
RoyalTek and the RoyalTek logo are registered trademarks of RoyalTek Inc.
Other products or system names appearing in this document are trademarks or
registered trademarks of their respective owners. Further, the © or TM symbols
are not used in the text.
Changes may be made periodically to the information in this publication with-
out obligation to notify any person of such revision or changes. Such changes
will be incorporated in new editions of this User’s Guide or supplementary doc-
uments and publications.
No part of this publication may be reproduced, stored in a retrieval system, or
transmitted, in any form or by any means, electronic, mechanical, photocopy,
recording, or otherwise, without the prior written permission of RoyalTek Inc.
DISCLAIMER AND LIMITATION OF LIABILITY
RoyalTek and its subsidiaries makes no representations or warranties, either
expressed or implied, with respect to the contents
hereof and specifically disclaims the implied warranties of merchantability or
fitness for a particular purpose. RoyalTek and its
subsidiaries assume no responsibility for any damage or loss resulting from the
use of this RoyalTek RNS-3200 Portable Navigator User’s Guide
Revision: 1.00
August 2006
NOTE: Record the device ID, serial number, purchase date, and place of pur-
chase information in the space provided below. The serial number is indicated
on the label affixed to your RoyalTek device. All correspondence concerning
your unit should include the serial number, device ID, and purchase informa-
tion.
NOTE: Information in this manual is subject to change without notice.

RNS-3200 GPS Receiver 3 Introduction
RoyalTek Contents Index
Warnings and Notices
For your safety, do not operate the controls of the product while driving.
GPS satellite signals cannot typically pass through solid materials (except
glass). GPS location information is not typically available inside buildings, tun-
nels, or underground parking lots.
A minimum of 4 GPS satellite signals is needed to calculate your GPS position.
Signal reception can be affected by weather events or overhead obstacles (e.g.
dense foliage and tall buildings).
Other wireless devices in the vehicle may interfere with the reception of satel-
lite signals and cause the reception to be unstable.

RNS-3200 GPS Receiver 4 Introduction
RoyalTek Contents Index
Table of Contents
Chapter 1 RNS-3200 PND Features and Specifications ................ 5
1.1 RoyalTek RNS-3200 PND features ...................................................5
1.2 Powerful system .................................................................................5
1.3 Wide and accurate GPS coverage ......................................................5
1.4 Mobile design ....................................................................................5
1.5 Ergonomic features ............................................................................5
1.6 Multimedia programs .........................................................................5
1.7 Contacts management programs ........................................................5
1.8 Hardware Mainunit ............................................................................5
1.9 Software .............................................................................................5
1.10 Main Battery ....................................................................................6
1.11 GPS ..................................................................................................6
Chapter 2 Getting Started ................................................................ 7
2.1 Hardware overview ............................................................................7
2.1.1 Packing list ................................................................................7
2.1.2 Front Panels ...............................................................................7
Chapter 3 Using the RNS-3200 ...................................................... 10
3.1 RNS-3200 Operating Basics ............................................................10
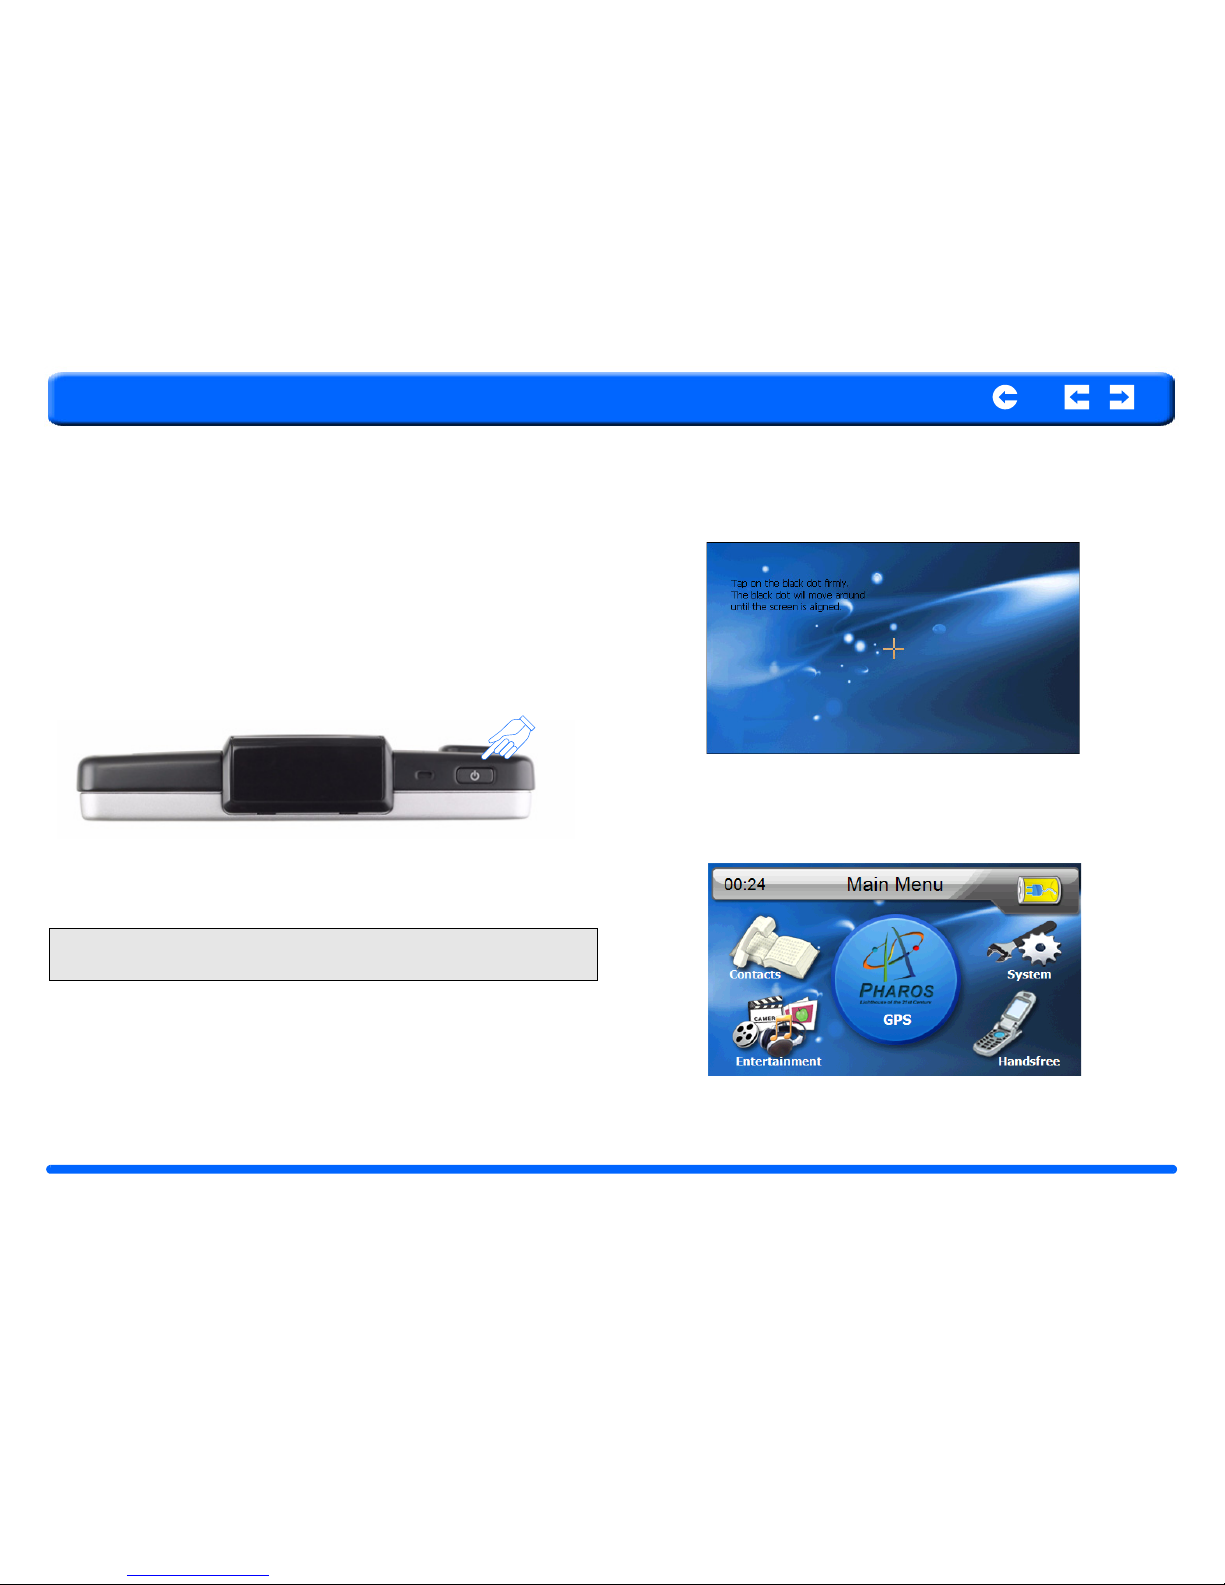
3.2 To turn on and calibrate the device: ................................................10
3.3 To configure system settings: ..........................................................11
3.4 Additional System settings ..............................................................13
3.5 Backlight ..........................................................................................13
3.6 Volume ............................................................................................13
3.7 Power ...............................................................................................13
3.8 System Information .........................................................................14
Chapter 4 Snychronization with a PC ........................................... 16
4.1 Creating and moving Contact information RNS-3200 and PC ........16
4.1.1 Using the SD/MMC slot .........................................................16
4.1.2 To insert a storage card: ..........................................................16
4.1.3 To remove a storage card: .......................................................16
4.1.4 Establishing device-PC connection .........................................16
4.2 Installing Microsoft ActiveSync ......................................................17
4.2.1 Minimum installation requirements: .......................................17
4.2.2 To install Microsoft ActiveSync on your computer: ..............17
4.3 Installing Contacts Manager ............................................................18
4.3.1 To install Contacts Manager: ..................................................18
4.3.2 Creating a partnership .............................................................19
Chapter 5 Contacts Management ..................................................21
5.1 Contacts ...........................................................................................21
5.1.1 Using Contacts ........................................................................21
5.1.2 To open Contacts: ...................................................................21
5.1.3 Creating a new contact ............................................................21
5.1.4 Editing contact information ....................................................22
5.1.5 Navigating to a contacts address .............................................23
5.1.6 Exporting contacts from your RNS-3200. ..............................23
Chapter 6 Entertainment ................................................................24
6.1 RNS-3200 Multimedia Player .........................................................24
6.2 Using the different media players ....................................................24
6.3 MP3 .................................................................................................24
6.3.1 Using the MP3 player. ............................................................24
6.3.2 To enter into the different media players. ...............................24
6.4 Video Player ....................................................................................26
6.4.1 Using the Video Player. ..........................................................26
6.4.2 To enter into the different media players. ...............................26
6.5 Photo Viewer ...................................................................................27
6.5.1 Using the Photo Album. ..........................................................28
6.5.2 To enter into the different media players. ...............................28

RNS-3200 GPS Receiver 5 Chapter 1 Features and Specifications
RoyalTek Contents Index
Chapter 1 RNS-3200 PND Features and Specifications
1.1 RoyalTek RNS-3200 PND features
No more fumbling with wieldy, outdated paper maps. No more sheepish
”I think I’m lost” expression. And most definitely, no more going in circles
finding that particular spot. Get to your destination the fast and easy way with
your new RoyalTek d100 Portable Navigator.
1.2 Powerful system
1.3 Wide and accurate GPS coverage
• Destinator DS
• NAVTEQ digital map database
• Integrated patch antenna for optimum satellite pick up at every angle
1.4 Mobile design
• Compact and lightweight body makes it easy for users to carry it any-
where while driving or hiking
• Car mount kit for multi-vehicle usage (windshield or dashboard mount-
ing)
• On-the-road recharging options via the car charger and USB cable
1.5 Ergonomic features
• 4.0 -inch
• Accessible control hot keys with backlight illumination
• Simple, easy-to-use user interface with large icons and command but-
tons
• Multi-language support for user interface
• Pre-loaded languages: International English, French, German, Italian,
and Spanish
• Additional language options for navigation mode: Danish, Dutch, Nor-
wegian, Portuguese, and Swedish
• Advanced power-saving options
1.6 Multimedia programs
• MP3 for your musical entertainment
• Photo for your favourite digital pictures
1.7 Contacts management programs
• Contacts for managing contact information on your device
• RoyalTek d100 Contacts Exchange for managing contact information
on your computer
• Microsoft ActiveSync 3.8 for synchronizing contact information
•
Overall dimension (w/o antenna)146.874mm*88.31mm*26.74mm
Weight (incl. battery)270g(TBD)
CertificatesCE/FCC
1.8 Hardware Mainunit
CPUSamsung S3C2440, 400 MHz, ARM compatible
NAND Flash256MB, Up to 2GB
RAM64MB
BluetoothBluetooth v2.0 compatible
Buttons5 buttons
Navigation padTouch screen
IndicatorsGreen/red for power, blue for Bluetooth
Earphone3.5mm, stereo
Memory ExtensionSD/MMC Memory Slot
Display4" Touchscreen, 480x272pixel, TFT, 16.7M colors
ConnectorsMiniUSB, external GPS-antenna, external TMC antenna, SD slot
USB InterfaceUSB v1.1
1.9 Software
FunctionalitiesVideo playback, image viewer, audio playback, navigation, Con-
tacts, RDS-TMC(optional), FM radios(optional)
OSWindows CE 5.0
Bluetooth ProfilesHands-free

RNS-3200 GPS Receiver 6 Chapter 1 Features and Specifications
RoyalTek Contents Index
-Answer phone, Volume up/down, Dial up, Hang up phone, Reject phone,
Caller ID display, Echo cancellation, Dialing-out
1.10 Main Battery
TypeRechargeable Li-Ion
Voltage/Capacity3.7V, 1900mAh
Runtime (GPS on, Backlight on)appr. 2h(typ.)
Chargetime 4.5 hours
1.11 GPS
Typeinternal
ChipsetSiRF GSC3
Antenna typePatch antenna
Very first start time (cold start)typ. 42 sec
Warm start (after fix and power-off >= 4hrs)typ. 35 sec
Hot start (after fix and power-off < 4hrs)typ. 1 sec
Car Adapter
Input rating12-24V
Output rating5.0V, 2A
Power indicatorred LED, non blinking
Fuse2A
Certificatese-Mark
AC Adapter
AC-Rating110-240V, 50-60Hz
DC-Rating5.0V, 2A
Protection classII, LPS
CertificatesCE, UL, TUV
Extrasmain plugs exchangable for supporting UK, EU, US and Korea areas
USB ActiveSync Cable
Length120 cm

RNS-3200 GPS Receiver 7 Chapter 2 Getting Started
RoyalTek Contents Index
Chapter 2 Getting Started
This chapter describes the hardware interface of the RoyalTek RNS-3200 and
its peripherals. Instructions for setting up the device and some basic system
operations are also discussed.
2.1 Hardware overview
This section introduces the RNS-3200 PND external features and hardware
components.
2.1.1 Packing list
The RoyalTek RNS-3200 box contains all of the items listed below:
• RNS-3200 Portable Navigation Device
• Car mount kit
• Car mount cradle
• Car charger
• AC adaptor
• USB cable
• Destinator DS SD card
• User documentation
• RNS-3200 Portable Navigation Device Companion CD
• RNS-3200 Portable Navigation Device Quick Start Guide
• RNS-3200 Portable Navigation Device Warranty Booklet
2.1.2 Front Panels
Figure 1: Front Panel View
NOTE: Although the RNS-3200 rechargeable Li-ion battery comes approxi-
mately 30% charged, before using, it is best to connect the AC adapter and
plug to power socket and fully charge the battery. The On/Off button will
glow yellow when charging.
Table 1: Front panel controls
No. Function Description
1 Main Menu To display Main menu home
2 Video player Displays video player interface
3 Music player Displays audio player interface
4 GPS Goes to GPS function
5 Microphone Microphone
6LED
7Speaker Speaker
8 Volume Up and Down Touch and slide to increase/decrease volume
1
2
4
5
6
7
8
3

RNS-3200 GPS Receiver 8 Chapter 2 Getting Started
RoyalTek Contents Index
Figure 2: Top and Bottom view Figure 3: Left and Right side view
Table 2: Top and Bottom controls
No. Function
1 Power button
2 USB input
3 On/Off
4 Reset
1
23 4
Table 3: Left and Right panel controls
No. Function
1 Main Menu
2 Power input
3 FM antenna
4 SD/MMS slot
1
2
4
3

RNS-3200 GPS Receiver 9 Chapter 2 Getting Started
RoyalTek Contents Index
Table 4: Car mount
No. Component Description
1 Cradle plate Connects the car mount to the
cradle.
2Horizontal angle adjustment
knob
Slightly loosen the knob to
adjust the viewing angle in a
left-right direction.
3 Vertical angle adjustment knobs
Slightly loosen the knobs to
adjust the viewing angle in an
up-down direction.
4 Extendable rod
Extend the rod to adjust the
device position in a front to rear
direction.
5 Suction cup locking lever Secures the vacuum seal of the
car mount.
6 Suction cup Fixes the car mount on the
selected mounting area.
7 Suction cup release tab Pull to release the vacuum seal
of the suction cup.

RNS-3200 GPS Receiver 10 Chapter 3 Using the RNS-3200
RoyalTek Contents Index
Chapter 3 Using the RNS-3200
3.1 RNS-3200 Operating Basics
After fully charging the RNS-3200 it is ready to be used. You can now turn it
on to calibrate the screen. After screen calibration, proceed to system settings
configuration.
3.2 To turn on and calibrate the device:
1. Turn on your device by pressing the power button on the top right panel of
the device.
2. Tap the center of the black dot as it moves around the screen.
After calibrating the screen, the Main Menu panel displays. This is also referred
to as the Home panel.
NOTE: When you first turn on your device, you will be asked to calibrate the
screen. This process ensures the accuracy of the touchscreen when used.

RNS-3200 GPS Receiver 11 Chapter 3 Using the RNS-3200
RoyalTek Contents Index
3.3 To configure system settings:
If you intend to start using your RNS-3200 at once, we recommend that you
configure the language and date/time settings first. The rest of the user prefer-
ences can be set up later.
1. Tap “System” in the Main menu.
2. Tap “Language” on the System Menu panel.
3. To set the system language settings, tap the forward or backward arrow
until the language you want appears.
4. Tap the Up Arrow in the top left to set the language and return to the Sys-
tem Menu.
5. To set the system date and time, tap “Date & Time” in System Menu.

RNS-3200 GPS Receiver 12 Chapter 3 Using the RNS-3200
RoyalTek Contents Index
6. Tap the correct Year, Month and Day.
7. Tap the Up Arrow in the top left to set the Date and return to the “Date &
Time” Menu.
8. Tap the “Time” in the “Date & Time” Menu.
9. Tap the Up Arrow in the top left to set the Date and return to the “Date &
Time” Menu.
10. Next, tap “Time Zone” in the “Date & Time” Menu.
11. Tap the Up Arrow in the top left to set the Date and return to the “Date &
Time” Menu.
12. Tap the Up Arrow in the top left of the “Date & Time” Menu to return to
the System Munu.

RNS-3200 GPS Receiver 13 Chapter 3 Using the RNS-3200
RoyalTek Contents Index
3.4 Additional System settings
Other System setting can be used to view and adjust your device current prefer-
ences. Navigate from the System Menu.
3.5 Backlight
1. Tap the Backlight icon in the System Menu.
2. Adjust the Backlight brightness.
3. Adjust how long you want to wait before Backlight goes into power sav-
ings mode while using battery or connected to a power source.
4. Tap the Up arrow to return to the System Menu.
3.6 Volume
1. Tap the Volume icon in the System Menu.
2. Tap + or - to set default system sound volume.
3. Tap the Up arrow to save and return to the System Menu.
3.7 Power
1. Tap the Power icon in the System Menu.
2. You can view the remaining batter power in the top bar.
3. Adjust how long you want to wait before the Hot Key LEDs turn off auto-
matically.

RNS-3200 GPS Receiver 14 Chapter 3 Using the RNS-3200
RoyalTek Contents Index
3.8 System Information
1. Tap the Sys Info. icon in the System Menu.
2. You can view the OS version, GPS firmware version and other system
information.
3. Tap the Sys Info. icon in the System Menu.
4. You can view the OS version, GPS firmware version and other system
information.
NOTE: Check Hot Keys backlight (LED) turn on when pressed. To conserve
battery power, these settings should be set to lowest values.

RNS-3200 GPS Receiver 15 Chapter 3 Using the RNS-3200
RoyalTek Contents Index

RNS-3200 GPS Receiver 16 Chapter 4 Synchronizing with PC
RoyalTek Contents Index
Chapter 4 Snychronization with a PC
4.1 Creating and moving Contact information between the
RNS-3200 and your PC
4.1.1 Using the SD/MMC slot
The RNS-3200 has an SD/MMC slot compatible with a range of SD and MMC
storage cards that you can use to back up or transfer files and data.
Along with photos, music and videos, the GPS navigation system program is
also stored on the storage card. To install and use maps, the program requires
that users load the digital maps available in the GPS Navigation SD card that
supports the device.
4.1.2 To insert a storage card:
Hold the device securely, then push the card into the slot until you hear an audi-
ble system sound; this will signal that the card is already properly seated within
the slot. The card is secure when it is not protruding from the slot.
4.1.3 To remove a storage card:
1. Hold the device securely, then push against the top of the card, as if you
were pushing it further into the slot, letting the card spring out. An audible
system sound will signal that the card has been released.
2. Gently remove the card from the slot.
4.1.4 Establishing device-PC connection
The USB cable that comes with your device enables you to connect the device
to your computer. File Explorer displays the RNS-3200 as a USB mass storage
device, with the SD/MMC card shown as a sub-folder. Once connected, you
can:
• Use File Explorer to copy digital music and image files into your
device’s SD/MMC card and access them when in Multimedia mode.
It is advisable to organize files into subfolders. These subfolders will become
playlists and help you to mange and better access the files on your device.
To enable access of multimedia files from your device, it should be located on
the SD/MMC card, not on the device’s memory.

RNS-3200 GPS Receiver 17 Chapter 4 Synchronizing with PC
RoyalTek Contents Index
4.2 Installing Microsoft ActiveSync
Use Microsoft ActiveSync to exchange information between your Acer d100
and a computer running on the Microsoft Windows platform.
If you have a previous version of the Microsoft ActiveSync installed in your
computer, uninstall it first before installing the Microsoft ActiveSync 3.8 ver-
sion from the Acer d100 Companion CD.
4.2.1 Minimum installation requirements:
• Microsoft Windows XP, 2000, ME, and 98 SE
• Microsoft Outlook 2000 or later required for Contacts synchronization
• Microsoft Internet Explorer 5.0 or later
• Hard disk drive with 12 to 65 MB of available hard disk space
• Available USB port
• CD-ROM drive
• VGA graphics card or compatible video graphics adapter at 256 color
or higher
4.2.2 To install Microsoft ActiveSync on your computer:
1. Close any open programs, including those that run at startup, and disable
any virus-scanning software.
2. Insert the RoyalTek RNS-3200 Companion CD into your computer’s CD-
ROM drive.
The CD's welcome page should appear.
3. Click the installation language of your choice.
4. Click Install ActiveSync on the Please select your task screen.
The installation wizard will automatically begin.

RNS-3200 GPS Receiver 18 Chapter 4 Synchronizing with PC
RoyalTek Contents Index
5. Follow the on-screen instructions.
After installation, the ActiveSync icon will appear on your computer’s system
tray (on the lower right-hand corner of the screen).
You can also use Explore in Activesync to look at all the content on your device
(as shown below).
Once ActiveSync is installed on your computer, you can use it to transfer files
(i.e. MP3 files/photos/videos) between your device and your computer.
For more detailed information on how to use ActiveSync on your computer,
start ActiveSync on your computer, click Help, then Microsoft ActiveSync
Help.
4.3 Installing Contacts Manager
Use Contacts Manager to manage the contact information located on your
device and on your computer. This PC program shares the same contact data-
base as the Contacts component of Microsoft Outlook. It only has an import/
export function; you still have to create contact entries in Microsoft Outlook
Contacts.
4.3.1 To install Contacts Manager:
1. Click Install Contacts Manager on the Please select your task screen.
The installation wizard will automatically begin.
2. Follow the on-screen instructions.
3. Click Finish after the installation process is completed.

RNS-3200 GPS Receiver 19 Chapter 4 Synchronizing with PC
RoyalTek Contents Index
4.3.2 Creating a partnership
After completing the Activesynch installation and Contents manager installa-
tion, set up a partnership between your RNS-3200 and your computer with the
help of the New Partnership setup wizard.
Once you’ve created a partnership, you will be able to synchronize contact
information using ActiveSync.
To create a partnership:
1. If you want to upload files into an SD/MMC card for use with your Acer
d100, insert the card to the device.
2. Connect the device to your computer using the bundled USB cable.
• Plug the cable’s smaller connector to the USB port on the left panel of
the device.
• Plug the USB client connector into an available USB port on your com-
puter.
The New Partnership setup wizard will automatically start on your computer
screen.
3. Follow the onscreen instructions.
4. When prompted to select the items to be synchronized, select only Con-
tactSync.
5. Click Finish on the Setup Complete dialog box.
The initial synchronization process will automatically begin when you finish
using the wizard. After the initial synchronization, information you've stored in
Microsoft Outlook Contacts on your computer will now be available on your
RNS-3200 without you having to manually input them on the device.
6. Disconnect your device from the computer and you're ready to go.
Now, once you have completed the first synchronization process, you can ini-
tiate synchronization from your device anytime, using the USB cable.

RNS-3200 GPS Receiver 20 Chapter 4 Synchronizing with PC
RoyalTek Contents Index
Table of contents
Other RoyalTek Car Navigation System manuals
Popular Car Navigation System manuals by other brands

Chevrolet
Chevrolet Chevrolet 2015 owner's manual

Magellan
Magellan Maestro 4000 - Automotive GPS Receiver user manual

Pioneer
Pioneer AVIC-Z2 - Navigation System With DVD player Hardware manual

Cadillac
Cadillac 2014 ELR manual

Nextar
Nextar Q4 series Hardware instruction manual

Kenwood
Kenwood KNA-DV2100 instruction manual

Sony
Sony NAV-U NV-U44/S Specification sheet

Good Sam
Good Sam RVND 5525 LM user manual

Mitsubishi
Mitsubishi NR-261UM-07LAN4 Service manual

Blaupunkt
Blaupunkt LAS VEGAS 900 DSP Operating and installation instructions

Advanced ICE
Advanced ICE NAV-LC-P2 Series user manual

Panasonic
Panasonic CNGP50U - Car Strada Portable Mobile Navigation... Quick reference guide