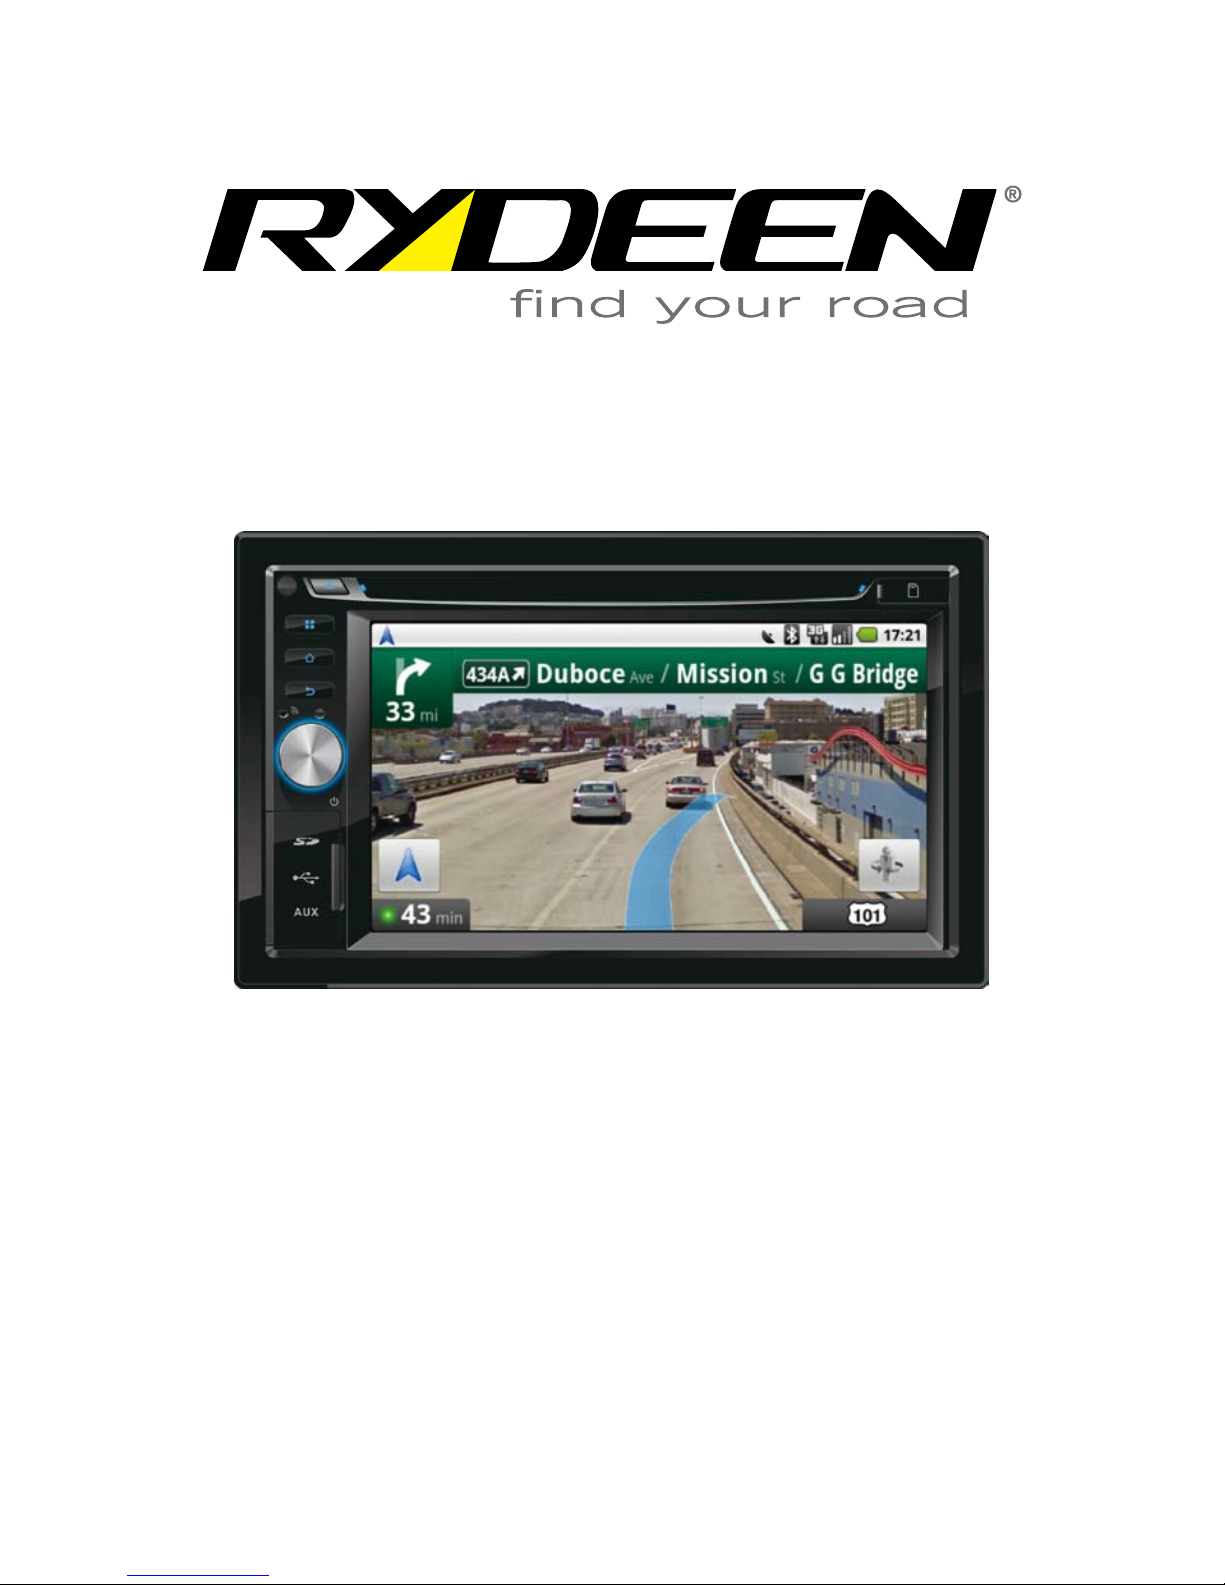
Rydeen DV638A User manual

DV638A
2-DIN 6.2” TFT Monitor DVD
AM/FM Receiver with BT A2DP
Owner’s Manual

1
Welcome Statement & Warnings
Congratulations and thank you for purchasing the RYDEEN DV638A Car Multimedia Player. We
hope you will enjoy using this exciting product and trust that it will make your driving experience
more comfortable and hassle-free.
The DV638A provides an easy-to-use touch screen user interface and innovative functionality in a
stylish design that replaces the factory radio.
Please read this Owner’s Manual carefully. If you have any further questions about your DV638A
operation, feel free to call RYDEEN, Toll Free at 1-877-777-8811 (within USA only) for product
support, or visit our website: www.rydeenmobile.com.
PRECAUTIONS & WARNINGS
IMPORTANT INFORMATION
PLEASE READ CAREFULLY BEFORE USING THIS PRODUCT
We recommend that you read and follow all information and instructions in this Owner’s Manual for the
best performance and satisfaction of your DV638A.
• YourDV638AnavigationsoftwareIS NOT a substitute for personal judgment. The route suggestions
shouldneversupersedeanylocaltrafcregulation,personaljudgmentorknowledgeofsafedriving
practices. Before making any maneuvers (for example, a U-turn or a left turn) suggested by the
DV638A system, please be sure that such a maneuver can be completed legally and safely. Do
not follow route suggestions that could put you or your vehicle in a potentially unsafe or illegal
circumstance.
• YoushouldnotdependonDV638Atolocateemergencyservices(suchaspolice,firestations,
hospitals and clinics). The database may not include all emergency service providers. It is the best to
call your local police department and ask for directions in these situations.
• Settheunitvolumeatalevelthatwillallowyoutohearoutsidetrafcandemergencyvehicles.
• AvoidplacingcellphonesorwirelesstransceiverdevicesneartheGPSantennaastheirsignalsmay
weakenorinterferewiththeGPSsatellitesignalbeingreceivedbyyourDV638A,causingittoperform
poorly.
• The DV638Ashould notbe programmed while driving. The driver can onlyprogram the unit
whilethevehicleisparkedinasafelocation.
• MovingpicturesdisplayontheDV638Ascreenshouldnotwatchedortouchedwhileavehicle
isinmotion.
• Parkingbrakesafetysystemshouldbeinstalledcorrectlyaccordingtotheinstructiononthe
owner’smanual. Otherwise,RYDEENanditsretailersarenotresponsibleforanyaccident
causedbyimpoperinstallationormisuseoftheDV638Aunit.
• SEVEREINJURYRISK-DONOTmountyourDV638Aonthesurfaceof,orinthedeploymenteldof
your vehicle’s driver and passenger airbag units.
• Positiontheunitinalocationthatdoesnotobstructthedriver’sviewoftheroad,instrumentsor
vehicle controls.
• Positiontheunitsothescreencanbeviewedwithjustaquickglance.Glanceattheunitscreenor
manipulate the in-route touch screen controls ONLY WHEN VEHICLE IS COMPLETELY STOPPED
AND IT IS SAFE to do so.
• BesuretheDV638Aunitissecurelyattachedtothevehicle’sdashstructurewiththesuppliedbracket
and screws.
• DONOTattempttomodifyordisassembletheDV638Aunit.Personalinjuryordamagecouldresult.If
aproblemoccurs,stopusingthesystemimmediatelyandcontactRYDEEN.Changesormodications
to the DV638A will void the warranty and its compliance with FCC rules thus making it illegal to use.
• Ifyounoticeanyofthefollowing:(unidentiedliquidontheunit;smokerisingoutoftheunit;unusual
odor emanating from the unit) – STOP USING THE UNIT IMMEDIATELY. Contact the nearest
RYDEEN retailer or call RYDEEN Customer Service for assistance Toll Free @ 1-877-777-8811 (within
USA only).
• DONOTmountyourDV638Aonanynon-automotiveformoftransportation(motorcycles,bikes,
ATV’s, watercraft).

2
WARNINGS
• AvoiddroppingyourDV638Aunitorsubjectingittoexcessiveshockandvibrationsasthismay
cause it to malfunction.
• DONOTuseanysharpobjecttooperateyourunit’stouch-screendisplay.Excessiveforce
could damage the LCD display.
• KeeptheDV638Aunitoutofreachofsmallchildren.Removableparts(microSDmemorycard)
can be a choking hazard.
• TheDV638AunitISNOTWATERPROOF.Avoidexposingittorainorotherformsofexcessive
moisture. Water damage is not covered under the warranty.
WARNINGS
• THEFOLLOWINGINSTRUCTIONSAREINTENDEDFORAUTHORIZED
RYDEEN MOBILE INSTALLERS ONLY
• PROFESSIONALINSTALLATIONBYAUTHORIZEDRYDEENRETAILER
REQUIRED TO BE COVERED UNDER WARRANTY
Technical Support Contact Info
IfyouhaveotherquestionsabouttheRYDEENGPS,pleasecontactyourretailerorTechnical
Support:
• Telephone:1-877-777-8811(withinUSAonly)
• Email:[email protected]
• WebAddress:www.rydeenmobile.com

3
Precautions
To ensure safe driving, please adjust the
volume to a safe & comfortable level in case
of emergency situations.
Neverexposethisunit,amplierorspeakers
to moisture or water to prevent electronic
sparksorres.
Please don’t change the fuse on the power
cord without professional guidance, using
an improper fuse may cause damage to this
unitorevencausere.
Please power off this unit at once and send it
back to the after-sales service center or the
dealer /distributor you purchased from if one
of the following symptoms is found:
(a).Noaudiooutput;
(b).Noimageoutput;
(c).Waterorotherobstacleenterstheunit;
(d).Smoking;
(e). Peculiar smell.
Only connect the unit to a 12-volt power
supply with negative grounding.
MUTE
OK
MUTE
OK
Never install this unit where the operation
a n d c o n d i t i o n f o r d r i v i n g s a f e l y i s
compromised.
MUTE
OK
MUTE
OK
Never use the video display while the car
is in motion. The use of video playback
whiledrivingisaviolationoftrafclawsand
increasestheriskoftrafcaccidents.
MUTE
OK
MUTE
OK
MUTE
OK
MUTE
OK
Thank you for purchasing this product.
Please read through the Owners Manual to
learn how to properly operate the DV638A.
Afteryouhavenishedreadingthemanual,
please keep it in a safe place for future
reference.
To provide a clear demonstration and an
alternative for easy understanding of the
operation of this unit, graphic illustration
was used. However, this illustration is not
necessary printed as the actual image found
on the unit.

4
Warning
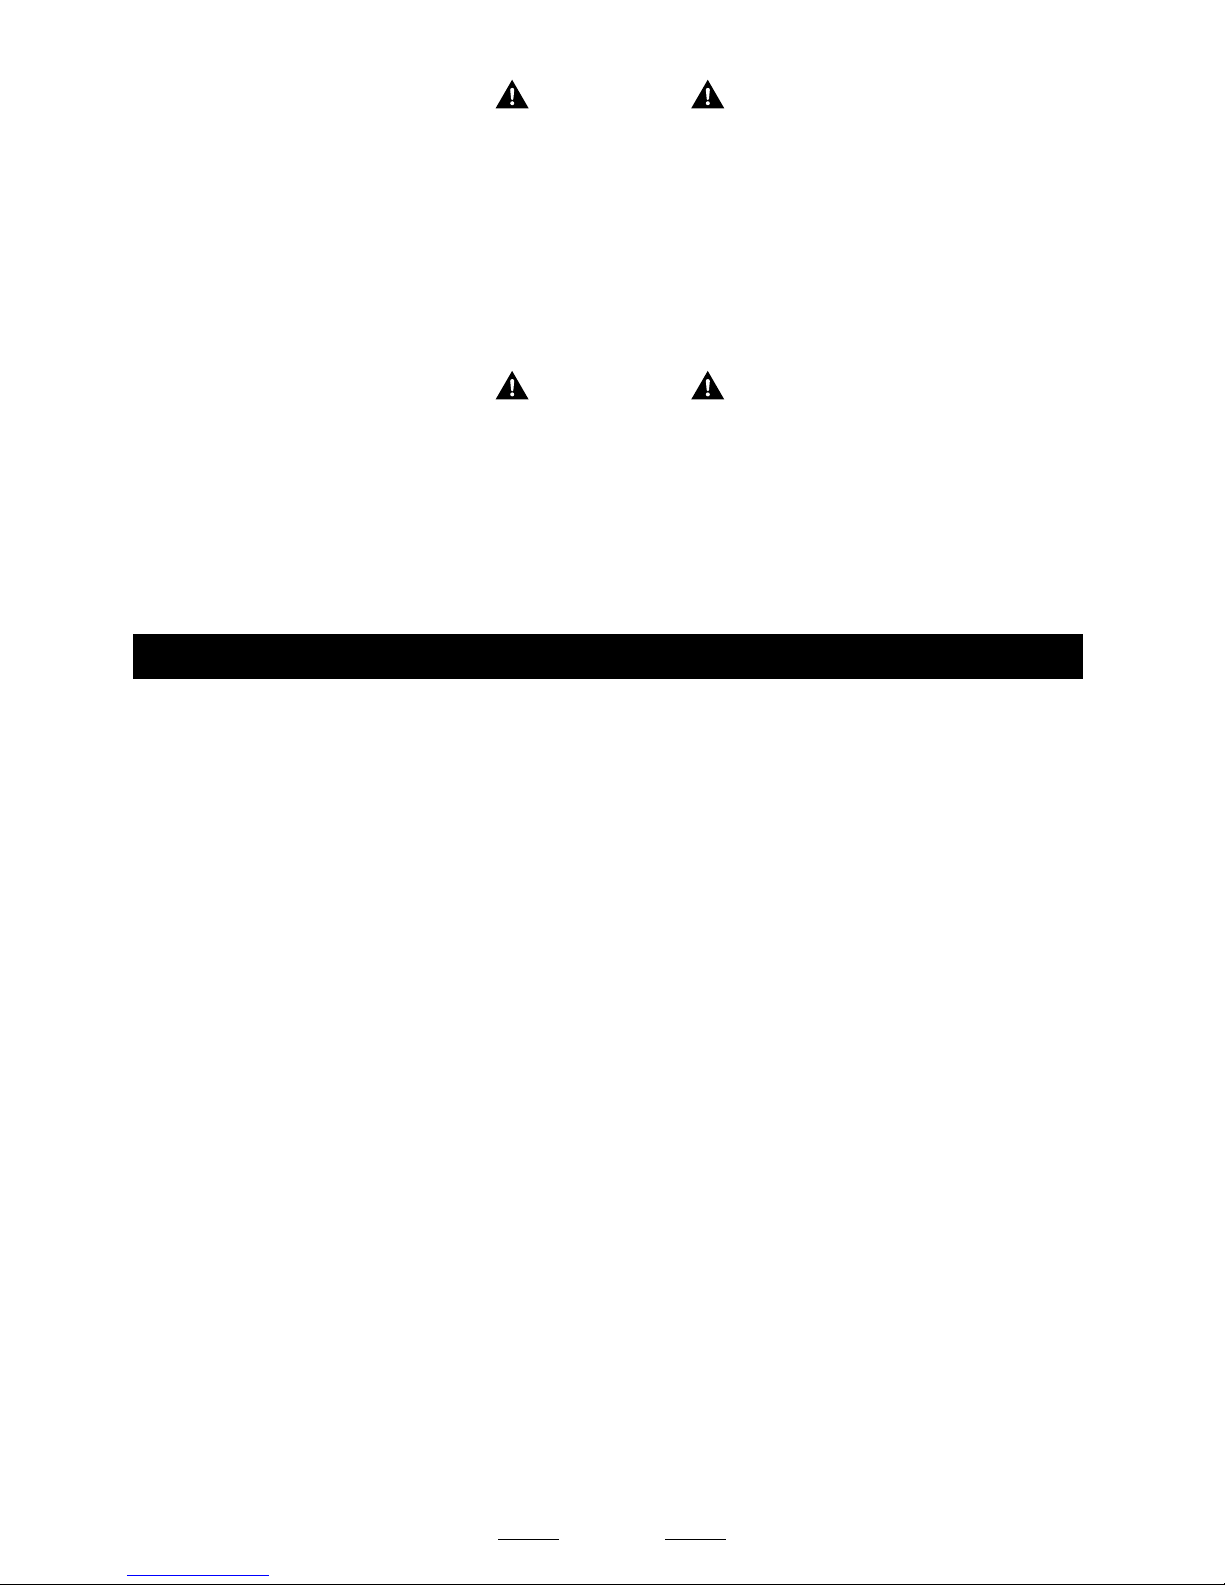
Operate the unit correctly according to the
manual instruction to prevent unnecessary
problems.
CAUTIONS ON HANDLING
This product is a CLASS 1 LASER PRODUCT.
Use of controls or adjustments or performance
of procedures other than those specified
herein may result in hazardous radiation
exposure. Do not open covers and do not
repair yourself. Refer servicing to qualified
personnel.
Twolaserproducts
Wave length: CD: 780nm DVD: 650nm
Laser power: No hazardous radiation is
emitted with safety protection.
To reduce the risk of fire electric shock, and
annoying interference, use only the included
components.
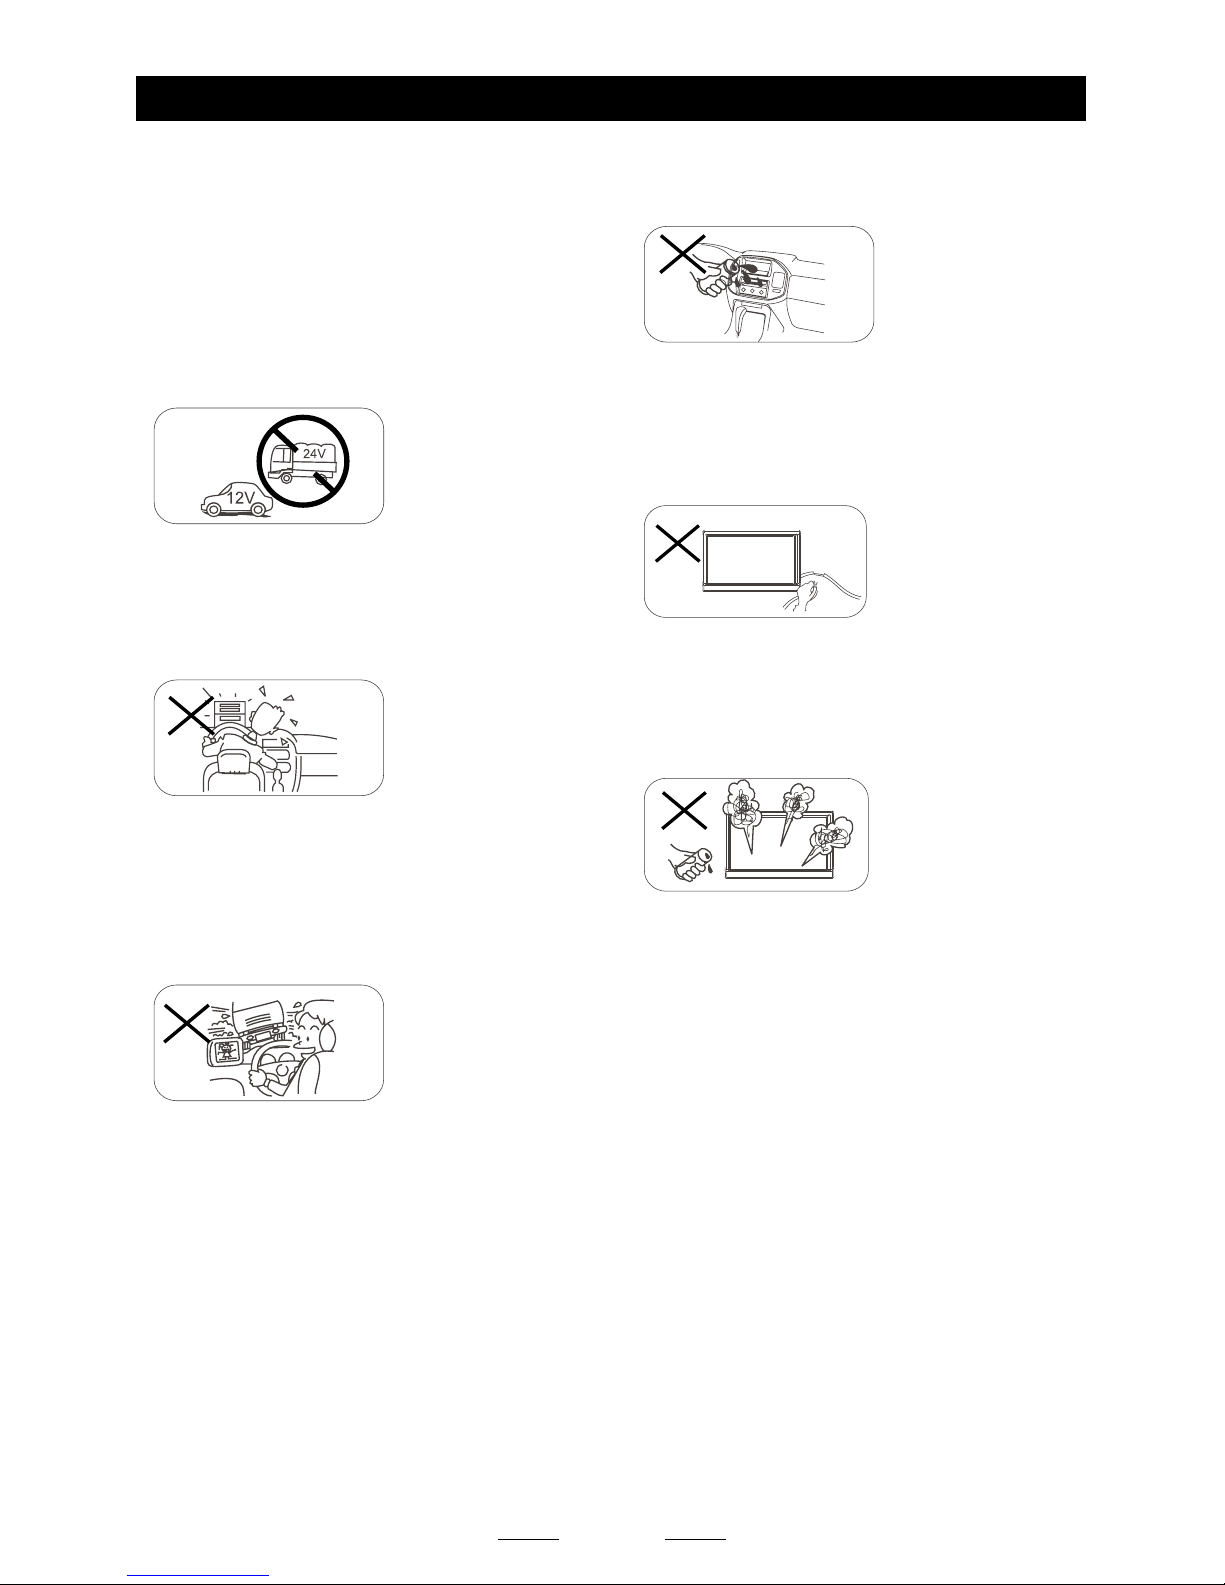
Caution of disc using
1. DONOTuseirregularshapeddisc.
2. DiscCleaning. Use a dry, soft cloth to
wipe the disc from center to edge, only neutral
detergent can be used.
3. Whenplayinganewdisc. New disc may
have some rough spots around the inner and
outer edges. If such a disc is used, remove
these rough spots with a pencil or ball-point
pen, etc.
Precautions Contents
WelcomeStatement&Warnings............1
TechnicalSupportContactInfo..............2
Precautions...............................................3
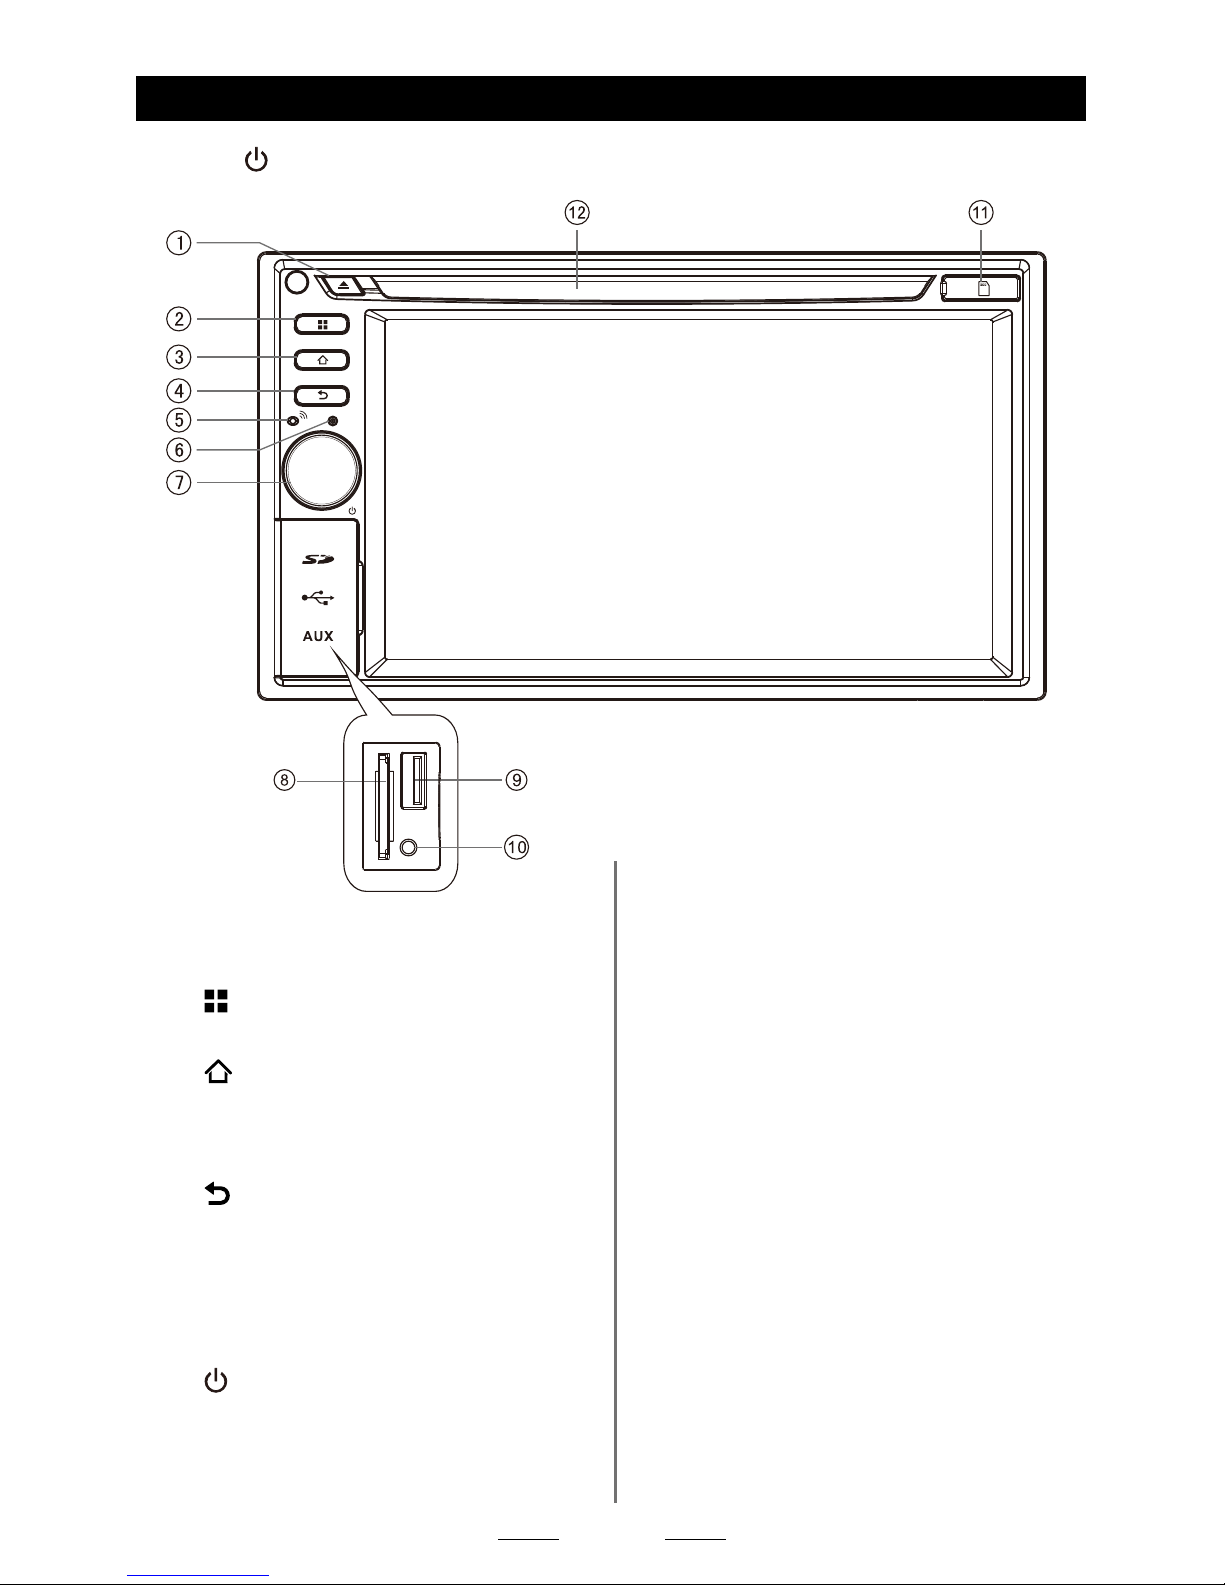
PanelControls..........................................5
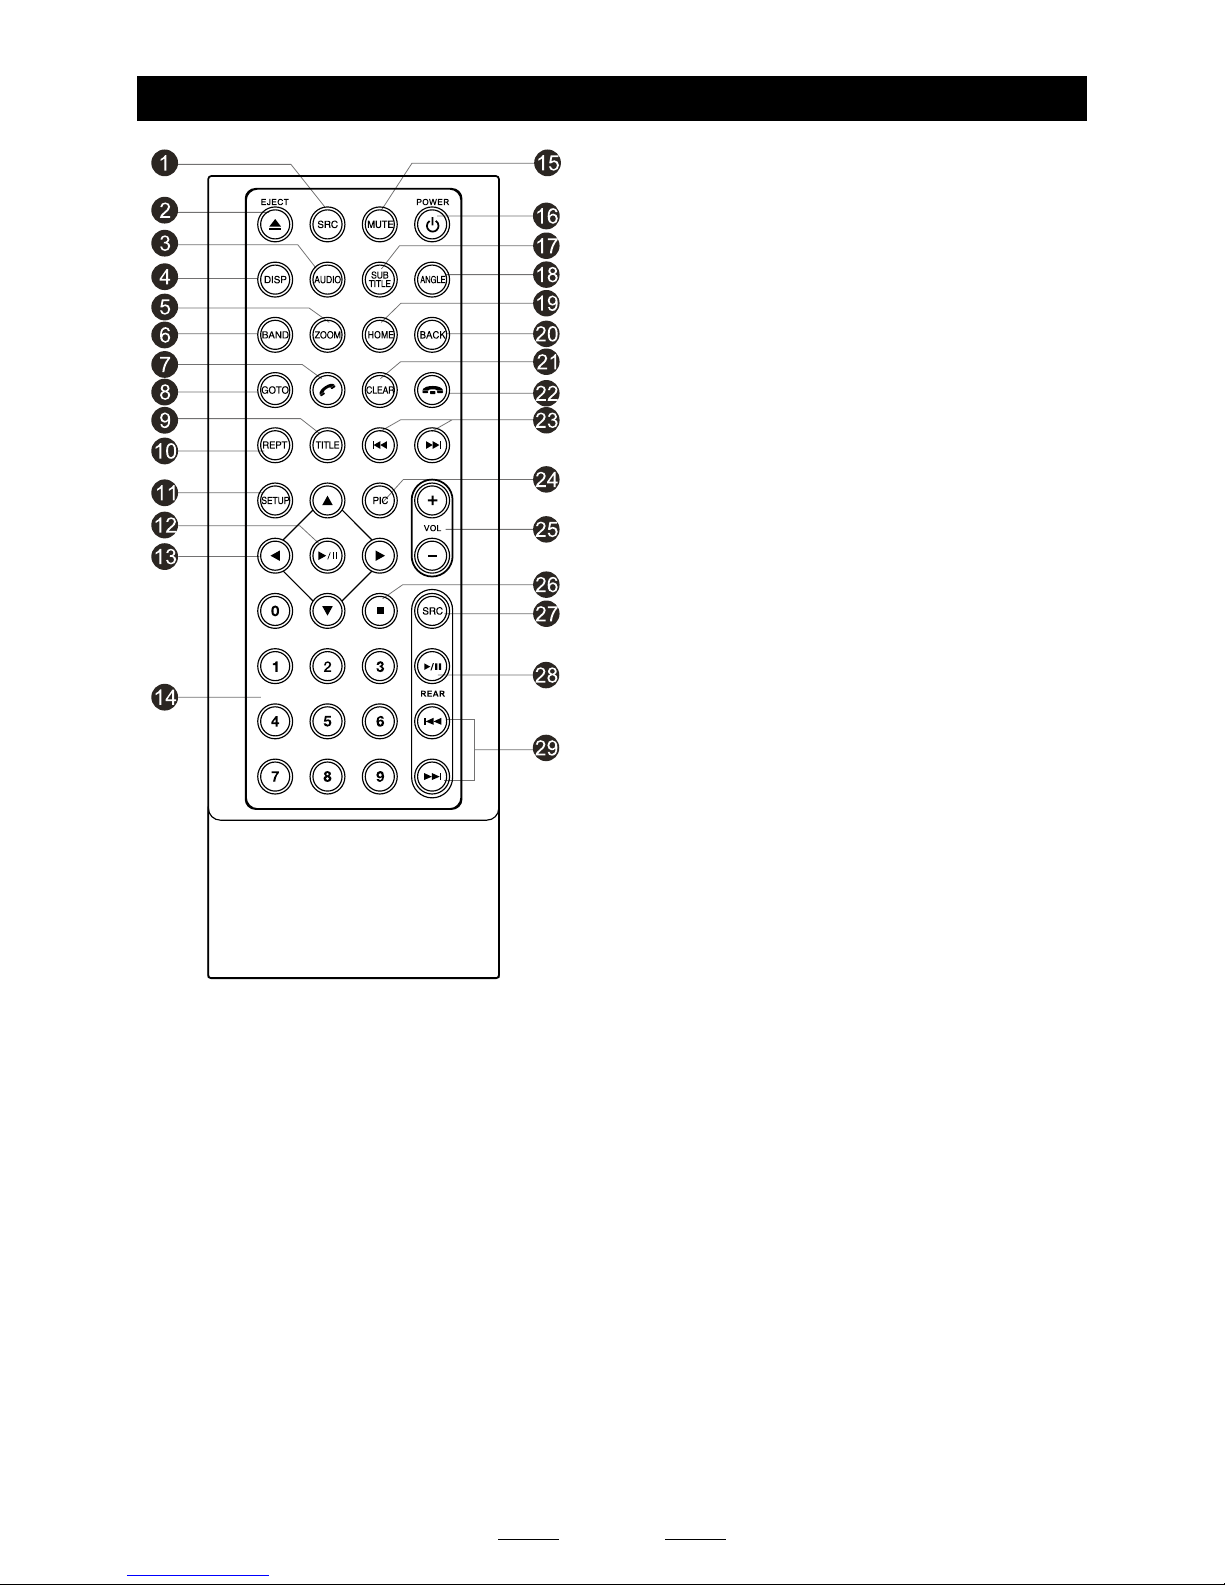
RemoteControl.........................................6
BasicOperations......................................8
Turn on/off the power..............................8
Mute........................................................8
Adjust the volume ...................................8
Playing source selection.........................8
When Vehicle is Put in Reverse .............8
When parking brake applied...................8
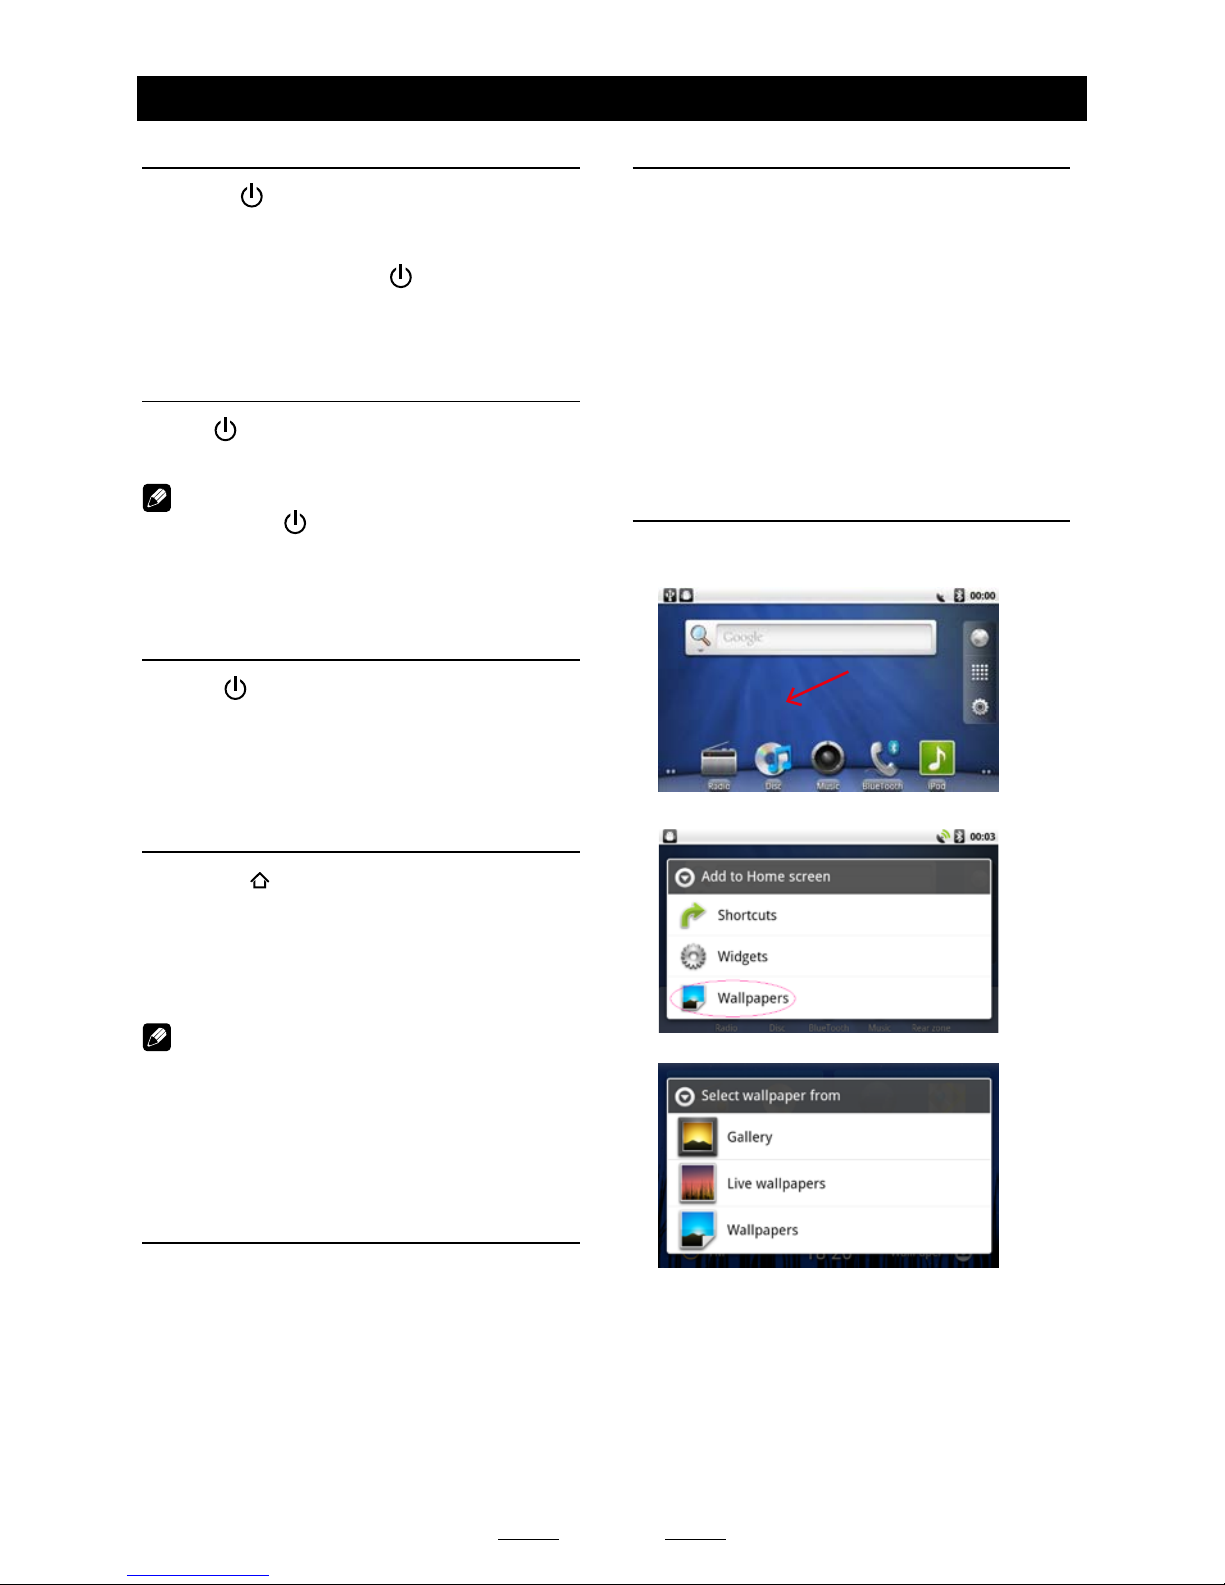
Wallpaper................................................8
Mainmenu.................................................9
DiscOperation........................................10
RadioOperations....................................12
SD/USBOperations................................14
BluetoothOperations.............................17
Internet....................................................19
OtherMode..............................................22
Navigation Operations ..........................22
AUX Operations....................................22
File Explorer..........................................22
Steering Wheel Control.........................22
MCU/MPEGUpdate .............................22
Install apk form SD card .......................23
Googlecalendarconguration..............23
DeleteGmailAccount...........................25
DualZoneVideoPLayback ..................25
Systemsettings......................................26
Soundsetting..........................................27
DeviceConnections...............................28
Wiring Diagram.....................................30
Troubleshooting.....................................31
Specications.........................................32
OneYearLimitedWarranty...................33
FCCComplianceStatement..................34
Disclaimer...............................................34

5
Panel Controls
Press[ ]knob(7)toturnontheunit.
1. Eject
Eject disc (when disc inserted)
2. MENUbutton
Show setting buttons.
3. HOMEbutton
Show main source menu
Show short-cut of recent accessing
modes (long press)
4. BACKbutton
Back to previous menu.
5. Microphone
6. Reset
Load factory settings
7. POWER/VOLUMEknob
> Power on (press)
> Adjust volume (rotate)
> Mute the volume (press when on)
> Power off (long press)
8. SDCardSlot
9. USBconnector
10. AUXinJack
11. MapCardSlot
Don’t remove the microSD card when
the unit is powered on. The standard
SD card slot and front USB input will not
work with the microSD card removed
form the unit.
12. DiscSlot
Insert the disc with label side facing up.
* DefaultPath:
1. Path of SD Card(8): /sdcard/external_sd
2. Path of USB(9): /sdcard/external_usb
3. Path of Map Card(11): /sdmmc
The path is used for navigation, it won't be
found in the File Explorer. To install a new
map,pleaseinstalltheapklerst,then
start the application and set the path to "/
sdmmc".

6
Remote Control
1. Change playing source in sequence
2. Eject the disc
3. Select audio language
Show music catalog
4. Display playback information
5. Zoom
6. Select radio band
7. Call out
8. Gotosearch
9. DVD title
10. Repeat playback
11. Setup menu
12. Play / Pause
EQ setting (long press)
13. Move the cursor up/down/left/right.
Up/down: Manual tuning
14. Numeric keys
15. Mute the volume
16. Unit power
17. Select DVD subtitle language
18. Select DVD angle
19. Show /exit home menu
20. Return to previous display
21. Clear information
22. Hang up
23. Previous/Next
Auto tuning (long press)
Fast backward/forward (long press)
24. Display settings
Display calibration (long press)
25. Adjust volume
26. Stop playback
Rear zone
27. Change next rear source
28. Play/Pause
29. Previous/Next track
Fast backward/forward (long press)

7
Remote Control
Notesofremotecontrolusing
1) Aim the remote control at the remote sensor on the unit.
2) Remove the battery from the remote control or insert a battery insulator if the battery has not
been used for a month or longer.
3) DO NOT store the remote control under direct sunlight or in high temperature environment, or it
may not function properly.
4) The battery can work for 6 months under normal condition. If the remote control doesn’t work,
please change the battery.
5) Use“button shaped” lithium battery “CR2025”(3V) only.
6)DONOTrecharge,disassemble,heatorexposethebatteryinre.
7) Insert the battery in proper direction according to the ( + ) and ( - ) poles.
8) Store the battery in a place where children cannot reach to avoid the risk of accident.
UninstallBattery
Slide out the battery compartment tray
at the bottom on the back of the remote
control.
InstallBattery
Use button-shaped lithium battery
CR2025 (3V)” only. Insert the battery
to the battery tray with proper direction
according to the (+) and (-) poles.
PULL OUT PUSH IN

8
Basic Operations
Turnon/offthepower
1. Press [ ] knob to turn on the unit.
The unit will go back to the last source used
prior to the radio being powered off.
2. When on, long press [ ] knob to turn off
the unit.
Mute
Press [ ] knob to mute the sound.
Note:
• Pressing[ ] knobagainoradjusting
volumewillreleasemuting.
Adjustthevolume
Rotate [ ] knob to increase or decrease the
volume level.
The adjustable range of volume is 0 to 50.
Playingsourceselection
1. Press [ ] button on the panel to show
main source menu.
2. Touch desired icon to enter corresponding
mode, such as Disc, Navi, Aux, etc.
Drag left/right to scroll.
Note:
• Whensomesourcesarenotready,they
cannotbeselected.
WhenVehicleisPutin
Reverse
If the rear view video camera is connected,
the unit automatically switches to CAMERA
source during reverse driving. The unit returns
to the previous source after the vehicle has
been taken out of reverse.
Whenparkingbrakeapplied
1.If'PRKSW'cableisconnectedtohand
brake switch, the video display of the TFT
monitor will be controlled by driving status,
system setup and input video sources.
2. When the car is moving ahead, if the
video disc is played, the screen appears
WARNINGinformation,andblankscreen.
The warning screen will prevent the driver
watching images. The passengers at the
rear seats can watch normally.
Wallpaper
1. Long press the blank area of the main
menu.
2. Select [Wallpaper] on the sub-menu.
3. Select a source from:
[Gallery]: to visit the gallery of mobile
storage.
[Live wallpapers]: to show the wallpapers
with animation stored in the unit. Drag up/
down to scroll.
[Wallpapers]: to show the wallpapers stored
in the unit. Drag left/right to scroll.
4. Select desired picture to view, touch [Set
wallpaper]or[Save]toconrmselection.

9
Main menu
MainMenu
Press [ ] button on the panel to enter main
source menu.
1. To select search mode.
2. To input searching contents by the keypad
on the screen.
Touch [123] to show number keypad, touch
[ABC] to show character keypad. Touch
[Go]tobeginsearching.
3. Hold and drag down to show mobile
devices information.
4. Wireless signal and time indicator.
5. Access web browser.
6. Show applications list.
7. Enter setting menu
8. Car AV system source bar
Touch and hold the center of the bar and
drag left/right to show more icons.
Touch desired icon to enter corresponding
mode.
Applicationsmenu
Touch [ ] to enter applications menu.
In the list menu, drag up/down to scroll.
Touch and hold an icon for more than 2
seconds to add shortcut to the desktop. To
delete the shortcut, hold it and drag to the
recycle.
Touch to exit.

10
Disc Operation
Insertadisc
Insert a disc into the slot, and the unit will
change to disc mode automatically.
Notes:
• Pleaseconfirmwhetherthereisadiscin
the unit before you insert another one.
• Theunitwillexitcurrentplayingsourceand
enter DVD mode when one disc is inserted.
• Thefollowingdiscformatsaresupported:
CD-R, CD-RW, DVD-R, DVD+R, DVD-RW,
DVD + RW .
Ejectthedisc
Press on the panel to eject the disc.
Notes:
• Afterejectingthedisc,theunitrevertsto
another source automatically.
• Ifthediscisnotremovedfromtheunit
within 10 seconds, the disc will be reloaded
to prevent accidental damage.
Discplayback
When a disc is inserted, the display will show
“Loading...”. For MP3/WMA or disc with mixed
les,readingtimemayexceed1minute.
DVDPlaybackMenu
During playback, touch the screen(except top
left corner) to show control buttons.
1. Progress bar
2. Mute
3. Previous chapter
Fast backward (long press)
4. Play/Pause
5. Next chapter
Fast forward (long press)
6. To enter search menu
7. Repeat play
8. To show next page
9. To show DVD title
10. Select audio language
11. A-B repeat
12. Select subtitle language
13. To show previous page
CDPlayback
Insert a CD in the disc slot, and the unit will
read the disc. For some discs, you will need to
choose Music/Video/Photo for playback.
1. Repeat play
2. Shufeplay
3. Show shortcuts menu
4. Showlelist
5. Progress bar
6. Mute
7. Previous track
Fast backward (long press)
8. Play/Pause
9. Next track
Fast forward (long press)
10. Enter search mode

11
MixedDiscPlayback
When inserting a mixed disc, the unit will read
thediscandshowtheleslist.Forsomedisc,
you need to choose Music/Video/Photo to play
back.
Touch to show music list.
Touch to show video list.
Touch to show photo list.
Drag the list up/down to scroll.
Touchalenametovisitit.
When view a picture, touch the screen(except
top left corner) to show control buttons.
1. Previous picture
2. Browse pictures automatically / manually
3. Next picture
4. Zoom
5. Rotate
6. Save as wallpaper
* Video/Audio playback reference DVD/CD
playback.
Stopplaybacktemporarily
1. During playback, press to pause
playback. The sound will be muted.
2. Press to continue playback.
Selectdesiredtrack/chapter
Press or to skip to the previous or next
track/chapter.
Fastforward/backwardduring
playback
Press and hold or button to fast
backward or forward during playback.
During the fast forward or backward operation,
the volume will be muted.
Repeat
During playback, press button on screen to
select repeat playback.
• Defaultsettingisoff.
Note:
If you do not select Repeat on, when the
entire disc or TITLE playback has finished,
the system will stop. If no other control, after 5
minutes the unit will turn into standby mode.
RepeatA-B
Select desired passage to repeat playback.
- Press [A-B] on the remote control once to
select starting point.
- Press [A-B] again to select ending point,
selected passage start to replay.
- Press [A-B] once again to exit.
Randomtrackplayback(for
CD/VCD/MP3/WMAOnly)
You can play all the tracks in random order.
1. During playback, press or button on
the screen to select random playback.
2. Press again to select normal playback.
Search
1. Touch the button on the bottom of the
screen to show search menu.
2. Touch button to change search type
Disc Operation

12
Disc Operation
from Track, Title and Time.
3. Input numbers by the keypad and touch
toconrm.
4. Touch to delete a digit inputted.
5. Touch button to clear all the digits.
6. Touch to exit.
PBC-Playbackcontrol(for
VCD2.0orup)
If you insert a VCD with PBC, playback
starts from the beginning of the 1st track
automatically.
Touch [ PBC ] button on the operation bar
to show PBC menu, touch to select desired
track.
DVDaudioselect
Press button to select audio language to
listen if the DVD has multiple audio languages.
VCDaudioselect
Press button to select audio channel to
listen (L, R, Stereo).
DVDsubtitleselect
Press button to select the subtitle
language to show if the DVD has multiple
language subtitles.
DVDtitleselect
Touch button to display title or chapter
list, touch desired title to play.
Radio Operations
Select [Radio] on the main menu to enter
radio mode.
1. Current band
2. Preset stations
Touch P1~P6 to listen to preset station.
3. Favorite stations
Touch one frequency on the middle of
screen to listen to stored favorite station.
4. Tune backward
Auto tune backward. (long press)
5. Tune forward
Auto tune forward. (long press)
6. Band switch
7. Current frequency
8. Store stations manually
9. Mute
10. Show more control buttons
11. Show setting menu
12. Search and store preset stations
automatically
13. Gotostationbyinputtingfrequency.
14. Preset stations list
15. Hide the lower buttons.

13
Radio Operations
Selectoneradioband
Touch the button to select one radio
band among FM1, FM2, FM3, AM1 and AM2.
Manualtuning
During manual tuning, the frequency will be
changed in steps.
Touch the or button on the
operation bar to tune in a lower/higher station.
Autotuning
Hold the or button on the
operation bar for more than 2 seconds to seek
a lower/higher station.
To stop searching, repeat the operation above
or press other buttons having radio functions.
Note:
Whenastationisreceived,searchingstops
andthestationisplayed.
Autostore
Onlystationswithsufcientsignalstrengthwill
be detected and stored in the memory.
To start automatic station search, touch the
button on the operation bar.
To stop auto store, press other buttons having
radio functions.
Note:
Afterautostore,thepreviousstoredstations
willbeoverwritten.
Manualstore
1. When one expected radio station has
been detected, touch button on the
operation bar to show the preset station
store list.
Touch [Favorite List] to show favourite
station store list.
2. Touch to select a item on the list and touch
[Conrm]tostorethecurrentstationinthe
memory.
3. Touch to exit.
Recallthestoredstations
Method 1:
Touch the P1~P6 on the screen to listen the
preset station.
Touch the frequency on the middle of the
screen to listen the favourite station.
Method 2:
1. Touch button on the operation bar to
show the preset station list.
Touch [Favorite List] to show favourite
station list.
2. Touch a station on the list to listen.
3. Touch to exit.
Localseeking
When LOCAL seeking is on, only radio
stations with strong radio signal could be
received.
To open LOCAL function, touch
button on the operation bar, then touch the
[Sensitivity] button to select “Local” or “DX”.
Note
Thenumberofradiostationsthatcanbe
receivedwilldecreaseafterthelocalseeking
modeison.
KeySearch
Touch button on the operation bar to
show key search menu.
Touch the keypad to input the frequency,
touch to goto the station directly.
Touch to delete a digit inputted.
Touch to clear all the digits.

14
SD/USB Operations
UsinganSDCard
1. Open the card slot cap, insert an SD card
into the corresponding slot, the unit will load
thelesautomatically.Youneedtochoose
Music/Video/Photo to play back.
2. Toremovethecard,youshouldrstselect
another source, in order to avoid damaging
the card, press the card slightly, and take
off the card after it pops out.
UsingUSBdevice
1. Connect your USB device to the USB cable
which you placed in the dashboard or glove
box during installation of the radio.
When connecting a USB device, the unit
will read the files automatically. You need
to choose Music/Video/Photo to play back.
2. To remove the USB device, you should
rstselectanothersource,inordertoavoid
damaging the USB device.
MusicPlayback
Select [Music] on the applications menu, the
unit will display all the music on the mobile
storages.
1. Listthelesbyartist
Touch to spread the album of the artist.
Touch an album to show the songs list.
2. Listthelesbyalbum
Touch to show the songs list.
3. Listthelesbysong
4. Show your playlist
5. Show playing menu.
6. List window
Drag up/down to scroll.
Touch and hold to show control sub-menu.
7. Show playing list
8. Shufeplay
9. Repeat play
10. Progress bar
11. Previous track
Fast backward (long press)
12. Play/Pause
13. Next track
Fast forward (long press)
Play/Pause
When playing, press [ ] button to pause, and
the sound will be mute.
Press [ ] button to play.
Previous/nexttrack
Press or button to go to previous or next
track.
Fastforwardingorreversing
Press and hold or button to fast
backward/forward.
SelectMusicbyArtist
1. Touch [Artists] on the top of the screen.
2. Touch an artist shown on the list.
3. Select a song to play.
SelectMusicbyAlbum
1. Touch [Albums] on the top of the screen.
2. Touch an album shown on the list.
3. Select a song to play.

15
SelectMusicbySongName
1. Touch [Songs] on the top of the screen.
2. Select a song to play.
Playlists
Addasongtoplaylist
1. Long press a song and select [Add to
playlist].
2. Add it to an exist playlist or [New].
If choose [New], you need input a name of
the playlist.
Deleteasongfromplaylist
1. Touch [Playlists], and select a playlist name
on the screen.
2. Long press a song name.
2. Select [Remove from playlist].
VideoPlayback
Select [Video] on the applications menu,
the unit will display all the video files on the
storages.
During playback, touch the screen(except top
left corner) to show control buttons.
1. Back
2. Folder/File list
Drag up/down to scroll
Touch to access
3. Progress bar
4. Previous chapter
SD/USB Operations
5. Fast backward
6. Play/Pause
7. Fast forward
8. Next chapter
Notes
• DisconnectUSBstoragedevicesfromthe
unitwhennotinuse.
• UseanoptionalcabletoconnecttheUSB
audioplayer/USBmemoryasanydevice
connecteddirectlytotheunitwillprotrude
outfromtheunitandmaybedangerous.
• Donotuseunauthorizedproducts.
UsinganAndroidmobile
phoneasanUSBstorage
If you want to use your Android mobile phone
as an USB storage.
1. Connect your Android mobile phone to the
unit by an USB cable.
2. Set USB connection type of your mobile
phone to “Mount SD card”.
* If you select “Charge only”, it won’t be
recognized by the unit.
3. In the setting menu of the unit, select “SD
card & device storage”, then “Mount USB
disk”.

16
SD/USB Operations
GalleryOperations
Select[Gallery]ontheapplicationsmenuto
visit the gallery. Select one gallery to show the
picture list. Select to view it.
Touch the picture to show control buttons.
1. Return to gallery menu
2. Return to list of current album.
3. Current picture number/total picture number
4. Browse pictures automatically
5. Show setting buttons
6. Zoom
7. Share the picture with Bluetooth/Facebook/
Gmail.
8. Delete the picture
9. Show more setting buttons
Details: Show picture information
Set as: Set the picture as background
Crop: Crop the picture. Hold the border of
frame to scale it, and drag inner side to
move it.
Rotate Left/Rotate Right: Rotate the picture
counterclockwise/clockwise.

17
The Bluetooth allows you to utilize your car’s
built-in audio system for wireless mobile phone
or music handsfree communication. Some
Bluetooth mobile phones have the audio
features, and some portable audio players
support Bluetooth feature. This system can
play audio data stored in a Bluetooth audio
device. The car stereo with Bluetooth will be
able to retrieve phonebook contacts, received
call, dialled call, missed call, incoming calls,
outgoing call and listen to music.
Notes:
• DonotsetthemicrophoneofBluetooth
handsfreeintheplaceswithwindpassing
suchasairoutletoftheairconditioner,etc.
Thismaycausepoorsoundquality.
• Ifsetitintheplacessubjectedtodirect
sun,hightemperaturecancausedistortion,
discolorationwhichmayresultina
malfunction.
• Thissystemwillnotoperateormayoperate
improperlywithsomeBluetoothaudio
players.
• Theunitcannotguaranteethecompatibility
ofallmobilephonestogetherwiththeunit.
• Audio playback will be set to the same
volumelevelassetduringtelephonecall.
Thismightcauseproblems,ifextreme
volumelevelissetduringtelephonecall.
Touch [Bluetooth] on the main menu to enter
Bluetooth mode.
1. Touch [Settings]. If the button beside
“Bluetooth” shows grey, touch it to turn on
the function.
2. Turn on Bluetooth function of your mobile
phone.
3. Search for new Bluetooth devices on
your phone. Select “AN6B02” from the
pairing list on the mobile phone, and enter
password (Default password: 0000)
The bluetooth icon lights up after pair
successfully.
Bluetooth Operations
Makingacall
• DialNumber
1. Touch to enter dialing menu.
2. Input numbers by digit-keys on the screen.
Touch button to delete a number.
Touch button to delete all the
numbers.
* Long press [ ] button to input “+”.
3. Touch button to dial out.
4. Touch button to terminate call.
5. Touch to redial the last call.
• Answeringacall
You can answer an incoming call by pressing
the button.
Touch button to reject an incoming call.
• Disconnect
To disconnect a paired device, touch
button, touch button beside mobile phone
on the list, then delete it.
Searchingthecontact
Touch button, input the keys in the
dialog box.
Touch to choose searching type.

18
Bluetooth Operations
CallHistory
Access Call History by touching
button.
Then touch the button on the bottom to show
Dialled/Missed/Received phone numbers.
: Received
: Dialled
: Missed
BluetoothAudio
Whatisaudiostreaming?
Audio streaming is a technique for transferring
audio data such that it can be processed
as a steady and continuous stream. Users
can stream music from their external audio
player to their car stereo wirelessly and listen
to the tracks through the car’s speakers.
Please consult your nearest dealer for more
information on the product of wireless audio
streaming transmitter offered.
CAUTION
Please avoid operating your connected
mobile phone while audio streaming as
thismaycausenoiseorthesoundtocutin
andoutonplayback.
Audiostreamingmayormaynotresume
after telephone interrupt a s t h i s i s
dependentonmobilephone.
Touch button to play music on your
mobile phone.
: Previous track
: Play/Pause
: Next track
BluetoothSettings
Touch button to show Bluetooth
setting menu.
turns green, the function is on.
turns grey, the function is off.

19
3G/4GAPNSettings
Note:
Contact the manufacturer for compatible
3G/4Gdevices.
User set the APN to access the internet.
1. Insertthe3G/4Gdongle.
2. Select [ ] on the main menu to enter the
setting interface.
3. Click the [Wireless & networks] to enter the
Wireless & network settings.
4. Click [Mobile network] to enter the Mobile
network settings.
5. Click the [Access Point Names].
6. Press the [ ] button on the front panel,
then click the [New APN].
7. Need to setup following options: Name,
APN, MCC, MNC.
Internet
Touch the dialogue box to show keypad,
and input your desired name.
APN according to the operator to determine
(such as China Unicom is: 3gnet)
Theunitwilldetectyour3G/4Gmoduleto
determine the MCC and MNC.
8. Then press the [ ] button and click the
[Save] button.
9. SelecttheAPN(chinaunicom),3G/4G
icon appears on the top right corner of the
taskbar.
Table of contents
Other Rydeen Car Receiver manuals